We may receive a commission when you use our affiliate links. However, this does not impact our recommendations.
 A Hybrid Construction Method that Imitates a CNC
 A Hybrid Construction Method that Imitates a CNC
The Maker Workstation Overview • Building The Top • Building The Base • Furniture & Accessories • CNC Instructions
This the first of five online articles on building the Maker Workstation featured in the June 2021 issue of Popular Woodworking Magazine. This is an extended version of the print article to help readers build the workstation stacked top unit without the use of a CNC. It’s like the print article but much extended and told in a step-by-step process. Future posts will cover building the workstation base, followed by a post about workstation furniture, components, and vise module. I’ll also add a video tour of the Maker Workstation. Finally, there will be a post on how the project can be built using large or small CNCs or the Shaper Original hand-held CNC.
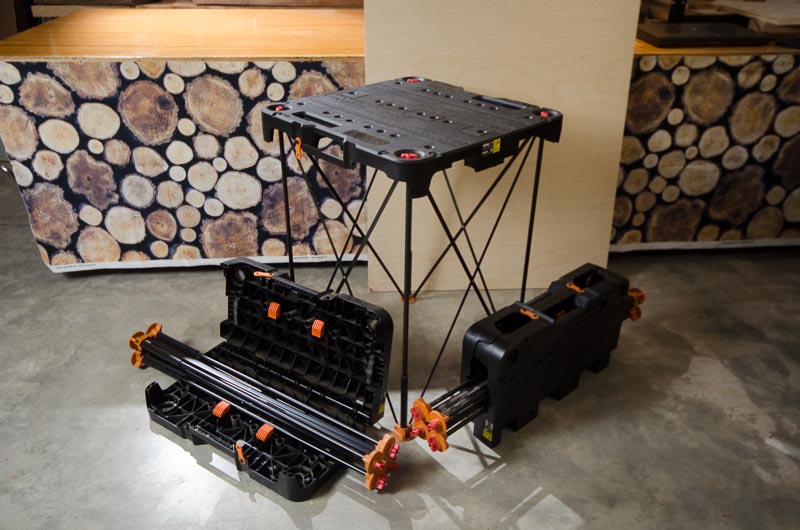
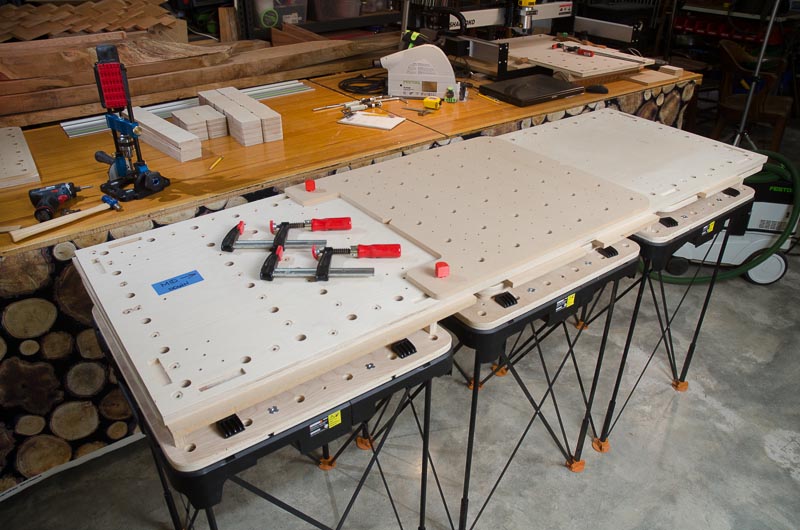
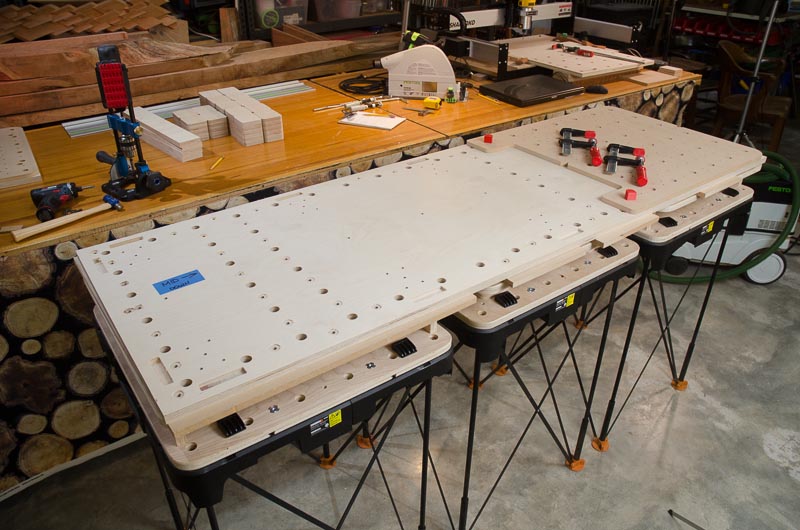
A lot of parts! The good news is you only make three different kinds of parts for the stacked top unit and five for the base.
Yes – LOTS of Parts, but Building It is NOT Complicated
There are only three different kinds of parts in the top unit and five in the base. Unlike a traditional bench made from hardwoods there’s no traditional joinery involved. Other than a few Domino or other loose tenon joints, the bench is held together with just screws and glue. This project is designed to be built by woodworkers of all experience levels, from beginners to advanced, as long as they’re comfortable with basic woodworking tools and tasks. What I mean by ‘comfortable’ is that you can use your power tools safely as intended, have the ability to measure, cut, and drill precisely, and follow detailed instructions. Since this is a different kind of woodworking, process instructions are important. If you’ve built other woodworking projects based on plans and instructions in the past, you should be good to go.
Things to Get Before the Build
- Basic plans, plywood layouts, and the story: print article is available in Popular Woodworking June 2021 or as PDF files at the end of this article
- Maker Workstation Layer Guide: choose your desired version: 72”x 24” / 48”x24” / 48”x48” and download the PDF file at the end of this article
- Eight 3/4” plastic bench dogs: You’ll use a lot of them once your workstation is done. I suggest getting two kinds to see which you prefer. Metal dogs work, but I recommend plastic dogs that are two plywood layers high.
- A Maker Workstation CNC template: You can’t make a workstation without a CNC or the accuracy of a CNC-made template. I have provided a link to free template files at the end of this article for the Maker Workstation and Worx Sidekick Stack Top/Top Plate. They come in Drill Guide or Router-with-an-offset-bushing versions.
- Box of 100 1/4″-20 T-Nuts: These are used in the holes between the dog holes for build-in hold-downs. They come in three depths: 5/16″, 7/16″, and 9/16″ I used all three in different areas on my bench, but if you had to choose just one, 7/16″ works just fine everywhere. Since you’ll need a lot of them, best to buy a box of 100.
- Common #8 x 2″ coarse thread construction-type Deck Screws: small box will work; used to attach the top
- 1/4″-20 x 1″ flat head Machine Screws: three dozen needed; I prefer hex head with wider tops, but any kind of flat head screw will work; used to attach the top
- 1/4″-20 x 2″ Bolts and Washers – 8 needed to attach the top unit to the plywood Maker Workstation base
- 3/4″ Forstner Bits – 1 or 2 needed; must have flat sidewalls. Don’t use the fancy kind. They’ll destroy the template.
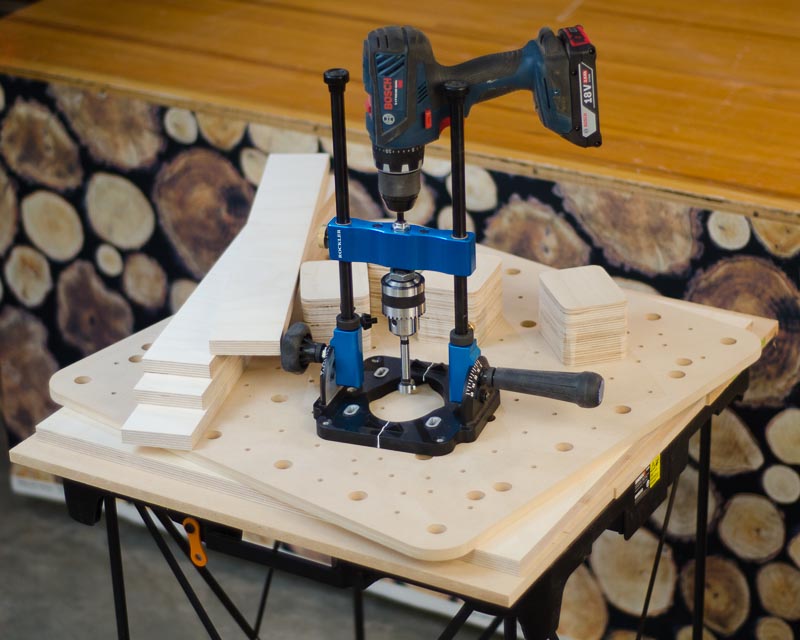
- Rockler Portable Drill Guide: This article uses this new tool as a precision drill guide instead of using a large, small, or hand-held CNC. (I will talk about using a CNC in a companion blog post.)
Materials For the Project
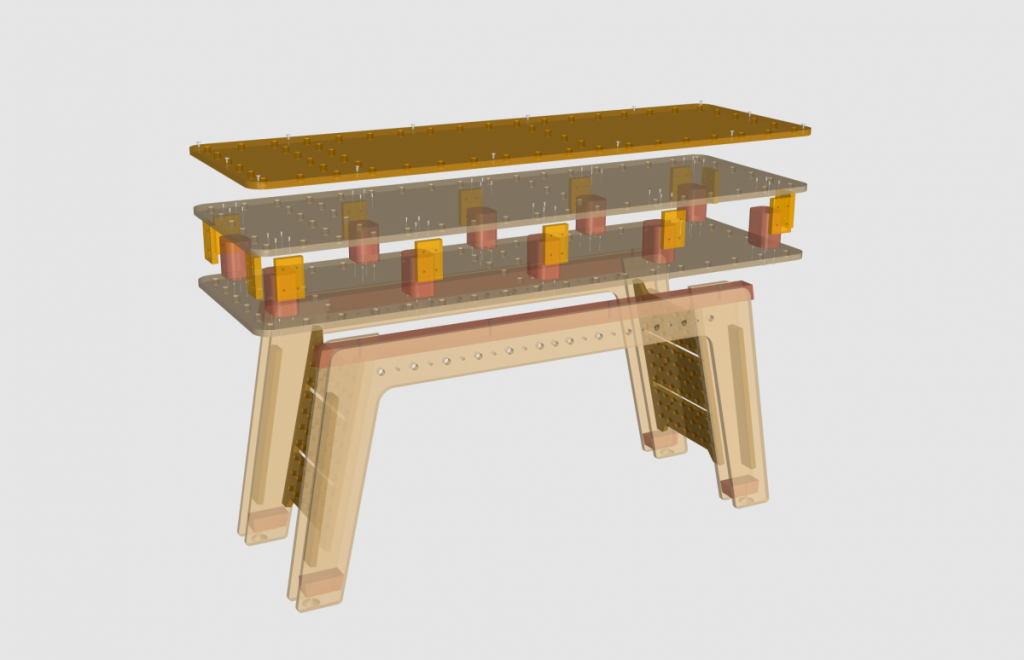
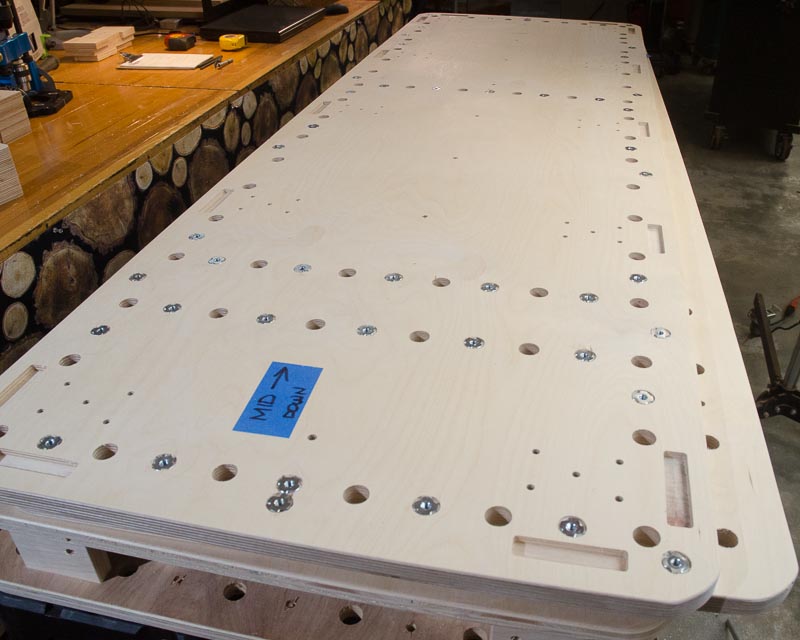
The 24” x 72” workstation open-top consists of three layers, 10 stack-laminated risers, and 14 plate mounts. You’ll need the following:
- Two 4′ x 8′ sheets of 3/4″ plywood
- One 1/2 Sheet of 3/4″ MDF
- Two additional sheets of plywood for the matching plywood base
NOTE: After making the 24″ wide cuts for the two layers and 24-1/4″ wide long cut for the MDF top, you’ll have plywood left over to make two or more maker side benches, extra top plates, riser, side mounts and side plates, and lots of workstation furniture.
Plywood Choices
Other than the MDF top, plywood is the major material for this project. Let’s look at options. The first choice is 3/4” (18 mm) 13-ply Baltic Birch BB or B plywood. All plies are birch with no voids glued, better adhesives, and the outer layers are thicker than lesser quality plywoods. This plywood is flatter, stronger, stiffer, holds screws better, joinery is cleaner, and dog holes wear less making it a great choice for this project. Don’t overdo it. You don’t need the perfect grade of Baltic Birch plywood. BB grade plywood often has defects that are filled with little football-shaped patches.
That said, you can successfully build workstations out of the 5-layer thin-skinned hardwood plywoods commonly found at home centers. I built several side bench prototypes this way, so I know it works. But, if you take into consideration the long-term value of a good workbench to a maker and all the ways you’ll use it, you might find the slightly higher cost for Baltic Birch, a good investment. Since I built the prototypes in 2020, the price of home center plywood rose sharply whereas Baltic Birch did not. Check your local pricing on both types of plywood and compare. It might be close. And, let’s face it…Baltic Birch plywood does look nice, doesn’t it?
Maker Workstation Sizing
The Maker Workstation is 24” x 72” and sized for small shops. However, being built on a grid-based system, workstations can be made in alternate sizes. To utilize the 23” top plates that greatly expand the functionality of the workstation and side bench, think in 24” increments. The 72” workstation perfectly handles 3 top plates. Optional layouts are available for a 24” x 48” bench or a 48” x 48” bench/assembly table. Soon, I’ll build myself a 48” x 72” multi-level assembly table to replace the well-worn table I’ve used for decades.
The 72″ maker workstation layer guide (available as a PDF at the end of the article)
Bench Layouts and Options
Note that just because the workstation is grid-based doesn’t mean it’s a good idea to put dog holes everywhere. A top filled with holes is one of the reasons why most commercially available work tables are less useful than they could be. More is not better. The trick is to put just the right amount of holes in the right place to make a grid system useful but not disruptive.
The 72” layout is optimized for two unobstructed 28” wide work areas. The workstation system needs dog holes and attachment points around the perimeter to work but no so much in the middle where you benefit from an uninterrupted work surface. When you need more dog holes, add-on top plates and workstation furniture are there to help. The templates have full grids to help you create custom plates and fixture layouts for different needs. When considering alternate layouts, just remember the design principle: less is definitely best.
The Key to This Project is Precision
Though not complicated, this project is a little different. It demands a commitment to working at a high level of precision that many woodworkers aren’t used to. Why high precision? To get the benefits of the precision grid, 4” dog spacing, part registration, perfect 90-degree angles, bench accessories, and top/side plate systems, they all rely on building everything with accuracy in order to work and fit perfectly together.
What we’re aiming for? In woodworking terms, a tight-fitting mortise and tenon joint has about a .002” gap. A loose joint is .005”. We’re aiming for .001”-.003”. How you do that is with CNC-level accuracy at every step. If you happen to have a CNC, it’s the perfect tool for this project. I’ll get into the details on building a workstation with CNCs (large, small, and handheld) in a companion blog post.
If you don’t have access to CNC, I’ve got good news. You can basically apply precision to this project. By using a CNC-made template, power tools, and working methodically, you can get close to CNC accuracy. That method and the new Rockler Portable Drill Guide are the focus of this article.
Why Some Methods Won’t Work
I’m sorry to say but looking at the drawings, laying out the workbench with pencil, square, and a ruler, and drilling the dog holes by regular means won’t work in this project. Why?
Because the end result requires a higher level of accuracy and consistency than most woodworking projects call for. For example, if you’ve measured 4” between two dog holes and try as you may, the space between the next two dog holes comes out to be 4.01, you’ve started a cascade of fit problems that shows up when you try to attach workstation furniture or top plates. Alternatively, you could start out with a small template that uses just two dog holes spaced accurately 4″ apart and register and move the template around the bench until all dog holes are drilled. With this method, you might find some areas work and other areas do not. More importantly, because you laid out the workbench in a small step by small step process, some dog positions won’t align or be square.
The workstation requires CNC level accuracy at every step for everything to fit. If you don’t have a CNC the solution is to use a large CNC precise template. That way you are accurate over a large area and have greatly diminished opportunities for creating small errors as you move the template from position to position.
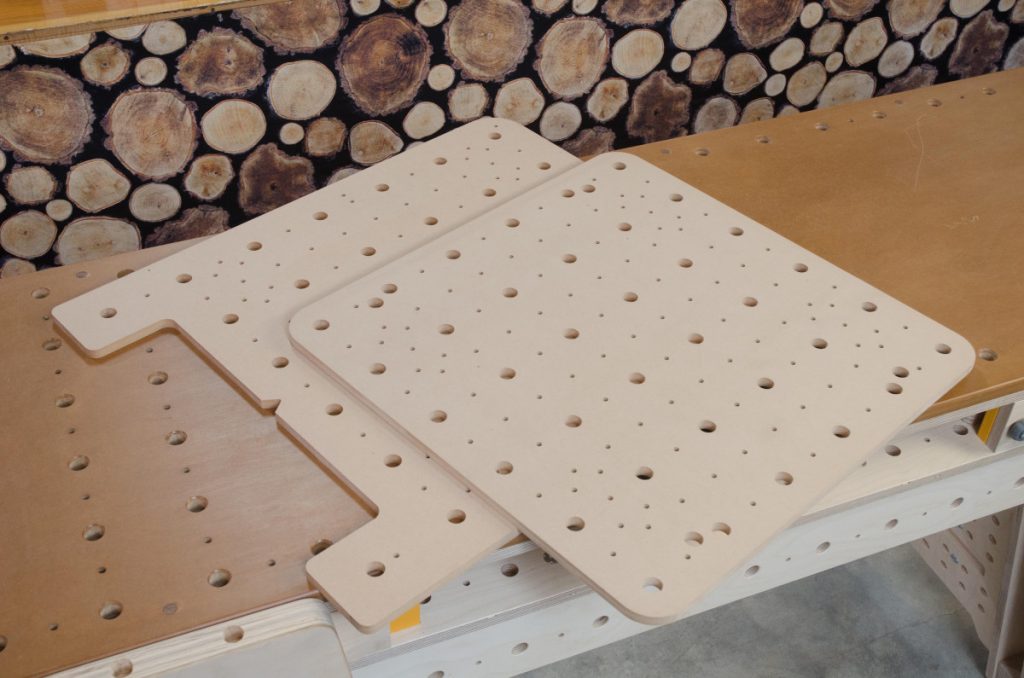
The workstation template with the top plate/side bench template on top. The workstation template is 24″ x26″. The other template is 23″ x 23″.
Template Description
Workstation templates need to be at least 1/2” thick. This is so a 3/4” Forstner bit can be lined up in the template’s dog holes. I prefer MDF, but Baltic Birch plywood is more durable. The workstation templates are 24”x26” and the side bench/plate template is 23″ square. Templates comes in two variations. One is for the new Rockler Portable Drill Guide and flat-sided 3/4″ Forstner bit where you’ll align the bit in the template dog holes. The alternative templates are for using a router with a 5/8″ bushing and 3/8″ spiral cutter.
Besides the dog holes, the templates have a second purpose. On the workstation 24″ x 26″ Rockler Drill Guide template, after you drill the 3/4″ dog holes with the template, the shallow side plate mount pockets along the the edge of the workstation require a router, 7/16” bushing, and a 1/4” bit.
On the 24”x 26” 5/8” router bushing 3/8” bit version template, there’s not enough room for the offset side plate mount pockets. So, a small second template is included just for doing the plate mount pockets. The small template’s dog holes align with the dog holes cut on the layer and register with two dogs. Like the other templates, you’ll use a router, 7/16” bushing, and a 1/4” bit to cut the plate pockets.
Getting Templates Made
There are several ways to get a template for the project. The DXF files to make the workstation and side bench templates are free and available here for drilling and here for using a router. If you need to have a template made for you, CNCs and CNC services are available in most areas. Professional woodworking shops, maker spaces, hardwood suppliers, sign shops often offer CNC services. Prices will vary, but the templates are small and should be inexpensive to make. Also, check with your local woodworking guild or club. In any woodworking group, there’s bound to be a member that has a CNC. Besides, making and sharing templates would be a fun group project.
Finally, my website at woodworking.digital has options for ordering CNC-made templates and the custom 3D printed dogs and components I’ve designed for the maker workstation.
Selecting Materials
The first step is to make an accurate 24” cut the length of both 4′ x 8′ plywood sheets. Since you’re set up for long cuts, on the 3/4″ MDF sheet, make a 24-1/4” cut the length of the sheet. Then, cut the 24” plywood pieces down to 72” and cut the 24-1/4” MDF down to 72-1/4” long.
That leaves you with a 23-1/2” square piece and a 23-1/2” x 96” piece. Set aside the leftover pieces of plywood for now. You’ll use these for making Side Bench stack tops, plate mounts, side and top plates, risers, furniture, and other workstation top and base parts.
TIP: Though I have a well-equipped shop, I don’t have a panel lifter and so handling full 75-90 lb. sheet material is one of my least favorite tasks. These days I use a track saw for cutting down full sheet panels more often than my table saw. If you don’t have one, most home centers or lumber yards offer one free cut on their vertical panel saws. Take advantage of it. Since these saws are never accurate, specify your cuts 1/4” oversize. For the workstation, ask for a 24-1/4” wide cut the length of both sheets of plywood and the MDF. Back at your shop using the factory edge for reference, trim the two plywood strips to 24” wide. Leave the MDF at 24-1/4”. Trim plywood to length.
Consider Building a Small Side Bench First
Among the challenges I faced building my first workbench were a couple of classic woodworkers chicken and egg questions: How do you build a workbench without a workbench to build it on? Or how do you build it without a shop full of tools? I struggled with a rickety Workmate and way too much time working on the floor using an old Skillsaw. Not fun! So, in honor of that first bench, I approached this project in much the saw way – as a new woodworker with no bench to build the workstation on and minimal tools. This is why I recommend you begin by building side benches. The side bench design is a smaller, simplified version of the Maker Workstation – the same concept, grid, components, building techniques, and finished height as the 72″ bench to make it a great warm-up for the main event. Plus you end up with system matching side benches that expand the maker workstation.
(If you prefer to begin with the workbench build, move on to the next section.)
I started with the excellent, 32″ tall Worx sidekick portable work table as a stable platform. I built 23″ open-sided worktops that mount onto the Sidekick and turn it into a small workbench with most of the features of the full-size workstation. If you use the material left over from the two sheets of plywood you just used for the 72″ workstation tops, there should be plenty of material to build two or more side benches, extra top plates, riser, furniture, and other parts.
The construction of the Side Bench is the same as the Maker Workstation outlined below. These are the key differences between the two.
- The workstation top is 24″ wide, the side bench top is 23″ square.
- The workstation has 3 layers, the side bench has two layers.
- Laminated risers are five layers high on the workstation, four layers high on the side benches. Additionally, only four risers are needed on the side bench and are located in different positions than the workstation.
- Four extra dog holes are added to connect the worktop to the sidekick base.
The Worx Sidekick work table is versatile, stable, and portable making it a great tool to have around the shop. With stacked tops, these become mini workstations the same height as the maker workstation.
Side benchtop parts ready to go assemble
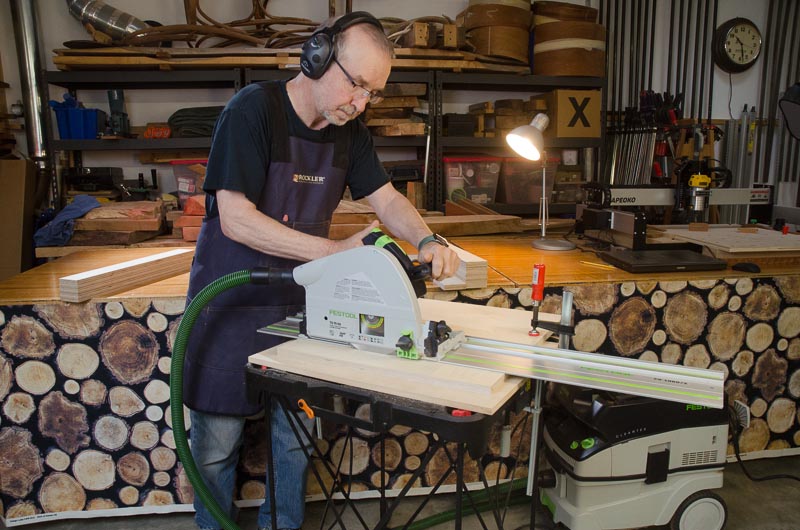
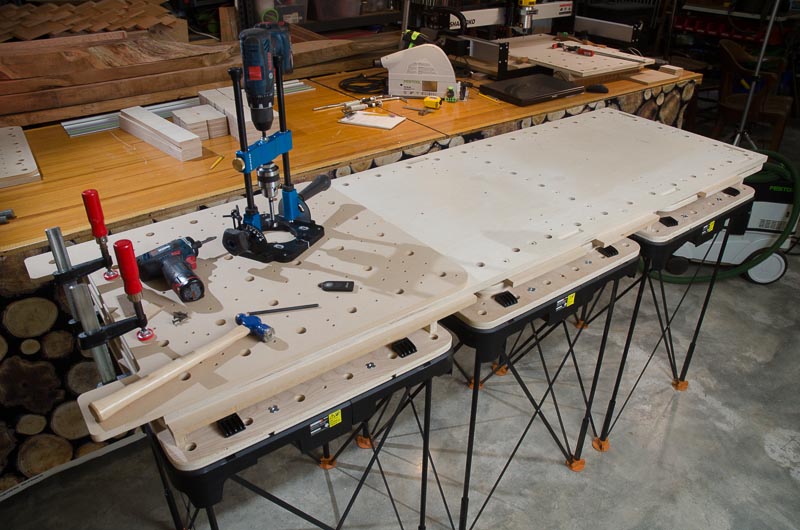
I used a Festool track saw to cut the parts for the side benches and workstation.
The side bench/top plate template sitting on a plywood blank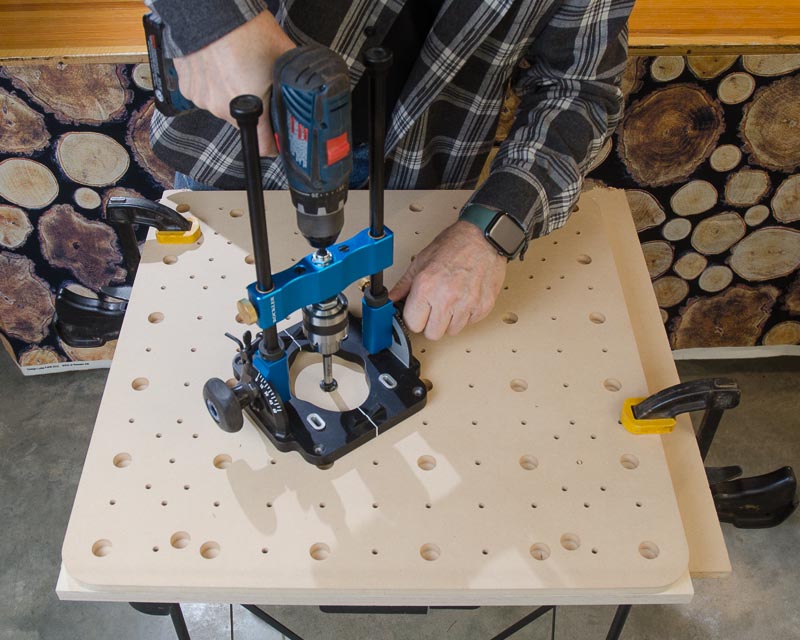
The precision Rockler Portable Drill Guide and template makes drilling perfect holes easy.
Maker Workstation Top Construction Continued
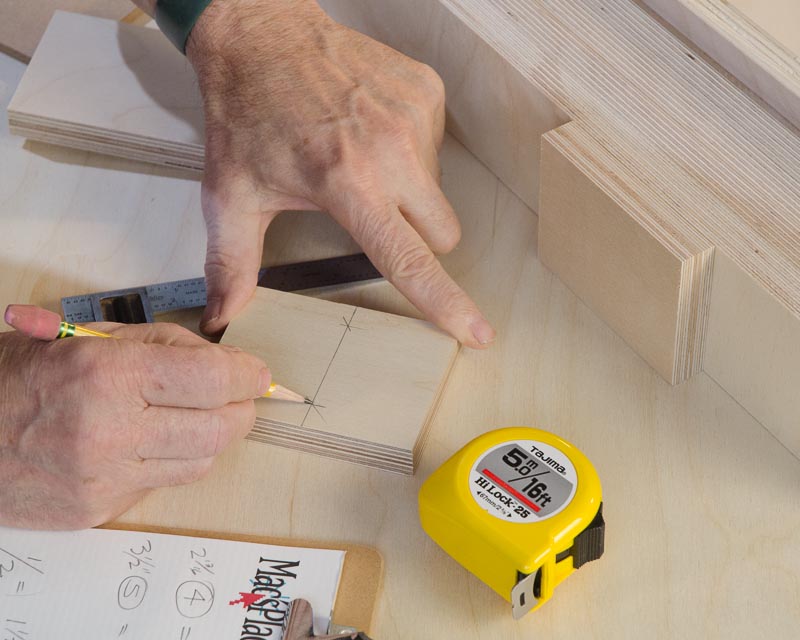
Once your two plywood and MDF blanks are ready, it’s time to grab some blue tape and label the blanks. Labeling panels may seem trivial, but it’s not. ORGANIZING IS THE KEY to successfully make this project. It’s very easy to get confused on this project. The labels aid in accuracy, consistency when using the precision template, and helps to prevent confusion.
Using tape and a marker, place a label on the left side of the bottom plywood layer labeled “Bottom – Up” with an arrow pointing from left to right toward the far end. Flip the plywood over and again on the left, left “Bottom – Down” with an arrow again pointing toward the right. Do the same for the middle layer and the MDF top.
Before you begin, find some “spoil board” material you’ll place underneath the areas you’ll be drilling. Spoil board is a term from the CNC world. It’s just scrap MDF, chipboard, or plywood that you don’t mind drilling or routing into. Do not use the project material you set aside earlier (the good stuff), we are going to use this during the build. Find something else to sacrifice.
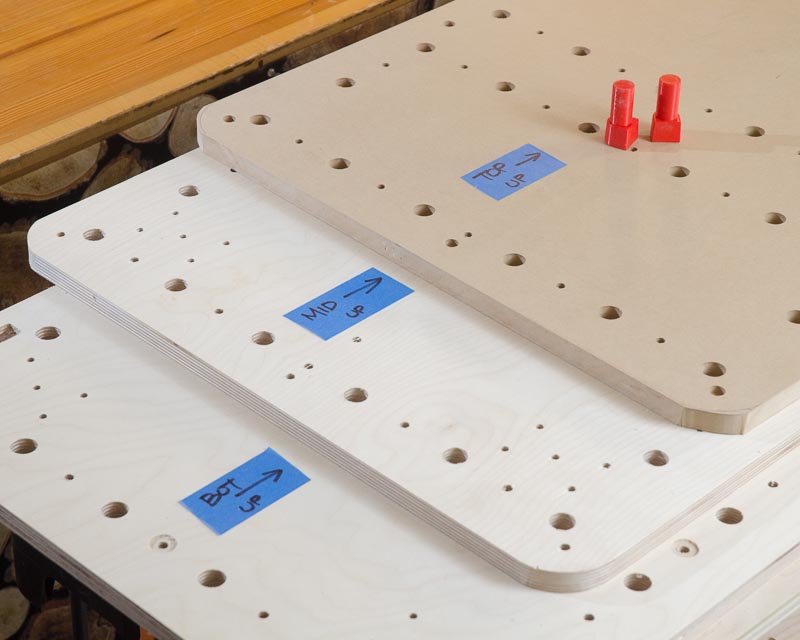
Organizing is the key. Label all layers on both sides with blue tape.
Imitating a CNC
I mentioned early that working methodically was important on this project. This is where being methodical starts. Work on the middle layer bottom first, working from left —where you label is, to the right — the direction the arrow is pointing to. Once the middle layer is complete it becomes the template for the MDF top layer and the template for the plywood bottom layer. Note that each layer of the workstation top unit is not the same. Each layer’s details are slightly different. For example, there are only a few dog holes on the bottom layer and no plate pockets on the MDF top layer. To help keep you on track, attached at the end of the article is a PDF of the Maker Workstation Layer Guide for each size workbench. I suggest you print one out and use it as a reference throughout the project that way you won’t drill dog holes in the wrong place. Though the templates have dog holes and hold-downs everywhere for creating custom top plates that you can add later, the workbench itself doesn’t need or want holes everywhere. Large workbench areas with no holes are a good thing. Using the Layer Guide as a reference, you’ll know where to drill.
TIP: Mark dog hole locations before you drill them. Position the template in the first position, with a red pencil, mark an “X” at the dog hole positions shown on the Layer Guide. Do the same for the second and third positions. Now, when you’re ready to drill your holes, you can look down through the template holes and see where holes need to be drilled. If you don’t see an “X”, don’t drill, check the Layer Guide.
Carry Forward
Once you complete the middle layer, it becomes the template for the other two layers. Again, refer to the Layer Guide for where to put dog holes on each layer. The top MDF layer is almost the same as the middle layer. There are not as many dog holes on the bottom layer. Any additional hole locations not on the middle layer can be added from the original CNC template.
Working layer-to-layer is where the blue tape labels help. Always position layers, face-to-face. The bottom of the top layer faces the top of the middle layer. The bottom of the middle layer faces the top of the bottom layer. The Layer Guide notes what’s needed on each layer and what side to put T-Nuts and side plate slots.
Run a Few Tests First
Before you begin drilling, it’s a good idea to run a few dog hole tests on a piece of scrap plywood first. Be sure to test the dog holes with the bench dogs you acquired ahead of time.
Work Methodically
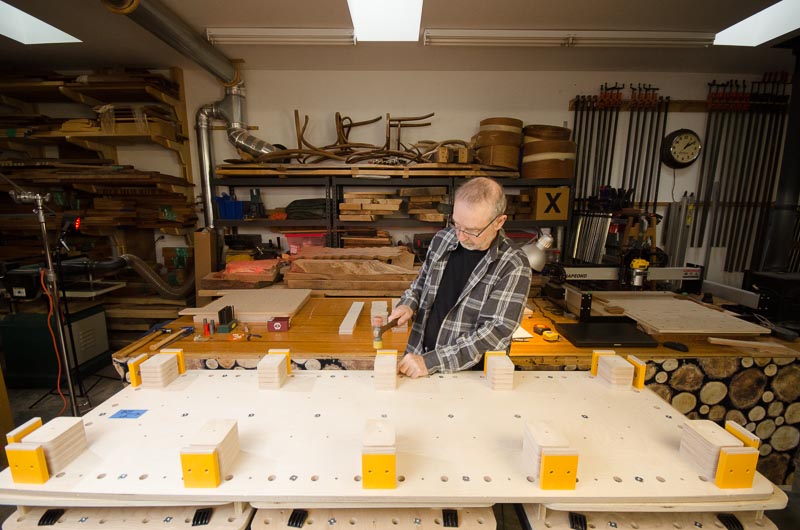
The major challenge in constructing the workstation is to drill precise, perfectly aligned, and positioned holes. CNCs are optimal for this kind of task but armed with a CNC-made workstation template and the new Rockler Portable Drill Guide, you can do this with a drill. Unlike guides in the past that were notoriously sloppy, this one actually works allowing you to drill perfectly vertical or angled holes. Other precision drill guides from Woodpeckers may also be used but I haven’t tested one yet.
To use the drill guide, you need a portable drill and a 3/4” Forstner bit. To prevent damage to the template, the bit needs to be the kind that has flat sides (not some of the fancy new kinds). Since these bits are inexpensive, you might want to pick up two or search for the longer lasting kind with serrated bottoms. With so many holes to drill, you could easily wear out a bit on this project.
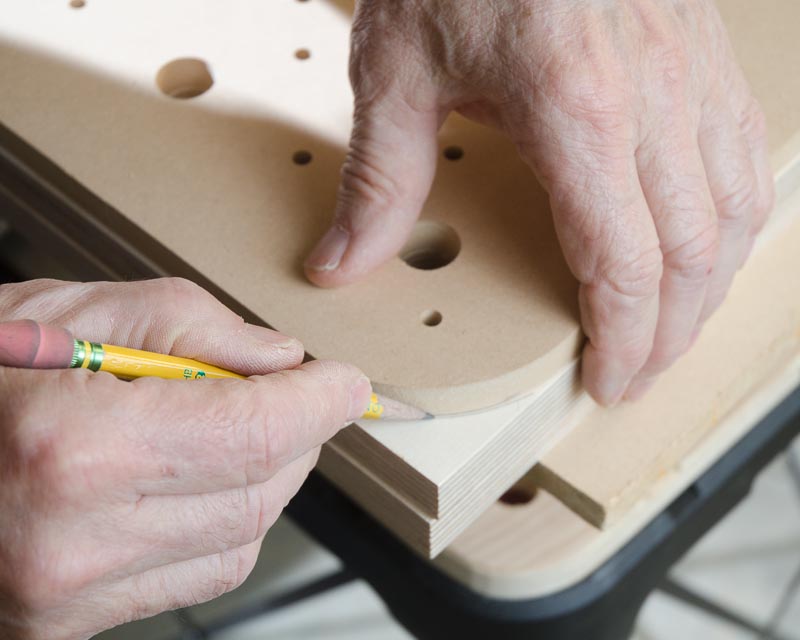
Checking again that the template and blank are lined up to the plywood edges, clamped and secured, move the drill guide over one of the designated dog holes. Without starting the drill, center it over the template hole and lower the drill down slowly and carefully so that the bit is just able to slip all the way down into the template hole without damaging it. You should only be able to see the top of the Forstner bit. This is your starting position. The .76″ diameter walls of the template and the precision drill guide keep your drill position true.
Drill deep enough through the 3/4″ plywood to just penetrate the spoil board below. Set the depth stops on the drill guide for consistency. Check often to make sure the Forstner bit isn’t filled with waste. If it is, stop and clean as needed. Refer to the Layer Guide for the dog hole positions on the left 1/3 of the middle layer. Before you remove the template, it’s time to mark – not drill, the holes for the hold-downs.
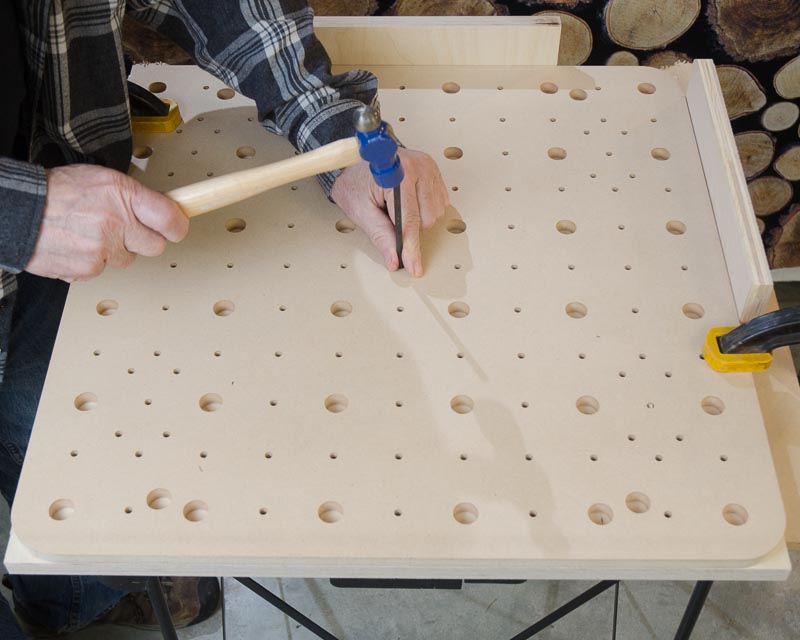
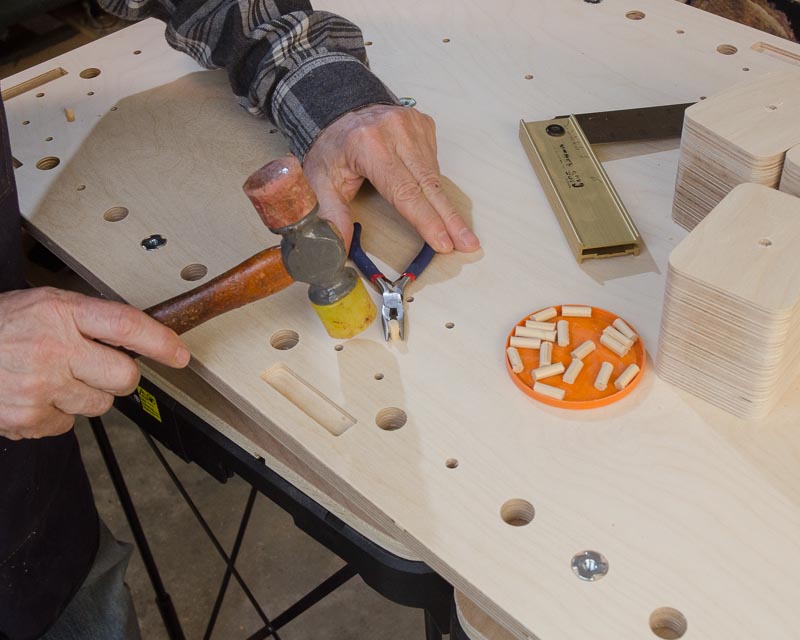
The small hole locations are for 1/4″-20 T-nuts and hold downs that don’t require the positional accuracy of the dog holes. Plus, the use of a spinning standard drill bit in the drill guide can quickly damage the sides of the small template holes. Better to mark the spot, remove the template, and go back and drill the holes later. For marking, I like to use a 1/4″ machinist center punch. Center punch sets are inexpensive and very useful around the shop. I always keep a 1/4″ one in my shop apron pocket. The right size punch will just fit the holes in the template. A 1/4″ drill bit will work as a kind of substitute.
Using the middle Layer Guide as a reference and a hammer, tap the punch, and mark the T-nut locations shown on the drawing. On the Layer Guide for the middle and bottom layers are also 10 riser locations with sets of five 1/4″ holes for attaching the blocks. Use the punch to mark them, too.
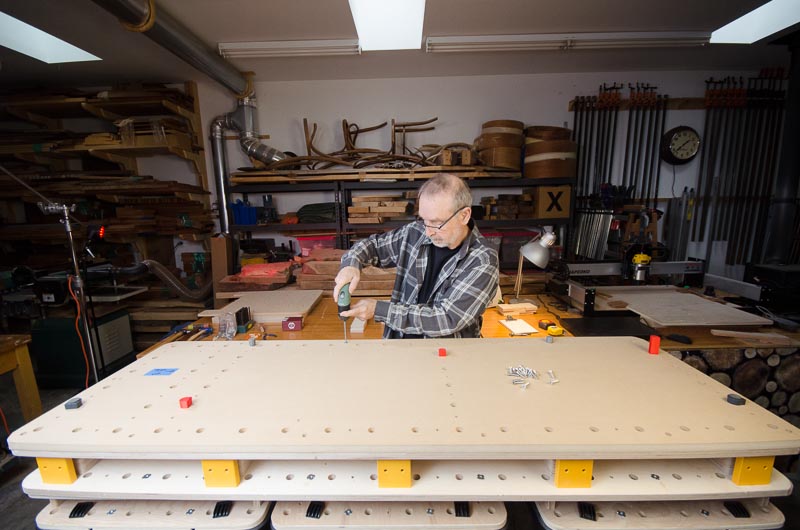
Once you’ve completed marking and drilling the dog holes, you can remove the template and move it to the middle position so that it overlaps the last pair of dog holes. We’re going to use those dog holes on the corners of the end of the template for reference. Use either a tight-fitting bench dog or two pieces of 3/4″ dowel sanded to just fit the template with the last pair of dog holes on the outer edges of the layer. Double-check to make sure the template is flush to the edges, square, and not twisted. Before clamping, push the template in the direction the arrow points on the layer label to remove any slack. This is where consistency comes in. Always snug up in the same direction in all three template positions. Again, refer to the Layer Guide as reference, drill the next set of 3/4” holes, and mark the T-nut holes and block holes with the center punch at each step.
Repeat the process for drilling dog holes and marking hole positions until the middle layer is complete. Remove the 3/4” Forstner bit from the drill guide, chuck a 5/16” regular drill bit, and drill at the marked locations for T-nuts and then use a 1/4” bit to drill the 10 sets of 5 riser holes.
So that dog positions are consistent layer-to-layer, the now completed middle layer becomes your template for the bottom and top layers. Refer to the blue tape labels with arrows to make sure your layers are always face-to-face as they would appear on the completed bench. Again, refer to the Layer Guide and add or subtract holes as required, clamp the stack tight, and use a spoil board underneath as you drill. The bottom layer only has dog holes around the edges and a few extra 5/16” holes. The top MDF layer is the same layout as the middle layer but without the riser block positions for side plate slots.
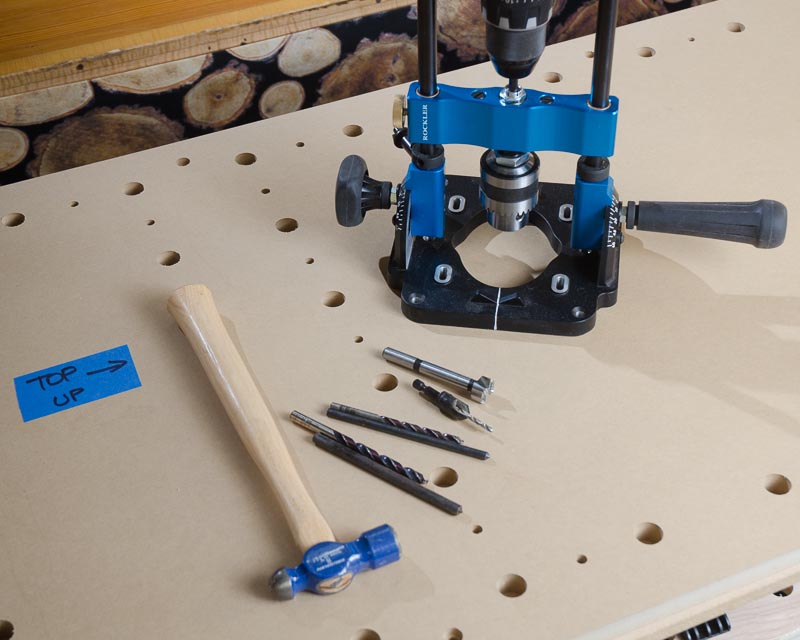
The Rockler portable drill guide, a few drill bits, a 3/4″ Forstner bit, and center punches keep everything precise.
Template position one ready to go.
Position two registers to the previously drilled dog holes.
Position three works the same. The template registers to the last dog holes in position two.
Side Plate Slots
The middle and bottom layers hold the 14 workstation 3″ x 4″ side plates with areas that are pocketed or mortised into the plywood to hold them. Refer to the Layer Guide for locations. Use your 3/4” positioning dogs or dowels to lock the template flush to the edge at each location. This job requires a router, 1/4” spiral upcut bit, and a 7/16” router bushing. Machine 1/4” deep pockets to the middle layer bottom and mirrored to the bottom layer top.
There are 14 side plate slots on the 24″ x 72″ workstation. They are one 3/4″ plywood layer thickness away from the edges. Cut the 1/4″ deep slots with a 1/4″ bit and a 7/16″ router bushing. The idea is the side plate mounts are exactly 3/4″ plywood thickness away from the edge.
Completing the Workstation Layers
Plywood edges are sharp. After lightly sanding the middle and bottom layers, soften the outer plywood edges that are touchable with a slight chamfer. Speaking of softening, put 2” radius corners on the middle layer. Use the template as a guide. Align and clamp the middle and bottom layers together and use a flush-trim bit to match the two layers.
The MDF top is oversized and once attached to the assembled top unit it will be flush trimmed. The final prep on the top is to use a 1/2” countersink bit at the attachment positions located around the outside edge of the MDF top surface.
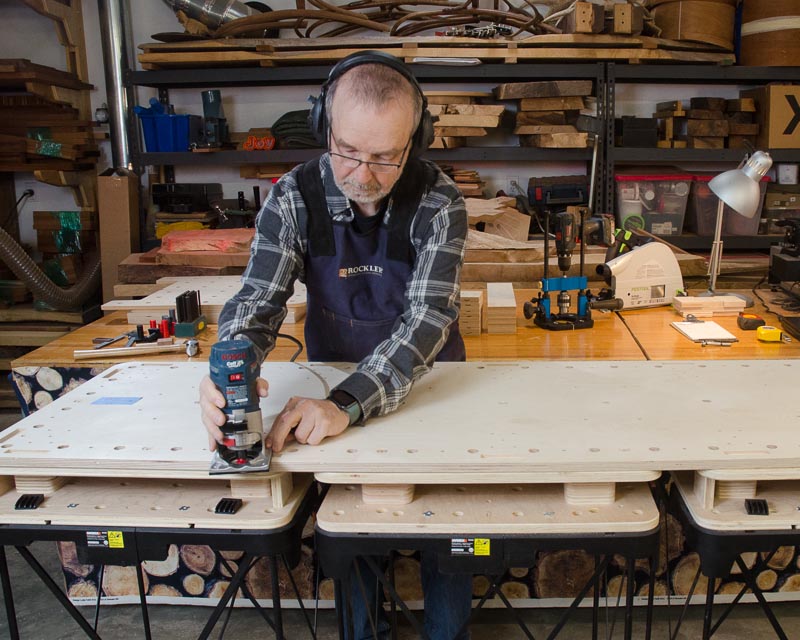
Soften touchable plywood edges with a slight chamfer.
Put 2″ radius corners on the middle layer.
The final prep before assembly is to pound in the T-nuts on the middle and bottom layers. Lots of them. Check the Layer Guide carefully to make sure they are in the right locations and on the correct sides of the bottom and middle layers. Be sure to note these important items (also, noted on the Layer Guide):
- For the middle layer, the t-nuts are on the bottom side.
- For the bottom layer, the t-nuts are on the top side.
- The middle layer has an extra set of T-nuts near the outside edge for attaching the MDF top.
- The holes in the middle of the bottom layer DO NOT need T-nuts. The top layer also DOES NOT need T-nuts.
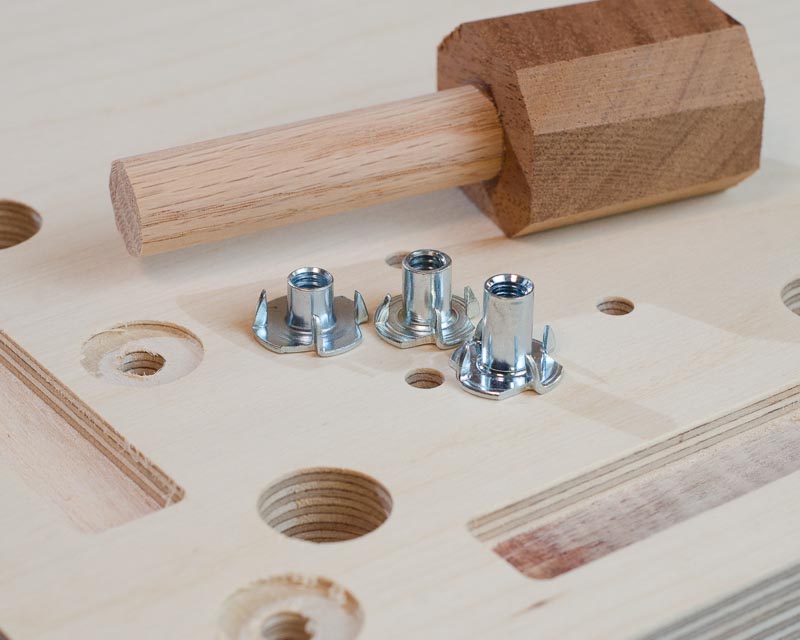
Preparing to pound in T-nuts on the middle and bottom layers.
Maker workstation middle layer. I told you there are a lot of T-Nuts used on this project.
Riser Blocks
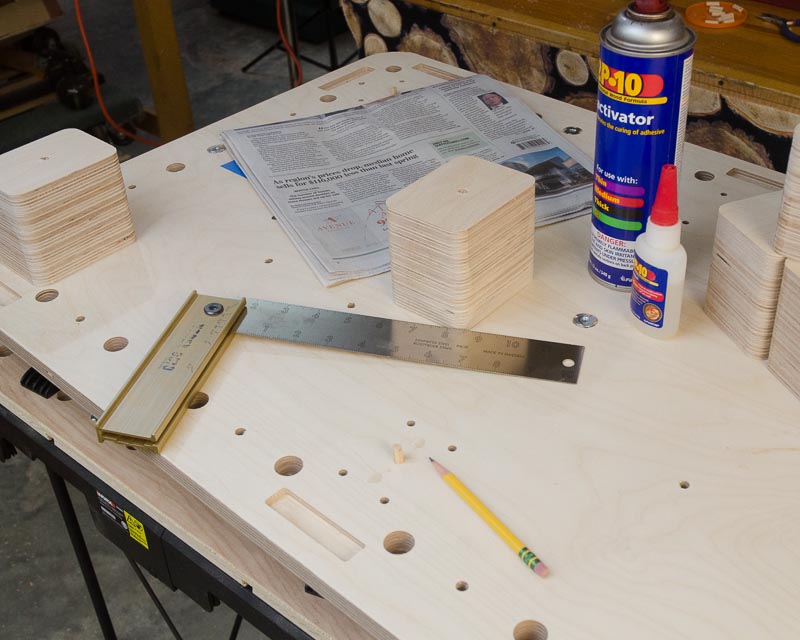
Using some of the 23”+ pieces of plywood you reserved, cut ten 3” wide strips. Glue five-layer high strips together to make up two laminated stacks. Once dry, scrape and sand excess glue from the edges.
I prefer to do the next step with a miter saw. Work carefully. The thick, small 3”x 4”x 3-3/4” thick blocks are prone to movement during cutting. Take extra care to clamp the plywood stack securely before each cut and cut slowly. Trim one end of the strip flush and cut 4” long blocks. You should end up with 10 blocks.
Since your hands will be moving around inside the open benchtop, let’s round over the edges of the 3” x 4” blocks. Easiest to do this in groups of blocks. Set the blocks on their long edges in a set of five. Add an extra piece of 3”x 4” plywood on each end to prevent tear-out, clamp the stack, and use a router with a 3/8” round-over bit to round the two top edges. Rotate the stack 180 degrees, repeat again. Then, repeat the process with the other five blocks.
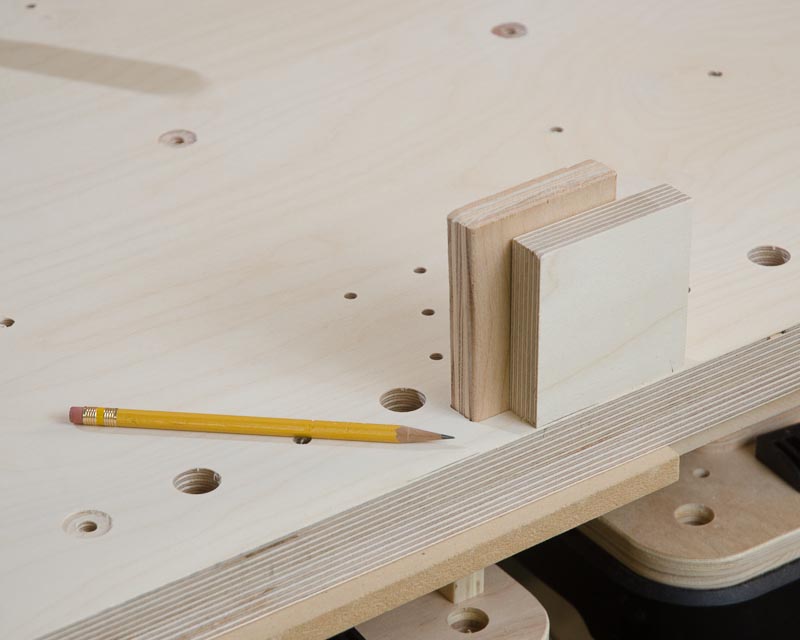
After sanding the sides of the blocks, we need to drill a 5/16” hole as a registration hole. Drill 1/2” deep or so in the center of the top side of each block. I use a drill press, fence, and stop to speed this up. Using the drill guide and extra blocks as support will work as well.

Laminate strips of 3″ wide plywood together first
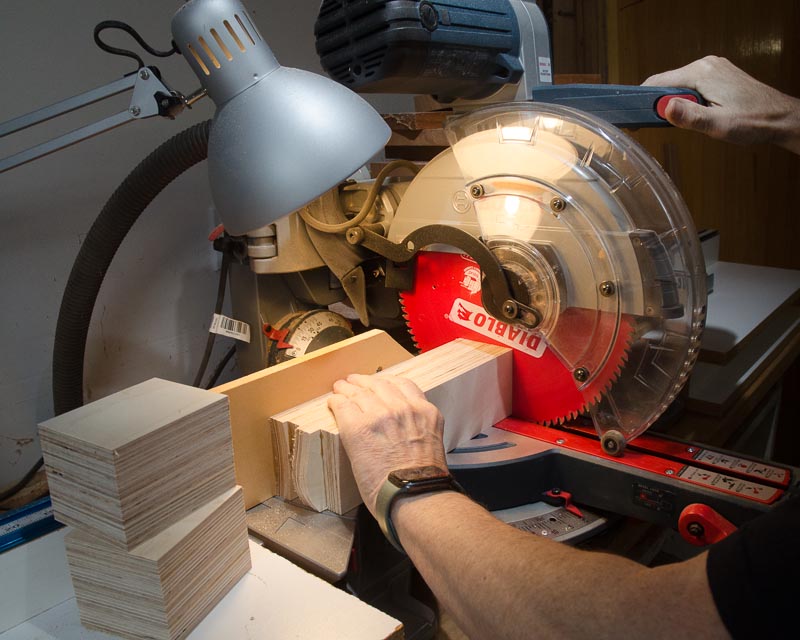
Cut 4″ long blocks from the blanks. Be very careful. These are thick pieces.
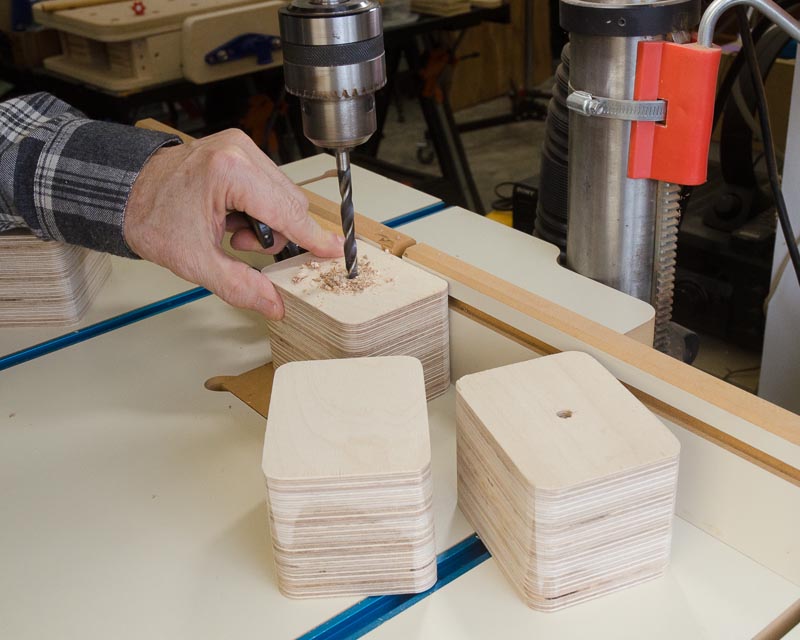
A 1/2″ deep 5/16″ hole in each riser block is used to align them to the layer.
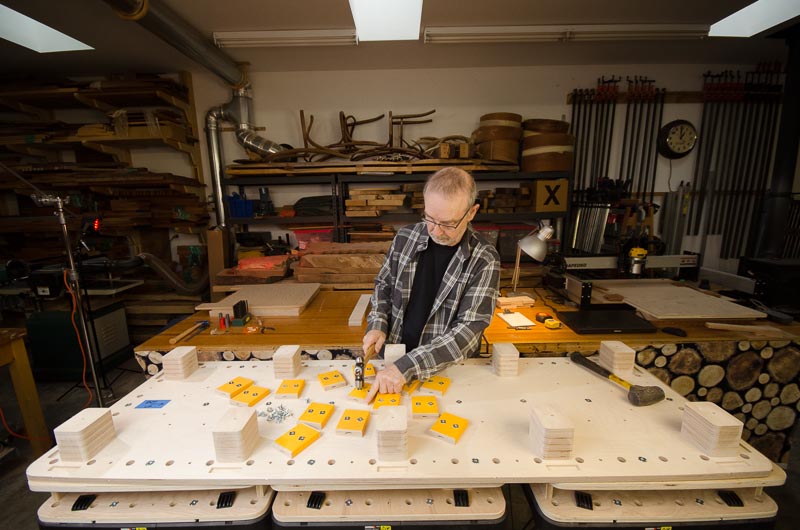
Side Plate Mounts
The 72” workstation has 14 side mounts for attaching side plates. Note the location of the 5/16” holes on the drawing. These are centered on the height of the mount and positioned 3/4” in from each side. Once the holes are drilled, trim one 3” end, 1/16” so that the top side of the plate mounts is slightly shorter on top than the bottom. Mark the bottom of each plate mount that has not been cut so you don’t get confused during assembly. The longer uncut side will go down to full depth in the 1/4” deep pockets on the top of the bottom layer. Round over the long edges of the plates with a 1/8” round-over bit so it will match the rounded inside corner of the pocket. That little detail is important. If you don’t do this the plate mounts won’t fit into the plate mount pockets.
DESIGNER TIP: This is where a little color helps. There’s a lot of plywood showing on this project so it’s time for a visual break. I spray painted my plate mounts school bus yellow. Have some fun. Time to personalize.
The last step is to tap in 1/4” T-nuts on one side of each side plate mount. At last! You’re ready for final assembly.
Easy way to make the side plate mounts. Cut 3″ x 4″ pieces and drill the holes for the T-Nuts. Trim one end 1/16″. Mark the longer side at the bottom for assembly.
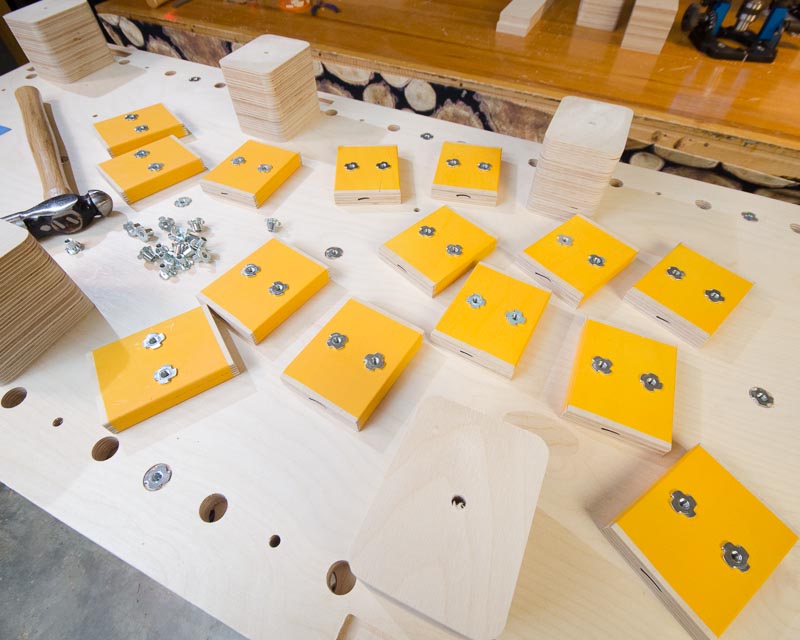
T-Nuts in place on the plate mounts. A little color to break up the sea of plywood. Yes. That’s school bus yellow.
Final Assembly
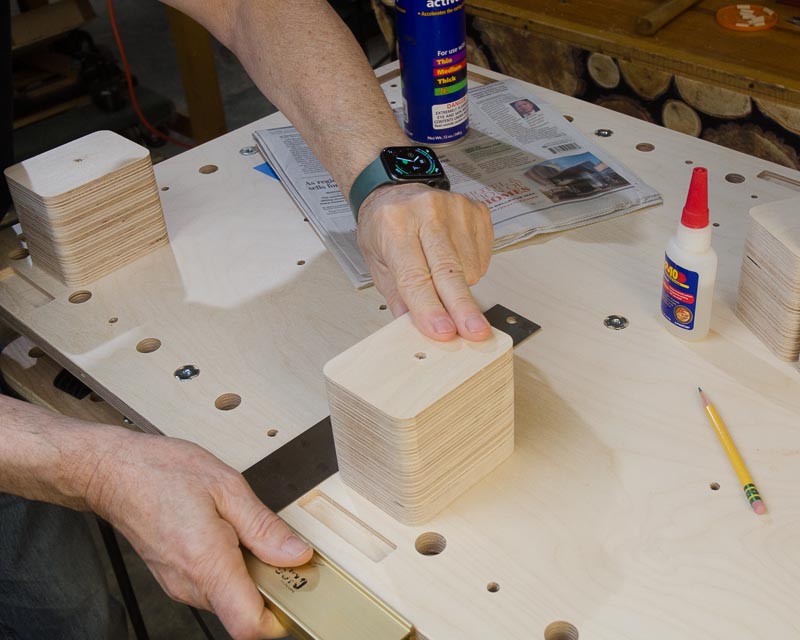
Once everything is sanded and touchable plywood edges are softened, we’re ready for final assembly. Aligning and positioning the riser blocks on the bottom layer and holding them in place is the challenge. To solve that we’re going to use 10 little alignment pins made out of dowel stock on the bottom layer. Cut several 3/4” pieces from 1/4” dowels. On the top side of the bottom layer, slightly tap in a piece into the 10 center block 1/4” hole positions leaving most of the dowel piece above the surface. Once they are in place, we’re ready to assemble.
This is when things happen very fast, so practice this without glue first. Using a square to flush to the edge of the bottom layer, drop a block down onto the pin and square it up, with the square. The slightly larger hole in the center of the blocks makes it easy to drop the riser down onto the pin. Once the block is square to the edge — that’s the position we’re aiming for.
TIP: Since you’ve got maybe 1 to 2 seconds to pull this off before CA glue sets it pays to practice positioning, squaring, and holding a few extra times first.
When you’re practiced and ready you’ll need some CA glue (Super Glue) and spray CA glue activator. Once the glue hits an area with activator on it, it sets up instantly. We just need to barely glue the blocks to the top of the bottom layer so use just two small drops placed between a cluster of 4 holes and the dowel piece in the center of the riser position. LESS IS MORE. The glue just has to hold the blocks temporarily and yet be able to be knocked off if the workstation is disassembled.
When you’re ready to go, spray the surface of a block with the center hole with CA activator. Have your square in position and ready and carefully and quickly lower down the block onto the pin, line up to the square and hold for a few seconds. It’s stuck! Now you know why I said that practice a good idea. Do the same for the other nine riser blocks.
Tap in a short piece of 1/4″ dowel stock to act as a registration pin
Check the end of the pencil. Yes, just two drops of CA glue are needed
It all happens very quickly with CA glue and accelerator. Be ready to square up the blocks with a square. At best you have 2 seconds before the glue sets.
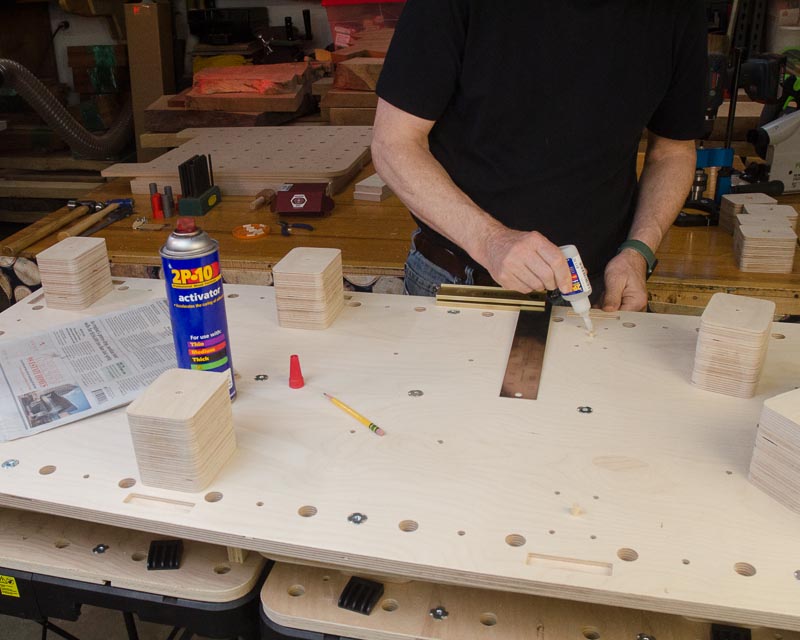
Temporarily gluing 10 riser blocks goes very quickly
What we’ve done is tack the 10 riser blocks into position on the top surface of the bottom layer. Carefully turn the bottom layer over and pre-drill 4 holes at each block location and use four, 2” long decking type screws to secure the 10 blocks to the layer making sure the heads of the screws are flush to the surface.
Once the blocks are attached to the bottom layer, turn the assembly back over. Position and tap in the 14 side plate mounts into the pockets around the edge making sure the marked side of the mount is at the bottom. Should be a snug fit. Now comes the tricky part —aligning the 14 pockets on the bottom of the middle layer to the plate mounts so that the middle layer can sit flat on the riser blocks. After a number of assembly sessions, I found that it seems to work best if you work one long side first. Then the ends and other side go a little faster. Once all 14 pockets on the middle layer are resting on the side mounts and it’s sitting absolutely flat on the riser blocks, align all four edges of the middle and bottom layers with a square and then drill and screw the middle level to attach it to the riser blocks. The structural top unit is complete.
Tap the plate mounts into the routed pockets on the bottom layer
Set the MDF top on top of the middle layer. It’s important to align the top layer precisely to the middle layer it sits on. I prefer to use four to eight 3/4” bench dogs to position the top layer. Once aligned, use 1” long flat head screws on the T-nut attachment points that were countersunk around the outer edge of the top. Finally, gently tap in unglued 1/2” plugs at the screw locations, trim the plugs flush to the surface with a flush-cut saw.
The MDF top work surface is screwed to the middle layer’s T-nuts that run along the outside. Use 1/4″-20 1″ long flat head screws.
With a router and flush-trim bit, trim the excess MDF around the top using the middle layer below as a bearing reference. To prevent the top MDF edges from chipping, round over the top of the top layer with a 1/4” or 3/8” round-over bit. Finally, slightly chamfer all the dog holes on the MDF top. To prepare for finishing, lightly sand the top unit’s edges and work surface paying particular attention to the plugged areas to make sure they’re flush to the top.

Trim the outside of the oversized MDF top and round over the edge with a 1/4″ or 3/8″ round over bit.
Finishing
The MDF workstation top needs protection. Glue drips stick to bare MDF easily and uncompressed MDF edges are more vulnerable to damage than the compressed top surface. To prepare for finishing, start by masking off the middle plywood layer with tape so that only the MDF work surface will be finished.
Do not use a water-based finish on MDF. The compressed fibers will swell up in a bad way. Oils-blends with varnish build-up quickly and make the surface too slippery for a workbench. The best choice is to use penetrating oils with a medium viscosity, not thin oils like Watco oil. Genuine tung oil is preferred. Since I didn’t have any at the time I built the prototype, I used a favorite finish, Osmo Polyx-Oil. It’s okay, but tung oil is the better choice for this project. I suggest wiping on and wiping off 2-3 coats of oil with a day drying between and light sanding with 300 grit paper between coats. Don’t apply finish inside the dog holes. When you’re done, the MDF top will not only be water and glue resistant but a lot tougher, too.
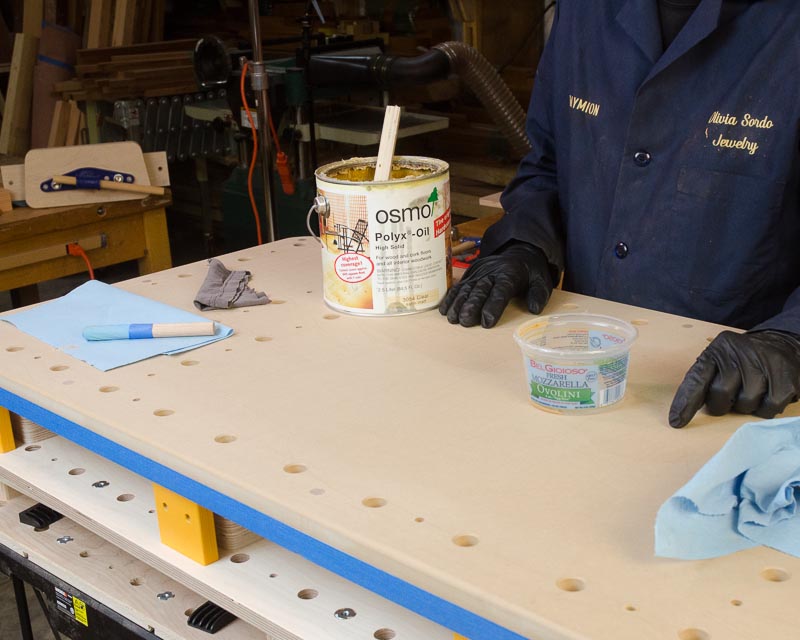
Mask off the middle layer. You only need to apply finish to the MDF top. Though I used Osmo Polyx Oil on the prototype, I recommend three coats of pure Tung Oil for water and glue resistance.
Good news. There are no more steps left to build the maker workstation stacked top. You’re all done! Next, post. Let’s build the workstation base. I’ve got two bases for you to choose from: Classic or Modern.
Additional Resources
- Other articles about the Maker Workstation at Popular Woodworking.
- Free Maker Workstation Classic Base drawing in PDF format
- Free Maker Workstation Modern Base drawing in PDF format
- Maker Workstation 72″x 24″ Layer Guide
- Maker Workstation Vise Module Drawing
- Maker Workstation 48″x 24″, 48″x 48″, and other Layer Guides sizes will be available beginning 6/1/21
- Plywood cutting layouts for 72″x 24″ workstation
- Baltic Birch Maker Workstation CNC machined templates available for ordering online at woodworking.digital.
- Free DXF Template Files to make your own templates for using a drill guide for dog holes
- Free DXF Offset Template Files to make your own templates for using a router for dog holes
- Digital Woodworking on Instagram
- Digital Woodworking YouTube Channel
- Author’s website at woodworking.digital
- Personal Work on Instagram
Here are some supplies and tools we find essential in our everyday work around the shop. We may receive a commission from sales referred by our links; however, we have carefully selected these products for their usefulness and quality.