We may receive a commission when you use our affiliate links. However, this does not impact our recommendations.
By carefully “nesting” your parts, you can make efficient use out of a sheet of plywood.
Build a modern workbench using digital woodworking tools
The Maker Workstation Overview • Building The Top • Building The Base • Furniture & Accessories • CNC Instructions
If you’re a CNC user who would like to build a Maker Workstation, this article is for you. Since CNCs come in a wide range of sizes, capabilities, and forms, I’ll go over three different ways to approach the workstation as a CNC project: if you’re using a large CNC capable of cutting the major parts, if you have a smaller, desktop-class CNC or if use a Shaper Origin hand-held CNC.
In previous Maker Workstation articles, I’ve emphasized that high precision is a requirement to build the Maker Workstation. The workstation, accessories, base, and the entire workbench system all rely on accuracy. For the majority of Popular Woodworking readers, the hybrid process centered around CNC templates and a new drill guide works well. But, there is a faster and even more accurate way to build the Maker Workstation. And that, of course, is to use a CNC to make all the parts.
First, if you’re a digital woodworker, let’s get the “obvious” out of the way. Yes, compared to the CNC template/drill guide method covered in the previous print and online articles, making a workstation with a CNC is both faster and more accurate. Next, assuming you’re proficient with your digital tools and comfortable programing your CNC operations, being made entirely out of plywood, it’s a straightforward project. So, let’s get started.

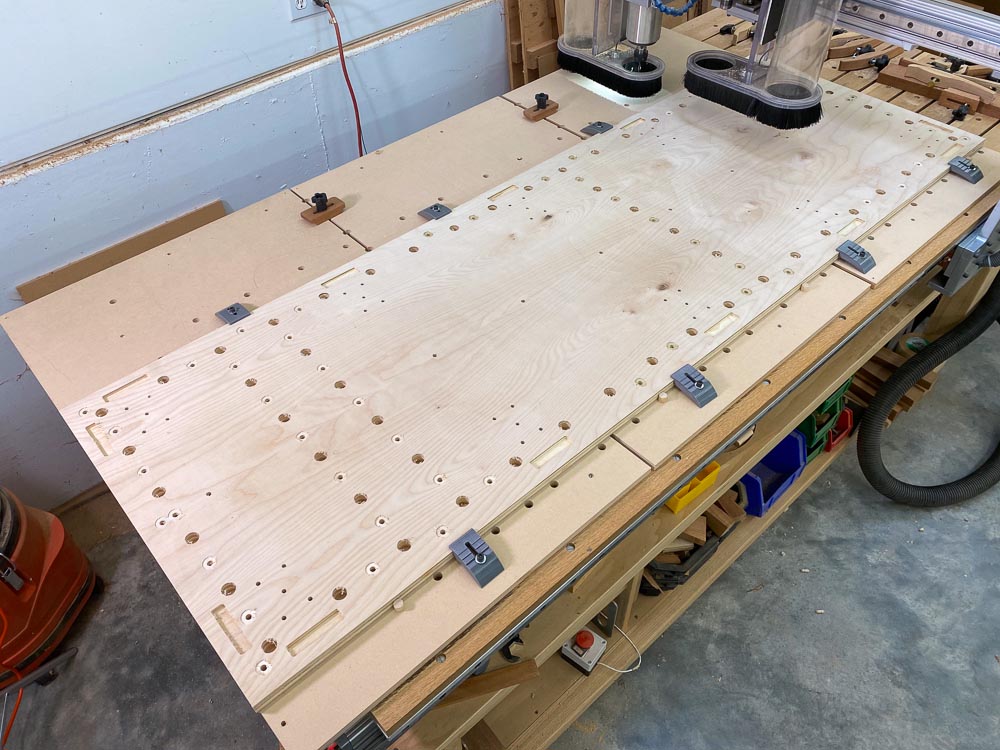
Not your average spoil board. I use dedicated spoil board setups or specialized spoil boards mounted on my CNC bed for through cuts on flat materials. For cutting Baltic Birch plywood and MDF, I designed a general use 3-panel spoil board setup that registers on the bed and adds alignment pin positions and hold-down T-nuts to secure the materials I’m cutting. There are rows of 1/2″holes for hard nylon dowels to align and square stock being machined. The rows are optimized with convenient anchor points and hold downs for the widths of plywood I often machine. I even designed 3D printed low-profile clamps just for the jig. This system makes for very fast alignment, setup, registration, holding, and changeovers. After the spoil board gets torn up from repeated use, I use a surfacing bit to re-level for its second act. Once the MDF needs replacing, I pop out the T-nuts, machine new spoil boards, and start all over. Why 3 panels? Well, smaller panels are easier to maneuver, store, and less wasteful than tossing out one large spoil board when just one area is torn up. I also have several other smaller and specialized spoil board/holding jigs for specific tasks. If some of these ideas for bed and spoil board setups sound a little familiar, they should. Many of these same concepts are repeated in the Maker Workstation.
CNC project basics
Spoilboards
My CNC beds are designed with positioning and registration systems that are machined by the CNC itself. This gives me predictable accuracy when positioning stock on the bed for machining. When cutting through plywood and MDF, I have a modular spoil board setup with machined pre-positions and built-in hold-downs. Think of it as a semi-customized jig optimized for a narrow range of tasks. Basically, the spoil board setup is an imitation of my CNC bed that’s optimized to hold plywood. The result is my sheet cutting processes and setups are fast and simple.
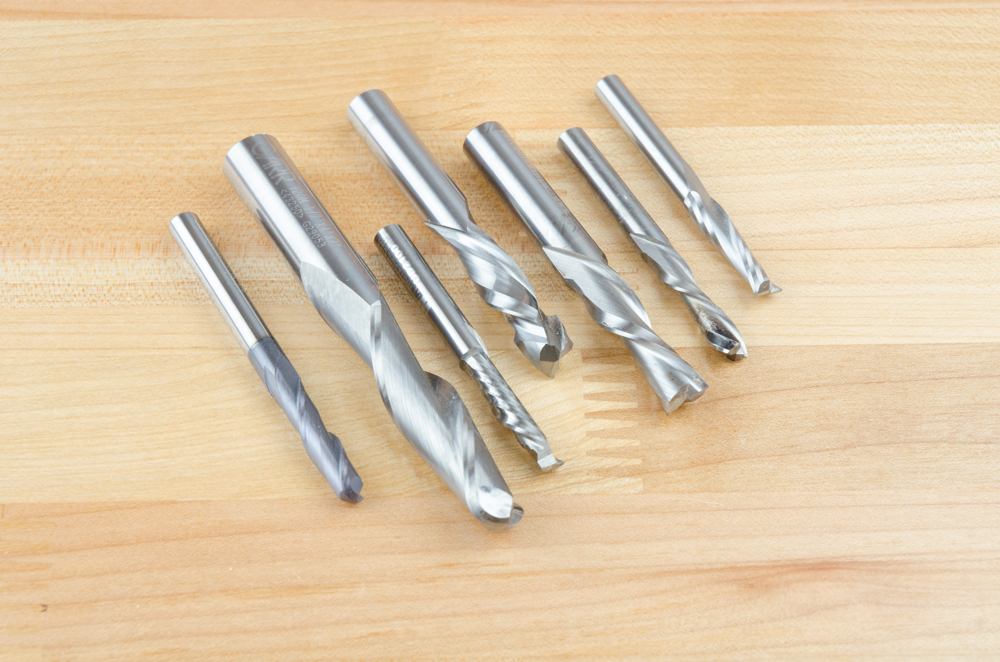
For cutting plywood for this project, I suggest .250″ two-flute spiral upcut or compression bits. Make sure you measure your bits with a micrometer or digital caliper before programming your CNC
CNC mills and router bits
When it comes to cutting plywood, CNC mills or router bits are pretty much the same things. That is, the cutter geometry for carbide spiral bits and mills designed for cutting wood are often identical. High-quality carbide bits are easily available. When it comes to buying smaller bits/mills that break easily or wear out quickly, I look around for the best price on trusted brands and buy several at a time.
For the maker workstation, I suggest a 1/4” (.250”) two-flute, spiral upcut, or a compression bit with a cutting length of 1”. This bit will cut all the project parts, openings, and pockets on the workstation. Sounds, simple enough. Now for a dose of CNC reality — I have never seen a .250” bit that comes close to the claimed size when measured with a micrometer or digital calipers. A measured .250” mills range anywhere from .240 to .245 or more. And, they vary a lot. For a project like the workstation that features a lot of critical inside profile cuts (3/4” dog holes, side plate pockets, etc. ) the difference between measured and advertised mill size is a big deal.
It is critical on this project that you measure your .250” bits. Plug that information as you program your CNC’s CAM routines and run tests before proceeding. If you don’t take this step, you’ll find your dog holes are too small, too tight, and will not accommodate .75” dogs and side plate mounts won’t fit. If you’re using a CNC, you’ve made a commitment to the world of precision. No cheating. Measure, measure, measure your bits!
Milling speeds and cutting depths
When it comes to cutting speeds, everybody’s CNC and work processes are different so it’s hard to be specific. In teaching digital woodworking classes, I’ve found that many students attempt to mill Baltic Birch plywood too fast for a clean-cut or beyond the capabilities of their machines or the size and type of bits they use. There are various tables and calculators for planning feed rates, but experience and familiarity with your CNC, the bits you use, and the materials you’re cutting are more important.
My philosophy is clean Baltic Birch plywood cuts are more than ultimate speed. Depth of cut is an important factor, too. Consider cutting 3/4” BB plywood dog holes with 1/’4″ bits over three .26” passes/levels. This level strategy works particularly well if you use compression bits as it’ll leave the top layer clean. As always, until you get everything dialed in, run tests first.
Tune your CNC first
As accurate as CNCs are, individual machines and tuning may vary. With large machines’ accuracy over the length of their beds is in the .002”-.007” range, it’s a good idea to check and tune your machine for accuracy, squareness, and level your spoil board before you begin. To ensure the workstation’s three top layers line up, machine each layer in the same direction. Large and small CNCs are pretty accurate, but not perfect. Get confused and rotate or flip one of the layers and even though they work in your drawings you may find that dog holes don’t line up once machined. Label layers: top, middle, bottom on both sides and indicate the direction of cut. See the main article for further explanation.
A 6′ or larger CNC makes machining a Maker Workstation easy.
Maker Workstation files
The keys to the castle. To CNC a Maker workstation, you need to start with CAD files. Broadly speaking that means access to DXF files. So, where can you get the files? The workstation and top plate/Worx template files are available for free on my site at woodworking.digital. Though you might be able to create something on your own, remember this is a complete workbench system design with a fair amount of subtle details built-in over years of development. Using the files designed for the project is the best solution if you’re using a CNC to machine a Maker Workstation. Though the workstation files are not free, they’re available at a small cost. The complete Maker Workstation set includes files for CNC machining the Maker Workstation top, system base, and workstation furniture, modules, and accessories are available at woodworking.digital.
Since CNC machining is more accurate than other woodworking methods, I like to take advantage of that benefit wherever and whenever possible by adding extra detail and precision when and where you it’s needed. That’s what I’ve done in creating the CNC-ready workstation files.
For example, the holes in the stretcher plates in the base are oversized to make it easier to insert and remove 5/8″ dowel pegs to hang workstation furniture. The same idea for the row of holes in the vertical panels sandwiched between inside and outside legs. These and other details make it easier to insert, remove and store workbench dogs and other accessories
Since a CNC is involved, the larger holes that surround the hold-down holes are for countersinking the T-nuts for a cleaner look. BTW, I cut them .0625” deep. Note that these countersinks are located on the bottom of the middle layer and the top of the bottom layer. Use the Layer Guides and blue tape labels, top and bottom of each layer to keep you on track of what feature goes where.
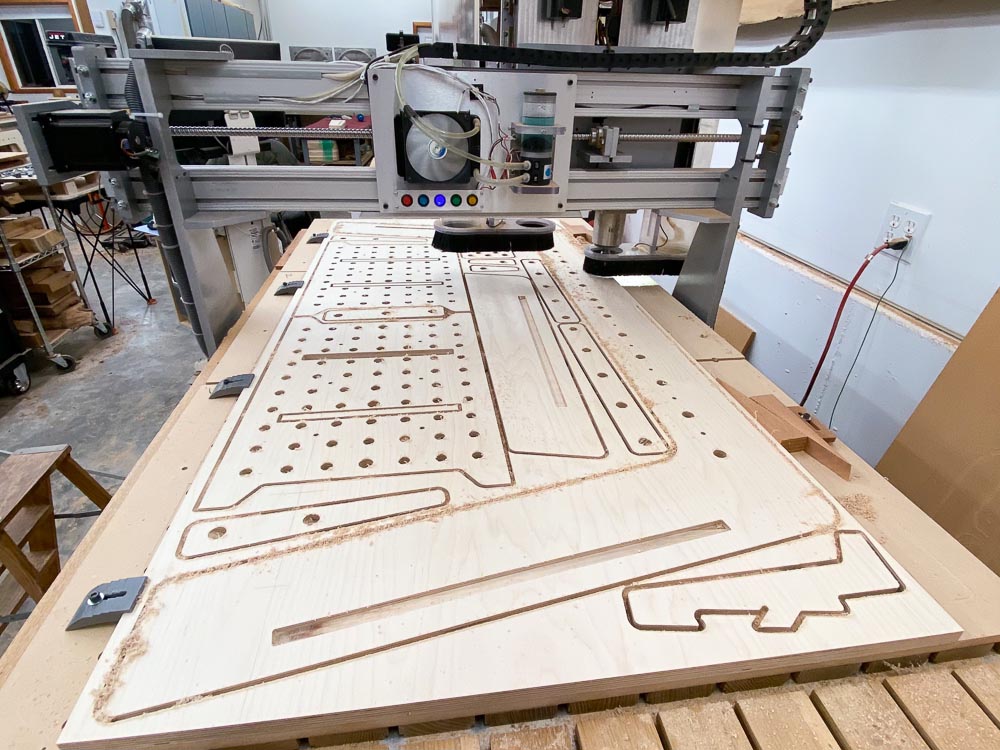
Making a workstation using a large CNC
As you’d expect, the workstation is a perfect project for a large CNC. Large, as in at least 32” wide and 72” long with heavy-duty stepper or servo motors and a powerful spindle. Think cabinet shop-grade CNCs. Vacuum panel holding really speeds things up if you have it. After first running accuracy tests to make sure everything fits before you start, (measure those .250” bits!) the 3-layer 72” maker workstation, system base, and a complete set of accessories can be machined in a matter of hours. If you build the laminated riser strips and blocks while the CNC is working and prep and sand major parts as they come out, a maker workstation can be built very quickly.
There’s really not much more to add regarding using a large CNC on this project other than to warn again about machining too fast, labeling parts, machine all three layers in the same direction, use tabs or bridges to steady parts while machining, tuning your CNC first, and always measuring your bits before you begin.

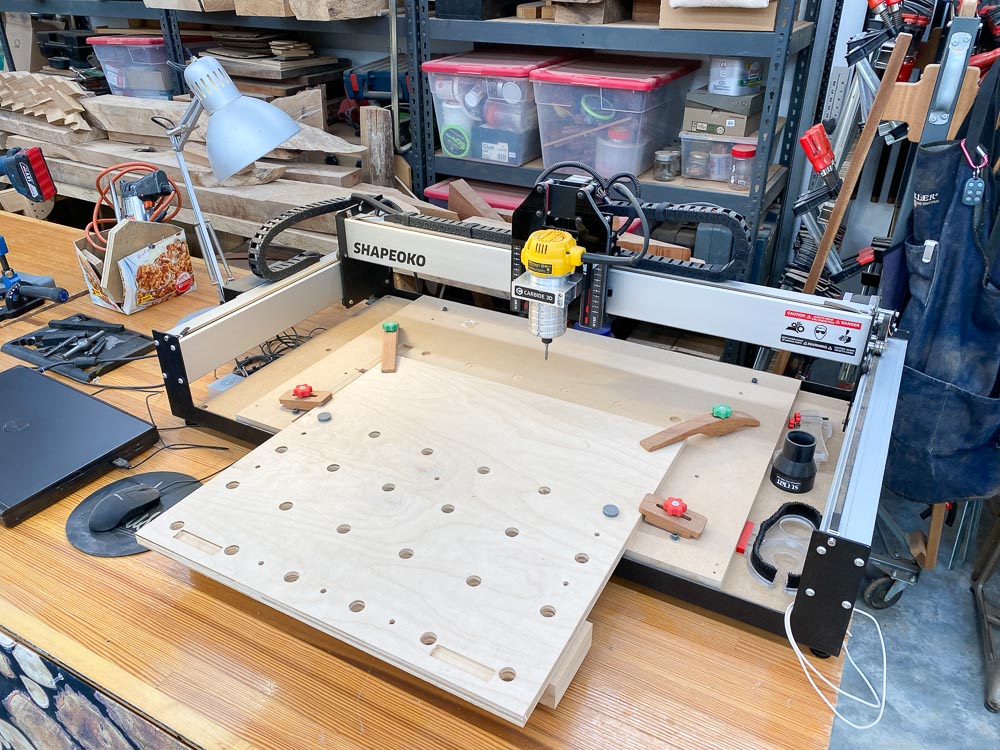
Even a desktop-class CNC like the Shapeoko XL with a 16″ x 32″ working area can machine a 24″ x 72″ Maker Workstation
Using a small CNC to build the Maker Workstation
If you register a long workpiece accurately, you can machine a large project by taking small steps. As an alternative, you could take a hybrid approach and use a small CNC to machine a template and follow either the drill guide or router offset method in the article to make your top layers.
I have a Shapeoko XL, desktop-class CNC. The cutting area is about 16” x 32”. If you use another, similar-sized small CNC your mileage may vary depending on the machine you use. Though the length of the bed may be different, there are a lot of machines that can cut 24” wide. The principles of the process I used are the same. If your CNC is even smaller, say 18”, you could make a template in two parts and use butterfly keys to align and connect the two halves together.
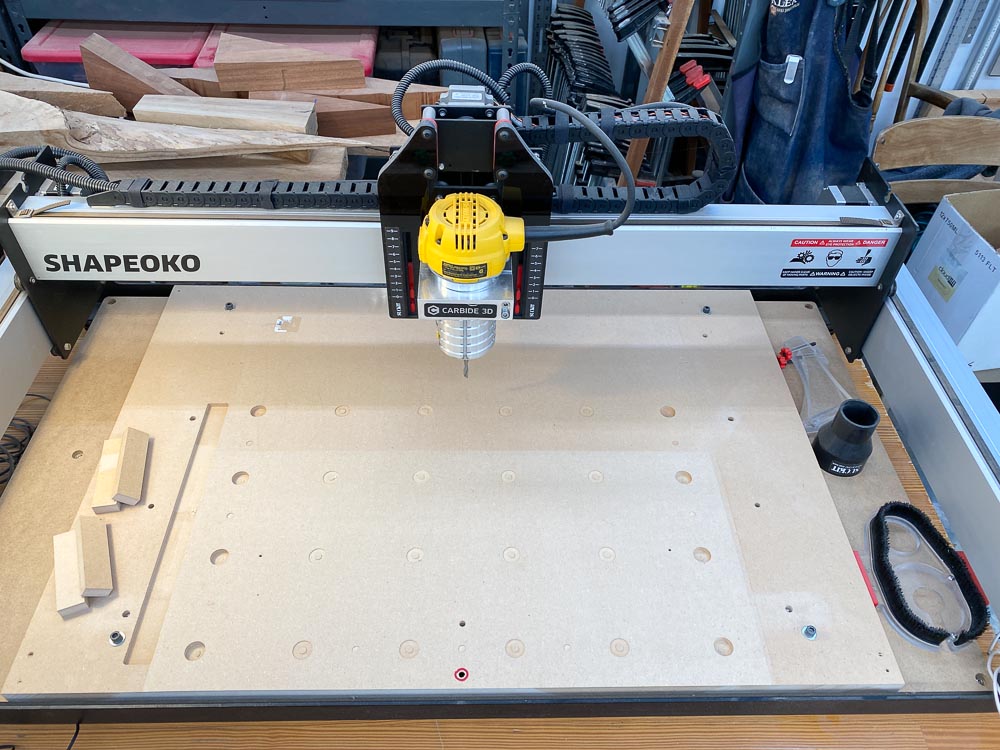
A dedicated spoil board/alignment/hold-down setup is the best way to machine the large Maker Workstation parts on a small CNC. This spoil board is just a piece of 3/4″ MDF registered and held down to the default MDF spoil board on a standard Shapeoko XL. Though it looks simple enough, there’s a lot of detail here. Note the small holes around the edges are for T-nuts that sit in the openings of the Shapeoko metal frame. The slot of the left is for strips of 1/2″ MDF used for aligning templates and Workstation layers. The large 3/4″ holes on the outside drilled deep into the spoil board are used to register Workstation layers as they caterpillar their way through the machine. A major design goal was to make sure small CNCs (24″ wide or more) could machine a 72″x24″ long, modern workbench system. By adding registration points, you could even machine the 30-3/8″ x 66″ Maker Workstation System Base parts on the 2′ x 4′ footprint, 85 lb. desktop-class Shapeoko XL. Yes, you can build a complete, full size modern workbench on a small CNC.
Here’s the spoil board in place and ready to go. Note the clamps ready to hold the plywood as it moves through the CNC and the stack of wood and MDF in front of the machine to stabilize the overhanging part being machined.
I’m cutting a 23″ x 23″ Top Plate/Worx Stack. This is position ONE milling the first 4 rows of dog holes.
The Top Plate is moved forward to position TWO. The last row of dog holes has been moved to position ONE’s first row of dog holes and registered with tight-fitting 3/4″ dogs and aligned and squared on one edge with the strips of 1/2″ MDF and held down with clamps. The overhanging end of the plate is resting on a stack of MDF the same height as the CNC’s spoil board.
Big project. Small CNC. Dedicate a Spoil board.
Because the Shapeoko’s 32” wide gantry travels along the short axis, that gives me ample room to cut 24” wide workstation layers or templates. To machine the length of the layer, it six cuts to pass through the 72” length in a caterpillar-like motion. That means 16” hops, move the layer along and re-position it on the spoil/registration board and tight bench dogs for each step. Sounds complicated, but it isn’t.
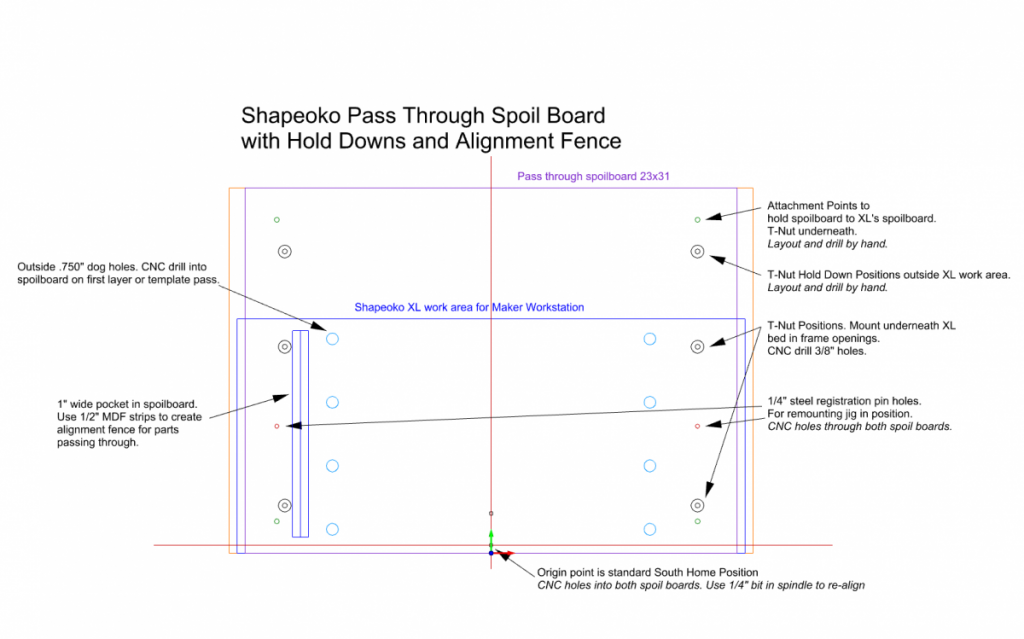
The DXF file for machining the pass-through spoilboard for the Maker Workstation project is free.
If you have a longer machine, say the longer Shapeoko XXL or other 36” or 48” CNC, adjust your registration positions for fewer hops and added dog holes accordingly.
When I find myself in a situation where I need high accuracy and have to reposition a workpiece, I often build a dedicated spoil board jig setup. Since a little engineering and CAD work are involved, while I’m at it I usually add built-in hold downs, a way to square the workpiece, and a method to register and re-attach the jig to the bed. That’s exactly what I did for the workstation jig I used for the Shapeoko XL.
This spoilboard/jig works great for the Maker Workstation but by adding the new registration points it also works great for any 24″ or so wide pass through project you might come up with.
Here’s a link to the free DXF file used to machine the dedicated Maker Workstation spoil board on a Shapeoko XL. If you have the larger XXL model, modify the dimensions by adding length and rows for more dog holes. If you have a different small CNC, use the file and ideas as a starting point for creating your own pass-through spoil board. The pass-through template will also work great for other 24″ or so wide pass-through projects on the Shapeoko XL.
I begin by temporarily attaching the spoil board blank to the MDF bed. Working from the bottom up, I CNC drill holes and use steel .250” dowel pins to register the jig to the Shapeoko’s bed. That way I can later position and reattach the jig. Next, I CNC machine the jig attachment points through the jig and into the CNC’s bed. Once I add the T-Nuts and other hardware underneath to firmly hold the jig to the CNC bed, I machine the other jig features into the spoil board for square up and registration points.
I save adding the part registration position for last because I want to machine them at the same time I’m cutting the actual first part. This way you get a perfect match between part and jig. In this project, all you have to do is machine the two dog hole positions closest to the edge of the machine deep enough to go partway into the spoil board. For example, cut 1-1/4” deep instead of the 3/4” depth of the plywood. Now, you have an accurate way to reposition your layer or template as it steps through the CNC. Simply move the last row of dog holes forward to the first of dog holes. Align to the jig, register to the spoil board with two tight-fitting dogs or dowel stock, clamp, and machine the next section. Move and repeat. In six hops you’re done. I suspect a Shapeoko XXL would be three hops, a 48” long CNC would be two hops.
The wide design for the system compatible workstation base even makes it possible to machine the 31-3/8” tall legs on a Shapeoko XL, XXL, or similarly sized CNC. You’ll have to come up with positons to register the part with registration pins in an unused area as the 66” long outside legs move through the CNC.
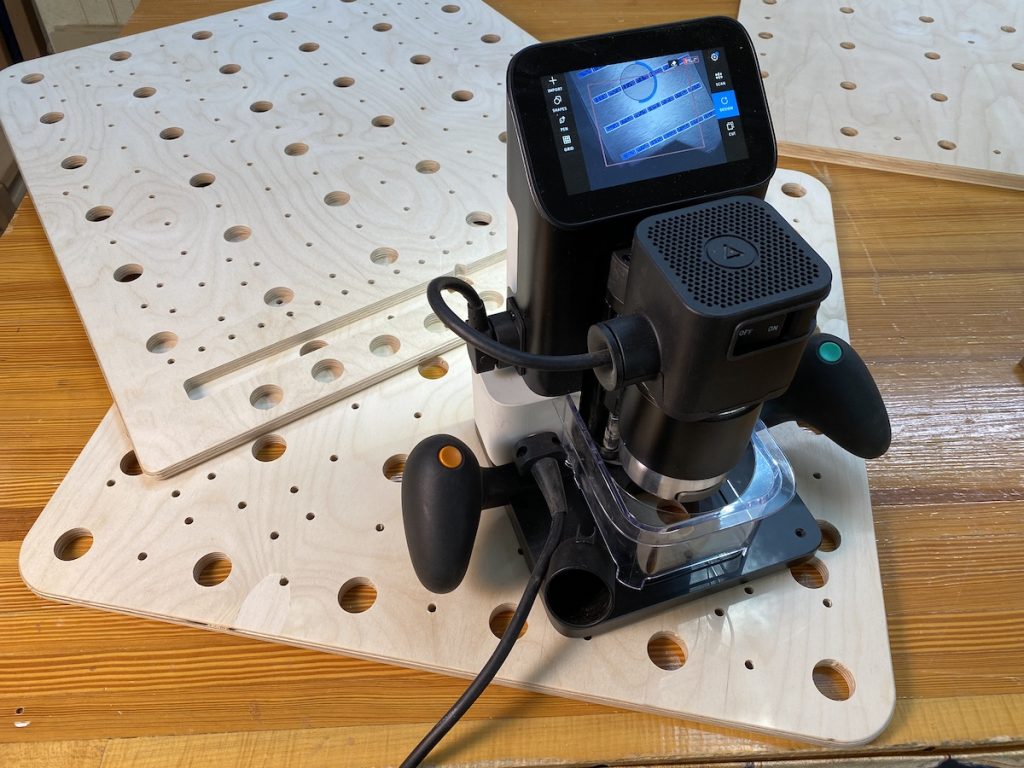
Use a Shaper Origin to make a Maker Workstation
Maker Workstation with the Shaper Origin
I’m a big fan of the Shaper Origin hand-held CNC. It makes CNC woodworking super simple and portable. Even beginners can learn to use an Origin in less than an hour. Because it’s a CNC-controlled router that needs to rest on a large flat surface, it excels in cutting materials like plywood and MDF. You would think that a plywood workbench like the 24” x 72” Maker Workstation would be a natural for the Origin, and it is, but a large project like this comes with a few caveats and workarounds.
First, let’s look at how the Origin works and examine one of its limitations. The tool uses Shaper Tape domino markers and cameras to locate and measure tool and part positions. Essentially, the machine’s vision system is based on triangulation. This works very well for parts located close to the machine, such as when using the vertical joinery-focused Origin Workstation accessory, but it’s less accurate for large or parts positioned far away from the Origin’s camera. On a 72” piece like a workstation layer, accuracy — particularly length, can be a problem. Dog holes on the near end may not be spaced or located as dog holes on the far end of a cut. But, there are ways to work around this.
First, the Origin accuracy issues on large projects are fairly consistent which means we can take a relative position for closer cuts and use it strategically. The Maker Workstation, as designed, has a little bit of slack built into the design to account for the slightly less accurate template-driven Drill Guide process I designed for the majority of Popular Woodworking readers and the variations in router bits. That gives us some room we need to work with. What’s needed is a process designed around Shaper Origin.
Let’s look at the variables: Workstation dog holes in the DXF files are .76” in diameter. Bench dogs, including the custom ones I designed for the workstation, are commonly .74” in diameter. With a 6-hole 24” long furniture strip that covers the width of the workstation, you have an allowance of .002”-.004” to work with. Second, in my testing, I’ve found that though long cuts on the Origin vary in length, they don’t wander very much. Straight and parallel lines lengthwise are pretty consistent.
Take a strategic approach for increased accuracy
So, the recommended Shaper Origin strategy is this: scan and work short dimensions whenever possible. Begin by using a table saw or a track saw to precut the 24” x 72” middle plywood layer a few inches oversize. When you position the drawing on the Origin screen on the workpiece, center it on the oversize workstation panel that you’ll trim later. As described in the Popular Woodworking article, don’t forget to label the layer you’re working on, top and bottom.
The goal for this project is to workbench side-to-side, rather than end-to-end. Layout marker tape lengthwise on the layer blank every 2-3”. Add extra strips of plywood with extra markers along the long side away from you. On the near side, add plywood strips to help support the Origin for close-up work. In order to get maximum accuracy, scan in the markers from the sides of the bench where you’ll be working rather than lengthwise.
Start with the middle layer. We’re going to be machining the bottom side of the middle layer dog holes, hold-down holes, countersink holes, and side plate pockets. Start on the lower left and work side-to-side a section at a time. Work from the nearest side to the far side that’s 2’ away. Avoid rotating the Origin and work lengthwise if possible. We’re trying to limit the length of the scanned and cutting areas. Once you’ve machined a foot wide or so, go back to the near side and slide over to the right for the next 1’ section. Side-to-side, slide right, side-to-side, slide right, etc. Minimize rotating the Origin as you work. If you’ve laid out enough markers on the blank and the extra maker strip away from you, you won’t have to work lengthwise.
Take the same approach to machining the top side of the bottom layer. Like the bottom side of the middle layer, it has .250” deep plate mount pockets. Before you jump in and use the Shaper Origin to machine the top layer, consider the more accurate, hybrid approach explained below.
Once machining is complete, go back and trim the panel to the 24” x 72” final size by measuring 2” from the centerline, not the edge of the dog holes around the perimeter of the workstation. Alternatively, measure 1/5/8” from the edge of the outside dog holes. An even faster way and my preferred way is to jig the cut. Cut a long strip of plywood scrap 1-5/8”, push a couple of drill bits in the dog holes toward the outside for the strip to rest against, draw the line using the strip as a straight edge, and cut with a table saw or a track saw.
A hybrid approach
Notice I haven’t mentioned machining the top MDF layer? As anyone who’s seen an Origin knows, it’s a CNC-controlled trim router that uses small bits. That means it will take some time to machine the dozens of dog holes and hold down holes in 3/4” Baltic Birch plywood. With that in mind, consider a hybrid approach that speeds things up and ensures the top two layers match up.
As above, use the Origin to machine just the middle layer and bottom layers that each has .250” deep pockets for side plate mounts. Then, as suggested in the Popular Woodworking article, use the middle layer as a template and a Rockler Drill guide plus a 3/4” Forstner bit to cut the dog holes, hold down, and attachment holes for the 3/4” MDF top layer. This way the holes on the middle and top layers will match up. Yes, you could just machine all the layers with the Origin, but keep in mind its inaccuracies on large pieces. As you stack the top two layers, it may not match up as well as the middle layer template method. An even faster alternative would be to use the Origin to machine router offset maker workstation templates and use a router to make the three workstation top layers.
For the plywood system base where accuracy doesn’t matter as much as the stacked top unit, use the Origin to machine all the leg parts, leg separators, and side stretcher panels with the Shaper Origin.
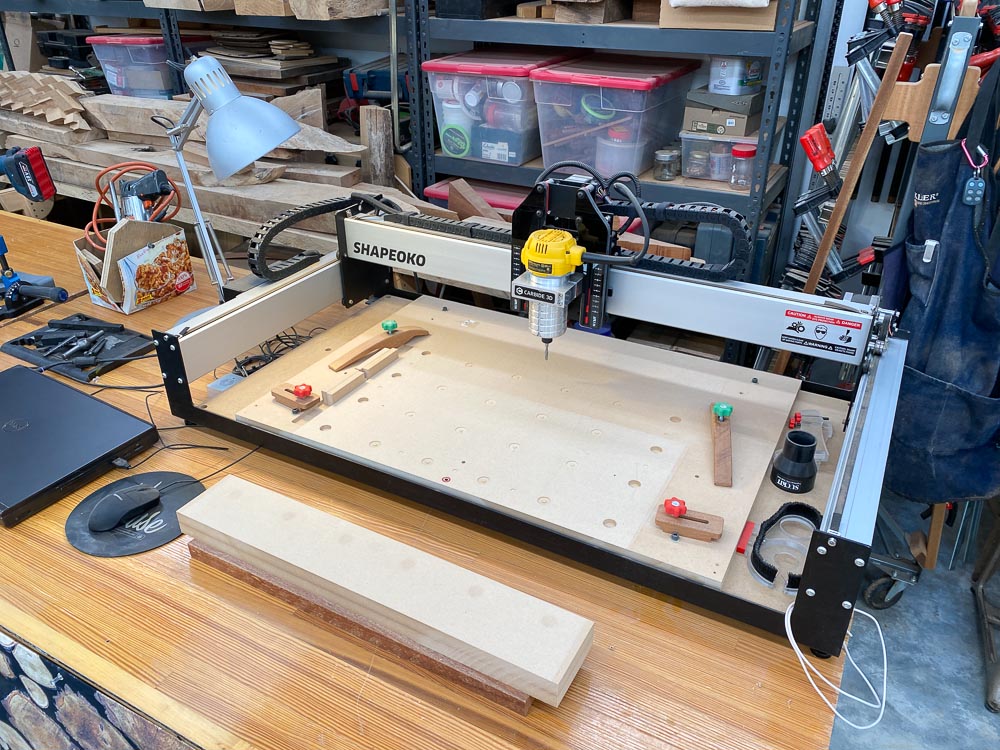
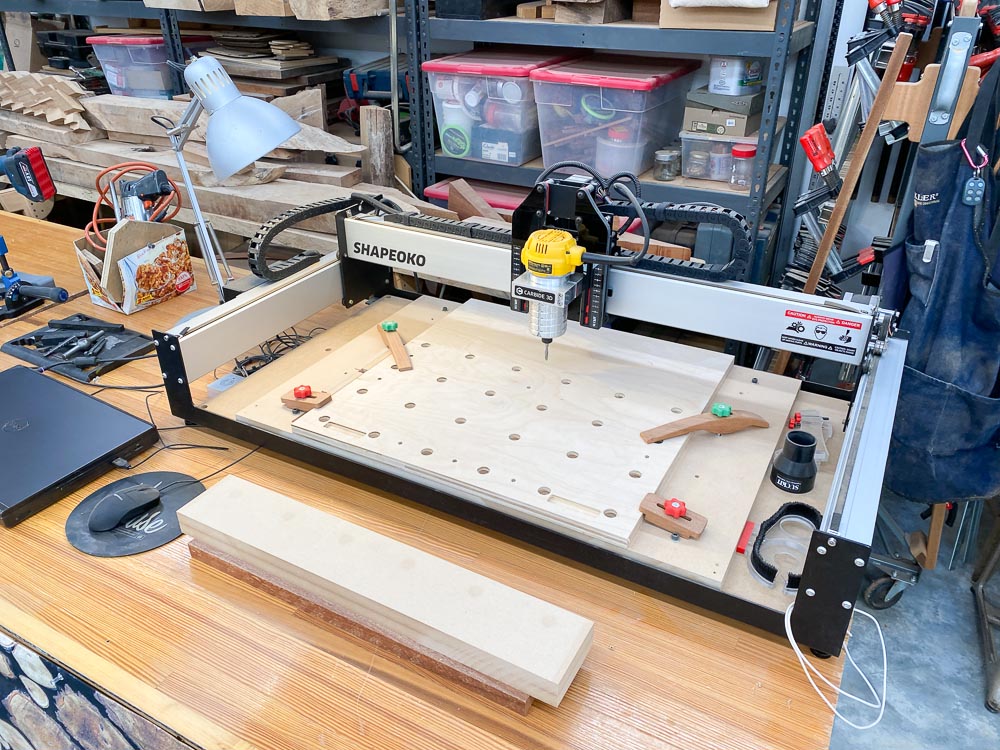
For the small workstation furniture and plate mounts, the Origin should work well. Because it works best supported by large panels, it’s easier to machine all the dogs and hold down holes on blank stock first and go back for the profile cuts leaveing tabs to stabilize parts and trim later.
At last
Yes, it’s true. A CNC is a simple and fast way to build a Maker Workstation. Particularly if you have a large CNC. But, if you have a small CNC like the desktop-class Shapeoko XL, it may take a little longer, but it works just as well. If you have a Shaper Origin, you can work around its accuracy limitations on longer cuts by working side-to-side, using plenty of marker tape, and planning your cuts. No matter which method, digital tool, or CNC you use to build a maker workstation take your time, plan every cut, make some tests for fit first, and as always: measure those pesky 1/4″ bits before you begin.
This is the fifth and final how-to-build entry in the Maker Workstation series. I’ll follow up on Popular Woodworking shortly with a series of YouTube videos I’ve prepared that introduce maker workstations concepts, how-to-use techniques, working methods, subtle workstation details, and some construction tips. And, I’ll add links to Layer Guides to help you build 24” x 48”, 24” x 54”, and 48” x 48” versions of the maker workstation. This fall, at my woodworking.digital website, I’ll have other modern work surface designs including a field bench designed for woodworkers for onsite projects outside their workshops. Much more than a job site work table, it’s a woodworker’s workbench for the field. Sounds perfect for building that radical new deck I’m designing and working on in a few weeks. Wow! Summer is here. I need to get to work.
Additional Resources
- Other articles about the Maker Workstation at Popular Woodworking.
- Free Maker Workstation Classic Base drawing in PDF format
- Free Maker Workstation Modern Base drawing in PDF format
- Maker Workstation 72″x 24″ Layer Guide
- Maker Workstation Vise Module Drawing
- Maker Workstation 48″x 24″, 48″x 48″, and other Layer Guides sizes will be available beginning 7/1/21
- PDF plywood cutting layouts for 72″x 24″ workstation
- Baltic Birch Maker Workstation CNC machined templates available for ordering online at woodworking.digital.
- DXF files for CNC machining the Maker Workstation available at woodworking.digital
- Free DXF Template Files to make your own templates for using a drill guide for dog holes
- Free DXF Offset Template Files to make your own templates for using a router for dog holes
- Free DXF file for machining the Shapeoko XL pass-through spoil board used for the Maker Workstation
- Digital Woodworking on Instagram
- Digital Woodworking YouTube Channel
- Author’s website at woodworking.digital
- Personal Work on Instagram
Here are some supplies and tools we find essential in our everyday work around the shop. We may receive a commission from sales referred by our links; however, we have carefully selected these products for their usefulness and quality.