We may receive a commission when you use our affiliate links. However, this does not impact our recommendations.
Workstation furniture is easy to make with a CNC machined maker workstation template.
Accessories = Versatility
The Maker Workstation Overview • Building The Top • Building The Base • Furniture & Accessories • CNC Instructions
A key feature of the Maker Workstation is versatility. What makes it work is the precision grid system that’s the foundation for all that happens on the surface, sides, and base of the workbench. It’s worth repeating, that in order for the workstation to work as intended, accuracy is critical. So the workstation, plates, and accessories have to be made with a CNC or a CNC machined template. Paper templates will not work for this project. When the precision foundation is in place, then the workstation accessories, furniture, plate systems can work their magic.
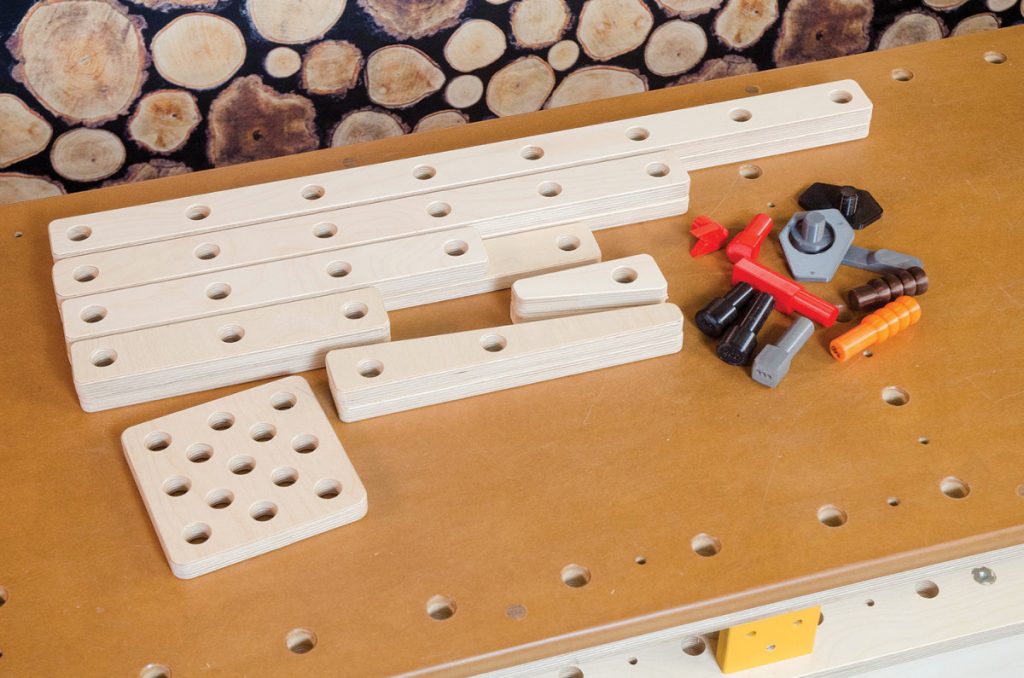
Plan on creating a collection of furniture with several pairs of workstation strips.
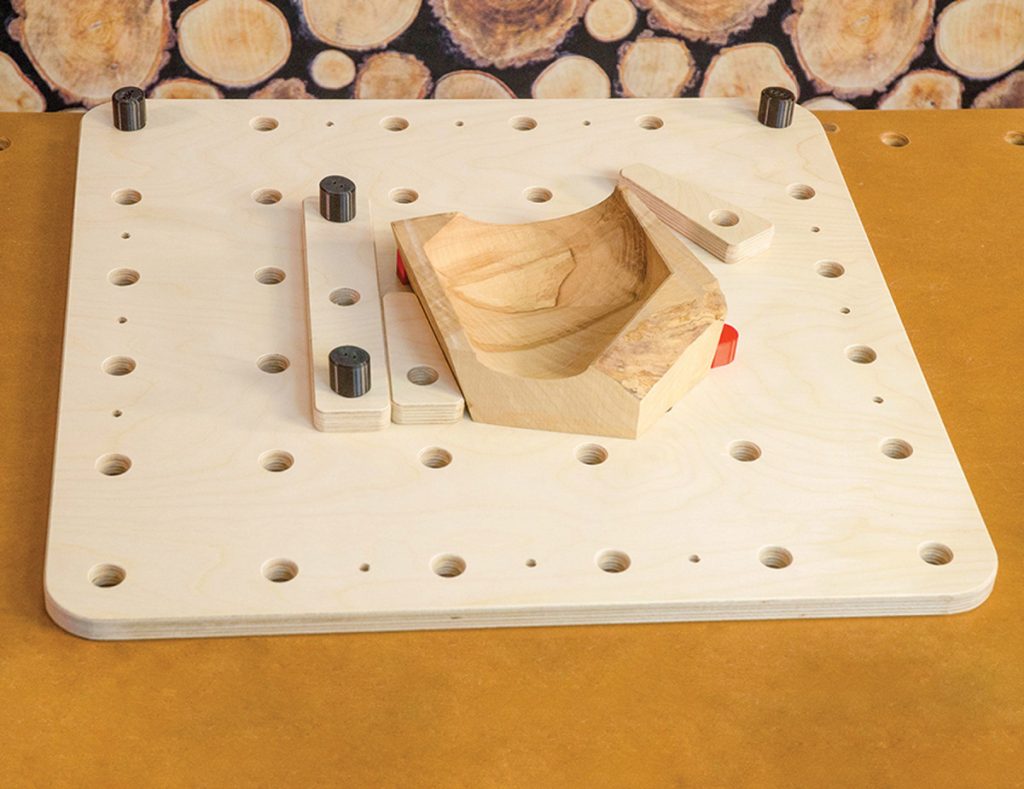
Dogs, furniture, and dog clamps. A workstation collection should include several sizes of furniture stops and wedges for work holding.
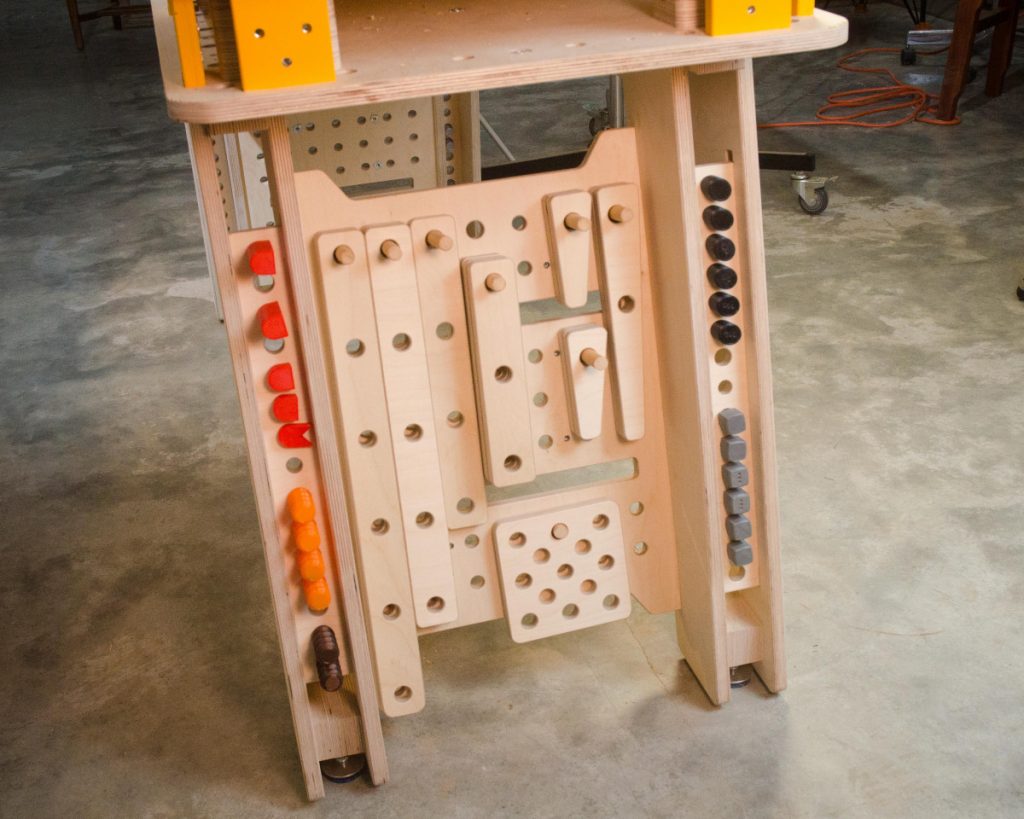
Store and organize furniture, dogs, and accessories on the ends of the maker workstation.
Workstation Furniture
Workstation furniture is a key ingredient in the Maker Workstation system. It’s used to position and secure workpieces to the work surface. Most furniture is made from 2” wide strips of 3/4” plywood. The length of each piece is based on 4” dog hole spacing. For example, a strip with three dog holes would be 8″ + 1″ added to each end (measured from the center of the dog hole closest to the end) for a total of 10.” For practical use, I think in terms of dog holes, not lengths. With this knowledge in mind, a good starting workstation starter set would have 15 pieces with dog holes: four sets of 3 dog holes, three sets of 4 dog holes, and two sets of 5, 6, 7, and 8 dog holes.
There are at least two ways to make the furniture. A CNC is obvious. If you don’t own one, the simplest method is to cut long 2” strips of plywood as stock. These strips should be precisely 2” wide. Use a caliper to verify your strips are accurate.
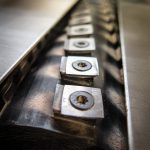
Furniture with a History
It’s not by accident that I chose the word “furniture” for this key workstation accessory. As woodworkers, we think of furniture as the practical things we create and use in our homes, but the term “furniture” is also used in another way in different world that also has a long history: letterpress printing. Letterpress furniture are the blocks of hardwood in specific widths, lengths, and thicknesses used to position lead type, cuts, and rules that make up a printed page. Once the type and elements are in position, the space around them is filled with letterpress furniture and locked up with letterpress Quoins, which are simple mechanical wedge mechanisms. Since letterpress furniture comes in sets of known sizes, a pressman can position the printed elements exactly where they want them to be on a page. I used the same concept, combined with the grid-based dog system to give woodworkers and makers the ability to position and securely hold workpieces. And, just like letterpress furniture, workstation furniture needs to be precise.
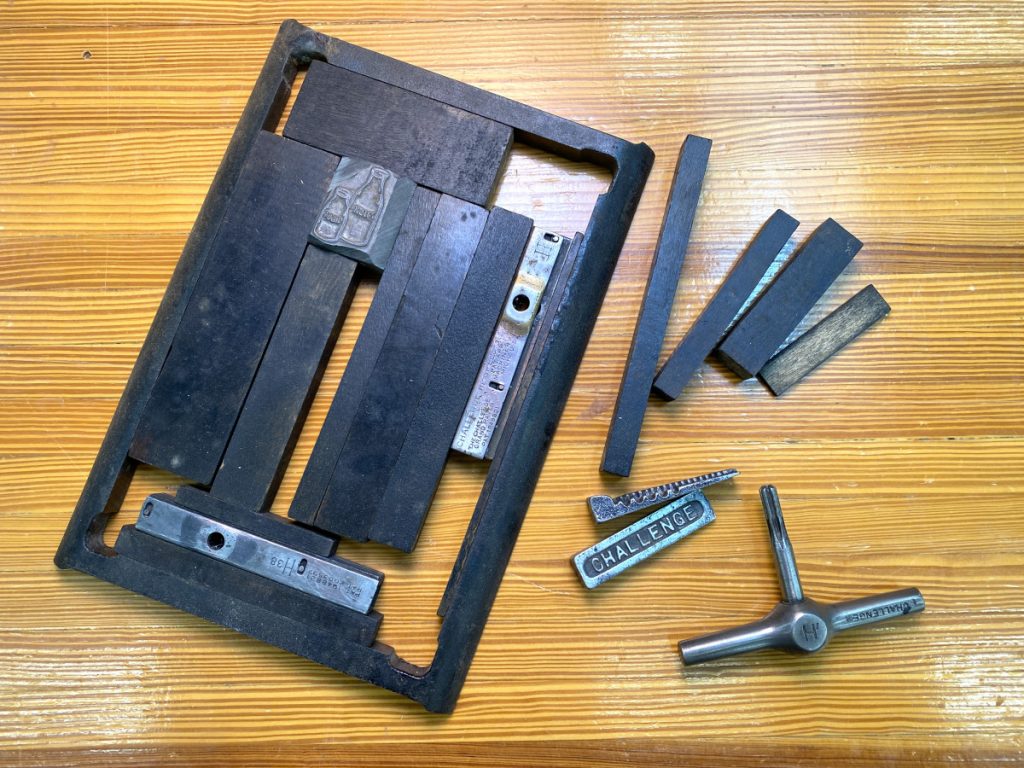
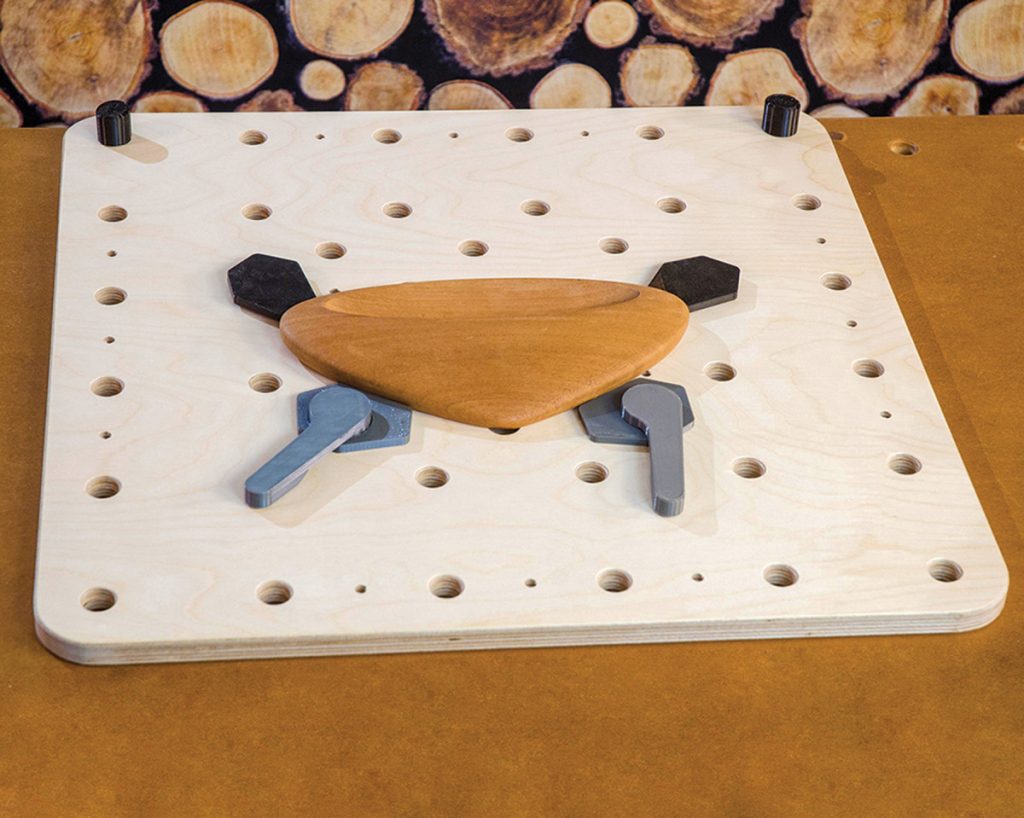
Look familiar? This a frame called a “chase” for a platten-style letterpress. Inside is a metal “cut” of a pair of milk bottles. It’s positioned and surrounded by letterpress “furniture” of various sizes and held in place with adjustable wedges called “quoins” that are set with a “key”.
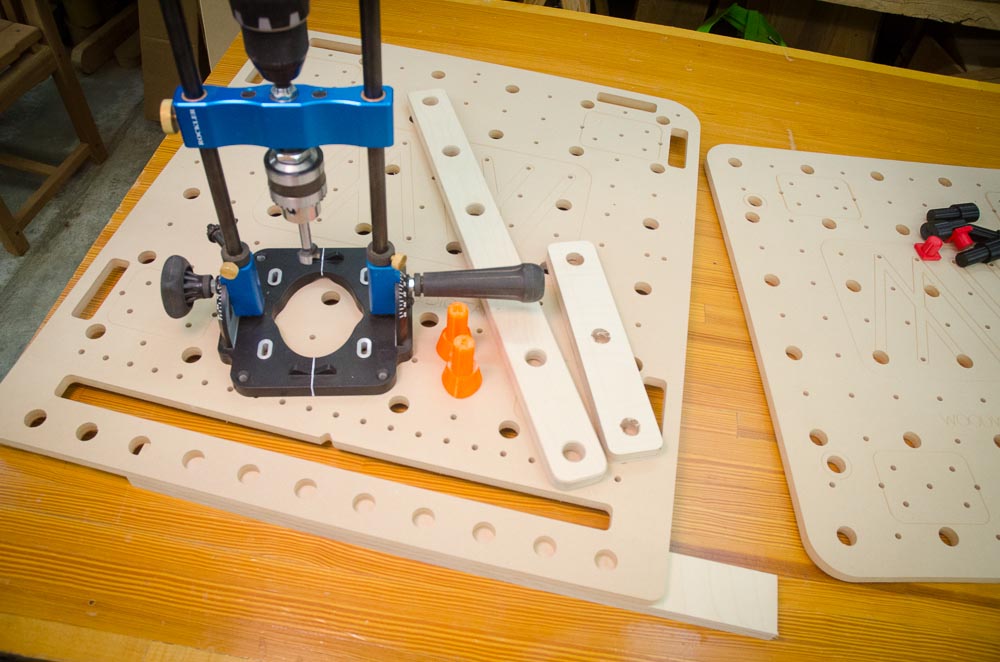
As you can see in the photo at the top of this article, the bottom of the Maker Workstation CNC’d machined template has a series of 2” spaced holes in the 2” wide section that’s there to help you make workstation furniture. Position and clamp blank 2” wide plywood stock under the template and use the drill guide (or router offset version template) and cut holes every 4”. Make sure you use a longer length of stock than you need. Better to make long strips of plywood furniture stock and trim furniture to size later. If you need strips longer than the template, just reposition the strip using the template’s dog holes and 3/4” dogs.
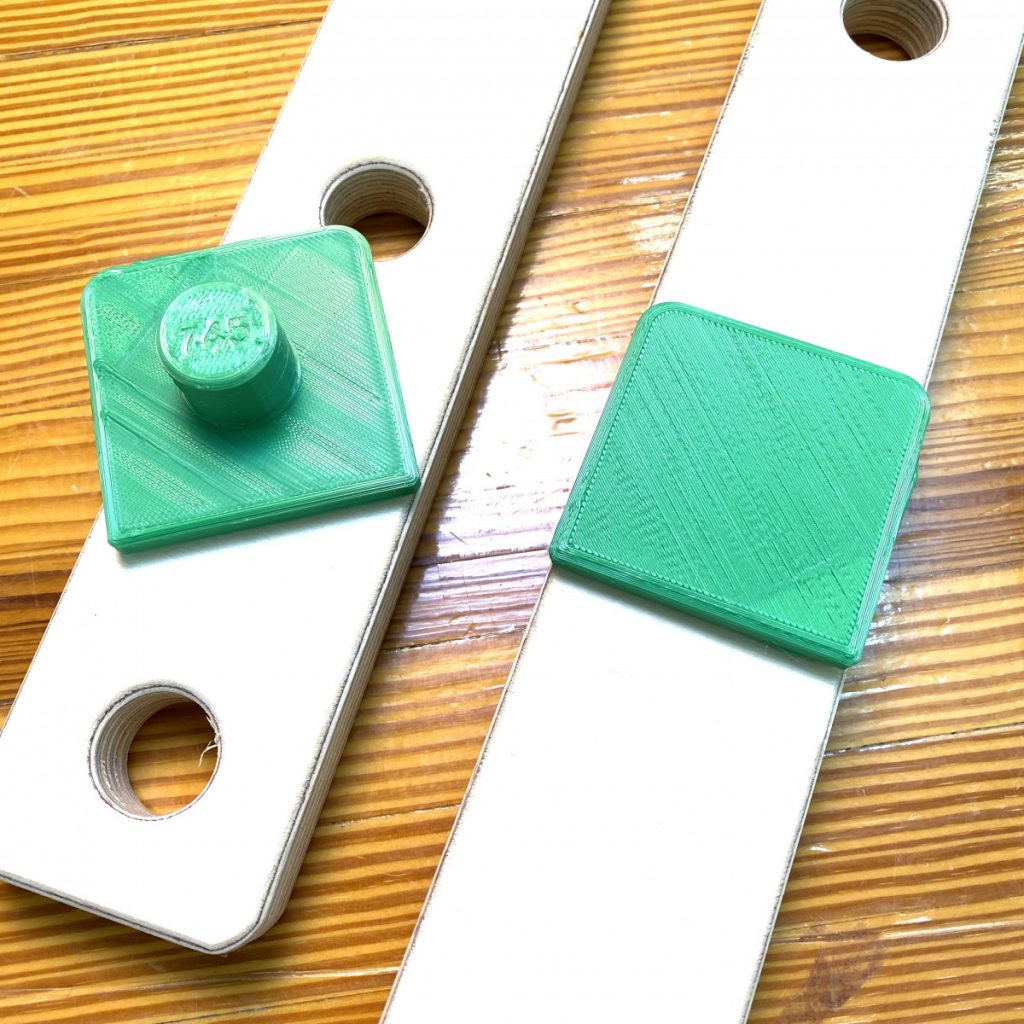
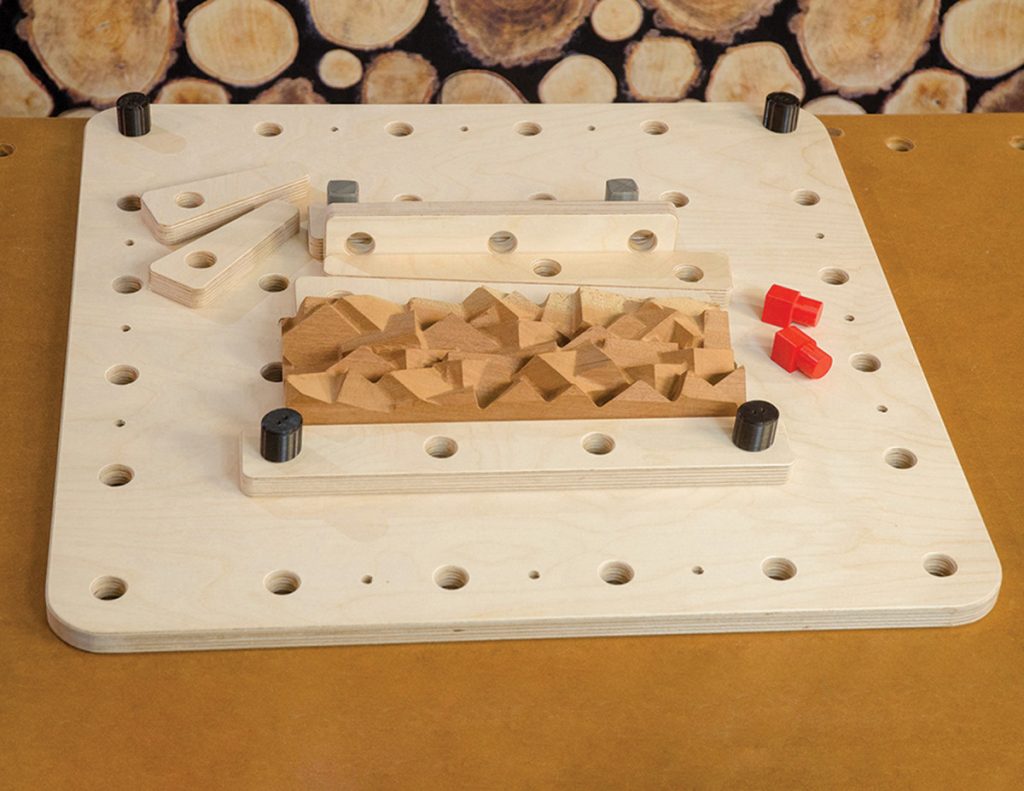
Dog templates for marking the lengths of workstation furniture
Trimming furniture from your 2” wide stock with 4” dog spacing is easy. Just measure 1” from the last dog hole center and cut. To make this job even easier, I created a 3D-printed workstation furniture-making template dog that’s just the right length and has rounded corners. I just draw around the end, trim with a miter saw, and sand the corners to soften the line.
If the part you’re holding a workpiece less than 3/4” thick, the easy solution is to use 2” and 4” strips of 1/2” plywood between the part being held and furniture. Because workstation workpiece holding is mostly lateral, it puts pressure in the right place. I find this works very well.
Top plates optimize the workstation for any project. And, since they’re easy to mount and hold down you can dedicate them to different projects and add and remove plates easily.
Top Plates
23” top plates are a key accessory. They give the workstation the ability to evolve, grow, and adjust to any tasks you take on. Top plates are inexpensive, easy to make, and store. Rather than cover the top with a grid of holes that are rarely useful that also ruin a large work surface, top plates allow you to keep the workstation as is and let you customize the work surface for any project.
What can you do with Workstation Top Plates? Plates with a denser grid of holes increase pressure points tof hold a workpiece firmly with bench dogs or other accessories. You could make plates with a grid of T-Nut holes for lots of vertical hold-down positions. You could make plates with added useful features like dovetail slots for the versatile Microjig clamps or add lines of T-track. You could make an overhanging top plate into a portable router table that mounts on the workstation. Thin top plates made out of MDF make great spoil boards for using track saws. You could make plates out of metal for a heavy-duty maker project or homeowner tasks. One of the most important uses for top plates is specialization: creating dedicated fixtures for specific woodworking or project operations.
Like the workstation top, top plates need to be made with a CNC or a CNC template so that they register to the bench and follow the grid system. Precision counts. Use a CNC machined Top Plate/Worx Sidekick template and follow the same process used to make the workbench top. The Top Plate template is 23” x 23” and has four extra dog holes out of the grid so a plate or Worx Stack can register onto the Worx Sidekick.

I made a side plate with a magnetic strip on my right side to quickly stash hand tools or hold metal parts.
Side plates can also mount modules such as the vise module. Rather than permanently mounting a woodworking vise permanently in a single location, instead, the vise is mounted to a module that can be moved to your choice of 10 locations around the workstation. It’s attached with two knobs or screws to the side plate mounts.
Side plates can be simple or specialized. For those that like to organize their toolsets on a French cleat wall, cleat plates can be attached to the sides of the workstation. This makes it possible to swiftly move toolsets to the bench as you need them.
Side Plates
Workstation Side Plates are for attaching tools, tool holders, or modules such as the Vise Module. They are 3.5” x 15-15/16” long. Being just shy of 16”, I find it best to cut them to 16”, drill the 5/16” mounting holes 3/4” from the ends on the plate center and then trim each end 1/32”.
A key feature of side plates is that they are attached with just two screws so you can move them around the outside of the bench and locate them where they are most useful. In a 24” x 72” workstation, you have 10 positions where you can mount a woodworking vise module. Better yet: think about what you could do with multiple vise models. A Moxon vise sized to fit. You could make a narrow side plate and locate it nearby for your most used small tools like pencils, squares, rules. I made a side plate with a magnetic strip I keep at my side to quickly grab small metal parts or hold hand tools like chisels and awls. For even faster tool changeovers, mount 45-degree French cleats on side plates for swapping toolsets as you need them who live on tool walls.
Vise Module
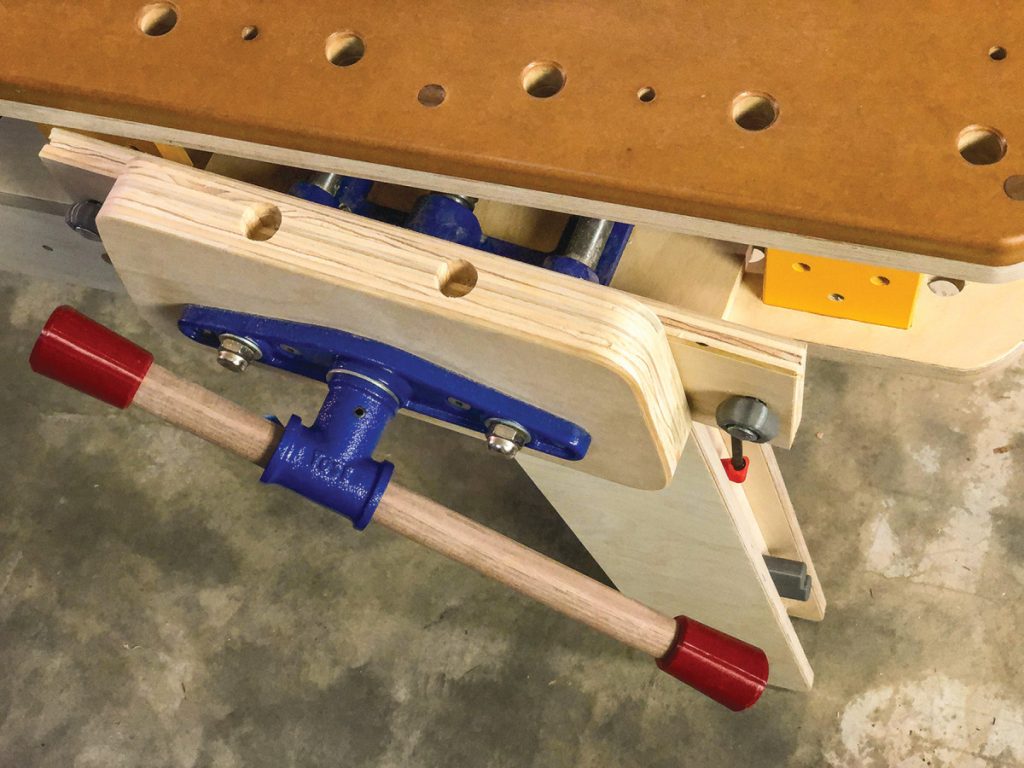
In keeping with woodworking workbench traditions, the first module I designed for the maker workstation was to mount a standard front vise. I used an inexpensive and easily available vise: the Yost Tools F9WW Yost 9″ Front Vise. To keep the module movable, I mount the vise upside down and use a standard 16” side plate. Like other side plates, the module is attached with just two 1/4”-20 star knobs or flat head screws that are countersunk into the plate.
Like most front vises, most of the time clamping is done between the jaws so the clamping force is contained within the vise. So mounting the module is simple. Because there are plenty of other options for holding workpieces, I rarely use the dog holes that are aligned with the vise, but if you do, you’ll need to hold the vise down to keep it from rotating under pressure on the top of the vise. I have a solution for that I’ll explain below. The bottom layer of the workbench has pairs of holes for this purpose.
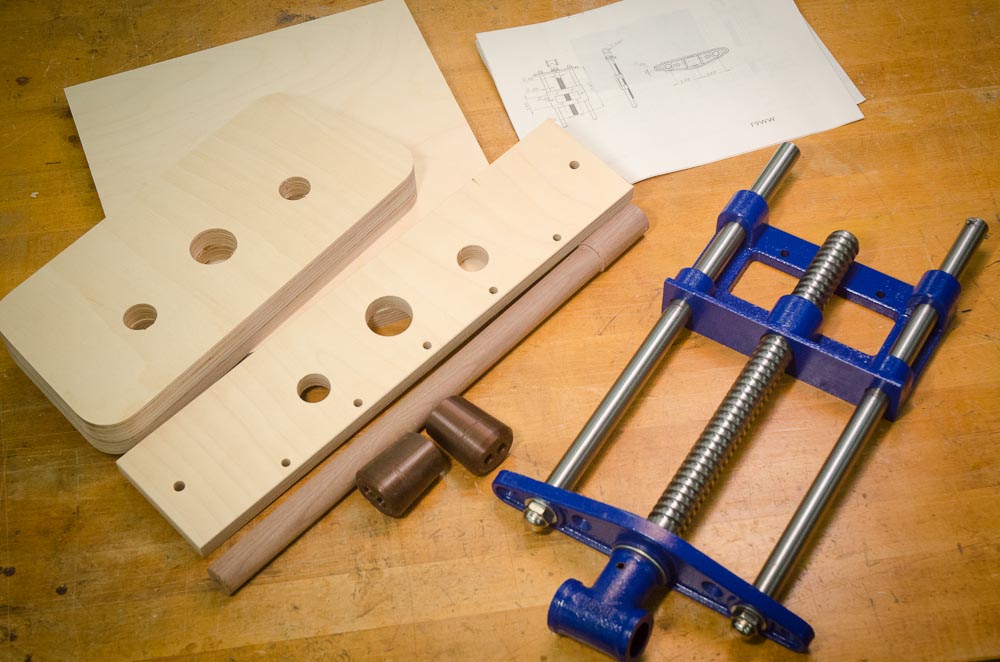
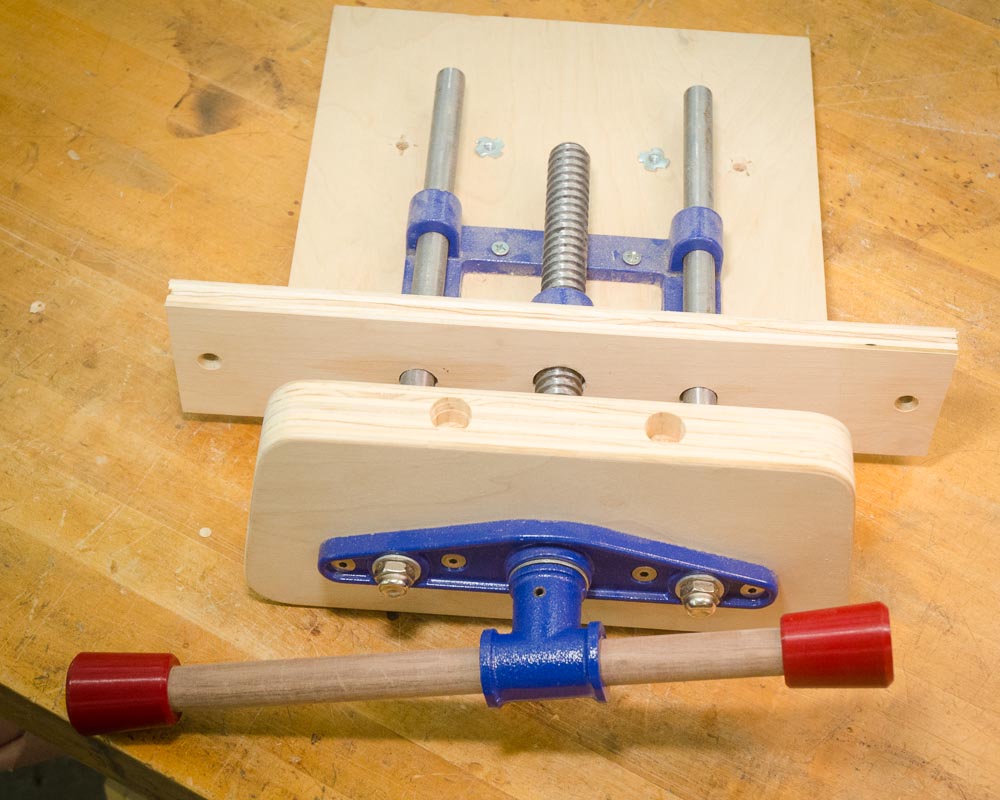
Building the Vise Module
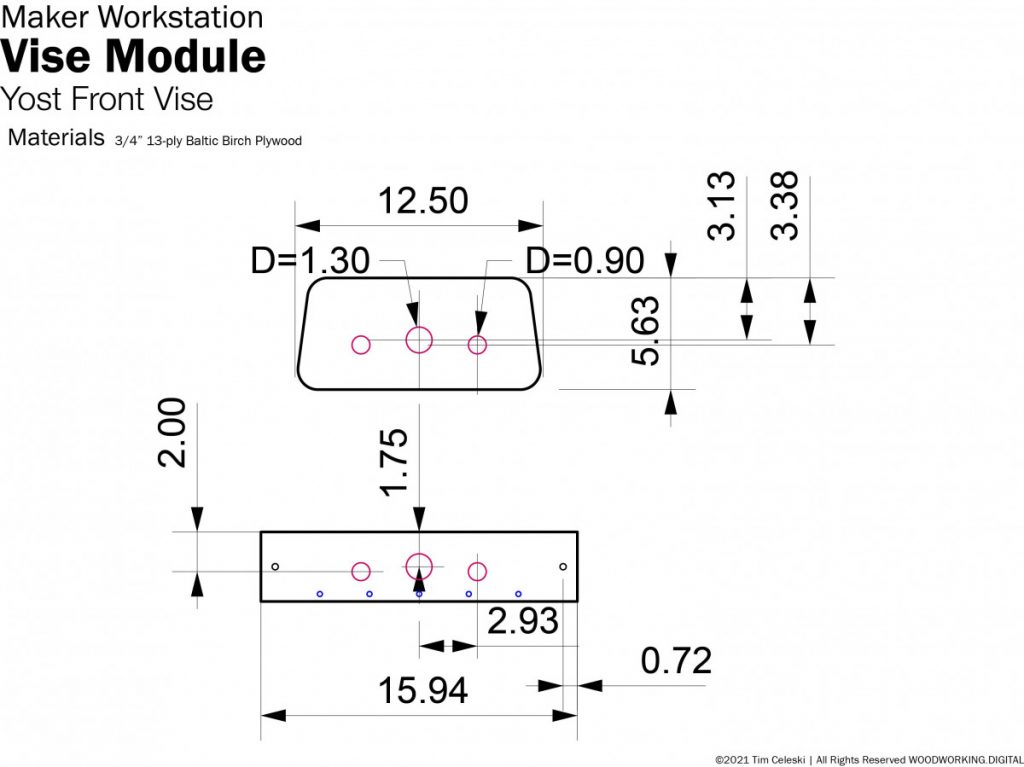
The vise module consists of a double-layer front vise chop, a blank side plate, and an 11” x 12” bottom plate to attach the inside vise hardware to. A single screw/twin-rail metal vise will require three large holes through the vise chop and side plate. Because there are a number of similar vises available, your mileage may vary. Refer to the mounting instruction that comes with the vise you choose. The drawings shown are for the Yost 9” vise. Other common single-screw front vises are similar. That said, I recommend making the through holes slightly larger than specified to prevent the vise from binding.
The vise module side plate is attached to the bottom plate the vise is mounted on with 5, long screws. The metal vise frame is mounted to the bottom plate with flat head screws and countersunk T-Nuts underneath. The front of the vise is mounted to the vise chop the same way. If you haven’t noticed, I use lots of T-Nuts in this project.
Once you’ve completed the vise assembly and mount it at one of the openings on the workstation, then you need to drill the hold-down holes on the vise module bottom plate. Look underneath the workstation bottom layer for the pair of holes underneath the vise module you mounted. These holes sit just outside the metal vise frame. Use a 5/16” drill bit to bore up through the module bottom plate. Remove the vise module and on the top of the bottom plate, where the vise is attached to, tap in 1/4”-20 T-Nuts. Now, when your vise module needs to be held down to the workstation, use 1/4”-20 star knobs screwed from underneath the bench.
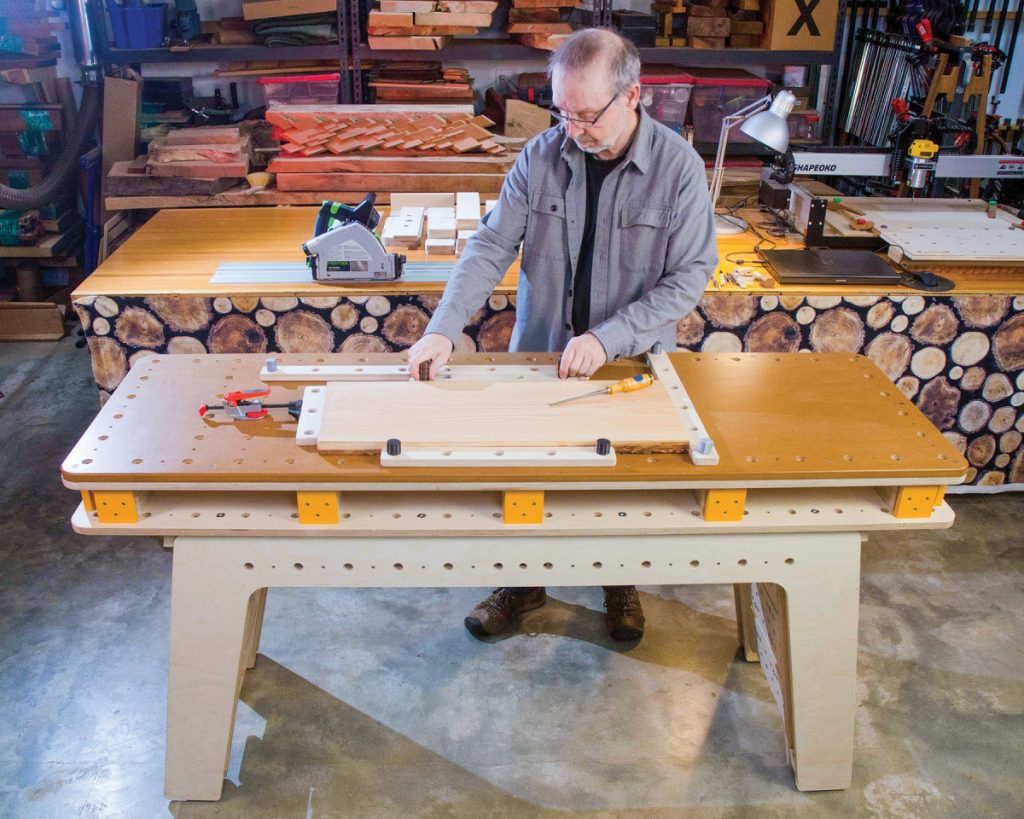
In use, this common style of front vises used on the majority of commercially available workbenches is prone to racking. That is, the vise tilts toward the open side as you tighten up the screw. The solution is to use a piece of scrap the same thickness as the piece you’re holding on the opposite side of the vise. A better long-term solution is to have a collection of various thicknesses of wood you select from to equal the thickness of the piece being held. In the near future, I’ll have a new solution for this problem I’ll share on my website: woodworking.digital.
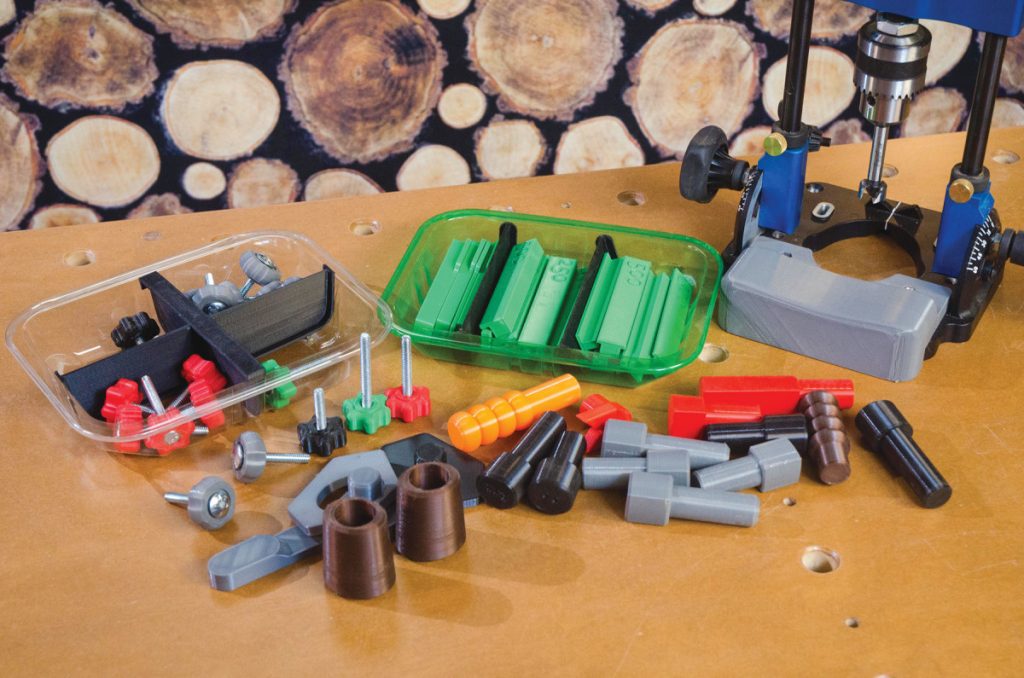
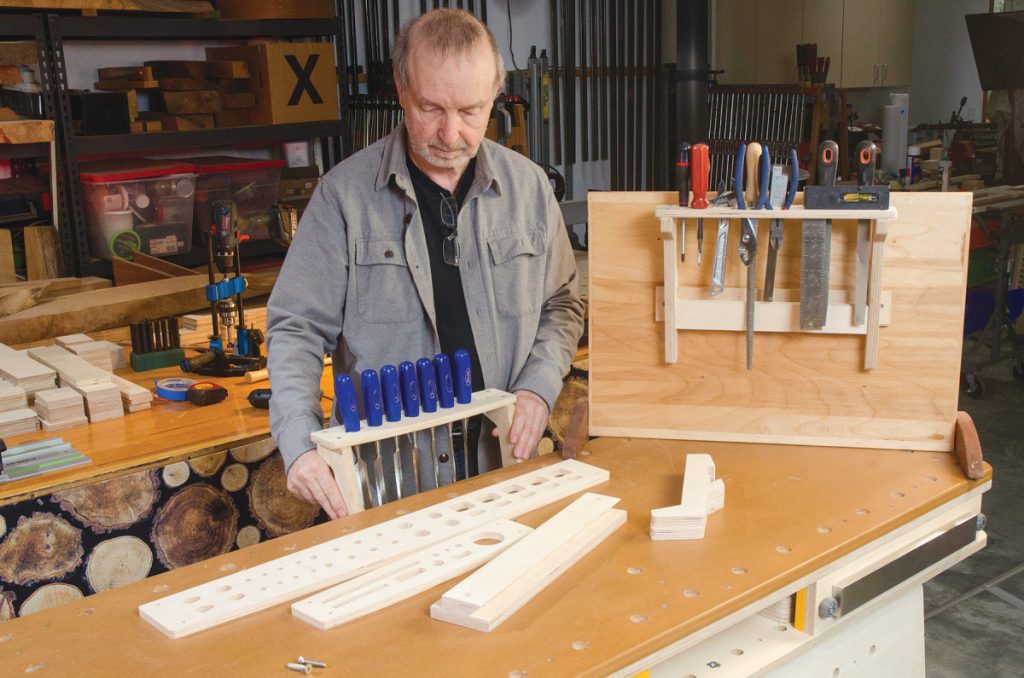
A full complement of custom 3D-printed bench dogs, threaded knobs, vise handle caps, and other accessories. I used Rockler’s portable drill guide to drill dog holes at a perfect 90° angle and designed a handrest that makes it easier to control while drilling.
Custom Dogs, Star Knobs, and Other Useful Things
Bench dogs are essential accessories of the Maker Workstation. I recommend having a basic set of at least eight dogs. Metal dogs will work or you could make dogs out of 3/4” dowels but short plastic bench dogs work best. Here are some inexpensive dogs that work well: option 1, option 2, option 3.

I developed a lot of new workbench dogs and dog accessories during the development of the workstation. The dogs are color-coded and indicate diameter and depth. Many are designed for various holding tasks, others, including the .0002″ steel pin dogs, are for accurate template registration during construction. If you have a 3D printer and want to make your own, I share my 3D models at thingiverse.com and prusaprinters.org. A few workstation sets will be available at woodworking.digital.

I couldn’t find high-precision dogs for aligning the workstation templates, so I made my own using a 3D printer.
During final workstation development, I found I needed bench dogs with various lengths, diameters, and functions that weren’t available. So, using 3D CAD software and 3D printers, I designed dozens of new bench dogs, star knobs, jig parts, and other workstation accessories. In my case, I work with Rhino3D for CAD design but most 3D CAD programs work fine for creating models that you can use for 3D printing. If you have a 3D printer and would like to print your own dogs, my model designs are shared at thingiverse.com and prusaprinters.org. As mentioned in the past I recommend all modern woodworkers consider getting a printer. Inexpensive, easy to learn, and too darn useful in the workshop.
Modules, plates, accessories, and the future
As a designer, I think of the Maker Workstation as a workbench system. As you consider your own needs and dream up your own workstation variations, modules or accessories be forewarned: the underlying grid system is key. Follow it and work precisely and everything will fit. The trick is to use a CNC or a CNC-machined template (not paper templates) to make the workstation, parts, and accessories. If you don’t, you’ll quickly discover the key problem working in high precision. You can’t cheat once you commit to it. You’re living in a .001″-.003″ world now. Fear not. You don’t have to be a digital woodworker to make the maker workstation. Traditional woodworking and hybrid woodworking are terrific. But, you do need to apply high precision to this project through the use of CNC templates.
Looking beyond the maker workstation, work surfaces designed for other creative needs or tasks will be added soon, including a Field Bench designed for woodworkers, not contractors. Check my website often at woodworking.digital and Popular Woodworking for the latest updates.
Metric
As expected, I’m getting a lot of requests for metric versions of the Maker Workstation. Festool compatible 96mm/20mm versions of the workstation and top plates and accessories will be coming this summer.
Finally, an apology for the unexpected delay in delivering the final Popular Woodworking Maker Workstation installments. Let’s just say that life got in the way when I was making plans. Funny how that happens.
Next: CNC techniques for the Maker Workstation.
Additional Resources
- Other articles about the Maker Workstation at Popular Woodworking.
- Free Maker Workstation Classic Base drawing in PDF format
- Free Maker Workstation Modern Base drawing in PDF format
- Maker Workstation 72″x 24″ Layer Guide
- Maker Workstation Vise Module Drawing
- Maker Workstation 48″x 24″, 48″x 48″, and other Layer Guides sizes will be available beginning 6/1/21
- PDF plywood cutting layouts for 72″x 24″ workstation
- Baltic Birch Maker Workstation CNC machined templates available for ordering online at woodworking.digital.
- Free DXF Template Files to make your own templates for using a drill guide for dog holes
- Free DXF Offset Template Files to make your own templates for using a router for dog holes
- Digital Woodworking on Instagram
- Digital Woodworking YouTube Channel
- Author’s website at woodworking.digital
- Personal Work on Instagram
Here are some supplies and tools we find essential in our everyday work around the shop. We may receive a commission from sales referred by our links; however, we have carefully selected these products for their usefulness and quality.