We may receive a commission when you use our affiliate links. However, this does not impact our recommendations.

They’re cheap! All you need is some PVC and plastic laminate.
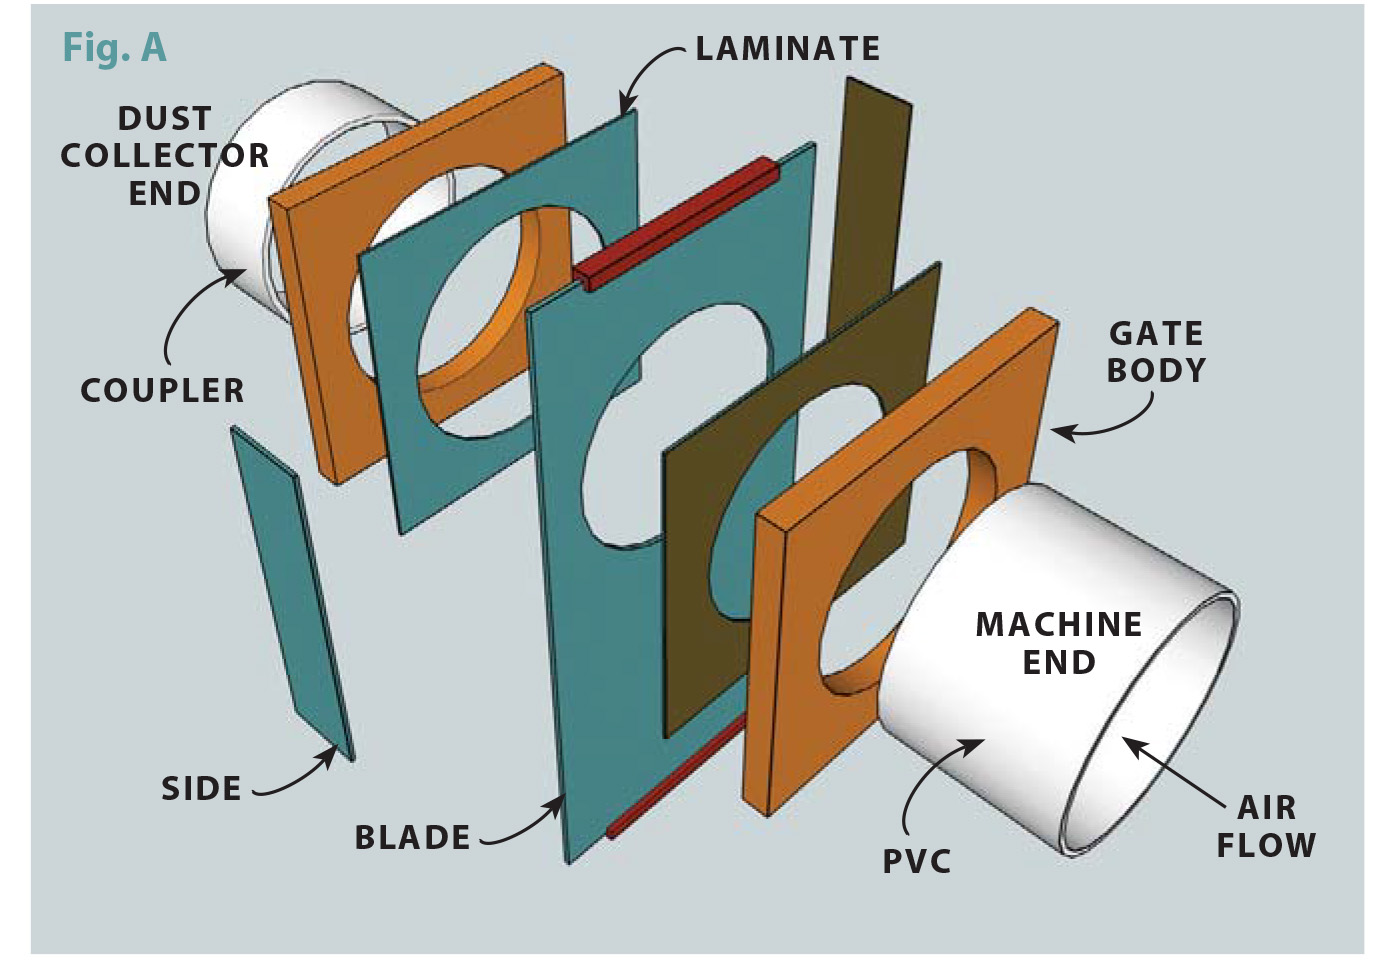
A central dust collection system is a big improvement to any shop, but the cost can really add up. With commercial gates going from $4 to over $50 each, building your own can help lower the bill. I make my own gates from a little bit of MDF, some PVC pipe or coupling, a few scraps of plastic laminate and plastic laminate adhesive. This design will work for 4″, 5″ or 6″ blast gates (the dimensions below are for 4″ gates).
Before you begin, note the diameter of the hoses or pipes that you’re planning to hook up to the gate. With this design, you can make the inlets and outlets of each gate any diameter you wish, to fit your system. On most commercial gates, the inlet and outlet sides are the same diameter.
In my shop, I run 4″ or 6″ flex hose between each machine and the gate. That means that the PVC inlet side of the gate must fit inside a hose. I’ve found that flex hose with plastic reinforcing works best. (If the fit is too tight, try warming the end of the hose with a heat gun to stretch it.) The outlet side of my blast gates is a larger diameter. I use PVC pipe between the blast gate and the dust collector, so I made the outlet side from a short piece of PVC coupling, which fits around the PVC pipe.
 Make the gate bodies
 Make the gate bodies
1. Cut two 6″ x 6″ squares of 1/2″ or 3/4″ MDF for the gate body halves. You can also use plywood that’s flat and smooth or melamine-covered particle board.
2. Drill an access hole and use a jigsaw to cut holes in the center of each gate body to fit your inlet and outlet (Fig. A). My inlet is a piece of 4″ PVC pipe, which requires a 4-3/16″ dia. hole. My outlet is a piece of 4″ PVC coupling, which requires a 4-1/2″ dia. hole. Use a spindle sander or file to achieve a good fit.
3. Apply laminate adhesive to the backs of two 6-1/4″ x 6-1/4″ pieces of laminate and one face of each gate body. When the adhesive is dry to the touch, apply the laminate to the gate bodies. Trim the edges with a router and flush-trim bit, but don’t open the hole yet.
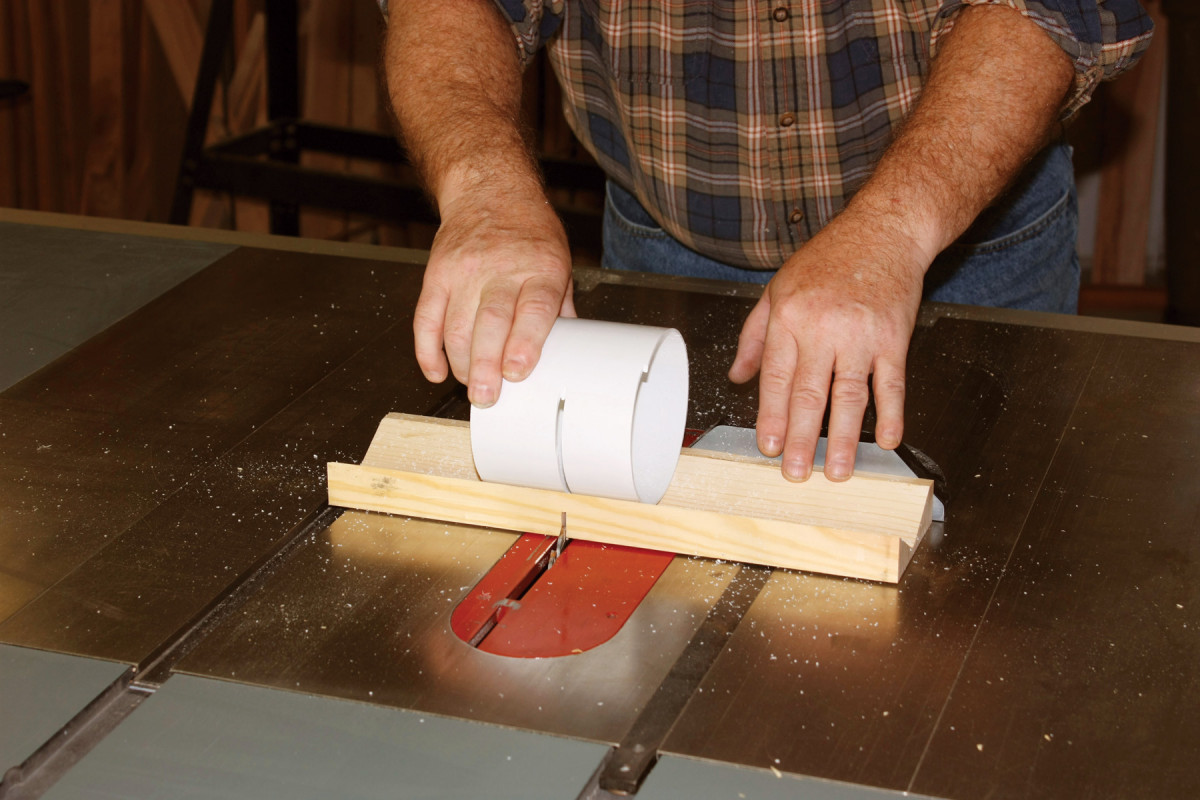
1. Cut short lengths of PVC using the tablesaw. Caution: To prevent kickback, use a V-shaped cradle and raise the blade just enough to cut through the pipe’s wall.
4. Cut the inlet and outlet pieces to length (Photo 1). Make a large V-shaped cradle to hold the pieces of PVC, and attach the cradle to your tablesaw’s miter gauge. Raise the saw’s blade so it barely cuts through the PVC’s wall. Push the cradle into the blade and rotate the PVC to cut it apart.
5. Roughen the PVC, then use epoxy or polyurethane glue to secure each piece in the cutout in each gate body. Make sure the pipe pieces bottom out against the laminate.
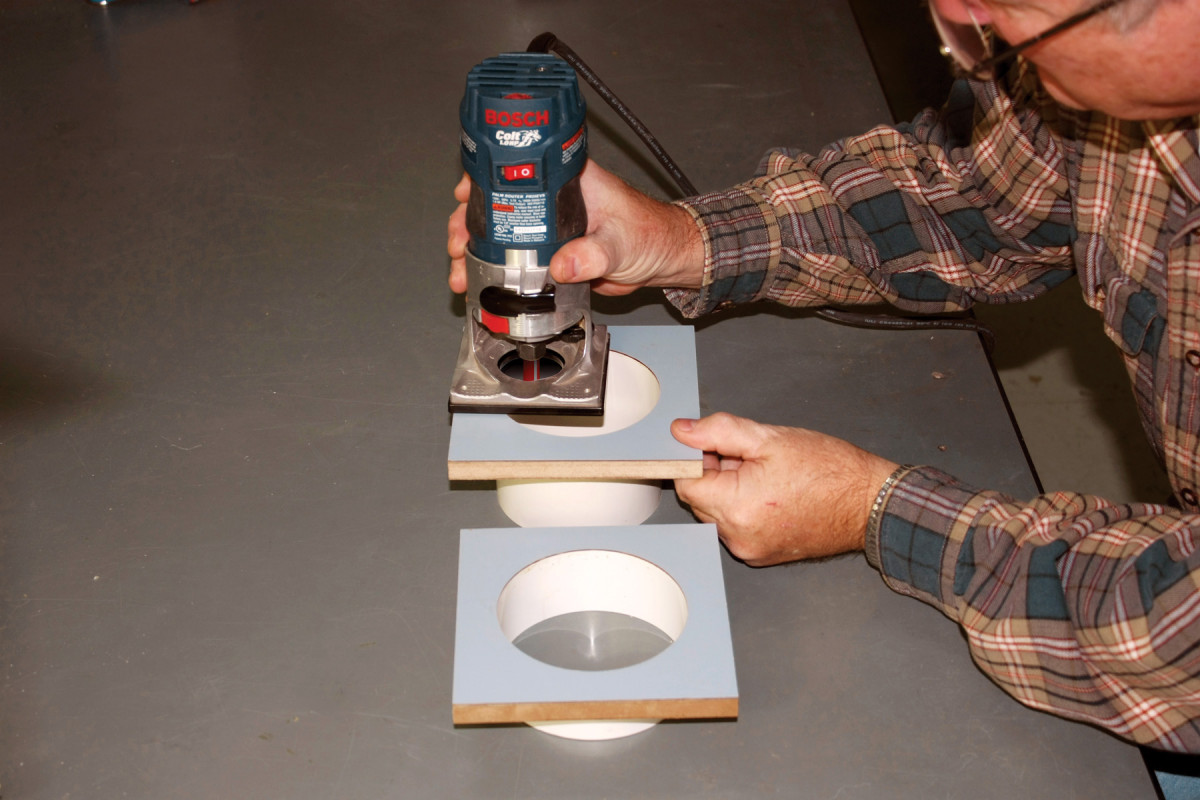
2. Glue the PVC into two pieces of MDF covered with plastic laminate. This creates each half of the gate body. Use a flush-trim bit to finish off the holes in the laminate.
6. When the glue has hardened, drill a hole through the laminate. Use a drill bit that’s about 1/4″ larger in diameter than your flush-trim router bit. Use your router to enlarge the hole (Photo 2).
Make the blade and sides
7. Make the gate’s blade by joining two 7″ x 14″ pieces of laminate back to back with laminate adhesive. Cut this piece to 5-15/16″ x 13″.
8. Use double-faced tape to temporarily attach the blade to the laminated face of the inlet gate body. Position the end of the blade 1″ past the 6″ square (the 1″ margin leaves room for a handle). Drill a hole in the blade and use a flush-trim bit to enlarge the hole, as you did in Step 6.
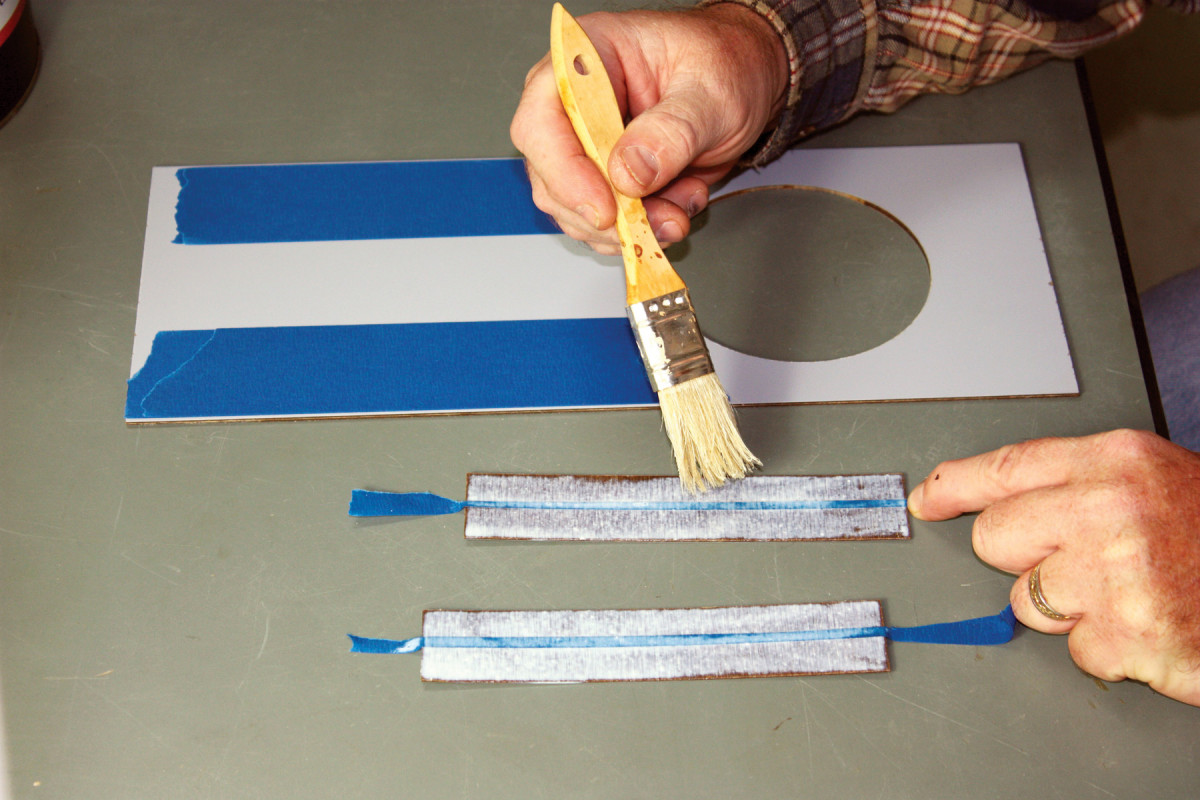
9. Make the gate sides from two 1-1/2″ x 6-1/2″ pieces of laminate. Apply a 1/8″ wide strip of tape to the middle of the back of each piece. The tape prevents adhesive from sticking to this area.
10. Soften the sharp edges of all laminate pieces with a file or sandpaper.
Assembly
3. Make the gate’s blade and sides from plastic laminate. Add tape to the blade to provide clearance during assembly. Assemble the gate with glue.
11. To create clearance for the blade when you assemble the gate, put two layers of painter’s tape near the edges of one face of the blade (Photo 3). Rub paste wax on the faces of the gate halves. Apply strips of tape down the middle of the side pieces, to prevent the pieces from adhering to the blade.
12. Carefully apply laminate adhesive to the backs of the gate sides and two edges of each gate body. Avoid getting adhesive on the faces of the gate halves. Remove the strips of tape from the gate sides before the adhesive sets up.
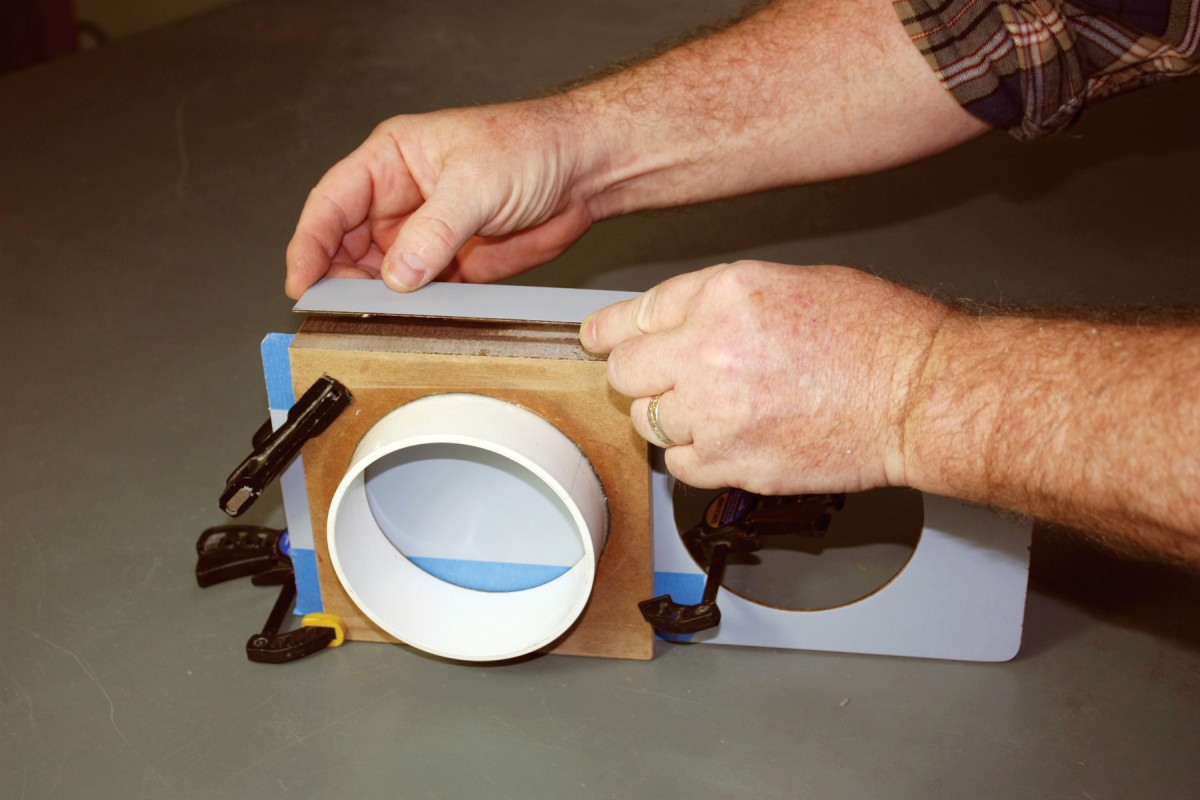
4. Clamp the gate body together and add the sides. Once the sides are secure, remove the clamps and blade. Add a handle to the blade, and you’re ready to go!
13. Once the laminate is dry to the touch, position the blade between the gate halves. Lightly clamp everything together and apply the side strips (Photo 4). Be careful: You only get one chance to position the sides. Use a roller or rubber mallet to ensure the sides make a good bond with the gate halves. Trim the sides flush with a router.
14. Remove the blade from the gate and peel off the tape. Clean and wax the blade. Screw handles to each end of the blade.
Here are some supplies and tools we find essential in our everyday work around the shop. We may receive a commission from sales referred by our links; however, we have carefully selected these products for their usefulness and quality.