


We may receive a commission when you use our affiliate links. However, this does not impact our recommendations.
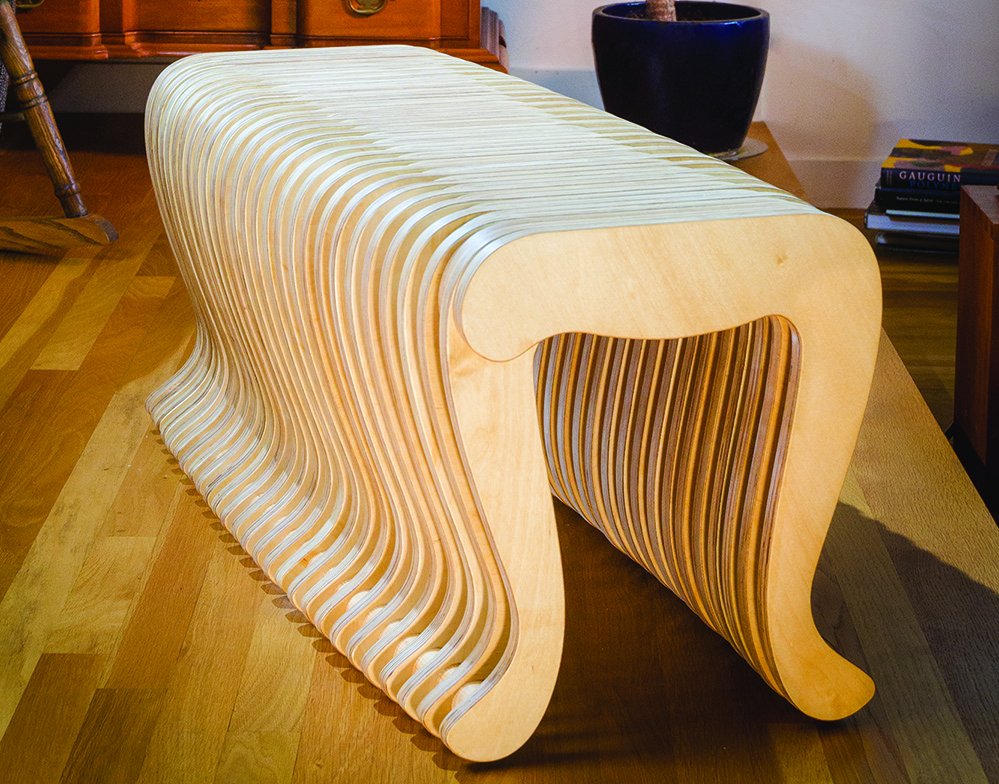
Spine and rib construction is key to this design.
Project #1924 • Skill Level: Intermediate • Time: 4 Days • Cost: $200
Thanks to advanced design tools, an entirely new category of modern architectural details, furniture design and art has emerged. Named after the specialty software tools used to create it, it’s called parametric design.
Parametric furniture consists of evenly spaced rows or stacks of shapes that create the illusion of large three-dimensional forms. Usually, these exacting shapes are cut on a CNC and assembled in several ways. Stacks of parts are glued together to form large laminations, evenly spaced shapes are held together with complex internal structures or drawn together with threaded rod and spacers.
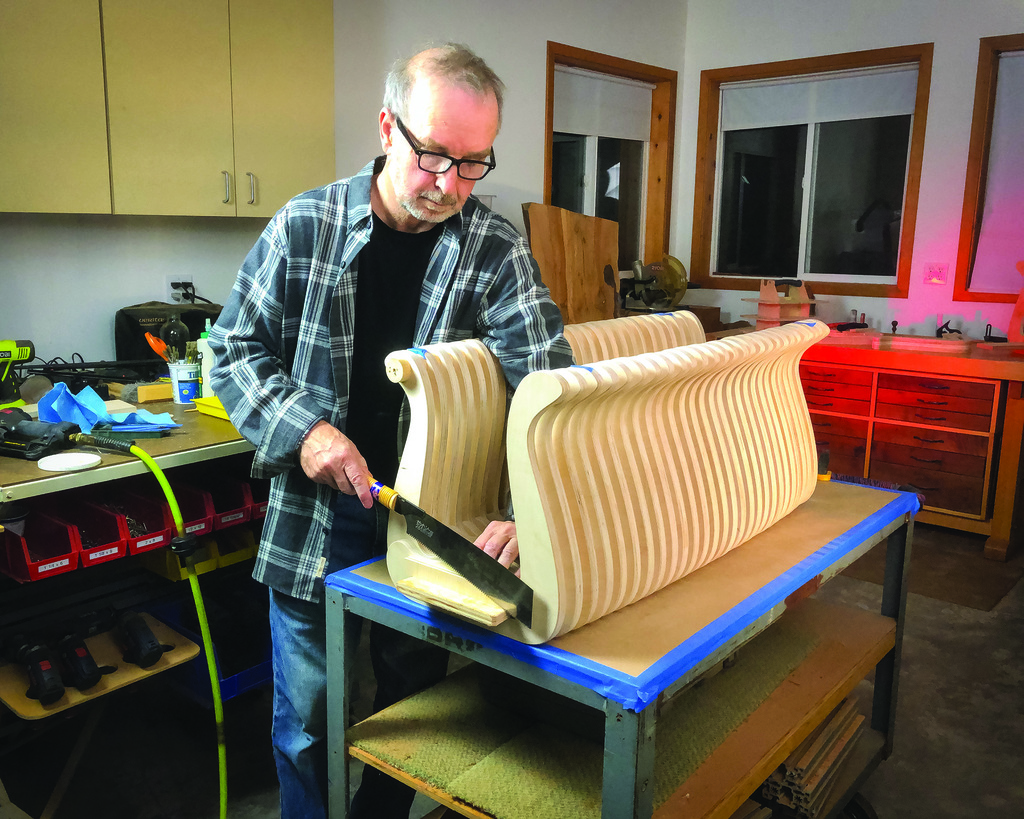
As a furniture maker and artist, I’ve been exploring parametric sculpture and have developed some new techniques that woodworkers can use to quickly build and create their own parametric furniture with or without a CNC. I call this technique spine and rib construction.
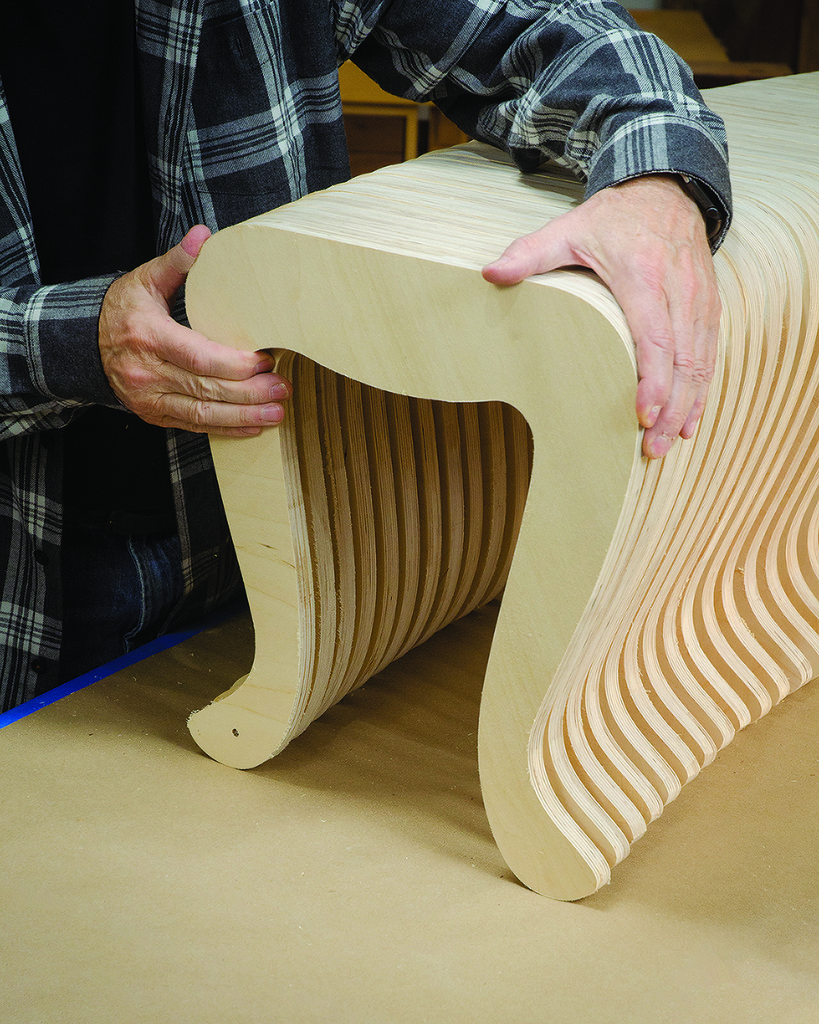
As the name implies, the main components are a spine and a lot of ribs. The ribs slide into position so that they form around whatever shape the spine happens to be. Spines can be straight, bowed or curved in many ways. This feature allows the builder to experiment with the overall look by tweaking the spine shape. And, because the plywood parts have large, glued, connecting surfaces there is no traditional joinery. The bench in this article is based on the shape of classic Cabriolet furniture legs.
Rib Design
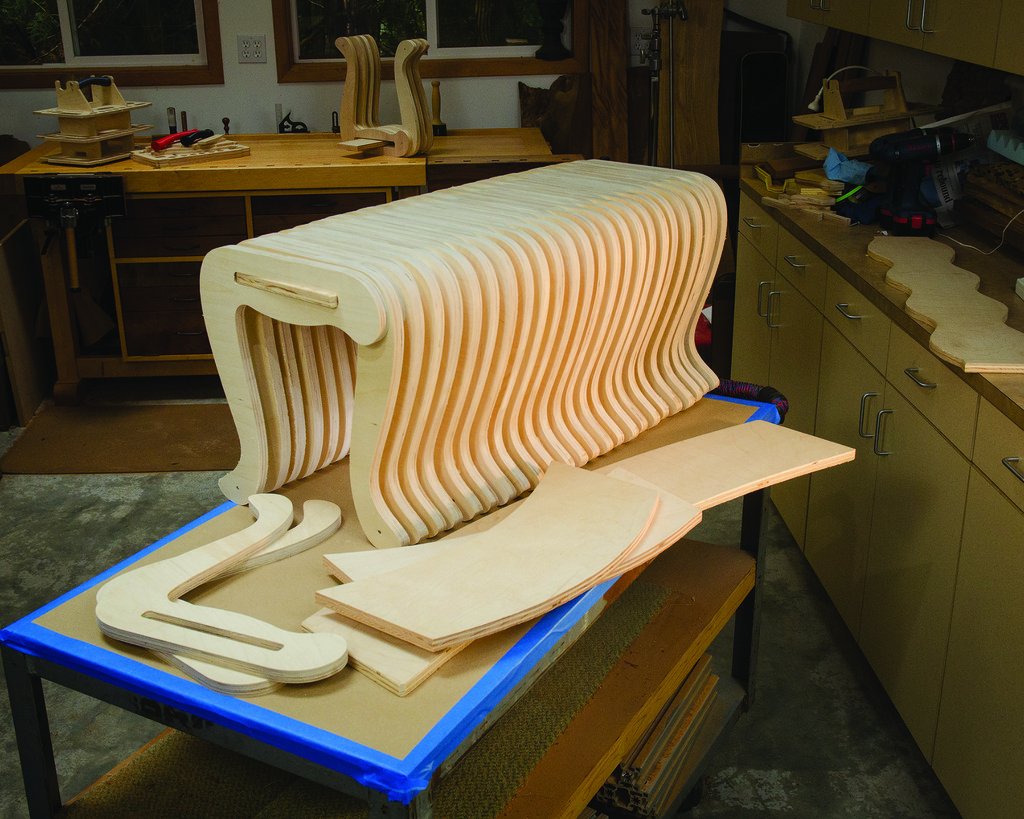
The bench consists of 48 ribs plus a spine for an overall length of about 36″ was made from two sheets of 3/4″ Baltic Birch plywood. A shorter version, with say 24 ribs makes a terrific side table. Certainly, make a longer version or change the rib shape as you prefer, but keep in mind the weight and the details used to produce 24 Cabriolet leg-shaped ribs per sheet.
During the project development, I explored various rib shapes and built a number of scaled and full-size models. Besides shape and efficiency, I’ve discovered that it’s important to consider the shape or symmetry of the top corners and the size and position of the slot in the middle. If you create a new rib design, these factors will affect the overall look.
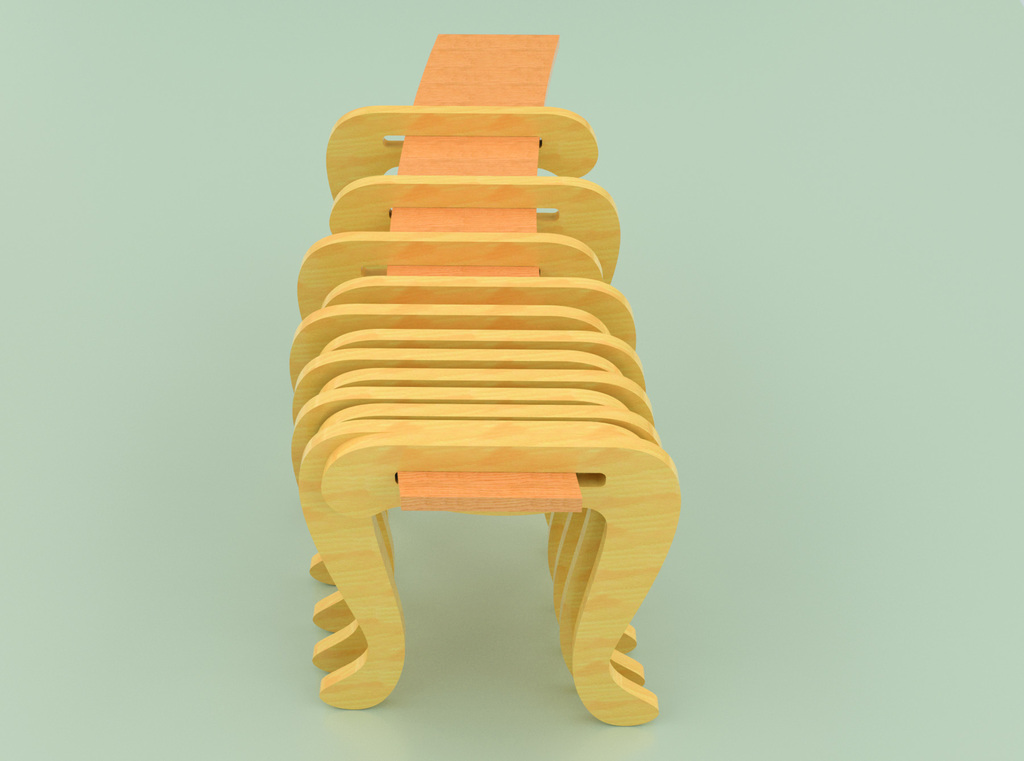
The ribs stack around the spine. As you pull the ribs outward against the spine, the bench follows the spine’s shape.
Spine Design
Because of the slot, the ribs are pushed against the spine to collectively form the overall bench shape. This makes the spine design important. To explore the effect, I created spines with sweeping curves, S-curves, bulges, short curves, bumps and the design for this article that bows out the middle for a neo-classic look that fits well with Cabriolet legs.


The overall shape of the bench is determined by the shape of the spine.
Spine designs carry both limitations and possibilities. If the spine curves are too short, the ribs protrude oddly rather then progressively moving in and out. I suggest gradual changes over at least 18″ or so. Bonus: if the sides of the spine are parallel, either curved or straight, you can have a curved seating area rather than a flat one.
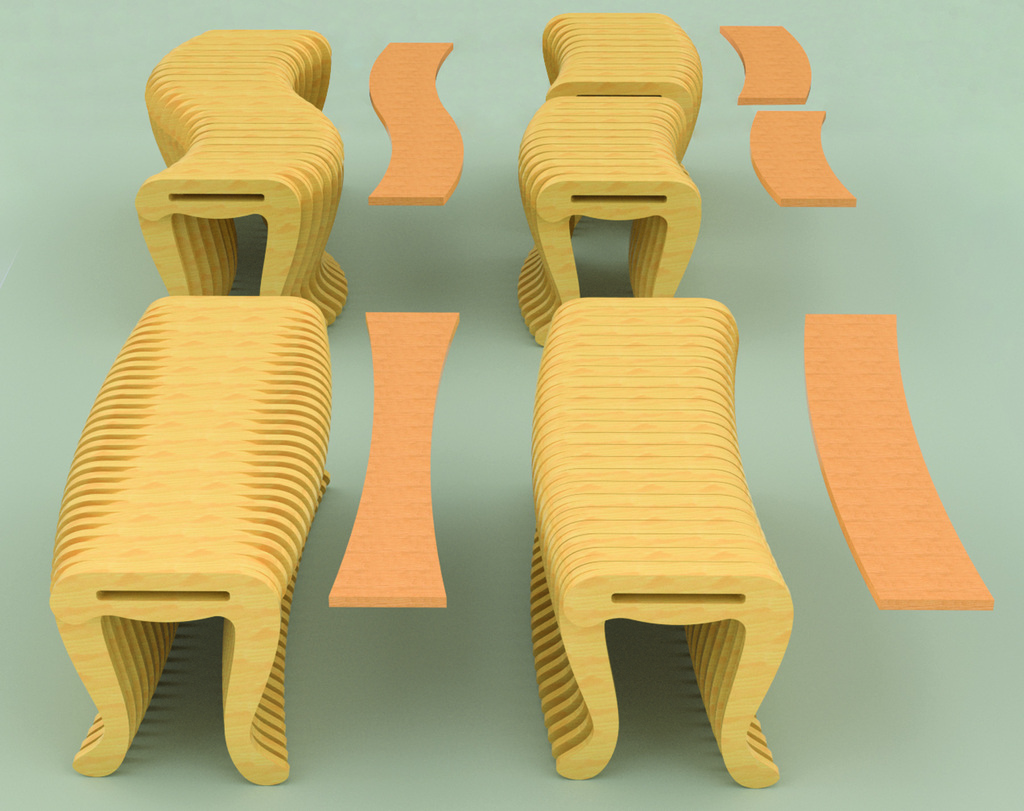
Using the same ribs with different spine shapes, you can create several different benches or side table designs.
Construction Technique
There are several ways to build this project. You can make your parts on a CNC, use a small CNC to make the sample and pattern, create a full-size drawing from this article, or use the PDF drawings available online to print out paper templates to make your patterns from.
If you have a CNC large enough to machine from large pieces of plywood, it’s certainly the fastest way to make a lot of parts quickly. If you don’t have one, I’ve come up with a couple of new techniques for imitating the accuracy and repeatability of a CNC using a router.
Start with Your Patterns
For this project, I made the 1/2″ plywood patterns with the Shaper Origin, a simple to use, hand-held CNC. Beginning with the original Rhino3D CAD drawing of the rib and offset pattern, I exported SVG files that can be read by the Origin. After laying out ShaperTools’ marker tape, I cut the pattern and sample out. Yes, you can make all your parts using the Origin but the process is slower.
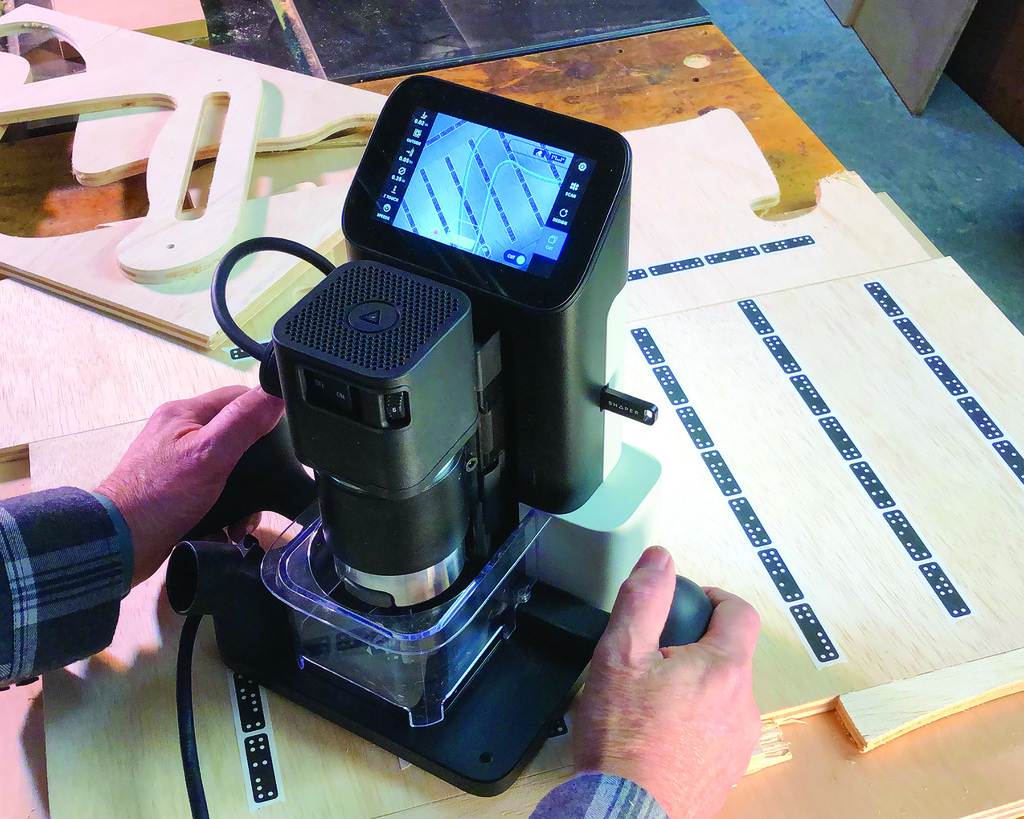
The Shaper Origin is a handheld CNC router. It registers itself using marker tape and auto-adjusts to the programmed cut.
The full-size sample is used to lay out the parts you’ll cut from 3/4″ plywood. The second is a special offset pattern. It’s 1/8″ smaller all around to allow for shaping parts with a router, 3/8″ router bit and 5/8″ bushing. Once you’ve drilled the two 1/8″ holes near the ends of the ribs as shown on the drawing and completed the two patterns, use a marker to identify the smaller, offset shaping pattern so you don’t confuse it with the sample part.
Materials
Most parametric designs feature visible and touchable plywood edges. Being furniture, this is not the kind of project for the lesser quality plywood found at typical home centers with paper-thin top layers, few layers and a core full of voids. Just like carefully selecting hardwood for fine furniture, your material choice is important. Baltic birch plywood is the default material for parametric furniture with its many solid core layers and 0.005″ thick top layers. Various grades are available all the way up to perfect and expensive Eurocore plywood. For this project, I used standard Baltic birch plywood.
Lay Out the Parts
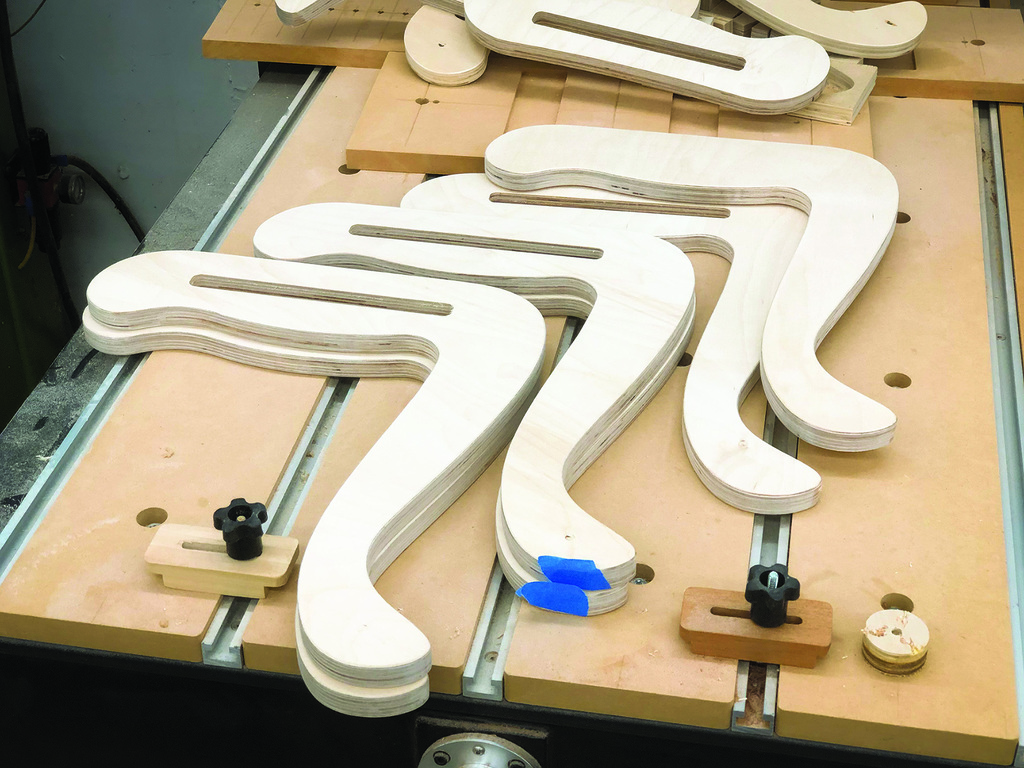
Handling heavy, 4′ x 8′ sheets of plywood is a challenge, so unless you’re using a large CNC, consider cutting sheets into thirds. (I’ve included a layout drawing for efficiently yielding eight parts out of 32″ x 48″ pieces.) Next, position your ribs on the plywood. Use the full-size sample rib for layout, not the smaller offset shaping pattern. Start at the lower left-hand corner of the plywood and trace around the pattern. Following the layout, continue tracing using a small 1/2″ piece of wood or short dowel for the gaps between rib locations.
 Cutting Blank Parts
When rough-cutting the blanks leave an extra 1/8″ or so outside the line. Use a bandsaw if you wish but I’ve found that a jigsaw also works well for this job as it gets into that tight inside corner and you aren’t wrestling a sheet of plywood.
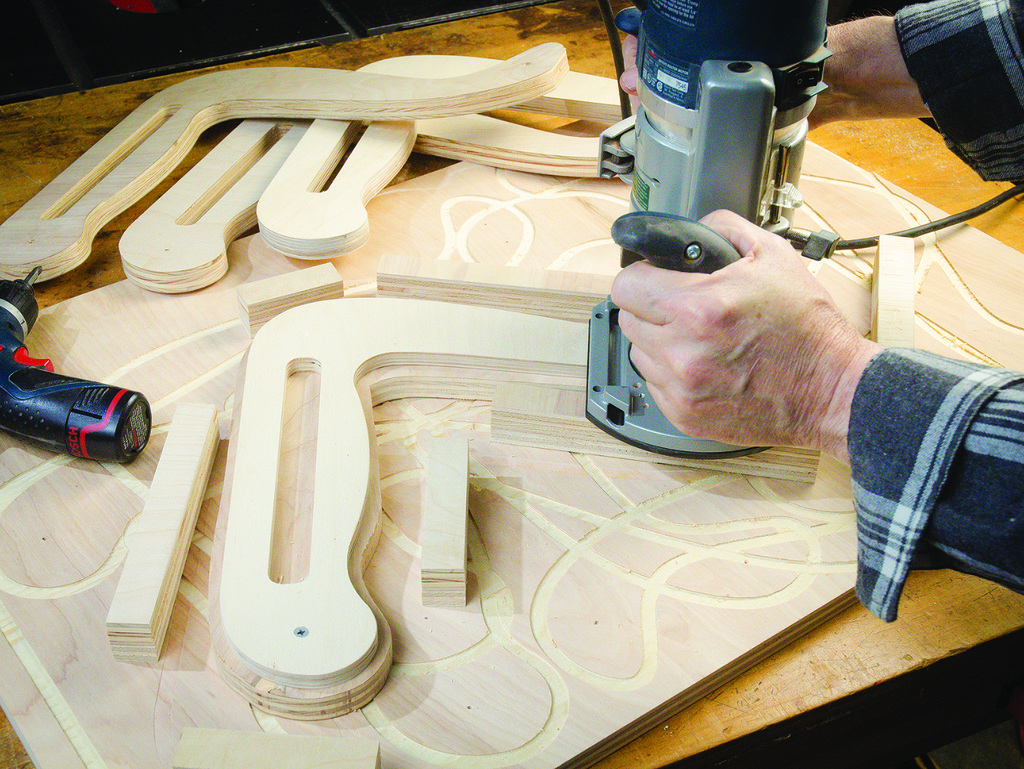
Think Like a CNC
On most projects that require shaping, I turn to a shaper or a router table and my adjustable shaping jig for holding parts. But, the parts in this project are small, narrow and shaped on all sides which makes holding the pattern and blank safely particularly challenging. It’s time for a little CNC thinking
When cutting plywood parts on a CNC, operators often use what’s referred to as a spoil or wasteboard. Typically, it’s a piece of MDF that sits underneath the plywood to be cut. Its purpose in life is sacrificial. A spoil board allows the cutter to cut completely through the plywood into its surface rather than damage the CNC bed.

Spoil boards are an essential tool for machining plywood with a CNC. If you use one with your handheld router, you can do your shaping upside down.
For this project, we’re going to do our shaping in a different way. Upside down, using a router and a spoil board. With 48 parts or more to cut, the spoil board will get a lot of use. For your sacrifice, I suggest a piece or 3/4″ MDF that’s at least 2′ x 3′ to 4′ in size. Plywood works, too, but the layers chip off easily. Before you begin, secure the corners of the spoil board onto your workbench with a couple of clamps.
No CNC? No Problem!
Start by making the shaping pattern and sample from full-size paper drawings spray glued onto 1/2″ plywood, rough cut with a jigsaw or a bandsaw. For the large slot in the middle, drill 3/8″ holes in the corners and use a jigsaw to remove the rest of the slot area. Precision matters in this project. Spend time making your patterns and slots exactly right using rasps and files to smooth, right to the line in the drawings.
 The full-size sample is used to lay out the parts you’ll cut from 3/4″ plywood. The second is a special offset pattern. It’s 1/8″ smaller all around to allow for shaping parts with a router, 3/8″ router bit and 5/8″ bushing. Once you’ve drilled the two 1/8″ holes near the ends of the ribs as shown on the drawing and completed the two patterns, use a marker to identify the smaller, offset shaping pattern so you don’t confuse it with the sample part.
Cut Special Parts First
With a few exceptions, all the ribs in the bench are the same. The standard ribs have two holes near the ends for alignment and holding during shaping that ultimately will be hidden. The exceptions are the visible outside ribs and second ribs where we don’t want to see holes. Cut and shape two of each of these parts first. Rather than screws for holding, use two-sided carpet tape to secure the blank part to the spoil board and the smaller offset pattern to the blank.
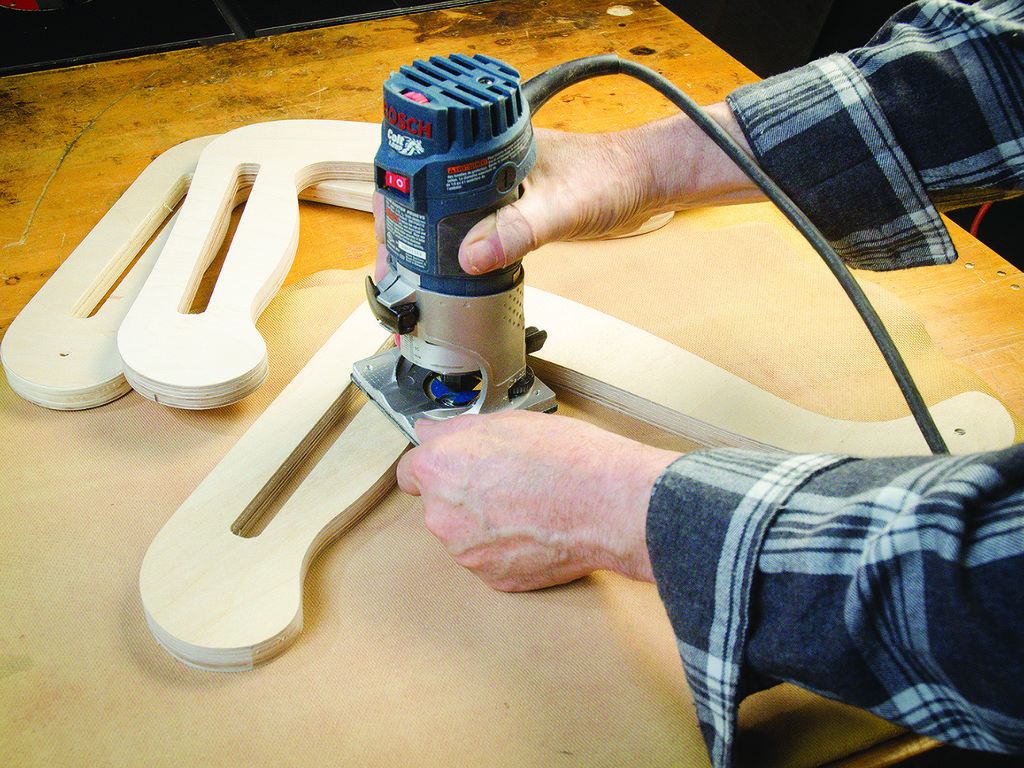
Use a plunge router with a 3/8″ spiral upcut or compression bit and a low profile 5/8″ pattern bushing. Because the parts are small and narrow, it’s all too easy to tip a heavy router slightly as you go and spoil the visible edges of your plywood parts. To help stabilize your router, I suggest gluing up several small support blocks out of scrap the height of the combined 3/4″ plus 1/2″ pattern materials and set them near your cutting path.

A plunge router, a 3/8″ bit and a 5/8″ pattern bushing are used to make the bench ribs.

Start with the special parts first. Use double-sided tape to hold the blank to the spoil board and the pattern to the blank.

With your pattern, rough-cut parts and routing station all set, it’s time to mill your pieces.
Shaping the Ribs
For a clean plywood cut, set your router’s final depth to slightly penetrate the spoil board. Once your part, pattern, router, and support blocks are ready to go, I suggest you start by cutting down a 1/8″ down at a time, working your way around the rib shape, counterclockwise. Step down in increments until you’ve cut all the way through and just into the spoil board. For the two special outside ribs, rather than cut a through slot, cut the slot just 5/8″ deep. For the second ribs cut the slot all the way through. Repeat until you have two of each of these special ribs.
The big production run is easier. We’re going to screw the parts and pattern together right onto the spoil board. Start by placing your blank part on the spoil board and the center of the pattern on the blank. Holding the two pieces together, drill 1/8″ holes through the pattern holes, through the blank part and deep enough to just tap into the spoil board. Using a 15/8″ deck screws, screw the pattern and 3/4″ blank stack onto the spoil board. With your plunge router and support blocks in place, follow the earlier shaping process for the special ribs. Each time you complete a rib, move your setup to a new location around the spoil board so you’re not using the same holes. After a couple of dozen parts, the spoil board will be pretty beat up. Just flip it over and use the other side.
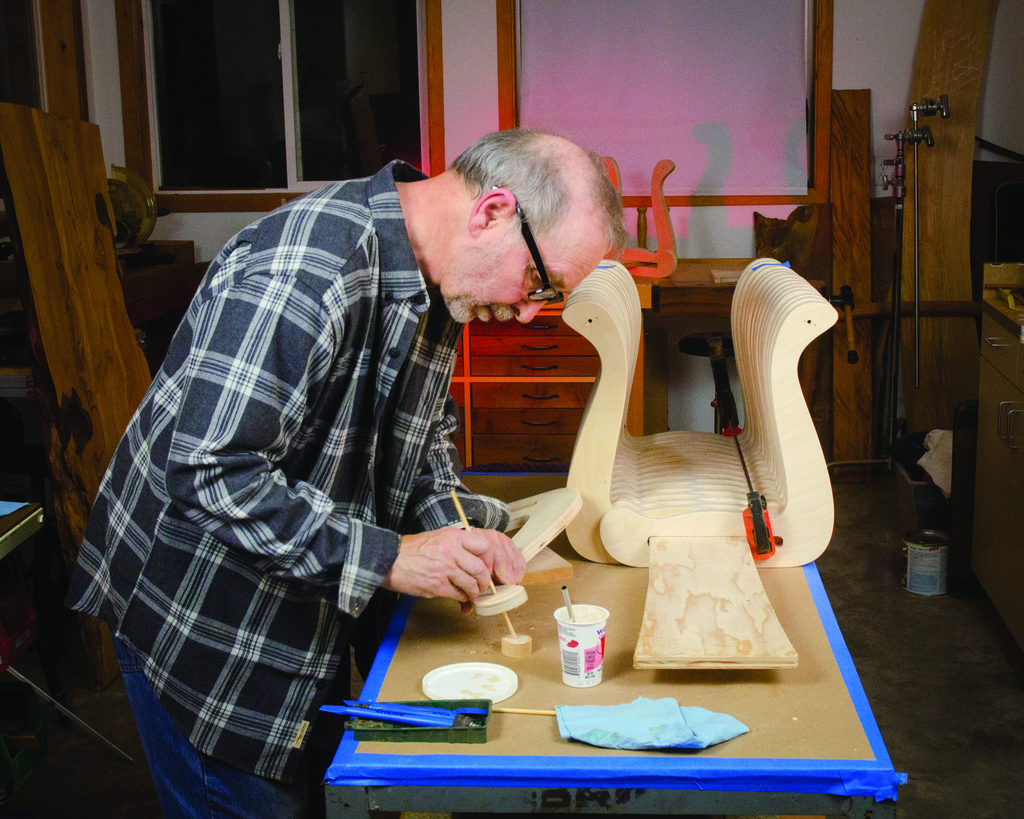
With the ribs cut out, I care-fully sand to 220 grit with random orbit and pad sanders.
Then add a small chamfer with a trim route, before softening the edges with 320 grit by hand.
Set aside the end and second-from-end ribs and the ribs modified to accept furniture glides.
Make the Spine
Once your impressive stack of parts is ready, it’s time to make the spine that defines the shape of your bench. I use the bowed design, but whatever shape you use, make the maximum width of the spine at least 1/4″ narrower than the slot. For length, measure your stack of all your parts and add an extra couple of inches to make assembly easier. As suggested, keep the spine shape simple and curves gradual and consistent. With no reason to use fancy plywood, my spines are made from scraps from other projects.
Test fit your spine to see if it moves easily into the slot. I sized the slot drawings to just match the default thickness of 3/4″ plywood so chances are it will be too snug. To adjust the fit, use a belt sander to gently and evenly sand down one side of the plywood spine a little at a time until it fits smoothly into the rib slots. To make dry fitting and glue up easier, soften the edges your spine with a 1/8″ round-over bit.
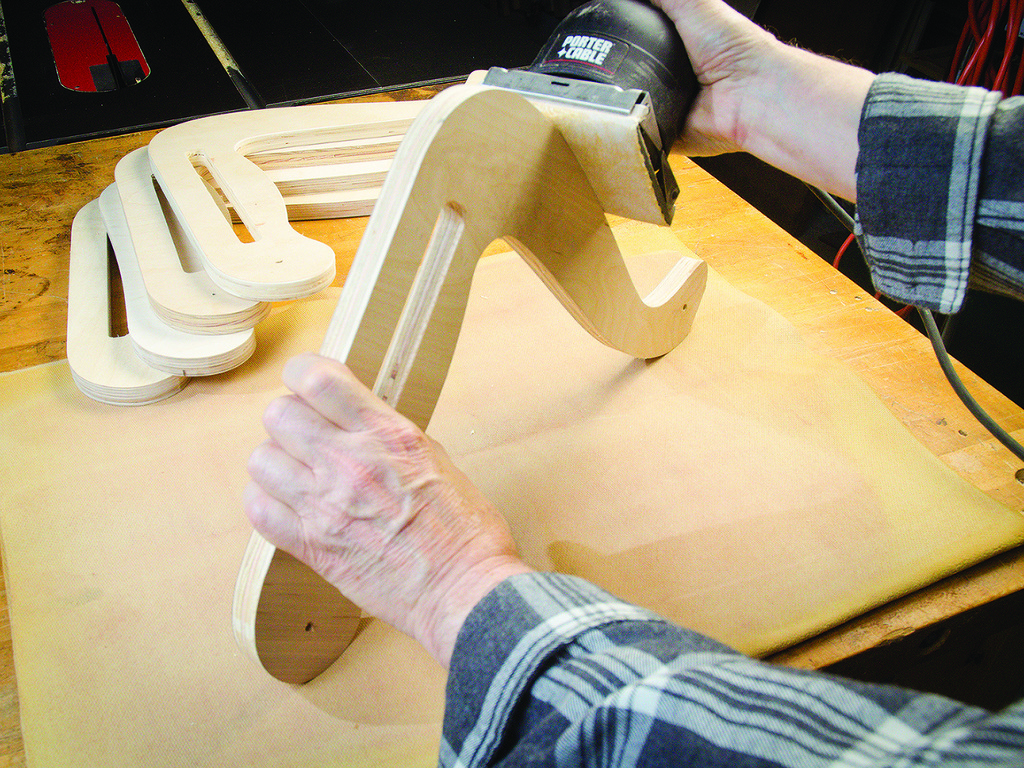
Time for a Dry Fit
Dry fitting is one of the most important steps in this project—it also happens to be the most fun. Putting it all together allows you to see and adjust what the overall bench shape will be. If you don’t like the shape or width of the bench you’ve created, you can quickly create a new spine and try out a new one.
Dry fitting is one of the best parts of the projects. You get to try out different shapes of the spine and change the look of your bench.
To dry assemble, work upside down with the heavy seating part of the bench on the bottom. Alternate ribs back and forth until your bench is assembled. For now, you can leave off the special end and second ribs. Carefully rotate the now heavy bench right side up. Now, pull each leg outward until it the inside bumps into the spine to define the bench shape.
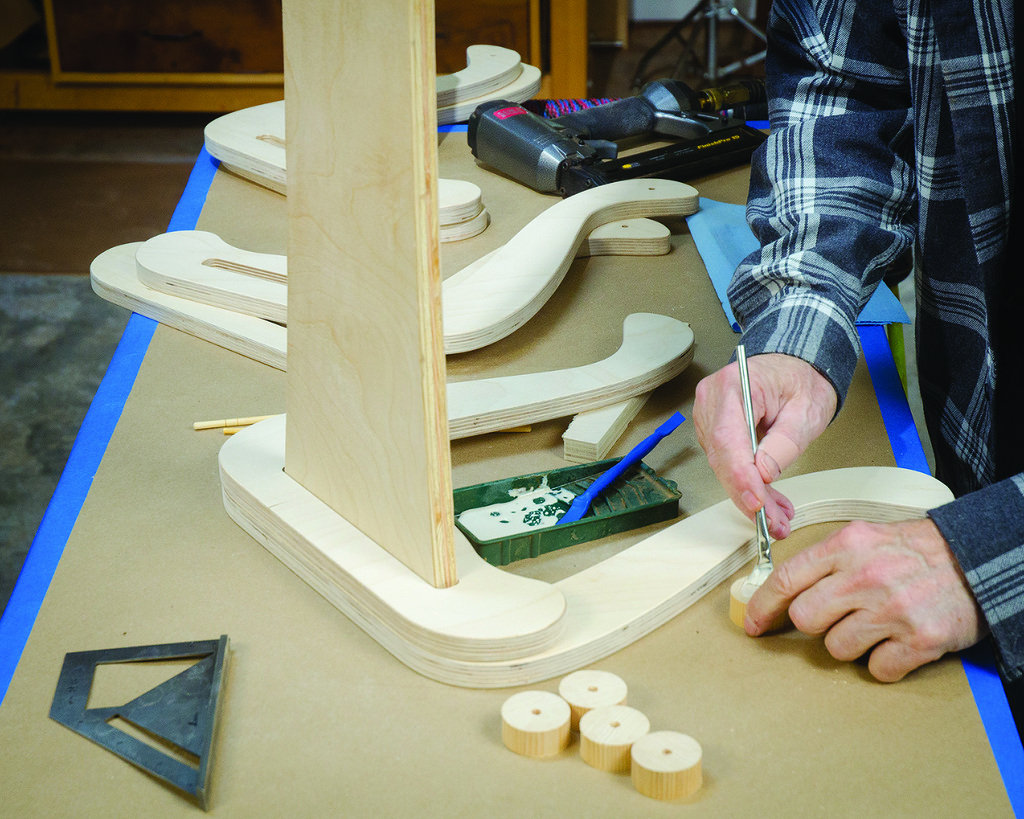
Leg Spacers Stiffen Bench
Once you have a shape you like, carefully clamp the set together. You’ll notice that the heavy top is rigid but the legs wiggle a bit at the bottom. What’s needed are spacers between each leg. There are a variety of ways to do this, but for the cabriolet shape of the legs, I chose to compliment the rounded shape with round spacers. I made mine from commonly available 11/2″ pine closet rod. After sanding the rod stock smooth, use a bandsaw and fence to make test cuts. Measure spacers with a digital caliper until you matched the thickness of the plywood ribs. Once you produced enough spacers for the bench (it never hurts to make a few extras), drill a 1/8″ hole through the center of discs you’re created. These holes will help you align the legs and spacers during the final assembly.

I used a closet rod for spacers. After sanding the rod smooth, I make test cuts to match the thickness of my plywood, then batch out a bunch with 1/8″ alignment holes.


To avoid confusion with the dozens of parts you’ll deal with during assembly, set aside the two sets of special outside and second rib parts. To that collection, we’re going to modify four of the main ribs to better accommodate furniture glides. Set up a table saw and fence to make a small flat spot by trimming off just 1/16″ off the feet of the four ribs. Slide the flat part of the rib along the fence. Set these four ribs aside and add four more regular rigs to your collection of special ribs. You should have a total of two end ribs with no through slots or holes, two second ribs with no holes, four regular ribs, and four ribs flattened for attaching furniture glides.
Final Preparation
With a random orbital sander, sand the ribs with 220 grit sandpaper. Remember, the top layer is only 0.005″ thick so use a light touch. Smoothing the edges, which are seen and touched, is more challenging. Being a furniture maker I have both edge and spindle sanders to help in the task but if you have neither, a carefully controlled pad sander or using a block sander making use of the curved and flat side, should help. Once sanding is done, I like to put a 1/16″ chamfer on all edges and then soften slightly by hand sanding with 320 grit.
Assembly in Two Stages
It’s very difficult to clean up excessive glue on this project, so apply carefully. During the dry fit, note the areas that touch each other are near the end of the ribs, not the shoulder end of the leg. As the spine shape is applied and the parts move into position, the glue area varies. It’s the area near the end and above and below the slot that always touches the part next to it where you want to apply your glue. To keep it from seeping out, I only apply glue to the area around the spine (see image 20). Also, I keep glue about 3/8″ from all outside edges. Unlike regular furniture joinery, there’s a massive amount of glue surface area to hold the bench together.
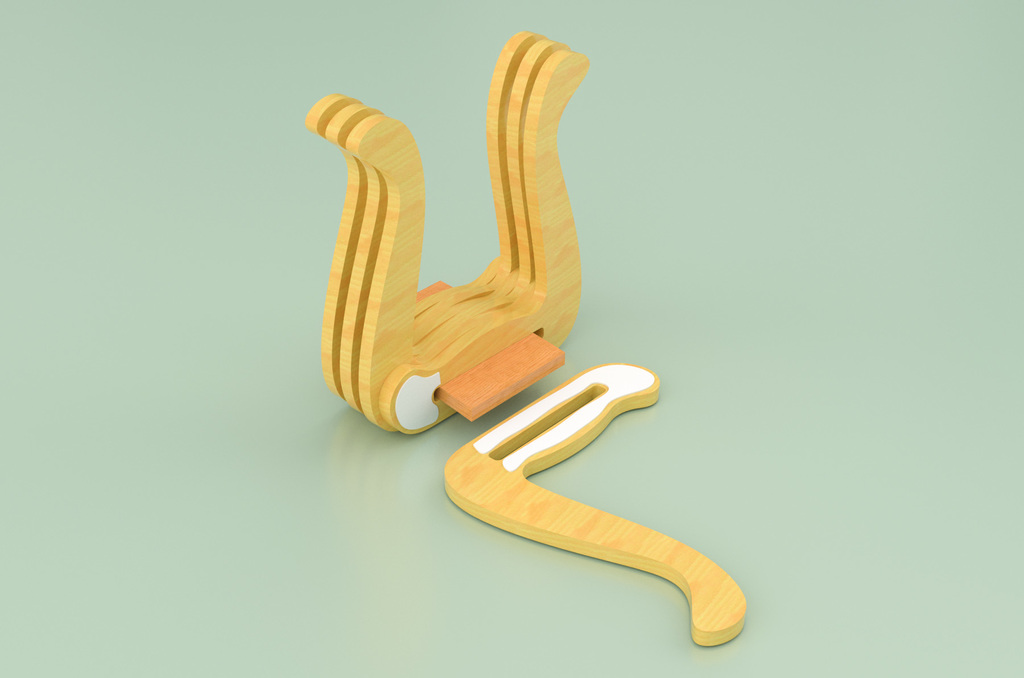
Apply glue to the two areas shown in white. Keep it away from the edges to minimize squeeze out.
Build the Backstop First
With a lot of parts to handle, to make final assembly easier, I’ve found that it helps to first vertically build a backstop. The backstop is the first six ribs. With your collection of special parts and spacers, start with an end rib with the slot up. Like any mortise and tenon, apply glue to the slot and end of the spine.
Assemble the backstop vertically first. Be mindful of alignment and glue squeeze out—it’s very hard to clean up afterward.


 Next, carefully add glue to the top of one of your prepared spacers. Position the second rib as it will be once added to the stack. Using a nail just big enough to pass through the 1/8″ hole in the special second rib, align the spacer underneath. Hold the two parts onto your bench using a piece of 3/4″ scrap to support the rib and tack together with a brad nailer loaded with 11/4″ brads. Now, apply glue to the other side of the second rib and the spacer, slide the assembly down the spine and align the part. Remember your dry assembly. Always push the ribs all the way into the spine until they touch. Use the same process of adding spacers and glue for the next two regular ribs. Finally, add the two flattened ribs. With a square, align the short stack of six ribs and spine and clamp or hold down the backstop to your bench and let dry before proceeding to the main assembly.
Once the backstop is cured, rotate the bench so that it sits upside down, resting on its back. Assembling the bench this way uses gravity to your benefit and is the only way to align the parts and keep the bench flat. With the backstop in place, it’s time to complete the bench.
For the main assembly, push the legs outward as you go and use a clamp to hold the stack of parts together.
Continue adding ribs, spacers, and glue, pushing them against the spine. As I go, I use ratcheting bar clamps to pull and hold the horizontal stack together. Once you run out of regular ribs, add the final pair of flattened ribs, followed by the last two regular ribs and finally the second rib.
Your last step is to trim off the excess spine that’s leftover. To do that, use a piece of 1/2″ plywood scrap plywood resting against the rib as a spacer and trim with a handsaw. Glue and align the spine and end rib and clamp the completed bench together to dry.
Trim off the excess spine with a hand saw.
Apply glue to the mortise on the final outside rib and the spine and clamp the bench assembly together.
Don’t forget to add furniture glides to the four flattened legs. Being a heavy bench, use small HDPE glides so it can easily be pushed or pulled around.
When choosing a plywood finish be aware that plywood can raise its grain severely with a water-based finish and blotches easily with certain stains. Ideally, the bench with all its nooks and crannies is a good candidate for lacquer if you have a spray setup. A hand-applied finish like Watco oil is another possibility. With any hand applied finish remember that getting into those little gaps will be challenging.
Wanting to add a little warmth, I chose a long-time personal favorite: Osmo Polyx Oil. This Ger-man floor finish is made from various vegetable oils and waxes. You can hand apply the very thick Osmo in the manner of a rub-on oil/varnish finish. Wipe on. Wipe off. Build up three or four thin layers, and it’s a rich and very durable finish.
Just the Beginning
Parametric plywood furniture is a great area for woodworking hobbyists to explore. And, using Spine and Rib construction and upside down shaping you don’t even have to have a CNC to do it. I look forward to seeing what you come up with.
Head to popularwoodworking.com for more on parametric furniture. You can downloadable PDF project files to help you make your patterns and get into the details on how to CNC the parts or use a Shaper Origin to make the project bench. Plus, I’ll show how the design was created, explore alternative designs and finishes, tricks to make the best of less expensive plywood, and more.

Additional Resources
- Modern Parametric Bench Tips and Details
- CNC the Modern Parametric Bench
- CNC machinable files at woodworking.digital
- PDF drawing of the Parametric Bench Template
- Digital Woodworking on Instagram
- Digital Woodworking YouTube Channel
- Personal Work on Instagram
Here are some supplies and tools we find essential in our everyday work around the shop. We may receive a commission from sales referred by our links; however, we have carefully selected these products for their usefulness and quality.


Tim, first of all, really cool bench and unexpected versatility with the different spines. One of the advantages of parametric design is efficiency (production, tooling, ease of construction, waste, etc..) I assumed looking at the “L” form you chose that you would nest your ribs on the plywood before cutting. In my opinion, parametric design is not worth doing if you’re not going to focus on minimizing waste. Your layout was incredibly wasteful, and I hope to see more attention paid to this in the future. Thanks for posting
When CNCs are used to cut repeated parts out of plywood and other sheet goods, the efficient use of materials is always a consideration. In this particular project, the key component is the “L” shaped rib which makes part layout proved particularly challenging.
Being very concerned about waste and efficient material usage for a hobbyist-focused project from the beginning, many rib designs, bench heights, leg lengths, and other details were developed reviewed, considered and designs ultimately had to be compromised. For example, I wanted the bench to be 1″-2″ taller but let that go to gain more yield.
To make the best use of materials, the plywood layouts were not produced randomly or parts placed by hand. I used a rather expensive nesting software program to layout the parts to achieve maximum yield. The result maxed out at 26 parts/full plywood sheet or 24 parts when using easier to handle 1/3 sheets. I wish it was better, but face it: we’re not exactly laying out square cabinet parts. Using dedicated software to maximize layout is the norm for pretty much all parametric based projects. This project was no different.
As a solid wood furniture maker, few things bother me more than wasting material. I cringe every time I cut out an arm for a dining chair out of a wide board for example. A lot of waste. But, I set aside the scrap and make use of it on other projects. In case of the plywood scrap I accumulated in this project, it’s being used for a stack-laminated carved sculpture I’m in the process of building.