We may receive a commission when you use our affiliate links. However, this does not impact our recommendations.
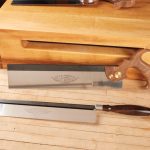
 A spline-and-miter joint ensures this elegant table will remain stable.
 A spline-and-miter joint ensures this elegant table will remain stable.
When I started building custom furniture many years ago, I discovered the best way to advertise my work is to let people see it. To do this my wife and I attend art and craft shows, and our local farmers’ market. We take along a selection of jewelry boxes and other small items that we feel show the quality of our work.
At the start of each year we try to come up with something that our regular customers haven’t seen before. And we hope it will be something that they will want to have for themselves.
A couple years ago, I designed this small table. Because all my work is one-of-a-kind and made using solid hardwoods, I needed something I could build in about four hours to make it affordable for my customers. This table is the result.
Since its first outing, I have made a considerable number of these tables. I have made them from native hardwoods and imported exotics, including teak, mahogany and purpleheart. The tops have been round, square, octagonal and other custom shapes. The legs have been tapered, straight and some have been Queen Anne style. All of these variations have an elegance all their own.
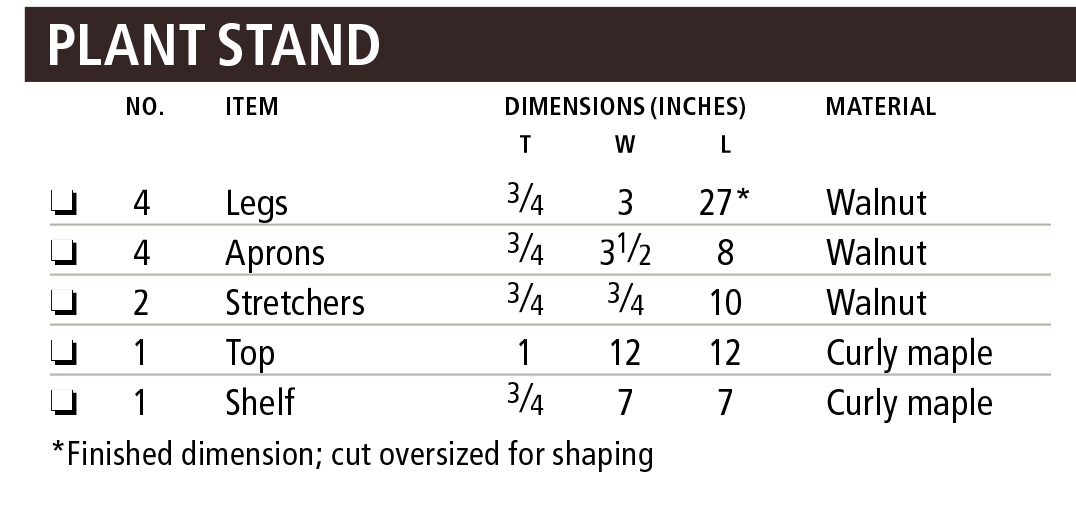
Plant Stand cut list
The Right Wood
Although I used 5/4 material for the top in the table shown here, the entire project can be built from 3⁄4“-thick stock. The wood should be planed reasonably accurately to thickness, but there is some room for small variations. Try to bear in mind that we are building a table, not a part for a space shuttle. No matter how carefully you prepare your wood, when the weather changes, it most likely will change, too.
The wood for the legs should be relatively straight-grained for obvious reasons. When I make a table with Queen Anne legs, however, I look for wood with some curve in the grain that mimics the curve in the leg’s shape. It looks great and adds strength.
For the top and the shelf, I select something showy, maybe some bird’s-eye maple or other figured wood. The aprons and stretchers are less conspicuous, and so more ordinary grain patterns can be used.
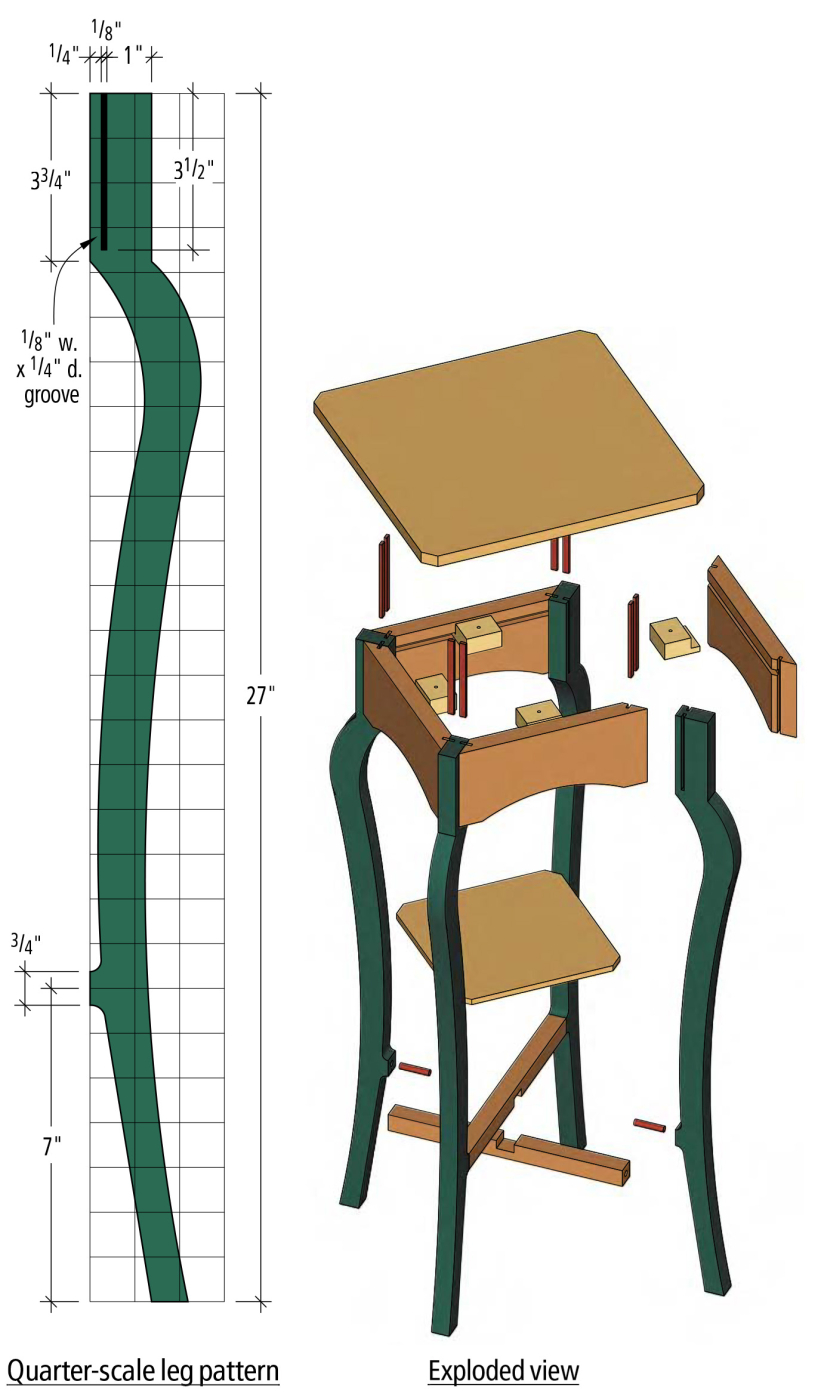
The dimensions shown are for a table that is ideal as a plant stand. But you can easily adjust them to build a table of up to about 20″ square without increasing the thickness of the legs. Tables larger than this tend to look a bit spindly in the leg department. So to improve the look it is better to use thicker material for the legs, maybe 1-1⁄4” or even 1-1⁄2” thick. All the other dimensions would be basically the same.
Queen Anne Legs
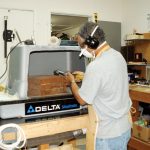
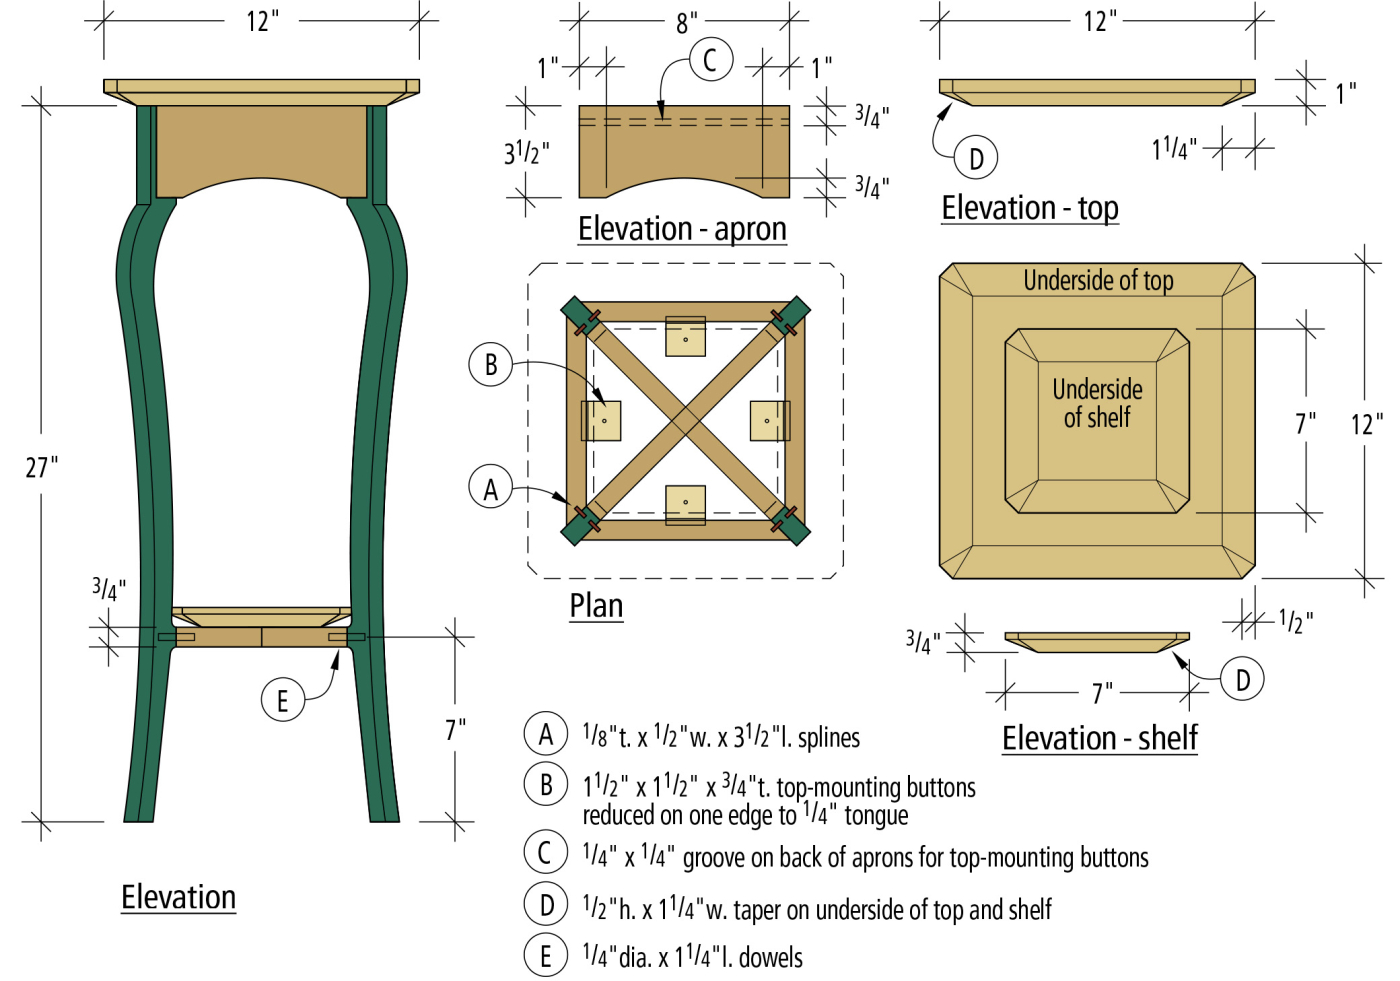
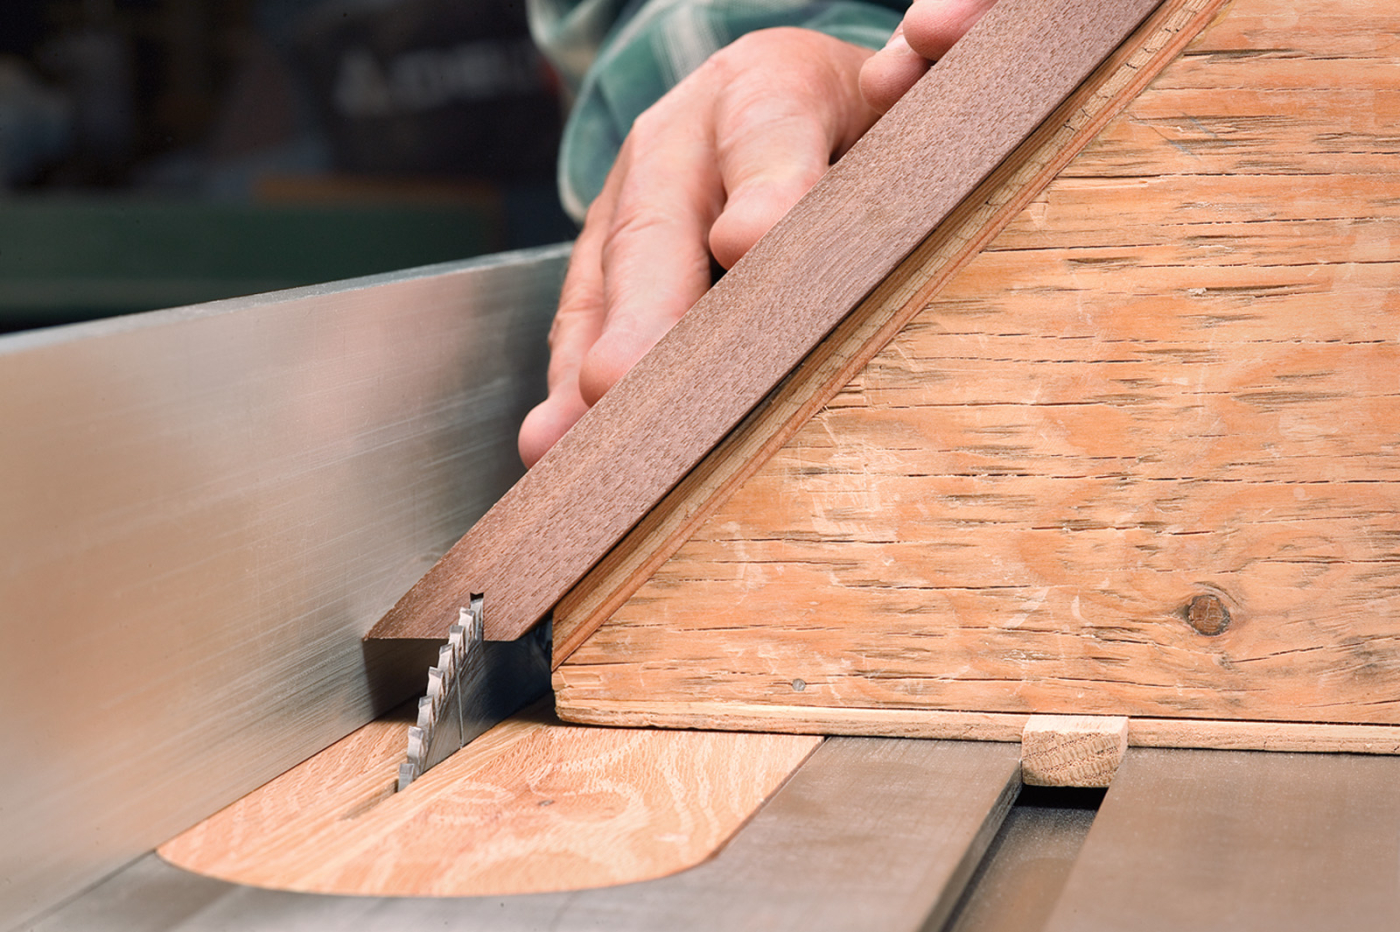
It’s best to cut the joinery in the legs before shaping them. To join the legs to the aprons I use a mitered spline joint. Using my table saw, I cut an 1⁄8“-wide slot in the leg and a matching slot in the mitered end of the apron. A spline in the slots holds them correctly in place and adds strength.
I attach the stretchers to the legs using dowel joints. Once all the joinery is cut I stack the legs together using double-sided tape and shape them.
A stopped groove is cut on each side of the legs for the splines that will join them to the aprons. A stop block ensures accuracy.
To make the legs shown here, begin with four blanks 3⁄4” x 3″ x 29″. Near the top of each leg mark where the slot will end at 3-1⁄2” from the top. On the table saw (with the saw off of course), lower the blade and clamp a block of wood to the fence to stop the cut in the right place.
You will need two fence set-ups, one for the left side of each leg and one for the right sides. Cut each groove 3⁄8” from the board’s edge. This operation will most likely require that the blade guard be temporarily removed. Set the height of the blade to 1⁄4” and make your cuts.
When the slots in the leg have been made, square up the ramped end of the slot left by the shape of the saw blade with a narrow chisel. Next, stack the leg blanks together using double-sided tape, and mark out and drill the dowel holes for the lower shelf stretchers. The holes should be 5⁄8” deep. I use 1⁄4“-diameter by 11⁄4“-long birch dowels. It’s hard to drill these holes accurately after the leg profiles have been shaped.
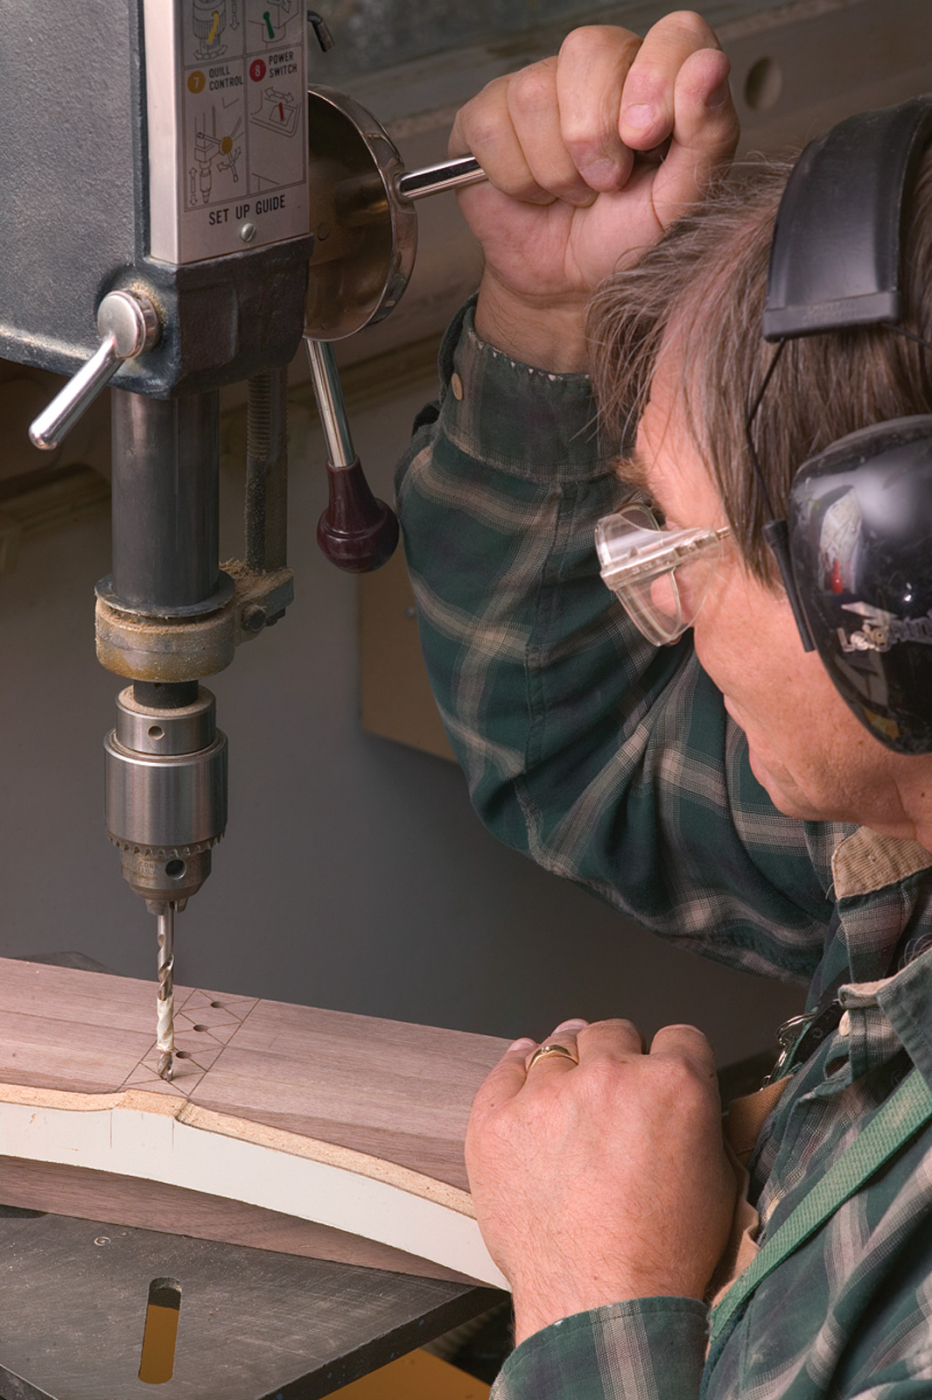
With the legs stacked and held together with double-sided tape, the pattern is used to lay out both the shape of the legs, and the location of the holes for the dowels.
Trace the shape of the leg on to the top piece on the stack, and cut to this line using a band saw or jigsaw. Clean up the saw marks using a spokeshave, plane or rasp, and finally sandpaper.
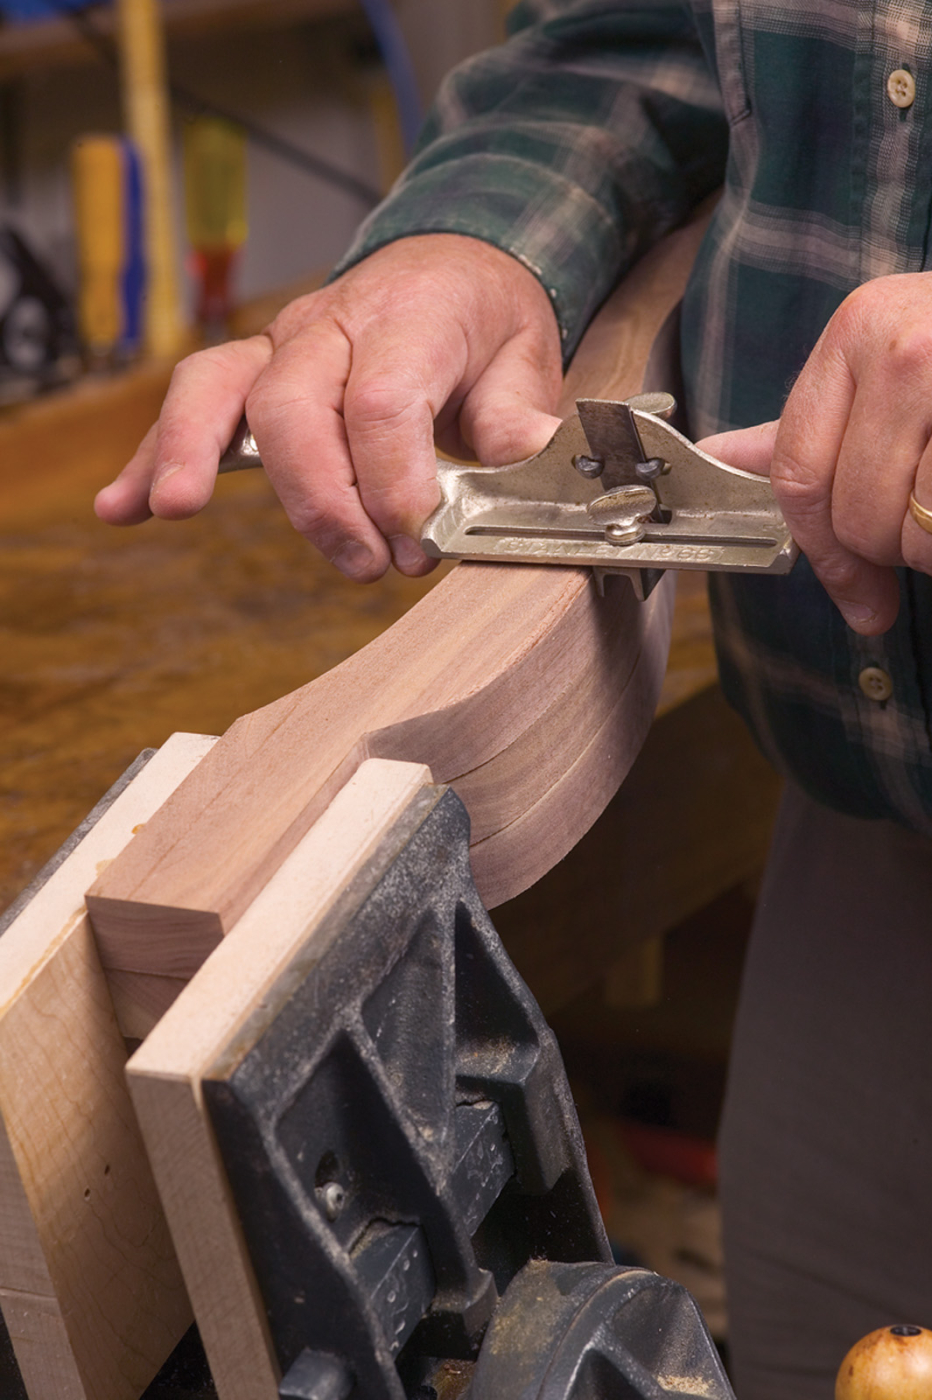
After the stack of legs is cut to shape, the edges are detailed by hand.
Now apply the edge treatment to the legs. There are many things you can do here. I like to use my old Stanley No. 66 hand beader.
I filed a bead profile into a piece of hacksaw blade and carefully work that shape into the edges of the legs. Be careful to not do too much to the projection left for the lower stretchers to attach to. It’s best to shape this section after the stretchers have been glued in place.
Aprons and Stretchers
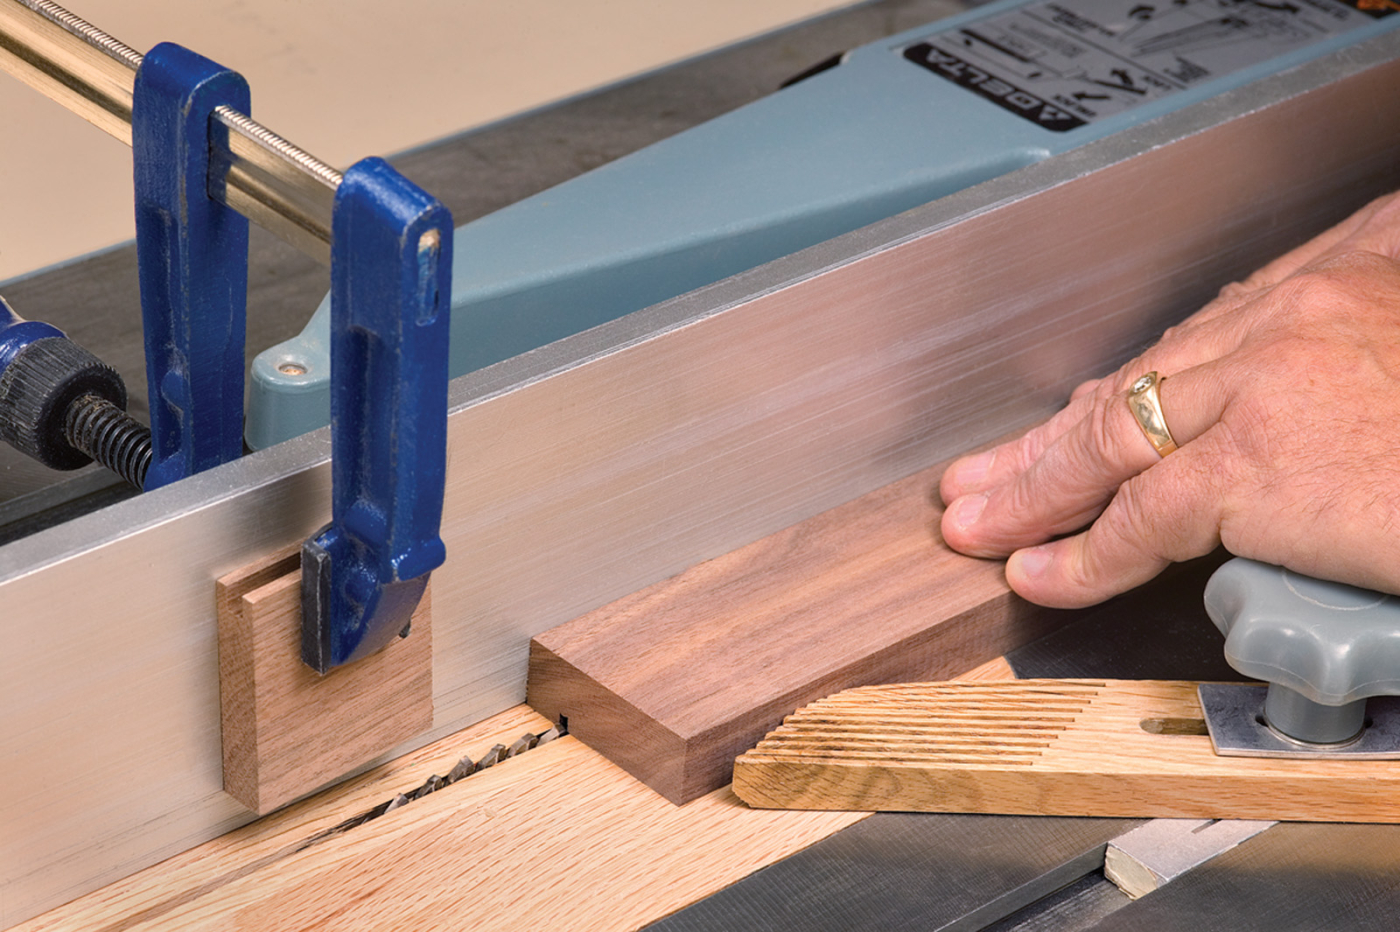
To make the aprons, I first cut the blanks to length, miter the ends of each piece, and cut a 1⁄4” x 1⁄4” groove for the buttons that attach the top to the base.
Now I need to make a saw kerf 1⁄4” deep in each mitered edge for the spline. I actually prefer to do this step using a sled I made that tilts the wood at 45° rather than tilting the saw blade.
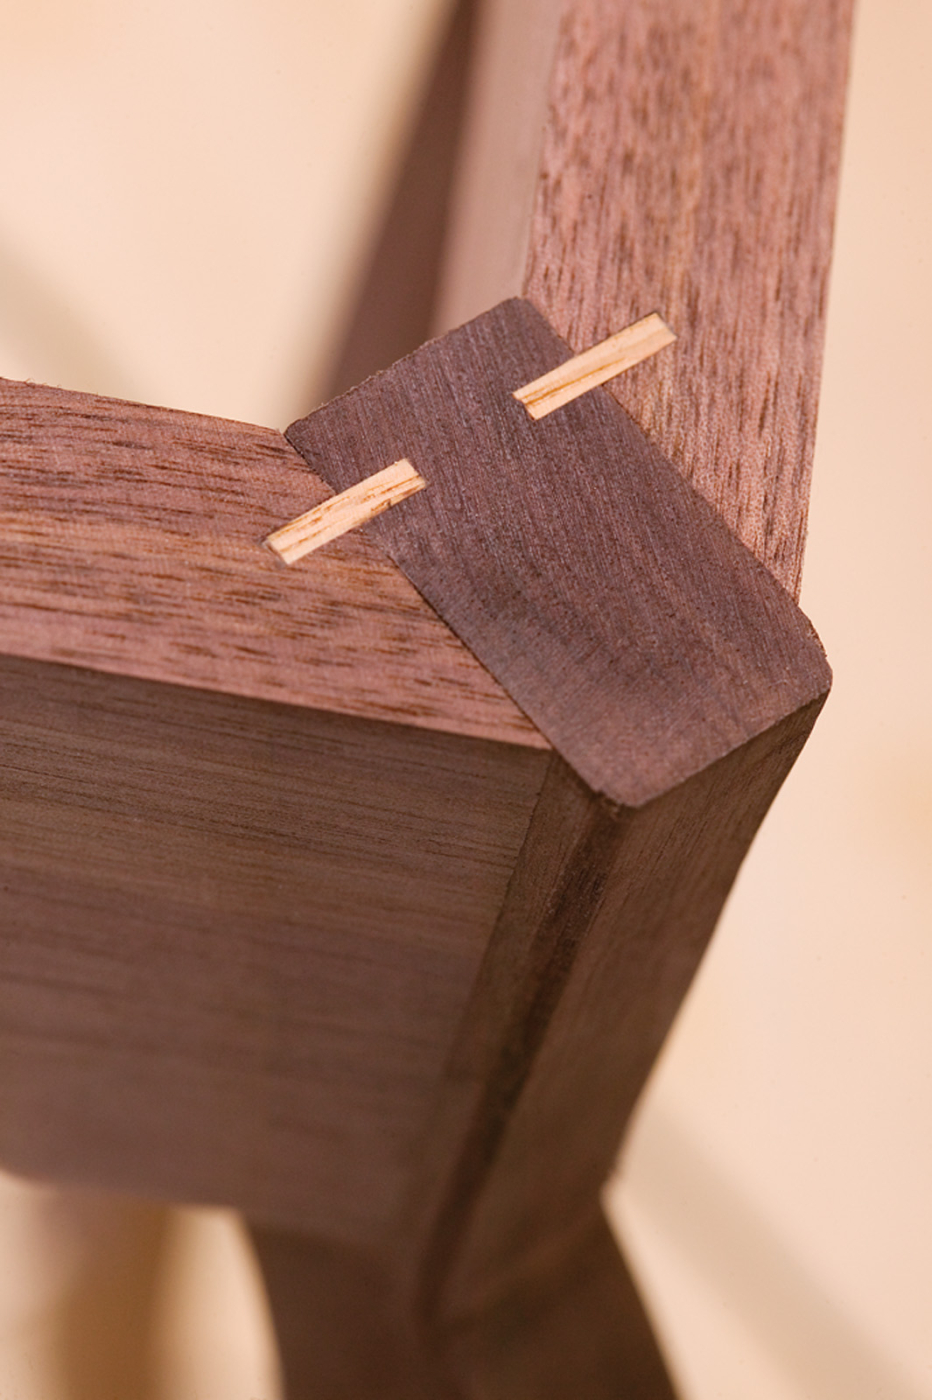
Each mitered end of the aprons receives a slot for the splines. The completed joint is strong, even though the splines are thin (below).
When this operation is complete, I stack the apron pieces with double-sided tape and then mark out the lower edge profile. I cut and then sand these edges, and complete the edge treatment the same way as was done on the legs.
The stretchers are made with 3⁄4“-square stock. Cut the two pieces to length and then drill dowel holes in the center of each end. The pieces are joined to each other using a simple bridle joint. You can cut this joint on a band saw, or with a handsaw and a some light chisel work.
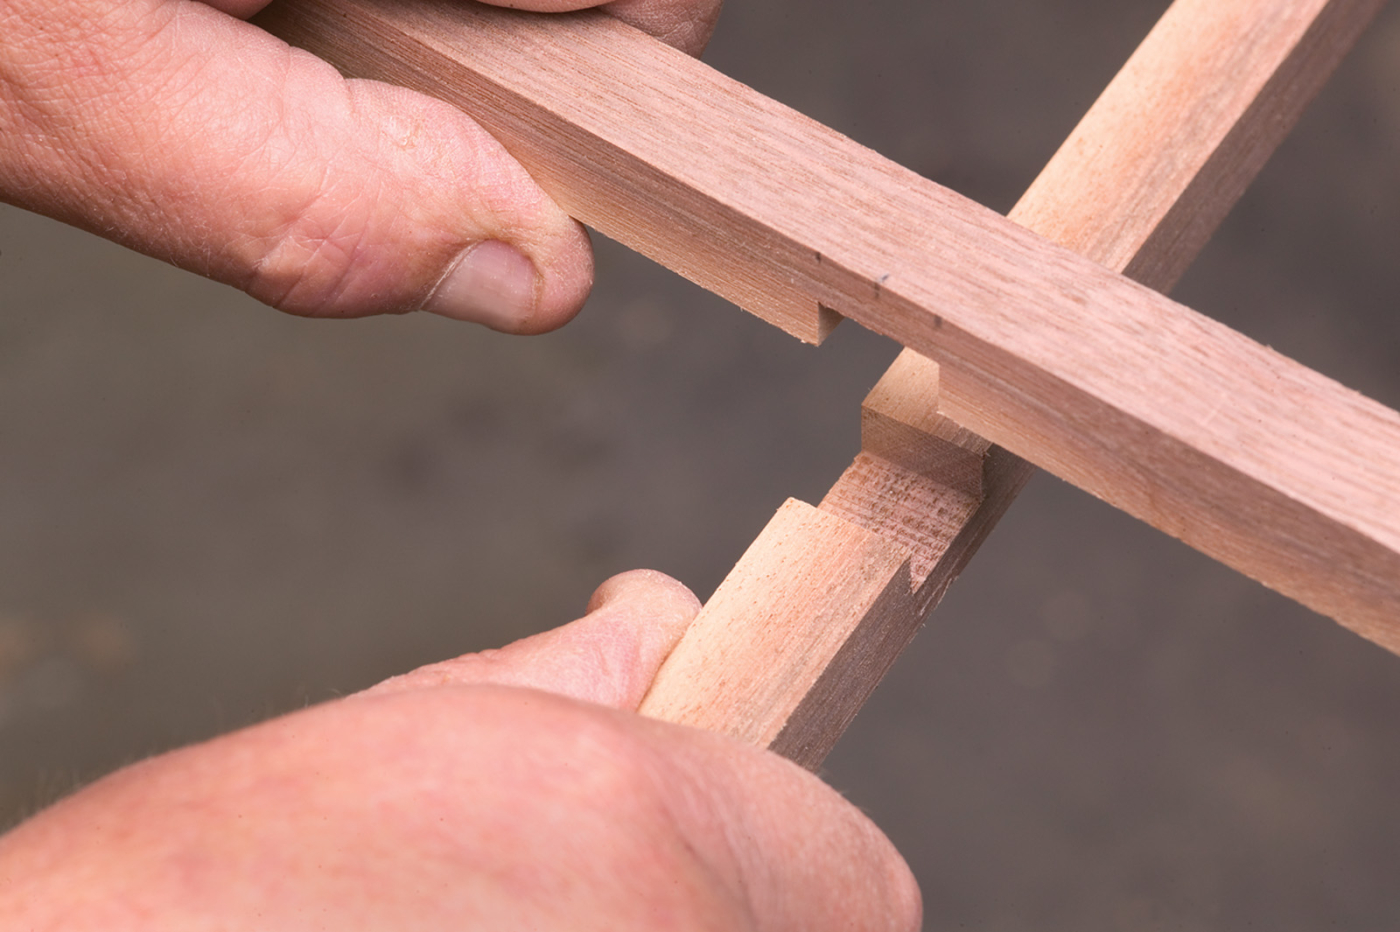
A bridle joint holds the stretchers together in the middle, dowels join the ends of the stretchers to the legs.
Top and Shelf
Choose your finest pieces of wood for the top and shelf. Sometimes I will use the same species I used for the base assembly, but occasionally I will become bold and use a contrasting wood. When this is done properly, it can be very eye-catching and the table will usually command a better price.
Because my tops typically are at least 12″ square, I generally find it necessary to glue together pieces for them. If you take the time to match the grain, the joint can be hardly noticeable.
On square or rectangular tops and shelves I usually clip the corners at 45° and bevel the underside of the parts about 11⁄4” back from the edge to a 1⁄2” taper with a hand plane. I find that this makes the finished piece look less top-heavy. The top edges can be chamfered or rounded over.
Prior to assembly I like to sand or scrape all of the parts, usually finishing at #240 grit for the legs and aprons, but going to #400 grit on the top and shelf. I then apply a first coat of oil finish to the top and shelf (as these parts won’t be glued), which I allow to soak in while I glue up the legs. I allow the finish lots of time to penetrate, but not so much that it’s difficult to wipe off. This, of course, depends on your local conditions, and where I live this will change from day to day.
Final Assembly
When it comes time to assemble the base unit, do a dry run first to make sure that everything fits. A tip here is to make sure that the dowels and splines aren’t too tight a fit or too long.
You can make your splines from any species of close-grained hardwood. I make them “cross-grained,” i.e. with the grain at 90° to the length of the spline. If it was done the other way, the splines could easily split down their length as they are only slightly less than 1⁄8” thick. I like the splines to run the full length of the slots, finishing them off cleanly with a sharp chisel when everything is dry.
If I’m alone, I do the glue-up in two stages. I glue up the legs and aprons in two sets. When these have had time to dry, I assemble them with the other two aprons and hold the whole thing together using surgical tubing. This stretchy tubing allows me to spring the legs open enough to get in the two stretchers along with their dowels.
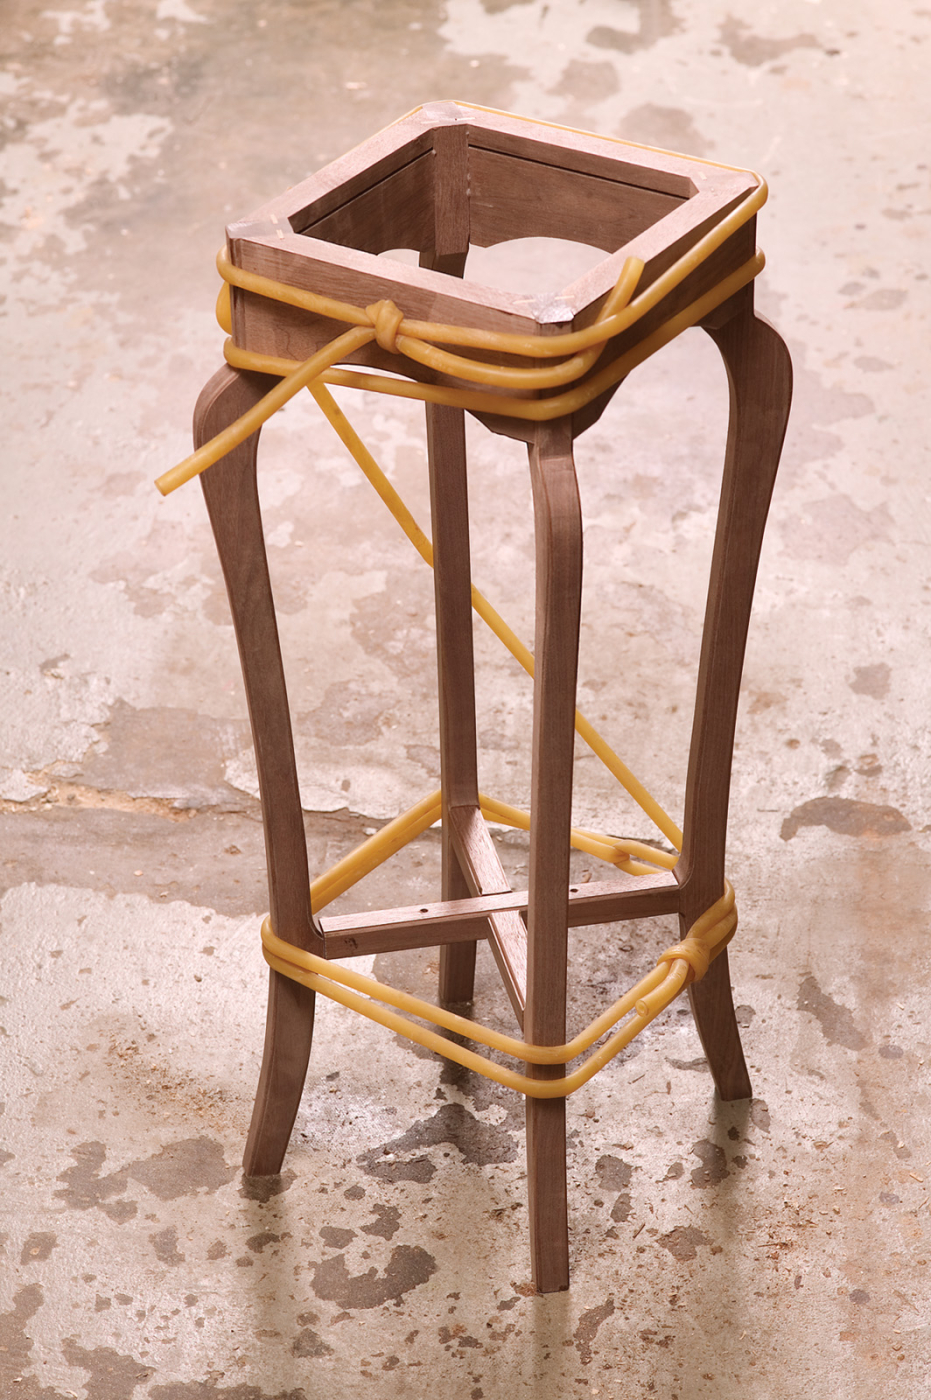
Surgical tubing applies pressure evenly on all the joints, pulling the assembly tight and square while the glue cures.
When this is accomplished, I bind more tubing around the legs near the stretchers. I find this works best when the base portion is assembled upside down and on a flat surface to ensure accurate alignment of the aprons with the top of the legs.
If the miters were cut accurately, when the surgical tubing is stretched tightly the whole thing squares itself. The beauty of the spline-and-miter joint really shows itself off in a project of this type. I usually clean up any squeeze-out glue at this time and while doing so I carefully inspect the joints for tightness.
I allow the glue to cure and then add the edge profile to the stretchers, sand everything again and attach the top and shelf. I use traditional wood buttons, keying in to the grooves in the inside of the aprons to attach the top, which allows for wood movement.
The buttons need to be 1-1⁄2” square x 3⁄4” thick. The buttons’ tongues need to be 1⁄4” thick. The length of the tongues isn’t critical but they shouldn’t bottom out when the top expands or contracts with changes in weather. The grain on a button should run into the slot in the apron – a cross-grained button would be very weak and could easily split.
Also, the holes to attach the buttons should be larger than the screws used, which will allow for movement and adjustment. If necessary, a washer should be used under the screw head to protect the button from splitting. Always use round-head screws. The taper under the head of a flat-head screw will almost certainly crack the surrounding wood.
I make my buttons from hard maple scraps. I usually make a lot of them at a time so I always have some on hand.
The table’s shelf only needs two through holes for screws drilled into the stretchers and up into the underside of the shelf to do the job adequately.
Careful Finishing
As with any woodworking project, finishing can make or break the piece. The difference between a great and a mediocre piece can be as little as 15 minutes extra in sanding or scraping. I scrape whenever possible to maintain my crisp edges and to keep down the dust in my shop. Sometimes though, sanding works best and then I use a random-orbit sander.
My finish of choice is an oil and varnish mixture. I always use this on the legs and aprons. The finish for the top and shelf depends on the intended use of the piece. If it’s to be a plant stand, a water-resistant polyurethane makes sense, but if it just has to look pretty or maybe display an ornament, it gets about four coats of the hand-rubbed oil. It’s also easy to repair if anything does damage the finish at a later date. One of the few drawbacks with oil is the possibility of the used rags spontaneously combusting if left around so it is imperative that they be disposed of properly.
This table has uses in every room of your house. Be creative with your design, and maybe try your hand at selling a few.
Here are some supplies and tools we find essential in our everyday work around the shop. We may receive a commission from sales referred by our links; however, we have carefully selected these products for their usefulness and quality.