We may receive a commission when you use our affiliate links. However, this does not impact our recommendations.
Bench first. The workbench is the heart of the small shop. Place the bench in the best position first, then fill in around it.
Simplification and organization are the keys to success.
I’ve worked in a small workshop for many years now. Many, if not most woodworkers, would classify my 7′ x 13′ space more as a closet than a workshop. In fact, I have seen some master-suite walk-ins that were indeed larger than my shop.
The challenges of woodworking in a small space are fairly obvious to most people. Many of the luxuries that are afforded by working in a large basement, garage or stand-alone workshop don’t exist in a small shop. Nonetheless, one can work efficiently; the secret is to simplify and stay organized.
Start with the Workbench
The table saw is often considered the heart of the shop and is typically the first machine purchased and moved into place. The problem is, table saws have large footprints and require a lot of open space on at least three sides in order to function. In a small space, this leaves little room for anything else. If you only have a small space to work in, I suggest forgoing the table saw and finding other methods of doing things (a band saw for ripping for example). And for hand-tool-only work, well….
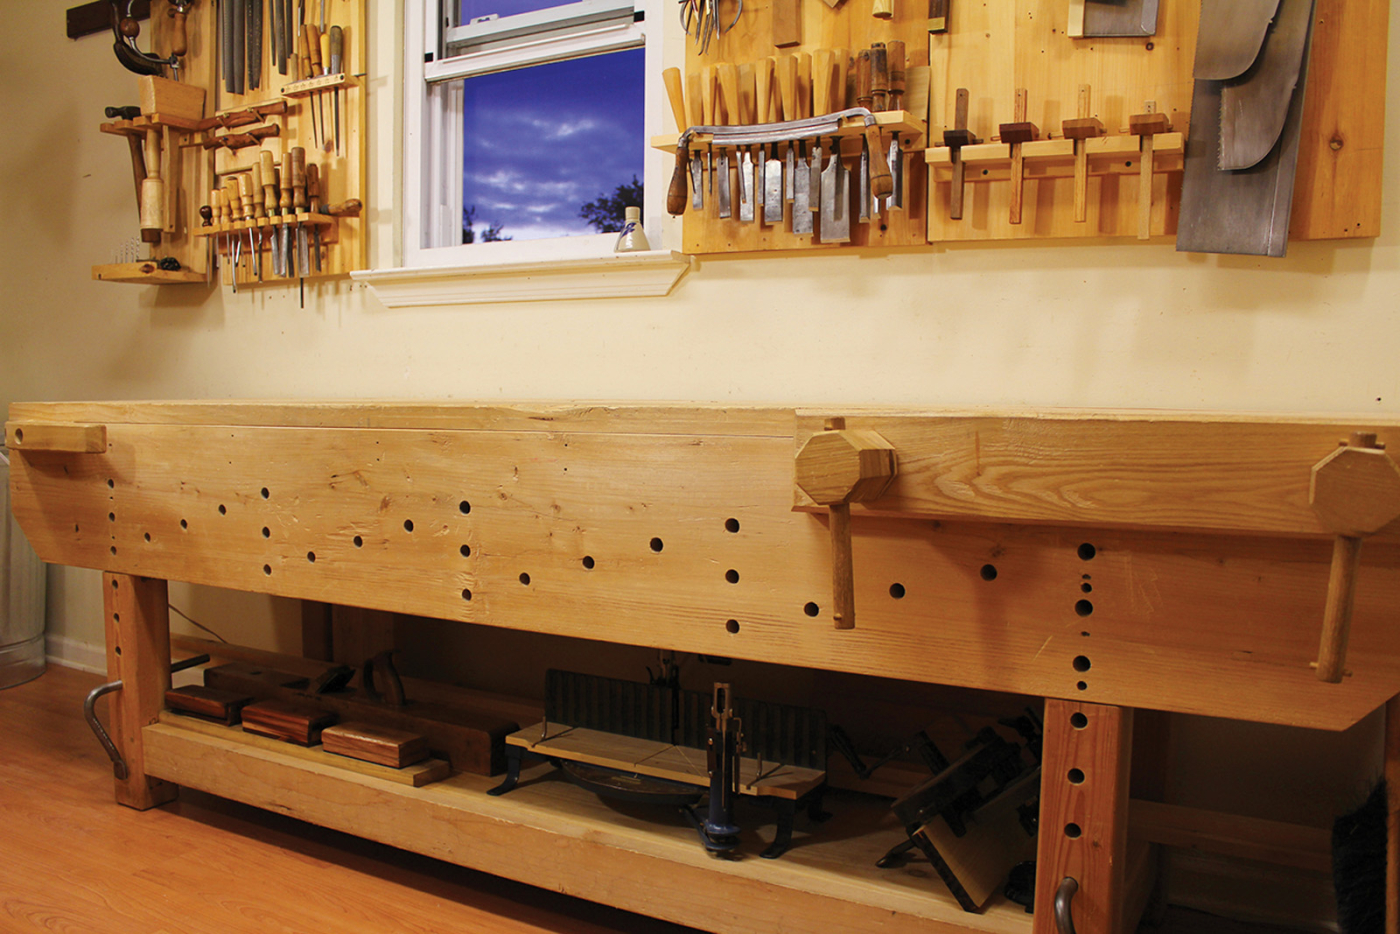
Instead, start with a good, solid workbench. Regardless of your preference in woodworking methods, no shop can function efficiently without a solid, flat workbench. In a small shop, the workbench is where just about every process takes place. It’s the layout area, the joinery bench, the assembly table and the finishing room. Without a good workbench, the shop is little more than a storage shed.
I think a workbench should be as long as you can easily fit into your space. Mine is 8′ long and there are times that I’ve wished it was longer. However, small spaces don’t always permit a workbench of this size. For small- to moderate-scale furniture work, I think a 5′-long bench is about as short as I’d go. One that size allows you to build things as large as a chest of drawers, and still permits longer appliances to be secured to it for working longer stock, such as mouldings.
For bench depth, I recommend at least 18″. Shallower than this and case sides begin to slip off the benchtop. I also don’t recommend the bench be much deeper than 24″. A 24″-deep bench is about the maximum that most people can reach across to get at things on the wall behind.
The workbench should go along the longest wall to allow the most space to either end. For right-handers, I think you need at least a foot to the right end of the bench (enough room to start a jointer plane). I also like at least 2′ to the left end of the bench for planing off the end of a board, and for shavings to pile up. A trash can also fits well in that space.
A Home for Tools
In a small shop, floor space is typically the most limited resource, so minimizing the footprint of everything you can becomes extremely important. This means storing as much on the walls as possible. You’ll probably have close to three to four times as much acreage on the walls as you will on the floor.

Shallow works best. I keep wall storage shallow to preserve as much depth on the benchtop as possible. Cabinets with doors are too deep and interfere with the work on the bench.
I like open wall storage for my most-used tools. Shelves and racks on the walls allow me to easily see what I’m looking for, and easily remove and return tools as I’m working. I arranged my wall storage so that deeper storage shelves are up higher on the wall where they interfere less with the benchtop real estate. Lower items are on shallower racks that protrude from the wall no more than a couple of inches.
I don’t like tool cabinets with doors. They look really nice, and they certainly keep more dust off of the tools. However, I dislike how they stick out so far from the wall. This can be acceptable if the cabinet is positioned away from the bench so it won’t interfere with the work. But to place it away from the workbench means taking wall space away from something else. I prefer my tools close at hand, so I skip the doors and keep the wall storage open, shallow and directly over my workbench.
For less-used tools, I like a traditional tool chest. While it does take up floor space, it can sit underneath the overhang of the workbench if needed, where it is basically out of the way. It can also serve double-duty as a sawbench and a decent place to sit down to take a coffee break.

Tucked away. A smaller-sized tool chest can fit under the overhang of the workbench in otherwise unused space.
Storage, Storage, Storage
Even in large shops, there never seems to be enough miscellaneous storage space. I love shallow cabinets and cupboards for storage of odds and ends that I don’t want to see. A shallow cabinet hung high on the wall is great for storing small cans of finish, boxes of fasteners and other small items. Don’t overlook the space in a corner behind a door either. These otherwise useless nooks are great for tucking away larger items that won’t fit in a shallow wall cabinet.

Don’t overlook nooks. A narrow, shallow cabinet such as this tall cupboard provides a lot of storage space in tight corners such as the space behind this door.
Another great way to add storage to the walls in a small space is to hang some full-length French cleats, Shaker peg rails or both. In addition to being able to hang things from them just about anywhere, they make it easy to re-configure your layout. You can even hang a full-sized cabinet with a French cleat.

Easy to rearrange. French cleats provide an easy way to add re-configurable storage to the shop walls.
Luxury of Lumber Storage
In a small space, there isn’t much room for lumber storage. I buy my lumber as needed so I can hand-select boards for a particular part. As a result, I rarely have more than a couple of boards on hand, unless I’m starting a new project. I cut boards that are too long for the shop into shorter lengths in the driveway, then bring the shorter boards into the shop for storage during the build. If you have a few extra feet of space, adding a small lumber rack up high on an unused wall provides some lumber storage. Otherwise, you may just need to store your lumber elsewhere.

Think up. In a small space, lumber is best stored up high and out of the way. Don’t sacrifice workbench length to add lumber storage.
Here are some supplies and tools we find essential in our everyday work around the shop. We may receive a commission from sales referred by our links; however, we have carefully selected these products for their usefulness and quality.