We may receive a commission when you use our affiliate links. However, this does not impact our recommendations.
 Building a sculptured rocker starts with a coopered seat. Or as I call it, “The Big Smile Seat!”
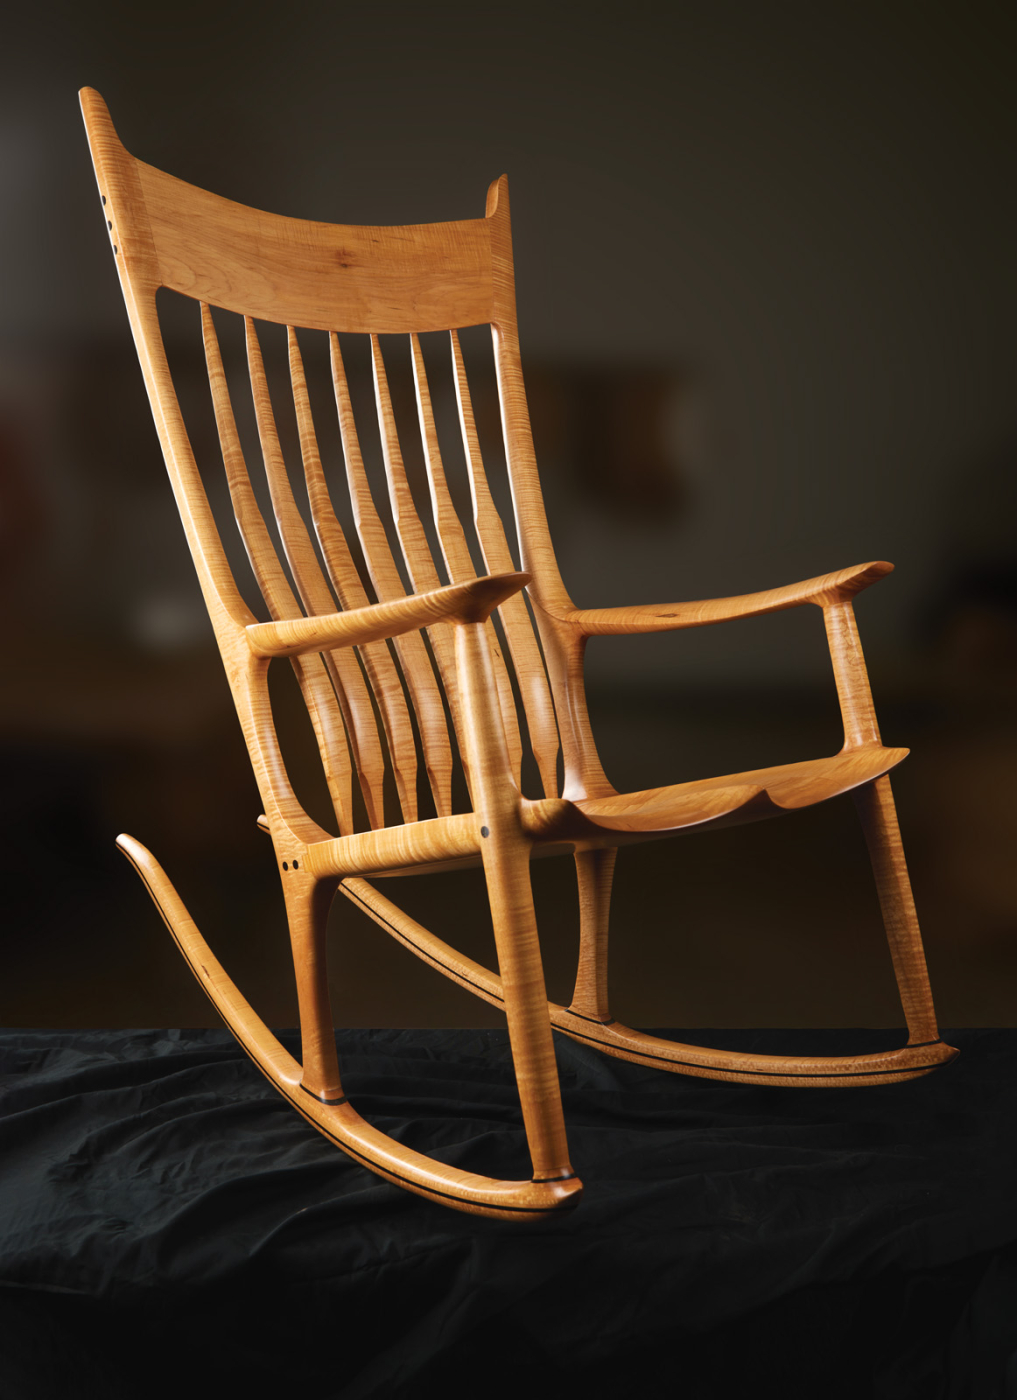 Building a sculptured rocker starts with a coopered seat. Or as I call it, “The Big Smile Seat!”
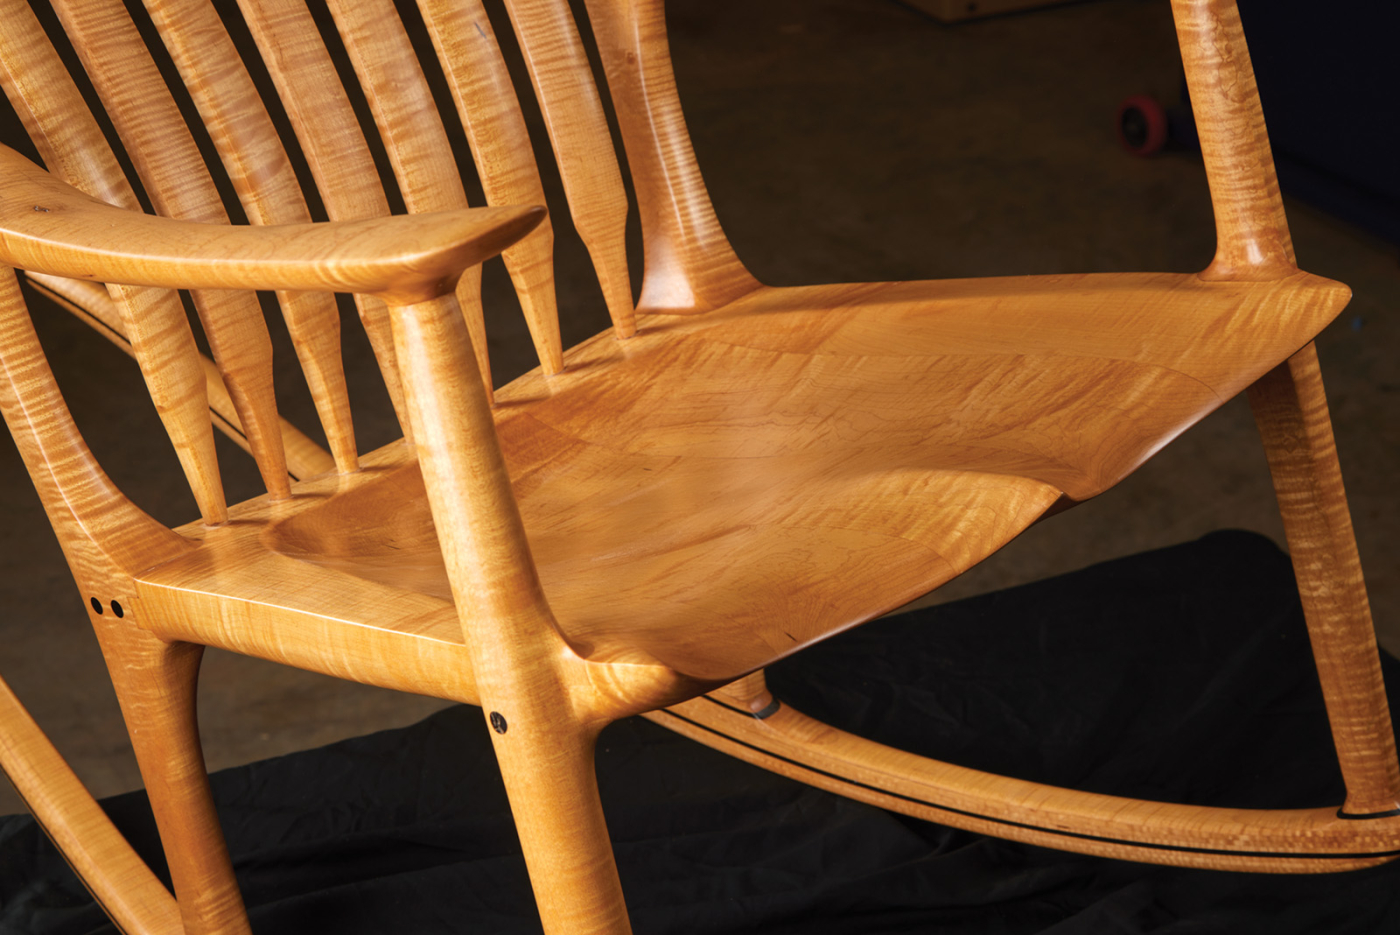
A Maloof style chair design (rocker, low back, or settee) represents some of the best in seating with extraordinary form and function. The entire chair’s flowing lines and gentle s-curves fit the sitter and the coopered seat adds to this ergonomic fit making it the key to this build. The seat’s pommel centers the sitter, the deck provides locations for spindle mortises and leg to seat joinery, and the seat bowl wraps around and supports the sitter. These characteristics can only best by accomplished by crafting a coopered seat.
 At my shop, I offer instruction for two coopered seats: The Regular Smile Seat taught in my video series and in-person classes and The Big Smile Seat. The former has fewer bevels and easier bandsaw cuts. The Big Smile Seat is the deepest and is more difficult. Don’t let that stop you tough. I’ll teach you to master this seat and it will make your chair, your seat, and your work have a Big Smile!
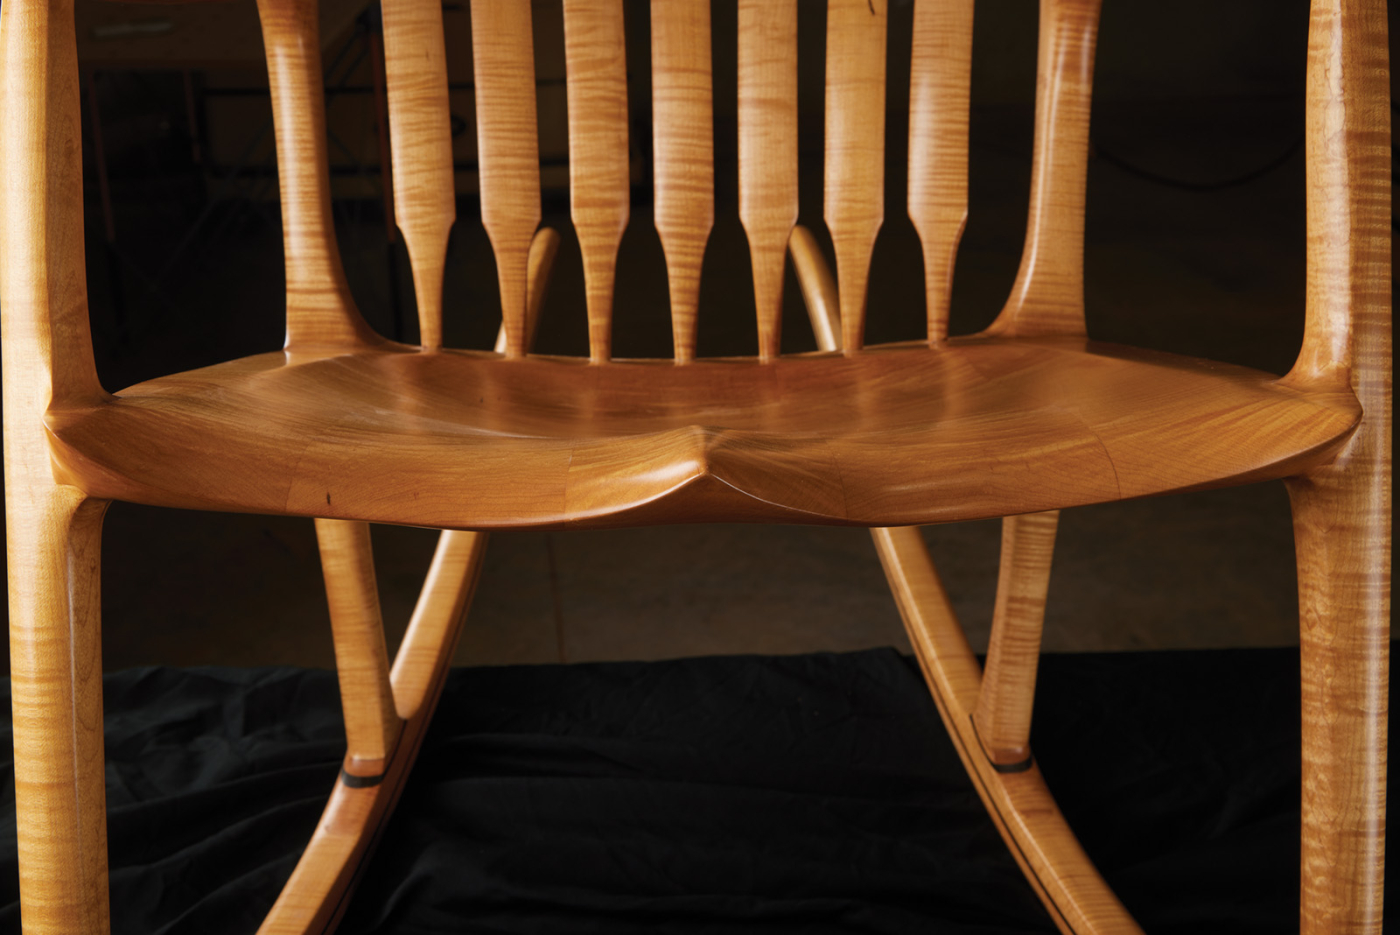 Every village in North America once had a cooper. They build barrels and buckets by beveling each edge of a board and arraying them in a circle before placing a hoop around them. To make a coopered chair seat, the beveled edges (my choice is 3°) work to create a slighter curve that functions wonderfully as a comfortable beautiful seat. No hoop is necessary!
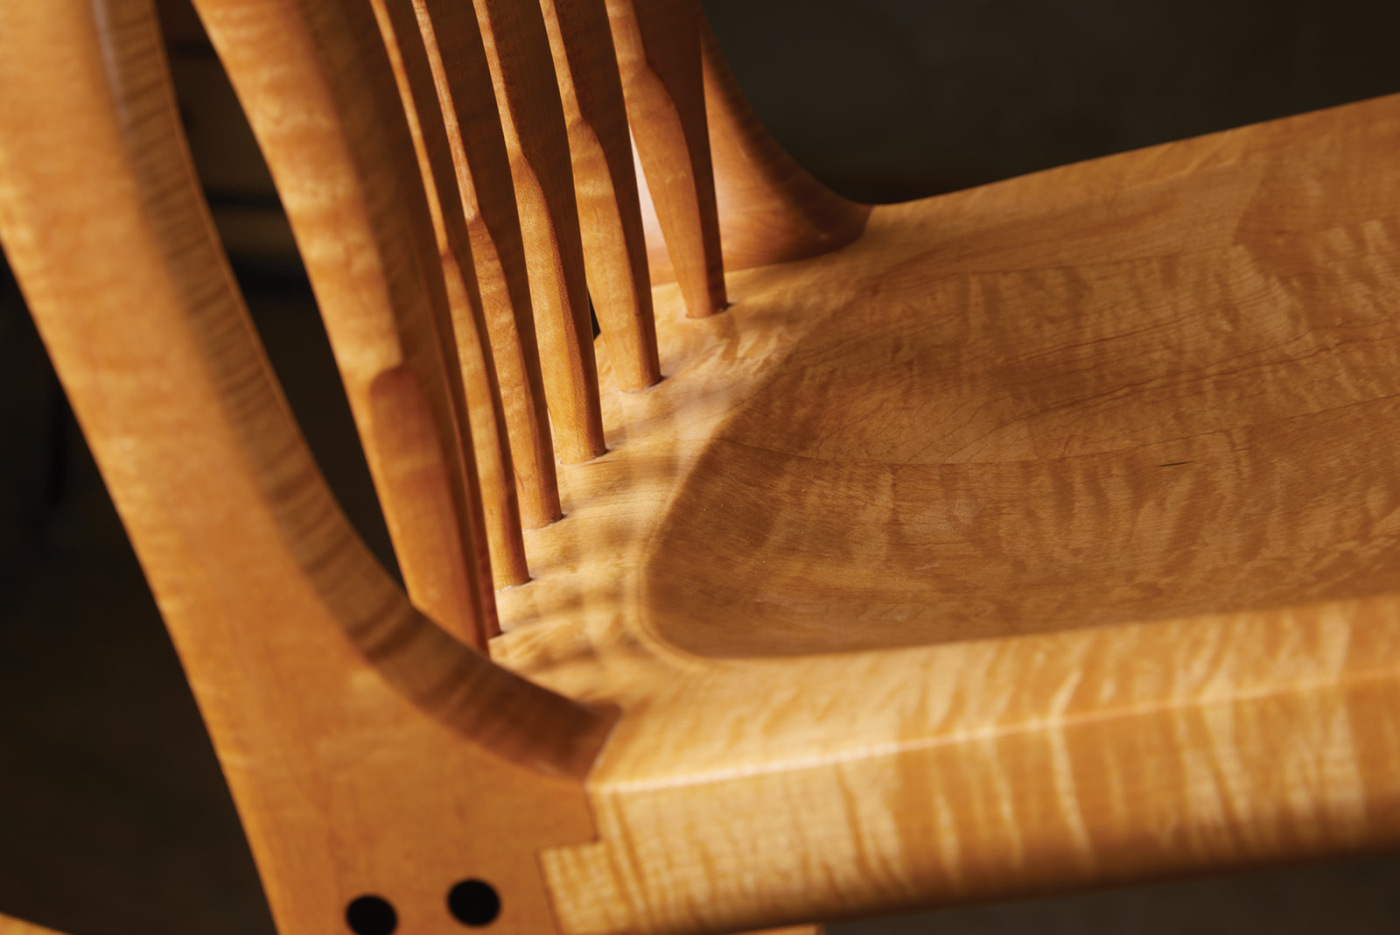 Today’s reproductions of Windsor, Welsh Stick and Stacked Chairs, and some Maloof style reproductions have seats that are somewhat similar but are not coopered and have no smile. They appear to have a raised deck and a pommel made by excavating a seat bowl in one or more seat boards joined at 90° angles to each other. Seat bowls vary in depth and contour by style. Methods of excavations and tools used also vary. Grinders, routers, and even CNCs may be used by some to dig the wood out. Purists might favor travishers, scorps, and scrapers to excavate the bowl and shape the pommel. Especially with grinders and routers, all the wood removed is in the form of dust. I am still cleaning up my shop and lungs from grinding one of these seats out in 2006. On the other hand, my coopered seat in the Maloof tradition is mostly excavated with a bandsaw using a 1/2“ resaw blade, grinder, hand tools, and a better strategy.
 What Tools Do I Use?
 What Tools Do I Use?
Marking tools: bevel gauge, dividers, marking knife, protractor, ruler, square, tape measure, yard stick
• Layout tools: chalk, colored pencils (white, red, black), no. 2 pencils, and sharpies
• Various tools
- – Block, jack, smoother, and router hand planes plus microplanes
- – Curved blade tenon cutters
- – Small-curved scrapers
- – Light and heavy scrapers
- – Spokeshaves
- – 12″ Cabinetmaker’s rasp (10 grain)
- – Modeler’s rasp (13 grain)
- – Combination rasp (5/9 grain)
- – Various rifflers
- – Pattern makers vise
- – Dowel and fluting plates
- – Dowel-It for 1/2″ holes
• Bandsaw and table saw blades
• Hardware: zinc plated screws, dominos (8 x 50mm)
• Misc. bits
- – dowel, rabbeting, roundover bits
- – Shaft, sphere, ball nose burrs
• Sandpaper: 24 grit grinder paper, 60-400 grit sandpaper, 3M pad (in maroon, gray, and white colors)
• Adhesives: Old Brown Glue and Titebond III glue
For brand recommendations, check out my blog section on my website.
Wood Choice and Stock Preparation
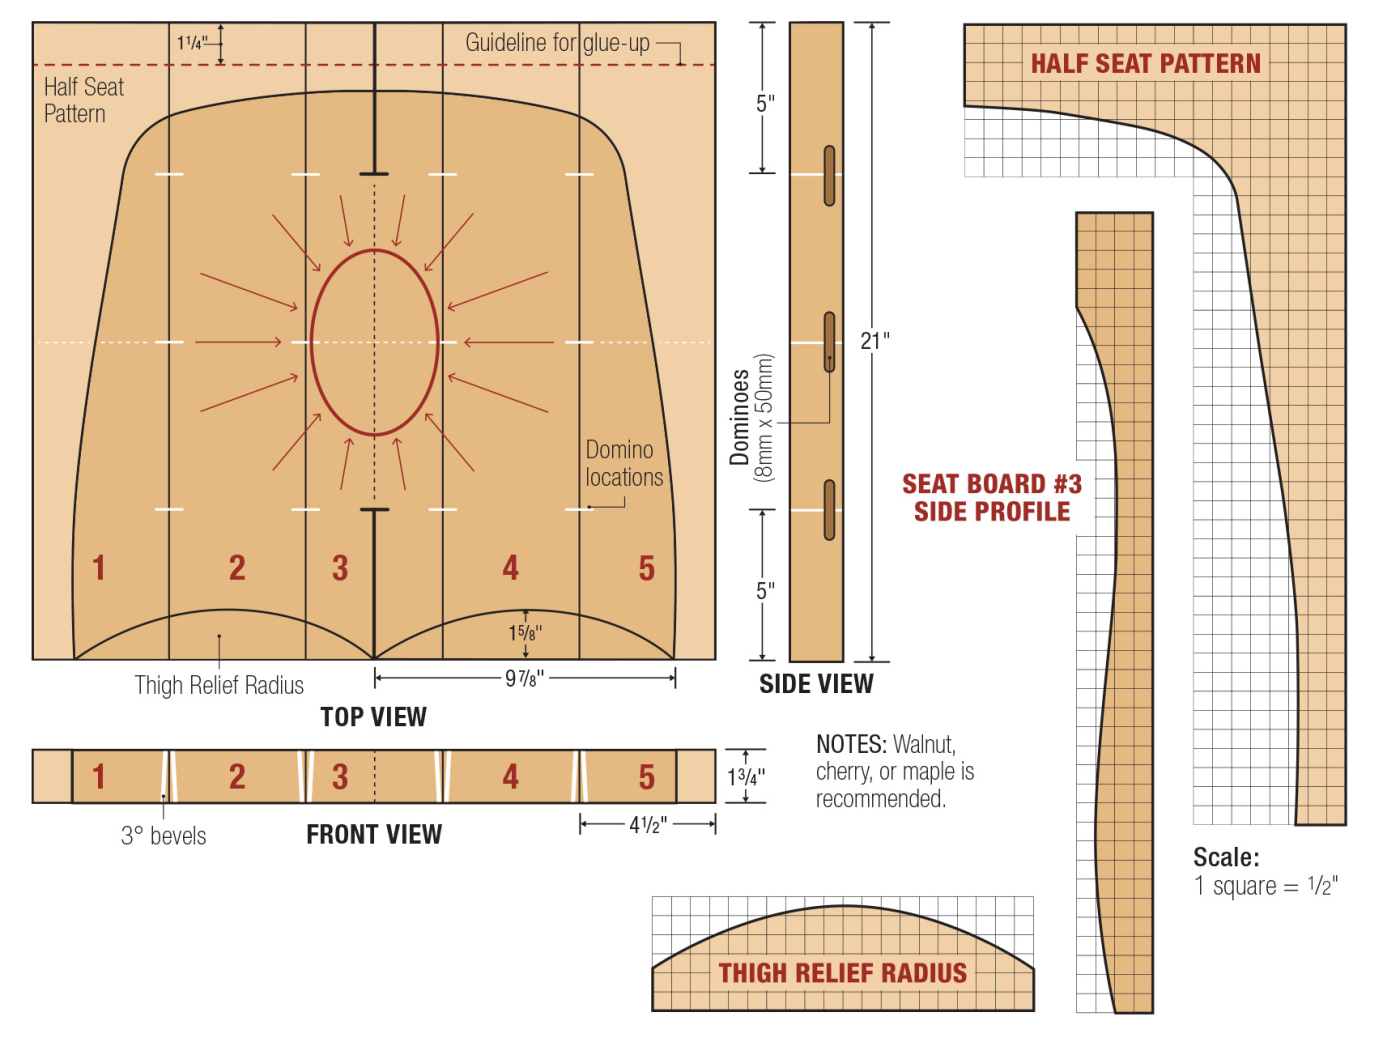
I like to start with a good domestic hardwood like walnut, cherry, or even maple. Figured woods look great for this seat, but maybe for your second chair. You will need 5 boards to create a coopered seat panel. With some thought any odd number of boards (greater than 3) can be used. The idea is for the center board to be the lowest in the coopered panel while board #1 and #5 flatten out the smile at the edges to provide for the seat to leg joinery opportunities.
NOTE: Each board must be face jointed, planed to thickness, and crosscut square to length with all edges jointed. Anything less will make executing accurate seat to leg joinery almost impossible.

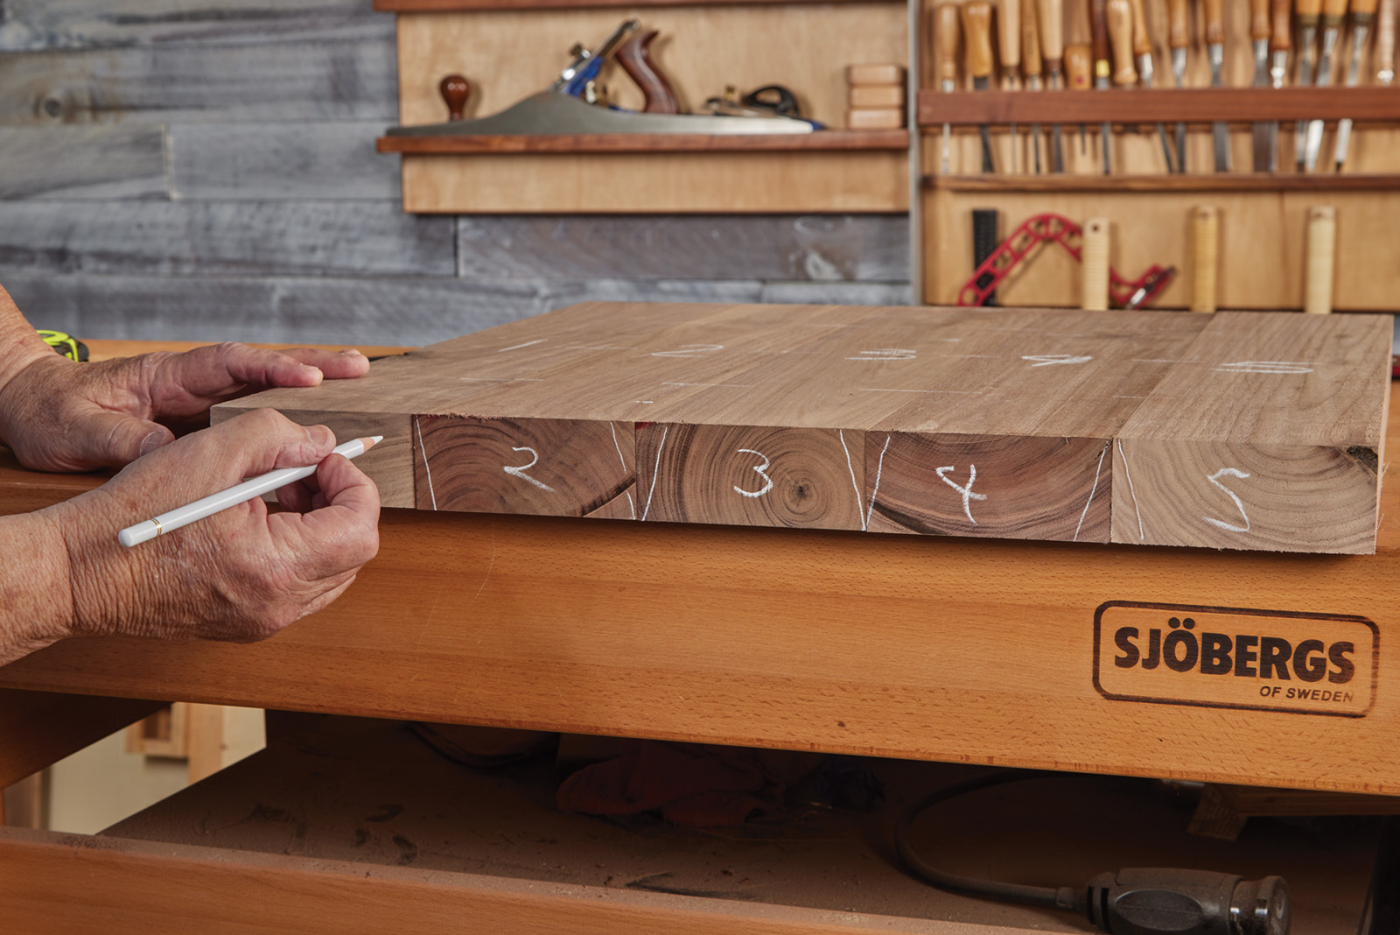
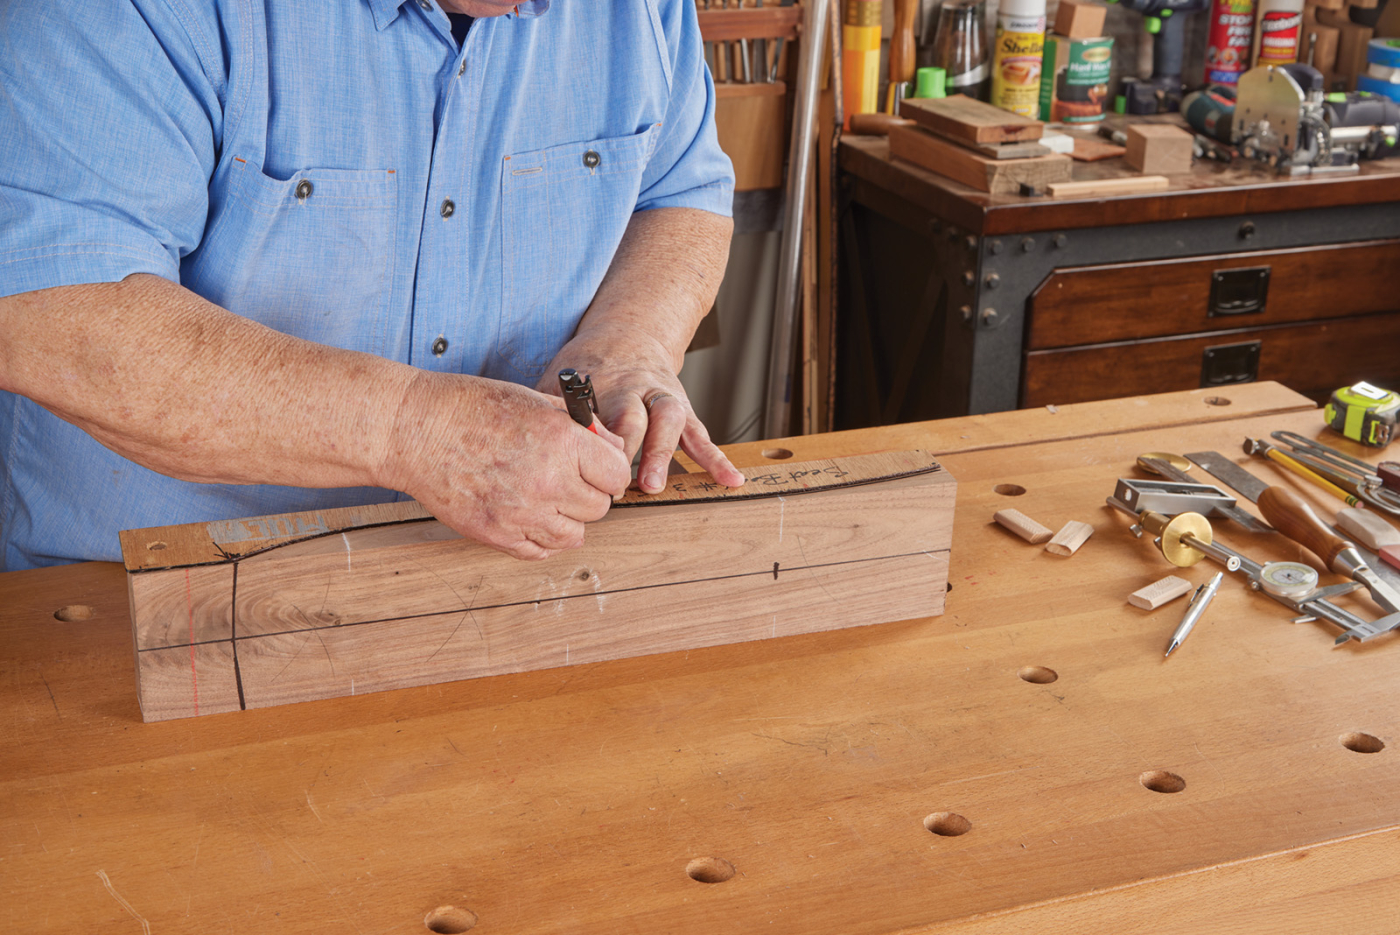
1 Start by marking reference lines for the Dominos.

2 I mark three locations across the seat.

3 Then transfer the marks along the mating edges.
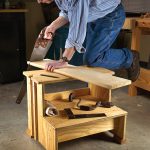
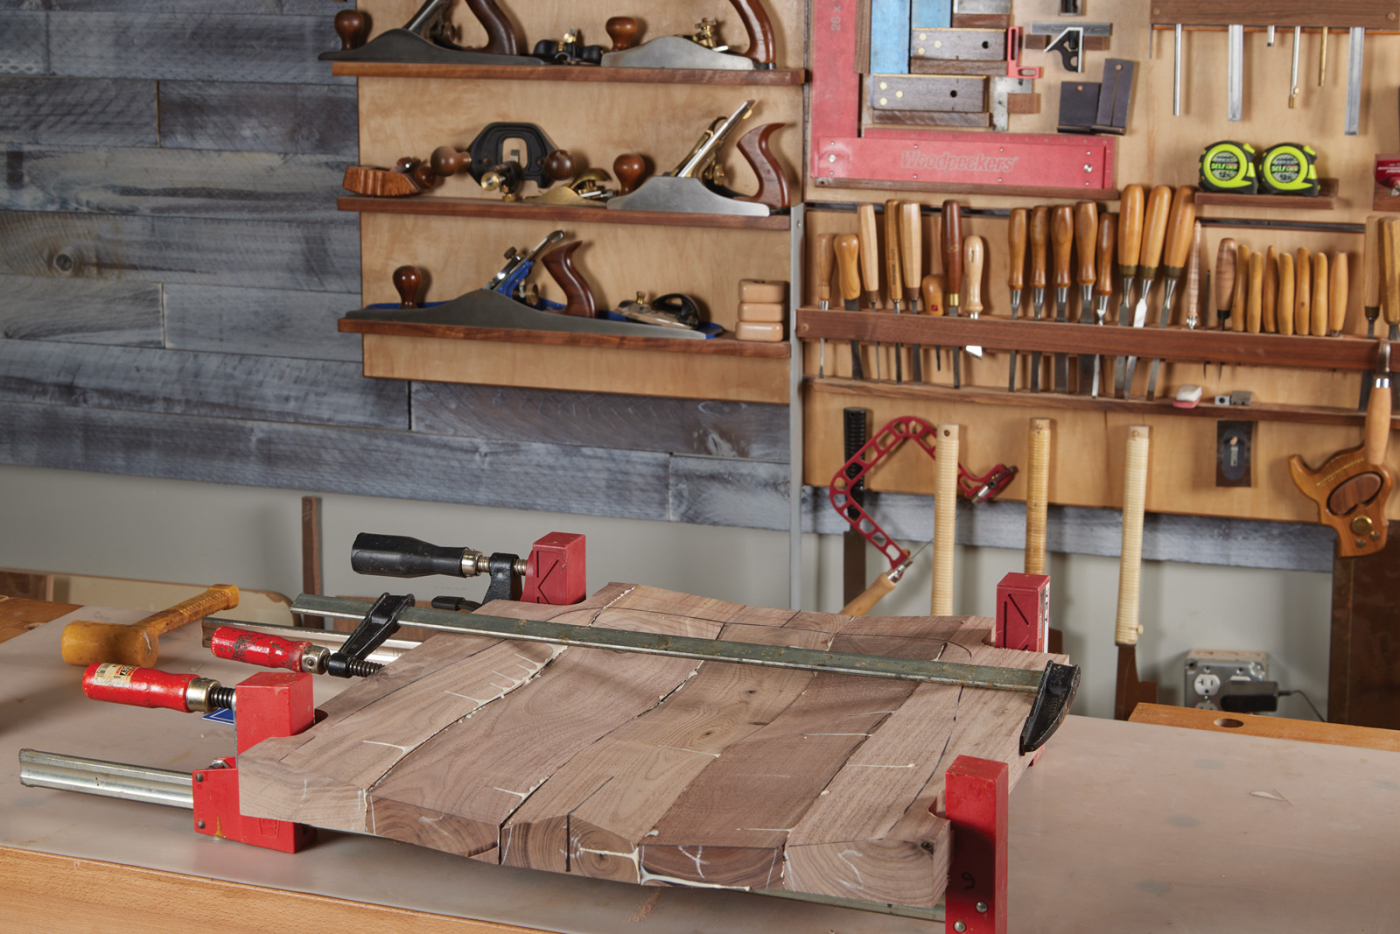
Lay out the boards side by side. Examine each board for knots or other situations that might either enhance the panel or become a problem. Remember you will be removing some stock on boards #1 and #5 for leg joinery and knots or anything noxious might become waste while excavating the tops of seat boards #2, #3, and #4. Also look for enhancing grain and color. Placement of your best-looking board in the center might be beneficial. Decide what looks best. You do not have to alternate the direction of growth rings as you often do when building a tabletop. Square up the array of boards along the back edge using a carpenter’s square. Then use it to draw a straight line across the panel about 1-1/4“ from the back using a red pencil or maker. This will visually help you keep everything square, especially when gluing up. Lastly, number the seat board #1–#5 on the top face and front of each board.
Make a Coopered Panel
Mark the 3° bevel placements on the ends of each board. In a five-board coopered panel, the center (#3) board will be shaped like a trapezoid after cutting the bevel on each edge. Boards #2 and #4 will be shaped like a parallelogram and boards #1 and #5 will have their inside edges beveled.
4 With the seat laid out as it will be glued up, draw exaggerated bevel lines on the ends of the boards for reference as you cut.
Make the markings highly visible and overstated so you get the proper board orientation when cutting the bevels on the jointer or the table saw. If you cut them on the table saw, use a glue joint rip blade for stock greater than 1“ with triple chip grind.

5 Tilt the table saw blade 3°. I use a digital angle gauge to make sure that this is accurate.
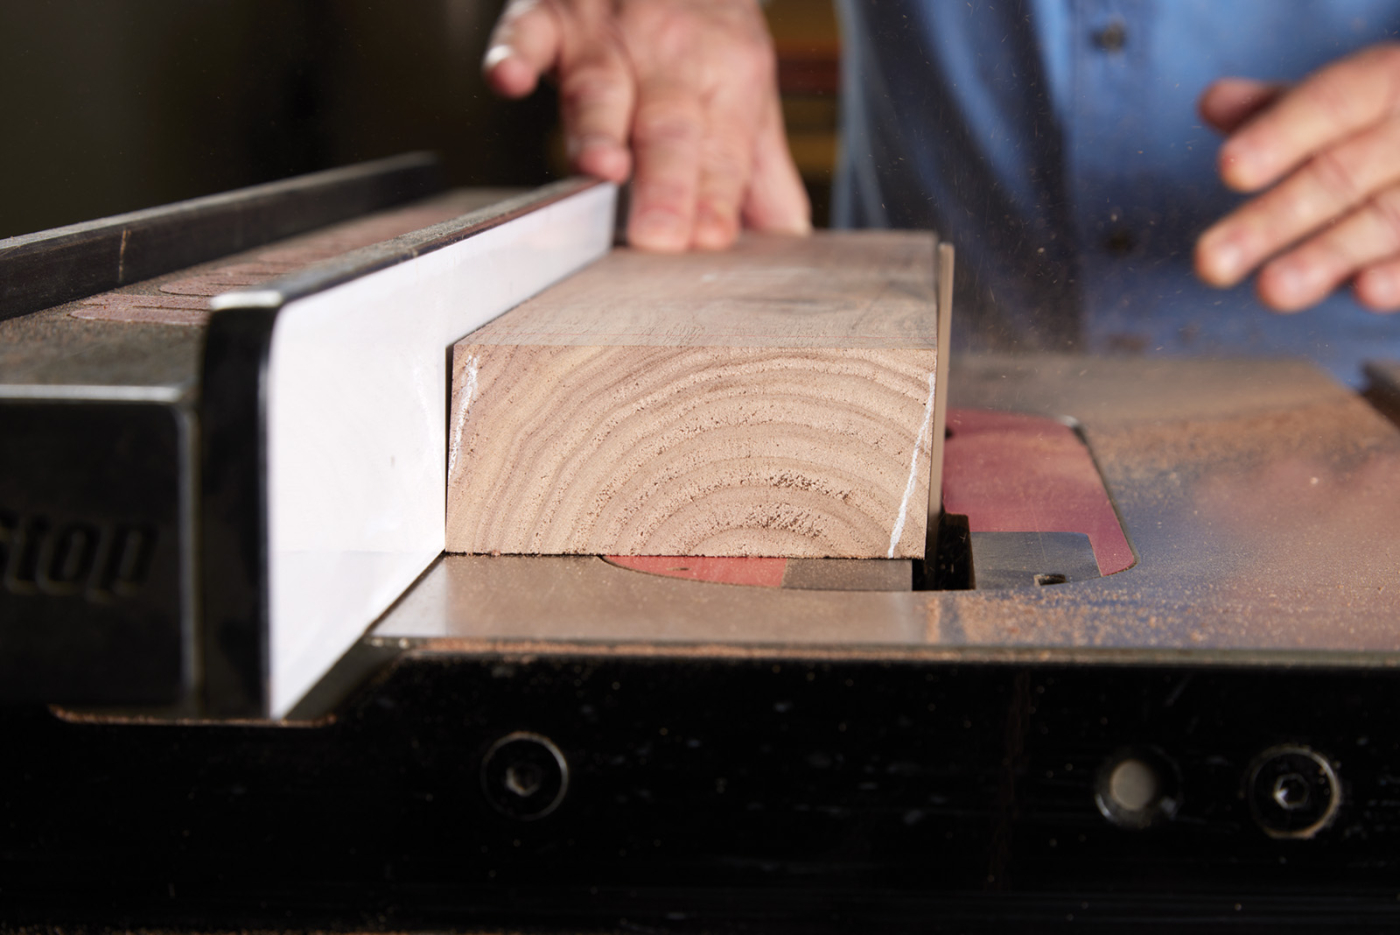
6 Then, bevel the edges of the seat parts, making sure to line up your reference marks with the tilt of the blade.
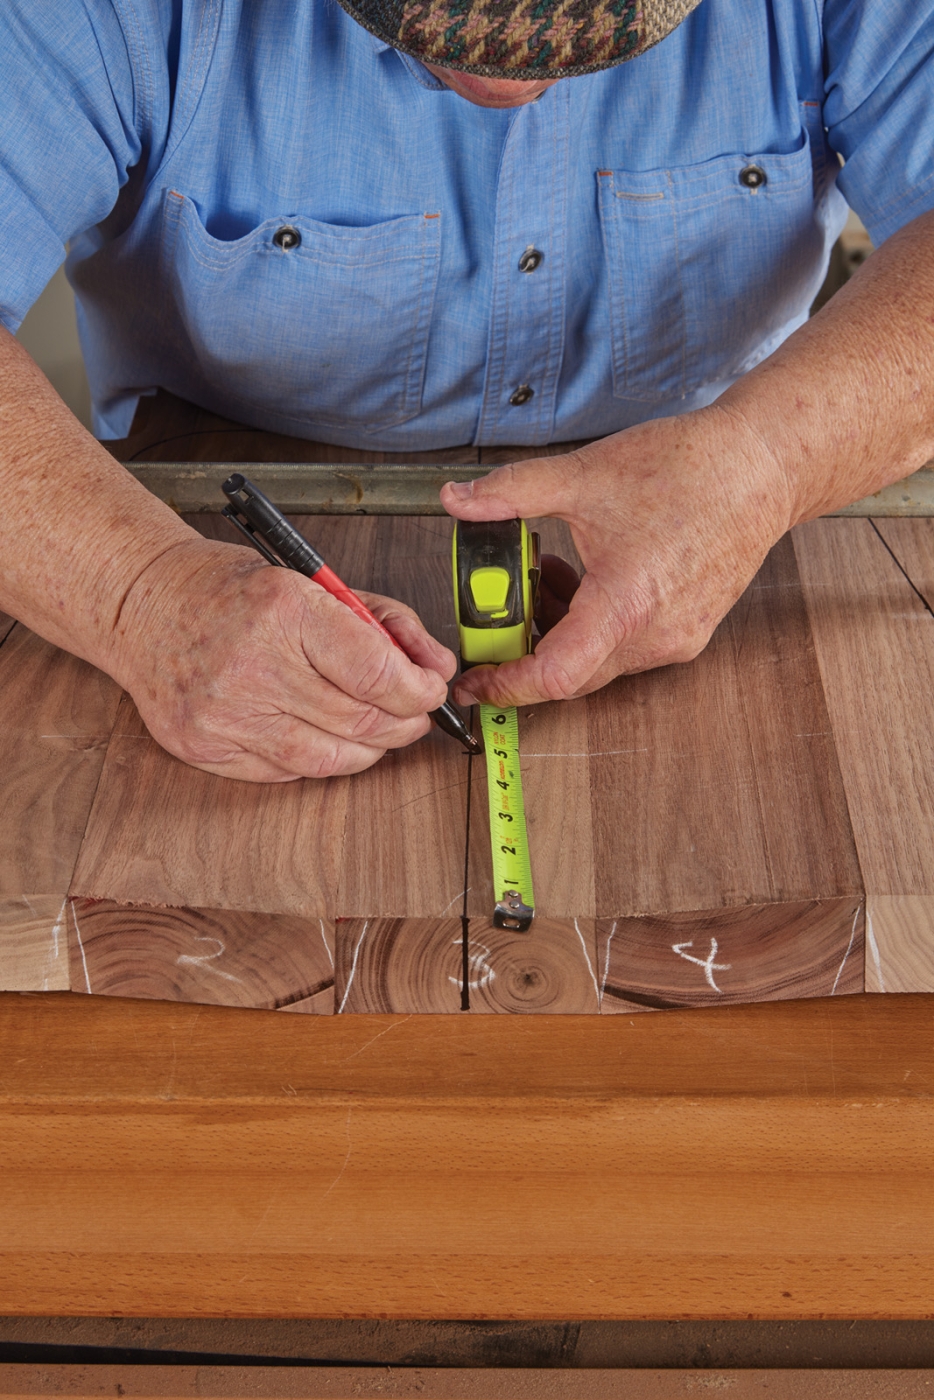
Each edge joint will have three Dominos (8mm x 50mm), biscuits, or dowels strengthening and referencing the joint between boards. To identify locations for your Dominos or biscuits, measure 5“ from the back of the panel and use a carpenter’s square to draw a short line at each joint location across the panel. Do the same 5“ from the front and split the difference between the two for the locations in the middle of the panel. Using a small square to make a line down the inside edge of all the location marks. Mark an X at the bottom of the line to denote the location of the domino on the lower edge of the board. It is a shame to dig into one when sculpting the seat!
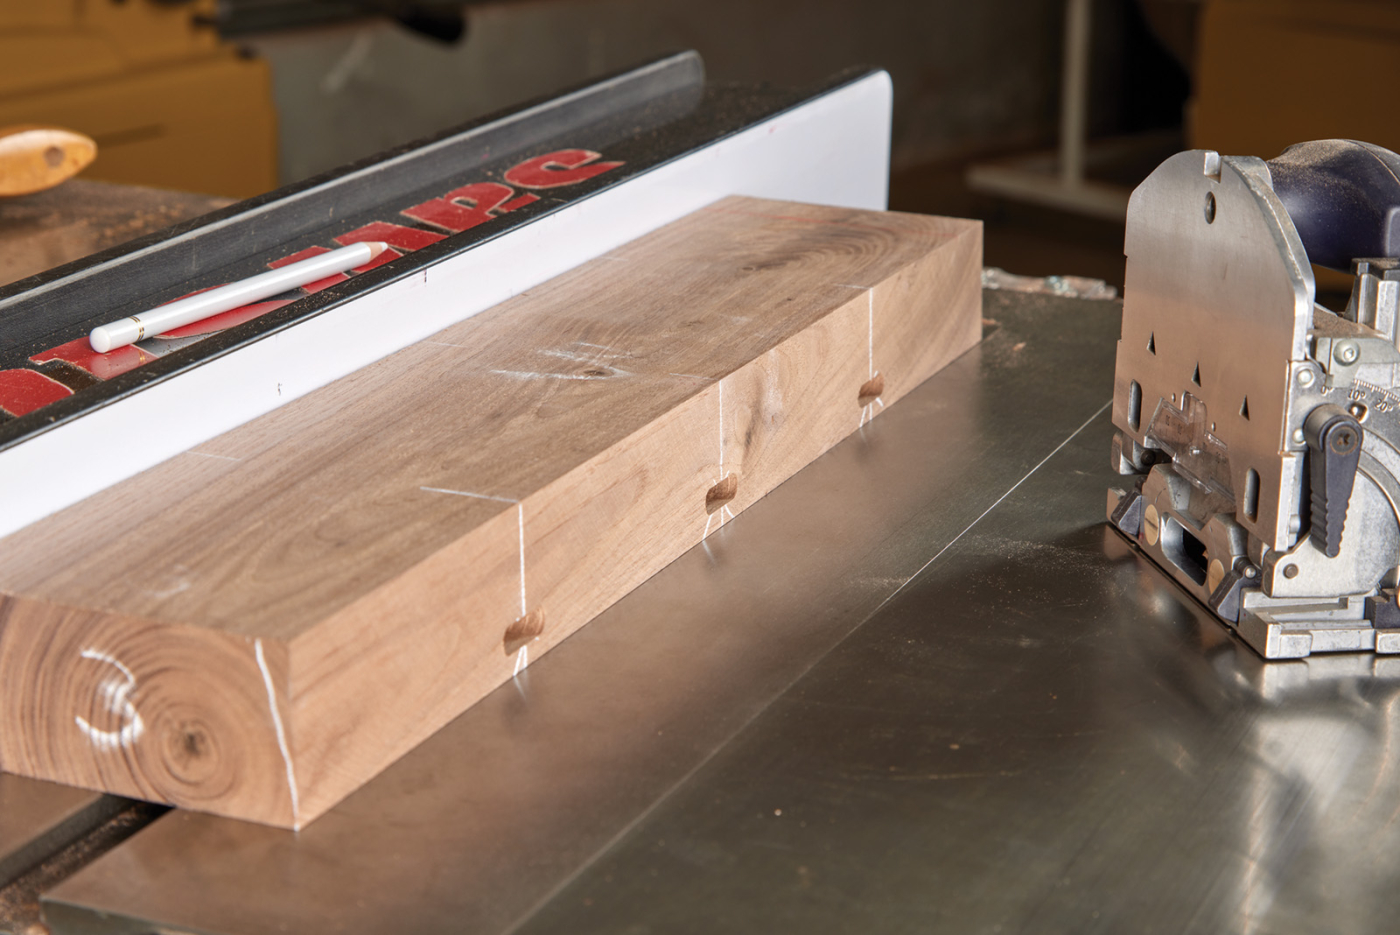
7 While at the table saw, I use the rip fence as a stop and cut Domino slots. The cast iron surface of the saw is a good reference for the Domino and the workpiece.
Begin cutting the mortise or biscuit slots starting with seat board #3. I recommend placing the board on your table saw top and bracing it against the fence. This method provides good support while cutting the mortise or biscuit slots. To get the acute angle, rotate the Domino fixed fenced up keeping the fence firmly against the 3° board edge of the tool against the table saw top. Plunge in and retreat before lowering the tool.
Do the same thing on each location for the inside edges of boards #2 and #4. The outside edges of these two boards and the inside edge of boards #1 and #5 require the use of the articulating fence on the domino. Because the fence will not accommodate an acute angle (less than 90°) you must change the mortising strategy. Flip the board over. With the seat board bottom up and articulating fence loose, place the fixed fence against the board edge and adjust the articulating fence until all the fences are flush. That should be the 3° you need. Tighten the fence. Find the centerline of the domino’s mortise on the side already cut and set a wheel type marking gauge at that measurement. Then mark the locations for the mortises on the other boards opposite edge using the bottom of the board as reference. Complete the mortises and dry assemble the seat panels with Dominos and clamps to ensure that all joints will close accurately.
Prepare Before Carving
Find the center of seat board #3 and make a strong, black marker line extending from the front to back including the ends. The centerline sets the symmetry for the seat panel and the chair.
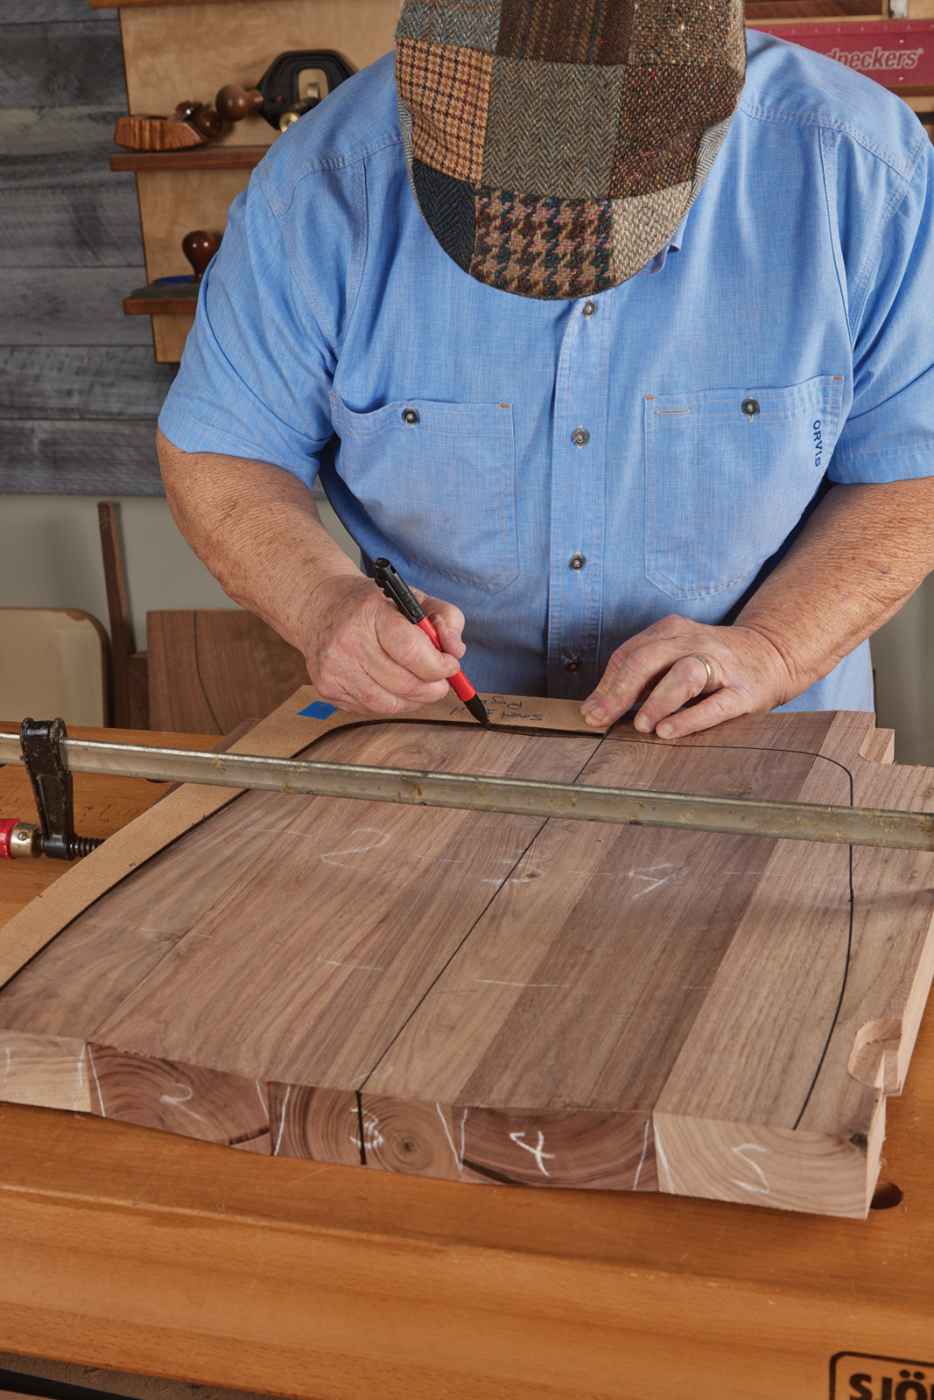
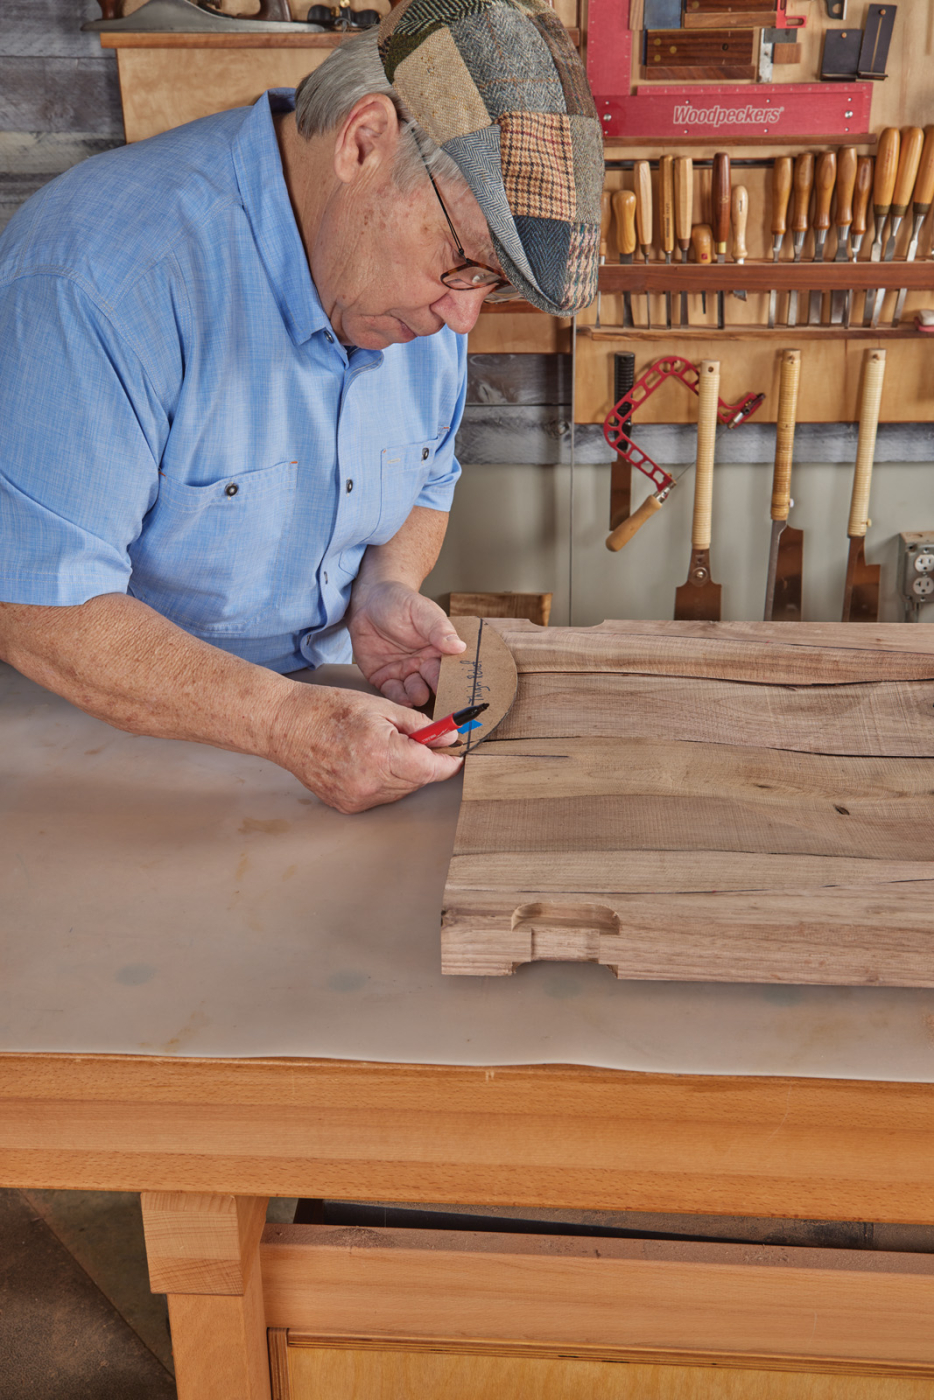
8 Trace the seat pattern to the seat, which has been temporarily clamped together.
Next, measure the center line out 10“ to identify the 20“ width of the coopered panel. Mark and rip the excess off the outside of boards #1 and #5 at the table saw. Mark out and cut all the seat side leg to seat joinery on seat board #1 and #5. My video series will simplify this process.
9 Mark the location of the pommel on board #3.
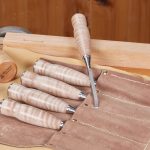
Carving a Seat Bowl
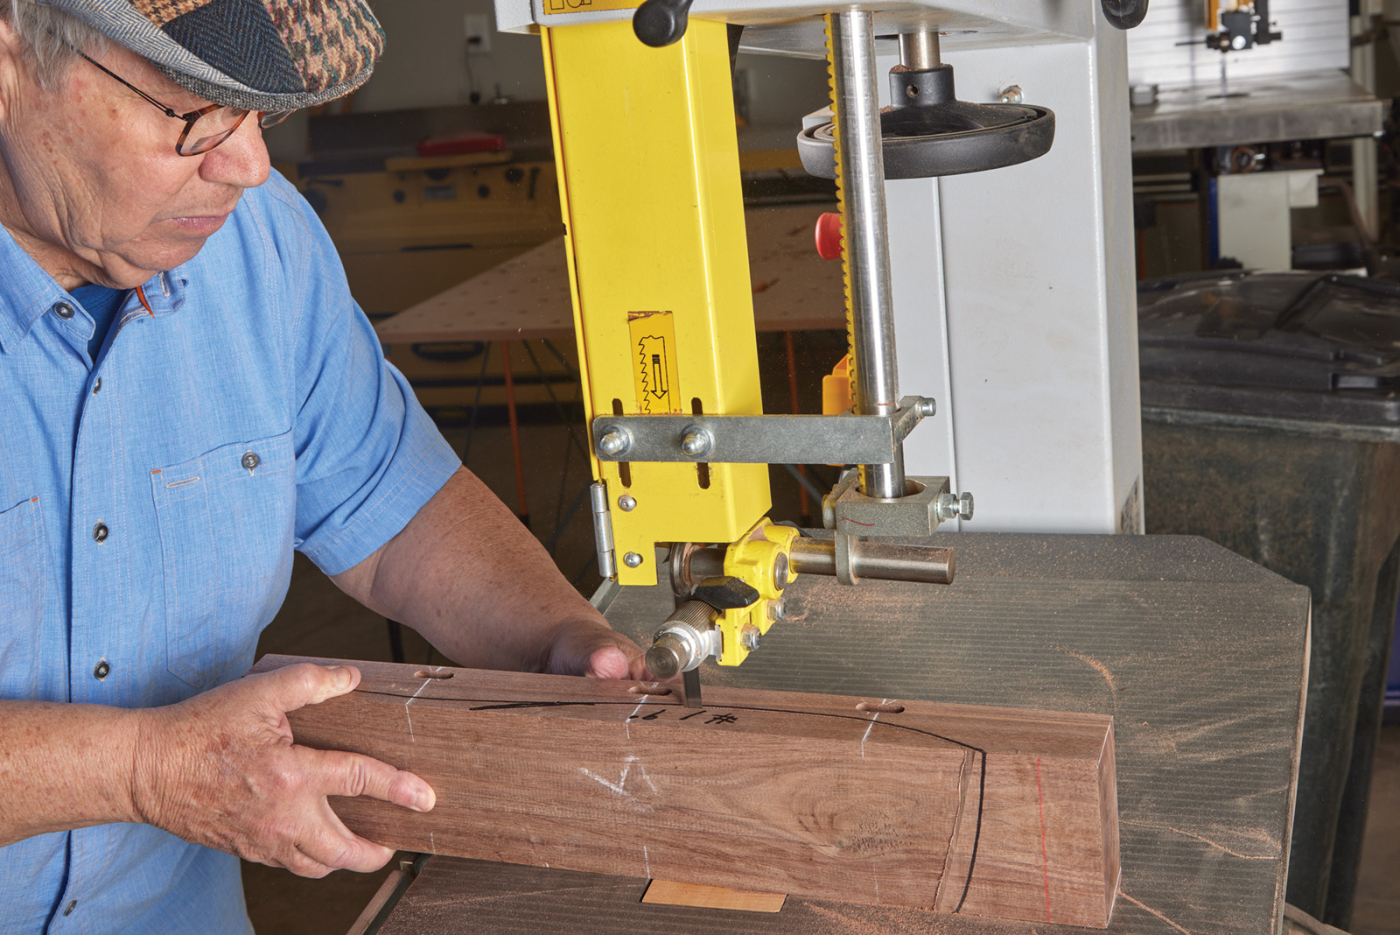
Use my “half seat pattern” or make one to use when laying out the seal bowl and deck. Mark out your pommel on the center line. It should be 5“ in from the front. Next, draw a s-curve on each side of seat board #3. They must match, so again use the “seat board #3 side profile” from my pattern set or make your own. The curve should start at the back of the seat bowl and extend to the front of the seat. Make sure you have the same alignment points. You will need to come out 5“ from the front of the seat board so you don’t cut off the pommel in front! Since you have the 3° bevels on each board edge, you must cut both edges of the board at the bandsaw. It will leave a little ridge down the middle of your board.
10 Trace the side profile pattern onto both side of board #3.
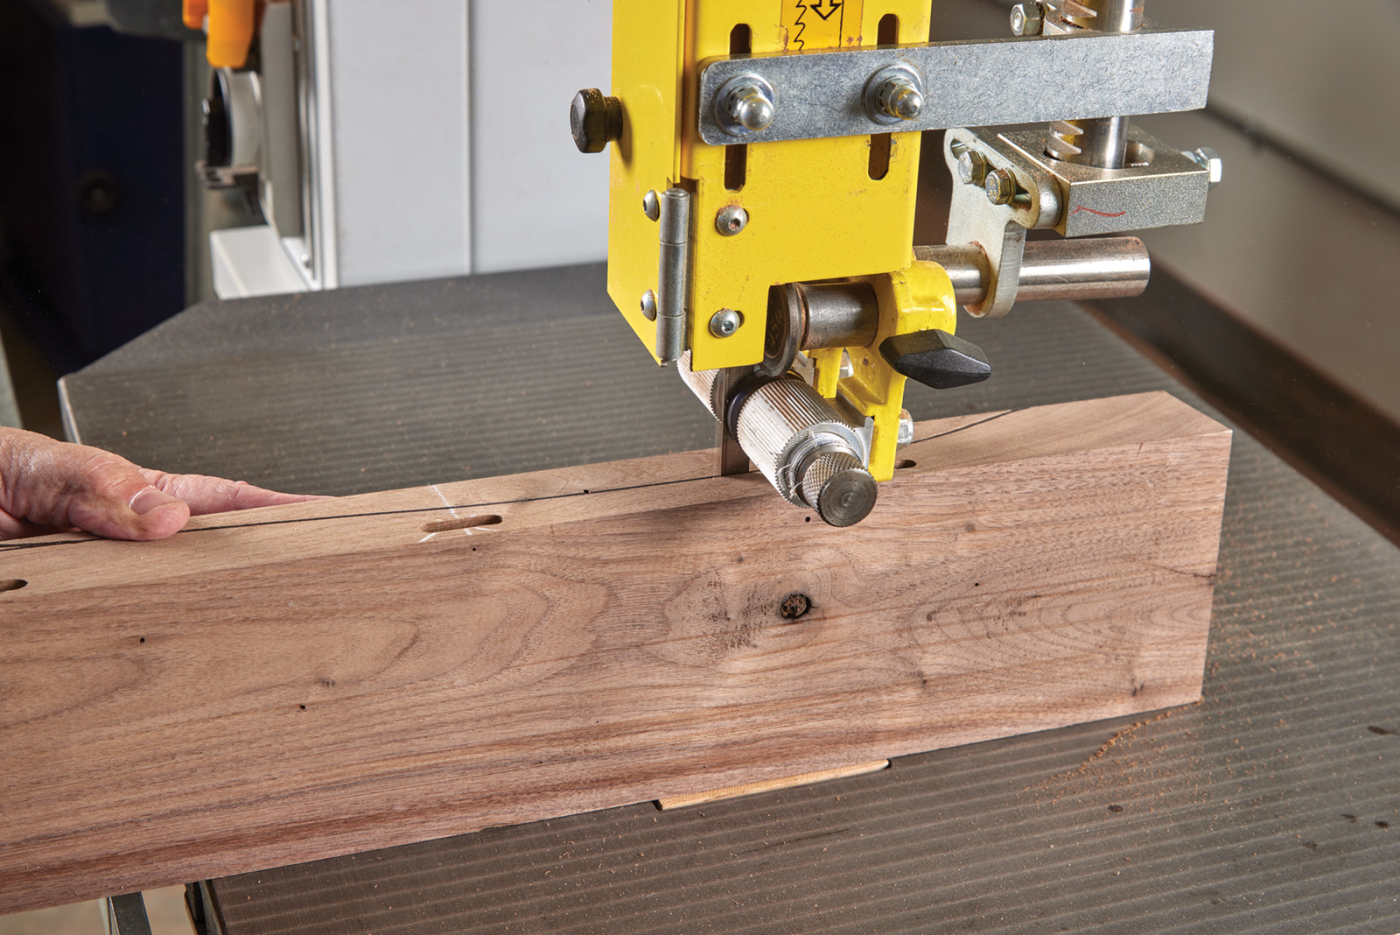
11 At the bandsaw, cut down the template line.
12 Because of the bevel, you’ll need to cut from both edges, leaving a ridge down the center.
Now use a grinder to remove the wood around the pommel. I use a grinder with 24 grit sandpaper. You can also use a carbide donut shaped grinding wheel attached to a grinder to do the same job. I like to be able to hook up to the dust collection.

13

14 A rotary sander with a 24-grit sanding pad acts as a grinder, and helps you smooth out the ridge and remove the wood around the pommel.
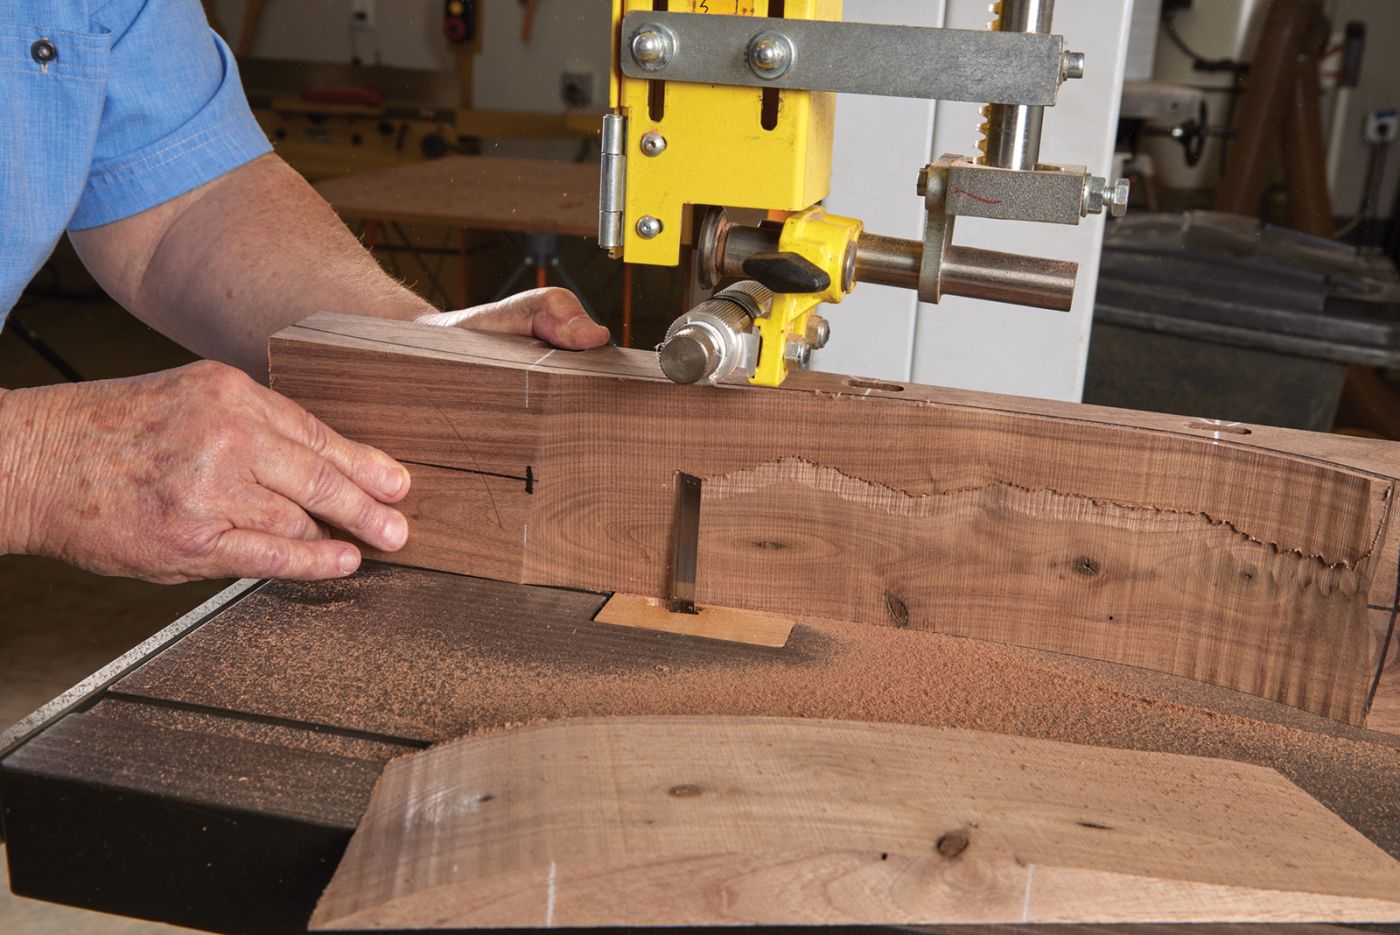
After grinding both sides of the pommel, use board #3 to trace the s-curve on the inside of seat boards #2 and #4. You are going to scoop out the deepest portion of the seat bowl on seat boards #2 and #4 with 9° bandsaw cuts. They are mirrored cuts on the bandsaw so be careful. Extend your traced line on the side of the board across the front edge grain of the grain. make it parallel to the board’s bottom. Use that line when placing the board on the bandsaw table to align the blade with the line vertically. The bandsaw table tilt should be about 3° for the cut. These are mirrored cuts again, so think through your bandsaw feed direction strategy before starting the cuts.
15 Transfer the shape from board #3 to boards 2 and 4.
16 Tilt the bandsaw table to 9° and cut the waste away from boards 2 and 4, but only in the seat area.

17 Set the table back to 90° and cut the remainder of the waste.
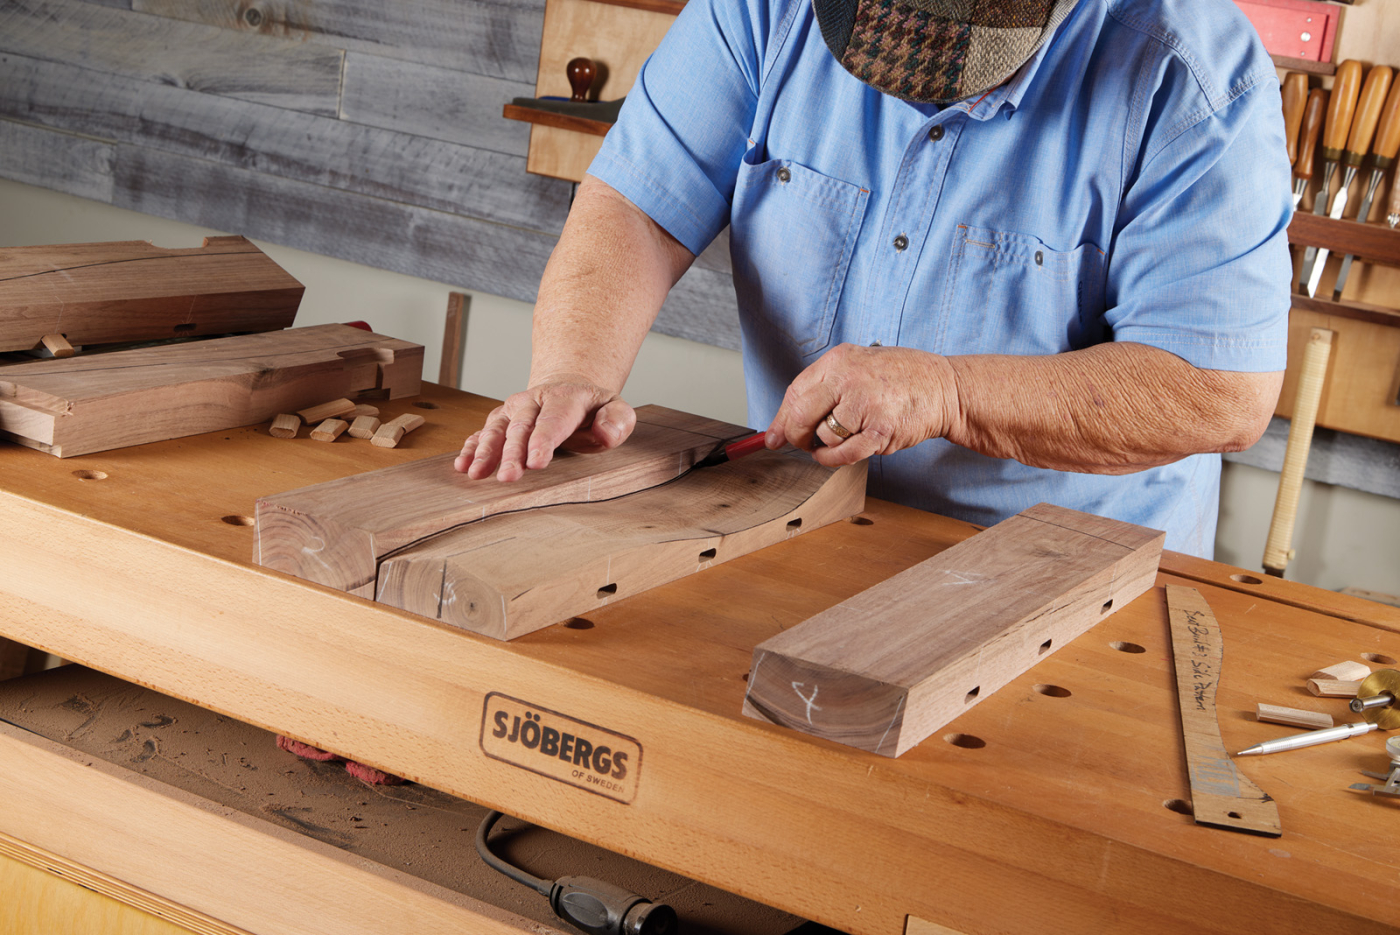
Now trace the outside edges of #2 and #4 against the inside edges of #1 and #5. Then use a grinder to shape #1 and #5.
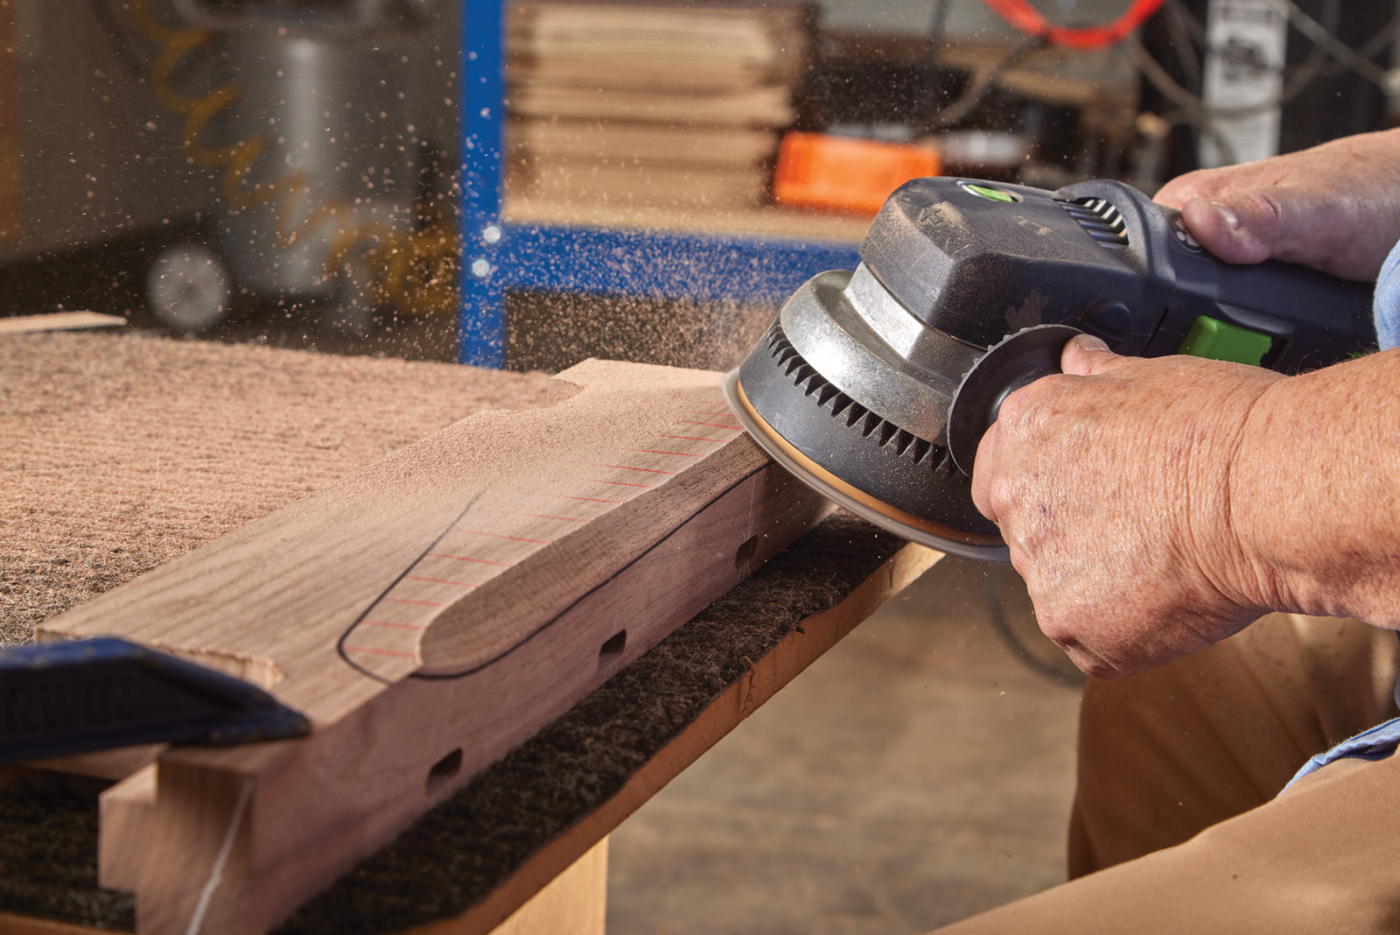
18 The outside boards, #1 and #5, get shaped with the rotary sander.
It’s Time for Glue!
Choose a glue with a generous open time and with a transparent glue line. Use two clamps on the bottom and a light duty clamp on the top and leave it overnight.
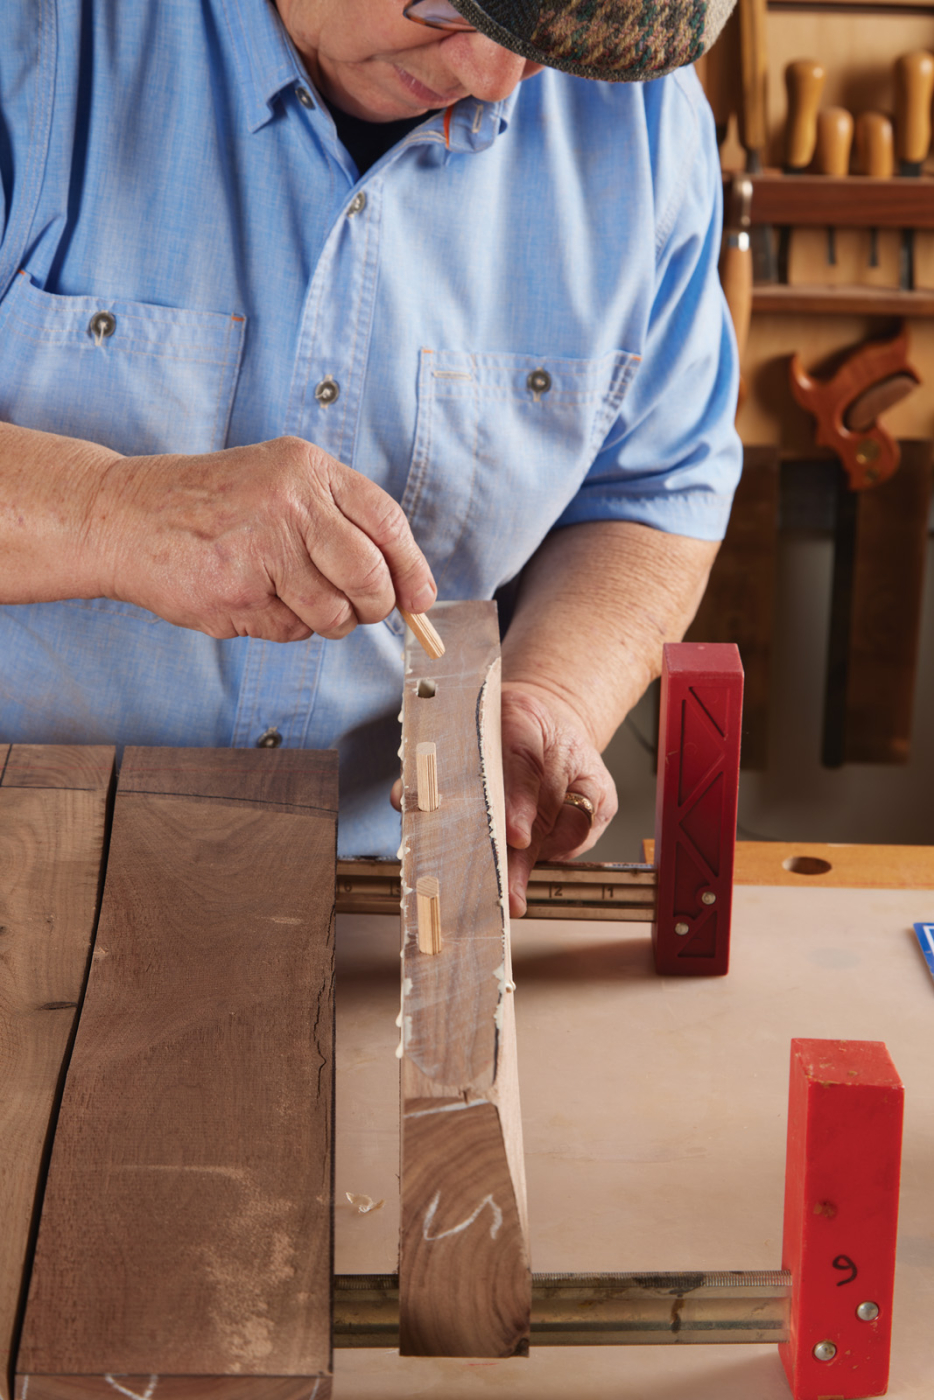
19 Spread glue on the seat parts, add the dominoes, and clamp it together. I like to use an old gift card to get a thin, even layer of glue.
20 Make sure that all of the joints pull together nicely, and apply additional clamps as necessary.
Smooth Transitions
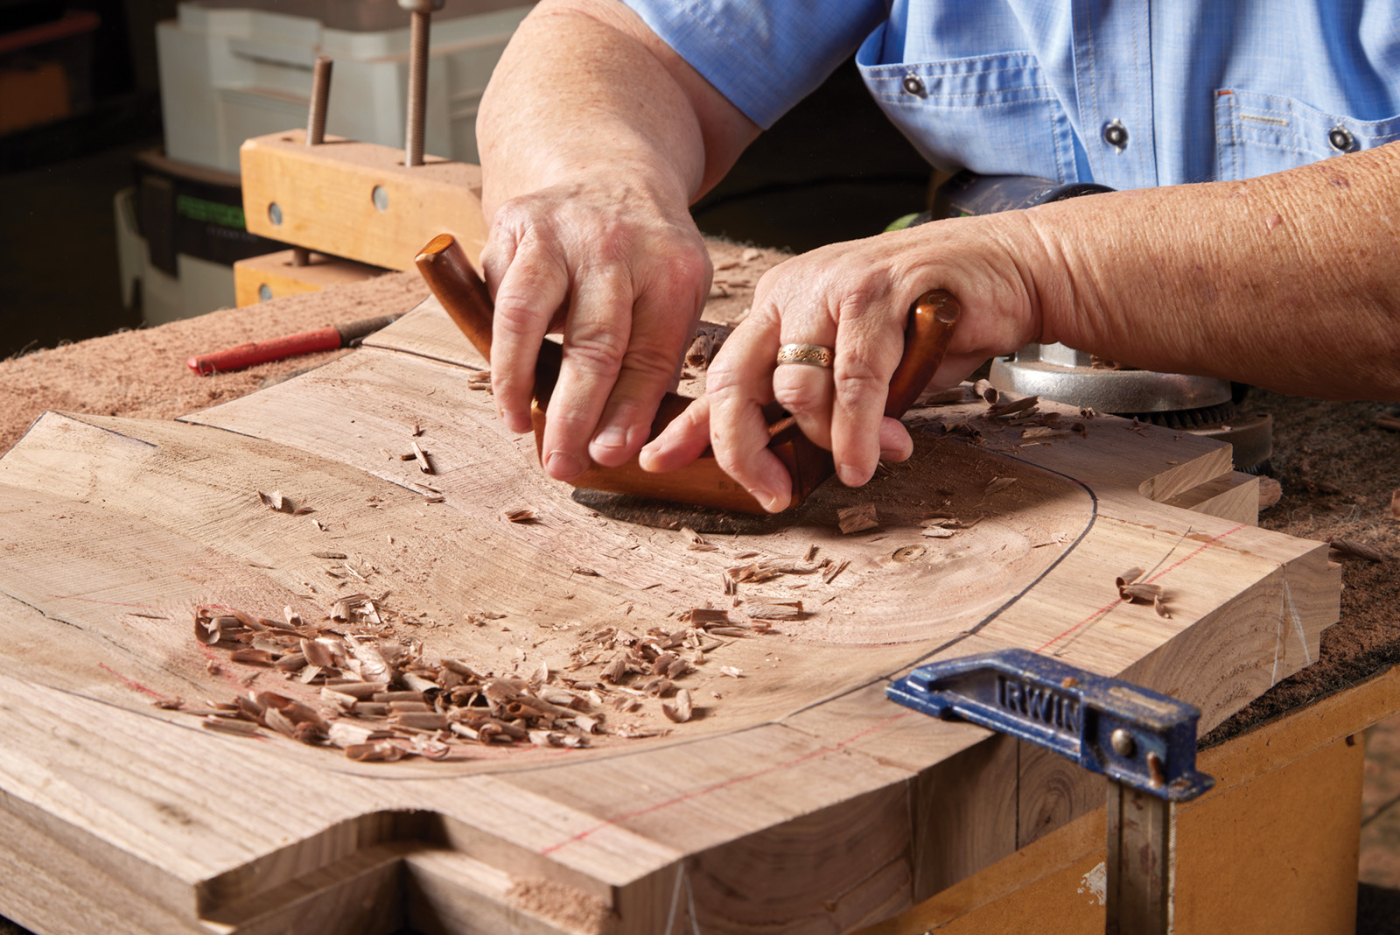
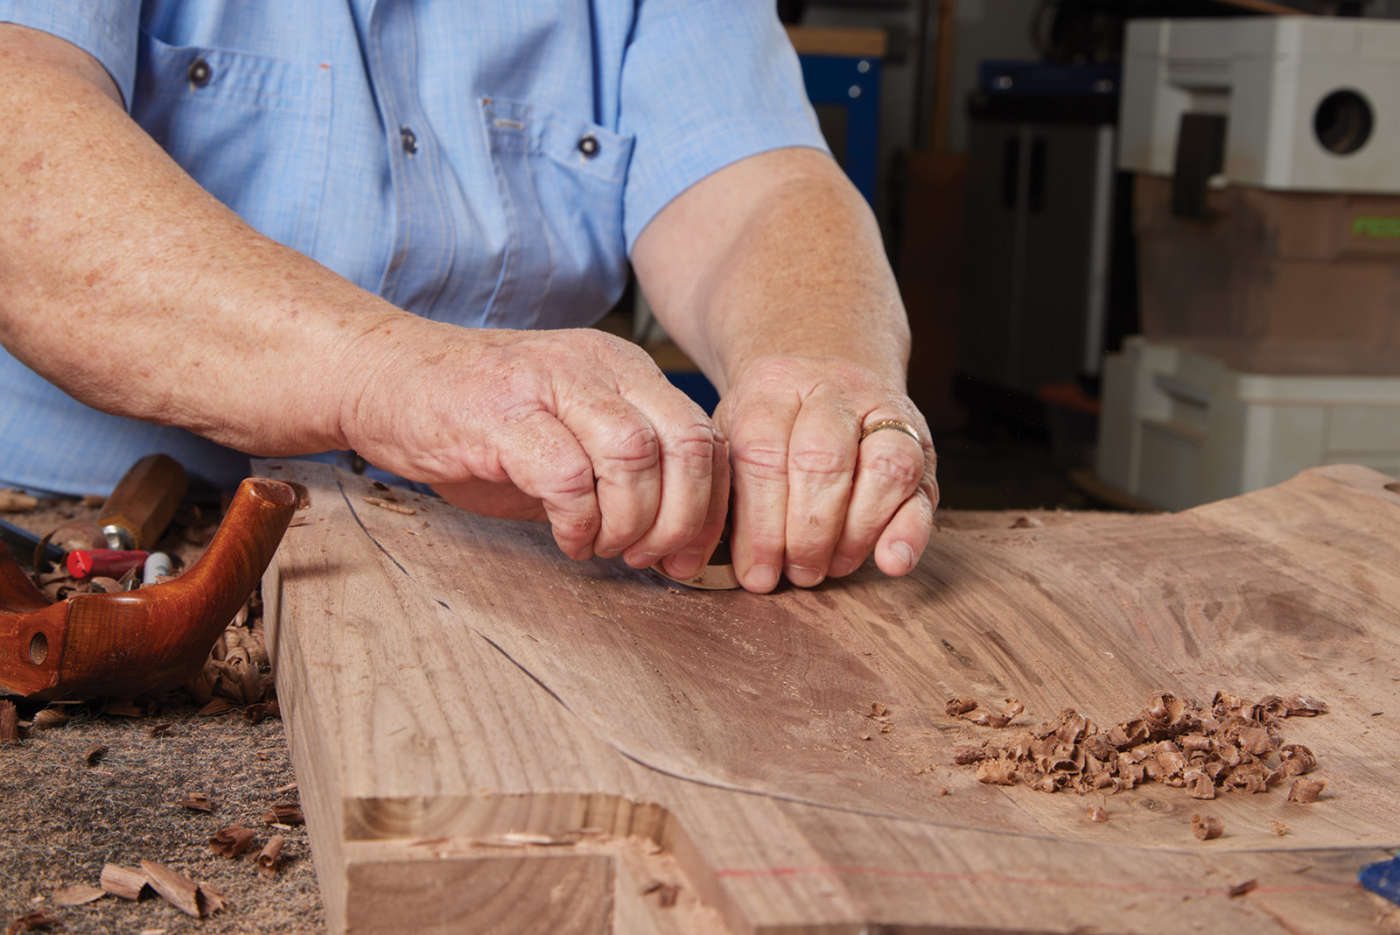
The next day, start smoothing the transitions with a grinder while working toward the bottom of the seat bowl. I also find that a #3 by 35mm gouge can help when cutting in around the seat bowl line. Smooth the high spots with a travisher when possible. If the wood is figured, all bets are off! Test the seat comfort by placing it on a 5-gallon bucket. Scrape and sand any spots necessary for perfect form and function!

21 After the clamps have been removed, the final “guide lines” can be re-drawn. This is for the final shape of the seat back, as well as a couple of notches up front for thigh relief.
22 The thigh relief notches can be cut away at the bandsaw.
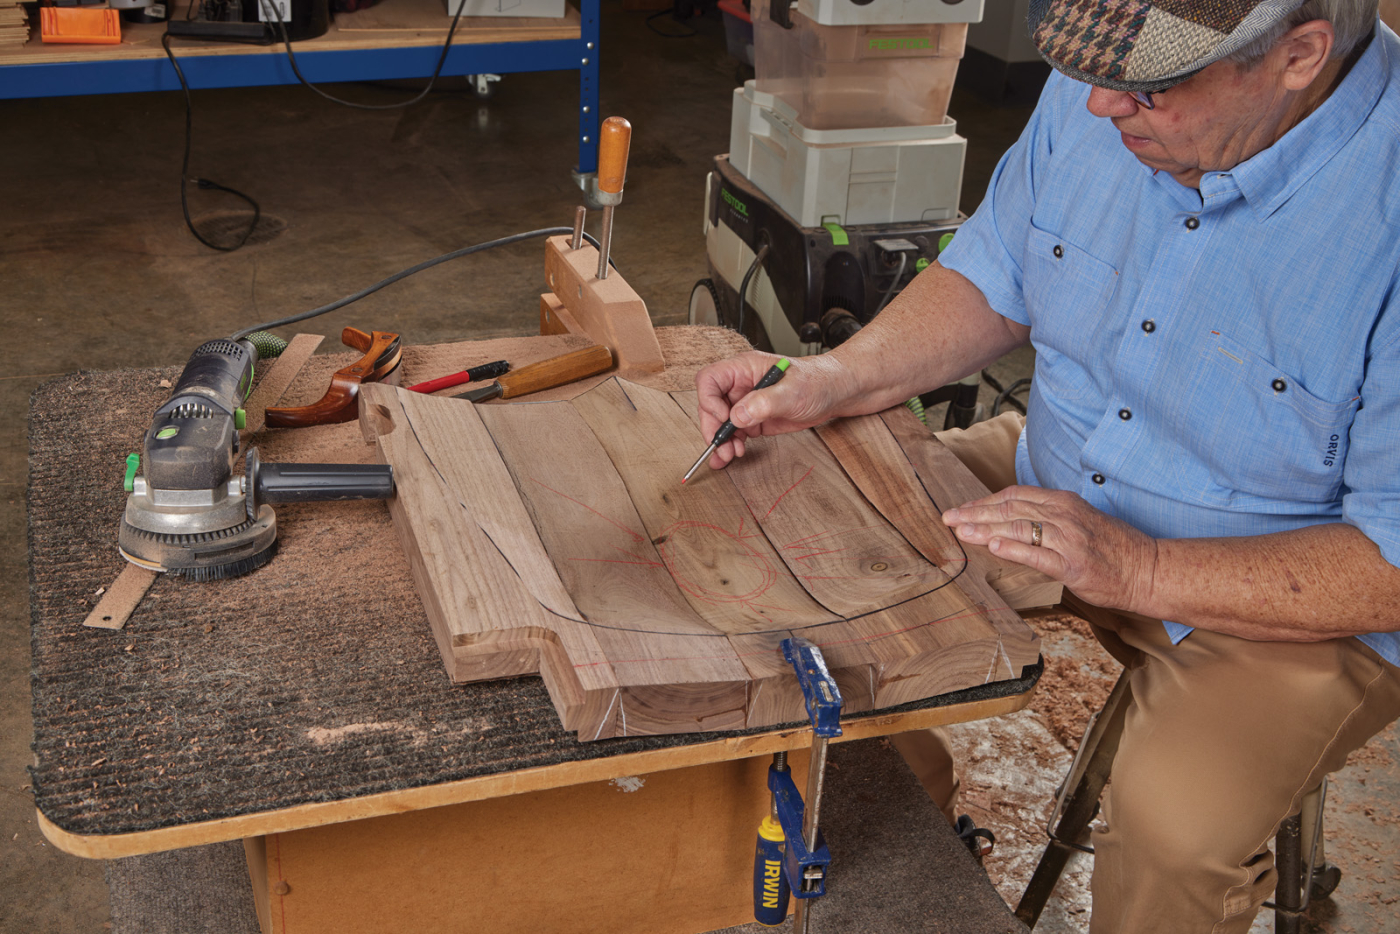
23 Before doing any sanding, I like to draw guidelines showing the deepest part of the seat, and reference “rays” coming out of it.
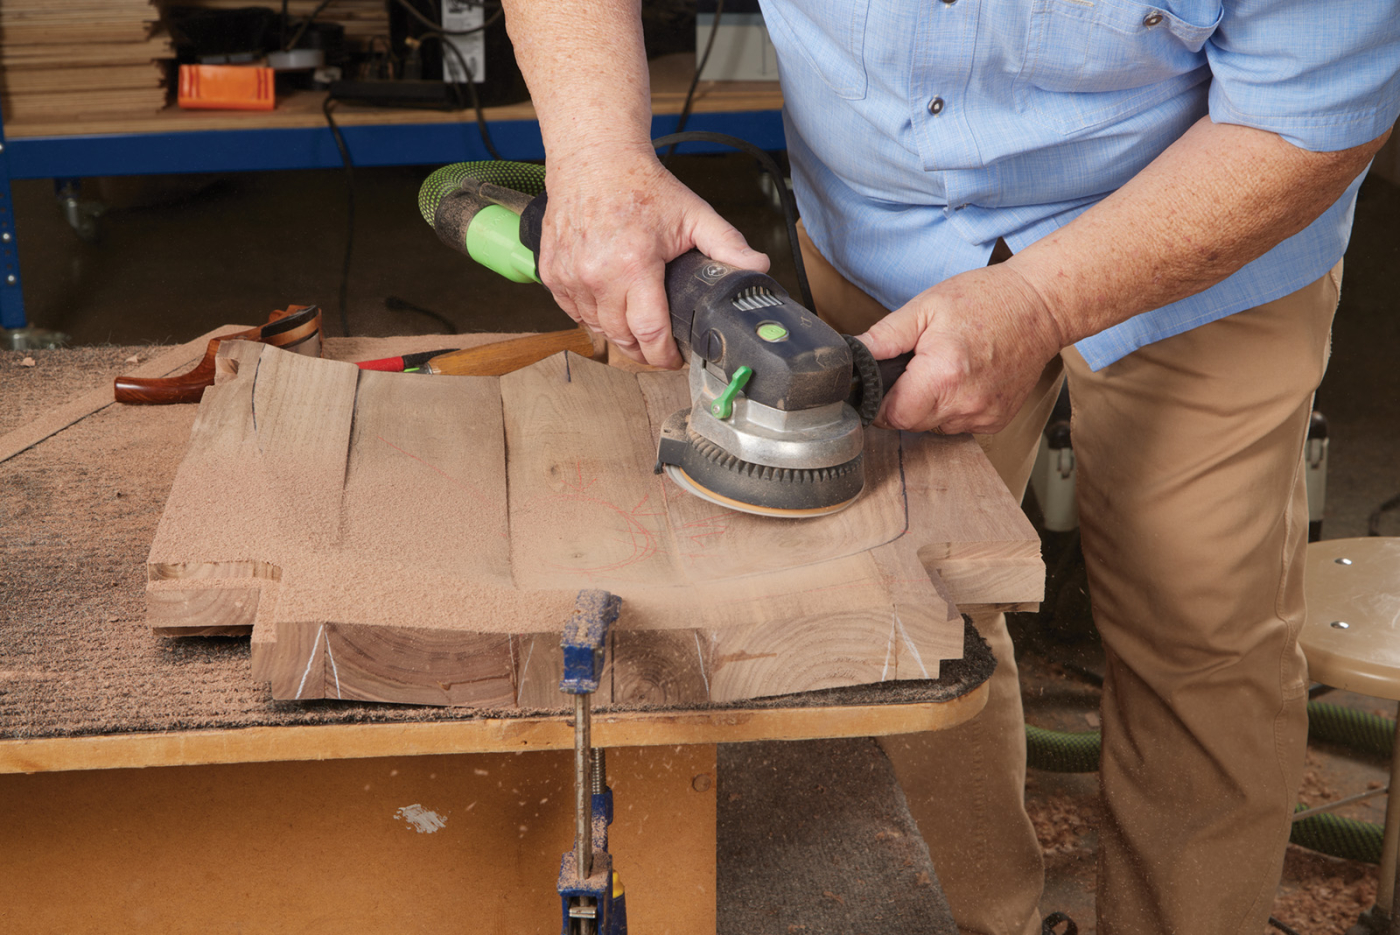
24 A grinder or sander with 24 grit paper sander can be used to start shaping the seat bowl.

25 Highlight any ridges or areas that need additional work with a wax pencil.

26 After much of the grunt work is done, now comes the handtools.
27
28 I use a gouge, travisher, and card scraper to help smooth out and remove any grinding marks left by the coarse paper.
It’s time for a celebration! You have a beautiful, coopered seat, now let’s craft the rest of this great rocking chair together!
Purchase plans for the full chair (including full-sized paper patterns) in our shop: Sculptured rocker plan by Charles Brock
Here are some supplies and tools we find essential in our everyday work around the shop. We may receive a commission from sales referred by our links; however, we have carefully selected these products for their usefulness and quality.