We may receive a commission when you use our affiliate links. However, this does not impact our recommendations.
26 drawers for tools and supplies.
My beat-up garage-sale seven-drawer metal tool cabinet was an eyesore. I wanted something bigger and better, but mostly I wanted something that looked like it belonged in a woodworking shop. Online I found a wooden version that fit the bill, but at $5,000 it was far too expensive. After calculating that I could build a bigger and better cabinet for a lot less, I decided it would be my next project.
My cabinet stands slightly more than 5′ tall. The nine small drawers at the top are side-hung. All the other drawers are mounted on full-extension slides. The narrow drawer just above the bank of side-by-side drawers is actually a handy pull-out shelf. The joinery is simple—pocket screws, biscuits, half-laps and rabbets—but the results are rock-solid. You could easily reconfigure this cabinet to suit your needs. Replace a bank of drawers with doors, for example, or reduce the overall size.
Ginormous Shop Cabinet Cut List
Overall Dimensions: 65-1/2″ H x 42-3/4″ W x 21-1/4″ D
|
Part |
Name |
Qty. |
Material |
Th x W x L |
|
A |
Cabinet side |
2 |
Oak plywood |
3/4″ x 20″ x 64-3/4″ |
|
B |
Horizontal divider |
4 |
Oak plywood |
3/4″ x 19-1/4″ x 39-3/4″ |
|
C |
Top support |
2 |
Oak plywood |
3/4″ x 4″ x 39-3/4″ |
|
D |
Side edgeband |
2 |
Oak |
3/4″ x 1/2″ x 64-3/4″ |
|
E |
1″ edgeband |
3 |
Oak |
1/2″ x 1″ x 39-3/4″ |
|
F |
3/4″ edgeband |
2 |
Oak |
3/4″ x 3/4″ x 39-3/4″ |
|
G |
Back |
1 |
Oak plywood |
3/4″ x 39-3/4″ x 63-3/4″ |
|
H |
Upper divider |
2 |
Oak |
1-1/2″ x 6-1/2″ x 20″ (a) |
|
J |
Upper divider edgeband |
2 |
Oak |
1/2″ x 1-1/2″ x 6-1/2″ |
|
K |
Drawer support |
18 |
Oak |
3/8″ x 5/8″ x 15″ |
|
L |
Lower divider |
1 |
Oak plywood |
1-1/2″ x 20-7/8″ x 19-1/4″ (a) |
|
M |
Lower divider edgeband |
1 |
Oak |
1/2″ x 1-1/2″ x 20-5/8″ |
|
N |
Corner block |
4 |
Oak/Poplar |
2″ x 2″ x 1-3/4″ |
|
P |
Base trim front |
1 |
Oak |
3/4″ x 2-1/2″ x 42-3/4″ |
|
Q |
Base trim return |
2 |
Oak |
3/4″ x 2-1/2″ x 20-1/2″ |
|
R |
Top |
1 |
Oak plywood |
3/4″ x 20-1/2″ x 41-1/4″ |
|
S |
Top edging front |
1 |
Oak |
3/4″ x 3/4″ x 42-3/4″ (b) |
|
T |
Top edging return |
2 |
Oak |
3/4″ x 3/4″ x 21-1/4″ [c] |
|
U |
2″ Drawer |
9 |
Oak |
2″ x 12-1/8″ x 15-1/2″ |
|
U1 |
Drawer front/back |
18 |
Oak |
3/4″ x 2″ x 12-1/8″ (d) |
|
U2 |
Drawer side |
18 |
Oak |
3/4″ x 2″ x 15″ (e) |
|
U3 |
Bottom |
9 |
Melamine |
1/4″ x 11-1/8″ x 14-1/2″ (f) |
|
V |
3″ Drawer |
4 |
Oak |
3″ x 39-1/2″ x 18-3/4″ |
|
V1 |
Front |
4 |
Oak |
3/4″ x 3″ x 39-1/2″ |
|
V2 |
Box front/back |
8 |
Birch plywood |
3/4″ x 2-1/4″ x 38-3/4″ (g) |
|
V3 |
Box side |
8 |
Birch plywood |
3/4″ x 2-1/4″ x 17-1/2″ (h) |
|
V4 |
Bottom |
4 |
Melamine |
1/2″ x 38″ x 17-1/4″ (j) |
|
W |
4″ Drawer |
4 |
Oak |
4″ x 39-1/2″ x 18-3/4″ |
|
W1 |
Front |
4 |
Oak |
3/4″ x 4″ x 39-1/2″ |
|
W2 |
Box front/back |
8 |
Birch plywood |
3/4″ x 3-1/4″ x 38-3/4″ (g) |
|
W3 |
Box side |
8 |
Birch plywood |
3/4″ x 3-1/4″ x 17-1/2″ (h) |
|
W4 |
Bottom |
4 |
Melamine |
1/2″ x 38″ x 17-1/4″ (j) |
|
X |
Shelf |
1 |
Oak |
2″ x 39-1/2″ x 18-3/4″ |
|
X1 |
Front |
1 |
Oak |
3/4″ x 2″ x 39-1/2″ |
|
X2 |
Box front/back |
2 |
Birch plywood |
3/4″ x 1-13/16″ x 38-3/4″ (k) |
|
X3 |
Box side |
2 |
Birch plywood |
3/4″ x 1-13/16″ x 17-1/2″ (l) |
|
X4 |
Shelf |
1 |
Melamine |
1/2″ x 38″ x 17-1/4″ (m) |
|
Y |
5″ Drawer |
8 |
Oak |
5″ x 18-7/8″ x 18-3/4″ |
|
Y1 |
Front |
8 |
Oak |
3/4″ x 5″ x 18-7/8″ |
|
Y2 |
Box front/back |
16 |
Birch plywood |
3/4″ x 4-1/4″ x 18-1/8″ (g) |
|
Y3 |
Box side |
16 |
Birch plywood |
3/4″ x 4-1/4″ x 17-1/2″ (h) |
|
Y4 |
Bottom |
8 |
Melamine |
1/2″ x 17-3/8″ x 17-1/4″ (j) |
|
Z |
Knob |
9 |
Dull chrome |
1-1/4″ dia. |
|
ZZ |
Pull |
26 |
Dull chrome |
3″ C–C |
Notes:
a) Glue two 3/4″ pieces together with shims between to achieve 1-1/2″ thickness.
b) Both ends mitered.
c) One end mitered.
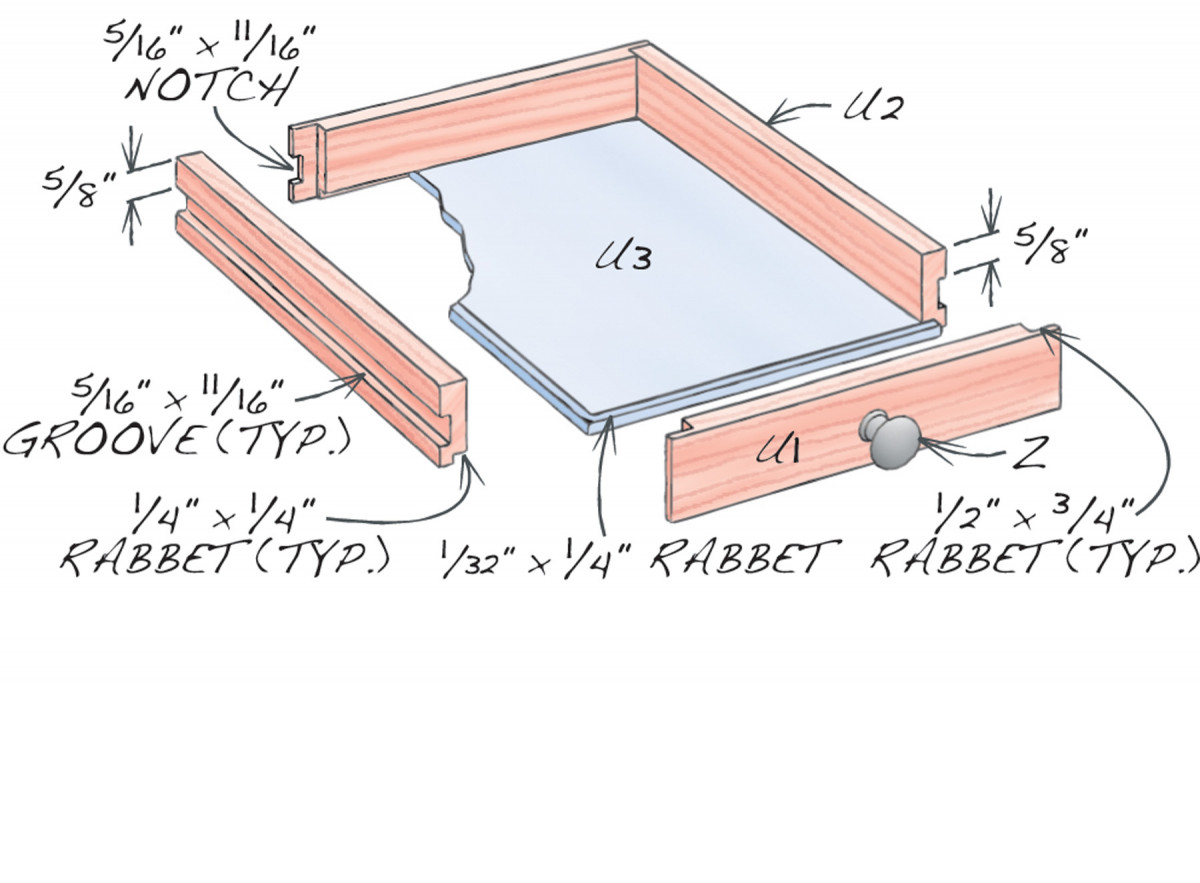
d) 1/2″ x 3/4″ rabbets on both ends; 1/4″ x 1/4″ rabbet for bottom.
e) 5/16″ x 11/16″ groove for drawer guide; 1/4″ x 1/4″ rabbet for bottom.
f) 1/32″ x 1/4″ rabbet around top edge.
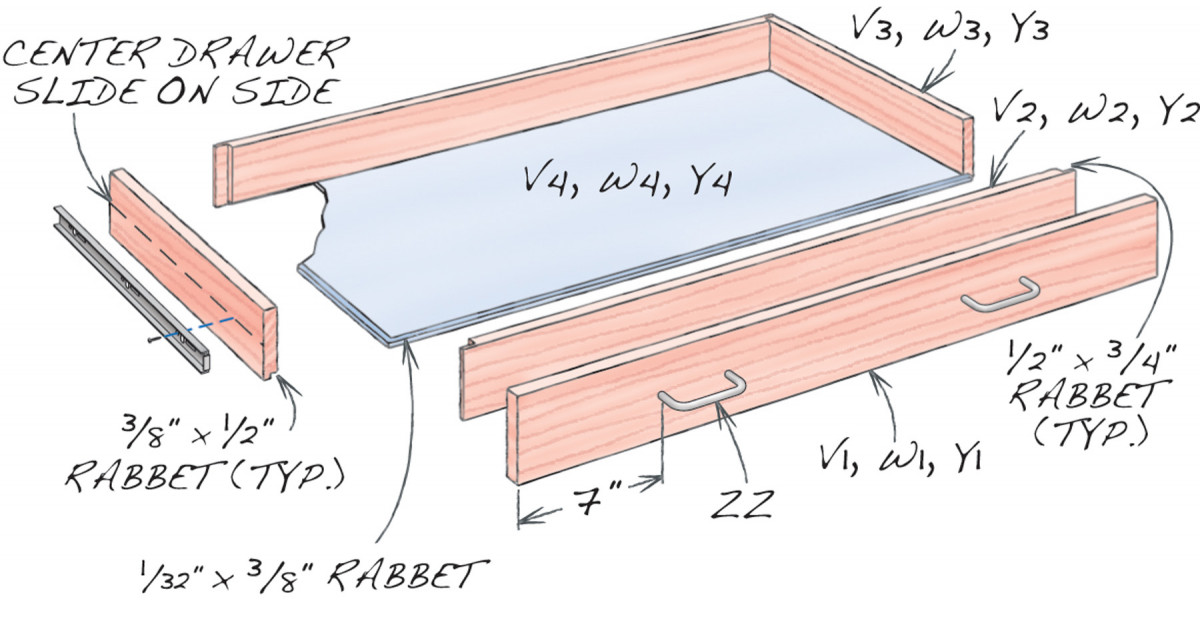
g) 1/2″ x 3/4″ rabbets on both ends; 3/8″ x 1/2″ rabbet for bottom.
h) 3/8″ x 1/2″ rabbet for bottom.
j) 1/32″ x 3/8″ rabbet around top edge.
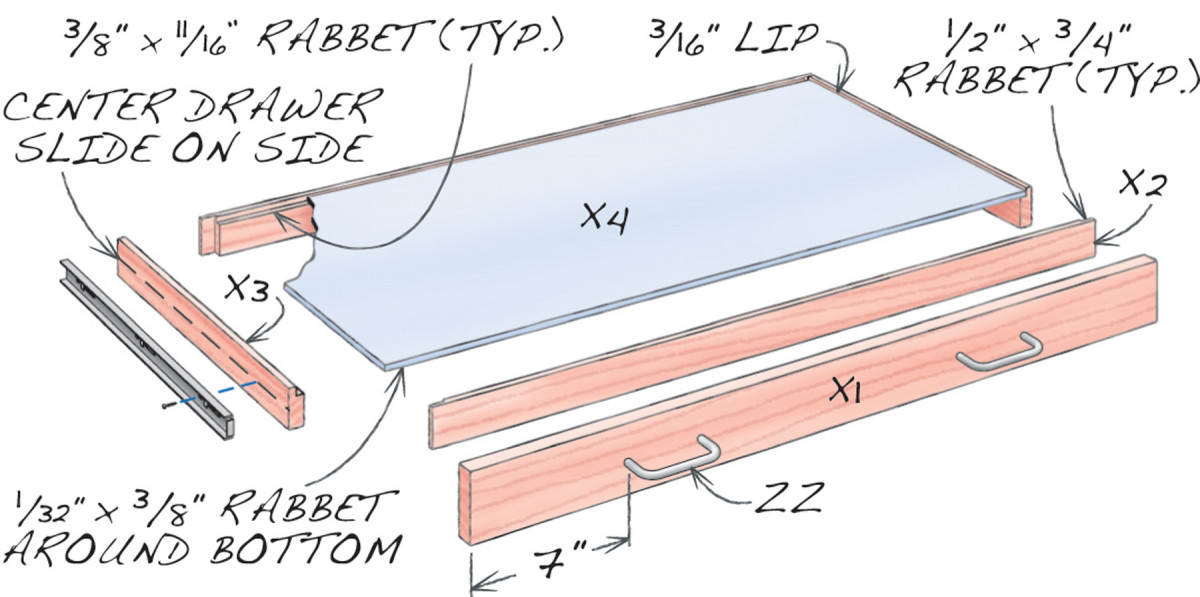
k) 1/2″ x 3/4″ rabbets on both ends; 3/8″ x 11/16″ rabbet for shelf.
l) 3/8″ x 11/16″ rabbet for shelf.
m) 1/32″ x 3/8″ rabbet around bottom edge.

Fig. A) Exploded View

Fig. B) Side-Hung Drawers

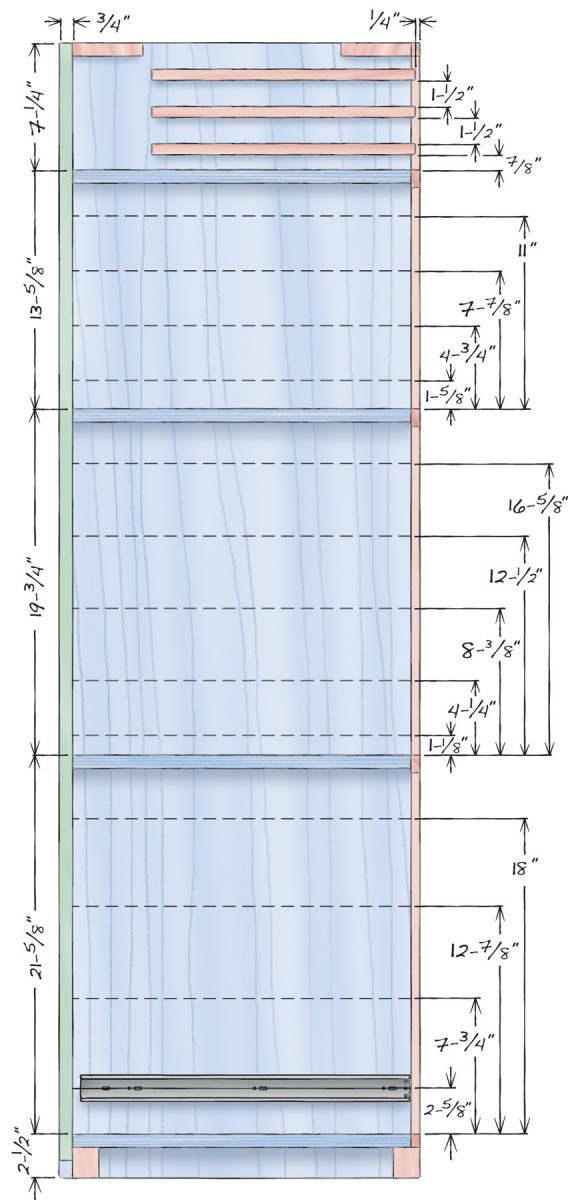
Fig. C) Side View

Fig. D) Slide-Mounted Drawers

Fig. E) Pull-Out Shelf
Build the cabinet
1. Cut the sides, horizontal dividers and top supports (A–C, Fig. A, above) to final size after gluing on their edgebands (D–F). Note the different edge band widths.
2. Assemble the sides, dividers and supports with pocket screws, biscuits and glue (Fig. C). Temporarily install the back (G) to keep the assembly square.
3. Glue together two pieces of plywood to create the upper dividers (H). Install shims between the pieces to match the 1-1/2″ width of the edge band (J). Glue on the edge bands. Then cut the assemblies to final dimension.
4. Fasten drawer supports (K) to both sides of the dividers and to the cabinet sides. Use 7/8″ and 1-1/2″ spacers to position the supports.
5. Install the upper dividers with screws and glue.
6. Glue together two pieces of plywood (with shims between) to create the lower divider (L).
7. Install the lower divider. Then glue on its edge band (M).
8. Install the corner blocks (N) and glue on base trim (P and Q).
9. Cut the top (R) to final size and glue on its mitered edging (S and T).
Build the drawers
10. Cut all the drawer box parts to size and rout rabbets on the ends of the fronts and backs (U1, V2–Y2 and Figs. B, D and E). The lowest full-width drawer (X) is actually a shelf with a 3/16″ lip at the top to allow installing a layer of cork.
11. Cut grooves in the sides of the 2″ drawers (U2).
12. Glue and nail together the drawer boxes. Then rout rabbets and install the drawer bottoms (U3, V4, W4, Y4) and shelf (X4). Create effective gluing surfaces on the melamine bottoms by routing shallow rabbets around the edges.
13. Test-fit the nine side-hung drawers and make any necessary adjustments. The fronts should stop flush with the cabinet, with 1/8″ gaps all around. Make any necessary adjustments and install the pulls (Z, see Source, below).
14. Center and install the drawer part of each slide on the sides of all the remaining drawer boxes.
15. Install the cabinet part of each slide in the cabinet (Fig. C).
16. Install the drawer boxes and make any necessary adjustments.
17. Cut the drawer fronts (V1–Y1) to final size and install the pulls (ZZ, see Source).
18. Position the drawer fronts on the drawer boxes. They extend 3/8″ above and below the drawer boxes, except for the pull-out shelf front (X1), which is the same size as the shelf box. Use shims to create even spacing (1/8″ gaps all around). Fasten the drawer fronts with 1/1-4″ #8 flat head screws.
Final assembly
19. Fasten the back to the cabinet with screws.
20. Fasten the top with screws through the top supports.
21. For safety, thread a large screw eye into the top so you can shackle the cabinet to the wall.
Sources
KVTT100 18″ Full Extension Side Mount Drawer Slide (13 pair req.)
Amerock Dull Chrome Wire Pull (26 req.)
Amerock Dull Chrome 1-1/4″ dia. Knob (9 req.)
Here are some supplies and tools we find essential in our everyday work around the shop. We may receive a commission from sales referred by our links; however, we have carefully selected these products for their usefulness and quality.


Nice cabinet! It looks perfect for what I need. The plans seem to have the same diagram as Fig A and Fig C. We could probably figure out what the “exploded view” in Fig A is supposed to look like from the parts call out, but it’d be great if you could republish or update the article with the correct diagram as Fig A. Thanks!