


We may receive a commission when you use our affiliate links. However, this does not impact our recommendations.
As it often happens with my ideas, the moment I start thinking about some type of innovation or another I gravitate to my sketchbook and try to evolve it on paper until I feel certain it has ripened enough and is ready to be built. But sometimes, at least with me, I have to force myself to put aside my sketchbook and go to the shop and give the basic ideas a chance – even before exhausting all my designer’s neurons on it.
In these moments I remind myself that the rabbit hole of design can go deep, split into different tunnels, and consequently take me away from my original intent, so I’d rather stop at some early point and give the damn thing a chance before spending additional time and brain resources on the drawing board.
The EZ sled idea was one of those notions where I had to stop myself from sliding too deep into the design rabbit hole.
Early on in the process, after buying and trying 3M Safety-Walk Gray, I decided I should give the concept of enhancing traction via this product the first chance on a simple sled. But now as I like the result and I feel that it works, I decided to share my additional sketches with you.
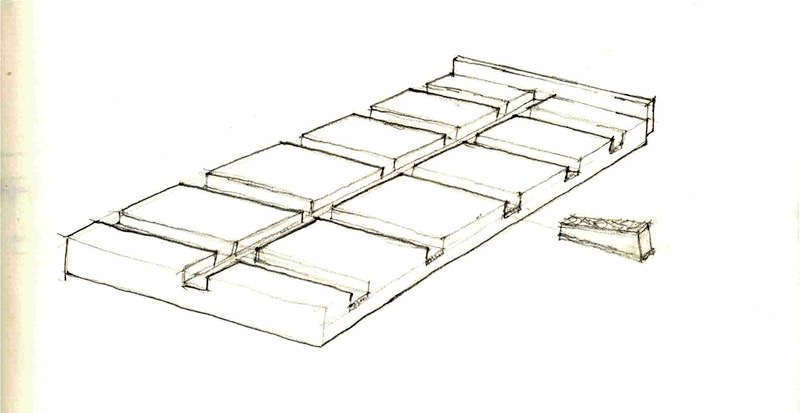
In the improved design, we don’t need to affix the 3M Safety Walk on the entire surface of the sled. It is only needed in the dados, the grooves, and on the shims.
The improve sled resembles a shipyard dry dock, where multiple wedges can be tucked under the board in relative stability to provide for optimal support during the milling process. This support system has fewer chances of moving on you as you feed and retrieve it from the planer. The secret to this Planer’s Dry Dock (Planing Dry Dock?) is its network of grooves and dados that prevent the wedges from moving along the length of the board. The PDD should also include a central groove capable of flanking a pair of long wedged to support a cupped board etc.
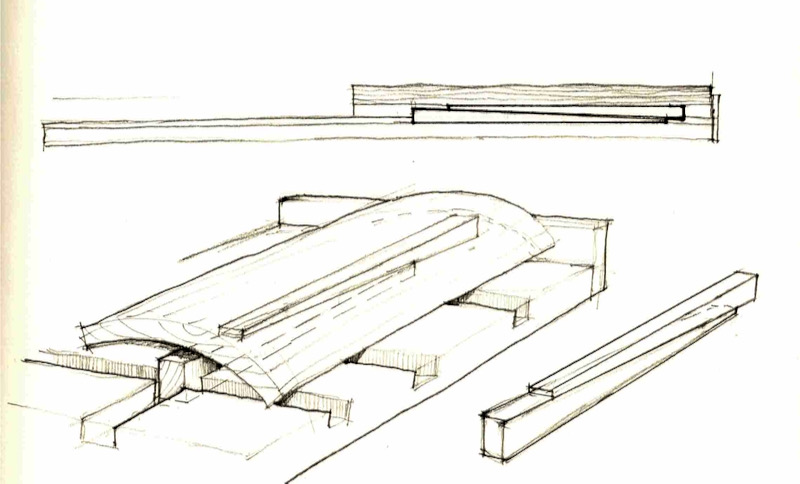
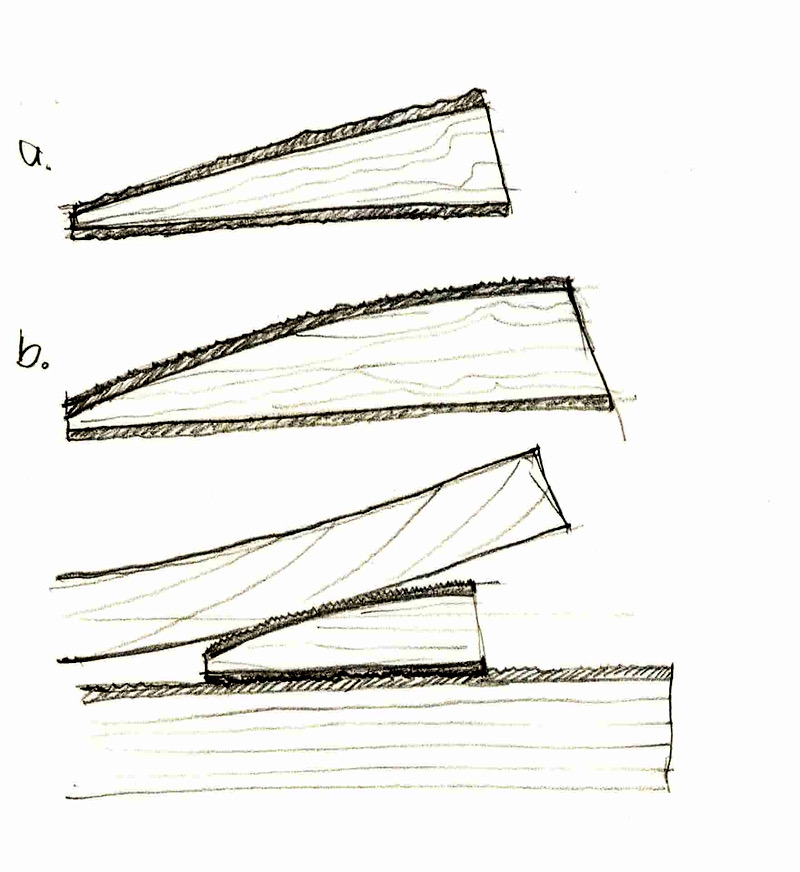
The 3M Safety Walk strips should be affixed inside the dados and grooves and be attached to the wedge’s sole and top. When making your wedged consider arching their top (b) to increase their board support capabilities.
Check these drawings to see where my designer mind took me. While this idea is still only on paper I don’t see why it would not be very successful on plywood or MDF too.
I wonder who is going to build it first?
Here are some supplies and tools we find essential in our everyday work around the shop. We may receive a commission from sales referred by our links; however, we have carefully selected these products for their usefulness and quality.


Enjoyed reading about this sled. Added the tape to an existing sled I have, but had an issue with it. My planer would not pull the sled/board through.
I think it is because the friction of the tape held it back somehow and that force is stronger than the plane rollers. I don’t think the tape has a direction like grain.
But something was preventing it from going forward.
Will try again and see what happens.
Also, this guy did something similar without the tape.
https://www.youtube.com/watch?v=6aB21q58MkU
Hi dawatson833,
First thanks so much for sharing this fantastic video. Brian Ward’s sled is very impressive and its design allows for a high level of security against racking and moving during milling.
As for your experience with the 3M stuff. Did you affix the tape to the top part of the sled? If your sled bottom is smooth and no tape was connected to it then I don’t see any reason why the planer would not pull the sled in? If you have a few minutes to share with me a picture of your sled I will be happy to give it a look.
Best,
Yoav
The long wedges bother me somewhat. If their thick end is taller than the slot, as shown, they have to be pulled out somewhat for boards which are not that cupped. That means there has to be a slot in the tailpiece so the back wedge can be pulled out while the tailpiece still makes contact to drive the board forward.
It looks more like you want multiple pairs of shorter wedges down that center line, each pair adjustable from flush with the top of the sled to as proud of the top as you can get and still have enough of the upper wedge in the slot to be stable. If that doesn’t get high enough, you make a few additional wedges that start from that maximum rather than zero, and swap to those when needed.
Outside of that… Do you really need the friction surface on both sides, especially given that most of the force on the wedges is going to be downward? My instinct is that you’re overbuilding this.
I like your insight and the points you made on the long wedges that support a cupped board. My last installment in the EZ Sled story is an attempt to disseminate a yet-to-be-built planing sled concept. Obviously, more work needs to be put into it and I welcome any solid feedback like yours. Braking the long wedges into smaller units is a good idea. Another thought is just to cut the long wedges to length as needed and have a handy collection of sloped wedges to address all kinds of cup situations. As for the overbuilding of the rubbery wedges. Last weekend I needed a very small and thin wedge so I quickly cut one on the bandsaw. I did not cover it with the 3M stuff and just tucked it under the board and over the rubberized sled. The outcome was great nevertheless. So here too, trying is the best way to learn what is best for each particular planing situation. If possible, I will prefer to use a fully rubberized wedge, but it is not needed in all situations.