We may receive a commission when you use our affiliate links. However, this does not impact our recommendations.
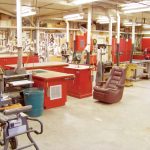
 Every shop can use more storage. This set of cabinets looks as good in the shop as they would in the home.
 Every shop can use more storage. This set of cabinets looks as good in the shop as they would in the home.
 Project #2411 • Skill Level: Intermediate • Time: 4 Days • Cost: $1000
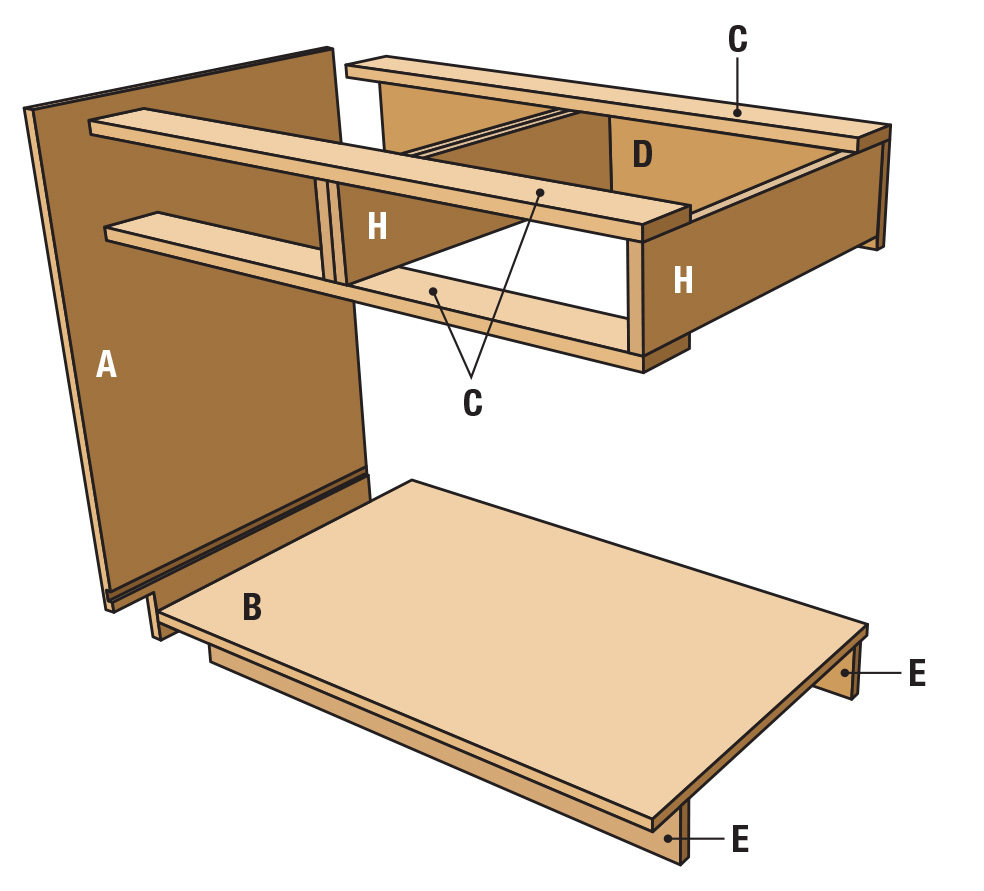
Get full details on the drawers and countertop in the online extras.
Shopping for pre-made cabinets, you’ll likely find woefully sub-par construction, often with 3/8“ MDF side panels. Even the shelves are made of thin chipboard and can’t support the gallons of paint and equipment that most shops need to store. Plus, common store-bought cabinets are 3 to 4 times the cost of sturdy shop-made cabinets. Another advantage of full custom cabinets is the ability to tailor them to suit your specific needs. And if you ever want to add another bank of upper cabinets in the future, you won’t have any problems handling future shop expansions. So, skip the cabinet showrooms and make your own simplified cabinets for the shop. They’re easy to build with just a few basic tools.
You’ll need a way to break down full sheets of plywood, which can be a circular saw and straightedge, or a tracksaw for splinter-free cuts. Another key accessory is a crosscut sled at the table saw for square crosscuts of each panel. Plus, I’ll share some tips along the way for drilling extra-clean shelf pin holes and a way to build sturdy shelves without hardwood edging.

1 Break down 3/4″ plywood sheets with your best method. A track saw gives finish quality cuts and helps control dust, but a circular saw and straightedge will work too.
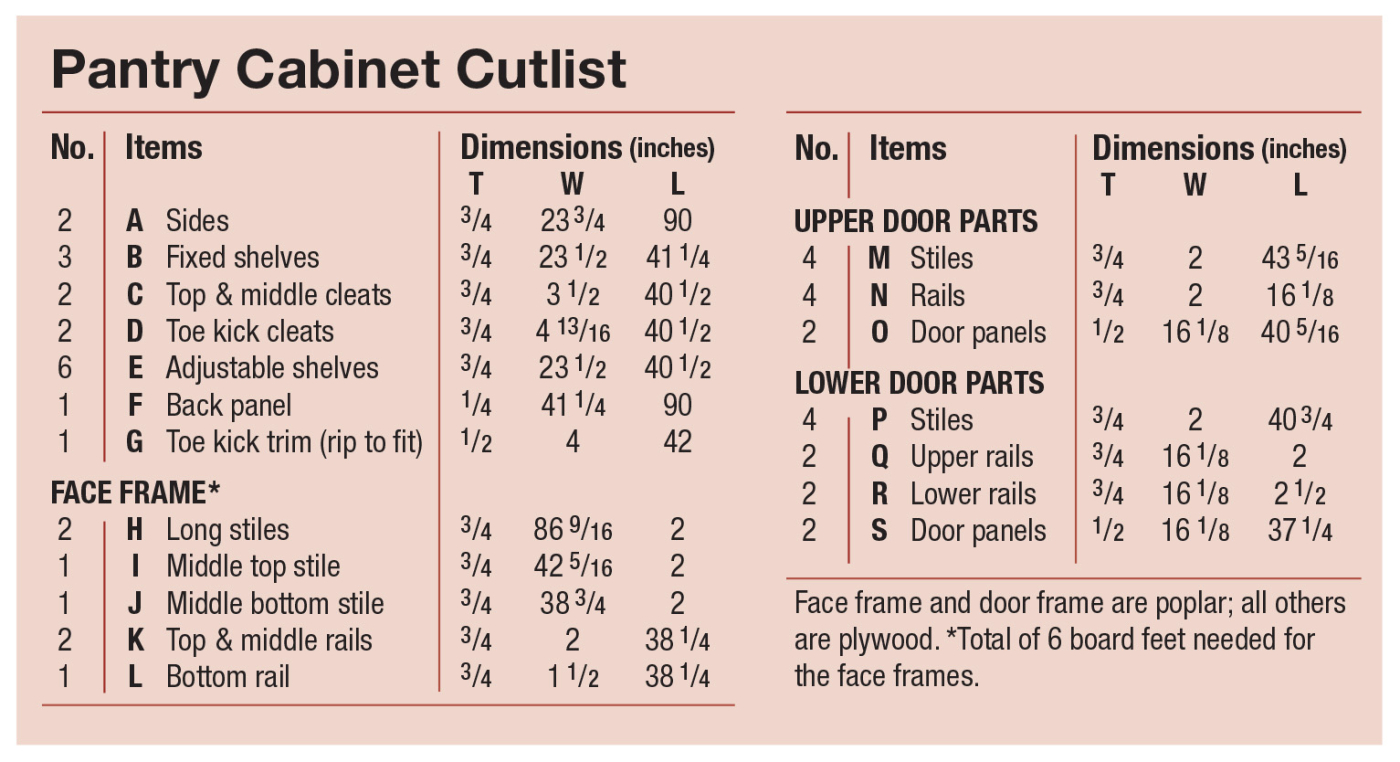
The base unit is made from two 36“ wide base cabinets that are joined together before the face frame is applied. The base cabinets have an integral toe-kick and stand 34-1/2“ tall, which gives you a 36“ high finished countertop. The upper cabinet is also made by joining two 36“ uppers and applying a single face frame. Upper cabinets are commonly 30“ or 36“tall and I opted for the taller version. If you’d also like the extra storage of a tall pantry cabinet, consider how it will relate to the uppers and lowers. By making the pantry slightly deeper than the lowers, you’ll have a nice way to terminate the countertop. Standard spacing between the finished counter and uppers is 18“, regardless of the upper cabinet height. So, a 90“ tall pantry cabinet will come out at the right height to match the uppers in this case. If you build the 9-1/2‘ wall of cabinets featured here, just follow the provided cut lists. Or, if you need to modify the size to fit your space, it’s pretty easy to generate a new cut list.
Total Sheet Goods and Hardwood
8x 3/4“ Birch plywood sheets (full)
2x 1/2“ Birch plywood sheets (full)
3x 1/4“ Birch plywood sheets (full)
1x 3/4“ MDF sheet for countertop
70 bd ft 4/4 Poplar (includes trim & waste)
Lower Cabinet Cutlist and Diagrams
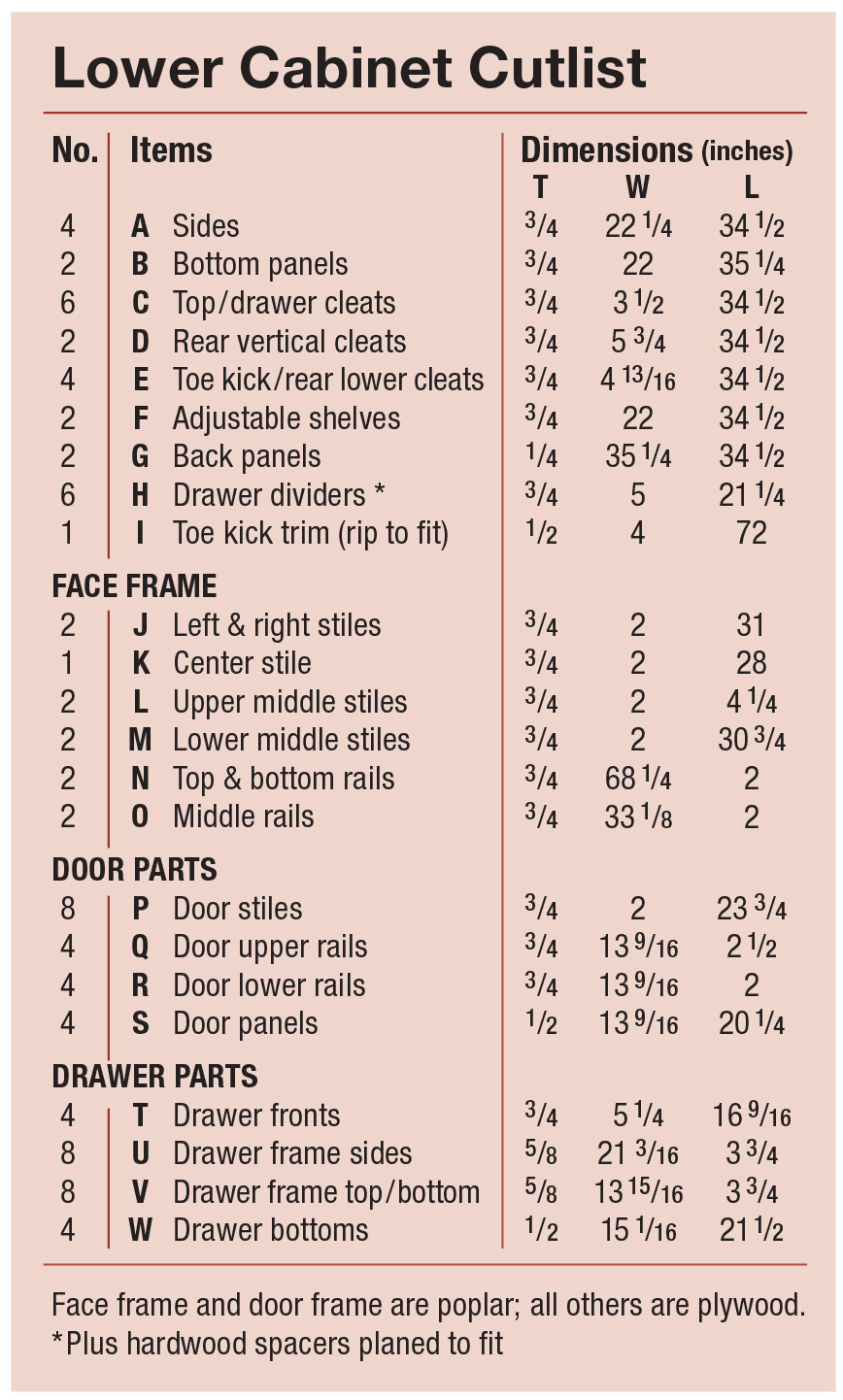
Lower Cabinets
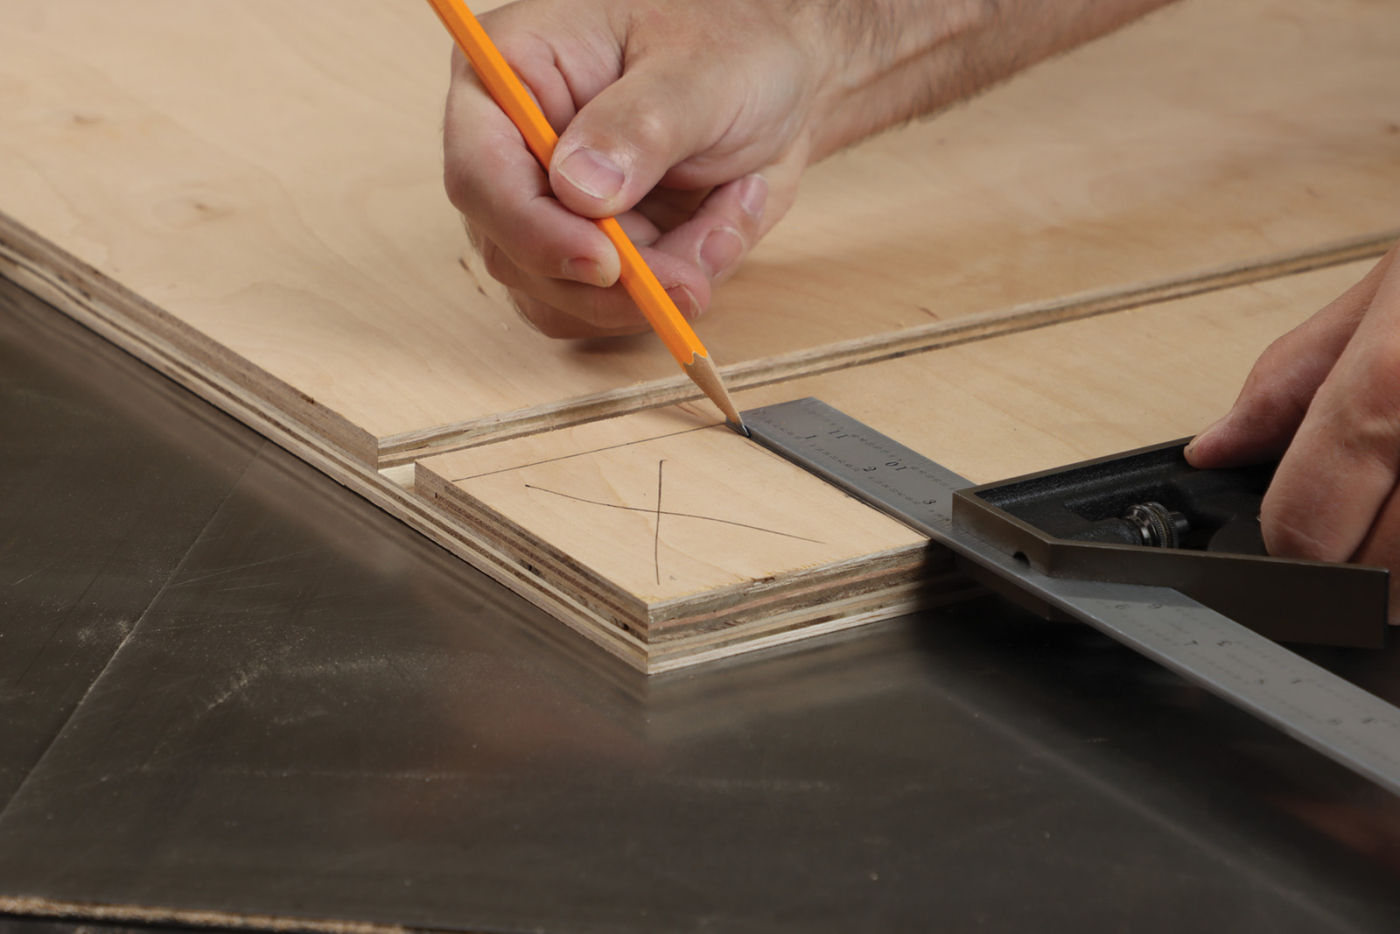
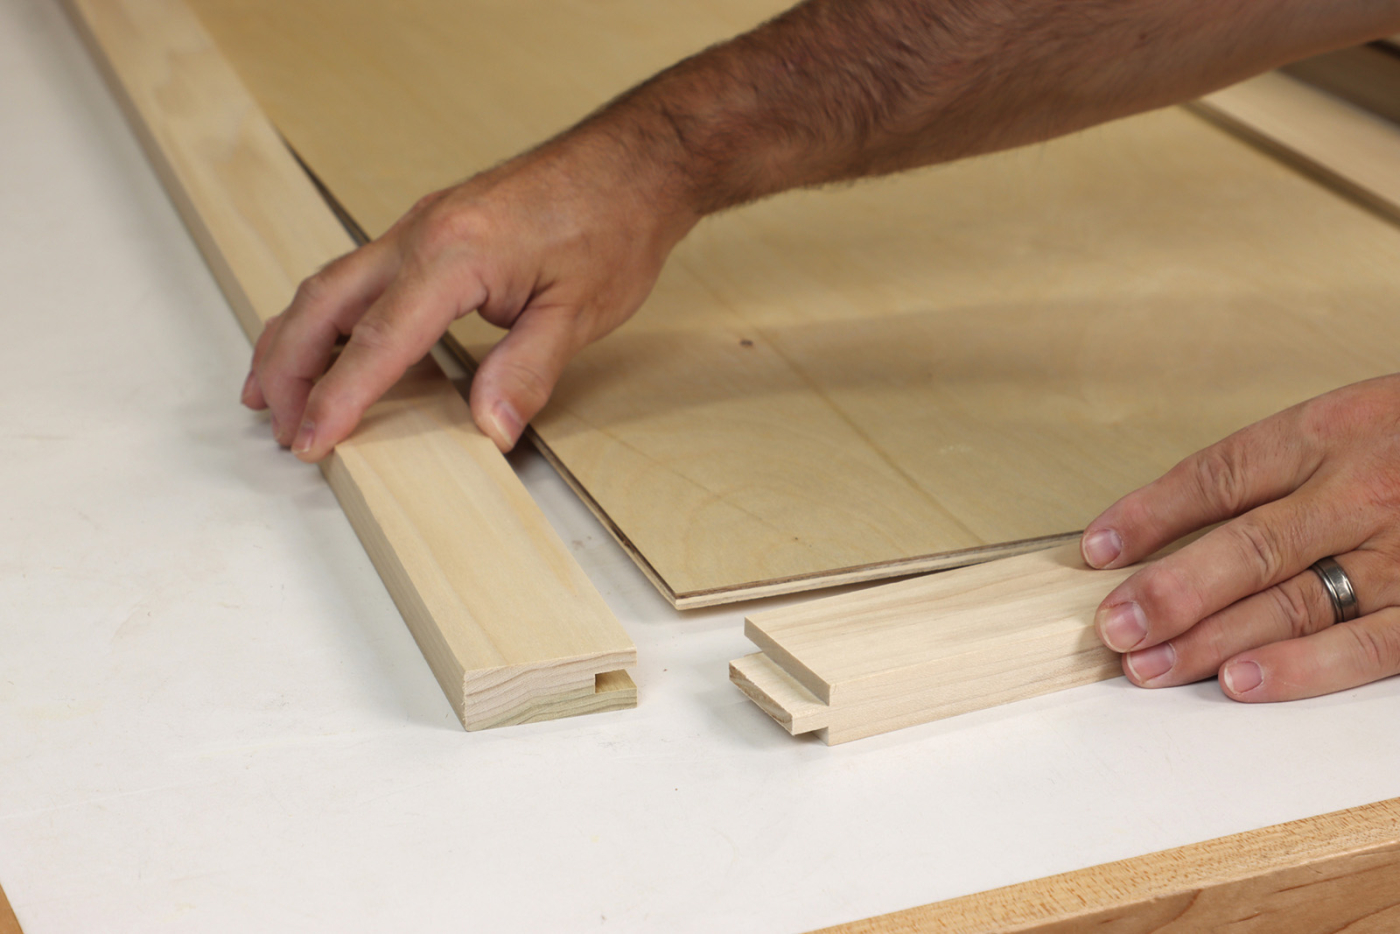
Start by cutting the side panels to final size and take care of the minimal joinery. Luckily there’s just a single 3/8“ deep dado in each of the side panels, starting 41-3/16“ from the bottom of the panel. These modest-sized panels can be handled on a full-size table saw, so a dado blade set to match the thickness of your plywood works the best here.

2 Cut a single dado in each side panel, sized to fit the plywood stock with your method of choice.

3 Each side panel also gets a rabbet to receive the 1/4″ plywood back panel. Use a sacrificial fence and dado blade to cut the rabbet.
4 Mark the extent of the toe kick and rough cut it with a jig saw.
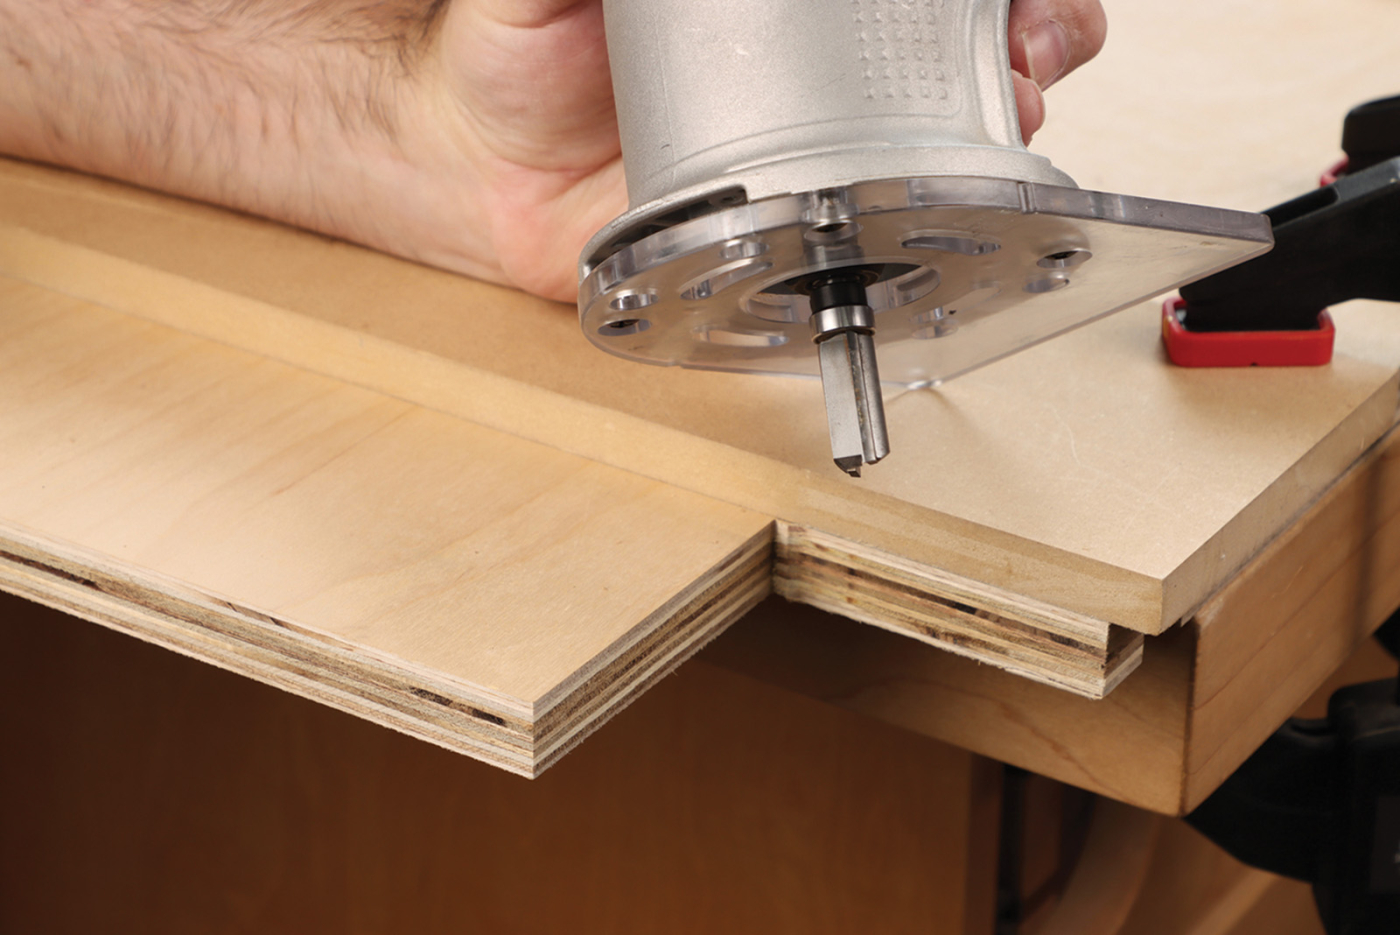
5 Trim to your line with a bearing-guided bit and scrap MDF used as a straightedge. Finish the inside corner with a hand saw.
Later when building the pantry, we’ll look at an alternate dado technique using a hand-held router. Each lower cabinet side panel also needs a rabbet along the back edge to accept the 1/4“ plywood back panel. Make these simple rabbets 3/8“ wide and 1/4“ deep. A toe kick is the final detail on the side panels, so take a moment to layout the 3“ wide x 3-1/2“ tall cutout. For best results, rough cut the toe kick with a jigsaw, staying well outside your lines. Then make the final trimming cut with a router and bearing-guided bit. This might seem like it’s unnecessary, but doing this two-step process will prevent the plywood veneer from chipping on the crosscut and give a nice finished appearance.
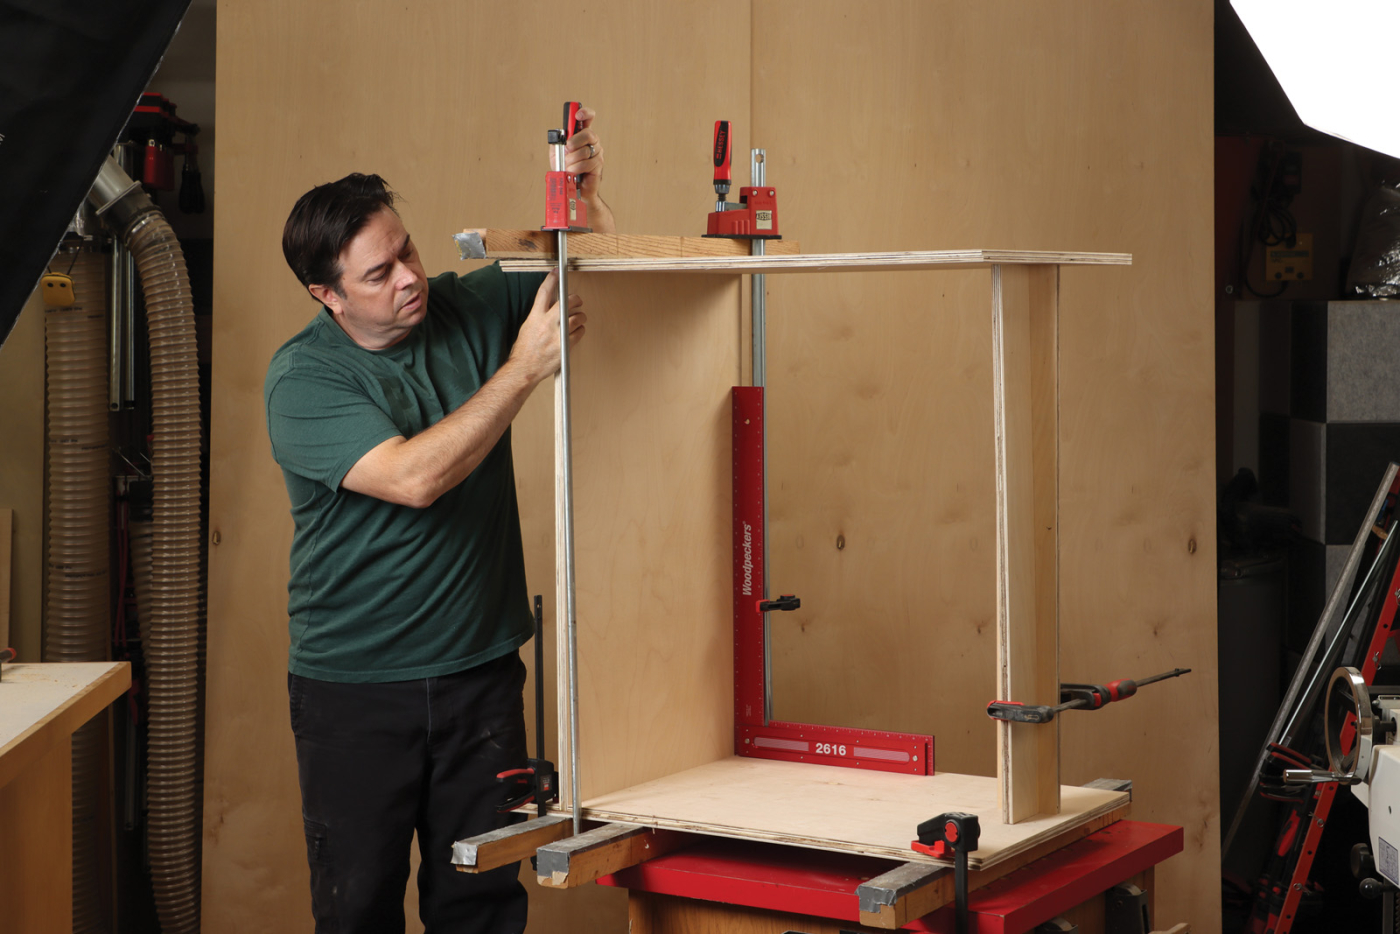
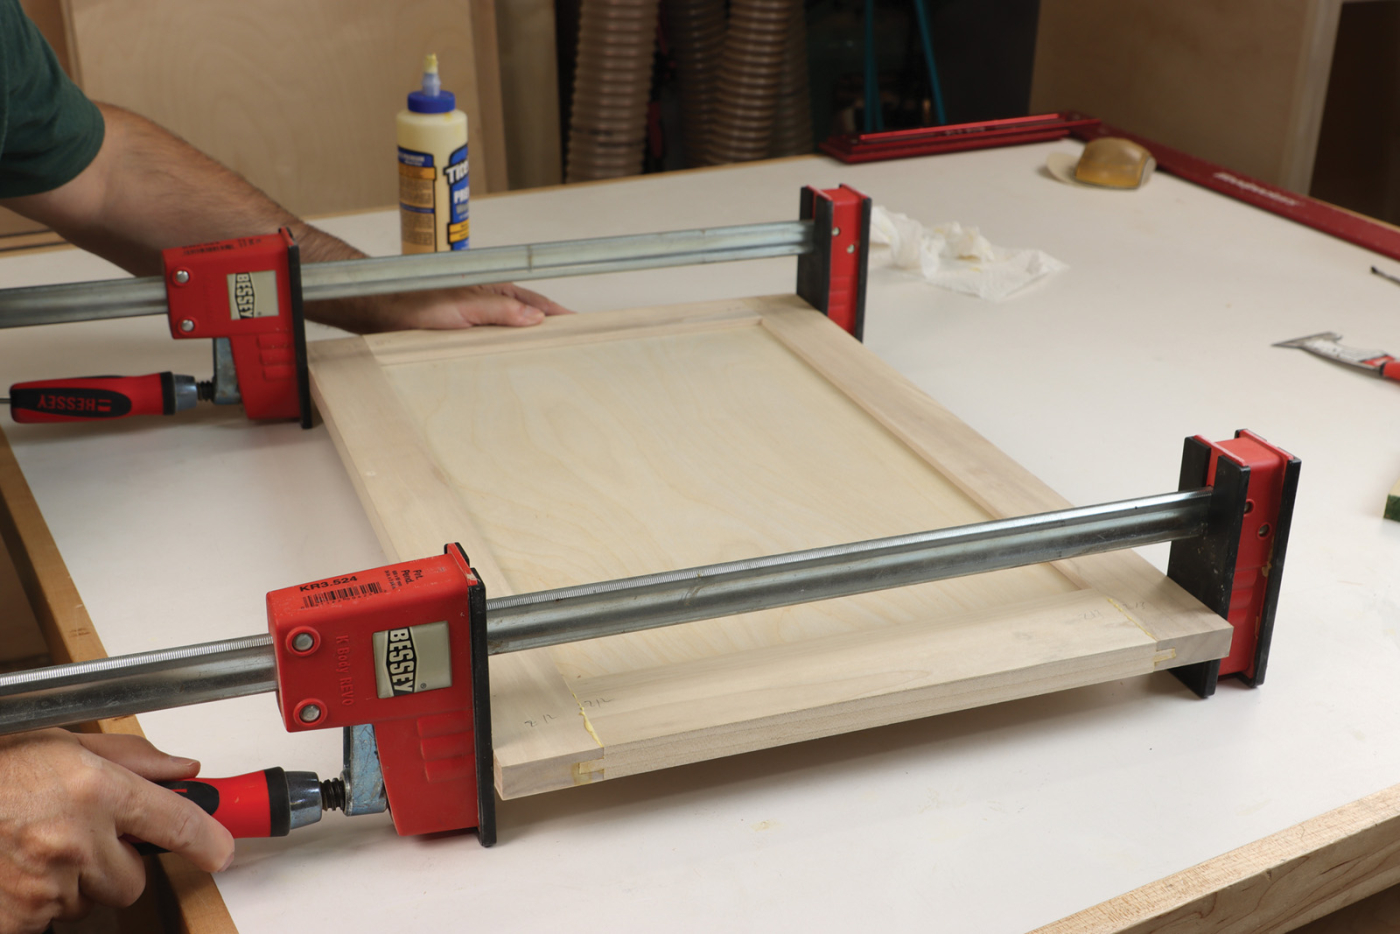
6 Glue the two side panels together with the fixed shelf. Loose cleats support the top of the cabinet while the glue dries.
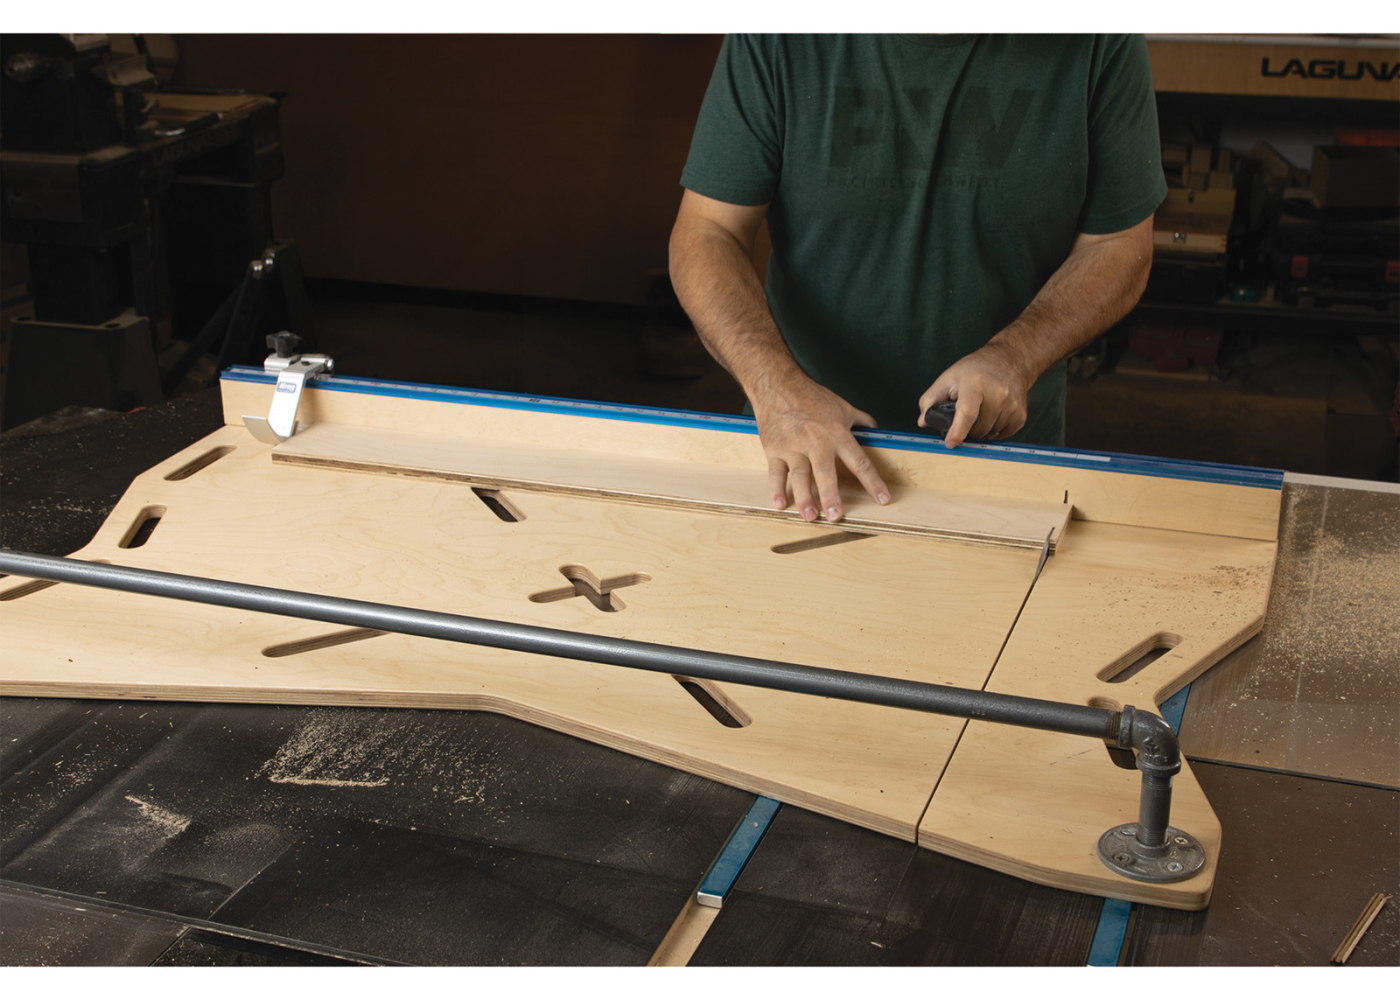
7 Cut all the cleats to length with a crosscut sled, such as my “X-Cut” sled designed to handle panels up to 24″ wide.
8 Drill pocket holes in the cleats to prepare for assembly. You can use a small portable pocket hole jig, or speed things up with a pocket hole machine such as the Kreg Foreman.
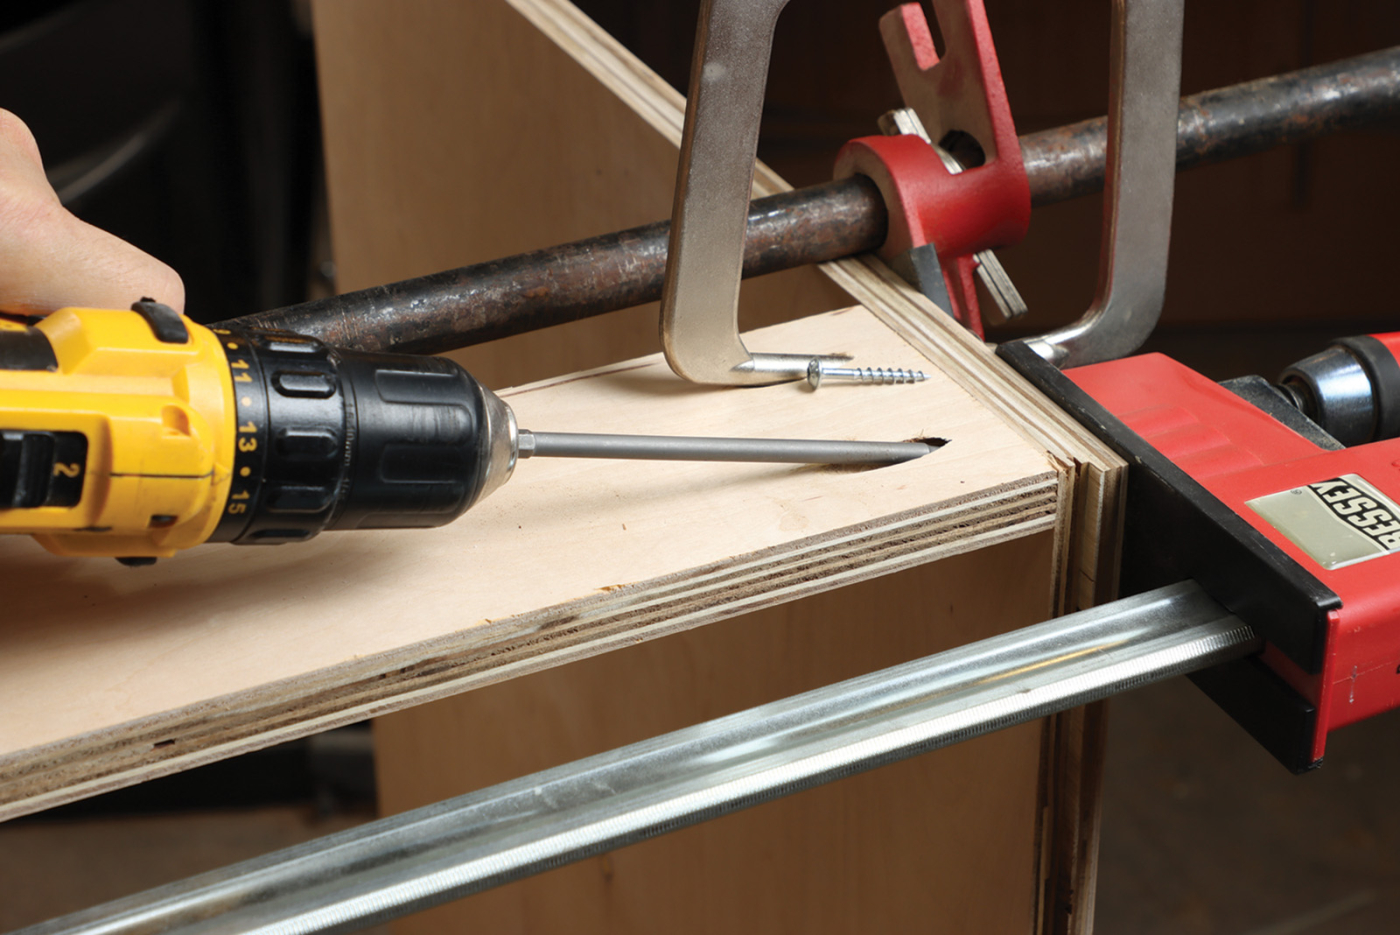
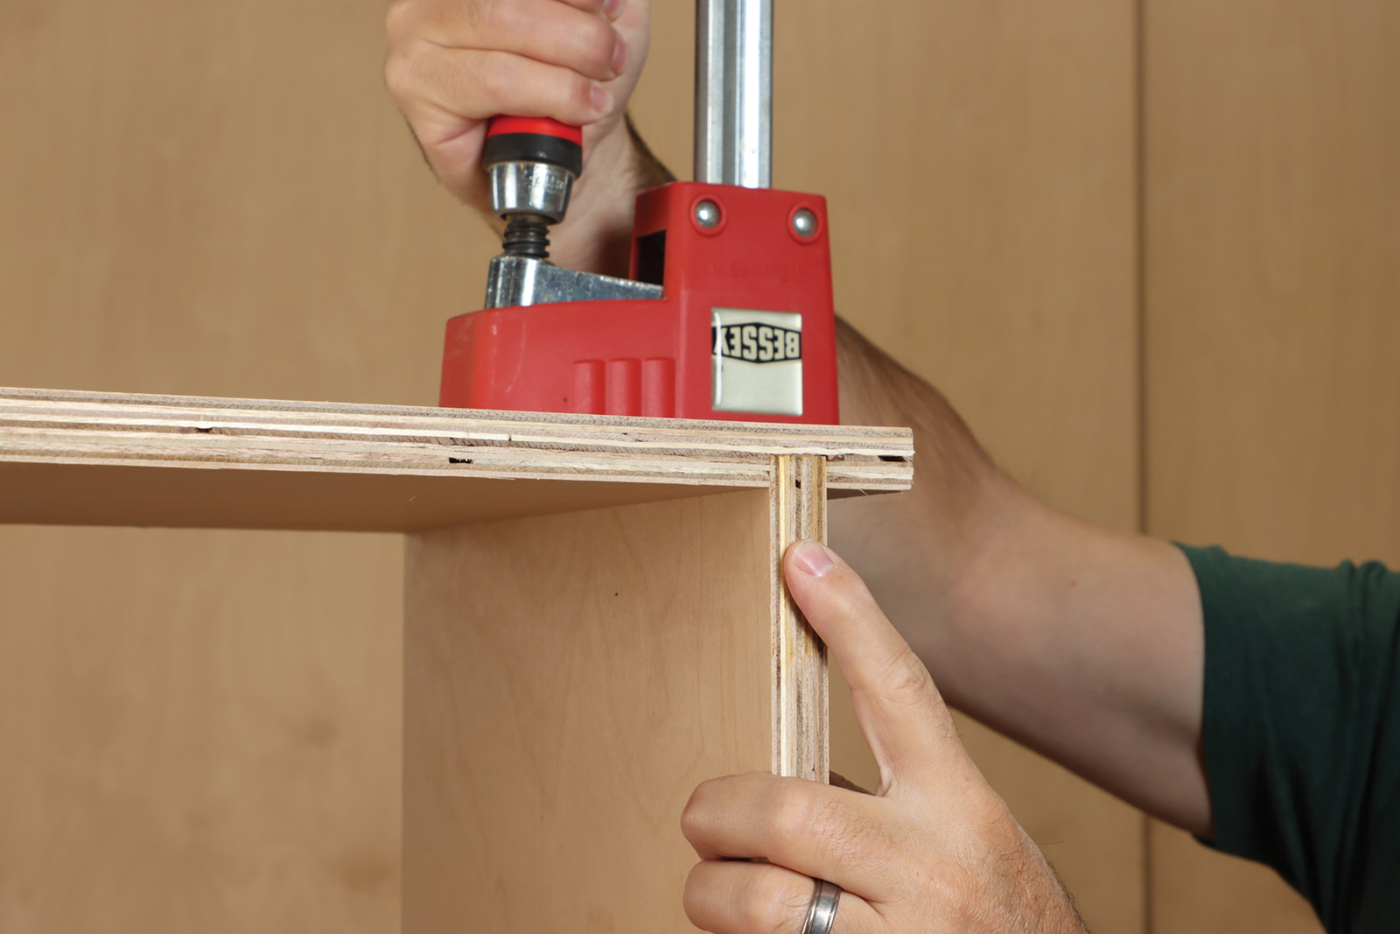
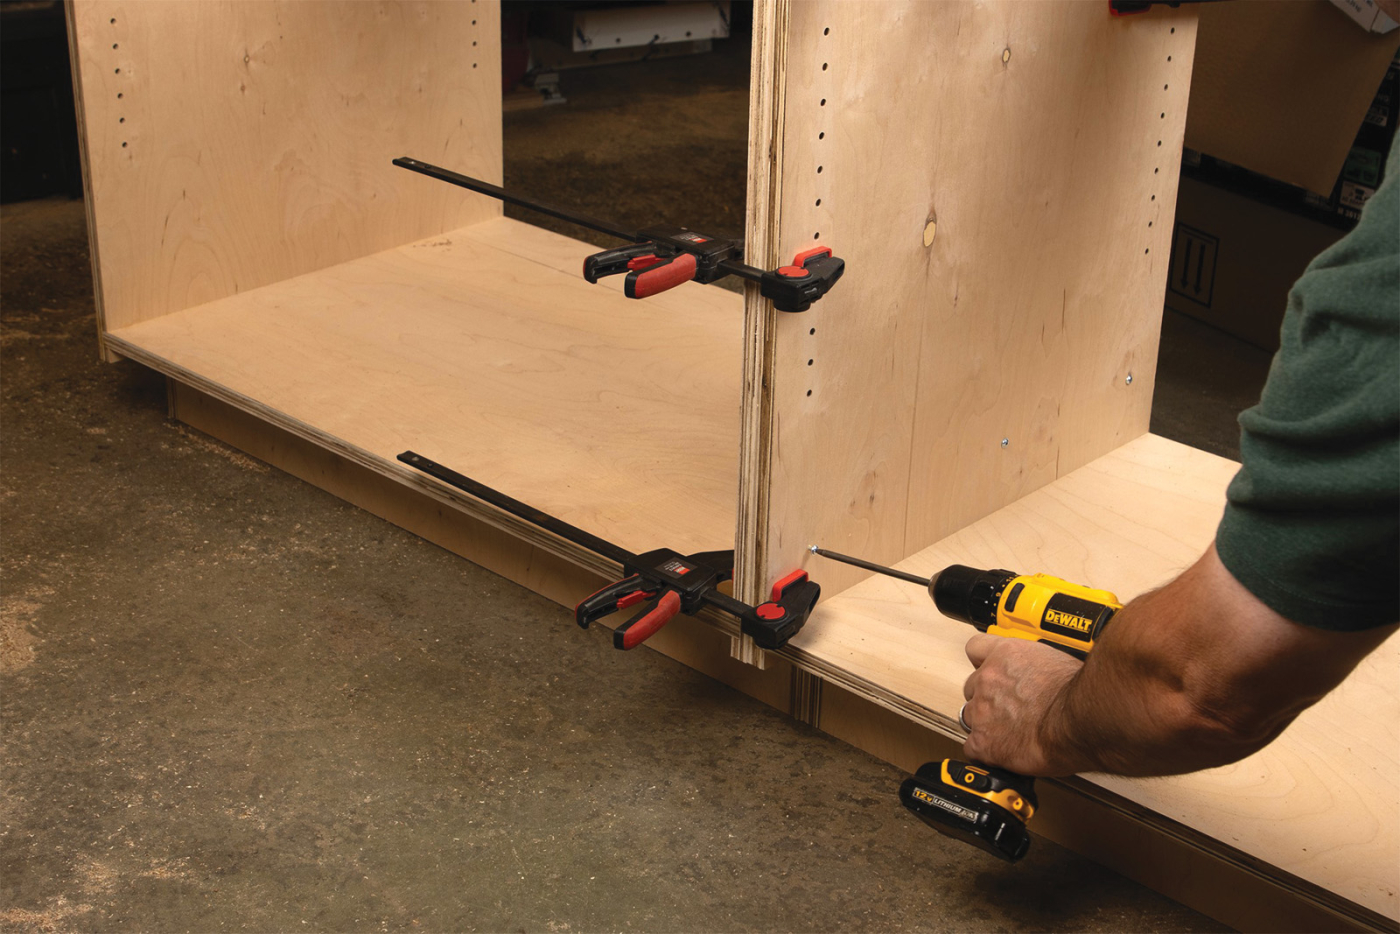
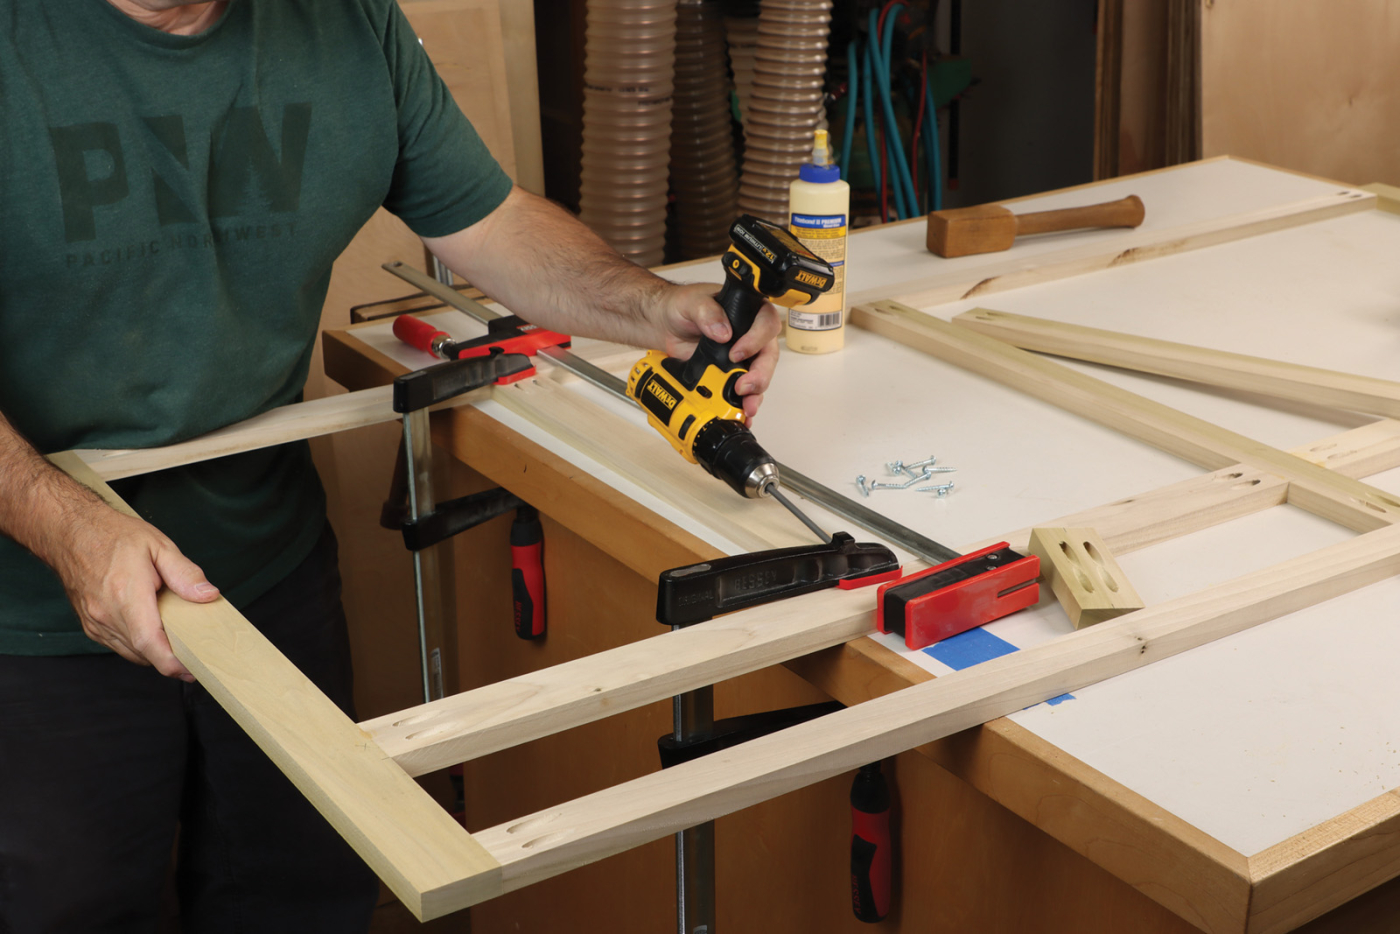
9 Install cleats starting at the back of the cabinet. Clamp it flush with the rabbet before driving the screws.
Now that you have the side panels complete, confirm the width of the fixed shelf, which should be 22“ wide. Next glue the two side panels together with a fixed shelf, using loose cleats to support the open end of the assembly. Once the glue sets, you can quickly add cleats to the cabinet and create drawer openings. Add a pair of 3-1/2“ wide cleats at the top to hold the cabinet square. A 5“ wide vertical cleat is installed next, which really starts to stiffen the cabinet box and provides a good surface to attach the back panel. Then use a 4-1/4“ spacer block to set the location of the drawer cleat and attach it from underneath with pocket hole screws. Finally, add a toe-kick cleat and rear lower cabinet cleat in the same way for a fixed shelf that won’t sag, even once it’s loaded with every gallon of paint you own.
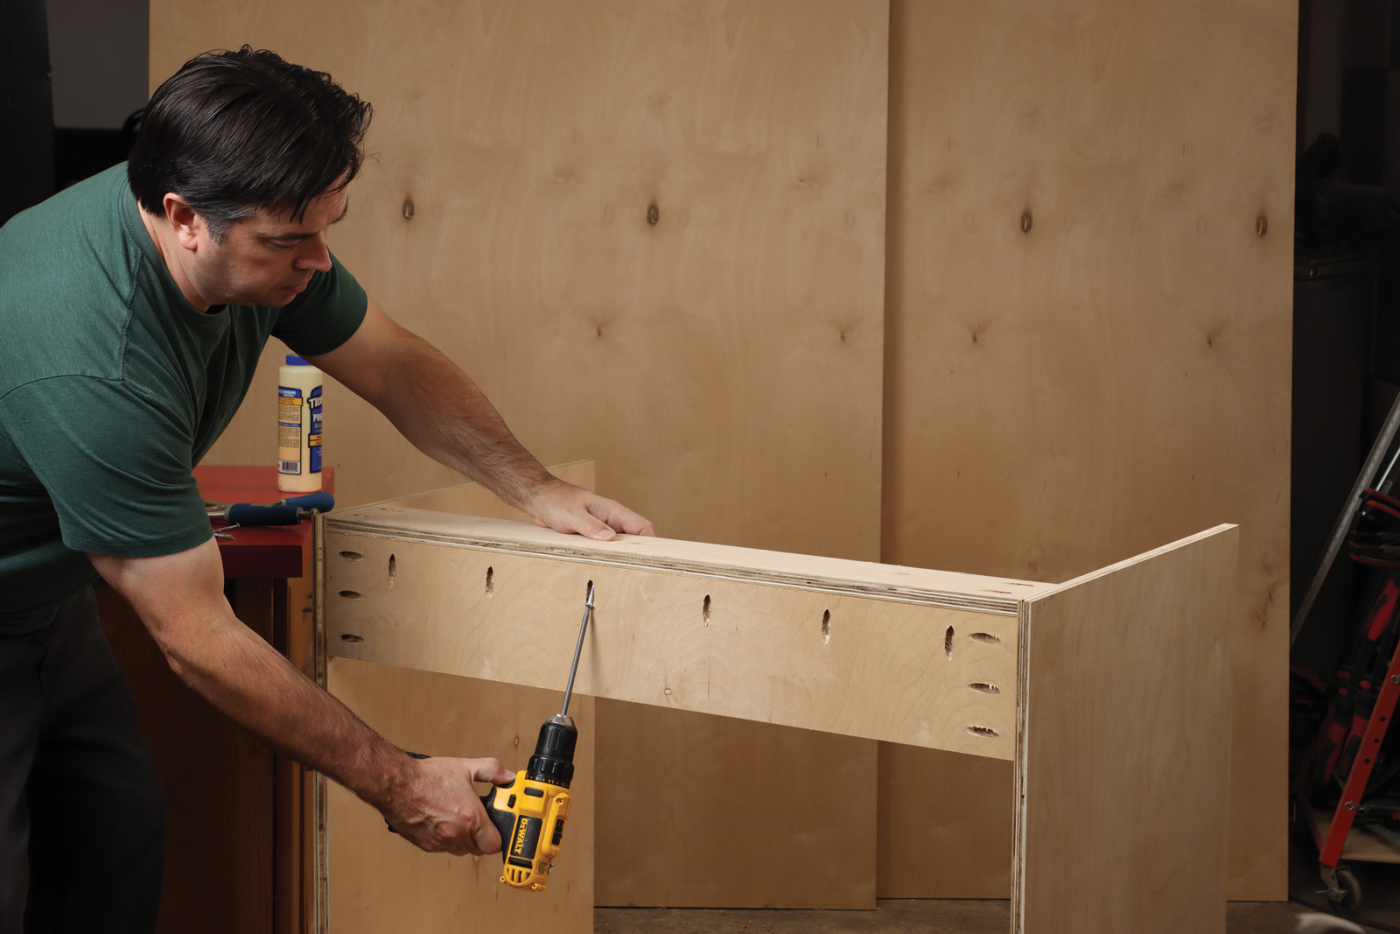
10 Add 5-3/4″ wide vertical cleats and join it to the top cleat.
11 Install the front cleat and use a spacer to locate the drawer cleat.
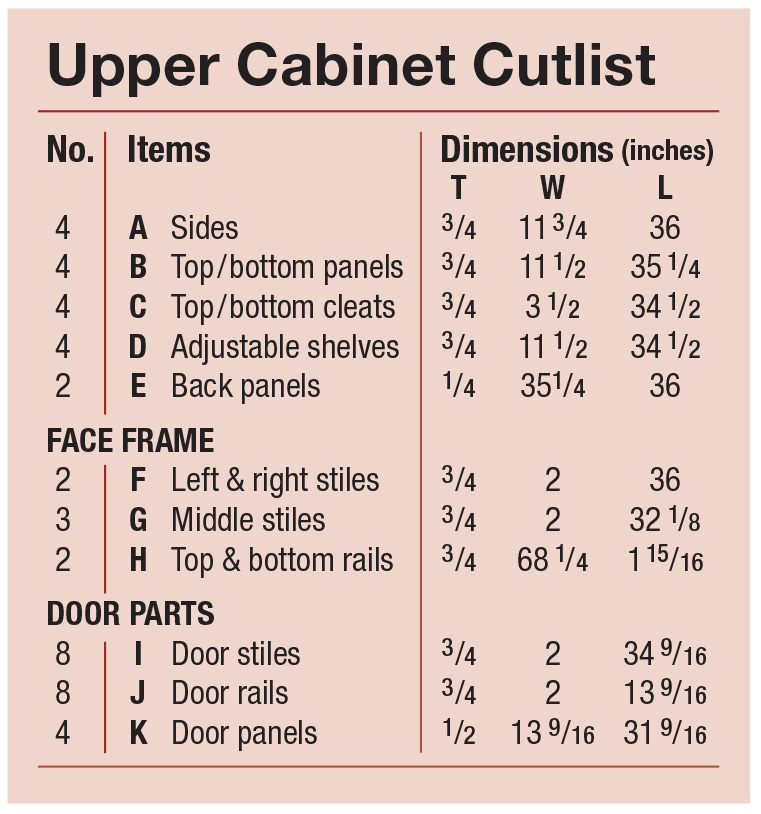
Upper Cabinets Cutlist and Diagrams


 Upper Cabinets
 Upper Cabinets
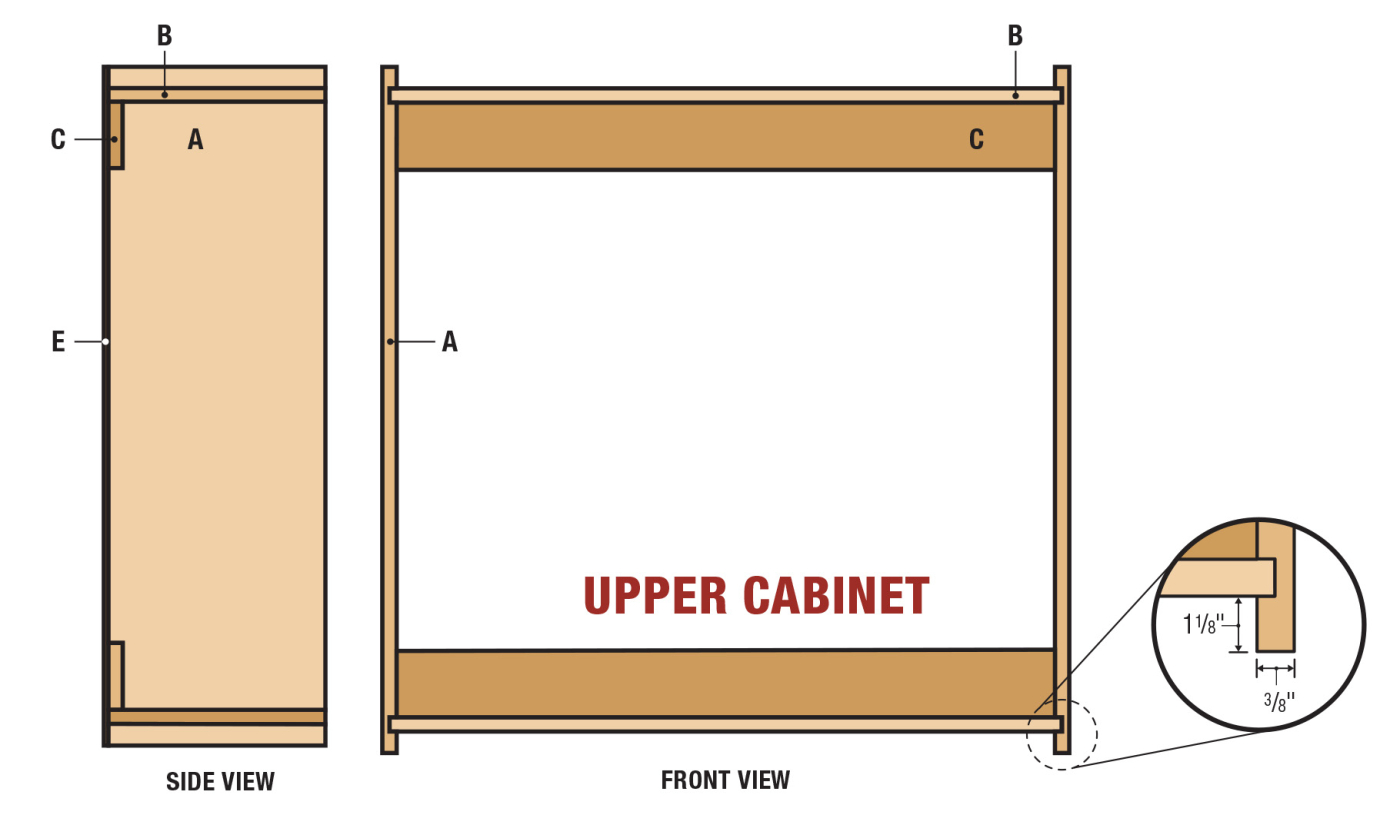
By comparison, the uppers seem smaller and even more basic to construct. The parts are lighter and layout well on 48“ wide sheet goods. Simply size your parts and cut a dado at the top and bottom of the side panels. These through dadoes start 1-1/8“ from the ends and are identical top and bottom. Just like the lower cabinets, you’ll need a rabbet in the side panels to receive the 1/4“ back panels. Assemble the sides with two fixed shelves and add two cleats. The cleats add some rigidity to the upper cabinets and offer a good place to nail off the back panel. But the main purpose for the cleats is a secure mounting point once you hang them on the wall. The cleats are visible inside the cabinet, so take a minute to edge band the exposed plywood edge if appearance matters to you.
12 The basic core for the upper cabinets starts with just four parts. Glue the two fixed shelves between the side panels to form a 36″ square box (cabinet shown on its side for glue-up).
13 Focus on keeping the parts flush at the front edge as you assemble.
Large Pantry Cabinet Cutlist and Diagrams

 Large Pantry Cabinet
 Large Pantry Cabinet
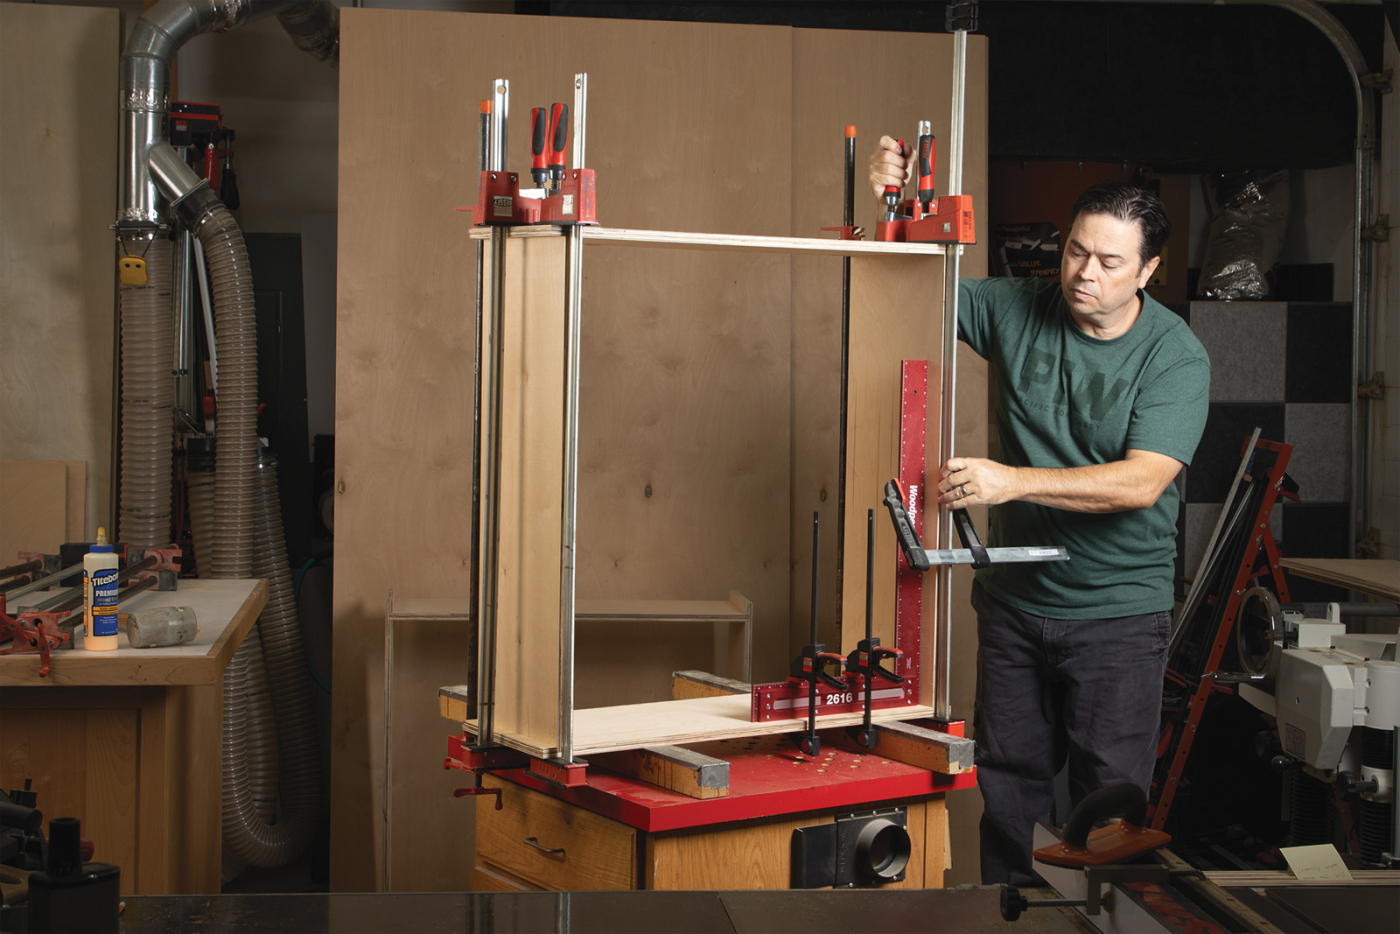
If storage is important in your shop, you’ll appreciate how much gear you can pack into this 90“ x 42“ cabinet. Plus, it’s a little deeper than the lower cabinets to handle those odd-shaped or bulky items. The tall side panels are too tall to safely dado on a table saw, so I set up a router and dado jig. I used an exact-width dado jig from Woodpeckers, but you could build a wide version of my shop-made jig from the October 2022 Popular Woodworking article. Just make the jig big enough to handle 23-3/4“ wide panels. The bottom dado is spaced just like the lower cabinets (starts 41-3/16“ from the bottom), while the middle dado starts 45“ from the bottom of the cabinet. The top dado mirrors the upper cabinets and starts 1-1/8“ from the top.
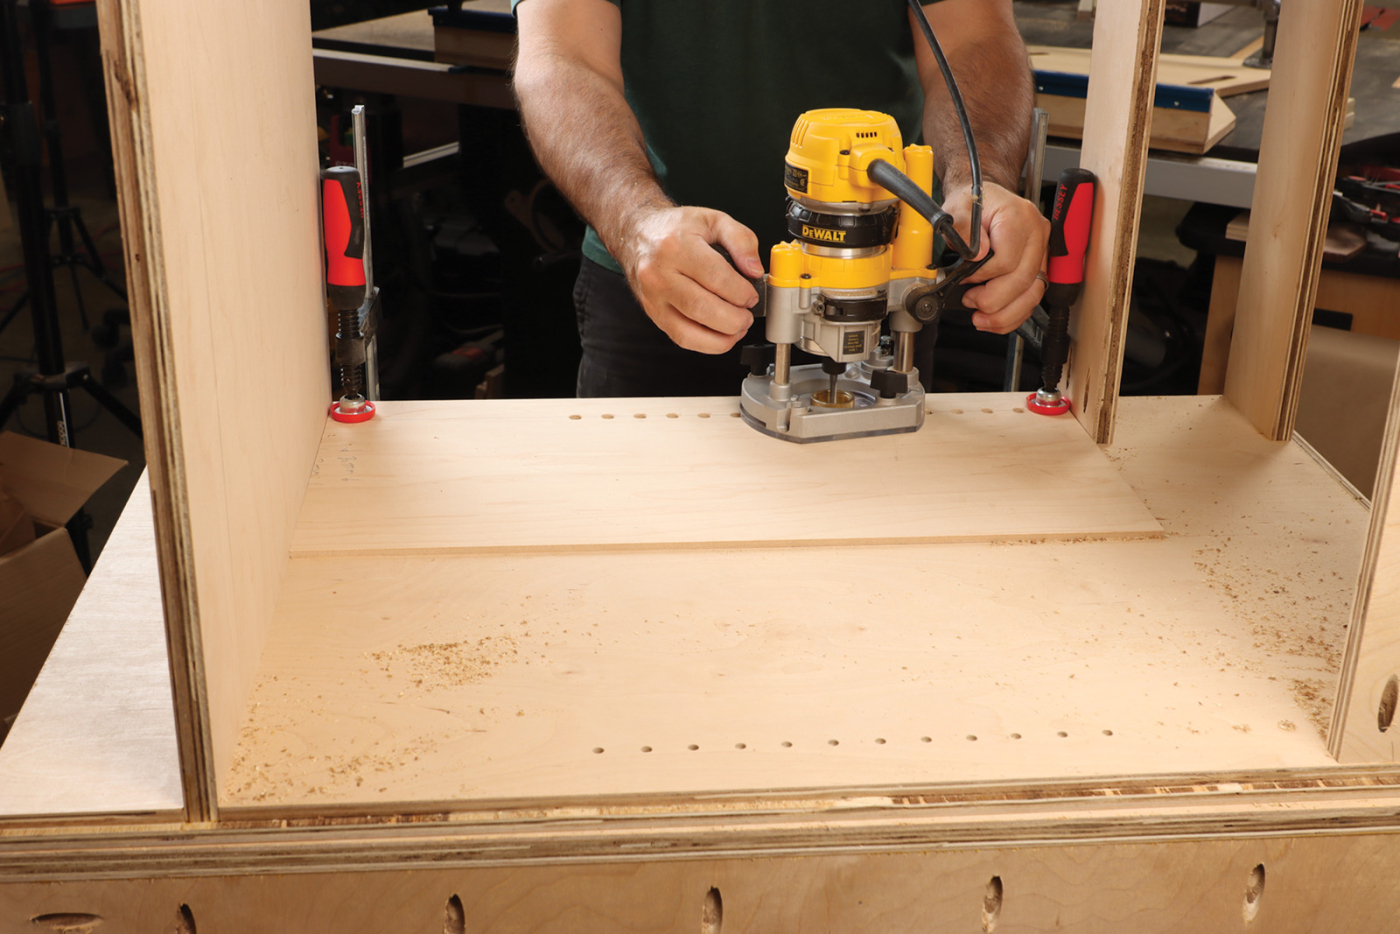
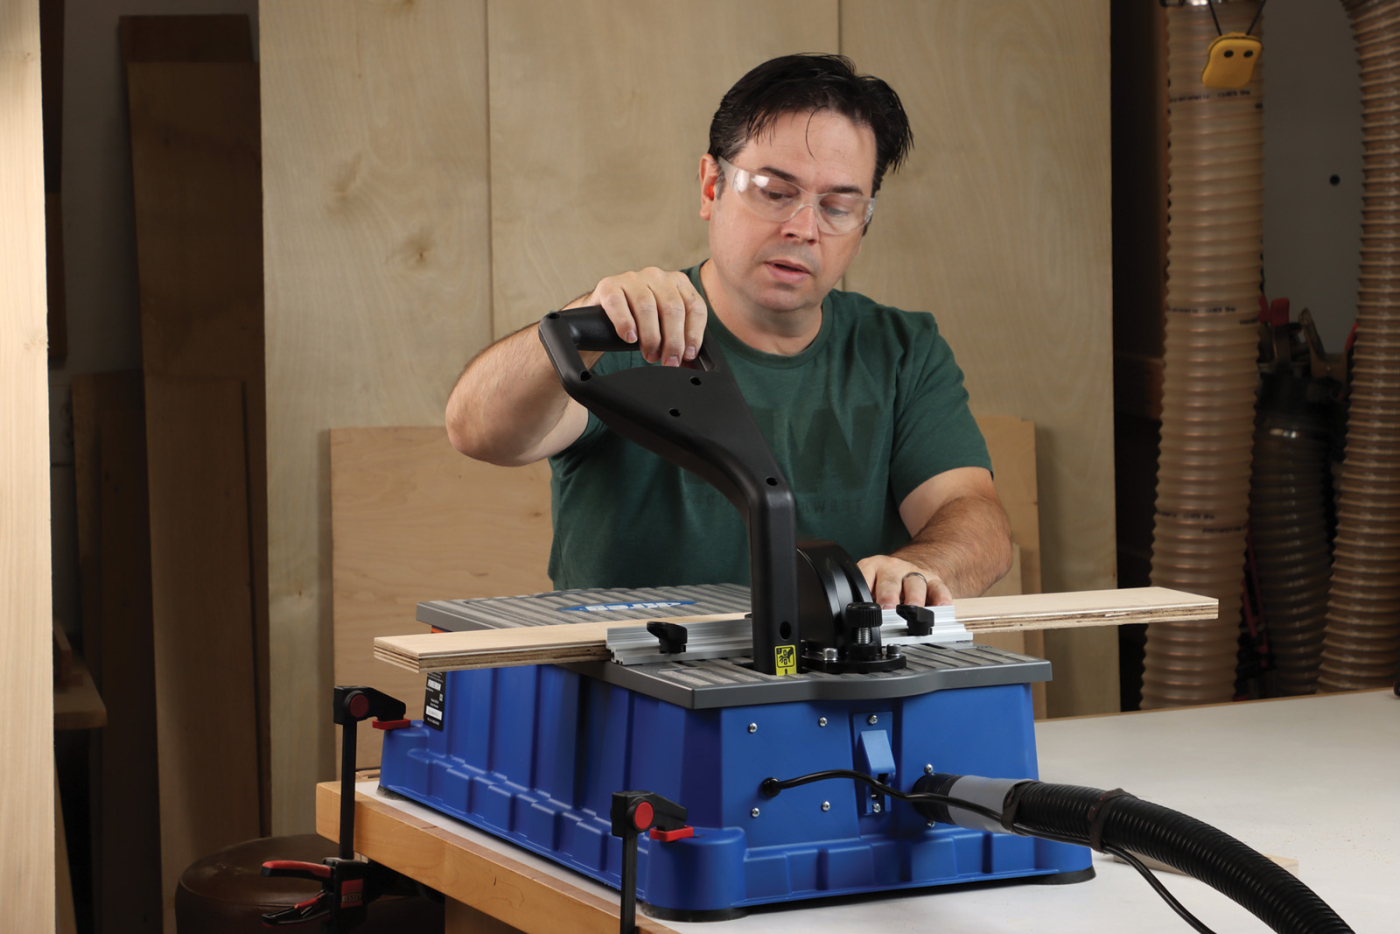
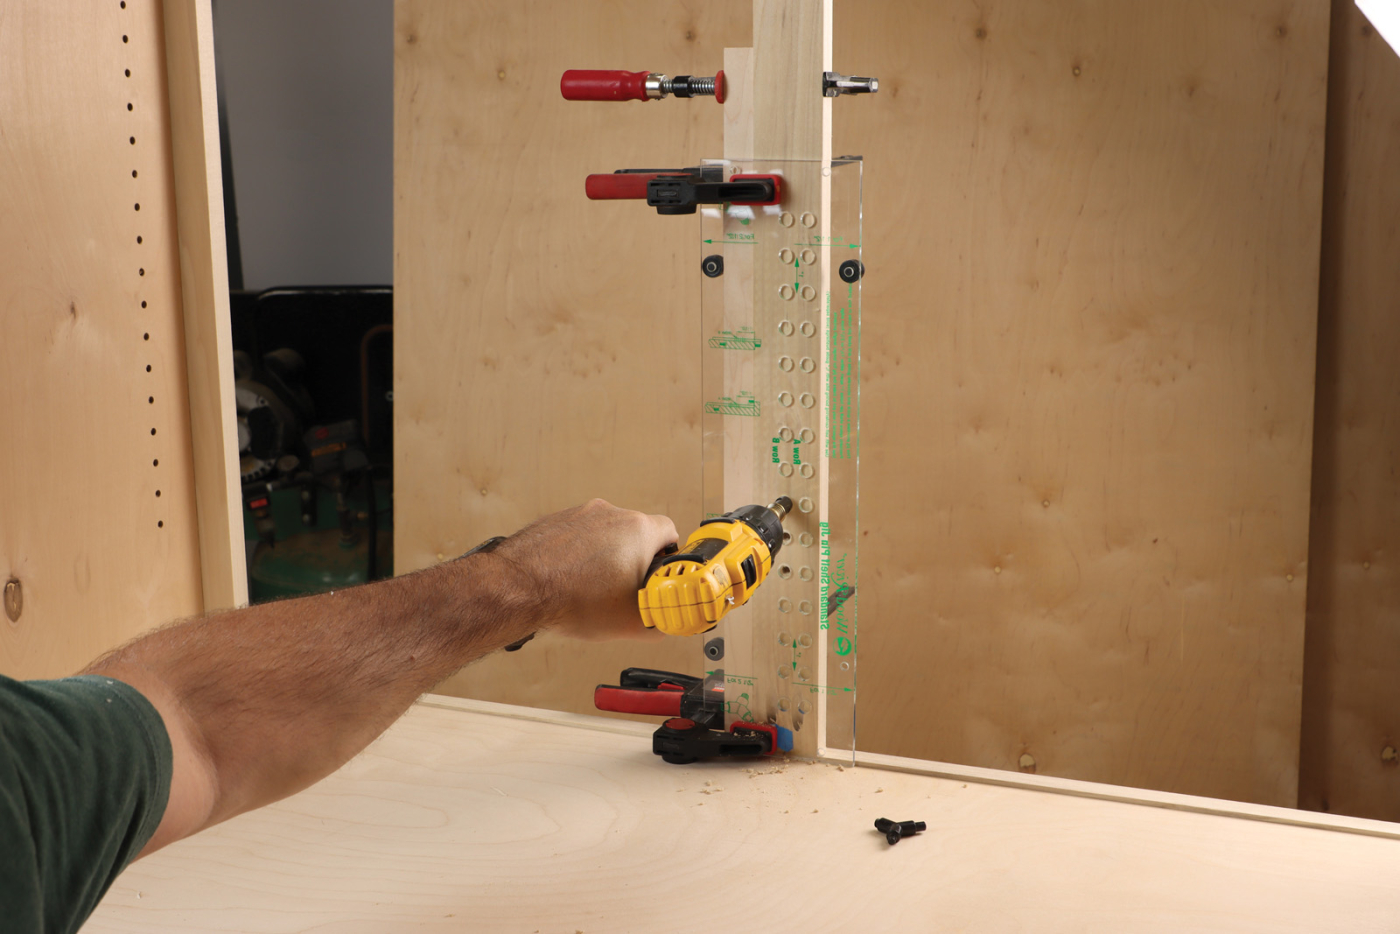
14 For extra-crisp shelf pin holes, try using a plunge router. Follow a commercially available template or make your own using 1/4″ plywood.
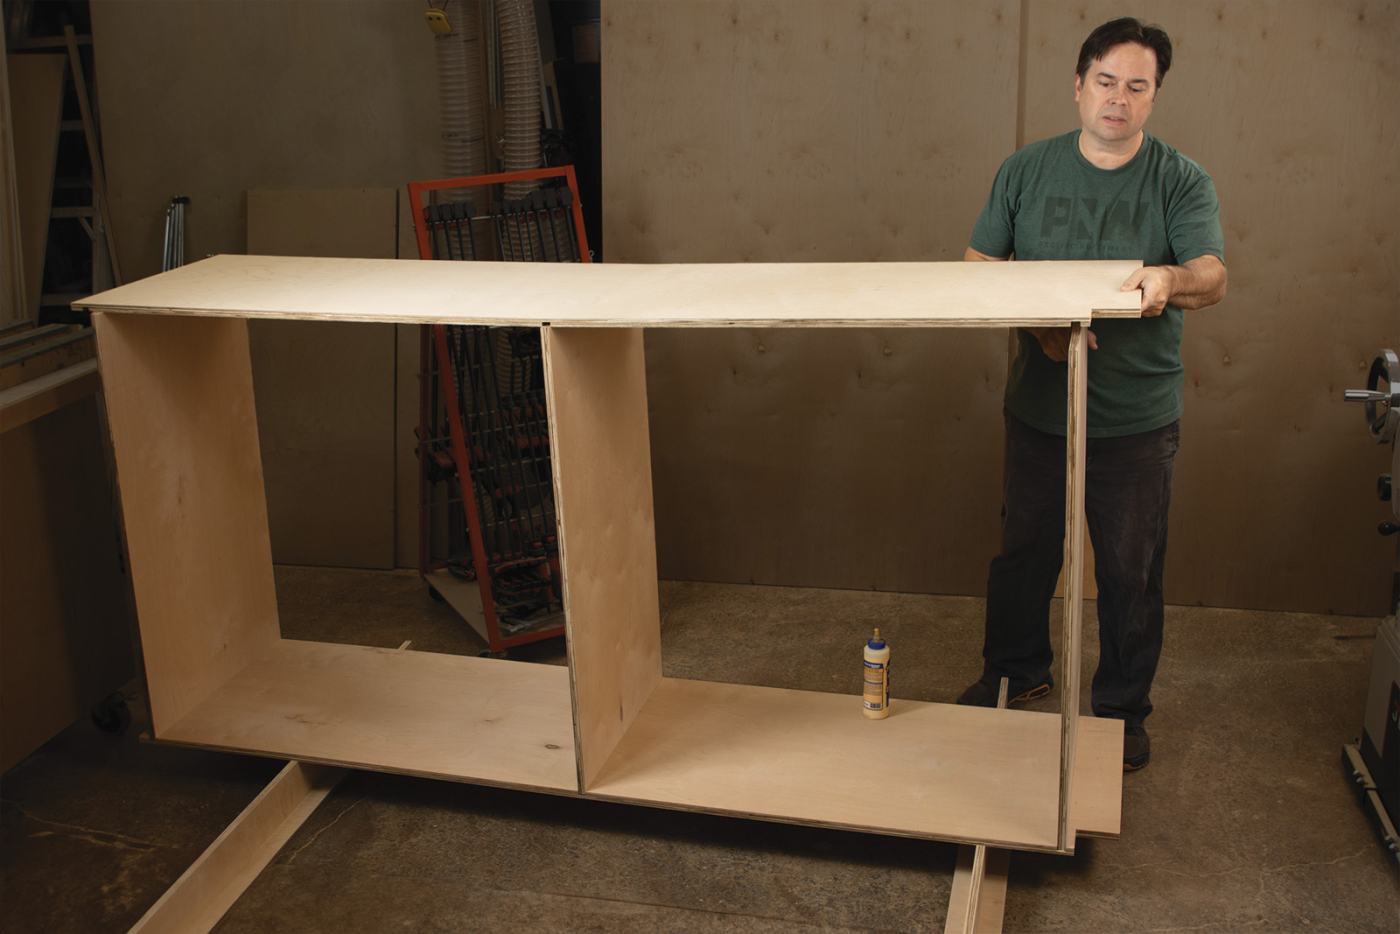
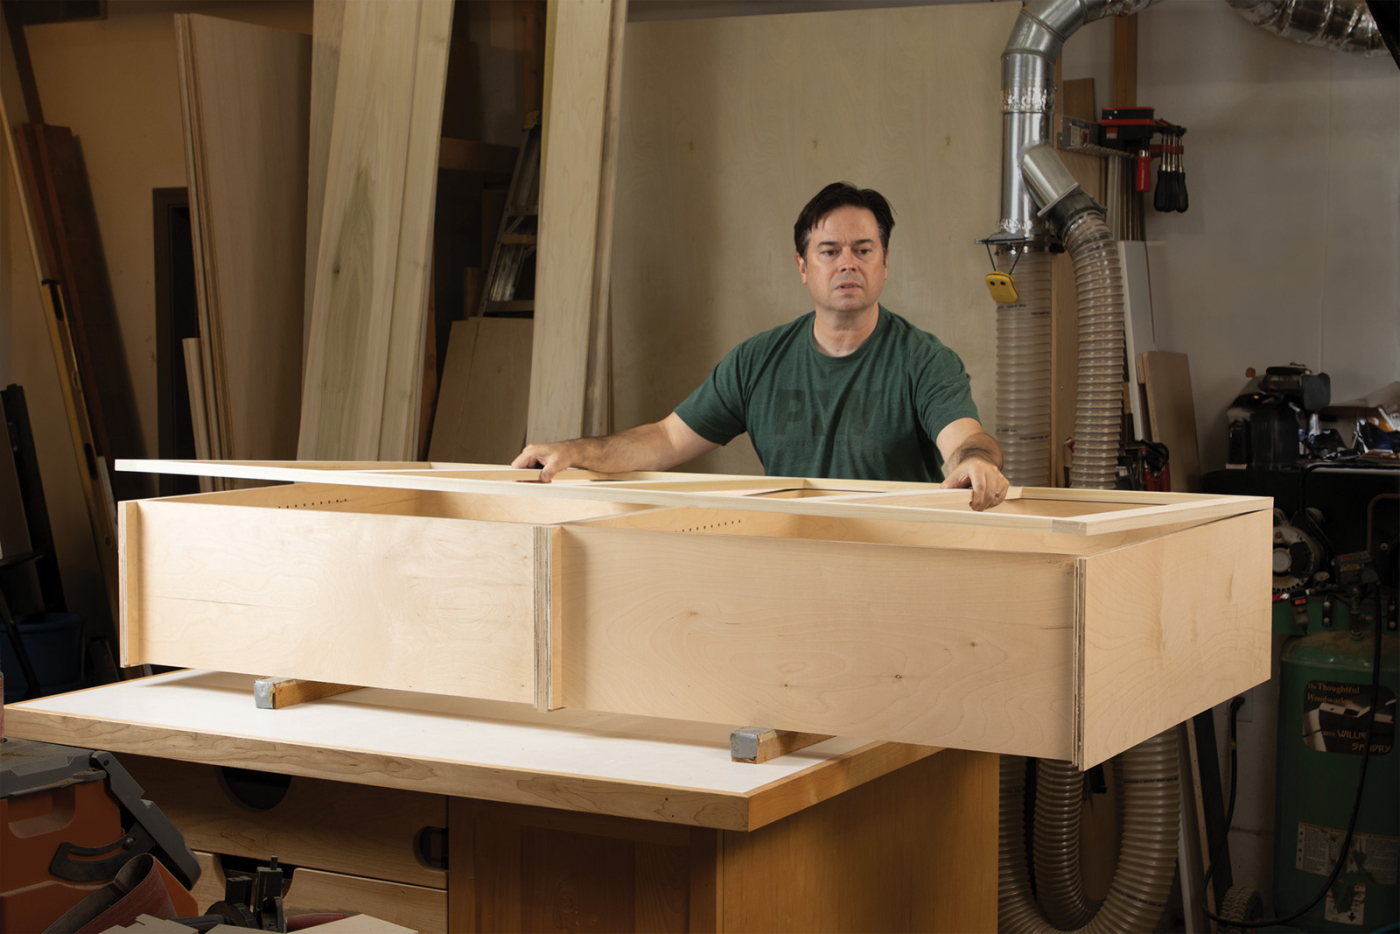
15 Screw together the two lower cabinets (shown here) as well as two upper ones.
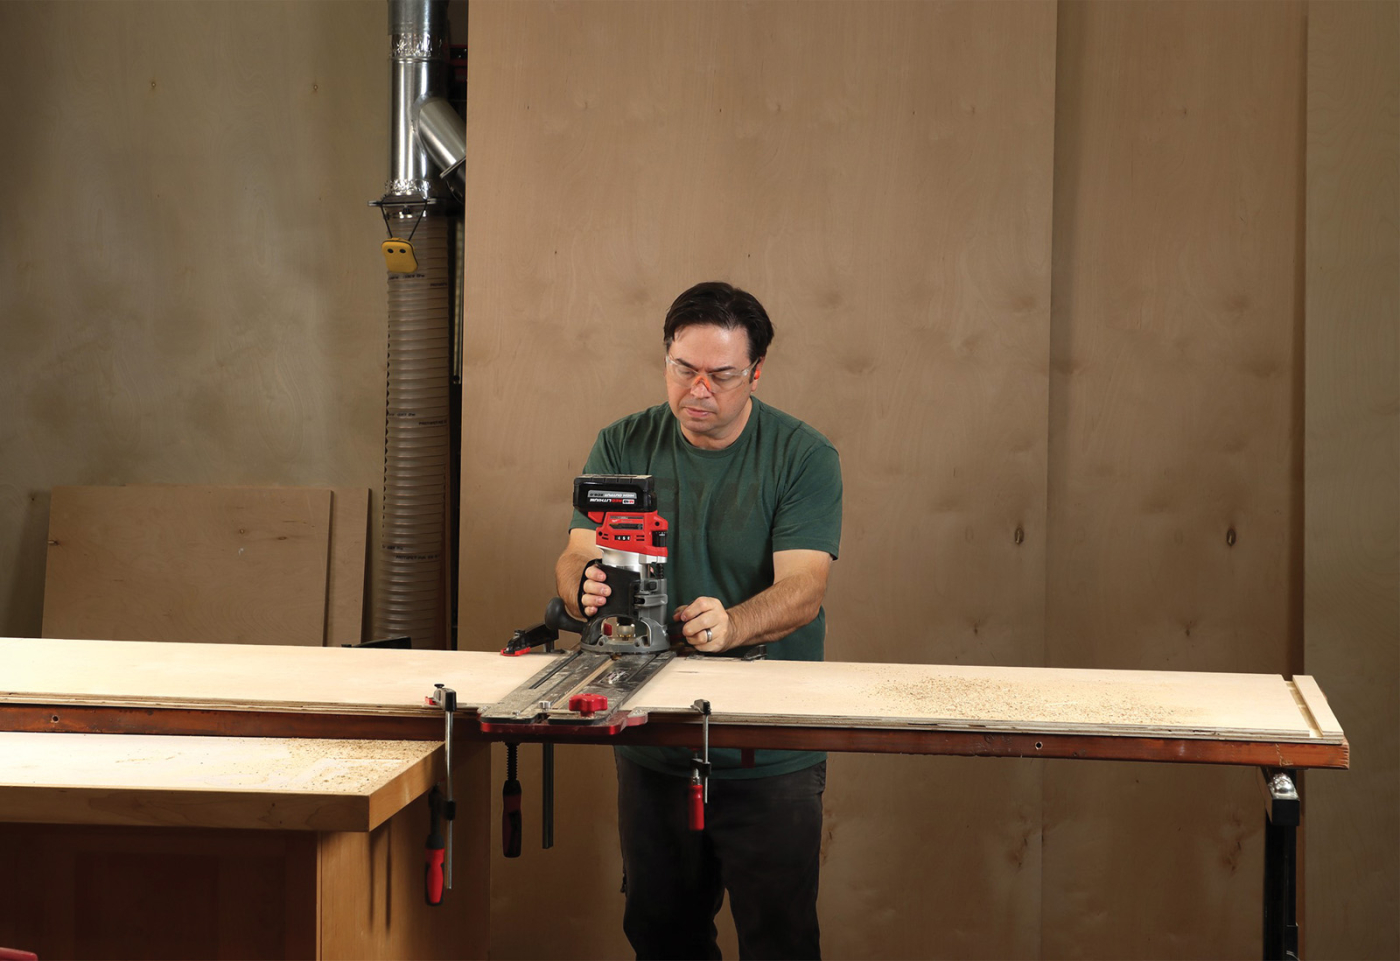
16 The 90″ long pantry side panels are too big for a table saw, so use a router and dado jig instead.
17 Glue together the pantry sides with three fixed shelves.
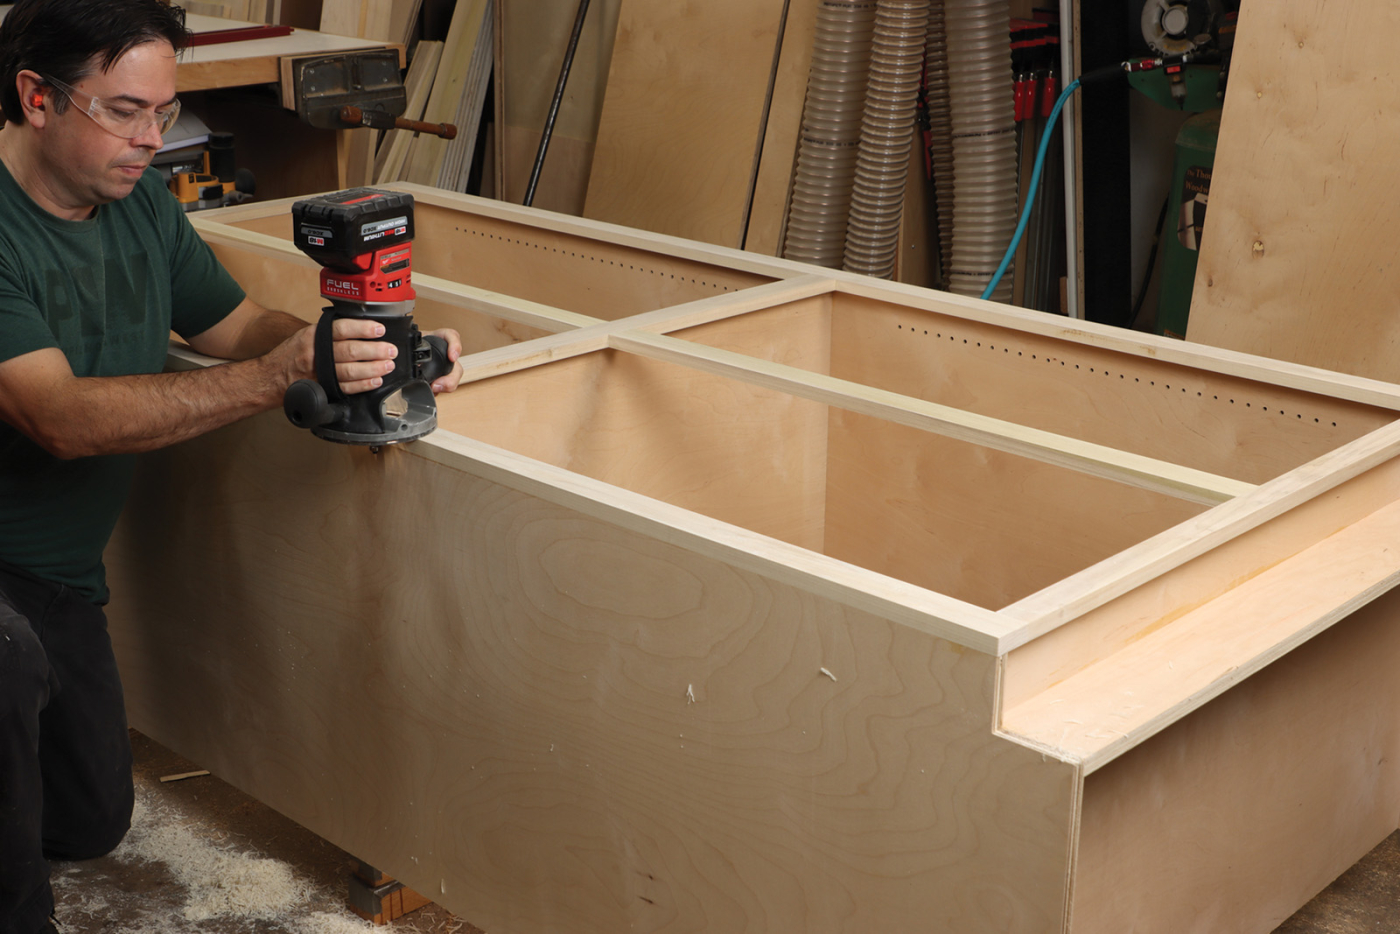
Next drill shelf pin holes for adjustable shelves in all the cabinets. I get cleaner results by using a compact plunge router equipped with a 1/4“ spiral bit and 3/8“ brass guide bushing. An upcut spiral bit will prevent burning and give the overall best results. Add cleats to the tall pantry—one beneath each shelf. Align each cleat flush with the rabbet at the back of the case and install them with pocket screws and glue.
18 Measure from the cabinet to size the hardwood components. Note the outer vertical components run the full height, while inboard stiles are sized to fit between the rails.
Quick Face Frames
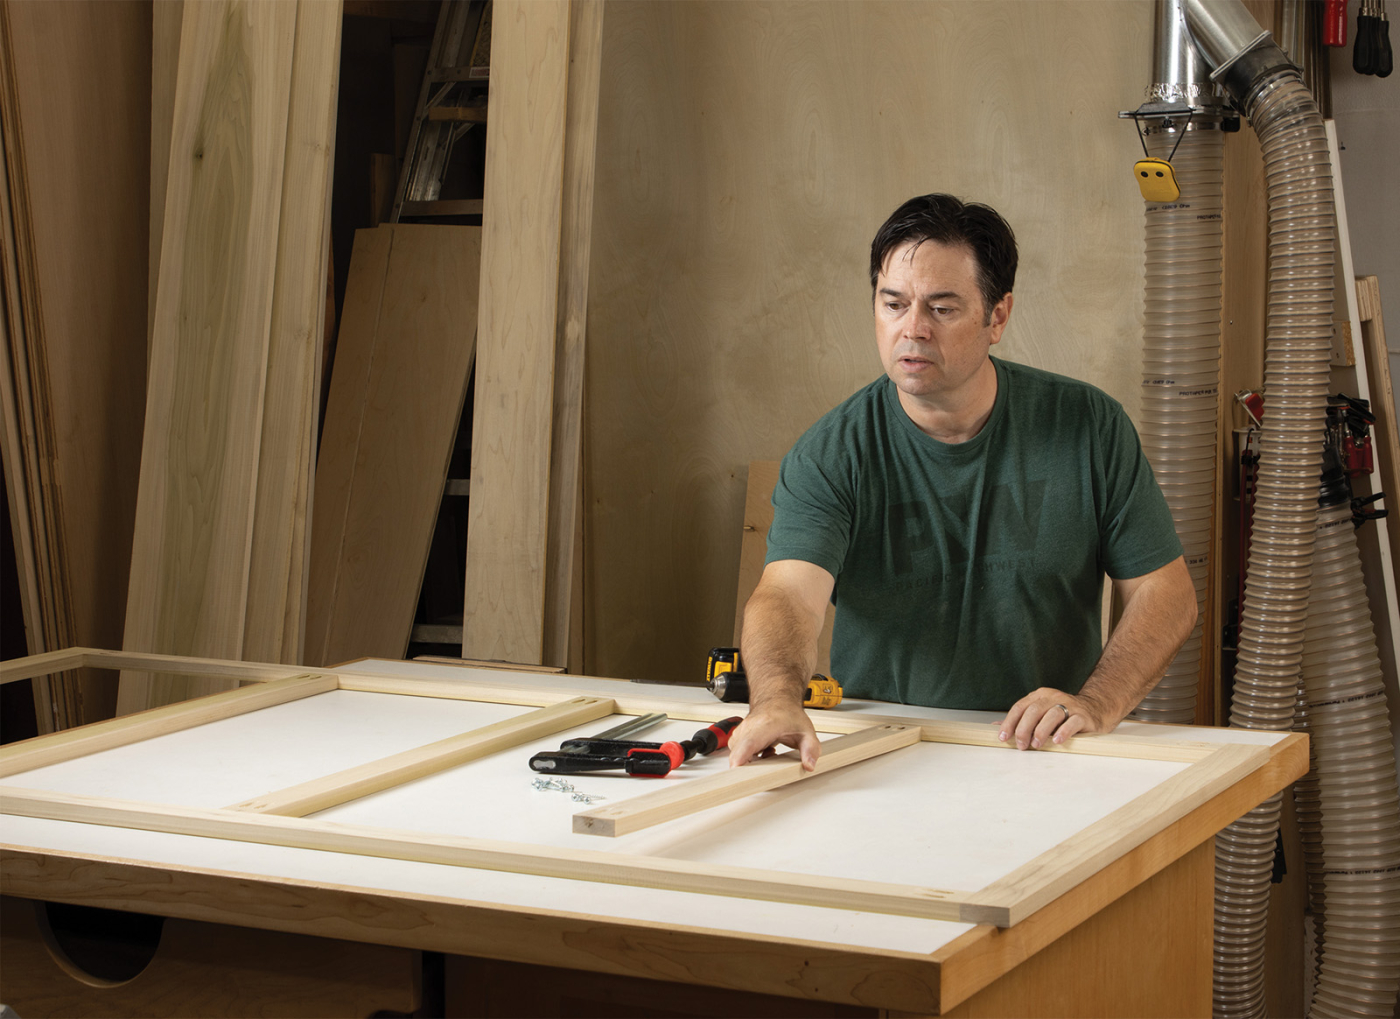
With all the cabinet boxes constructed, it’s time to layout and build the face frames. I used poplar for these simple face frames, but maple is a nice paint-grade choice as well. Measure the cabinets to get the dimensions for the hardwood parts. The goal is to have the vertical parts extend 1/8“ beyond the sides of the cabinet, to allow some fine-tuning as you assemble the cabinets. The horizontal parts should align nearly flush with the shelves. Typically, I shoot for the face frame rails to set 1/16“ above the shelves, which gives a nice margin of error when building and installing the frames. Luckily, making face frames for ganged-up cabinets such as these is much easier than building individual frames. Just mill some hardwood stock 3/4“ thick x 2“ wide and cut the vertical parts to the full height of the cabinet (minus the toe kick on base cabinets). Then cut the horizontal parts to fit between the uprights and assemble the frames with pocket hole screws and glue. Finally, glue the face frame to the cabinet while checking for an even reveal beyond the sides and fixed shelves. The nice thing about paint-grade cabinets is you can use brad nails and a few clamps to secure the face frames. Then just fill the nail holes with a non-shrinking, paintable filler before applying primer.
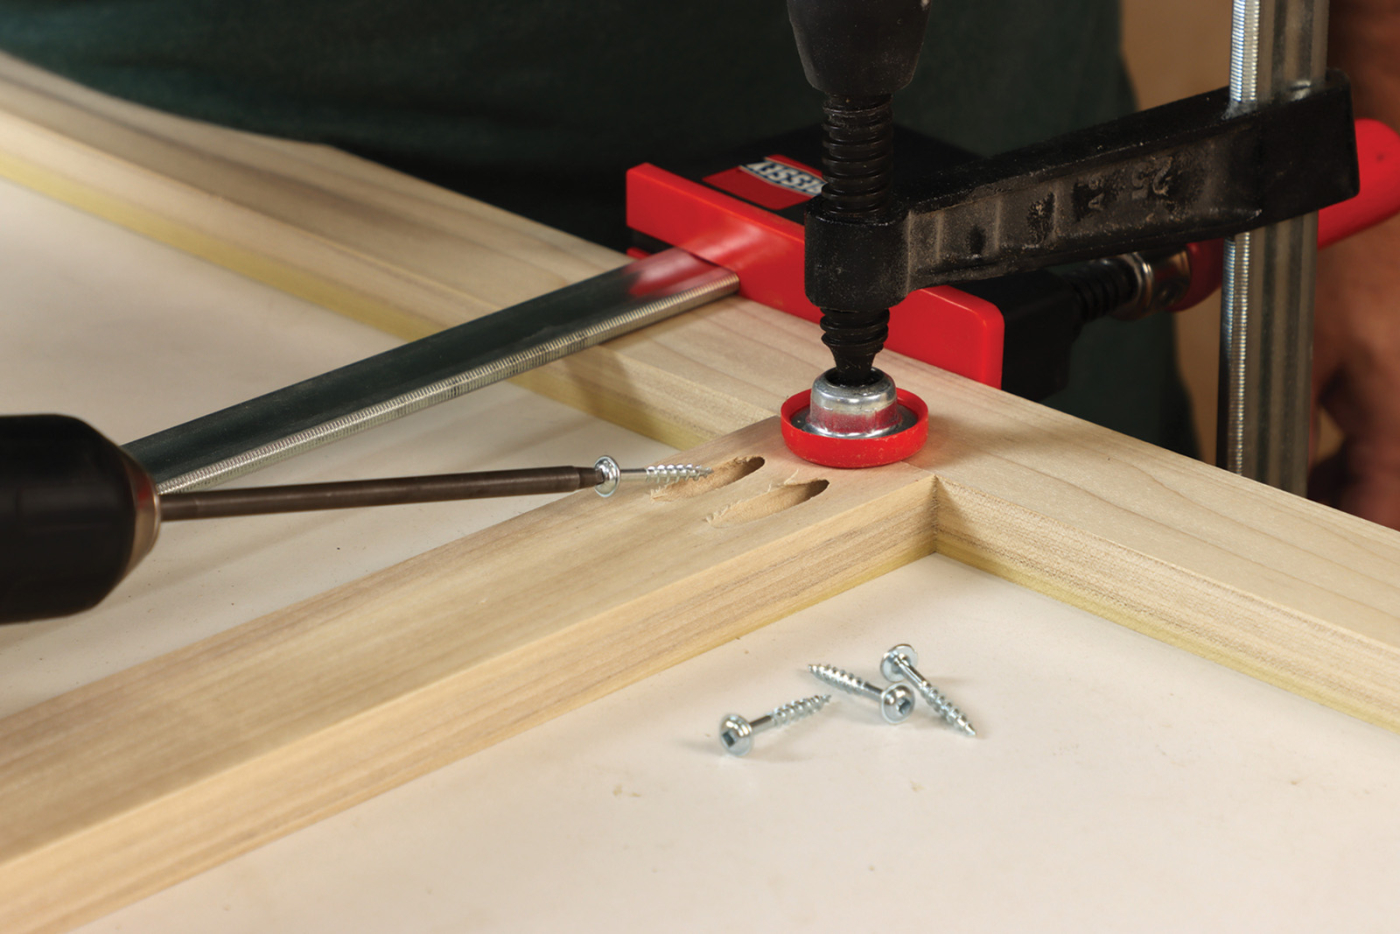
19 Assemble the frames with pocket hole screws and glue for a quick and sturdy butt joint. Be sure to clamp the parts down to a bench and tightly together to avoid joint creep.
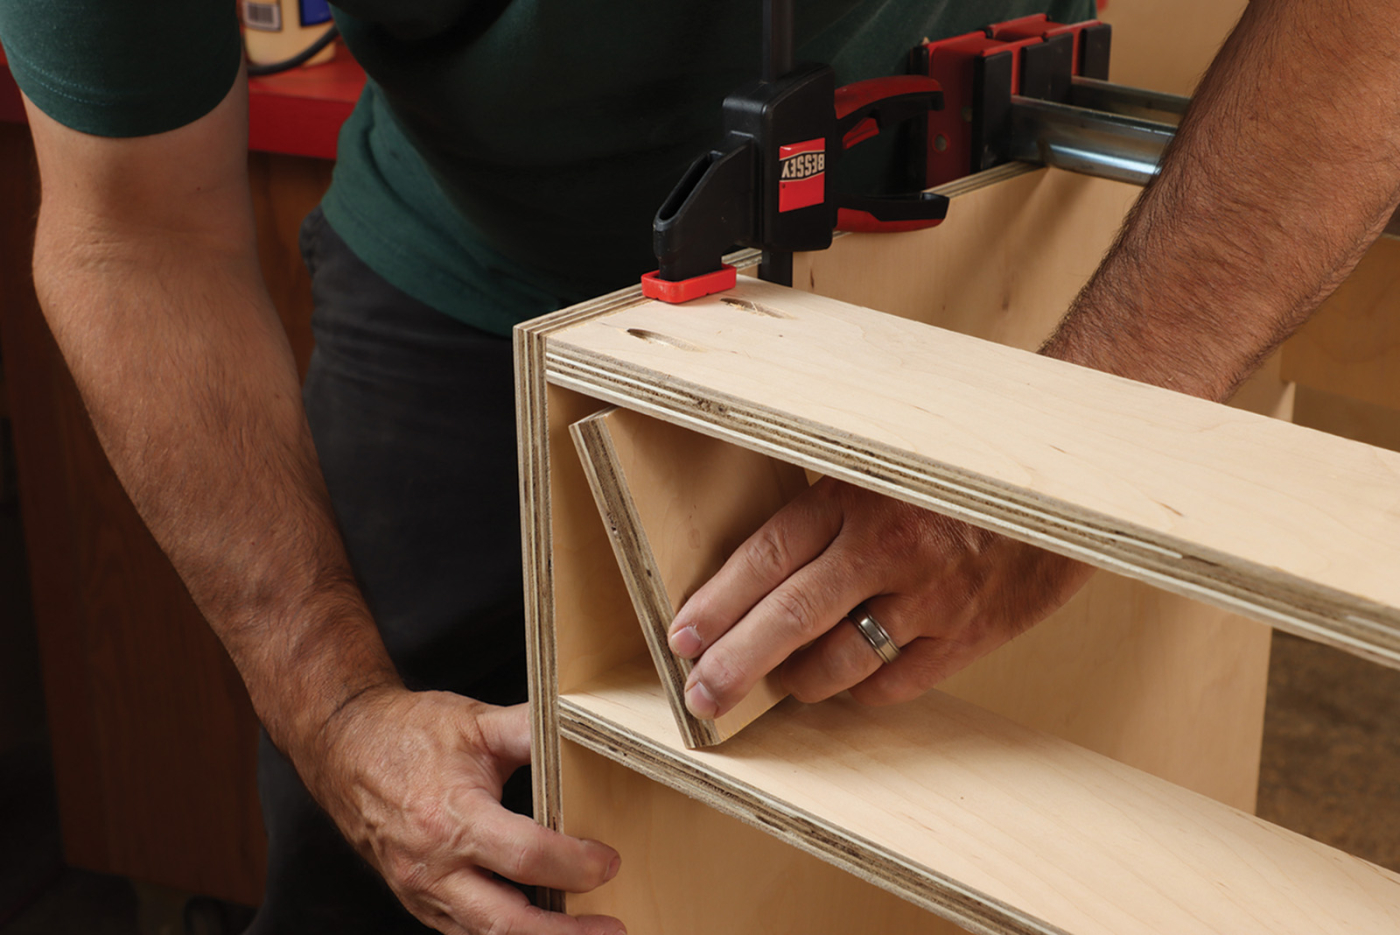
20 Lower cabinets get additional small dividers to separate the drawer openings. 2″ wide material can handle 2 screws per joint.
21 Glue the single face frame onto the cabinet with brad nails and a few clamps. This is the stage you’ll start to appreciate the “monolithic” face frame because it’s so easy to install.
Build the Doors
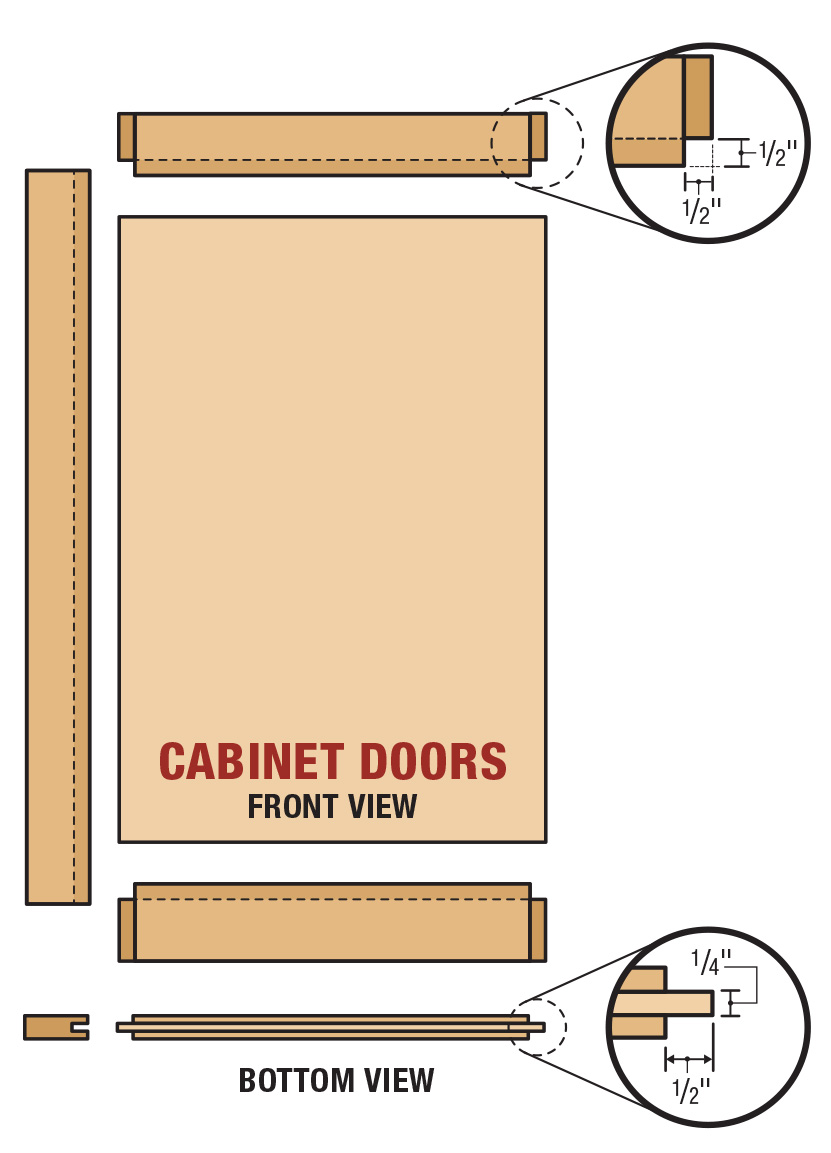
With the face frames built, you can now accurately size the doors for your project. There’s some flexibility in determining how much of the face frame should be covered by the door, but let your hardware be your guide. I chose 1/2“ overlay European-style hinges with a nice soft-closure feature. I like the bottom of the doors to nearly cover the face frame, so I sized my door parts with that in mind. Otherwise, the door dimensions list will yield a door that’s 1“ wider than the opening and provide 1“ spacing between the doors in both directions.
22 Complete the basic joinery at the table saw and rabbet the door panels to fit the groove.
23 Stub tenons are the easiest standard cabinet door construction method, so you can batch the doors out quickly.
The door joinery is about as simple as it gets—stub tenons at the table saw. Once the 1/2“ thick door panel is glued in place, these sturdy doors should go out of style before they ever fail. Thinner plywood panels are an option, but I find the 1/2“ panels make a sturdier, flatter door, and don’t cost much more. Just rabbet the edge of the plywood panels to fit the groove in the door parts. Study the materials list and note the bottom rails on the lower doors are wider at 2-1/2“.
24 Clamp the doors together, taking care to align the outer edges and check the assembly for flatness.
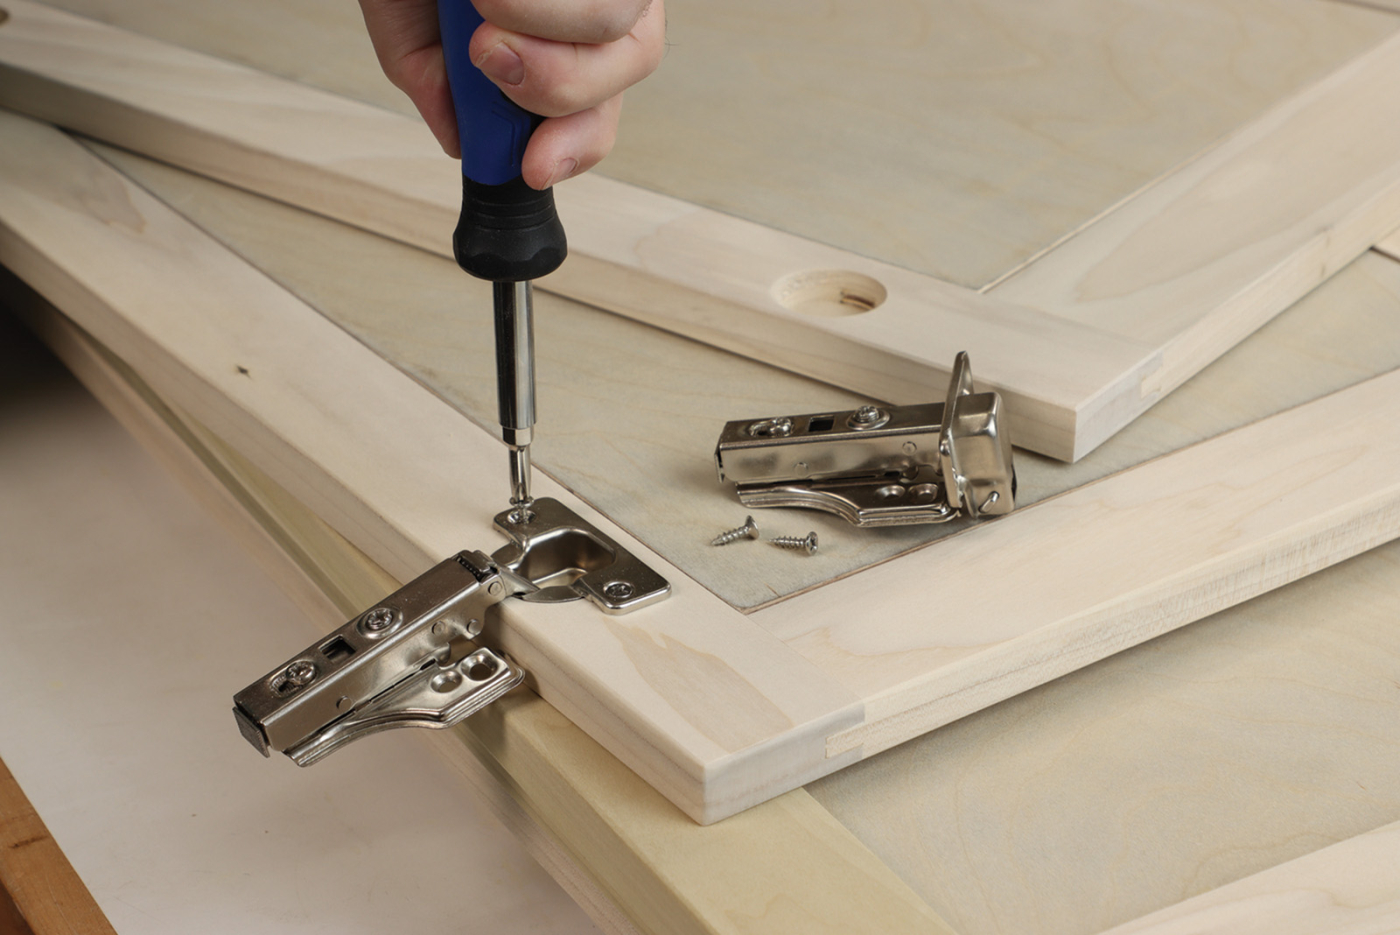
25 Add basic 1/2″ overlay Euro hinges, mounted in 35mm holes. These have a built-in soft-close mechanism, without adding any extra bulk to the hardware.
Odds & Ends
Just a few details remain before you can add the finish of your choice. First, the face frames are intentionally left proud of the side panels and now it’s time to decide if you’ll trim the excess flush. Cabinets from the big box stores leave that edge proud, but one way to elevate your build quality for a “full custom” look is to trim it clean. My rule is to leave the overhang where two cabinets meet, but flush trim any exposed edges. Another detail I like to add is shelf pin holes drilled on the back of the face frame. A well-placed row of holes gives these 36“ wide shelves extra strength and prevents them from sagging, all without the trouble of adding hardwood edging.
26 Flush trim the sides of the face frame as desired. If the cabinet joins another cabinet, it’s okay to leave the overhang.
27 Working from inside the cabinet, drill an additional set of shelf pins in the central stile. This helps support heavy loads on the 3′ long shelves.
More Information
Because some cabinet designs make it almost impossible to install shelves after installing the back, play it safe, place the shelves in the cabinet before installing the pre-finished 1/4“ birch back panels with brad nails. The back panel is primarily for squaring the cabinet build, so make sure to mount the cabinets through the cleats. For more details on finishing your cabinets, see the cabinet details article. There you’ll find a simple technique for locking rabbet drawers, as well as tips for building a laminate countertop and backsplash.
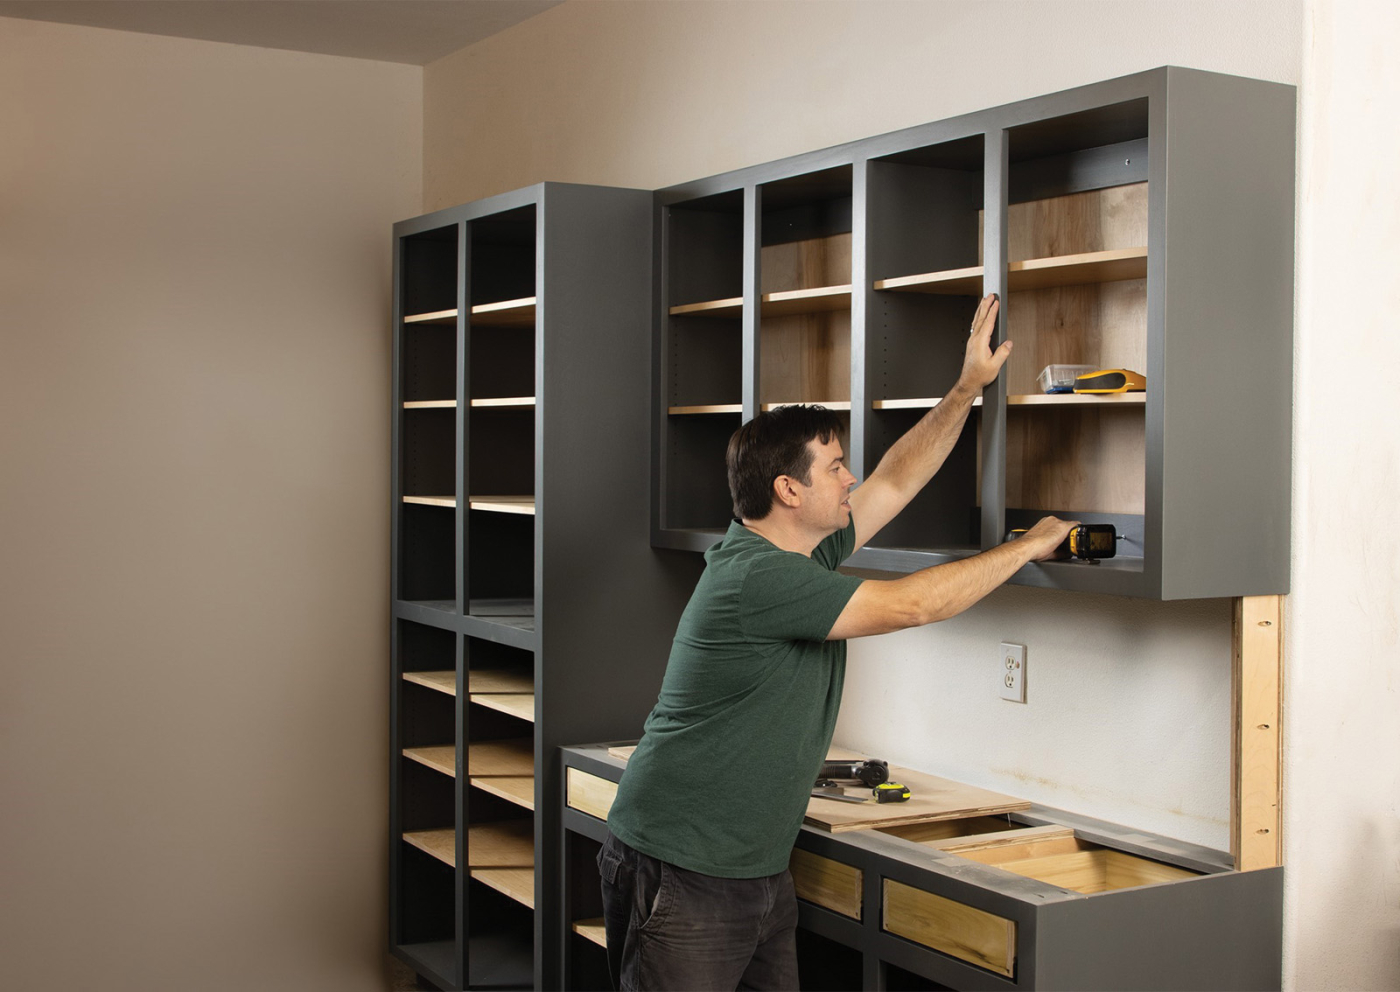
28 Use “L-shaped” cleats to support the upper cabinet during installation. Make the temporary support cleats 19-1/2″ long for the proper cabinet height.
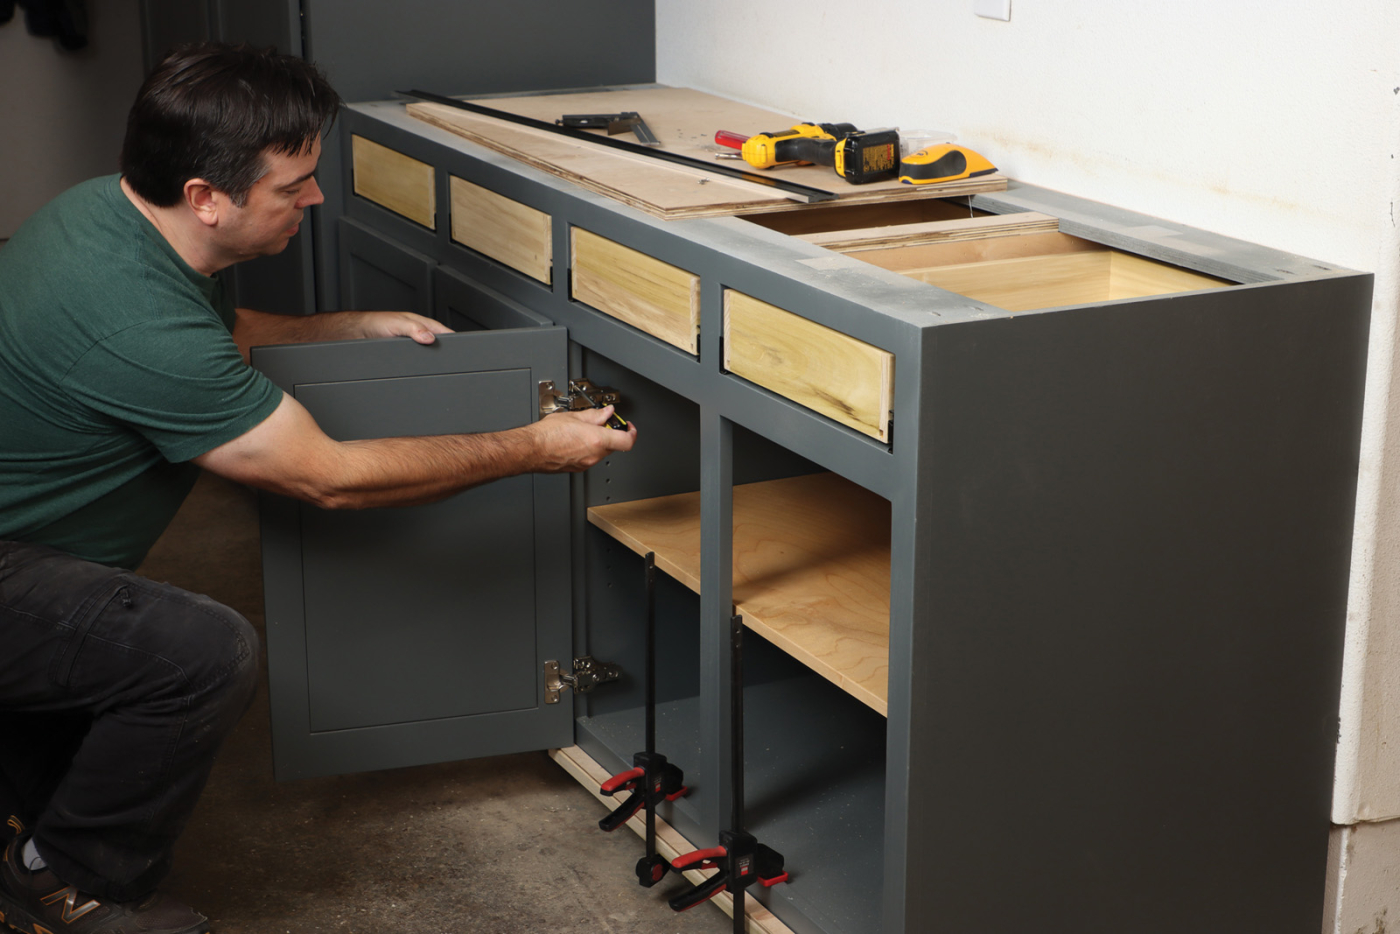
29 Clamp a scrap board under the face frame to support the cabinet doors during installation. Mount each hinge with a pair of screws and align as needed.
The cabinet boxes, doors, and drawer fronts were primed, then painted with urethane enamel cabinet and trim paint. Be sure to make up some toe kick and wall trim so you can spray everything in one go. Clear lacquer was chosen for the adjustable shelves and poplar drawer boxes, creating an interesting two-tone look. For additional details on painting cabinets with a HVLP sprayer, check out Willie’s YouTube channel, The Thoughtful Woodworker.
Here are some supplies and tools we find essential in our everyday work around the shop. We may receive a commission from sales referred by our links; however, we have carefully selected these products for their usefulness and quality.