


We may receive a commission when you use our affiliate links. However, this does not impact our recommendations.
 Plow planes are some of the easiest joinery planes to use , once you know a few tricks to getting good results. I struggled with the tools until Don McConnell (now a planemaker at Clark & Williams) set me straight years ago with one simple piece of advice:
“Each hand should have a separate job,” he said. “One hand holds the fence. The other pushes the tool forward.”
Before that point, both of my hands were engaged in job sharing. My hand on the fence was also pushing forward. My hand on the tote was twisting the tool to keep the fence tight on the work.
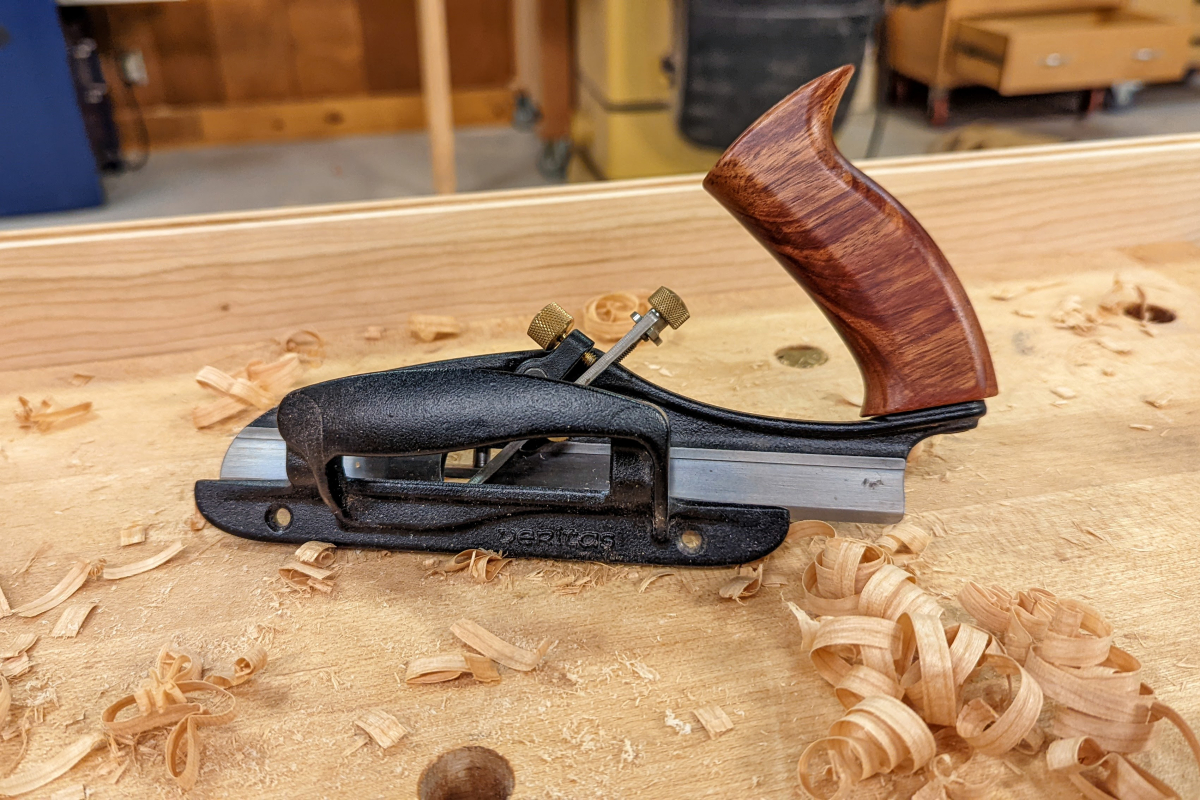
Editor’s note: This article was first published on our site in 2009. The original photos were lost in the digital void, so we re-shot them featuring Logan Wittmer as the hand model.
Here are the other things I’ve learned about gripping a plow plane over the years:
1. It’s a bit like sawing. The hand that holds the tote (or the stock) should be directly lined up with the cut and should swing free. Sometimes this means getting your body over the work (a low bench is helpful here). If your forearm is not in line with the skate of the tool, it’s gonna be a roughie. 2. It’s a bit like jointing an edge. For my fence hand, I wrap the web between my thumb and index finger around the stems (sometimes called posts) of the tool. I reach my fingers around the fence and touch the work and the front edge of the bench if possible. My thumb is pressing down. If you joint edges of boards by hand, you’ll recognize this hand position immediately.
3. Workholding: Keep it Simple
There are lots of ways to hold your work for plowing. If your end vise and dogs are positioned near the front edge of the bench, you can usually pinch things directly between dogs. You also can use a sticking board, which is a little shelf that holds your work.
Or you can do what I do: Clamp a batten to the benchtop to brace the edge of your workpiece. And plow into the tip of a holdfast. This is very quick for plowing drawer parts , there’s no clamping and unclamping and you can work with a bunch of different lengths easily.
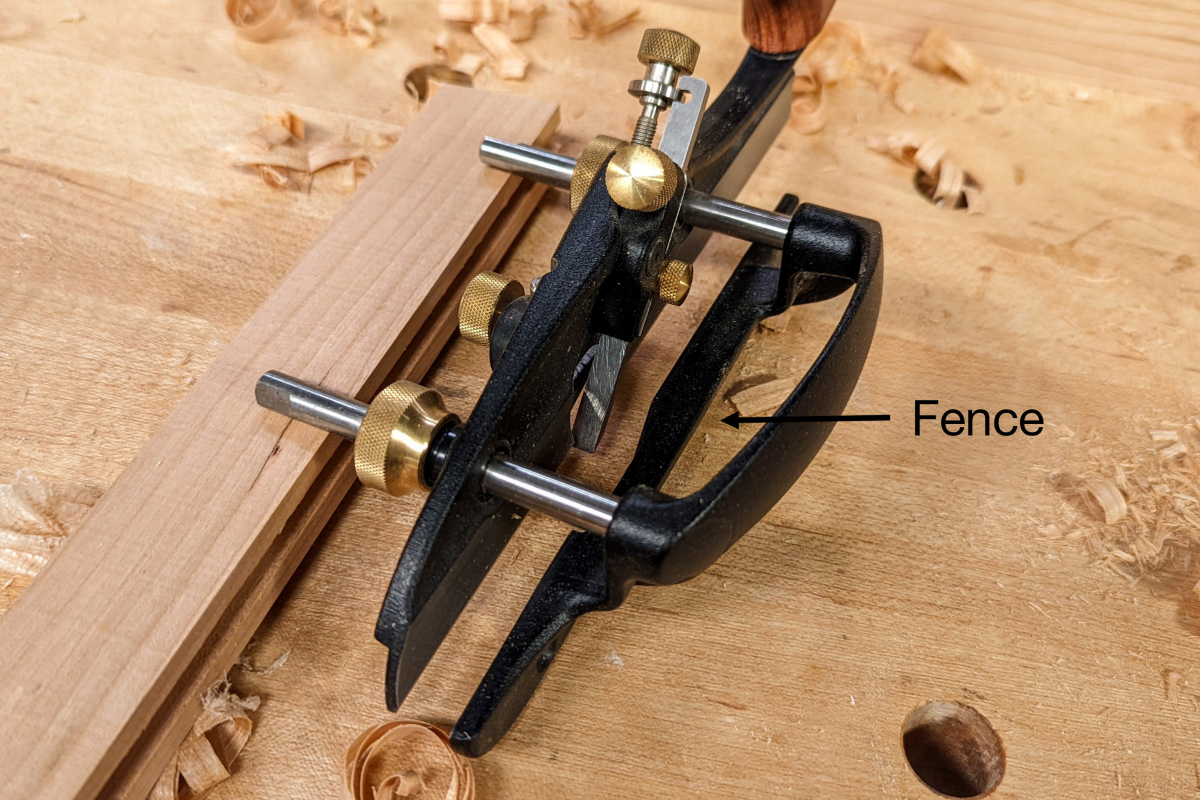 4. Set the Fence
Set your plow’s fence so it is parallel to the skate and the desired distance from your cutter. The most common cut I make is a 1/4″-wide groove that’s 1/4″ from the fence. Conveniently, the brass section on my folding rule is exactly 1/4″ long, so it’s easy to set things at a glance.
5. Begin at the End
You can use a plow plane like a bench plane and make full strokes that run from the near end to the far end. But I have found this to be sometimes troublesome. Sometimes the cutter will follow the grain in the board and the tool’s fence will drift away from the work. The results are ugly.
Instead, I start at the far end of the board and make short cuts. Each succeeding cut gets a little longer until I am making full-length cuts. The advantage to this is that if your plane wanders, it will only be for a short distance and the next cut will correct the error.
After you are making full-length cuts there’s little danger of the tool wandering.
 The shavings should be fairly thick, you don’t want to do this all day. These shavings are .015″ thick. I could probably go a little thicker in pine.
Results and Then…¦
When the tool stops cutting, you stop stroking. The edges of the groove might be a little furry , that’s typical even for the best work. That’s why I wait to smooth plane my pieces after I have grooved them. That removes the fur.
Here are some supplies and tools we find essential in our everyday work around the shop. We may receive a commission from sales referred by our links; however, we have carefully selected these products for their usefulness and quality.


Chris,
The plow I have is an English screw stave with an almost complete matched set of irons. The fence is attached to the staves with large iron screws and they are just loose enough to pivot.
I use the pivot to slightly askew the blade to crab (or cast) into the fence. With narrow irons, the skate prevents much if any skew, but on larger irons a bit more skew is possible.
Your groove looks much better then I ever make, but then mine never really show. They are filled with a tenon or panel. While yours are finely grooved, mine are just plowed.
Stephen
Thanks for the article. We need more if we are to have a chance of being good at using these bad boys. Keep up the good work. John
I once made a series of set up blocks for my wedge arm plow from pieces I had grooved. Makes setting up the common offsets a breeze–and keeps the arms parallel while setting the wedges.
The pita is that one needs to have several for the various widths of cutters and offsets (if more than one iron is used regularly the number grows considerably). Even so, they are quick to make.
Setting off an already grooved piece is also fairly easy–I’ve done that when I have had to remake a matching piece due to ruining a mate on a box.
As for non-parallel fences? Never tried it on purpose. The times I have not had them parallel there has always been more resistence in the cut than there whould be. And extra fuzziness on the show surface and or slight chip-out. Most times it hasn’t been an issue worth messing with the fence. But a few times I have had to correct the fence alignment.
Stephen,
It’s a bridle plow made by D.L. Barrett & Sons in Canada. Good people. It’s a copy of a Mathison bridle plow. The chief advantage over my old screw-arm plow is that it’s easier to keep the fence parallel to the skate.
And yes, your terms for the staves are more historically correct than mine. Thanks for noting that. I’d always rather use the right words.
Your note about the fence is a really interesting one. My old plows also have a fence that seems to pivot more easily than I think it should. I’ve always chalked it up to wear on the screws or staves.
I’ve wondered at times if pivoting the fence slightly would pull the fence toward the work – like a skewed dado plane or skew rabbet. When I’ve tried this the result has been that the tool gets bogged down because the iron is a bit of a parallelogram in relation to the work.
Have you found skewing the fence to be an advantage?
Chris
Chris,
What type of plow plane are you using? The fence adjustment is interesting. Also the term ‘stem’ or ‘post’ is that for the ‘staves’ or ‘arms’ or ‘beams’ that hold the fence?
Why do you suppose the fence on old plows pivots slightly? Ease of adjustment or is there any time that the fence is set askew?
Your description was much clearer than Moxon’s.
Stephen
I have an old Sandusky Tool Co. plough plane that I acquired long ago from a coworker. Being one of the first planes I had, I had no clue how to use it properly and it frustrated the heck out of me. I’ve never used the "far end first" method, but I think I’ll give it a try this weekend. Great post.
How on earth do you manage to write about the exact topic I was wondering about quite so often! I’ve just acquired a number of wooden planes that I’m in the midst of cleaning up — the plough plane first 🙂