We may receive a commission when you use our affiliate links. However, this does not impact our recommendations.
 Most bench planes come equipped to eliminate tear-out.
 Most bench planes come equipped to eliminate tear-out.
Handplanes are great tools for creating a smooth, finish-ready surface on a board without the dust and noise from a sander. If the board is straight grained and the blade is sharp, it is easy to use a plane. But if the board has some figure, such as that commonly found in curly maple, figured cherry or knotty pine, there is a risk of tear-out.
There are many strategies that can be used to reduce or eliminate handplane tear-out on tricky surfaces. A tighter mouth, a higher bed angle or, if you’re using a bevel-up plane, a steep secondary bevel, are all ways one can attack the problem. But there is a device that comes standard on many bench planes that is equally effective: the chipbreaker.
The ability of the chipbreaker to reduce tear-out can be seen in the photo above. The cherry board shown was deliberately planed against the grain with a Stanley No. 4, using a stock blade and chipbreaker.
On the right side in the picture, tear-out can be seen, which is expected. On the left side of the board, tear-out is nearly nonexistent. The same plane and blade were used to produce both surfaces. The only difference is that the chipbreaker was set up properly when planing the left side.
Chipbreaker Theory
If a board is straight grained, planing is easy when you’re going with the grain. But nearly all boards have areas where the grain reverses, so you’re forced to plane against the grain. If the board is figured, the grain can switch back and forth over a short distance. In spots where the plane is cutting against the grain, instead of cutting fibers, the blade acts as a wedge that splits them. Eventually these fibers will break and a small divot of wood comes off, which leaves an uneven surface that we know as tear-out.

Blow out. A still from the video by Yasunori Kawai and Chutaro Kato shows the mechanism of tear-out when planing against the grain. As the shaving comes up over the blade it levers up the fibers ahead of the cutting edge, which results in tear-out.
 In this situation, if there is a way to alter or break the fibers so there’s no leverage to cause the divot of wood, tear-out can be reduced. Chipbreakers work by making the shaving deflect so the fibers in the shaving lose their integrity, either by bending or breaking. Therefore, the shaving loses the ability to pry the divot out of the board ahead of the plane blade, which reduces the tear-out.

The bends. As the shaving comes up over the blade, it runs into the chipbreaker and bends over. The shaving loses structural integrity and cannot lever out wood ahead of the cutting edge, reducing tear-out. Here the chipbreaker is 0.02 mm (1⁄128″) from the cutting edge.
 Chipbreaker History
The oldest written evidence we found of a chipbreaker is from a 1767 advertisement by Philadelphia planemaker Samuel Caruthers. He describes the availability of “double-ironed planes, of a late construction, far exceeding any tooth planes or uprights whatsoever, for cross-grained or curled stuff.” Those chipbreakers were probably imported from England, and were likely in use before this first written record.
Other references to and explanations of how the chipbreaker works have appeared in books and articles over time. But it wasn’t until professors Yasunori Kawai and Chutaro Kato, at Yamagata University in Japan, made a video that showed a chipbreaker in action on a microscopic level that we could see the exact mechanism of how it works to prevents tear-out.
In the video (available online; see the Online Extras at the end of this article), a sharpened plane blade with a microadjustable chipbreaker was filmed planing a board against the grain to see what factors impacted the performance. Kawai and Kato were able to show that the face of the chipbreaker did indeed bend the shaving over as the plane was advanced on the wood. The effect was greater the closer the chipbreaker was to the edge of the plane blade – distances on the order of 0.1-0.3 mm (about 1⁄128“). In addition, the angle of the face of the chipbreaker changed the optimal distance that the chipbreaker needed to be from the edge of the blade. It appears that the bending of the shaving causes the shaving to be unable to lever out wood fibers ahead of the cutting edge, thus reducing tear-out.
Chipbreaker Setup

Tight is right. The chipbreaker needs to mate flat to the back of the plane blade in order for it to work. Otherwise, shavings lodge in the gap and interfere with the plane’s function. An excellent way to check the fit is to hold the chipbreaker and the blade up to a light source.
Setting up a chipbreaker is a fairly straightforward procedure. The first step is to flatten the back of the plane blade and sharpen the blade as much as possible with your favorite sharpening regimen.
Next, the chipbreaker should be adjusted so it mates tightly to the back of the blade. (If there is a gap between the edge of the chipbreaker and the back of the blade, shavings will find their way under it and clog the mouth.) If the chipbreaker and plane blade are pressed together and held up to a light, no light should be visible between the two components.

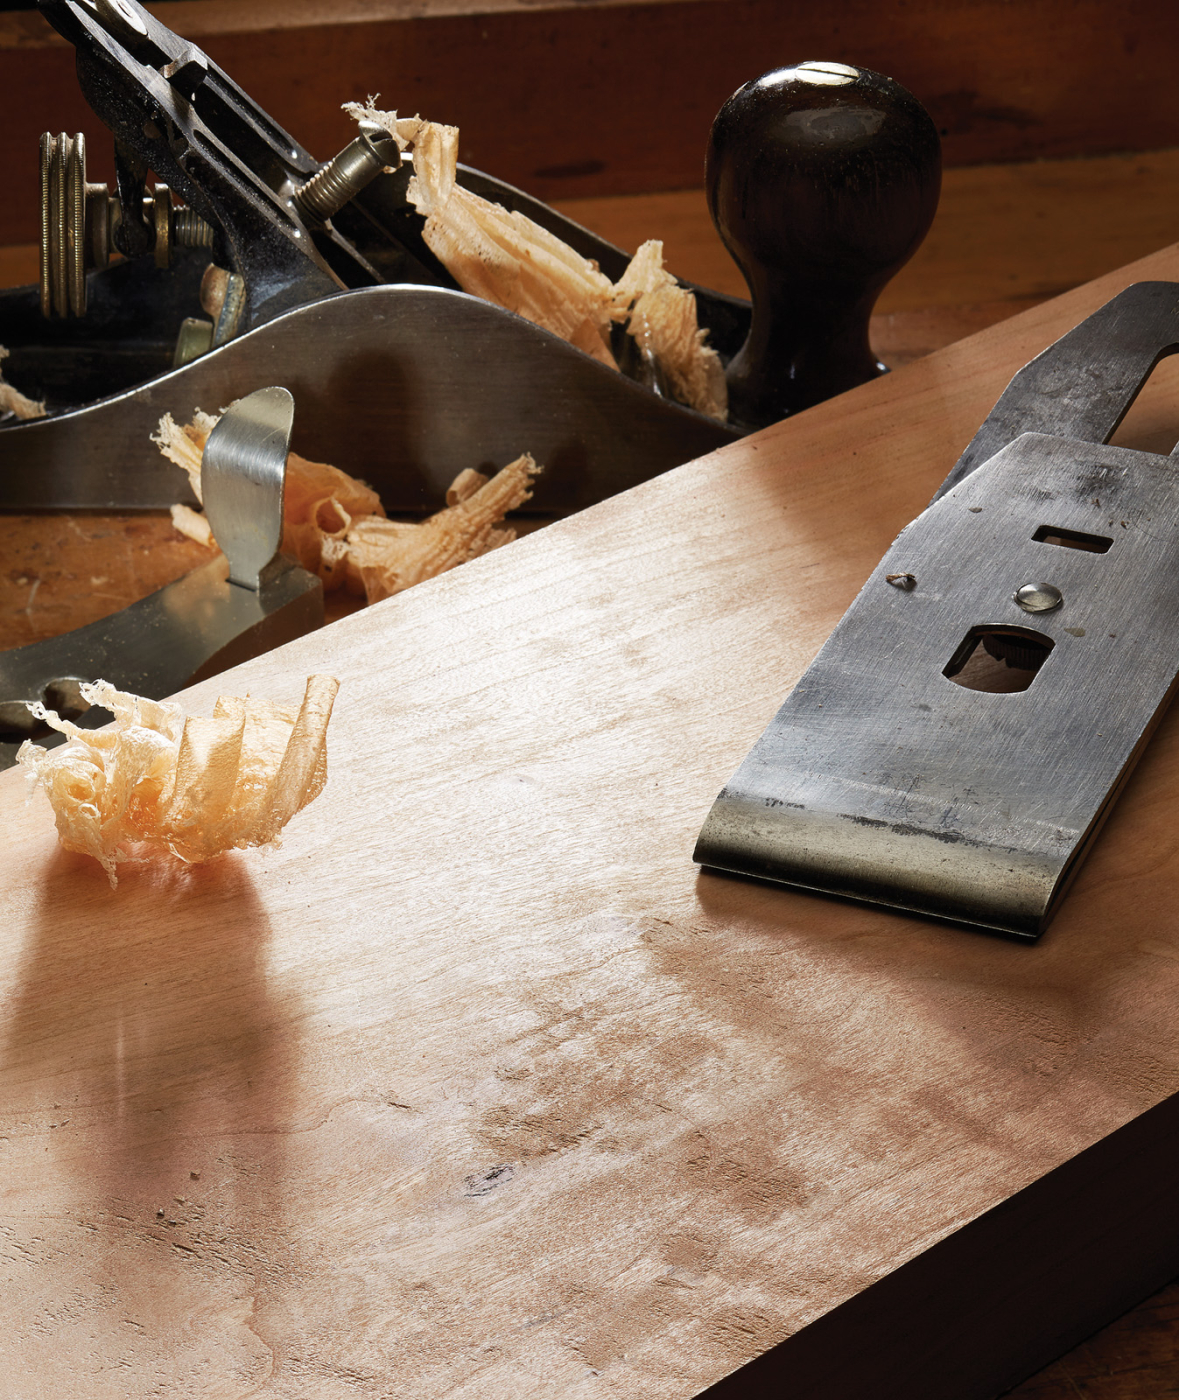
Get it tight. Flattening the edge of the chipbreaker is straightforward. In this photo, a standard Stanley chipbreaker is being flattened on a waterstone, although any sharpening medium can be used for this task.
If there is a gap, it is often because the edge of the chipbreaker is not completely flat. If this is the case, flatten the mating surface of the chipbreaker the same way that you would the back of a plane blade. Luckily, the steel in a chipbreaker is not usually hardened to the same degree as the plane blade, so flattening that surface should be relatively easy.
Finally, if you are using an aftermarket chipbreaker (one that doesn’t have a hump like the Stanley), a secondary bevel of about 45º should be honed on the leading edge (the exact angle is not critical). The curve of the front edge of a stock Stanley chipbreaker provides this angle. This secondary bevel provides the wall that bends the shaving.

Little by little. With an aftermarket chipbreaker, a small secondary bevel – created by holding the chipbreaker at about a 45º angle during the last step in your sharpening regimen – provides the “wall” against which the shaving bends. The angle doesn’t need to be exact and the bevel can be quite small.
Set the chipbreaker on the back of the blade and tighten the chipbreaker screw with finger pressure only. The goal is to place the edge of the chipbreaker as close to the cutting edge of the plane blade as possible, in the range of 1⁄64” or less.
From a practical standpoint, this distance is not easily measurable in the workshop, but it can be achieved. Turn the blade assembly around until it reflects the light. Now push the chipbreaker forward to the edge and see how close it is by watching the reflection of light change in size. This will take some practice. When you are happy with the result, tighten the screw.

Show me the light. For the chipbreaker to work best, you need to put its edge 1⁄64″-1⁄128″ from the edge of the iron. Shine a light on the assembly and look at the reflection as you adjust the position. Despite the appearance of the reflection, this chipbreaker is less than 1⁄64″ from the edge of the blade.
Using the plane also provides feedback on the position of the chipbreaker. If you still get tear-out in reversing grain, the chipbreaker is likely positioned too far from the edge and not doing its job of bending the shaving before it tears the wood.
If the shavings are wrinkled, the chipbreaker might be positioned a little too close to the edge; you also may feel more resistance when using the plane. Move the chipbreaker back to alleviate these issues. When the chipbreaker is in the right spot the shavings straighten out and you’ll have a surface relatively free from tear-out.
This technique is not only useful for smoothing planes, but also for jointer and jack planes. Because these planes are often set up with a cambered edge, it may not be possible to set the chipbreaker as close as you can on a smoothing plane. In this situation, tear-out may not be eliminated, but it will reduce the depth of the tear-out, so it will be easier to clean up the damage with a smoothing plane afterward.
Try making adjustments on the location of the chipbreaker in your plane to see what works best in your shop, on the woods that you commonly use. Do some planing against the grain and feel how and where setting the chipbreaker in this manner gives you an advantage. It won’t take long to get the hang of using this approach to good effect.
Do You Need a Chipbreaker?
Obviously, there are other ways to achieve a surface free from tear-out when planing a board. In fact, one of the first sequences of the Kawai and Kato video shows that a chipbreaker isn’t needed when planing against the grain, if taking a shaving that is sufficiently thin. As mentioned before, a tight mouth, a higher bed angle or a steep secondary bevel are all valid approaches. These methods all work by causing the plane shaving to fail before it can lever a chunk out of the wood ahead of the cutting edge.
All these approaches have their advantages, although many times the only way to take advantage of these features is to buy a new plane (or a high-angle frog if you can find one to fit your tool). The benefit of knowing how to set up and use a chipbreaker is that the vast majority of bench planes that woodworkers already own have a chipbreaker that is just waiting to be used.
Special thanks to Yasunori Kawai, professor, and Chutaro Kato, honorary professor, Faculty of Education, Art and Science, Yamagata University, for the use of material from their video in this article, to Mia Iwasaki for translation help, and to Bill Tindall, who facilitated the use of the video.
Here are some supplies and tools we find essential in our everyday work around the shop. We may receive a commission from sales referred by our links; however, we have carefully selected these products for their usefulness and quality.