We may receive a commission when you use our affiliate links. However, this does not impact our recommendations.
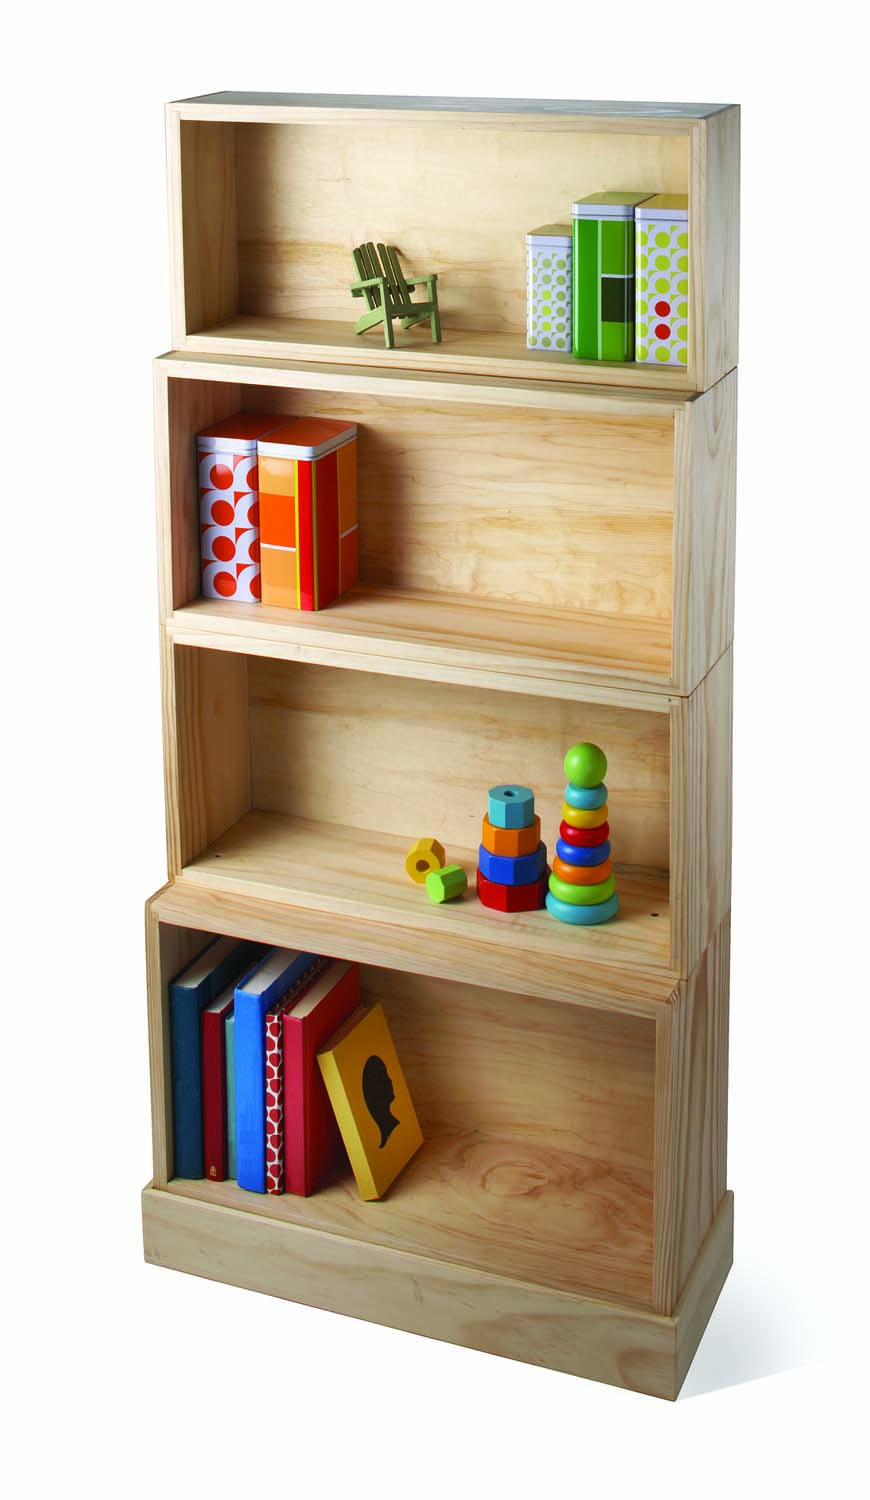
Made to order. Fit the cases to your books to avoid wasting space, lower your material costs and make moving easy.
Make Boxes to fit your books – and your space
The typical bookcase is a good example of poor design. We make them that way because that’s the way we’ve always made them; almost every plan you see is 12″ deep, yet few books require that much space. Most bookcases are heavy and a pain to move. These stacking bookcases solve those problems, and won’t take long to build.
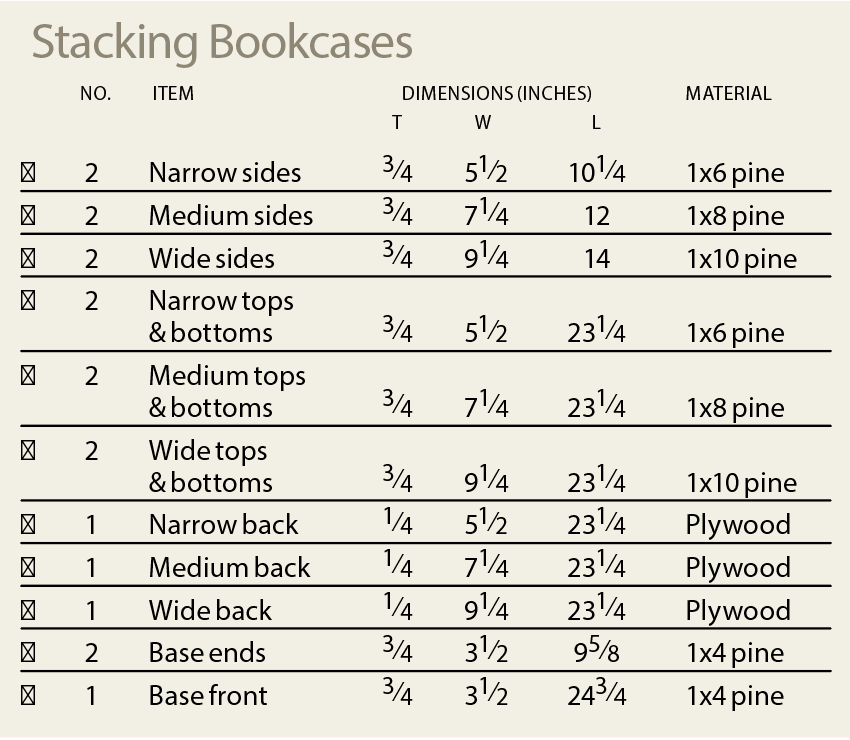
Before you begin, assess your library. The three sizes shown here are based on common lumber sizes, and typical sizes of books and video cases. If you stay with standard 1x lumber, you won’t be able to change the depth, but you can change the height and width.
An inch or two higher than your tallest book is a good inside height, but don’t go too wide; beyond 36″ and the shelves may begin to sag. Also consider how the parts of the sizes you are planning will fit the available lengths of material; an inch or so of adjustment may save you from buying another board.
Get Ready to Rabbet
The individual boxes could be just glued and nailed together, but the rabbet joints shown here will be stronger, and the boxes will be easier to assemble. I used a 3⁄8″-wide rabbeting bit that uses a ball bearing below the cutter as a guide.
You may find a cheaper version of this bit with a solid piece of steel instead of the bearing. Don’t give into the temptation to save a few dollars. The solid guide spins at the same speed as the cutter, fast enough to burn the edges of your wood.
Plan on making at least two passes with the router to reach the final depth. In theory that should be 3⁄8″, but your wood might be a bit thinner or thicker. In reality, the depth is half the thickness of your material, and the article on adjustable squares shows a quick way to find and set your router to the exact center of the wood.
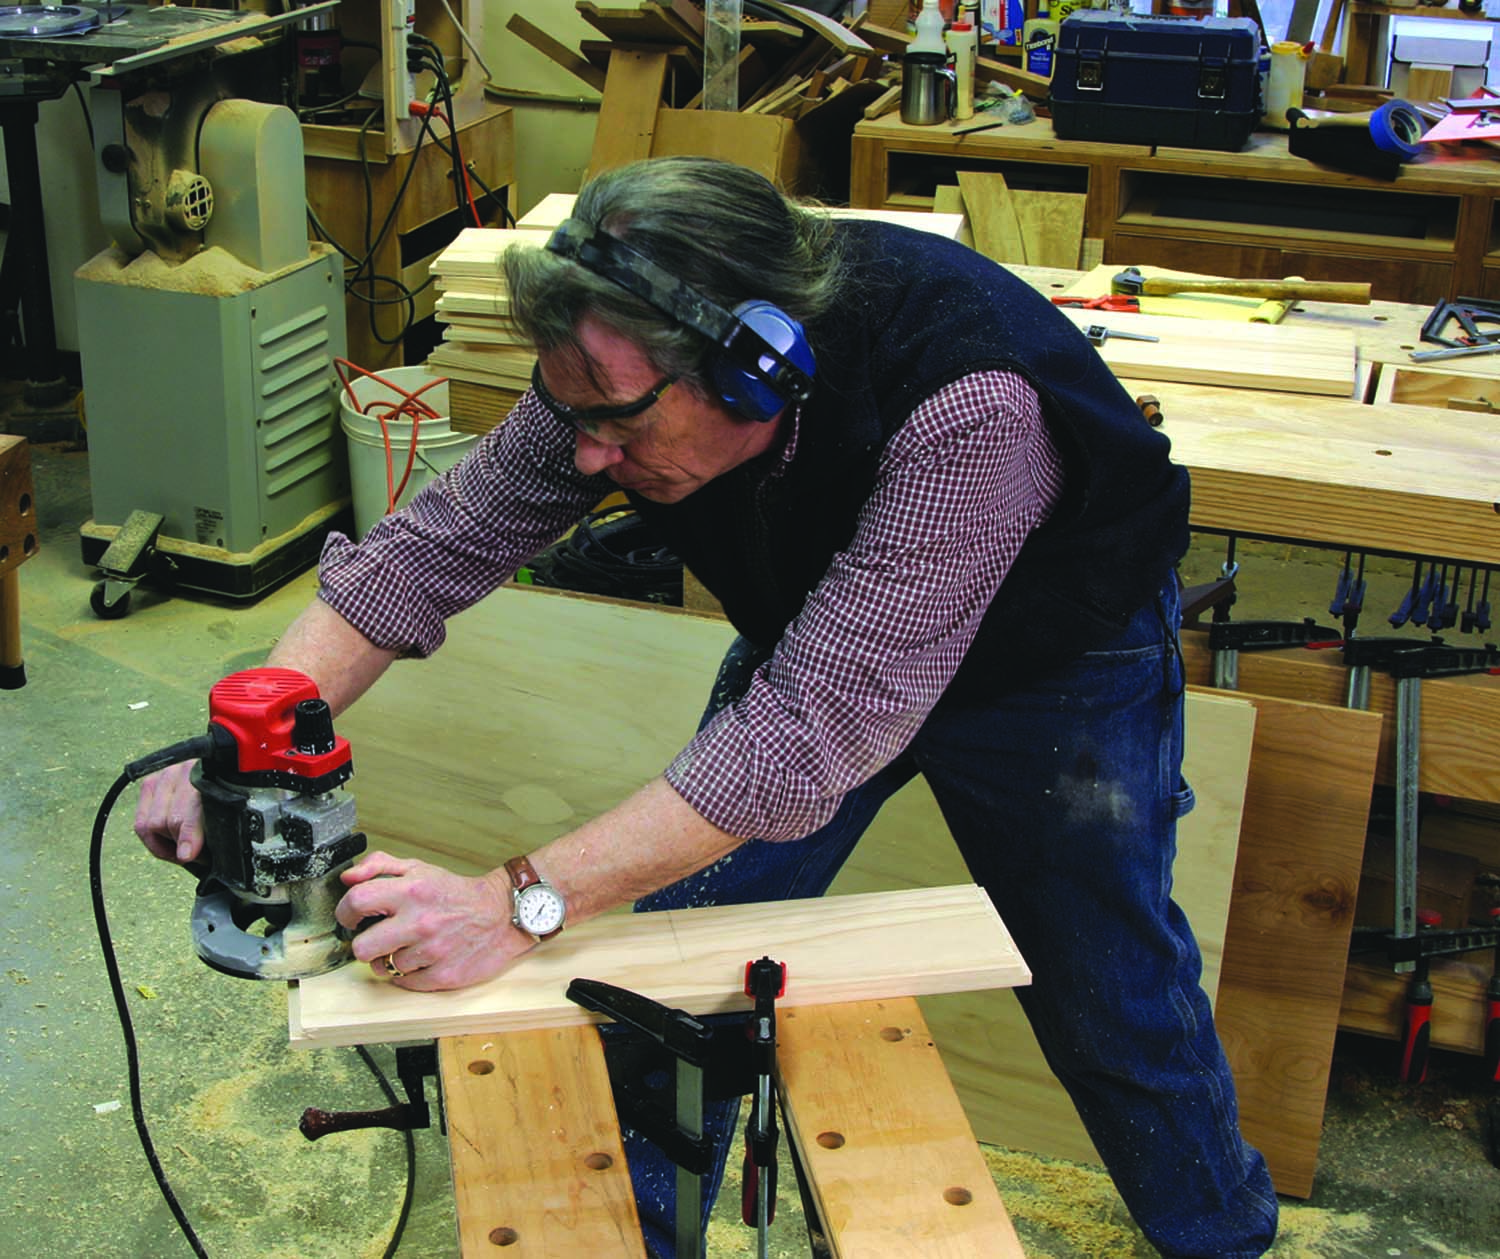
Router rules. Clamp the work securely before routing the rabbets and keep the base firmly on the surface.
If you’re new to routing rabbets, make a few practice cuts in scrap to get the feel of it. The router will behave differently when you move it in different directions. When you move from left to right, the cutting edge of the bit is moving into the work. This is more efficient and gives you greater control – but when you reach the edge of a board, it tends to break a chip out of the edge.
Moving from right to left is considered backward, and is called “climb-cutting.” If you move the router backward into what would normally be the end of a cut before you make the cut, you can prevent blowing out the wood. You should only climb-cut for a short distance after the cutter enters the wood.
Keep the base of the router flat on your work while you press the guide bearing against the edge. Be careful at the start and end of a cut that the bearing doesn’t go around the corner and on to the adjacent edge.
In This Corner
Before you put the boxes together, sand the inside surfaces with a random-orbit sander or by hand. It is difficult to sand into the corners after the boxes are assembled. The vertical pieces go outside the horizontal pieces, hiding the end grain when viewed from the side.
Put a bead of glue on the end-grain surfaces of the sides and spread it across the entire surface. Let it soak in for about five minutes before applying glue to the other joint surfaces. This allows the glue to soak into the end grain and makes for stronger joints – it’s called “sizing.”
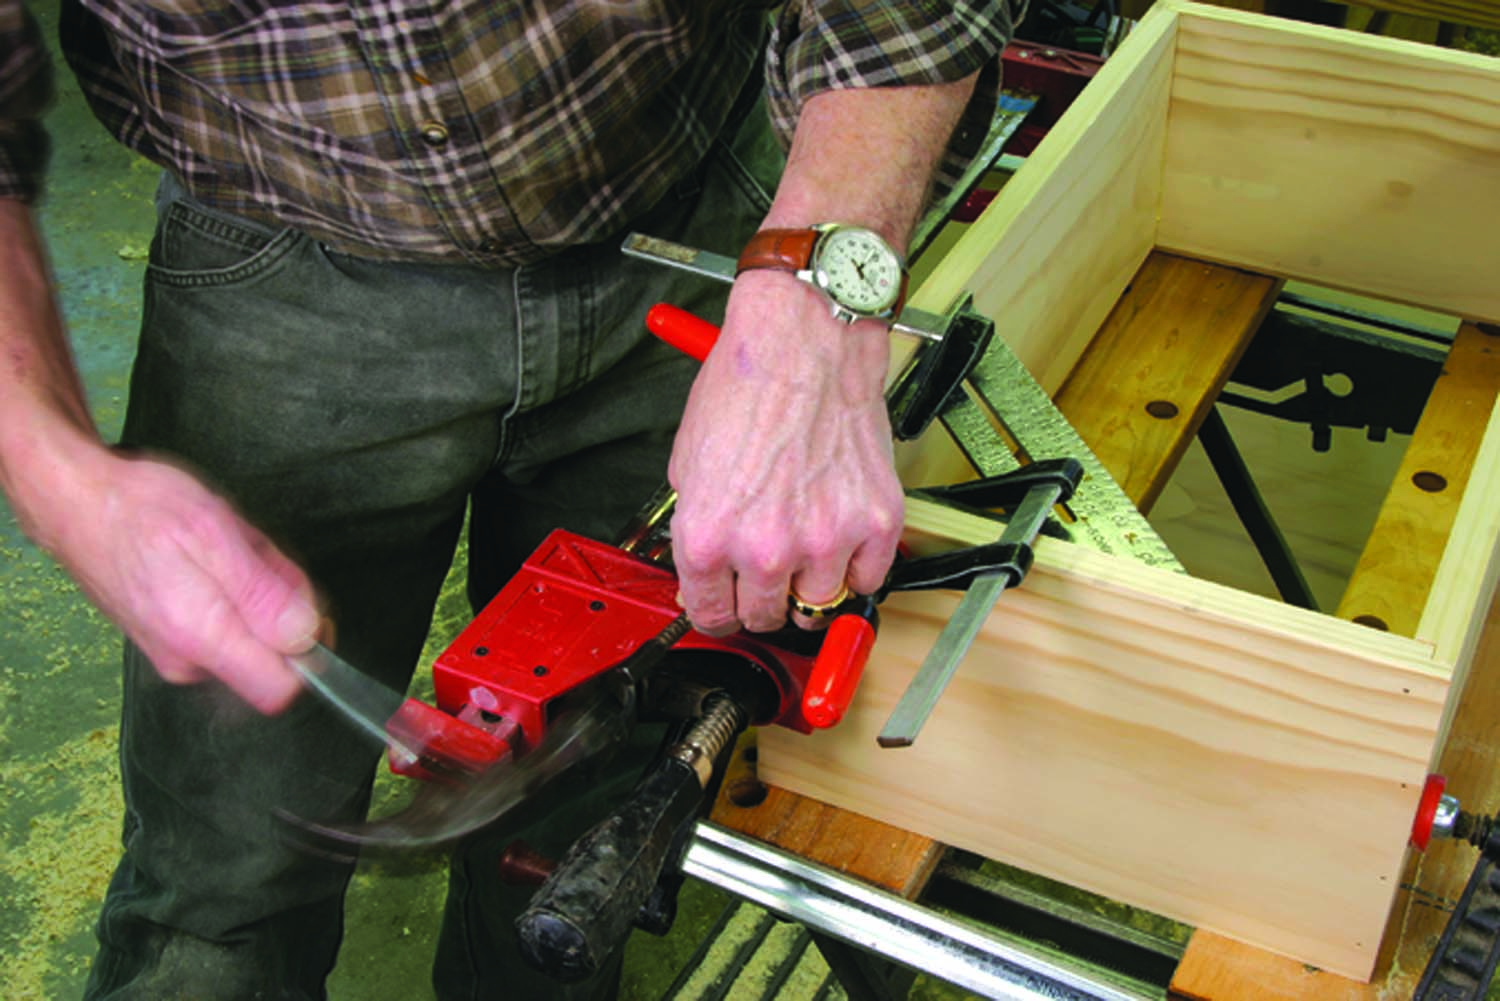
Nice and square. Clamp a square in the corner to hold the boards in position while you drive and set the nails.
Put the corners together and use clamps to pull them tight. Clamp a Speed Square (or a square block of wood) in each corner as you nail to keep the entire assembly square. I used 3d finish nails, and set them slightly below the surface of the wood. When the nails are in, the clamps can be removed and you can move on to the next box.
Let the glue dry overnight, and remove any excess wood at the joints with a block plane or a random-orbit sander. When all the corners are flush, sand the outside surfaces and break the sharp corners with sandpaper.
Cut the backs to fit the openings, but finish the bookcases before attaching them permanently. You can hold the backs in place with either 3d finish nails (quick, but be careful with your aim) or #6 x 5⁄8″ wood screws. 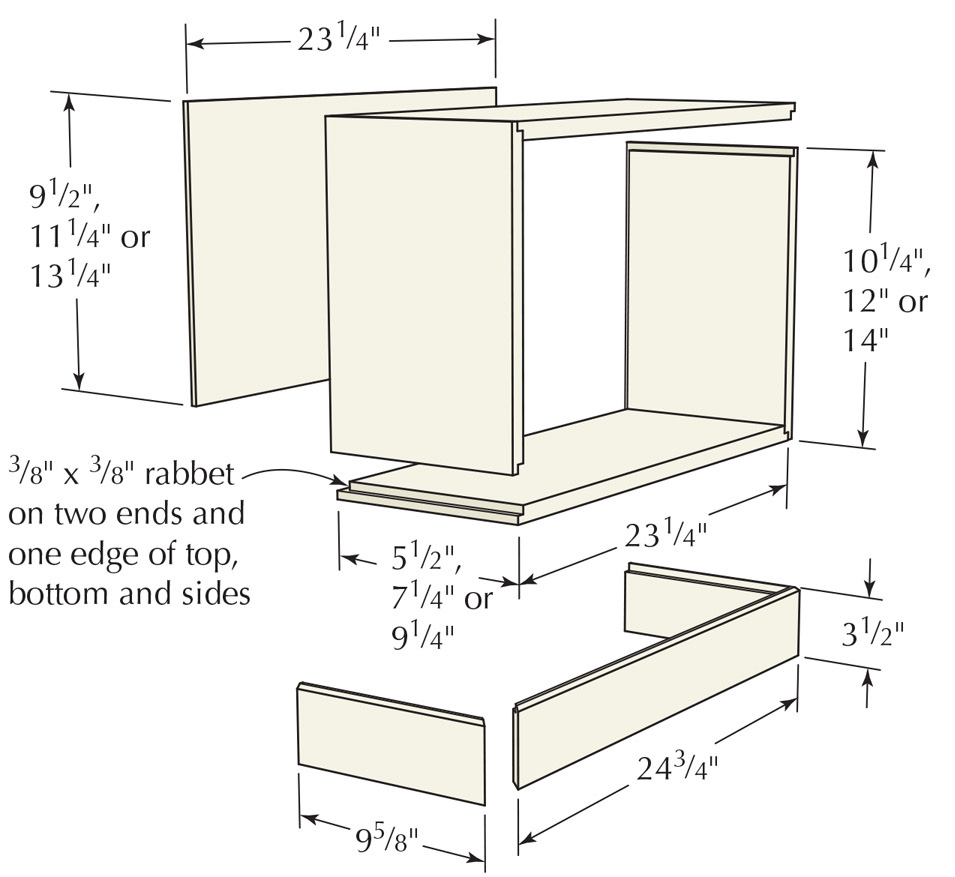
Off the Floor
Cut a rabbet along one long edge of the piece for the base before mitering the corners. Size the mitered ends with glue, as was done with the end-grain of the rabbets. Assemble the three parts of the base with more glue and nails. Clear packing tape at each corner will hold the pieces in position while you nail.
I used clear shellac as the finish, brushing on two coats. Before finishing, I mixed some dust from the collection bag of the sander with a dollop of shellac to make a filler for the nail holes, and any gaps on the edges of the joints. This takes a while to dry, but the price is right, and the color will match the surrounding wood.
After finishing, the boxes are stacked on top of one another and on the base. Drive a couple 1-1⁄4″ drywall screws from the top of one box into the bottom of the next to keep the assembled bookcase stable.
Download this PDF of the project: Stacking Bookshelves
Here are some supplies and tools we find essential in our everyday work around the shop. We may receive a commission from sales referred by our links; however, we have carefully selected these products for their usefulness and quality.