We may receive a commission when you use our affiliate links. However, this does not impact our recommendations.
 If you follow my woodworking habits, you are well aware that I enjoy using my routers with pattern bits chucked in the collet. The piece I’m working on for the August issue requires repetitive stop cuts that are a 1/4″ wide. As far as I know, pattern bits with a 1/4″ or 1/2″ shank in 1/4″ diameters don’t exist.
If I had a pattern bit, I could clamp a straightedge at my layout line then proceed to routing the dado in just the right location. Another option is to clamp a fence at the appropriate offset to the layout line so I could run the base of the router against the fence and cut the dado where needed. Who wants to constantly measure and mark that offset?
There is a third option. I realize this jig might be old hat if you’re deep into woodworking, but if it’s a new idea, you should give it a try. I use these all the time, they are simple to make (as demonstrated below) and they are so cheap you can make a separate jig for each different bit you use.
The pieces are all cut to size and square at the outset. The 1/4″ plywood is a 1/2″ or so wider than the width of your 3/4″-thick fence piece plus the distance from the edge of the router base plate to the center of the collet. I’ve made these up to 15″ in length, but generally I build them to match the groove length. If you get way long, you’ll need to clamp the far side as well, but that’s getting too far ahead.

First, attach the ¾” fence piece to the ¼” plywood allowing just a fuzz of the fence to stick out past the plywood. Hint: If you’re using a brad nailer with 1” brads, angle the gun as you drive the nail. You don’t want any brad ends sticking through the fence.

Next, chuck your bit into the router then trim the plywood to width as you run the base of the router against the fence. Cut the plywood back to the fence end. This results in the exact cut line of this particular router and bit combination – that’s why it’s important to make a jig with each new setup.

Finish the jig by attaching the 1/2″-thick x 3/4″-wide T-square piece to the jig. This piece has to be squared to the fence (that’s why you leave a small amount of the fence beyond the plywood). A few brads driven through the T-square piece and into the fence holds fine.

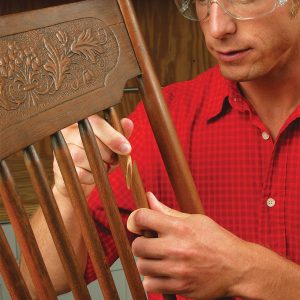
To use the jig, align the edge to your layout line, add a clamp (one clamp does the trick if you’re jig is shorter) then run the router base along the fence. If you choose to back up during the cut – something I would not recommend – it’s easy to allow the base to pull from the jig fence. To avoid this mishap, run fully to your stopping point then turn off the router and allow it to come to a complete stop before lifting the tool. (Draw a line along the edge of your router base when you get to the stopping point of your first cut, so you can easily hit the same mark with each pass.)