


We may receive a commission when you use our affiliate links. However, this does not impact our recommendations.

Simple shelves. Though it’s large, this Shaker-inspired bookcase is fairly simple to make – and three adjustable shelves make it simple to fit books of all sizes.
With simple lines and straightforward joinery, this project yields ample shelf space (and drawers to boot).
This large case-on-case shelving unit is adapted from similar pieces I’ve seen in private libraries and in stately homes. I also dug up a few pictures from the Sotheby’s and Christie’s auction sites, where the form is referred to as a “bibliotheque” (also the French word for library).
Those examples, however, all feature intricate mouldings and fancy corbels and are more adorned than would look right in my less-than-stately 1895 home. I do, however, have 10′ ceilings and an embarrassment of books, so while I didn’t want fancy, I did want big. So I reconceived the form in a Shaker-on-steroids style – the piece is just shy of 50″ wide x 90″ high. It will fit in a room with standard ceiling heights, but in case I ever needed to use the top and bottom separately, I installed a solid top for the bottom case so it can stand alone (and with the addition of a cushion, it would make a handsome hall bench).
The size did have me fretting about stock costs, so I culled the “shorts” bin at our local lumber store for lower-priced cherry, and found a nicely figured wide piece for the drawer fronts, as well as sufficient stock for the lower case and all the shelves. The shelves are made of some rather homely boards, but because I added a lip to the front for strength and appearance, you can’t actually tell – unless you remove the books and take a close look. I did have to go to the regular-price rack for the upper-case face frame and sides, but I saved money by using poplar for the backboards, which I painted to match the trim in the living room.
Bottom’s Up First

Scabby feet. Because I had very little extra stock, and not enough with matching grain to glue up a solid panel for the curved bottom rail, I had to scab on the foot piece at either end.
First, I cut my parts to rough sizes then surfaced and thicknessed all the stock but the drawer fronts, and glued up panels for the sides, lower case top and upper case top, and all the shelves. I never cut my pieces to final size until I need them – and then I mark cuts using the project as a guide, not the cutlist. No matter how meticulous I am with the measuring, things are never perfect. But, once my pieces are cut to size, I plane and finish-sand as much as possible before assembly because it’s hard to maneuver around a piece the size of a New York apartment.
Because I didn’t have a 7″-wide piece for the lower rail, or two 49″-long pieces with matching grain that I could glue up, I had to scab on a 4″ x 14″ piece at each rail end for the curved feet (the downside of parsimony).

Cut the curve. I traced my pattern onto each foot and made the cuts at the band saw.
I then traced my pattern onto each foot, cut it at the band saw and smoothed the cuts on a spindle sander – but had to resort to hand-sanding where the curve met the flat.
After setting up the mortiser with a 1⁄4” bit, I made a 11⁄2“-wide mortise for the 2”-wide center stile dead in the middle of the lower rail, then moved to the table saw to cut 11⁄4“-long tenons on each end using a dado stack.
Holding the workpiece took a little thought, because the two feet created a not-solid surface on the bottom edge (a good argument for spending a little extra to make the lower rail and feet out of one board – or at least a solid panel glue-up, and cutting the tenons before cutting out the feet). But no worries – a 3″-long offcut clamped to the sliding table did the trick. I cut each tenon face in two passes, first removing 3⁄4” or so at the end before pushing the end against the fence to remove the remainder of the waste on each shoulder.
The resulting tenon was 61⁄2” wide – on the cusp of too wide to offer sufficient mortise-wall strength – so I split it by sawing out a 1″-wide piece with a coping saw, then chiseled the shoulder flat while removing the remaining waste. I cut 11⁄4” tenons on the upper rail and center stile at the table saw, marked then cut the mortises on the side rails at the mortiser. After I glued together the face frame and set it aside to dry, it was on to the side pieces.
Jigged up. Because the feet created a non-flat surface, and the sliding table is shorter than my workpiece, I simply clamped a flat piece of scrap to the fence against which I could hold the rail while I made the tenons.
I marked the curved cutout on each piece, then made the cuts at the band saw. (Note: the apex is not centered; it’s 3⁄4” closer to the front.) Because the full dado stack was still in place, I went ahead and added a sacrificial fence, then cut a 3⁄4” x 7⁄16” rabbet up the back of each side piece to house the backboards. In retrospect, I should have cut an 11″ stopped rabbet, because the backboards don’t go all the way to the floor. While the unnecessary 7″ portion of rabbet doesn’t show, the base would be stronger without it.
I adjusted the dado stack to make a 3⁄4“-wide cut, and made a 1⁄4“-deep dado across each side piece 7” from the bottom (the top edge of the dado is flush with the top of the lower front rail) to accept the web frame, which is joined with pocket screws. I glued the web frame into the dados on each side, squared it up and tightened the clamps. After the glue dried, I glued on the face frame and attached a rail across the top of the back, flush with the backboard rabbets, with pocket screws.
Upper Case

Split tenon. A 61⁄2″-wide tenon is too big, so I split it using a coping saw then chiseled out the remainder of the waste.
First, I cut the mortises and tenons for the face frame and glued it together (luckily, no one had adjusted the mortiser from when I did the lower face frame). I made it about 1⁄8” oversized on the sides (as I did with the lower case face frame), so I could flush it easily to the sides later with a flush-trim router bit.

Framed. The pocket-screwed web frame was glued into the side panel grooves and squared up before I tightened down the clamps.
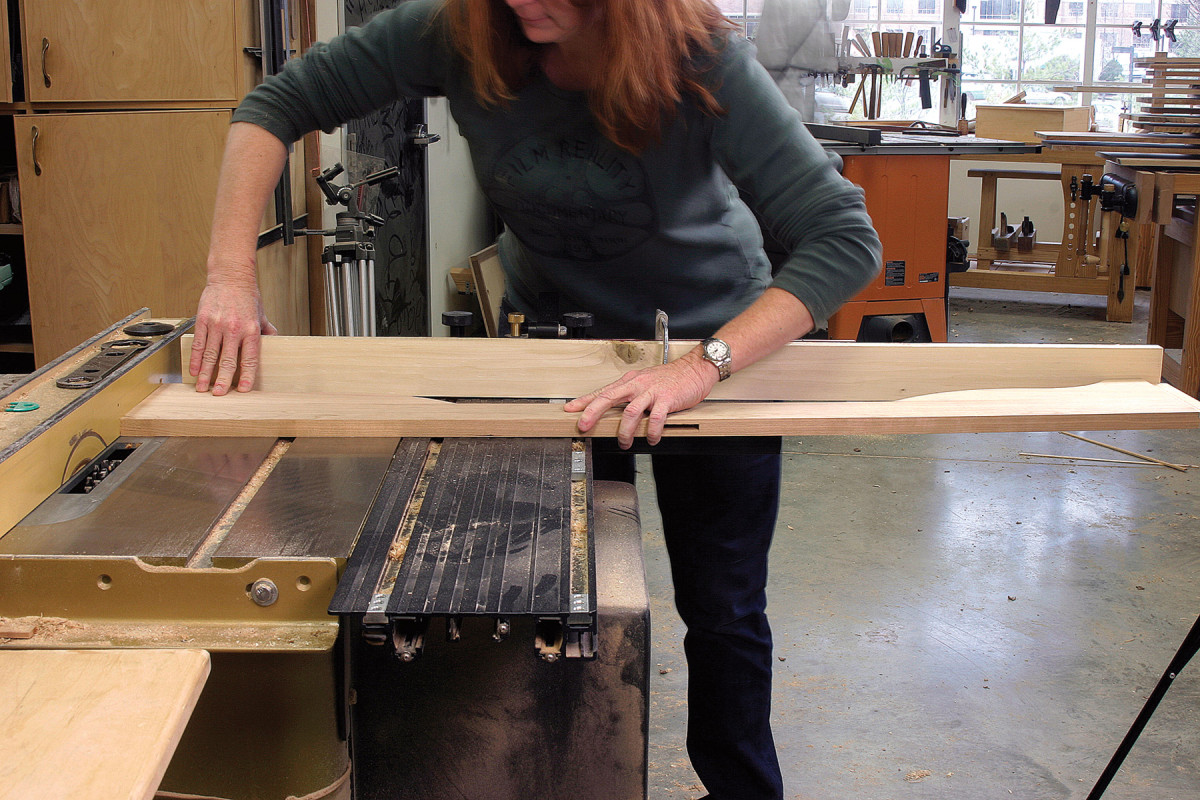
Then it was on to the side pieces, and cutting dados for the bottom and middle fixed shelves. Workholding was tricky here, because the side pieces are 701⁄2” long – well over the edge of the saw table. So, I clamped a handscrew around the crosscut sled fence, on which to rest the overhanging part. This, however, meant I couldn’t use the stop on the sled, so a stepoff block on the fence solved the problem to locate the 3⁄4” dados for the fixed bottom shelf.
I also cut 3⁄4” dados in each side 303⁄8” from the bottom for the center fixed shelf, and marked and drilled holes for the adjustable shelf pins. The locations were figured from a graduated shelf progression – but with the remaining three shelves adjustable, it’s unlikely that progression will ever be evident.
Stiff Lips

More jigs. Again faced with secure workholding problems at the table saw, I used a handscrew attached to the sliding table to support one end, and an stepoff block at the other to safely locate the groove for the bottom fixed shelf.
With the sides done, I cut the bottom and middle shelves to size (note that the widths are different; the bottom shelf has no lip), and glued a 11⁄2“-wide lip across the front edge of the middle shelf, leaving just better than 1⁄4” of the shelf’s front edge uncovered at each end to slip into the dados.
 After the glue dried and I sanded the lip flush, I ran a bead of glue in each side-panel dado, set the fixed shelves in place flush with the front edge of the side, clamped across, then toenailed the fixed shelves in place. Be careful with the angle of your nail gun and the length of your nails. I blew through the side once. OK, maybe three times.
While that glue-up dried, I added lips to the three adjustable shelves, keeping them just shy of either end to make shelf adjustment easier (the face frame covers the shelf ends, so the gap won’t show).
Next, I added the face frame, and got a little help clamping it up square – there was simply no way for me to reach corner to corner to pull things into place without assistance. Then, I pocket-screwed a rail at the top edge to which I later attached the backboards.
Topping Things Off

Toenails. Be sure you have 11⁄4″ nails in your gun – or if it’s loaded with 11⁄2″ nails, make sure you angle your shots enough so that you don’t blow through the sides. Or keep the nippers handy.
I cut the upper- and lower-case tops to size, and rounded over the edges with #80-grit sandpaper until I liked the way it looked, then progressed through grits to #180 until the shaped edge was smooth.
The lower-case top is attached with L-shaped wood buttons, and has a 1″ overhang on the front and at each side; the upper-case top (to which the crown attaches) has a 27⁄8” overhang on the front and either side. It’s screwed to the back rail, sides and face frame.
A Dusty Crown

A little help please. With a big glue-up, it’s best to rope a friend into helping. By oneself, it’s difficult to tighten all the clamps down quickly without things sliding around – or reach corner to corner should you need to square things up. Or click a camera button from 9′ away.
I dislike making crown moulding. It is incredibly dusty, and my arms get an unwanted (but not unneeded) workout pushing 3⁄4” stock at an angle across the table saw blade. But there’s no getting around it. So I had to set up the table saw, suck it up (the dust, that is) and get it done. And then there’s the sanding. Lots of sanding.
The simplest way to fit the crown is to invert the upper case, then wrap the moulding around the front and two ends. Secure it to the top, sides and face frame with brads.
Put Your Back Into It

Crown moulding. To make a simple crown, angle your stock at 45° to the blade and center the blade on the stock (or cut it just off-center so you have a thicker flat on one edge, if you like that look). Then clamp a long offcut beyond the blade to serve as a fence. Make repeated cuts in each piece of stock, raising the blade a little each time. Stay tight against your fence and to the table. Though I’m not wearing one here, a dust mask would be a good idea.
My backboards are shiplapped random-width poplar, and in the upper case they’re painted. I did cut a chamfer on the front of each for added visual interest – not that it will show when the case is loaded with books.
In the lower section, the backboards are unpainted and have no chamfer – but they do run vertically to match the top. (If you have an 11″-wide piece, you could get away with one board, run horizontally. But your co-workers might snicker at the idea.)
Hidden Storage
Last, I fit the inset drawer fronts and constructed drawers with half-blind dovetails at the front, and through-dovetails at the back. The bottom is an upside-down raised panel slid into a groove (the back edge isn’t beveled),
then secured to the drawer back with a 11⁄2” shingle nail. I suspect these drawers would have originally housed candles and perhaps paper and writing implements; I’m using them to store extraneous cat toys.
The finish is two sprayed coats of amber shellac (with sanding after each) and a top coat of pre-catalyzed lacquer. PW
Bibliophile’s Bookcase Cut List
No. item dimensions (inches) material comments
T W L
Upper Case
❏ 1 Upper rail 3⁄4 x 5 3⁄4 x 47 3⁄16 Cherry TBE*
❏ 1 Lower rail 3⁄4 x 3 x 47 3⁄16 Cherry TBE
❏ 2 Stiles 3⁄4 x 2 5⁄8 x 70 1⁄2 Cherry
❏ 2 Sides 3⁄4 x 11 1⁄4 x 70 1⁄2 Cherry
❏ 1 Bottom fixed shelf 3⁄4 x 10 1⁄2 x 48 15⁄16 Cherry
❏ 1 Middle fixed shelf 3⁄4 x 9 3⁄4 x 48 15⁄16 Cherry
❏ 3 Adjustable shelves 3⁄4 x 9 3⁄4 x 48 1⁄4 Cherry
❏ 4 Shelf lips 3⁄4 x1 3⁄4 x 48 Cherry
❏ 1 Top 3⁄4 x 14 7⁄8 x 55 11⁄16 Cherry
❏ 2 Crown 3⁄4 x 4 1⁄4 x 54 Cherry Rough size
❏ varies Backboards 5⁄8 varies 70 1⁄2 Poplar
Lower Case
❏ 1 Upper rail 3⁄4 x 3 x 47 3⁄16 Cherry TBE*
❏ 1 Lower rail 3⁄4 x 3 x 47 3⁄16 Cherry TBE
❏ 2 Feet 3⁄4 x 4 x 14 1⁄4 Cherry TOE**
❏ 2 Outer stiles 3⁄4 x 2 5⁄8 x 18 Cherry
❏ 1 Center stile 3⁄4 x 2 x 10 1⁄2 Cherry TBE
❏ 2 Sides 3⁄4 x 12 3⁄4 x 18 Cherry
❏ 1 Top 3⁄4 x 14 1⁄2 x 51 15⁄16 Cherry
❏ 2 Drawer fronts 3⁄4 x 8 x 21 1⁄4 Cherry Size sides, bottom to fit
❏ varies Backboards 5⁄8 varies 11 3⁄4 Poplar
Web Frame
❏ 2 Long rails 3⁄4 x 2 1⁄2 x 43 15⁄16 Poplar
❏ 2 Short rails 3⁄4 x 2 1⁄2 x 12Poplar
❏ 1 Center stile 3⁄4 x 4 x 7 Poplar
* Tenon both ends, 1 1⁄4“; ** Tenon one end
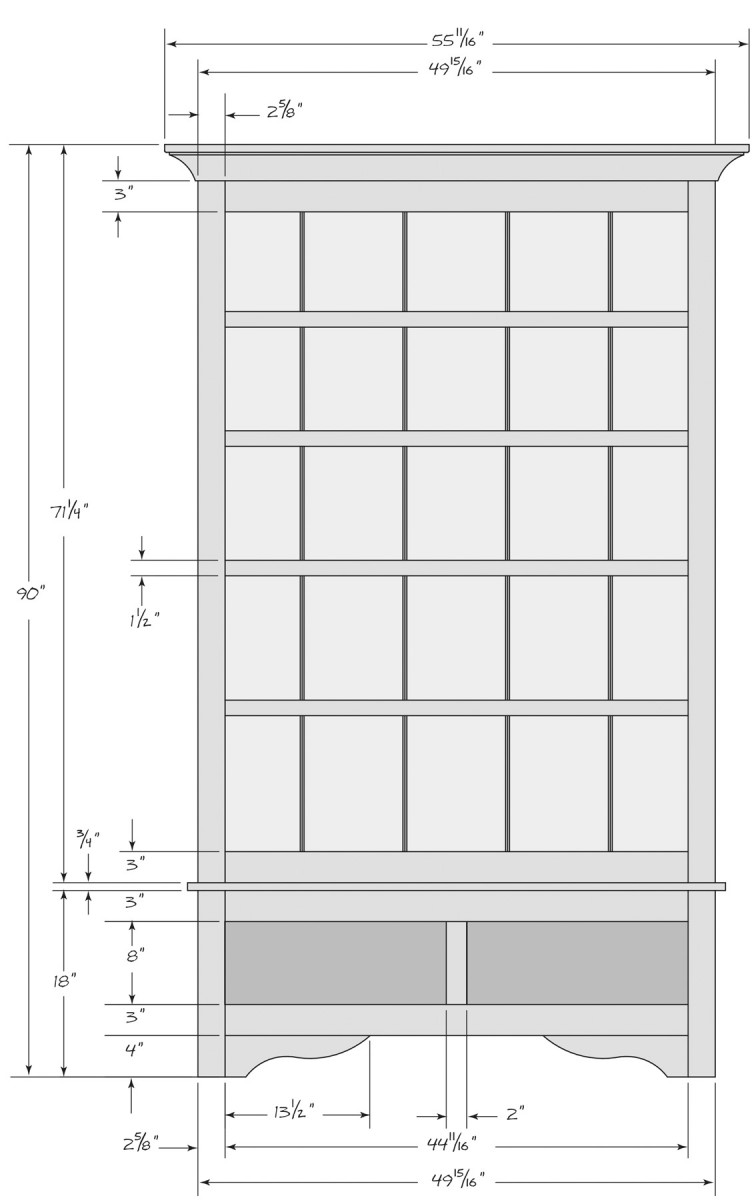
elevation

Section


