


We may receive a commission when you use our affiliate links. However, this does not impact our recommendations.

Versatile storage. This tall chimney cabinet is perfect for any narrow space, whether in the kitchen, bath or elsewhere in your home.
Seven solid joints comprise this sturdy custom storage unit.
Bonus: View the SketchUp Model.
There’s a backstory to this chimney-cupboard project. I had planned a week off to renovate the 6-1⁄2‘ x 8’ bathroom in my 110-year-old house (I was sure it wouldn’t take long – after all, I only had to gut it to the studs and joists, hang new drywall, reroute plumbing … ). Three months later, I finally had the tile in and grouted, and a working shower. A month after that, I installed a medicine cabinet and put up the wainscoting and the trim. So close on a year later, I was almost done. But the small space allowed no room for built-in storage, and I was unwilling to tear out adjoining plaster walls to enlarge the space.
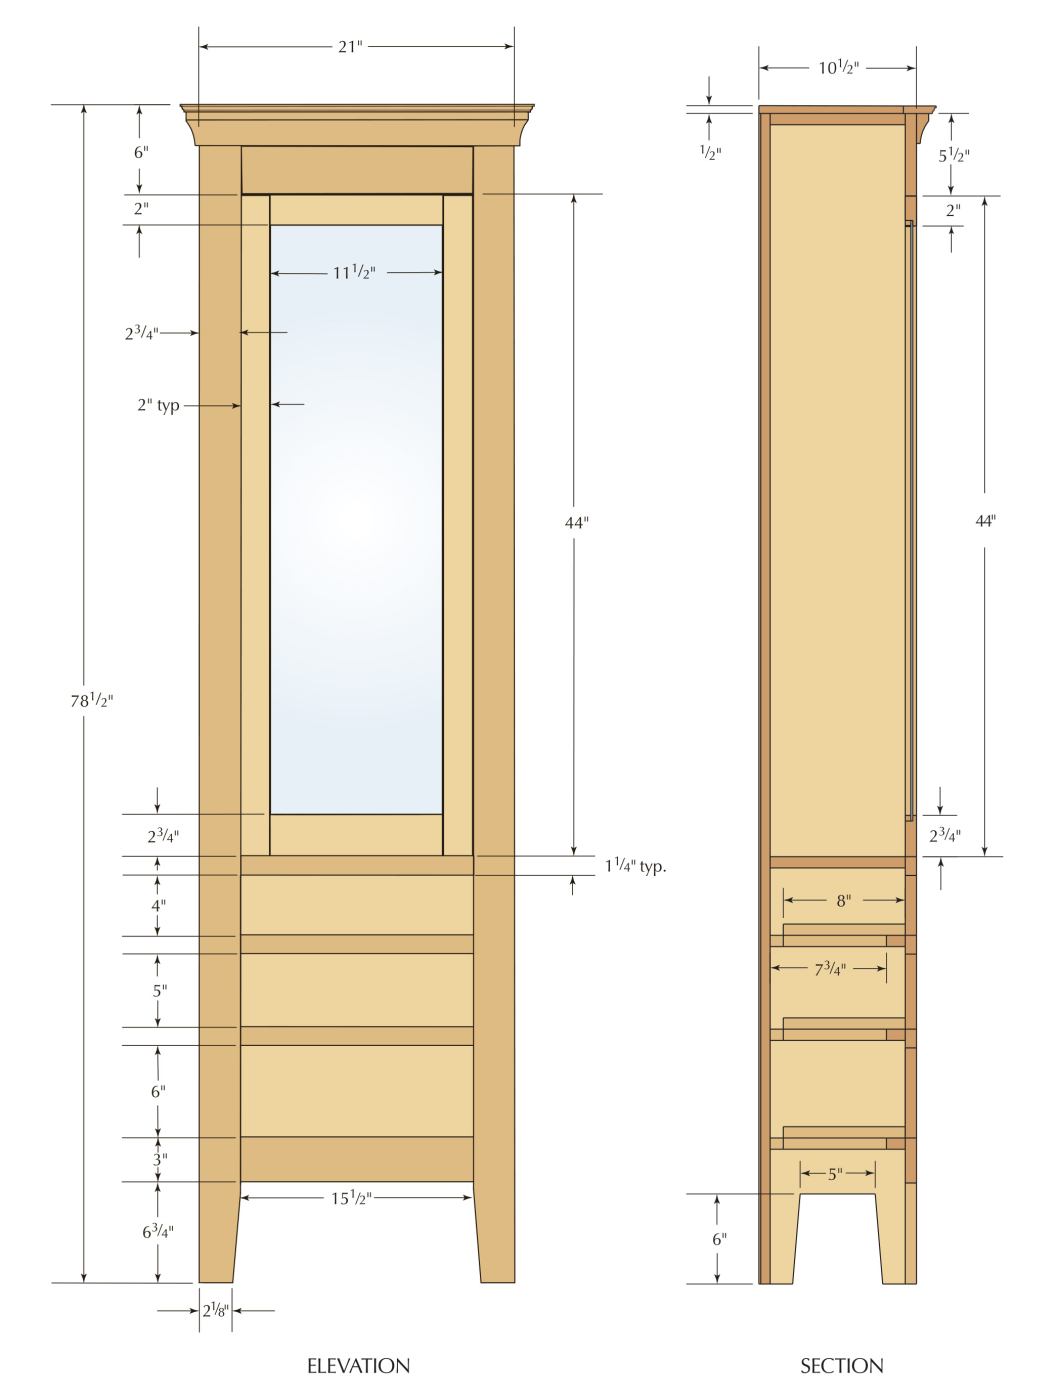
So I needed a tall, free-standing cabinet that fit with my amalgamation of Victorian and Arts & Crafts design elements, and it had to fit into the narrow area between the shower door and commode, making the most use of available space. This three-drawer chimney cupboard was designed to accommodate a variety of storage needs, and fit a specific location. At 10-1⁄2” the depth, due to space limitations, is fairly shallow. And, I wanted the piece to match the exact height of the shower wall, 78-1⁄2“ (I’ve been told I can be a tad persnickety). The point (yes, I do have one) is that it’s easy to start with a design idea in mind, and adjust the dimensions and design elements such as inset versus lipped drawers, or hardware and mouldings, to meet your specific needs.
Chimney Cupboard Cut List and Diagrams
 First Steps
 First Steps
Bsased on the measurements established in the drawings, we headed to the shop and pulled rough maple planks from our rack, selecting straight-grained boards for the face frame and side panels, and laid out the various elements. We rough cut the pieces to length for the face frame pieces and sides, adding 1″ to the final lengths, then milled the stock to 3⁄4” on the jointer and through the planer.
Face First: Mortise-and-Tenon
This is a face-frame cabinet, so building that frame is the initial step in the process. By completing it first, you can then use the finished frame to make any necessary size adjustments to the other pieces.
At the table saw, we ripped the rails, stiles and drawer dividers from the same S4S board, and crosscut them to final length. Then it was on to laying out the mortises on the rails.

Square cuts. To ensure you get a nice, squared mortise, first make a series of cuts spaced a little less than 1⁄4″ apart; this will help keep the chisel from deflecting.
Determine the face of each frame member, then clamp the stiles together with the working edge facing up. Use the drawing to locate each rail and divider along the length of the stiles and mark the top and bottom edge of each rail with a line completely across each stile. Next, move in a 1⁄2” from the top end of the stiles and draw a line setting the location of the mortise for the top rail. Move toward the center of each layout area 1⁄4” and place a partial line for each of the remaining rails. Mortise only between these partial lines.
Using 3⁄4” stock makes this a simple process. Set up a marking gauge to find the center of the workpiece. Using the marking gauge you’ve already set up, strike the centerline of one of your mortises (you’ll use that mark to line up the bit at the mortiser).
You’re now ready to make the cuts. Chuck a 1⁄4” hollow-chisel mortising bit in the mortiser, set the depth for 11⁄4” (setting the depth of cut on the strong side), then line up the bit point with the centerline you marked in the top mortise. Bore a series of holes across the mortise, leaving a little less than 1⁄4” in between each hole (this helps to keep the chisel from deflecting). Go back and clean out the remaining waste, then make another series of passes from end to end in the mortise to clean out any remaining waste, and to break up any large chips (this will make it easier to knock out the sawdust). Then move on to the next mortise. Because each mortise is centered on your 3⁄4” stock, you can flip the workpiece end-to-end and the setup will remain consistent.
With all your mortises cut, it’s time to move on to the tenons on the rails. Again, 3⁄4” stock makes it easy to center the tenons in your workpieces, and not have to change setups or spend much time measuring. Glen suggests using 3⁄4” stock for all face frames when possible; that way the layout becomes second nature (after so much time in the shop, he can eyeball it to within a millimeter, so he spent a lot of time rolling his eyes every time I reached for my 6″ rule and/or sliding square).

Rolling shoulder cuts. Make all four cuts on one end of each rail at the table saw, using a sled or sliding table.
Each tenon is 1-1⁄4” in length and 1⁄4” in thickness. Raise the blade in your table saw to just a hair under 1⁄4“. Set your fence at 11⁄4” to the outside edge of the blade, and make the cuts on all four shoulders of each end of each rail. Raise the blade to 1⁄2” when cutting the edge shoulder cut on the top rail. We used a tenon jig to cut the shoulders. Your fence setting will vary depending on your jig, but the idea is to leave a matching 1⁄4” tenon when finished, with the blade raised to 1-1⁄4“.
Cut the shoulder off the outside of the rail to keep from trapping waste material between the blade and the rail. It’s a good idea to check the fit of that tenon in your mortises to see if you need to make any slight adjustments in your saw settings before you finish the rest of the cheek cuts. The goal is a snug fit. You should be able to insert the tenon into the mortise using hand pressure and maybe a little mallet tap – if too much force (or too little) is necessary, you’ll want to adjust your fence accordingly.

Tenon jig. This tenon jig keeps the workpiece secure as you cut off the cheeks of your tenons.
Once you have that right, make the rest of your cheek cuts then head to the band saw to remove the remaining waste. Set up your fence a heavy 1⁄4” from the outside edge of the blade so you’re cutting away waste on the inside of each tenon (that way you can just flip the piece to make the second cut, without having to adjust the fence). This will make each tenon just a little loose from top to bottom in the mortise, allowing room for minor adjustments. Exercise caution to get the depth of your cut just right – if you cut past the proper depth, the kerf will show on your finished frame.
Dry-fit, Then Glue
Now dry-fit the frame together, and when everything looks good, take it back apart and squeeze glue into the mortises of all stiles, using an acid brush to coat all the surfaces. Then spread a thin layer of glue on the face of each tenon and mate the two. Remember: you left a little wiggle room on the mortise from top to bottom, so you can knock it one way or the other as necessary so that all your openings are square. Now do the same on the other side, check all the openings for square, and clamp it together to dry.

Dry fit, then glue. With everything squared up and fitting, add glue and clamp your face frame together and set it aside to dry.
How much glue? Glen suggests that you look for a little bit of squeeze-out, so you know you’ve got enough. You can clean it up after it dries with a chisel or card scraper, or wipe it off while wet with a rag and warm water (though there is some argument that this could give you finishing problems later).
Side Panels
Because the side panels have to be glued up from two pieces (unless you’re lucky enough to find wide stock), it’s important to take a close look at the pieces you’re using, and work with any grain patterns and color variation to get the best-looking panels possible. I wanted the panel seam to be dead center, so I ripped from both edges of my surfaced boards to get the best look, and took the final passes for the glue line at the jointer. We then glued the panels and set them aside to dry.

Shelf groove. Set up a straightedge jig to guide your router through your shelf-groove cut.
With the panels dry, we lined up the top edges and marked the dado location at the top drawer divider (behind which is a 3⁄4” solid shelf) then routed a 3⁄4“-wide x 1⁄4“-deep dado in each side panel using a shopmade straightedge guide for the router. We also routed a rabbet of the same size at the top end of the side panels to accept the top.We then moved to the table saw to cut a 3⁄4” x 7⁄16” two-step rabbet at the back edge of each side panel, to later receive shiplapped backboards. The 3⁄4” flat cut is made first. I used a featherboard to help support and secure the second cut; for me, it’s hard to hold a 93⁄4” piece of stock steady though a 78″ long cut without it moving.

Two-step. This two-step rabbet cut is made more secure and safe by using a featherboard to help hold the workpiece.
Before gluing the sides to the face frame, we used a plywood jig we made at the drill press to drill 1⁄2” deep x 1⁄4” holes for shelf pins to hold the three glass adjustable shelves (you could instead buy a plastic shelf-pin jig, or use peg board as a template.)
Then, we stuck a 3⁄4” offcut into the dado, both to check the fit and to use it as a guide to line up the dado location with the top drawer divider, ran a bead of glue along the edge of the side panel, then clamped the panel and face frame flush. After it was dry, we did the same on the opposite side. We then made a template for the side cutouts, clamped it to the bottom edge of the side panel, and used a 1⁄4” top-bearing router bit to cut out the shape on both sides after trimming it with a jigsaw.

Cheap and easy. Chucking an offcut into the shelf dado makes it easy to line up the face frame with the sides.
Next, we cut and fit the shelf and case top into the side/face frame assembly. The shelf is held with 1-1⁄4” brads installed from below the shelf, into the side panels; the top is attached with brads coming in from the top.
Next up were the drawer extensions, the runners and the drawer guides. Cut the extensions according to the cut sheet and fit each to the case directly behind the top edge of the dividers. Before they are glued in place you’ll need to create the 1⁄4” x 21⁄4” x 1⁄2” mortises to accept the runners. These mortises begin a 1⁄4” from the end of the extension.
The runners are milled to size and a tenon is created on one end of each runner. I elected to notch the back edge of each runner so I could use a 11⁄2” cut nail to hold the rear portion of the runner in place. The notch is 7⁄8” x 13⁄4“. Add glue to the mortise and tenon, then add the nail to complete the installation of the runners.
Each runner needs a drawer guide. The guides are set square to the case front and flush with the face-frame edge.

Taking sides. Make sure everything is lined up flush before tightening down the clamps. Secure the ends first, then adjust as necessary through the middle to compensate for any slight bowing.
Door Construction
The door is also constructed of 3⁄4” stock, and it’s the same mortise-and-tenon process and setup as was used on the face frame.
Once the door was glued, clamped square and the glue was dry, we fit it to the door opening in the frame using a nickel to gauge the offset on all four sides, and took passes at the jointer (one for one on each side) until the fit was perfect.
And here’s Glen’s hint to avoid tear-out along the top or bottom of the door frame: Because you’ll be taking jointer passes off the end grain of the stiles, there’s a very good chance that you’ll splinter the outer edge of the stile. To avoid that, make a short cut from what will be the trailing end of the cut, then reverse the work and make the full cut. Because the material at the end is already gone, you won’t have any tear-out.

Careful now. Cut the remaining waste on the tenon at the band saw, being careful not to overshoot your mark. If you do, the resulting kerf will show on the front of the door.
Drawer Construction
I wanted inset drawers, which I was told (after the fact) are a little trickier to make than lipped drawers, because the fit has to be perfect or they won’t look right. Because the fronts involved half-blind dovetails, we milled maple to 7⁄8” thick (you can go as thin as 3⁄4“, but the extra thickness provides a more antique look).
The drawers are graduated in size, from 4″ – 6″ in height, all are 153⁄8” wide. (I just hope that bottom one will be deep enough to hold my hair dryer). First, we carefully examined the surfaced stock to select the best faces for the drawers, then crosscut each front to length before ripping each front to width, making the fit very snug. We then pared each front to finished width, taking thin passes at the jointer on each edge until we had a penny-thickness offset on all four sides of each.
We milled the 1⁄2” drawer sides and backs out of poplar and cut them to size; I then hand cut half-blind dovetails for the front, and through dovetails at the back.

Stacked. Here, the finished drawers are stacked and waiting for drawer bottoms and the finish.
After dry-fitting each drawer then knocking them apart, it was back to the table saw to cut a 1⁄4“-wide x 1⁄4“-deep groove 1⁄2” up from the bottom edge of each of the six side pieces, and on the three drawer fronts, for the drawer bottom. Add glue to your tails and pins, knock the drawers together and check for square, then set them aside to let them dry.
Next, mill poplar (or whatever secondary wood you choose) to 5⁄8” for the drawer bottoms, and cut them to size. What you’re about to make is basically a country-style raised panel. At the table saw, set the fence to 3⁄16“, angle your blade to 12° and raise it so the blade exits cleanly through your workpiece.

A raised panel. To angle the drawer bottoms so they’ll fit in the 5⁄8″ groove, you’re basically making a raised panel on the table saw. Angle your blade to 12° and raise it so the angled blade exits cleanly through your workpiece.
Check the fit of the panels in your drawer grooves, mark a line where the inside edge of the drawer backs and the bottom panels meet. Pull the bottoms out and measure to find the center of each bottom (if, like me, you’re anal-retentive … Glen prefers to eyeball it) and cut a saw slot set to the height of the line. Insert the bottoms into each drawer (you’ll have an overhang at the back of 1⁄4“), drill a pilot hole into the drawer back, then drive a cut nail through the slot in the drawer bottom, into the drawer back. This provides support for the bottom while allowing for seasonal movement. (In wider drawers that require more support, space two slots across the back.) Glen admits that you could simply eschew the slot and nail straight through the drawer bottom, but the slot more easily accommodates seasonal movement in the drawer bottoms.
Back to the Door
Now we need to rout a 3⁄8” x 1⁄2” rabbet for the glass (or mirror, if you prefer) for the door. Set up your router with a rabbeting bit, set the depth to 1⁄2“, then clamp your door face-down on your bench (you’ll have to change the workpiece setup several times while routing the rabbet so you don’t cut into your bench). Cutting the rabbet involves some climb cutting, so make sure you have a good grip on the router, and are holding it tightly and flat against your workpiece (a D-handle router makes this a little easier). To avoid ugly tear-out on the finish cut, first climb cut a shallow pass to waste out just some of the material. Then reverse directions (regular routing operation) and remove the rest, working your way around the interior of the door.

Rout a rabbet. To rout the rabbet for the glass, you’ll be making some climb cuts, To avoid tear-out, first make a shallow climb cut with the router, then go back and cut to full depth.
With the rabbet routed, you need to square the corners with a chisel. Press a rule against the inside of the rabbet, and extend the lines at each corner with a pencil to mark the area to be chiseled. First, make sure your chisel is sharp, then pare your way down 1⁄2” to the bottom of the existing rabbet.

Square your corners. Use a 6” rule to extend the line of the rabbet, then clean the corner square with a chisel.
Measure from side to side and top to bottom, and give your glass purveyor a call for both the panel glass and adjustable glass shelves. We ordered 1⁄16“-thick glass for the door, and 3⁄8“-thick glass for the shelves.
Now it’s time to cut mortises for the hinges. While you could set up a router for this operation, with only two hinges to install, I opted for hand tools: two marking gauges, a chisel and mallet, and a small router plane to clean up the finished depth (which could be accomplished with a wide chisel, and a little more care).

Hinge mortise. I cut the hinge mortises by hand using two marking gauges, a wide chisel and a router plane. If you don’t have a router plane, use a chisel to pare the flat bottom.
Drill pilot holes for the hinge screws, and seat two screws in each hinge to make sure the fit is correct then transfer the hinge locations to the face frame, and remove the hinges from the door (you’ll need them to mark around on the face frame). Cut your hinge mortises on the face frame, drill pilot holes for the screws, then install the hinges on the door. Hint: Put a smidge of paste wax on the screw, and it will seat more easily.
Now grab a buddy and have him or her hold the hinges in place on the frame as you install the door to ensure it fits. You’ll then have to take it off and remove the hardware before finishing.
Building a Top Hat
The top frame and cove moulding completes the construction for the case. Mill the material to thickness and size according to the cut sheet.
The top frame houses another of our joints, the biscuit. The biscuit joint is used to join the two front mitered corners as well as the rear frame piece to the sides of the frame.
Cut the 45º miters at the miter saw, locate the center of the angled cut and use the plate joiner to create the slot for the biscuits. The wider rear frame has the slot centered on the ends with matching slots on the inside edge of the frame sides.
Assemble the rear frame to the sides with glue and biscuits, then clamp. Next, add glue into the remaining slots and assemble the frame. The trick to getting a square glue-up is to add another clamp across the front with one clamp along each side. Then, tighten the clamps so the mitered joints align.
Once the glue has dried, sand the frame to #180 grit and profile the edges at the router table. We used the new Freud Quadra-Cut beading bit to profile the top frame.
Attach the frame to the case using #8 x 11⁄4” wood screws ensuring the frame is centered on the case and flush with the back.
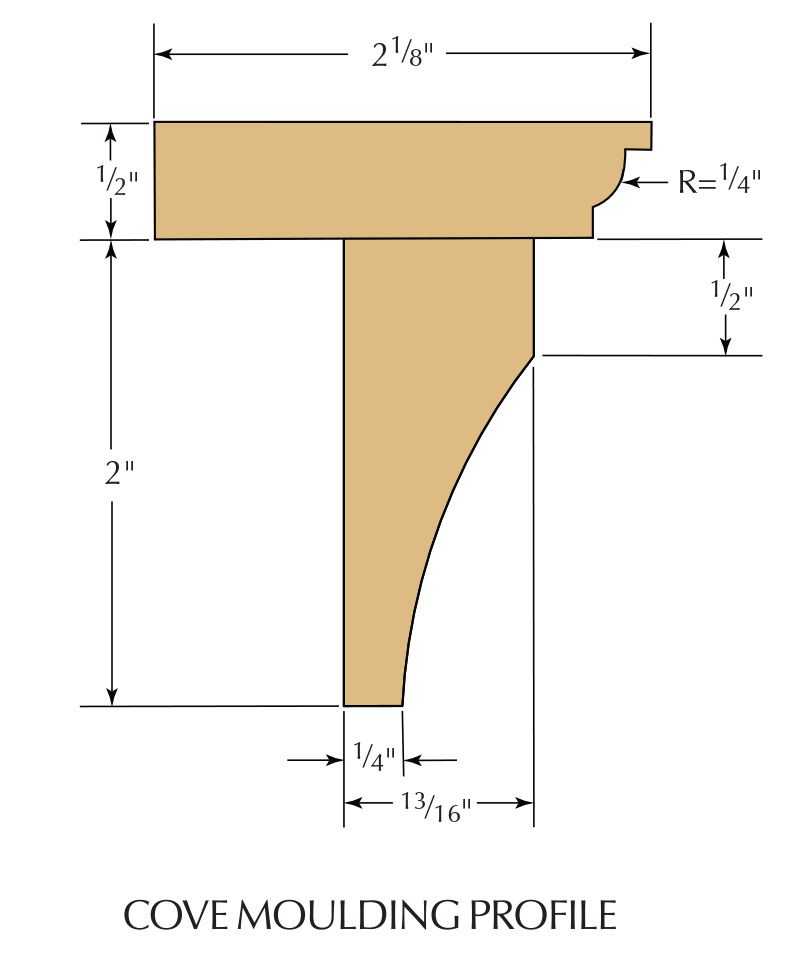
The cove moulding is created with a raised panel bit at the router table. Use the full profile taking shallow passes until the top of the cove just touches the panel; there’s no reveal.
Next, cut the mitered corners of the moulding, sand the profile smooth using #180-grit sandpaper and add the pieces to the case with 1″ brads applied both to the case and into the top frame.
Backboards
I built a shiplapped back with three evenly spaced boards (a plywood panel would work, too). We ran two-step rabbets at the table saw, and I used a block plane to chamfer the edges that would show on the inside. Before installing the backboards, I painted the interior display area for some contrast with the clear finish on the outside, and to tie it in with the rest of the bathroom woodwork. Using the same template as for the side cutouts, we marked the back and made the cuts with a jigsaw.
Next, install a nailing strip at the bottom to which to attach the backboards. The piece is screwed to the bottom of the bottom drawer runners with two #8 x 11⁄4” wood screws.
To install the backboards so that they’ll accommodate seasonal movement, the idea is to use as few nails as possible. Two of the boards have only three nails: one at the top, one at the fixed shelf and one into a nailing strip at the bottom edge. The third board, because it has no lap to secure it flat, has two nails at either edge, in the same locations.
Finishing Touches
For the finish, we simply used a coat of sanding sealer and a coat of lacquer (sanding between coats) then wax.
Finally, you’re ready to install the glass. It’s held in the door with simple retaining strips pulled from the scrap bin and tacked in place with 1⁄2” headless pins (make sure you shoot the pins at an angle, wood to wood, so you don’t hit and break your glass). Now install the catch for the door; we simply put it where we thought it looked good. For the final step, center the drawer pulls in each drawer, drill pilot holes then screw the pulls in place.
Here are some supplies and tools we find essential in our everyday work around the shop. We may receive a commission from sales referred by our links; however, we have carefully selected these products for their usefulness and quality.


