


We may receive a commission when you use our affiliate links. However, this does not impact our recommendations.
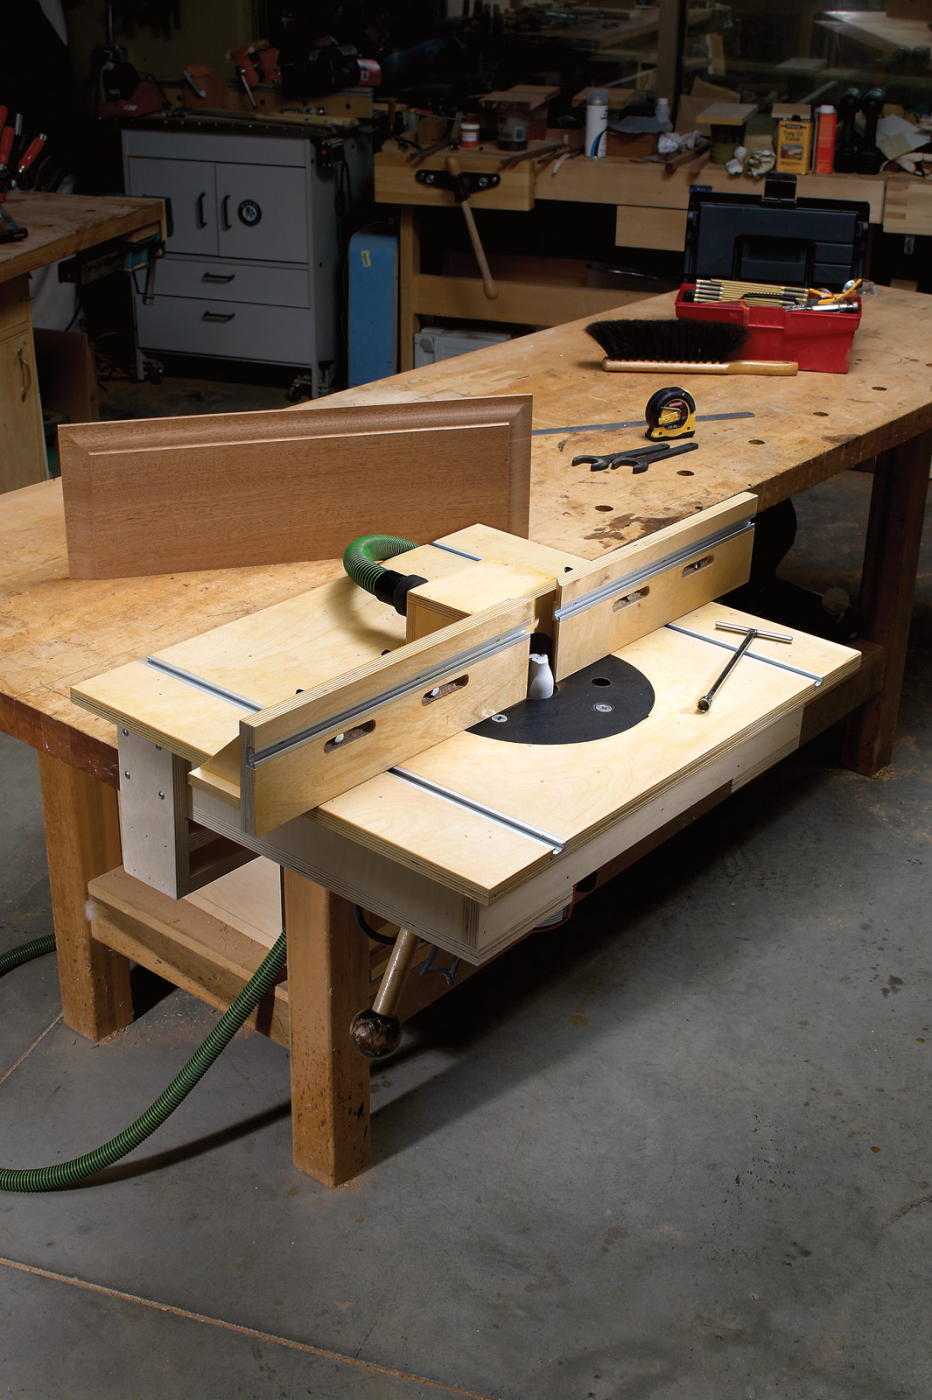 Router table cabinets can be a waste of space. This compact, vise-mounted unit stores easily and is just the right size.
 Router table cabinets can be a waste of space. This compact, vise-mounted unit stores easily and is just the right size.
I think it might have been seeing a $1,000 router table setup at a recent woodworking show (it’s very cool, but $1,000?). Or maybe it was realizing that our shop’s router table’s cabinet mostly takes up space and fills with dust. Either of these observations was enough to get us rethinking our router table needs.
Essentially you need a stable, flat working surface that can support most work. You need a fence that guides, supports and moves easily for adjustments (both the fence location on the table and the faces themselves toward the bit). You also need easy access to the router for bit changing and height adjustment. Other than that, it just needs to be up off the floor, hence the cabinet.
So we decided that a lightweight, easily stored router tabletop that would still offer all these benefits would be preferable. Oh, and we wanted to be able to make it in a weekend for less than $185. No problem!
An Ingenious Design

Allowing the proper clearance for your router is critical. You can see that I’ve removed the handles from the tool to allow as much space as possible. Mark out the space and then assemble the frame to fit.
For a stable, lightweight top the solution that made sense was a torsion box made of high-density plywood. The size that seemed most functional was a 20″-deep x 24″-wide platform that only needed to be about 4″ tall. The box itself has an open center section on the bottom to accommodate the router body. There are two lengths of T-track installed front to back on the tabletop to easily reposition the fence.
The fence itself is a variation of one we’ve built half-a-dozen times. The fence base is almost a torsion box – more of a torsion corner – that provides stable support for the laterally adjustable fence faces and allows for dust hook-up.

More marking: With the frame assembled and resting on the bottom piece, mark out the notch that will allow the router to extend through the top.
We chose a circular router plate from Veritas because it replaces the sole plate on your router and allows you to still use the router freehand or in the table without changing the base. The base also fits into the table without the use of any tools, and slips in and out from above in seconds.
Now the fun part: To bring the router table up to height, but still make it compact, we designed a brace that is mounted to the table and then the entire thing is simply clamped in your bench vise. Instant router table!
Torsion Top Construction
The top itself is very simple to make. A frame made of 3⁄4” x 3″ plywood pieces is sandwiched between two pieces of 3⁄4” plywood. The bottom piece is notched to accommodate your router (you’ll need to test fit your router to locate the center frame pieces and the notch). The top piece extends 11⁄2” beyond the frame on all sides to allow for clamping featherboards or other guides to the top surface.
Start by cutting out the top, bottom and seven frame pieces. If you opt to use the Veritas plate, the instructions are very clear on how to cut the hole in the tabletop to fit the plate. Otherwise, follow the instructions for your individual router plate.
We chose to locate the router plate closer to the front of the table rather than in the center of the table. Most router table work happens within 6″ of the fence and this location keeps you from having to lean across the table for operations. If you have a larger piece to run, the fence can be reversed on the table to give you a larger support surface.

With the bottom notched, simply glue and nail it in place on the frame.
With the router plate located in the top, suspend the router from the top and locate the two center frame members the necessary distance to clear the router. Make a note of that dimension, then lay out your frame accordingly.
I used glue and an 18-gauge brad nailer to assemble all the pieces for this project. While perhaps not the height of joinery, it’s fast and reliable.
With the frame assembled, place the frame on the bottom, and mark and notch the center section to allow clearance space for the router body. You could leave the center section open, but the extra strength along the back of the tabletop is worth the effort.
Attach the bottom the same way you assembled the frame.

After cutting the grooves for the T-track, tap it in place using a backing block. If you have to tap too hard with the hammer, your groove is too small. Attach the track with 1⁄2″ x #4 flathead screws. Pre-drill and countersink each hole.
Before fastening the top to the table, you need to install the aluminum T-track inserts for fence adjustment. I used a dado set on my table saw to run the grooves before attaching the top.
Next, attach the top, centering it on the frame assembly. Pay extra attention when attaching the top to keep the fasteners below the surface of the tabletop. This will keep you from scratching your work, or worse, allowing your wood to hang up on a brad head during an operation.
One-weekend router table cut list

 Down and Dirty Fence
The fence is also absurdly simple to make. Accuracy is important to make sure it sits square to the tabletop, but other than that, it’s brads and glue.
Start construction on the fence by cutting out the base, sub-face, faces and braces. All but the braces are very straightforward. The braces are actually triangles. The best method is to rip a piece of plywood to 3″ wide, then head to the miter saw. First miter both ends of the strip at a 45° angle, then reset the miter saw for a 90° cut and cut the 3″ triangles from the strip. Repeat this process and you’ve got four braces.

Cutting out the bit clearance hole on the band saw is made simple by first cutting “spokes” toward your line. These relief cuts allow the pieces to fall out in small chunks, rather than fighting with one bigger piece.
The sub-face and base need to have a 3″-wide half-circle cut at the center of each piece along one edge as shown in the exploded view. This space will be the opening for the router bits.
The sub-face is then glued and nailed to the base. Then glue the braces into the corner formed by the sub-face and base. Make sure to locate the braces as shown to avoid interference with any of the fence handles. I again used brad nails to hold the braces in place.

With the sub-face and base assembled, add the four triangular braces with glue and brads. Space them adequately to support the fence, but make sure you leave room for the knobs.
For the router table to be as useful as possible it needs dust collection. This is achieved by building a simple hood to surround the bit opening in the fence. Drill a hole in the hood back piece. Adjust the hole size to fit your dust collection hose, usually 11⁄4” in diameter.
Then attach the hood sides to the hood back, holding the sides flush to the top edge of the back. Then add the top to the box.

The dust collection hood completes the router table fence. It should seal tightly around the fence to provide the best dust collection, so don’t skimp on the glue here.
The next step is to locate and drill the holes for the cam clamps that hold the fence to the table and for the knobs that hold the faces. Place the fence assembly over the table and orient the cam clamp holes so they fall in the center of the T-tracks in the top. There can be a little bit of play, but not too much.

After installing the cam clamps, lock the fence in place on the top and check for square. If adjustment is necessary, you can do it by sanding the base or adding thin shims. You don’t want to add shims behind the fence faces because they’re moving parts. Adjust the base.
Secure the fence to the table with the cam clamps so it seats tightly. Use an engineer’s square to check the fence against the top. If it’s not square you need to adjust the base slightly, either by shimming or removing material from the underside of the fence base to make it square.
Next, drill the holes for the fence knobs, again avoiding the braces so the knobs can be easily turned. The holes should be 2″ up from the tabletop.

Seen from the front, the fence faces have been grooved for the T-tracks, and the clearance holes to attach and adjust the faces are drilled. Note that the face slot shows the rough edges from the overlapping holes made on the drill press. A few minutes with a file and some sandpaper will clean up the slots so the bolt will move smoothly.
The fence faces are next. To allow the best fence clearance near the bit, I beveled the inside lip of each of the faces at 45°. Next you need to rout two, 2 1⁄2“-wide stepped slots in the front of each fence face. These will allow the faces to be moved left-to-right to accommodate different bit sizes.
The easiest way to do this is on a router table, but if you’re building your first, you can use a drill press with two different bits. Use a 1⁄2“-diameter Forstner bit to first cut a 1⁄4“-deep slot. Then change to a 5⁄16“-diameter bit to drill through to the back of the fence face. This will create a slot that will let a 1⁄2“-hex-head bolt drop into the slot, recessing the head, but capturing the sides of the bolt head to keep it from spinning.

After drilling clearance holes, you can locate the holes in the fence faces and add the knobs.
I also added a T-slot fixture to the front of each face. This allows you to attach featherboards, a guard to protect your fingers and other guides. Again, you can use a router or your dado set in the table saw to make the slot (about 1″ down from the top of the fence).
Attach the fence faces using the bolts, washers and knobs.
The Mounting Support

Here you can see the fences in place and the fence attached and ready to run. The T-tracks in the fence faces can be used for featherboards and you can use them to attach a simple guard to keep your hands a safe distance from the bit.
To make the whole thing work, you need to be able to secure the table in your bench vise, but still have access to the router motor. We used a U-shaped support screwed to the sides of the table. The actual size of the support will depend on your bench vise, but you want the tabletop to rest on the vise as much as possible. In fact, if you can also get the top to rest on the vise at the rear of the table, that’s even better support. Our larger router forced us to move the support all the way to the rear of the table. This is something else that can be individualized on your table.

The support brace (customized for my bench vise) holds the router top firmly in place with plenty of clearance (and no wasted space).
You’ll see in the photo that we used two support braces to catch the vise at both the top and bottom of the jaws for more support. Your vise may require a different arrangement, so give it a test run to make sure it’s held tight.
Finishing Touches
With the support mounted you can put your table to work. But you may want to add a step – finishing. While a bare plywood surface will perform reasonably well, a slicker surface will make things move easier. You can add a topcoat of spray-on lacquer (as we did), or simply add a coat of oil or shellac.
Some other simple additions for your table can include some shop-made featherboards (that will fit nicely in the T-tracks on the fence face) and if you’re really industrious, you could actually add a couple of storage drawers to either side of the opening in the top. Customize the project to meet your needs.
Here are some supplies and tools we find essential in our everyday work around the shop. We may receive a commission from sales referred by our links; however, we have carefully selected these products for their usefulness and quality.


