We may receive a commission when you use our affiliate links. However, this does not impact our recommendations.
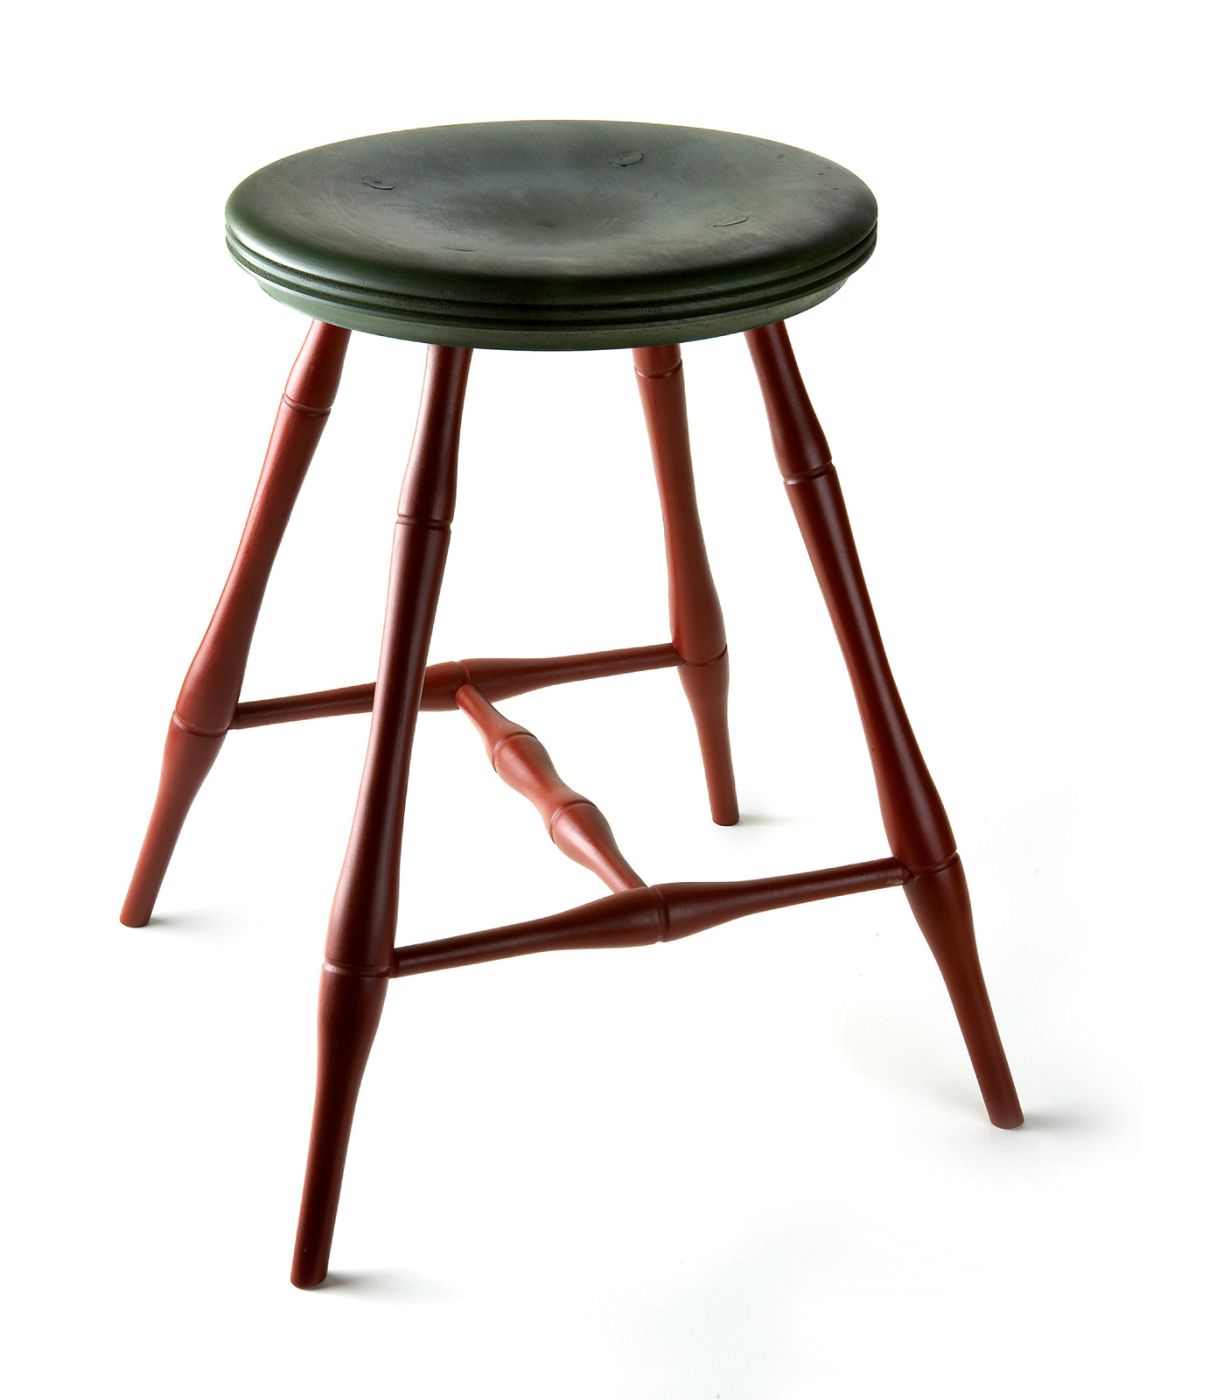
Have a seat. With basic lathe skills and some angled drilling, you can make this Windsor shop stool – or 30 of them – for your own workshop.
A comfortable seat can make a big difference in your work.
For a SketchUp model of the Windsor Shop Stool as illustrated in the article, click here.
I designed this stool for a special purpose – making chairs. The stool places a chairmaker above the chair seat. This position is more comfortable when assembling the back. We have more than 30 of these stools around our shop. There is one for each vise and a couple extras for the teaching staff and for visitors. Our students all sit on these stools when working. They sit on them when watching demonstrations and when eating. In other words, our stools get used a lot.
You can make this stool for your shop. It is also a handy piece of furniture to have around the house. The stool is 2″ higher than a typical chair. It places a child or a smaller adult at table height. Made in the 24″ version, the stool is perfect for use at a counter or around an island.

24″ version of the stool
These stools are comfortable and you can sit on them a long time. Their design solves the problems that make most stools uncomfortable. The round top is big – an ample 14″ wide. It will accommodate the widest backside. The top is dished to 3⁄4“. This depth allows you to sink into the top. A flat-topped stool is very uncomfortable.
 In spite of its delicate appearance, this stool is remarkably rugged. Some of mine have been in continual use for 30 years. While somewhat worn, the joints are still perfectly tight. They have stood up to hard treatment. Putting a Windsor chair together requires a chairmaker to move fast. Lots of parts have to go together at once. There is little time to gently move a stool into the desired position or out of the way. The job is usually done with the foot. The stool is kicked into place then shoved out of the way. They are frequently put on the bench. When they fall off they bounce across the floor.
These stools are a good way to get some chairmaking experience without getting in over your head. Most woodworkers avoid chairs because of complicated geometry. Most chairs involve compound angles – parts lie in two planes. This stool uses only simple angles. The parts are all in one plane. Stools are seating furniture and part of the chairmaker’s trade. So, in this article I will often refer to chairs and chairmaking when talking about the process of making this stool.
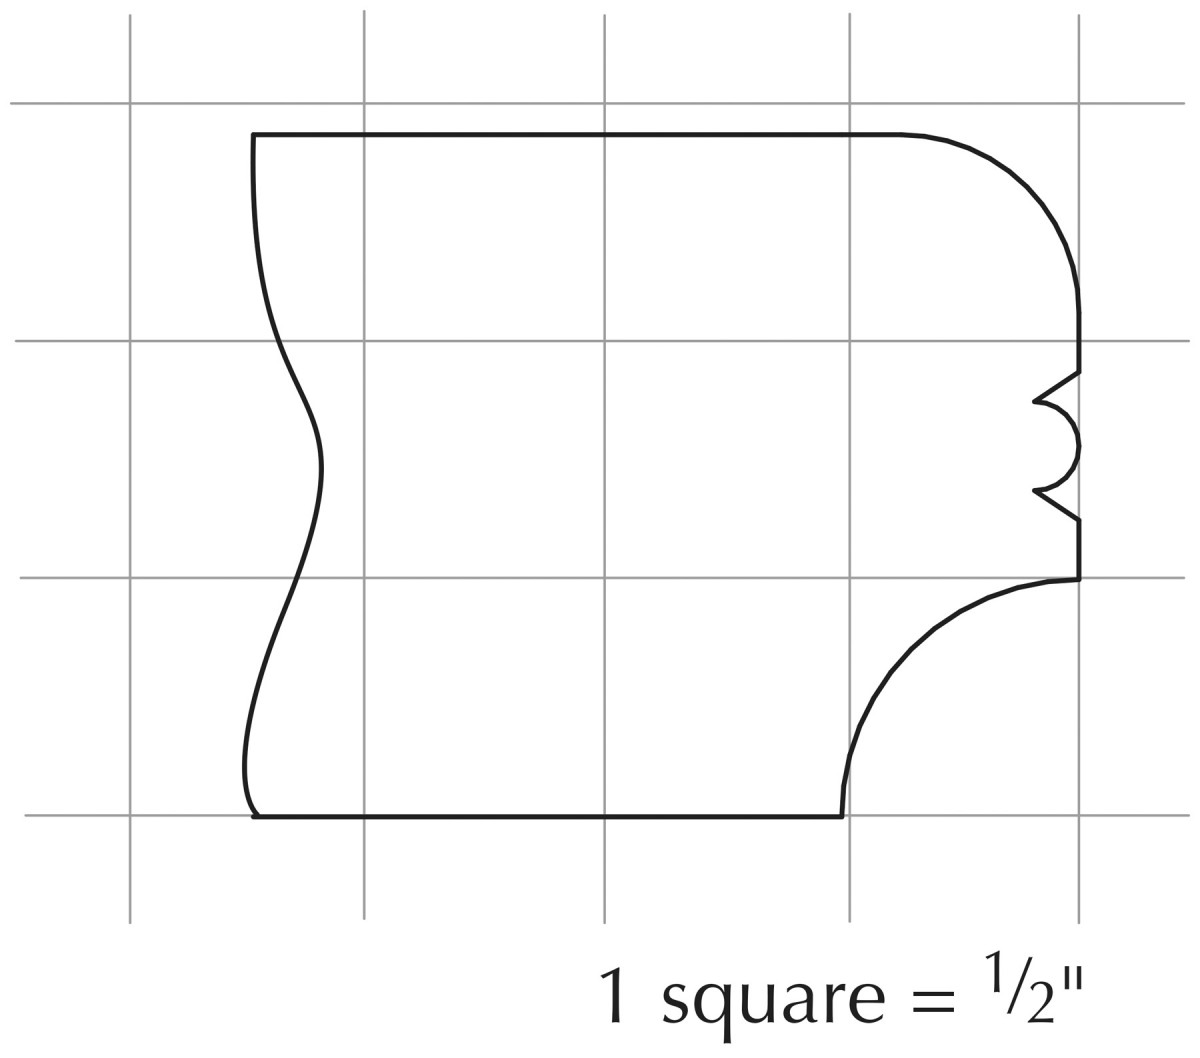
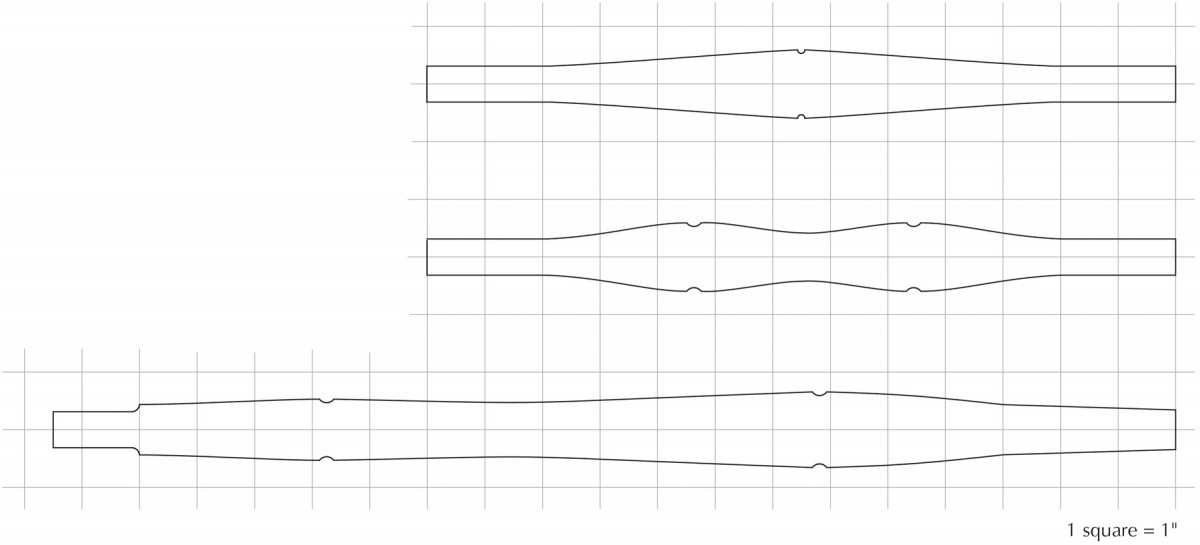
Seat profile
One Afternoon of Lathe Work
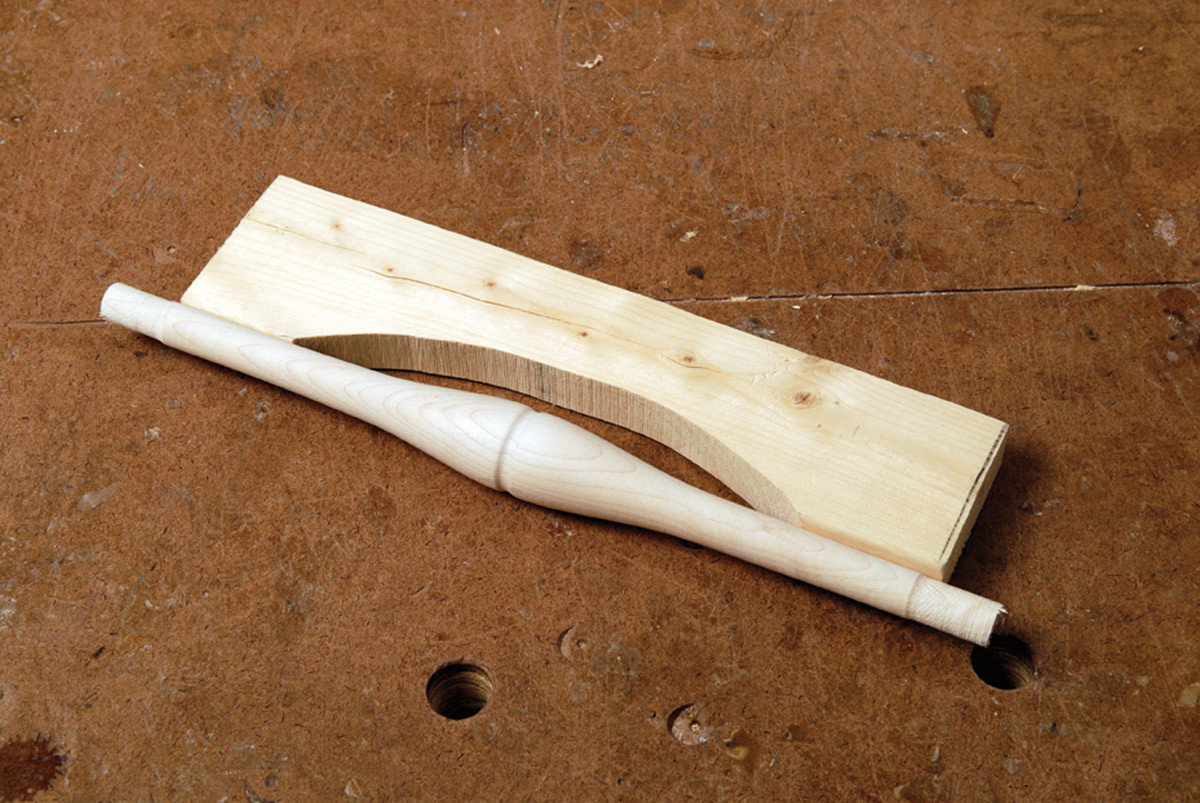
The stool is all lathe work. If you have good lathe skills you can make one in an afternoon. The top is face-plate turned. The four legs and stretchers are spindle turned – turned between centers. I use yellow poplar (tulip) for my stool tops. This wood is relatively inexpensive. It turns easily and cleanly and is stronger than pine. The legs and stretchers support a human being so they have to be strong. They require a hardwood. Maple, birch, oak and ash are fine. Choose stock with straight grain. Mahogany and walnut are not strong enough.
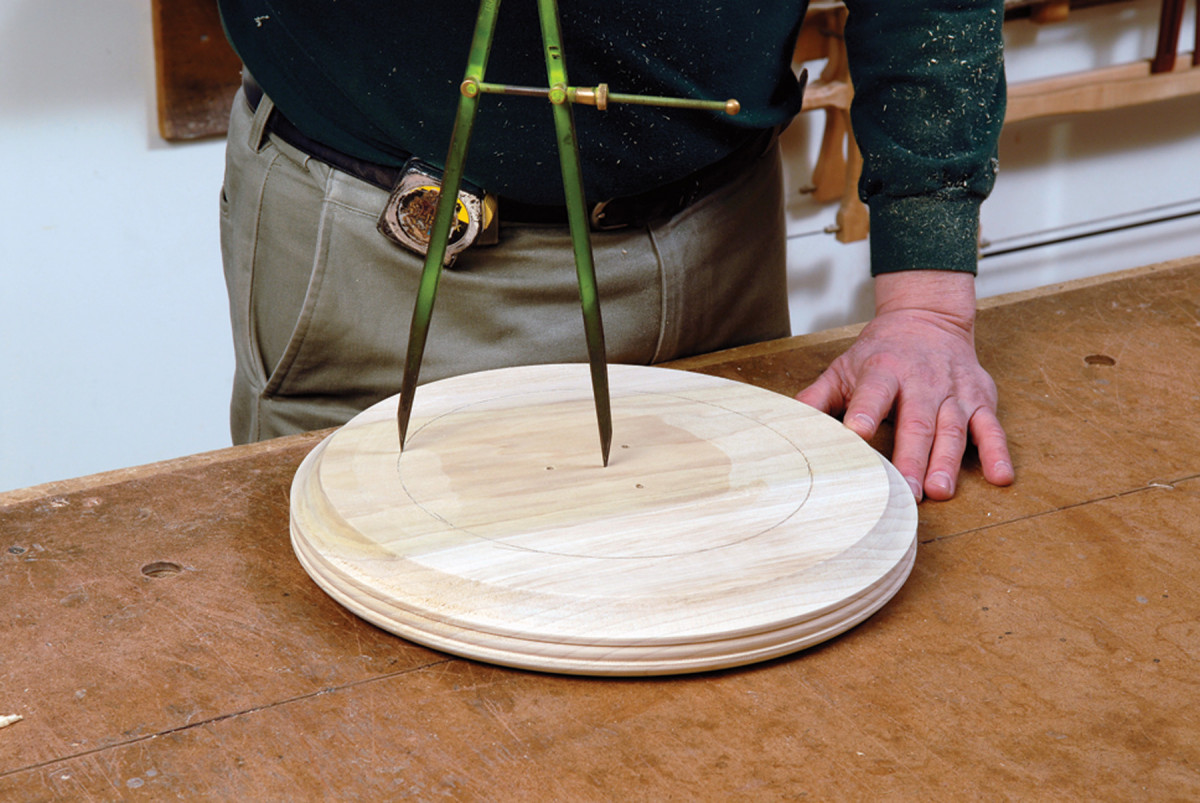
Thickness the stock for the top to 1-3⁄4” and if necessary, glue up a blank at least 14″ square. Some additional length and width does not hurt. Use a compass to lay out a 14″ circle. Cut out the rough disk on the band saw. Mount your face plate so it is centered on the circle. Most face plates have a center hole, which allows you to find and center the point made by the compass.
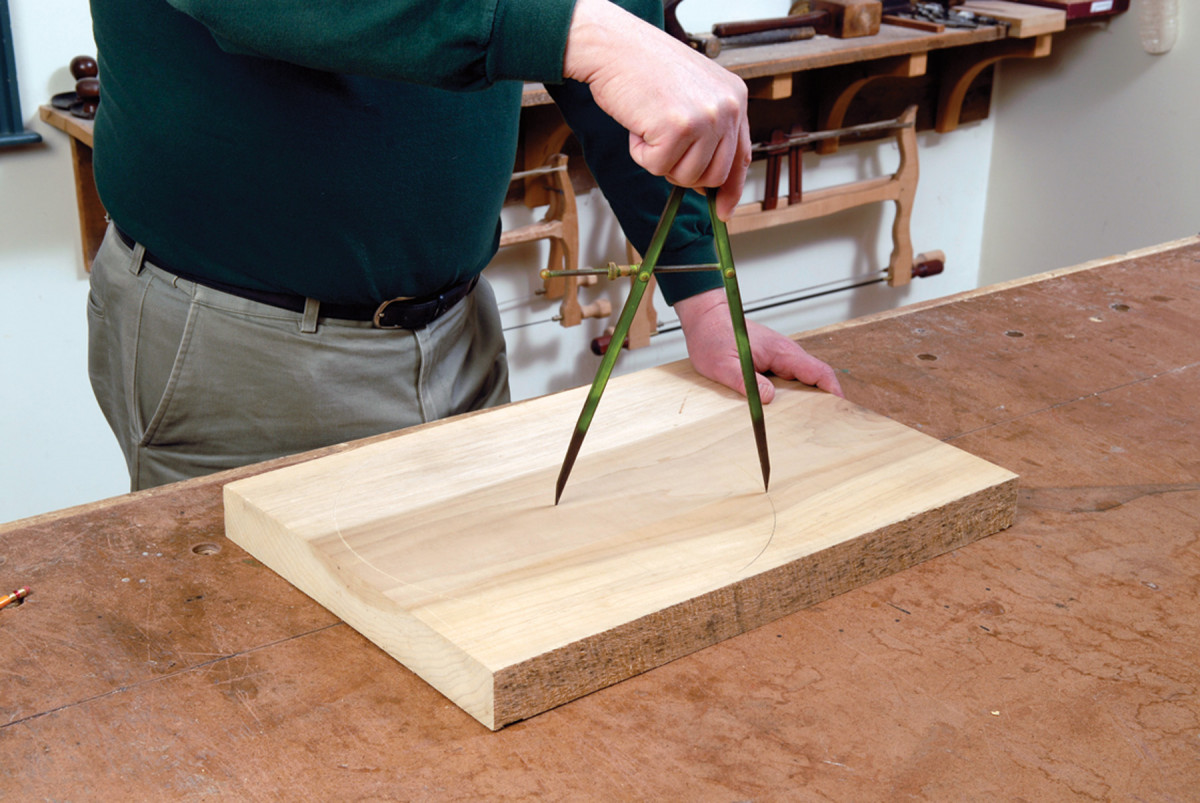
Seat layout. Use a compass to mark a 14″ circle for the seat of the stool.
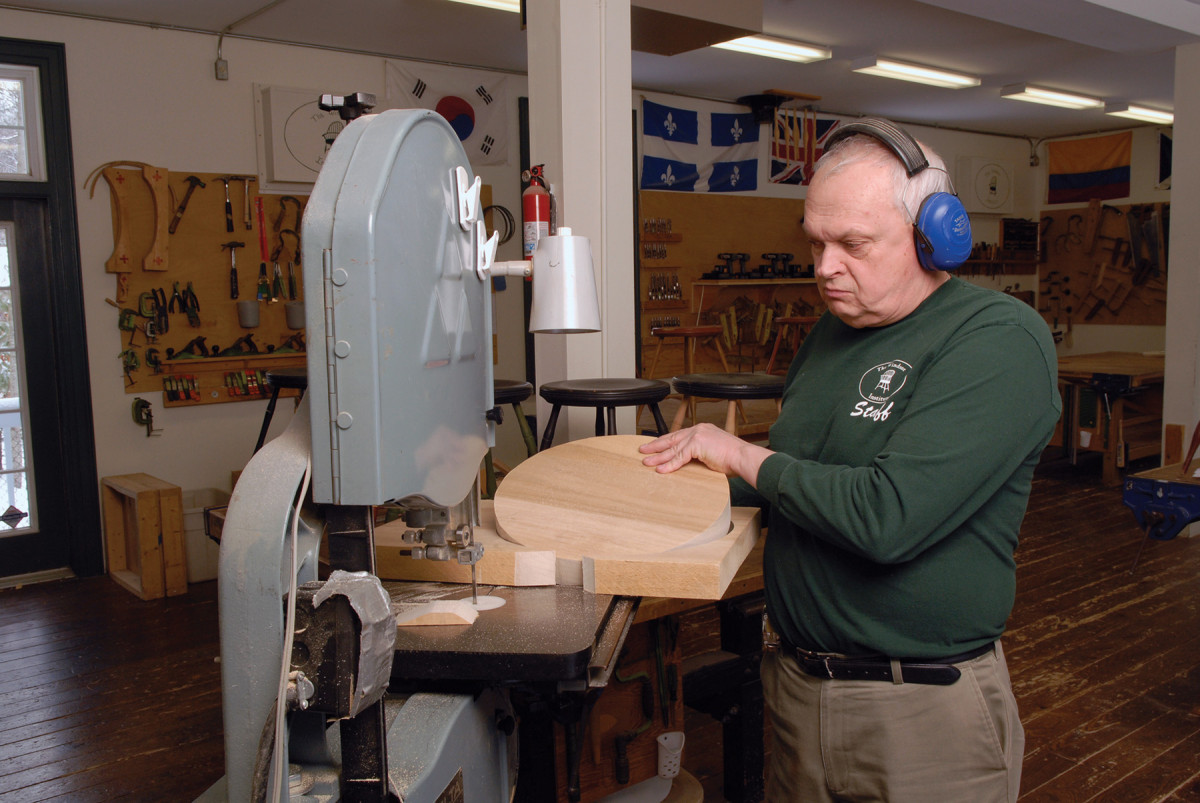
Rough shape. Use the band saw to cut out the seat blank.
Centered. Mount your face plate so it’s centered on the seat blank.
Turn the blank’s edge so it is smooth. Next, flatten the top and bottom surfaces. This gives you a perfect disk that spins true. Now, turn the outer edge to the shape shown in the drawing at left. Or, you can use your own design. The decorative bead makes the outer edge more interesting. A chamfered lower edge is a pleasing and desirable detail. It makes the top appear thinner and more delicate. Relieving the lower edge is an old Windsor chairmaking trick. It permits the top to be thick enough to be strong without looking clunky.
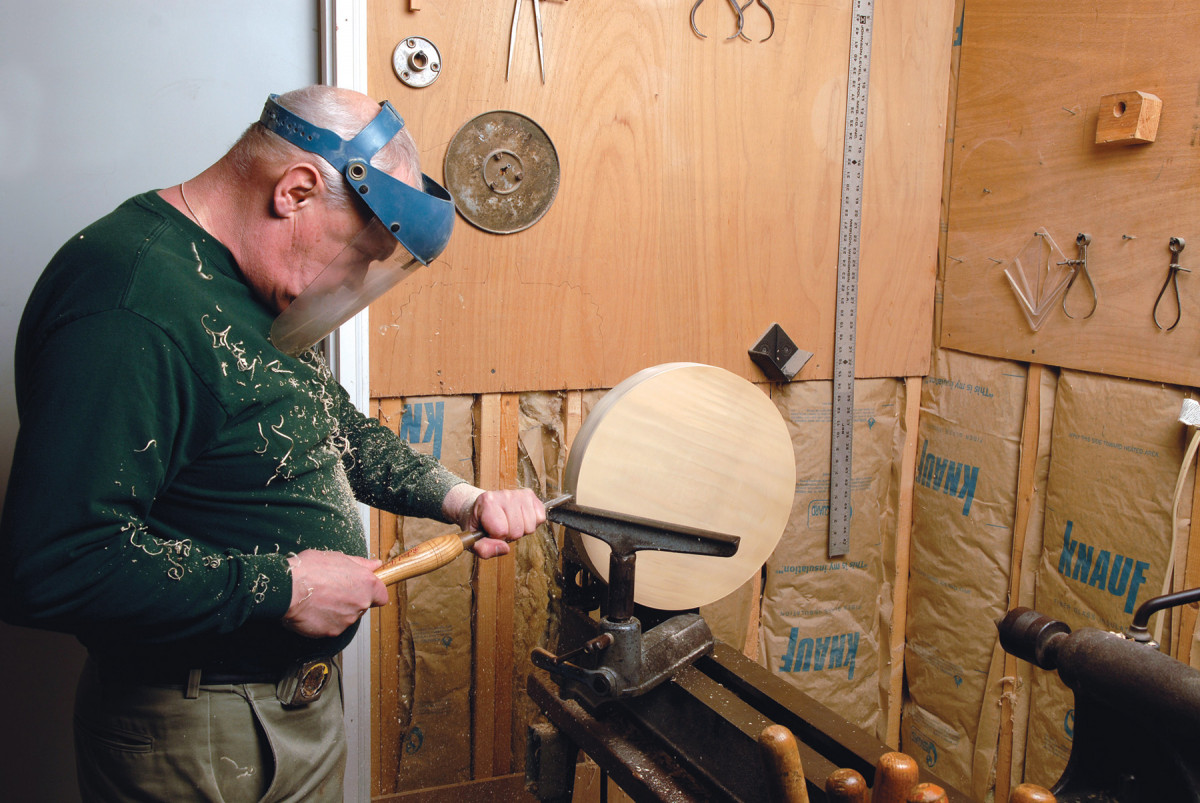
Smooth edge. Turn the blank’s edge smooth.
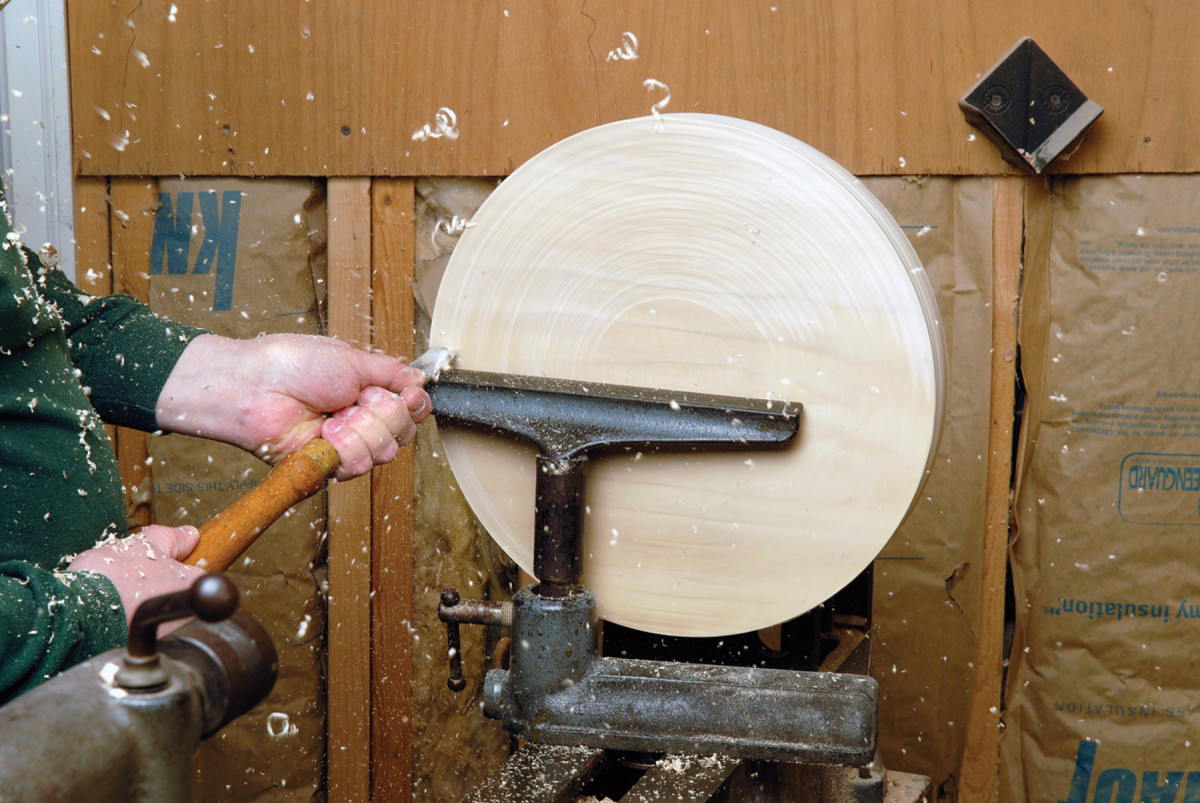
Shape. Turn the outer edge of the seat to match the shape shown in the “Seat Profile” drawing.
Sand the top surface and the edge while the top is spinning. Take it off the lathe and remove the boss (the projecting wood) under the face plate with a handplane.
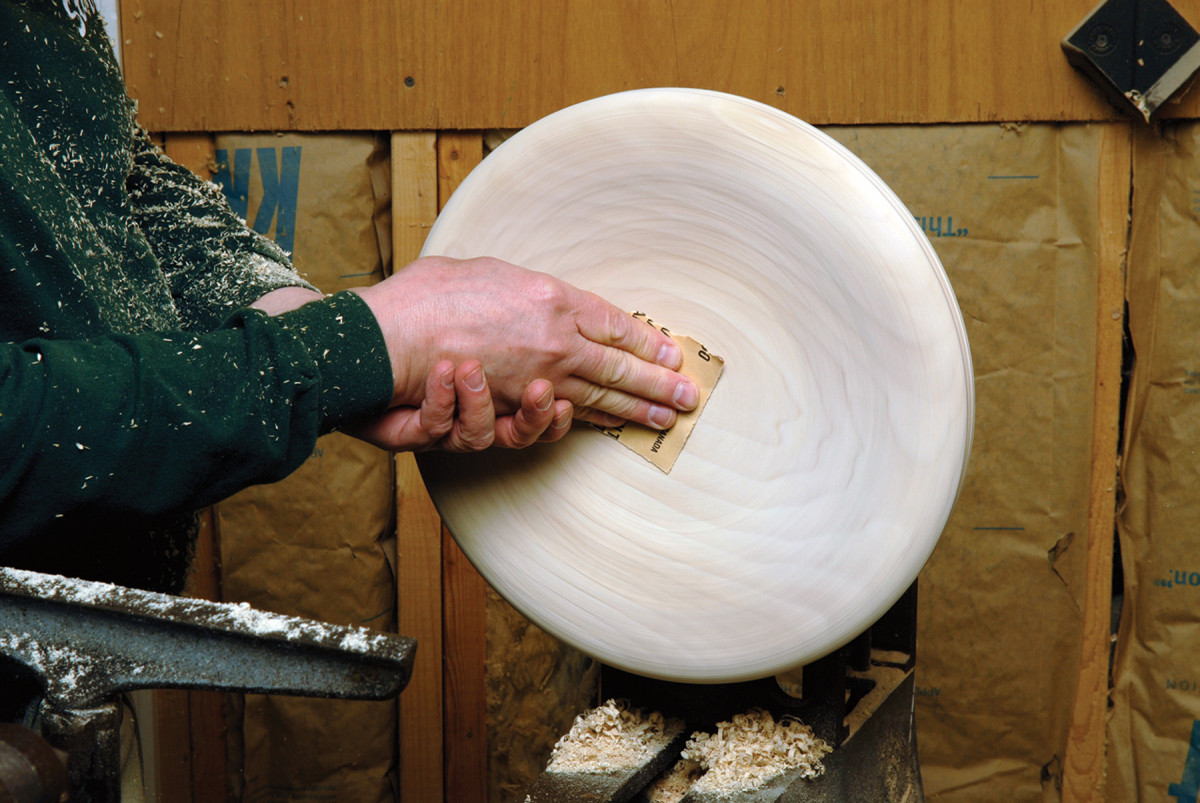
Easier sanding. Sand the seat surface with the workpiece spinning on the lathe.
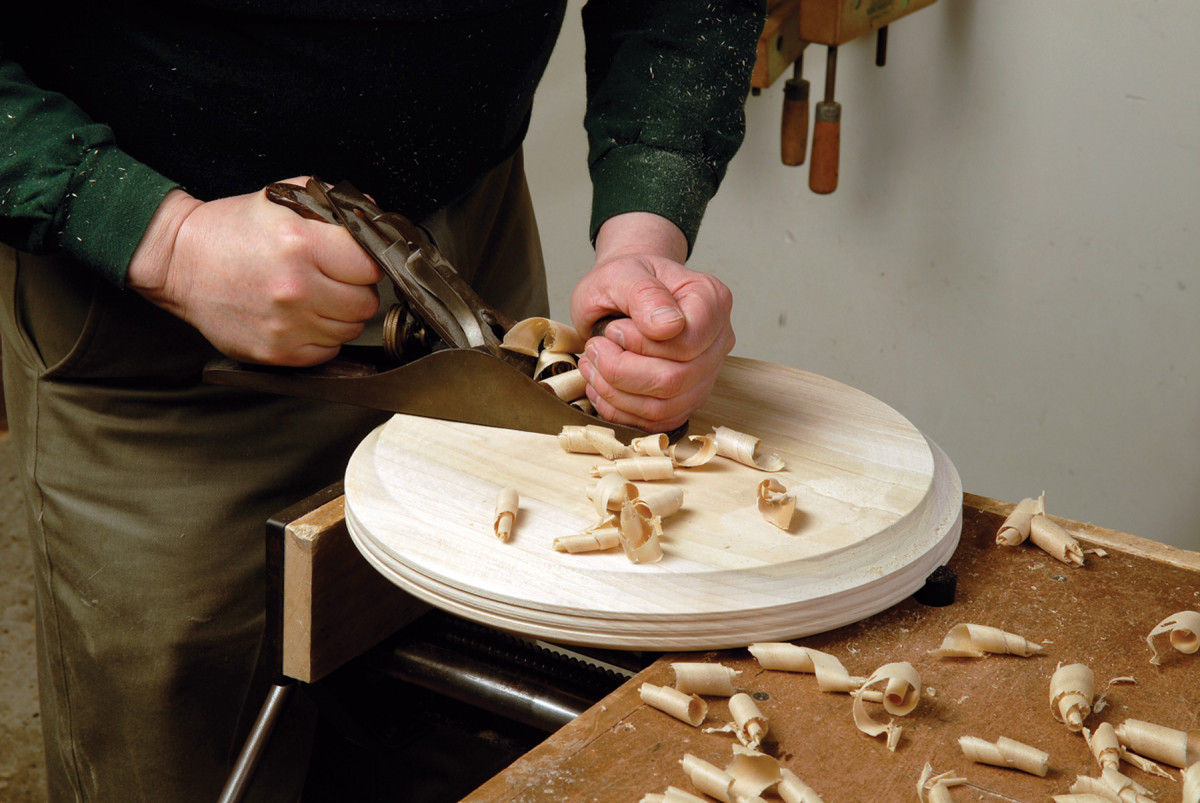
Handplane. Use a handplane to remove the boss (the projecting wood) from the face plate.
Shapely Legs
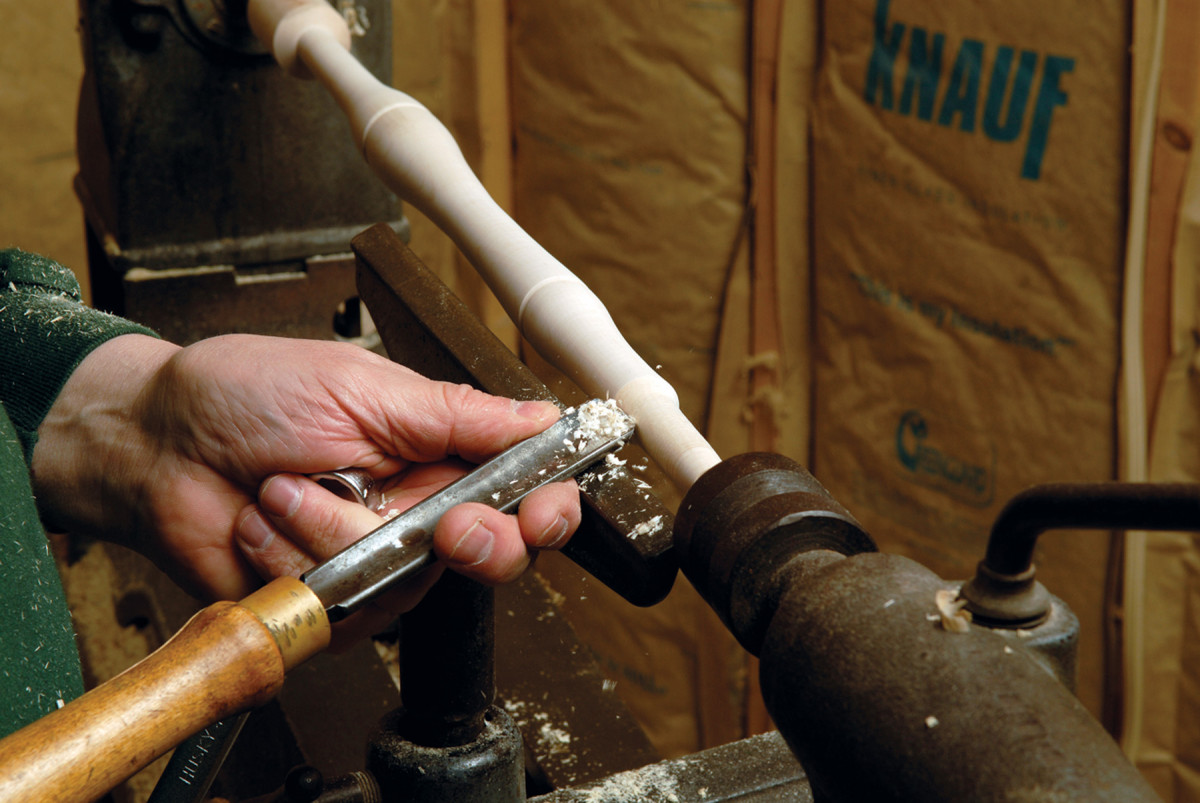
Four legs. Turn the legs to the profile and dimensions shown in the drawings below.
Turn the legs to the profile and dimensions shown in the drawing below. Windsor chairmakers introduced this style of leg about 1790. They called it “bamboo.”
Top: Side Stretcher. Middle: Medial Stretcher. Bottom: Leg
However, around 1820 the next generation of Windsor chairmakers developed another style of turning they called bamboo, too. To distinguish between the two historical types of bamboo legs, today’s chairmakers refer to this shape as double bobbin.
Like Windsor chairs, the stool is made using socket construction. This means it is joined with round tenons in round holes. You can bore all the holes in a drill press. If you don’t have a drill press, or want to be more adventuresome, it is easy to do by hand.
Joinery Layout
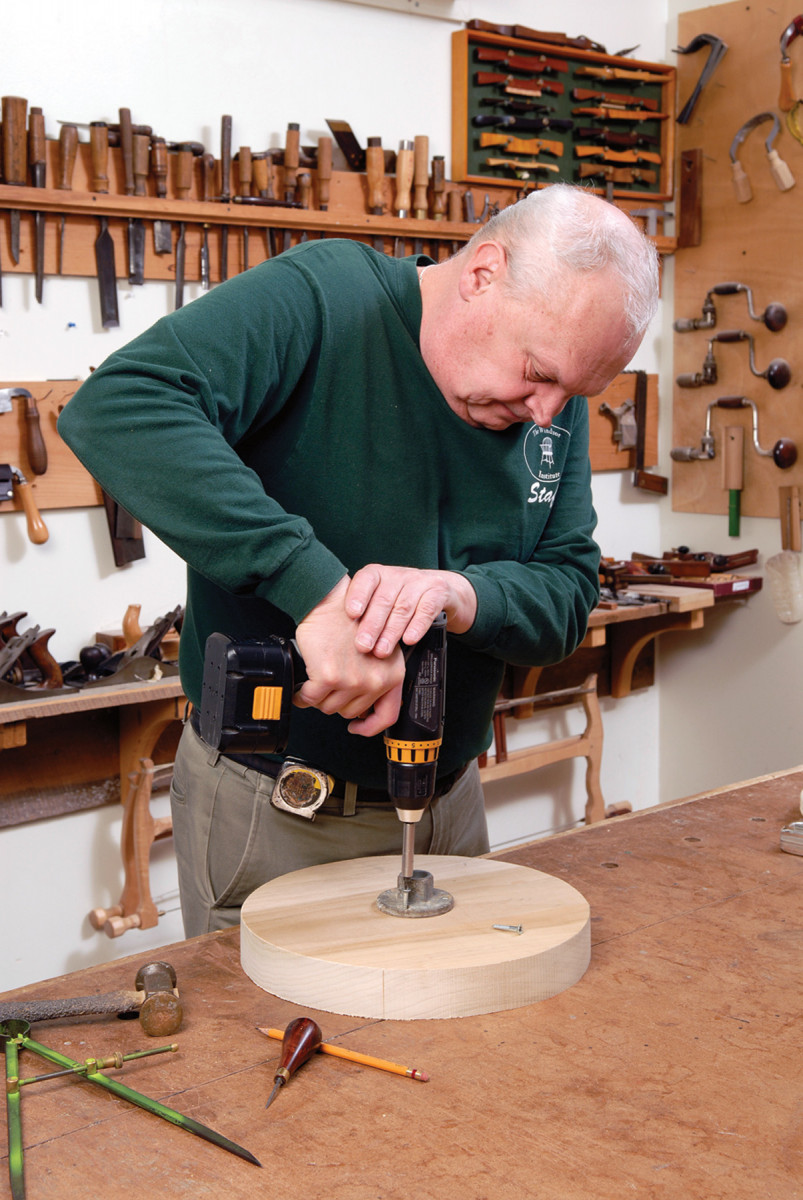
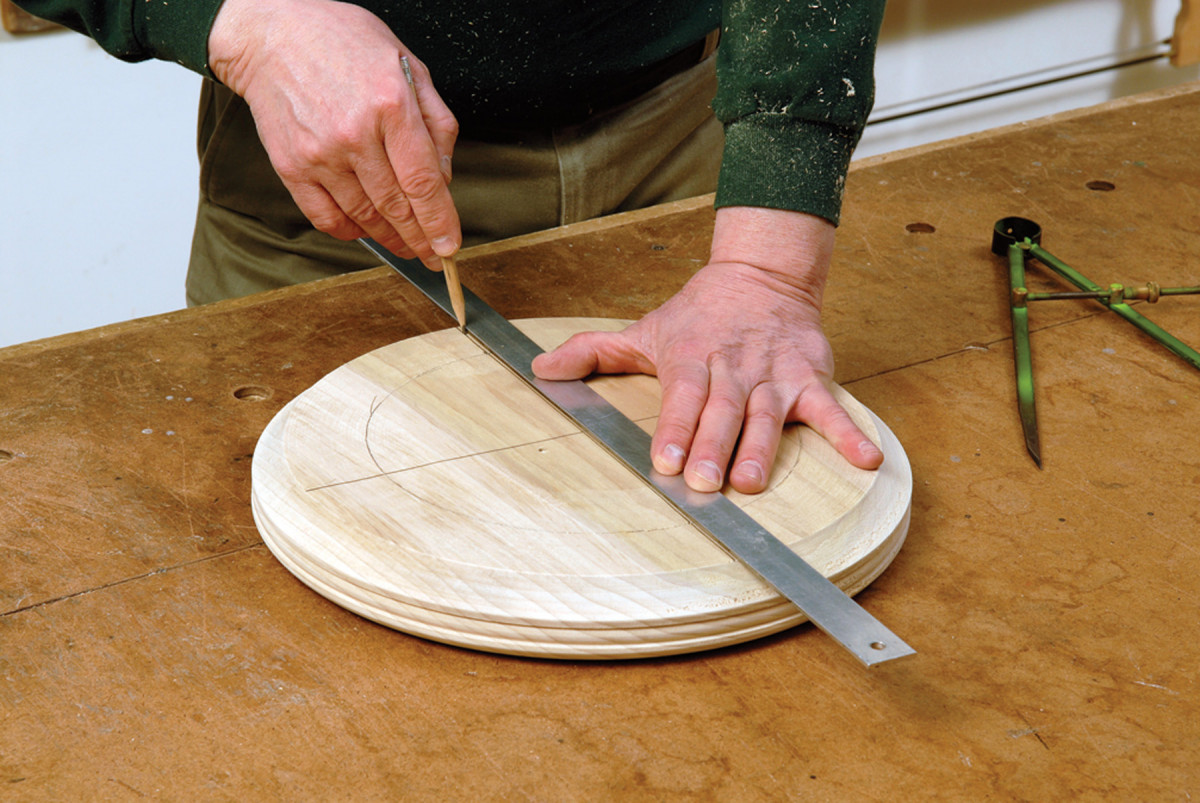
To begin the joinery, you have to locate the leg holes. Place the seat upside down and with a compass, draw a circle with a 4-1⁄2” radius. The leg holes will be located on this circle. Next, scribe a diameter (a line across the bottom that passes through the center.) Scribe a second diameter at a right angle to the first. An easy way to lay out this second line is to walk off the half circle with a pair of dividers. Adjust the dividers until you have two equal divisions. These two intersecting diameters have two purposes. They locate the four leg holes and will also serve as your sight lines.
Locate the leg holes. The first step is to mark a 4-1⁄2″ radius.
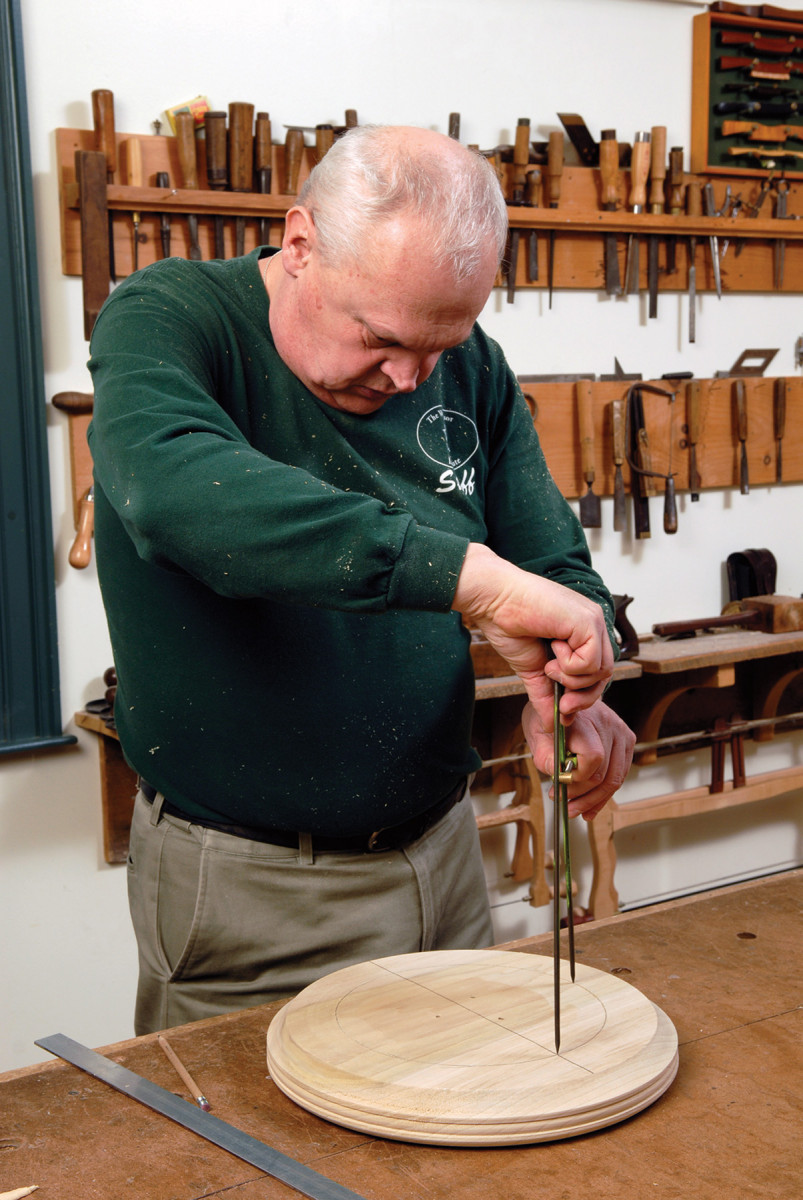
Divide and find. A simple way to find the location for the second diameter is to walk off the half-circle with a pair of dividers.
Two purposes. The two diameter lines locate the leg holes and act as sight lines.
Before you drill, a word about what we call chairmaker angles. Chairmakers don’t measure angles the way most woodworkers do. We use the same system as the guys who drill for oil. We assume the perpendicular to be 0°. Our angles are the number of degrees from the perpendicular. In the case of the stool top, the leg holes are at 21°. It’s a lot easier to think this way than to use 111°.
A matter of degree. The leg holes are at 21° off perpendicular.
Commence Drilling
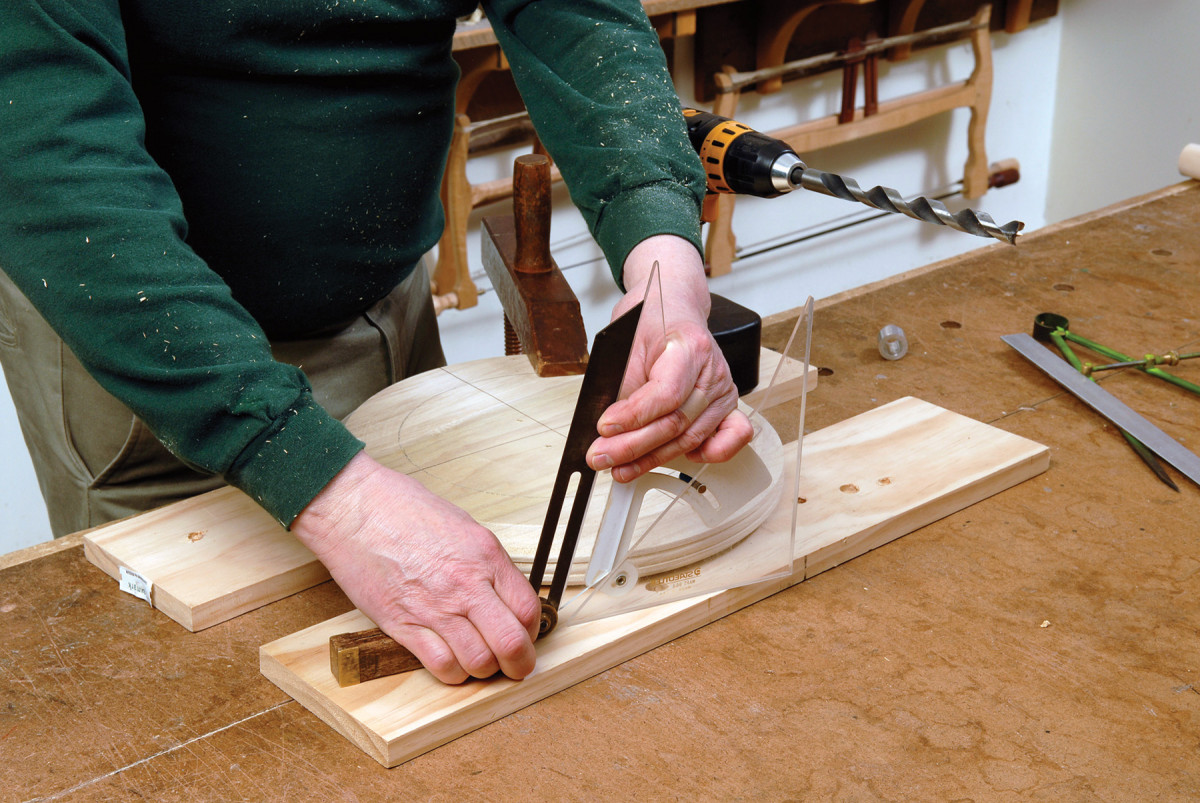
Clamp the seat upside down with some scrap under it. We keep a box of 1″ x 4″ x 24″ boards in the shop for this purpose. We call them backboards. Windsor chair leg holes are through-holes. The backboards protect the benchtops from the bits. Set a bevel square to 21°.
Place the bevel square’s handle so its slot runs along the sight line. Use the edge of the bevel’s blade to align your bit while you sight the bit along the line. There is no need for jigs or other aids. In fact, these things are more effort than they are worth. Using these simple techniques, chairmakers can accurately drill an angle over and over.
By eye. Use the bevel’s blade to get the drilling angle, and sight the bit along the line – no jig needed.
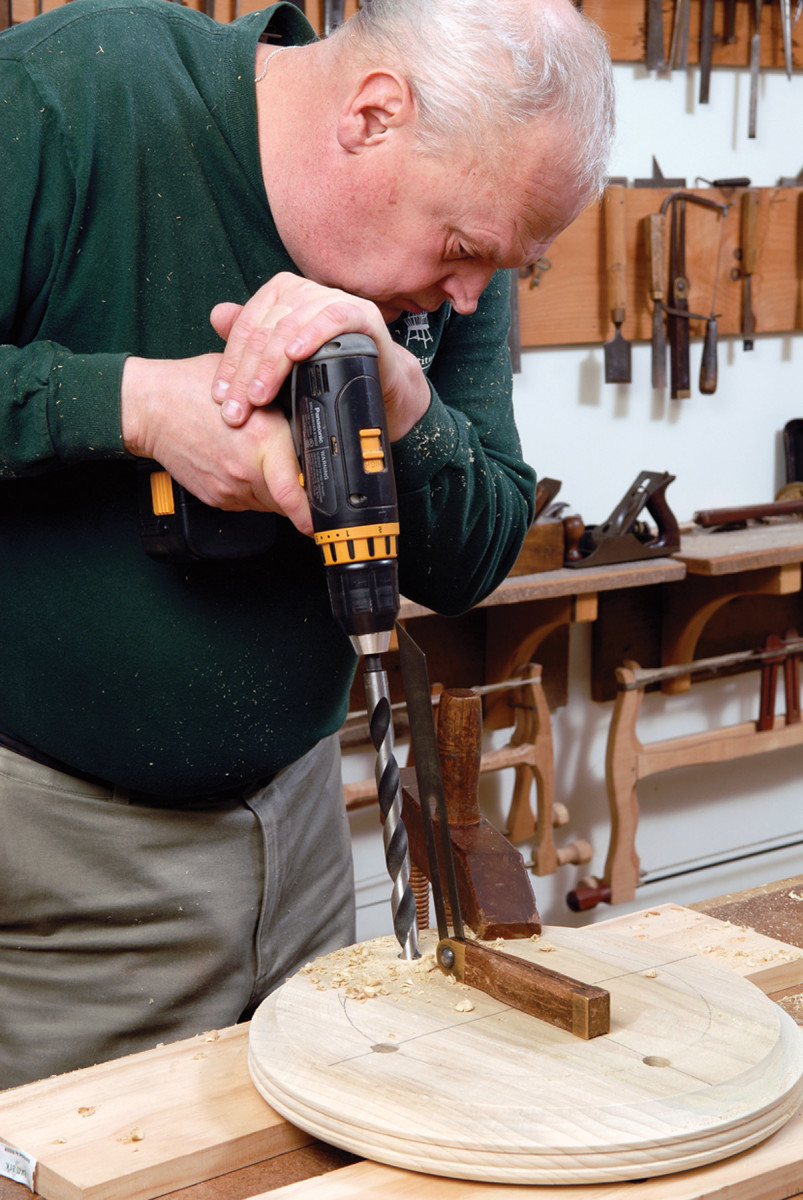
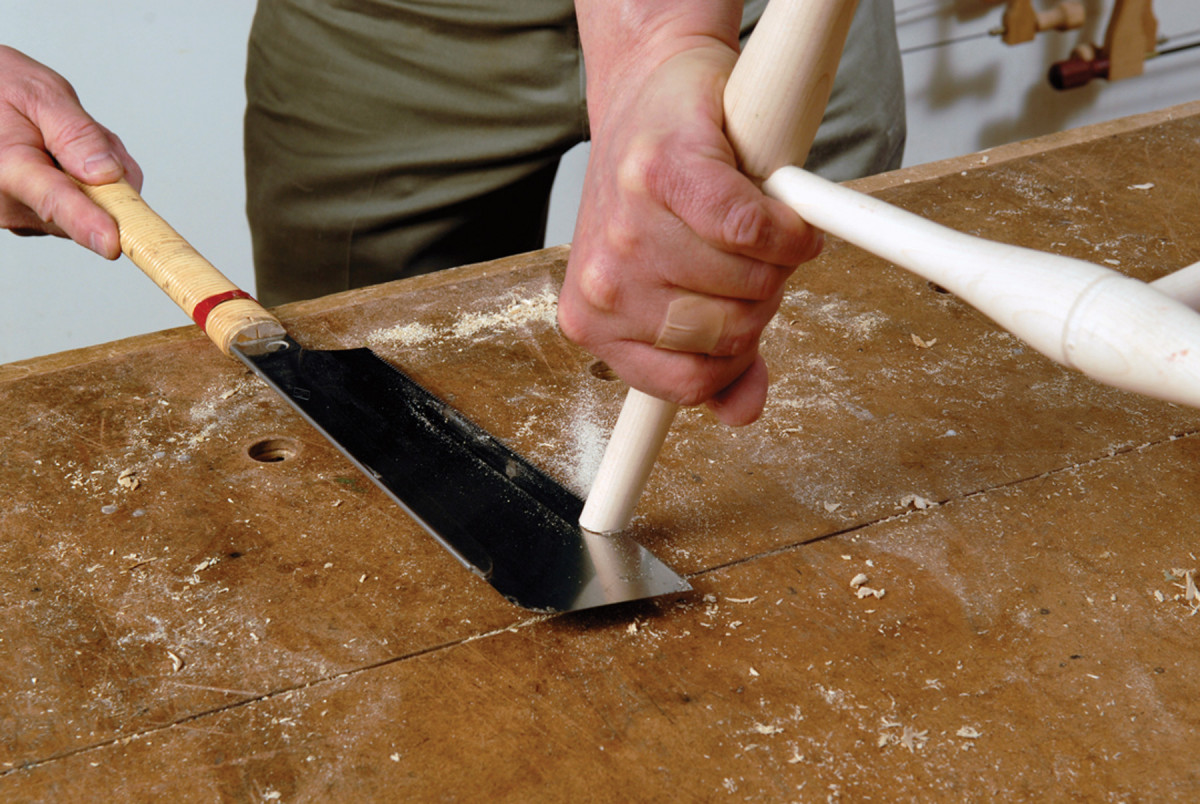
Be gentle when your bit begins to break through the top surface. You can feel it happening. If you push too quickly you risk blowing out a chunk of the surface around the hole.
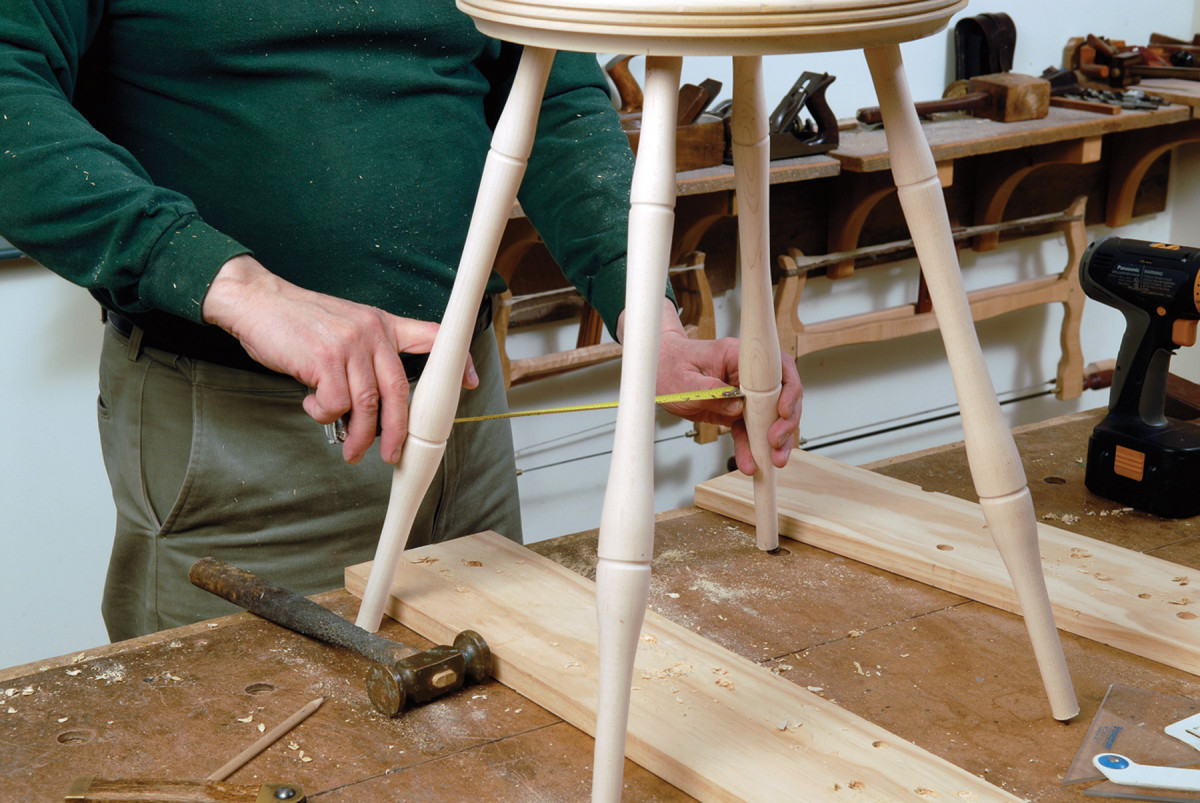
Insert the four legs into the holes and stand the stool upright. Do not worry if it rocks. You will trim the legs later so it sits flat. In this position, you can measure the stretchers. The four legs should describe a square. In a perfect world, the distance between each pair of legs should be the same. If not, don’t fret small variations. If you have a big difference, put the bit back in the hole and use it to ream the hole to the desired angle and location.
The stretchers will be connected to the legs at the location of the lower rings. This is where you measure and where the joints will be drilled. On all my stools, the distance between legs at the lower ring is about 11″. It is important to understand that in a measured drawing of a chair, stretcher lengths are always an approximation. These lengths vary slightly from chair to chair. Like boats and barrels, chairs tell their makers important dimensions as they are being made. For that reason, make the stretchers for your stool as you go along, not beforehand.
Think Square
Remember, the four legs describe a square. Think of the two side stretchers as opposing sides of a square. The distance between them is the same as the distance between the legs. This means all three stretchers – the two sides and the medial – should all be the same length. Turn the three parts to the shapes shown in the drawing and to your lengths.
Before you begin to turn the stretchers I need to let you in on chairmaking’s dirty little secret. We use socket construction – round hole and round tenon – only because it can be done so quickly. It really speeds up our work. This is, however, the second-worst joint you can make. The worst is gluing end grain to end grain. Think about a hole drilled in wood. Its inside surface is almost completely end grain. The only edge grain is on the tangents. If you rely on glue, the glue will eventually fail. You know this from your own experiences. What is the first thing friends and neighbors ask when they find out you are a woodworker? “Can you glue my kitchen chairs?” Why? Because factory chairs always fall apart.
This is the important point. If we want to take advantage of the speed and ease of socket construction, we cannot rely on glue alone. This is what factories do. They use socket construction to hold their chairs together. In other words, the joints are in tension. When the glue fails they pull apart. While we too, glue the joints, we use a completely different principal. We still use a technique that was worked out by Windsor chairmakers 250 years ago. We do not use stretchers to hold legs together. We use them to push legs apart. Our joints are in compression. When the glue fails, they remain tight.
Stretchers. The stretchers will connect at the lower ring locations; turn the stretchers as needed, to fit.
To put the joints into compression, we need to make our stretchers over-long. We are going to add some extra length called pre-load. This is really simple. Before you turn the stretchers add 3⁄8” overall (not for each tenon) to the distance between the legs. We call this length shoulder-to-shoulder. Shoulder-to-shoulder is not the overall length. You still have to add a 1″ tenon on both ends. So the math in my case is 10-5⁄8” plus 3⁄8” equals 11″. This is my shoulder-to-shoulder. When I turn the stretcher, I will add 1″-long tenons to both ends.
Commence Assembly
You are now ready to assemble the stool. It will be easy. The holes in the side stretchers are 90°, right angles. I use a 9⁄16” brad-point bit. I drill the holes 1-1⁄8” deep for 1″ tenons. The deeper hole ensures that my shoulders are tight to the leg. The shoulders do the pushing apart, not the end of the tenon.
Stretcher holes. I use a 9⁄16″ brad-point bit to drill 1-1⁄8″-deep holes for 1″ tenons.
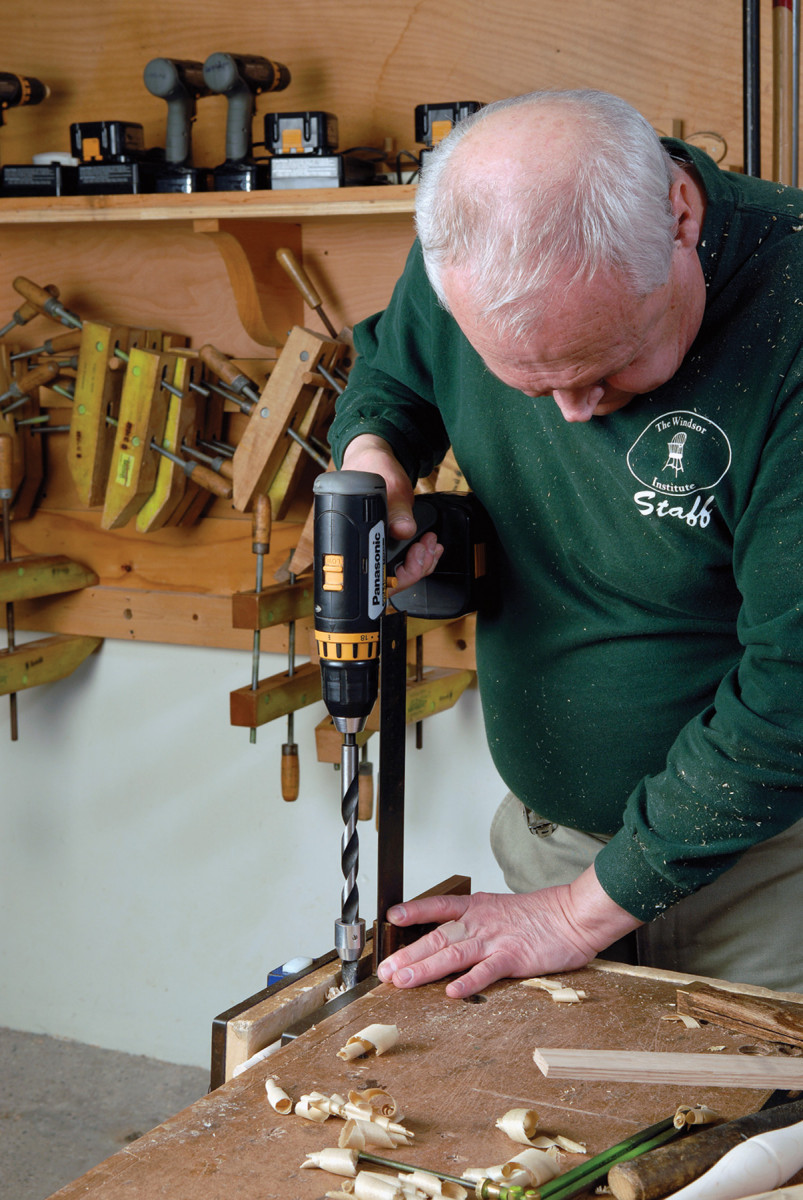
Grip the stretcher in a vise and drill. It will not rock if you make a simple cradle like the one in the picture below. Now, assemble the side stretchers to the medial stretcher. I glue only the inside of the hole. If you glue the tenon, the glue gets all over the place. Check to be sure the assembled “H” lies in a plane. Then, set it aside while you drill the leg holes.
Cradle. This simple cradle keeps the stretchers from rocking as you drill.
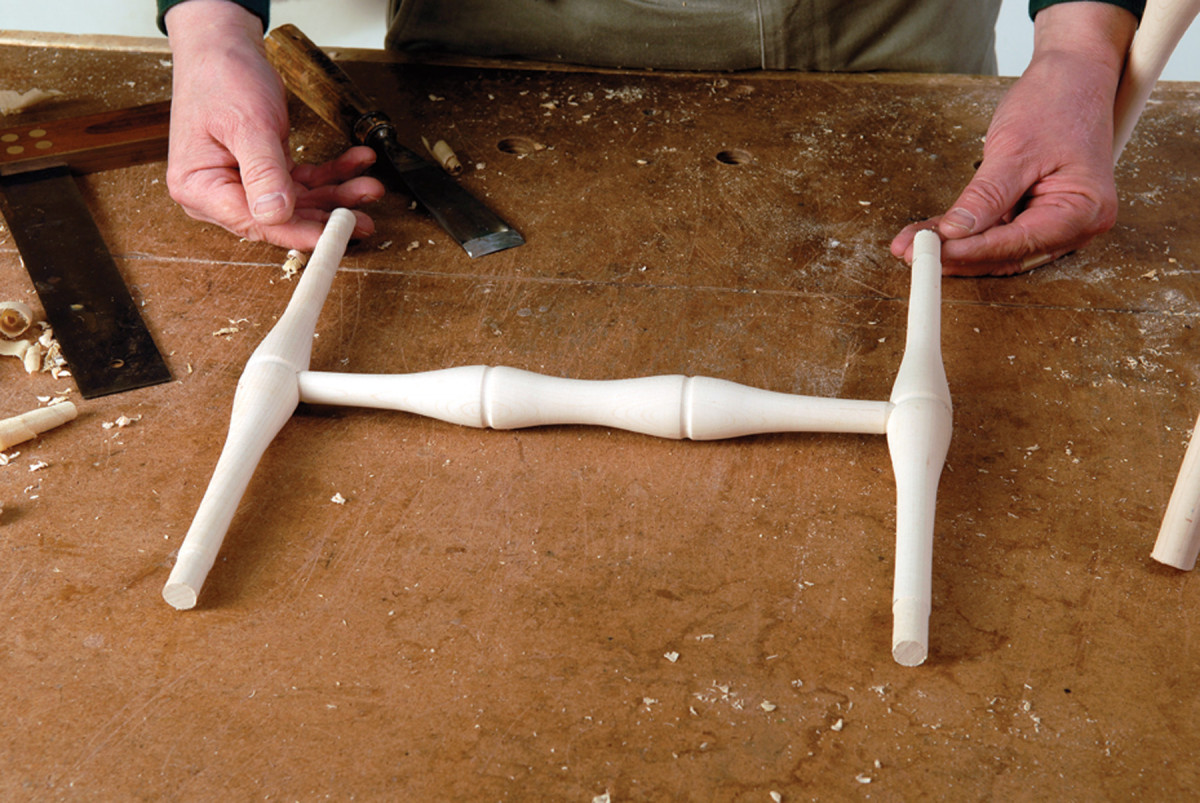
An even plane. Check to ensure your assembled “H” lies all in one plane.
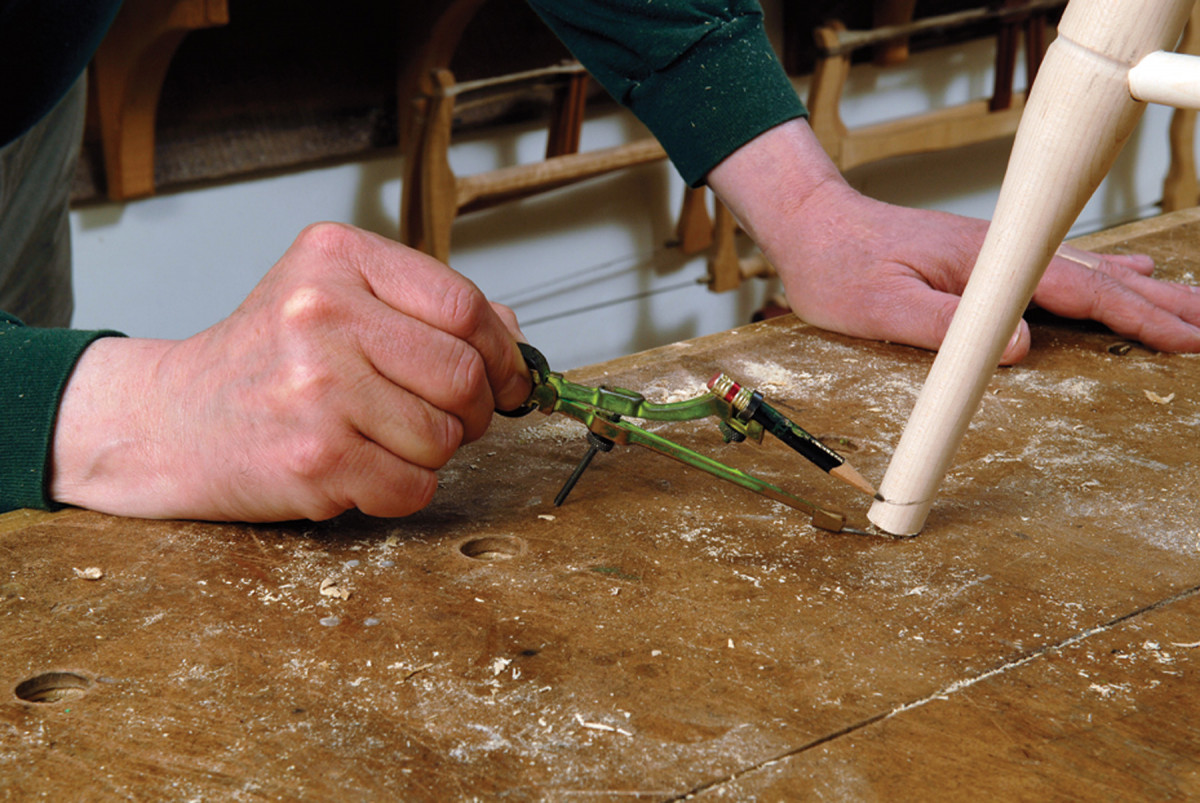
You need to first determine the stretcher-hole angles. This is another case where the project gives you the information. Clamp a straightedge across the two legs at the decorative rings, as shown in the picture below.
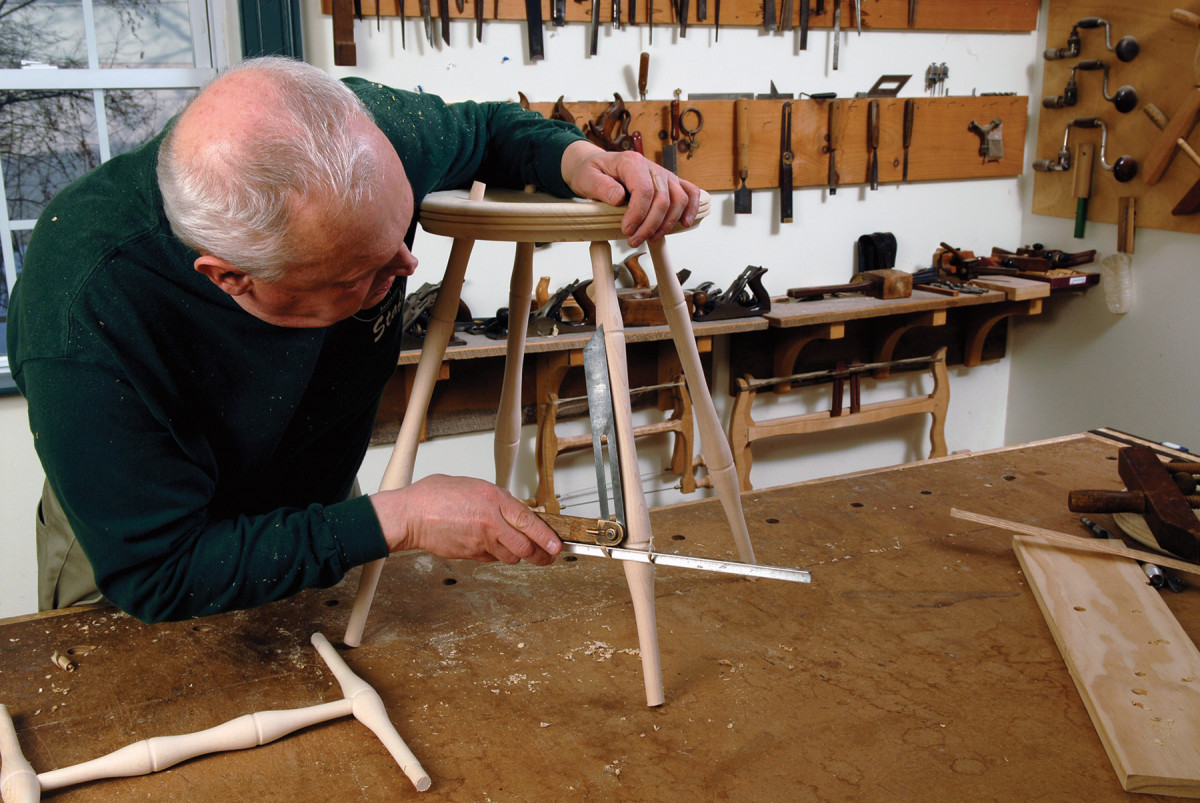
Workpiece determines angle. A straightedge clamped across the legs at the rings will help you find the correct hole angle.
The straightedge and the leg’s centerline form the angle. Take the angle with a bevel square and use the tool to guide you while you drill the holes. (Here’s another chairmaking secret: Sometimes chairmakers don’t even know the angles they are using. They just measure from the chair.)
It is possible to drill the holes in the legs upside down. Notice in the picture below that I am drilling from the top of the leg.
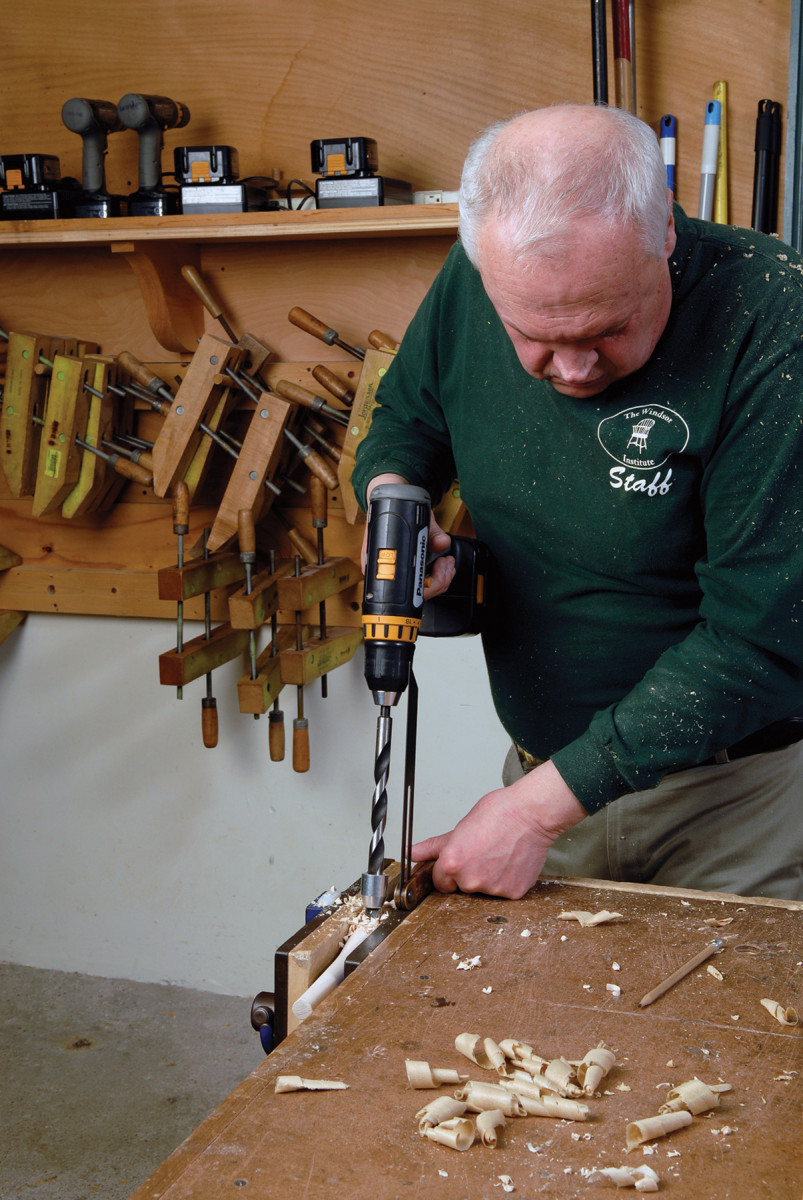
Chairmaker’s mantra. Notice that I’m drilling from the top of the leg. To avoid drilling upside down, remember the mantra: “Top of leg to top of leg.”
The tenon is sticking me in the thigh. To avoid drilling upside down, chairmakers repeat this mantra while drilling: “Top of leg to top of leg.” Top of stool leg to top of chairmaker’s leg. Do that and you’ll always be safe.
Glue and Wedges
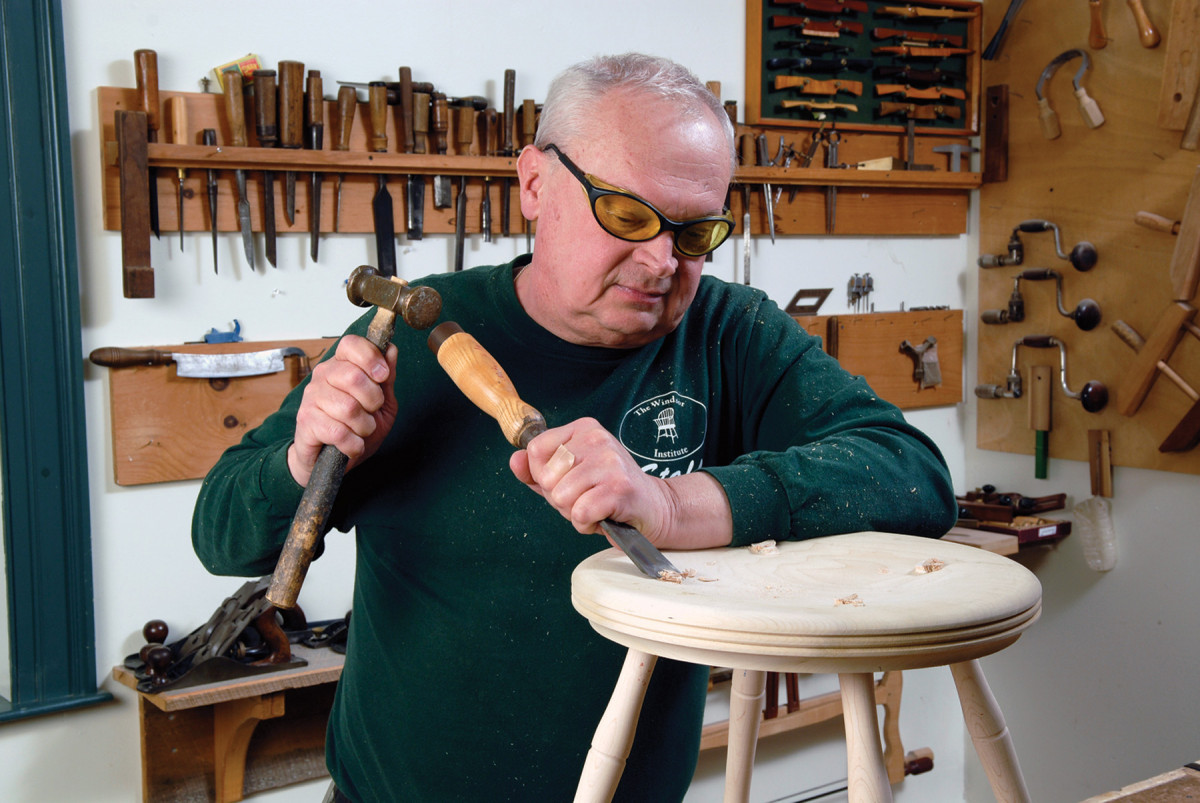
Glue and assemble. When all four legs are on the “H,” test-fit the dry assembly to the top. If it works, take the stool apart and glue the legs into the top. Use a hammer to tap them tightly into place. The 12-ounce double-faced hammer I use is a traditional chairmaker’s tool, called a framing hammer. Assembling the back was called “framing the chair.” The hammer was also used in this process, which chairmakers called “legging up.”

Test-fit, then glue. If the test-fit works out, go ahead and glue the legs into the top, tapping them lightly in place with a hammer.
The leg tenons will not rely on glue alone. They need to be wedged. The wedges will serve two purposes. They spread the tenon and make it conform to the hole. Also, they key into the seat. This keying resists the torque caused by the shifting weight on the stool. Make your wedges so they taper both in width and thickness. I whittle my wedges from strips of scrap oak. Chairmaking creates piles of this scrap. We make so much that we have to burn it to avoid choking on scrap. After I drive a wedge and cut it off, I whittle the next wedge on the same piece of oak. I do not make individual wedges. It takes too long. Trying to cut wedges on the table or band saw is too risky for me.

Tapered wedges. Your wedges should taper in both width and thickness.

Drive, then cut. After I drive a wedge and cut it off, I whittle the next wedge from the same piece of oak.
Split the end of each leg with a chisel. (I never understand why some guys go through all the work of cutting a kerf on the band saw. The wedge has to fill the kerf before it can begin to fill the joint.) Make the splits run at right angles to the grain of the seat. Otherwise, the wedges can pop the seat into two pieces. Use a gouge to trim the excess and to make the leg tenons flush with the seat. Sand the joints smooth.
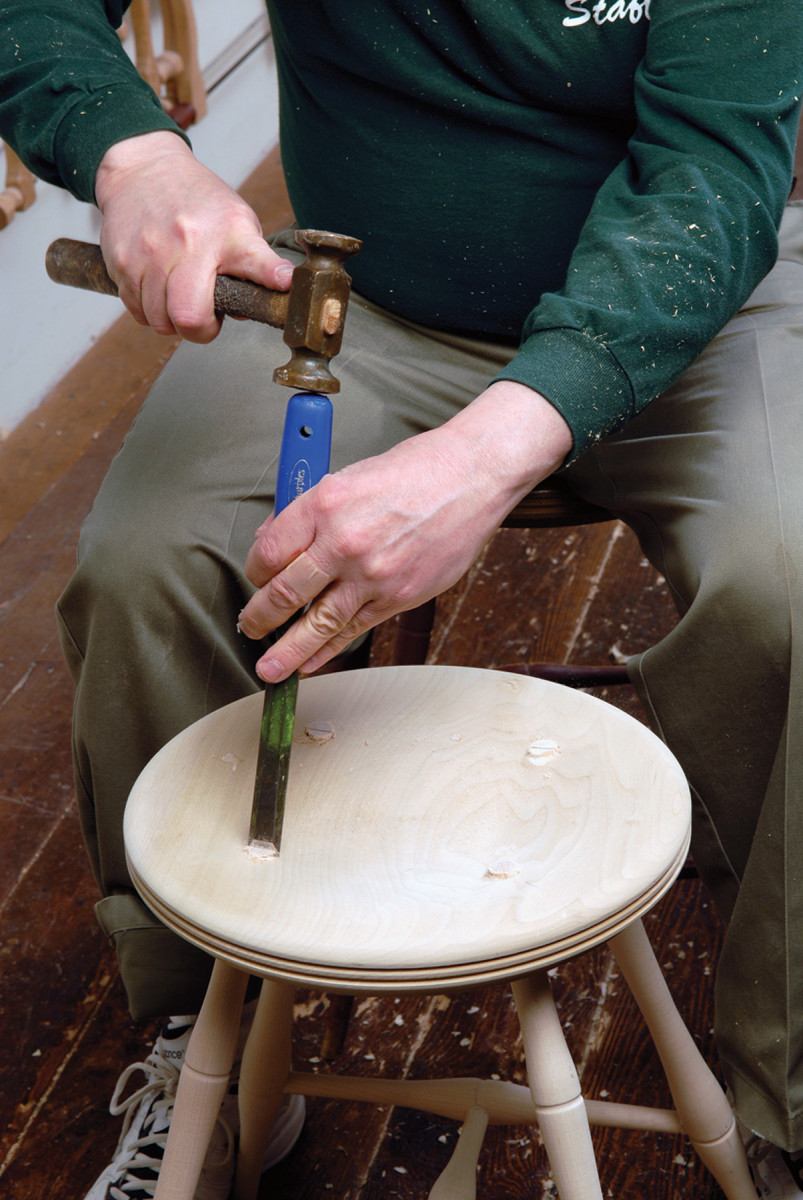
Chisel, not kerf. I split the ends of each leg with a chisel – this takes far less time than moving to the band saw for a kerf cut.
Gouge flush. Use a gouge to trim the excess off the tenons, flush with the seat, then sand smooth.
Place the stool on a level benchtop or a table saw. Shim the bottoms of the legs until the top is level. Measure the height from the top of the bench to the top of the stool – not the bottom. That’s another one of our mantras. Chairmakers measure top to top. Set a compass to whatever amount you need to trim (measured height minus 19) and scribe a line around the leg. Use a backsaw to cut on these marks.
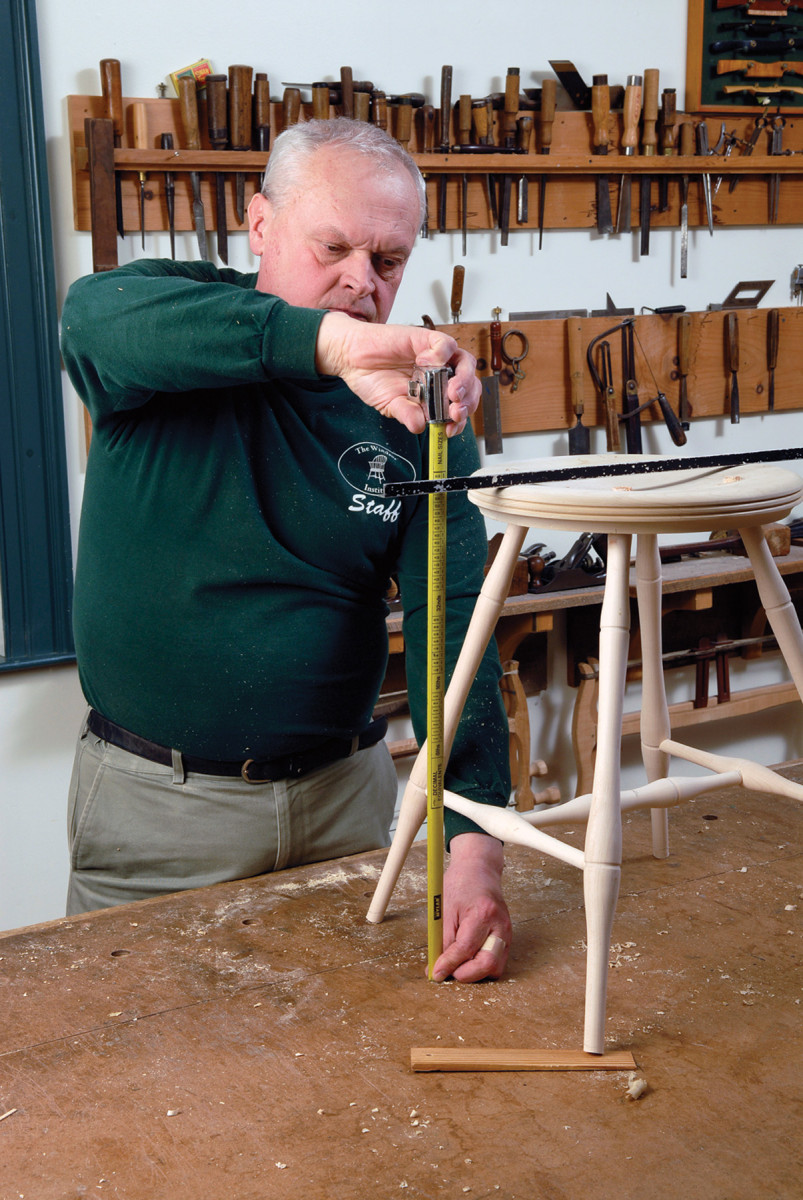
Shim to level. Use shims to level the stool and measure the height from the top of the bench to the top of the stool.
Mark. Mark a line around each leg to locate your cut.
Cut. Use a backsaw to cut the legs to length at your marked lines.
Do some finish sanding and apply whatever finish you want. In our shop we like our stools in cheerful colors and use milk paint to achieve this.
We also make a 24″ stool. I have four of these around my kitchen counter. You do not have to make a lot of changes to make the taller stool. The first change is the leg shape. I like a baluster leg. The 24″ stool is a lot bigger than our shop stool. The more elaborate leg looks better. The hole angle is 17° in the top. If you use 21° like on the shop stool, the longer legs end up so far apart, you trip over them. The stretcher length is typically 11″. The stretcher tenons are 1-1⁄8“.
Now that you have a comfortable stool to sit on, it is time to think about using it to make a complete chair
Additional Thoughts: Paying for Past Mistakes
When we are young we all make stupid mistakes that come back to haunt us the rest of our lives. I made a whopper and it has dogged me for years. In 1984, I published a book titled “Make a Windsor Chair with Michael Dunbar.” In the book I described a wet/dry system of construction I had dreamed up. It was not a historical process. It came out of the ravings of my fevered brain. It involved turning the legs and stretchers from green wood. I then dried the tenons in hot sand. The idea was to let the wet joints shrink around the dry tenons. The method sounded good and it was one of those things that really wows other woodworkers.
I have since realized how stupid it is. I do not do it any more. I have not done it for years. I cringe when anyone brings it up. I repudiate it every chance I get. There is no way to reverse my mistake. It’s out there in print. Every time someone else puts it in print, it continues to pursue its cursed life. Please forgive me. Please help me. Please pass the word. If you see someone doing it, tell them the idiot who started it begs them to stop.
I accept my fate. When I die I will spend an eternity in Chairmaker’s Hell drying tenons in hot sand. It will be the only way to atone for this blunder. Don’t condemn yourselves to sharing in my punishment. Turn chair parts out of dry wood and put your joints in compression.
Here are some supplies and tools we find essential in our everyday work around the shop. We may receive a commission from sales referred by our links; however, we have carefully selected these products for their usefulness and quality.