We may receive a commission when you use our affiliate links. However, this does not impact our recommendations.
Sharpen your end-grain hollowing skills.
Drinking from a wooden Goblet is a unique experience, because its weight and feel is distinct from goblets made of other materials. But is it practical? Of course! With the right wood and finish, it’s perfect for anyone who loves wood!
Tools and materials
Almost any lathe will do for this project—even a mini lathe. A four-jaw scroll chuck is a great asset for mounting the blank for hollowing. You’ll need standard spindle turning tools, including a roughing gouge, a detail/spindle gouge, a skew chisel and a parting tool. You’ll also need a tool for hollowing the cup. I recommend using a round-nose scraper (with either a side- or full-round profile) that’s 1/2″ to 1″ wide and 5/16″ to 3/8″ thick.
Steer away from really soft woods such as basswood, pine, cottonwood, etc. and look for harder woods such as cherry, walnut, maple and oak. Many exotic woods are also suitable. Finding large enough turning blanks may be the biggest challenge—I like to start with blanks that are 2-1/2″ to 3″ square.
A wooden goblet’s usability turns on the finish. With some woods the wrong finish can allow wine to literally seep right through the cup. Epoxy, pre-catalyzed lacquer (sometimes sold to turners as “melamine”) and varnish are good choices that seal the wood well and are not affected by alcohol.
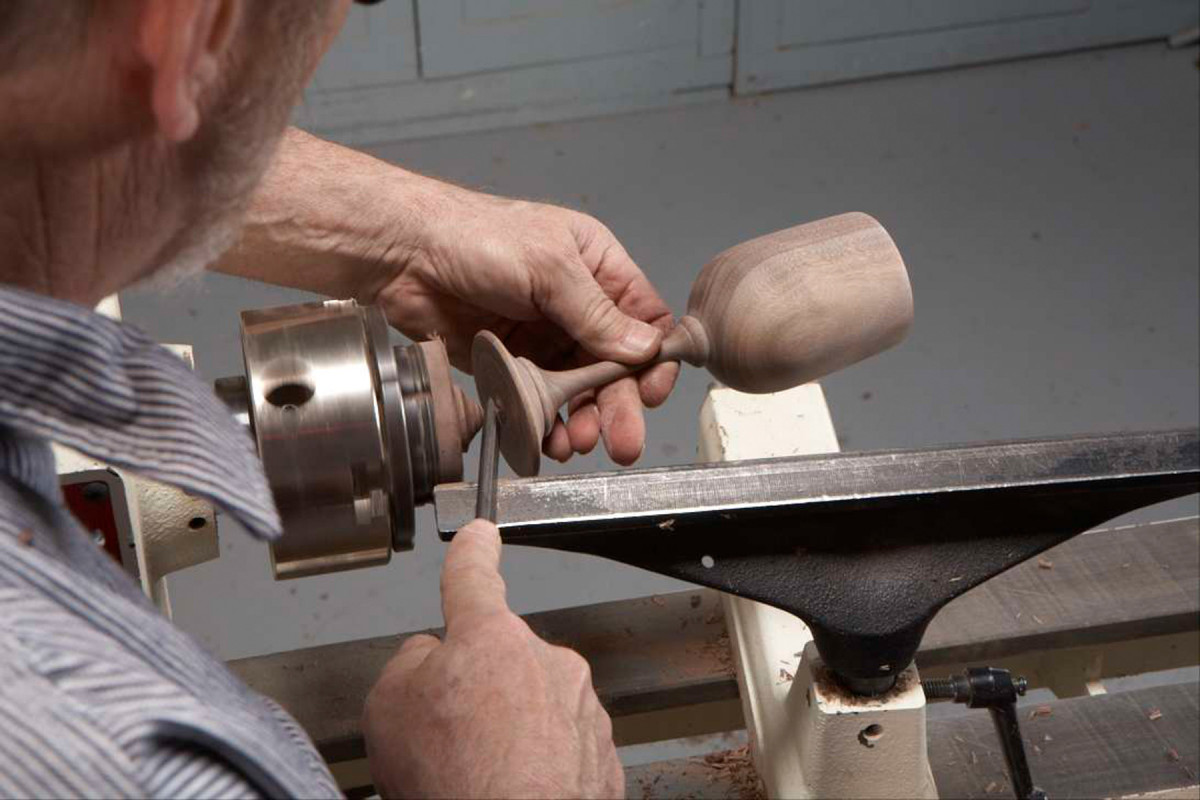
Securely mount the blank
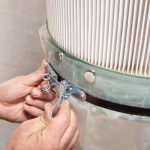
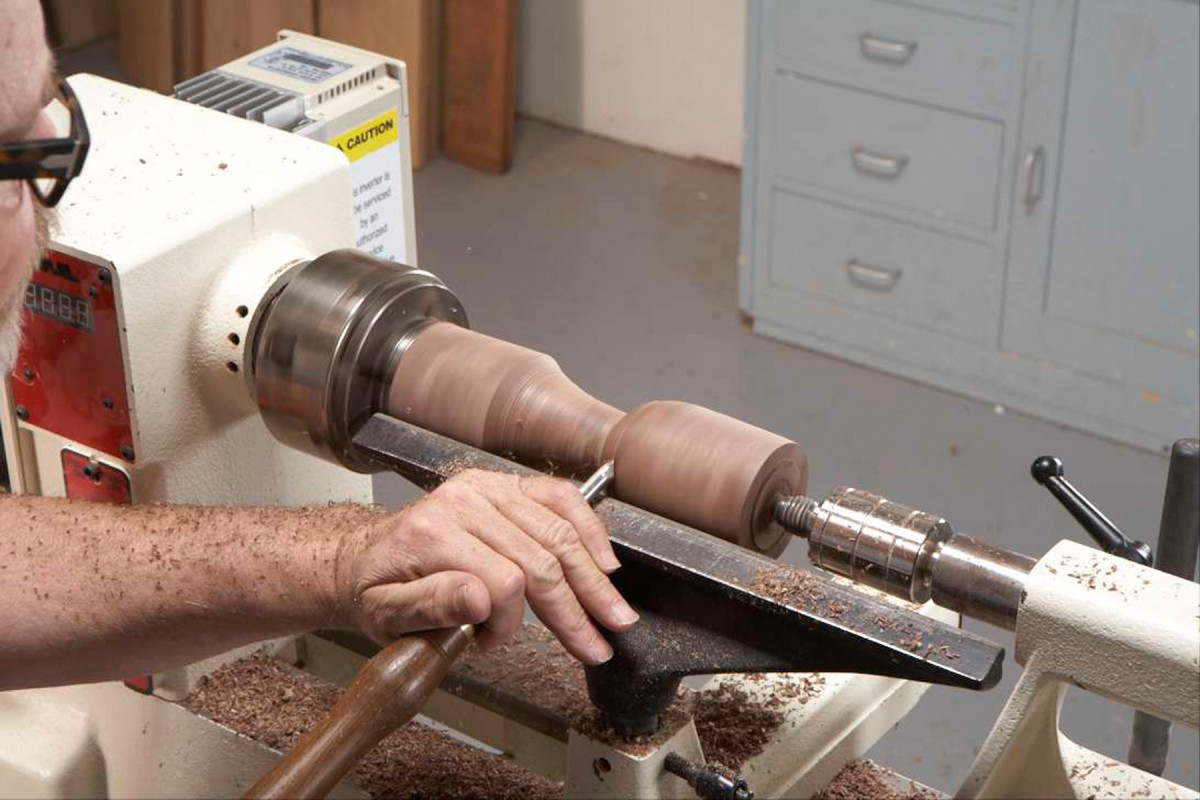
1. Securely mount a blank with a turned tenon into a scroll chuck. A secure mount comes from the tenon’s large gripping surface and its shoulder, which rests on the top of the chuck’s jaws.
Select a square blank that’s about 9″ long. Mount the blank on the lathe between centers and turn it to a cylinder using the roughing gouge. Select which end will be the base and which will be the cup. Use a parting tool or a skew chisel to turn a tenon on the base end to fit the scroll chuck. Size the diameter of this tenon to provide the chuck’s jaws with an effective grip over a large surface area. Remove the blank and mount your scroll chuck onto the headstock. Then, using plenty of pressure, mount the blank securely within the jaws (Photo 1).
Shape the cup
2. Cut in below a line marked to indicate the cup portion of the goblet to provide clearance for shaping the bottom of the cup.
Decide the cup’s height and mark it on the blank. You may want to measure glass goblets that you like to find a pleasing balance between the cup and the goblet’s overall height. Or simply experiment by drawing different lines on the blank. I like a 40-to-60 ratio between the cup and the overall height.
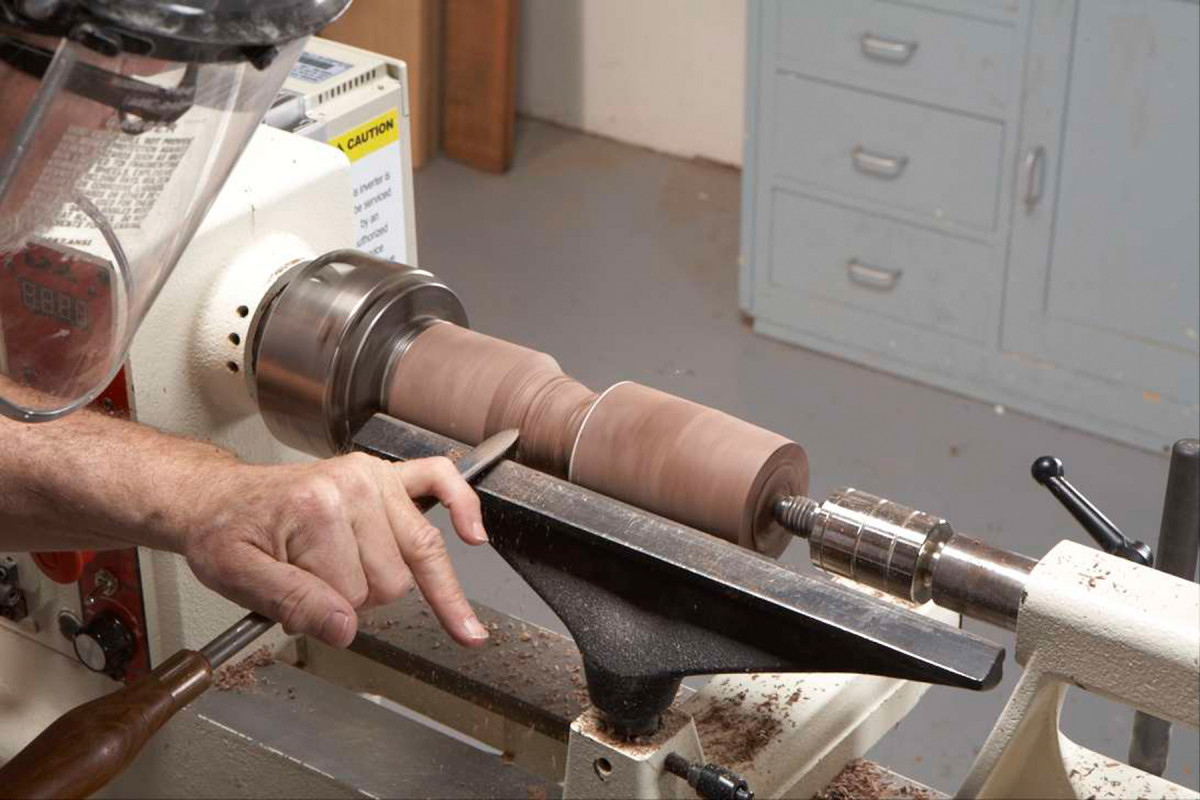
Begin the rough shaping by cutting in below the line to provide clearance (Photo 2). Do not cut in too far—about half the diameter of the cylinder is as deep as you should cut at this point. Reducing the diameter too much will leave too little support for hollowing the cup.
3. Shape the bottom portion of the cup with the detail/spindle gouge. Switch to the roughing gouge to refine the cup’s flatter upper portion.
Roughly shape the outside of the cup. Its bottom is normally rounded like the side of a bead (Photo 3). Don’t cut in too far as you refine the shape—leave plenty of stock at the bottom for support during the hollowing process. Switch to the roughing gouge to shape and refine the sides of the cup. They may be straight as shown here, or gently rounded.
Hollow the cup
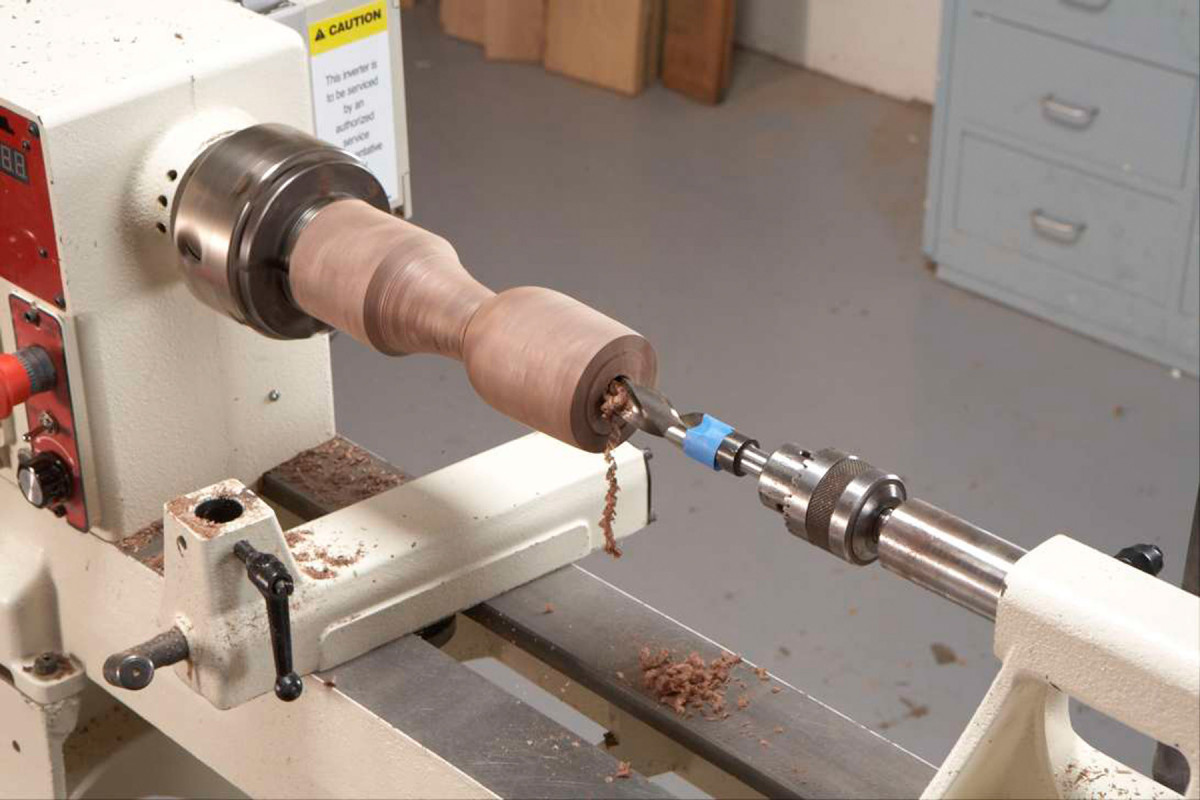
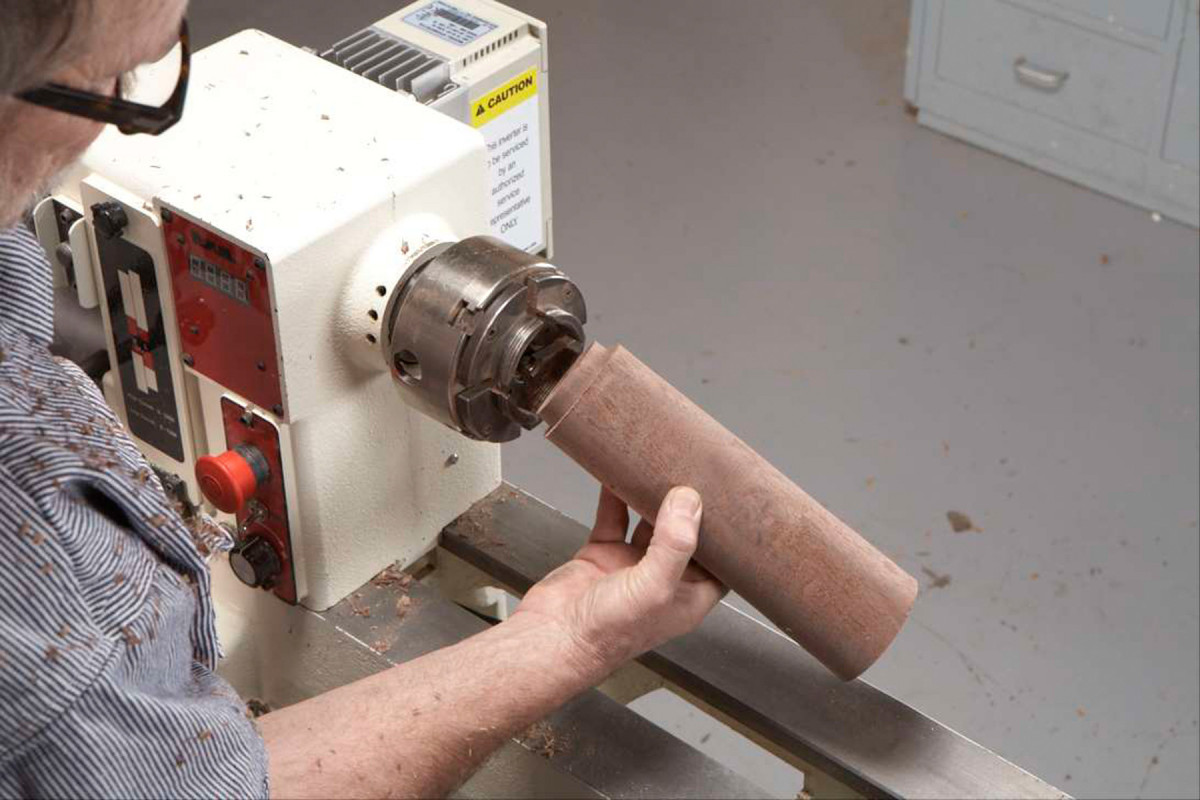
4. Drill the cup to within 1/2″ of final depth, using a Jacobs style chuck mounted in the tailstock.
It’s much easier to hollow the cup if you drill it out first (Photo 4). Use a 1/2″ to 3/4″ drill bit to create working room for the turning tools. Drill to a depth about 1/2″ less than the ultimate final depth, to allow refining the bottom of the cut.

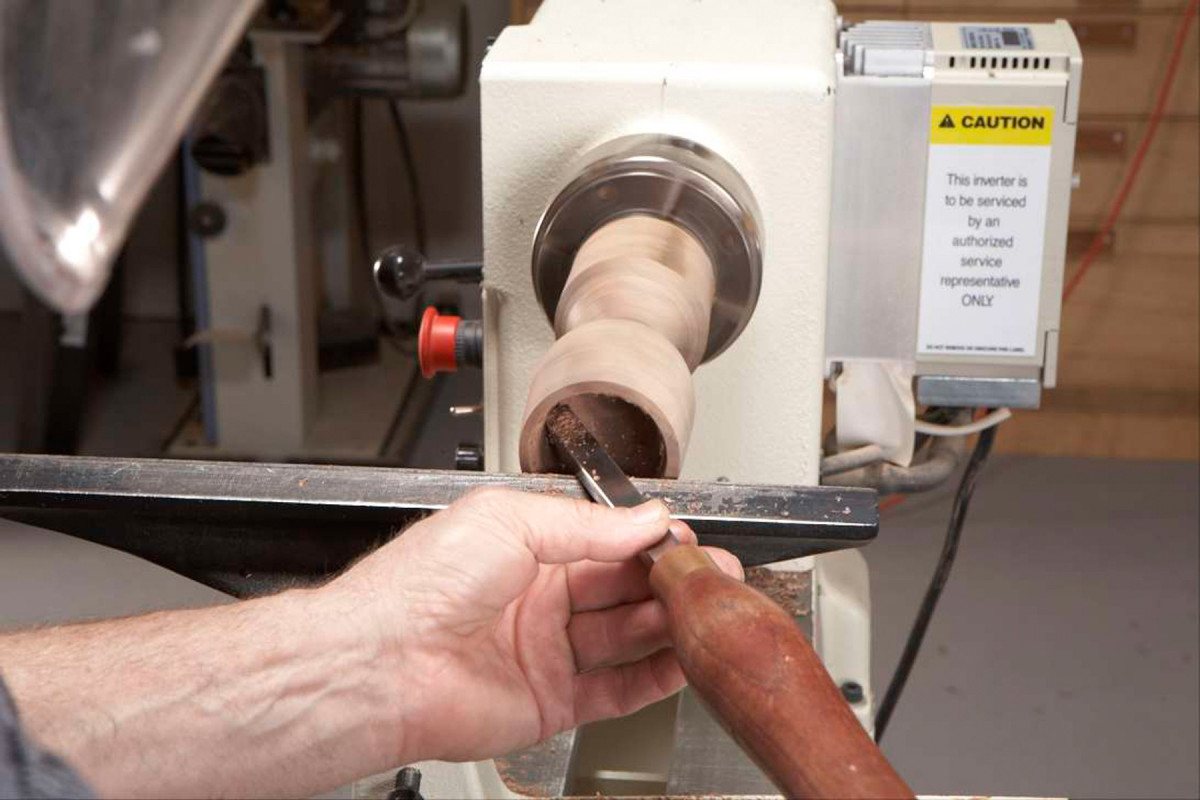
5. Begin hollowing the cup by making sweeping cuts with a thick round-nose scraper, working from the sides of the pilot hole back towards the rim. Make ever-deepening cuts to open the inside.
Use a thick round-nose scraper to open the cup (Photo 5). To work with the grain, you must work from smaller to larger diameter. In this case, that means working from the center of the cup towards the sides and top edge—“pulling out” rather than “pushing in,” as with face-grain bowl turning.
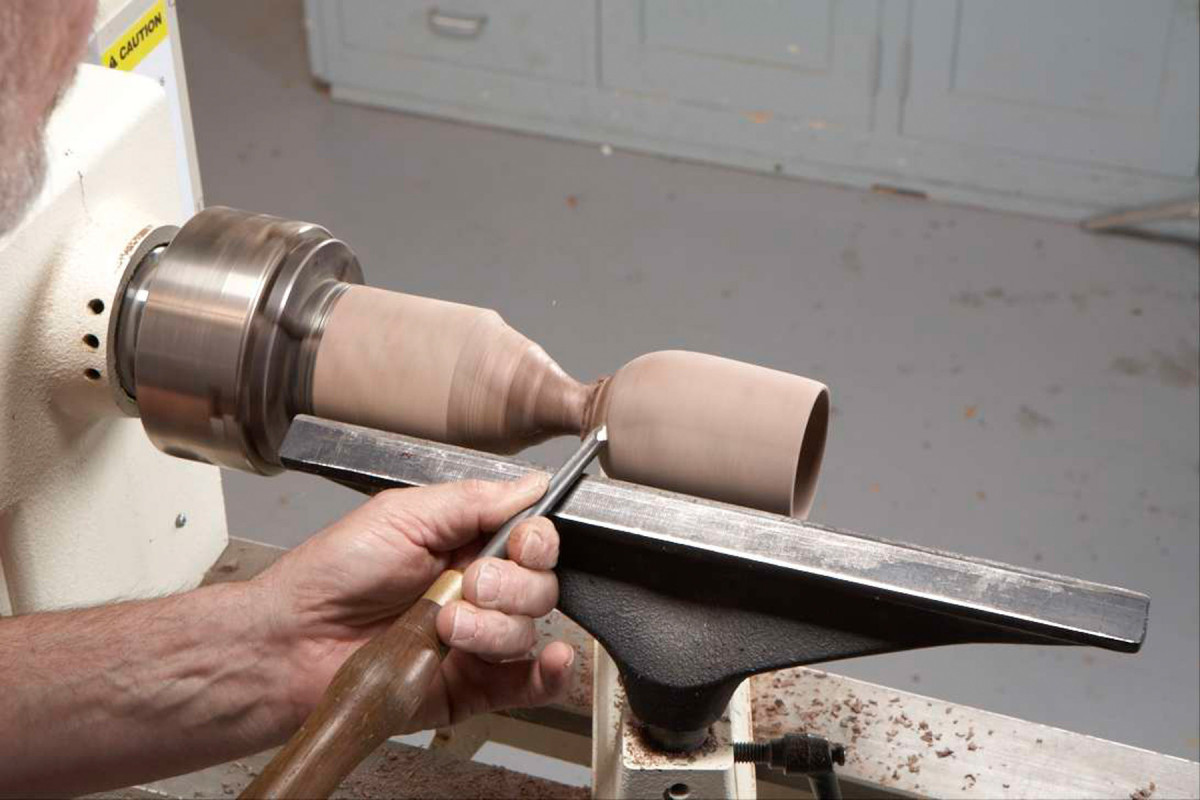
6. Work near the rim to establish the wall thickness. Make the same sweeping cuts, working from the inside out.
Open the cup in stages, gradually reducing the wall thickness more towards the top of the cup than the sides (Photo 6). Work to a wall thickness near the top of 3/16″ to 1/4″—you’ll be able to further reduce the wall thickness as your end-grain hollowing skills improve.
Switch to the detail/spindle gouge to further refine the shape of the bottom on the outside of the cup. Reducing the outside diameter around the bottom and at the base of the cup provides a better sense of the wall thickness when you refine the interior walls—but be careful about reducing the outside shape to its final diameter, as you still need some support to finish hollowing the inside.
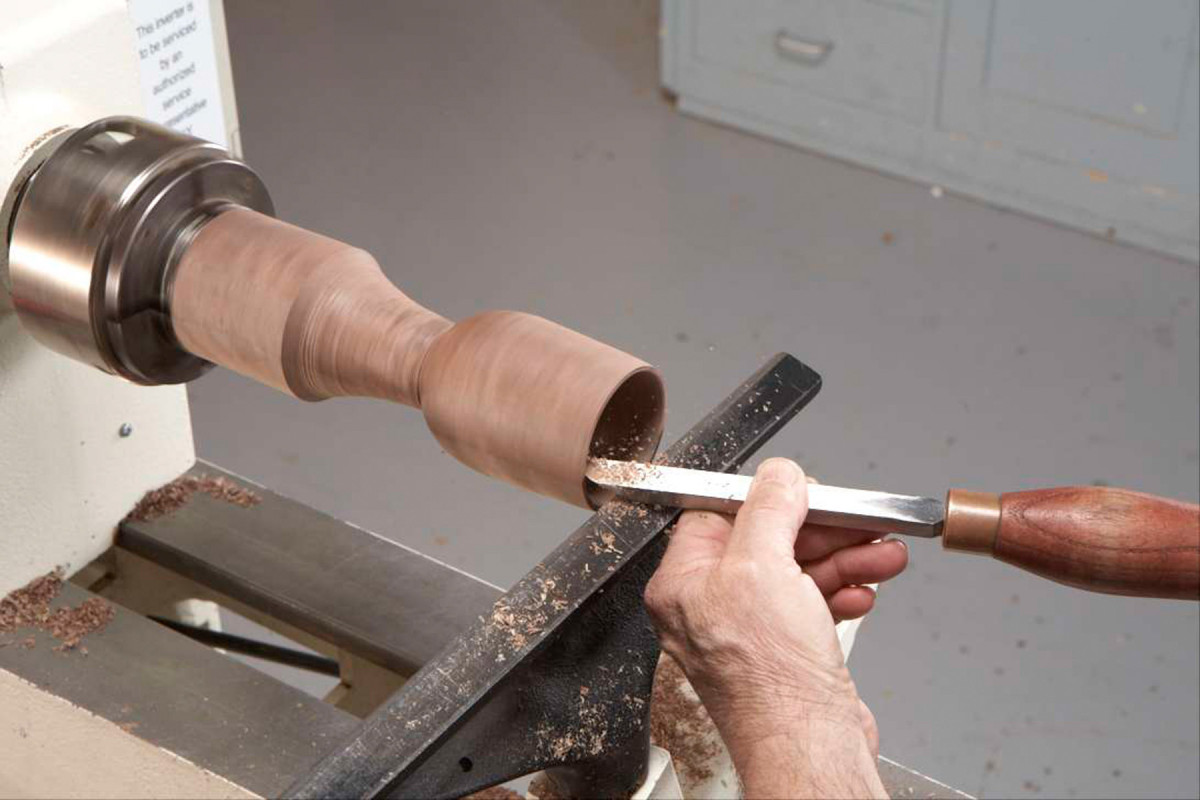
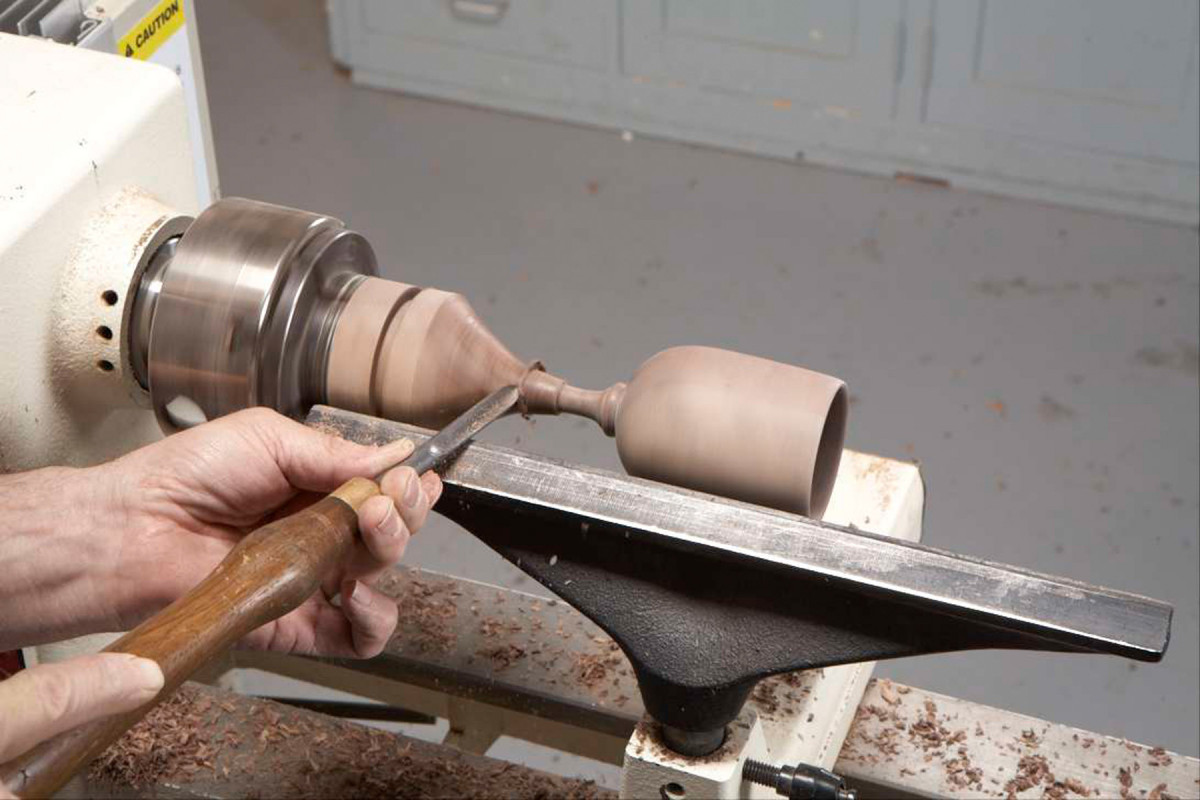
7. Finish hollowing the cup by making light passes from the bottom to the top edge with the scraper tilted toward the cut. Then sand the inside of the cup and the upper part of the outside.
Switch back to the round-nose scraper to finish turning the inside of the cup (Photo 7). Work to achieve the best surface you can prior to sanding by using a technique called “shear scraping.” Work from the bottom and up the sides with the scraper tilted to the left, in the direction of the cut (around 45˚), making light, consistent movements across the wood’s surface.
When you’re satisfied with the surface finish from the turning tools, finish-sand the inside of the cup and the flat part of the outside. Start with 120 grit and work through 320 grit. Note: Waiting to sand the cup after the goblet’s stem has been turned to a small diameter is a bad idea—it courts disaster.
Shape the stem and base
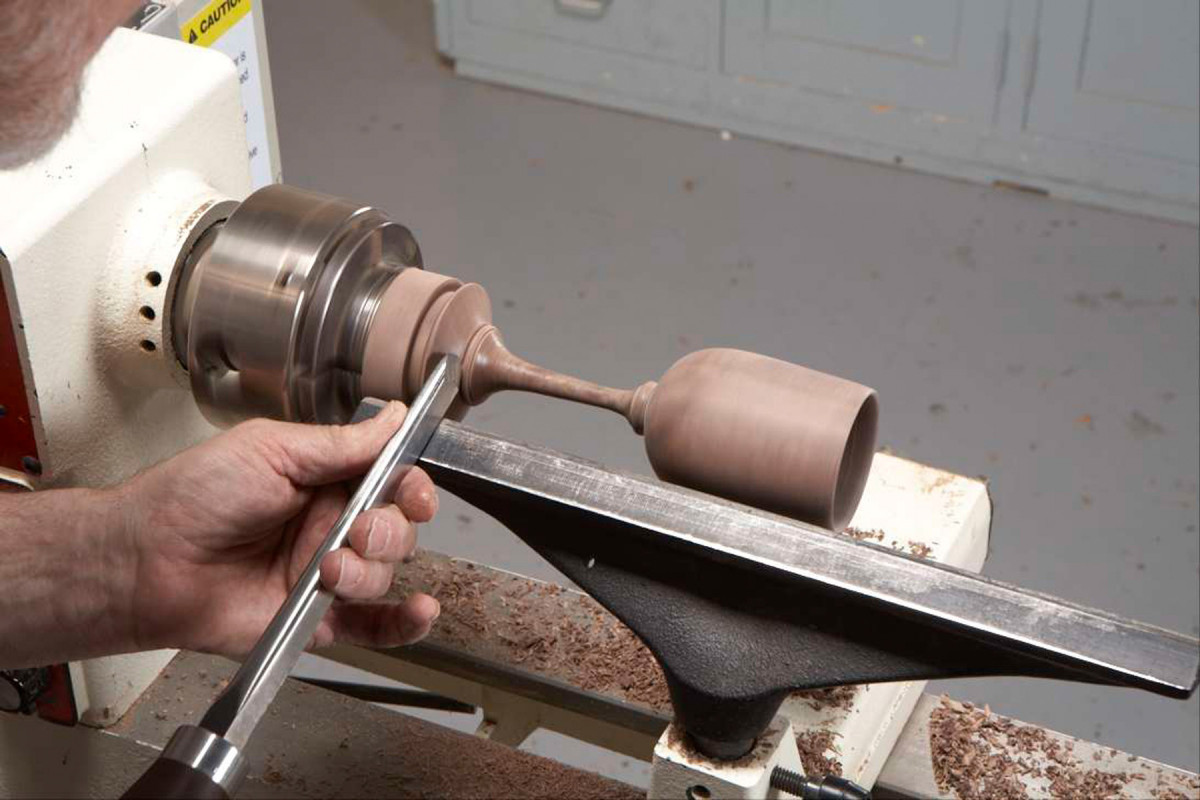
8. Ease the transition between the cup and the stem by adding a bead detail. Sand the detail. Then establish the final shape at the base of the cup.
Finish turning the bottom of the cup (Photo 8). The stem can flow right into the cup, or you can add a detail at the transition point. Finish-sand the bottom of the cup.
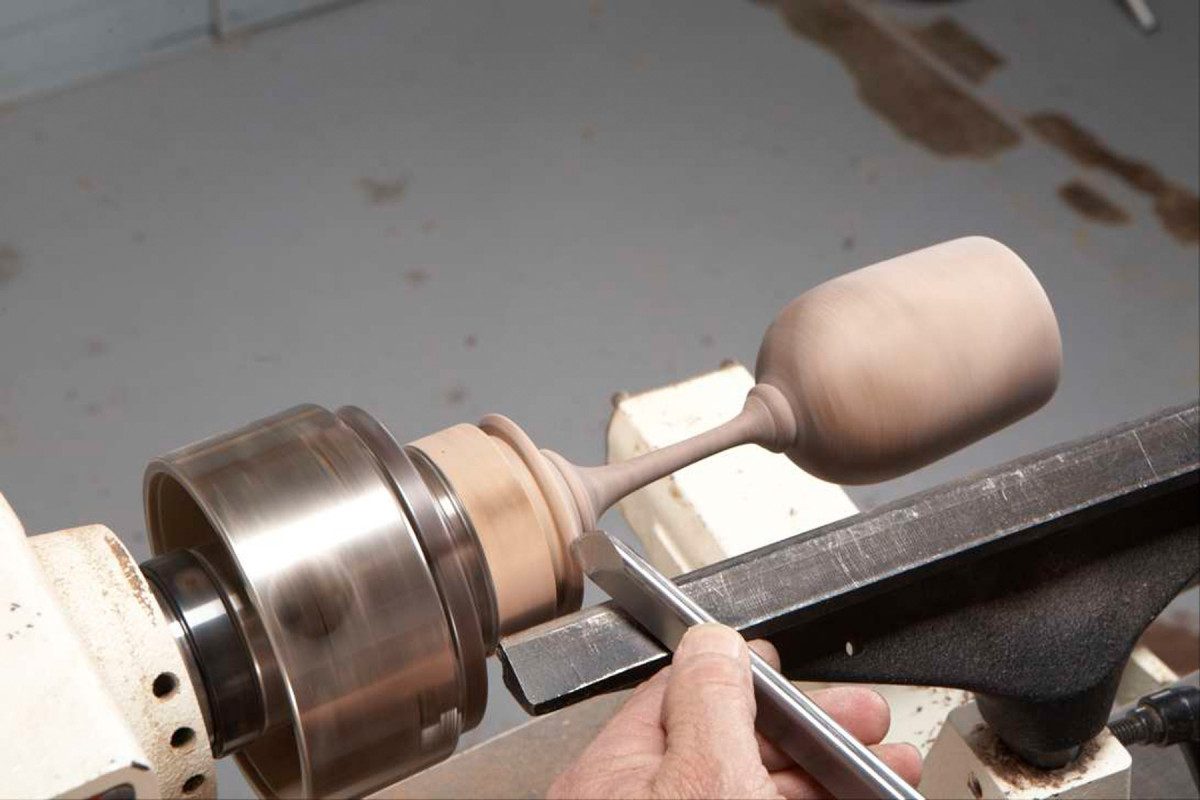
9. Cut in slightly at the base to establish the goblet’s overall height. Then turn the stem in stages, working from the cup to the base and sanding completed areas as you go.
Establish the goblet’s height by cutting in with a parting tool about 1/4″ deep on the chucked end of the blank. Then slowly create the stem and the base by clearing away the remaining waste in short segments, finish-sanding as you go (Photo 9).
10. Complete the base and add details, using the detail/spindle gouge and the skew chisel.
When the stem and base are nearly complete, decide whether to add a detail (Photo 10). Finish-sand any remaining areas to 320 grit.
Parting off
11. Refine the rim of the base by making an angled cut on the bottom edge, using the long point of the skew chisel.
Cut a small chamfer at the bottom edge of the base (Photo 11). This cut creates a subtle shadow line that slightly lifts the base. Prepare to part off the goblet by alternating between removing the waste with a parting tool and shaping the underside of its base with the skew chisel or the detail/spindle gouge.
12. Part the goblet from the waste material after cutting into the underside of the base at a slight angle to create a concave bottom surface, so the goblet will sit flat.
Create a shallow undercut from the rim towards the center, so the goblet will sit only on the rim (Photo 12). Continue the slight undercut until you part off the completed goblet into your hand. Sand the underside of the base by hand or with a soft flexible pad mounted in a drill or rotary tool.
Apply a durable finish
Use an alcohol- and liquid-resistant finish. Of the three options mentioned earlier, I prefer the working properties, durability, look and feel of a high-grade varnish finish, even though it dries slowly and takes a long time to fully cure.
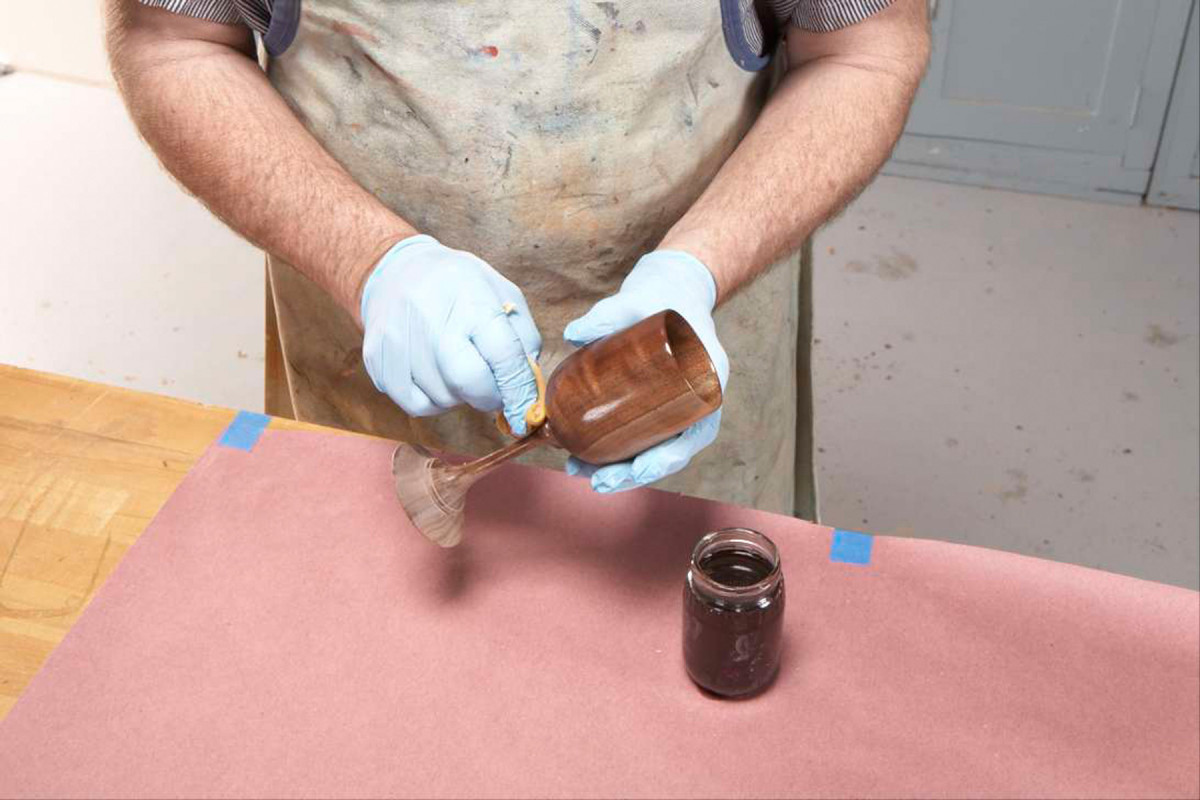
Create an excellent wiping varnish by mixing equal parts of Behlen’s Rock Hard Tabletop Varnish (see Sources) and odorless mineral spirits. Apply at least five light coats inside the cup and three to four coats on all other areas. Allow each coat to dry for at least eight hours and lightly sand between coats. Wait 20 to 30 days before using the goblet, to allow the finish to adequately cure. I often go by the sniff test: If I detect any solvent odors inside the goblet, it needs more curing time.
SOURCES
Behlen’s (Mohawk) Rock Hard Tabletop Varnish
Here are some supplies and tools we find essential in our everyday work around the shop. We may receive a commission from sales referred by our links; however, we have carefully selected these products for their usefulness and quality.