We may receive a commission when you use our affiliate links. However, this does not impact our recommendations.
It won’t solve a tool addiction, but it’ll make finding tools easier.
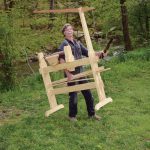
You’ve no doubt seen photos of the H.O. Studley tool cabinet – the Sistine Chapel of tool cabinets. And as far as I’m concerned, Studley got it right. Yes, his tool chest is a work of art and all that, but more importantly, it hangs on the wall.
With apologies to all you people who love floor chests, I prefer wall-hung tool storage if I don’t have to travel and I have the wall space. I can see at a glance where my tools are and I find my access is easier.
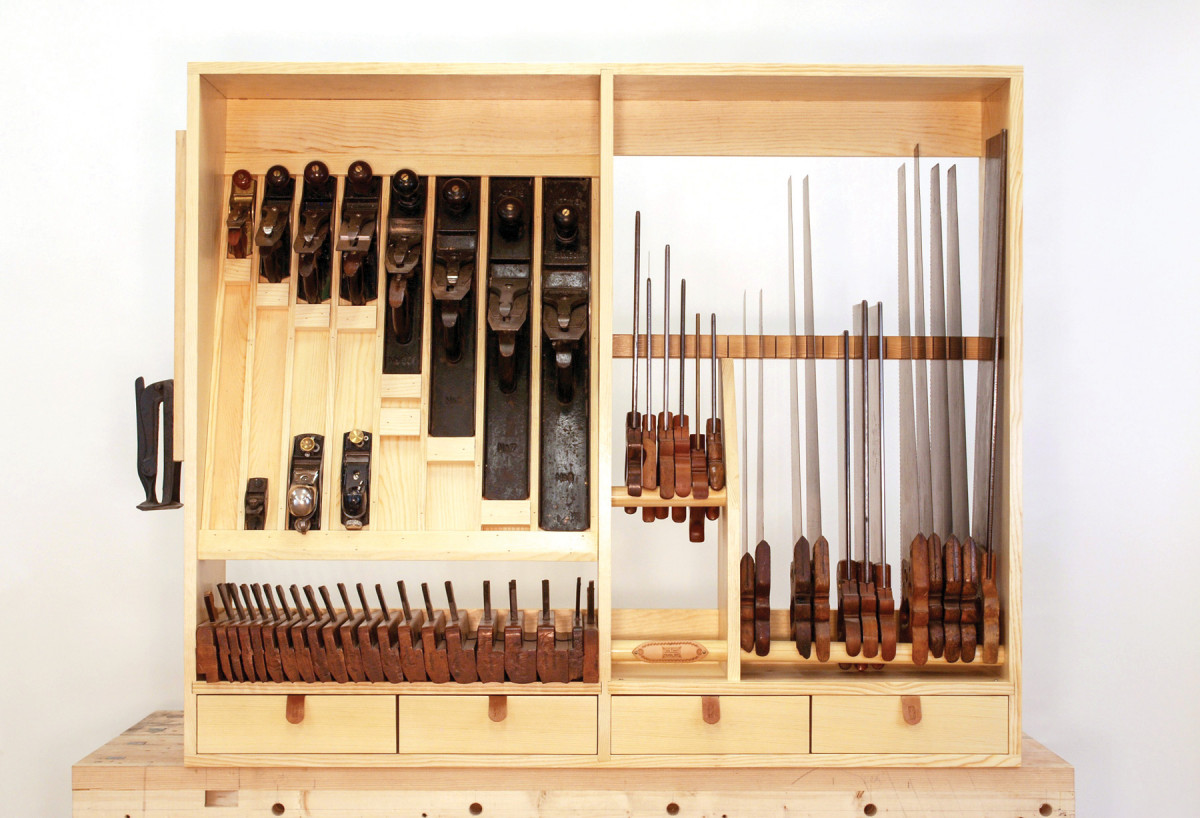
This saw and plane till is open for easy access, but with a few modifications you could put doors on it to keep out humidity (or co-workers). It’s also a simple matter to add a back.
First, Admit the Problem
Bespoke fit. You can get an exact fit for your tools if you use them as the basis for your till‘s measurements.
I designed this till for my minion, Tod Twist (we don’t have apprentices any more). Tod needed tool storage, and I needed fodder for an article.
Because you’re reading a woodworking magazine, it’s probably safe to assume that you have a saw or plane problem (or both).
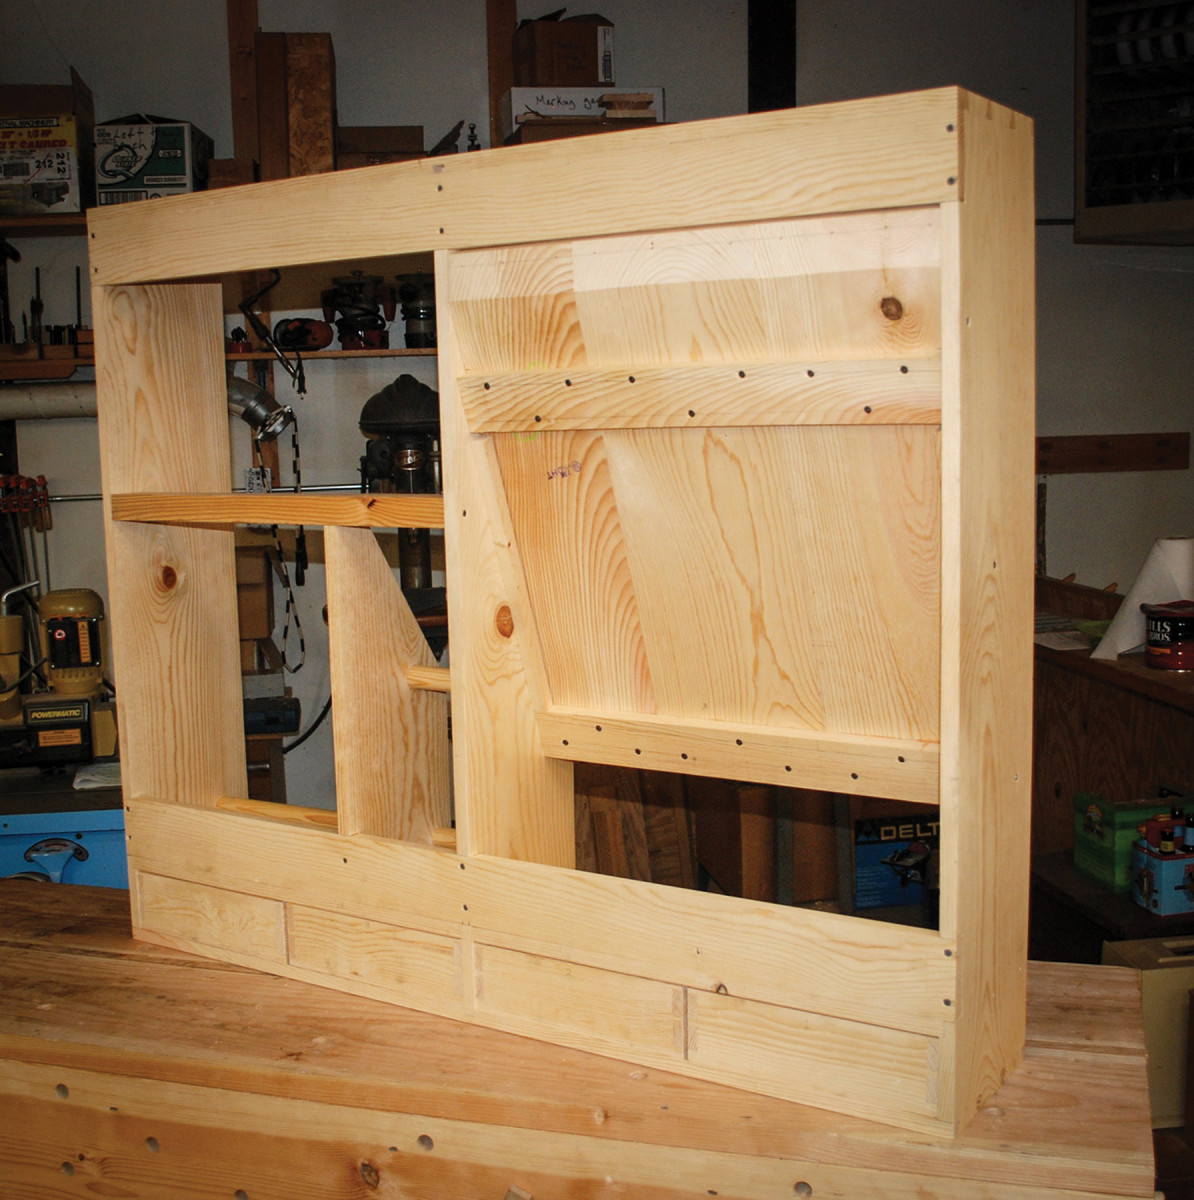
This till holds 21 saws, the Stanley bench planes from No. 1 to No. 8 and a half-set of hollows and rounds. It has four drawers to store parts and sharpening equipment, saw sets, files and the like. I hang my saw vise from a nail in the side.
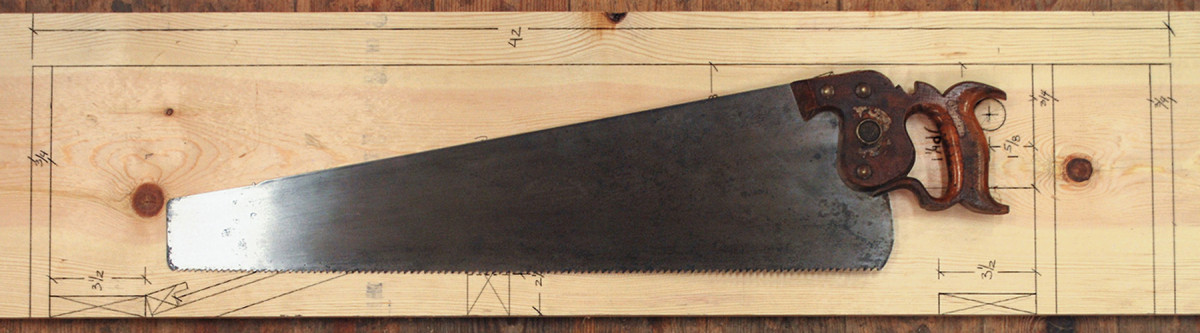
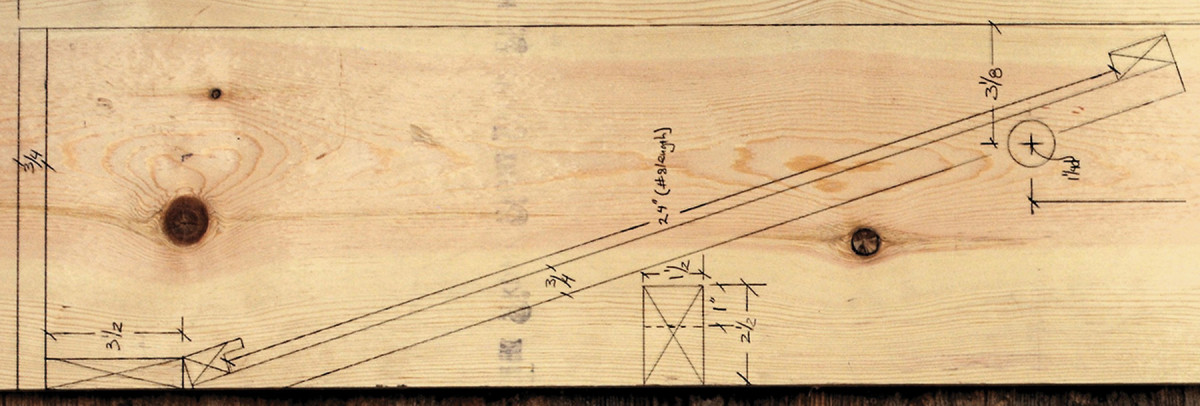
All in one. I used the same board to lay out dimensions for both the saws and planes – it’s easy to tell them apart.
You can build just the saw till or the plane till, or combine them as we did. Feel free to make it wider or narrower as your needs dictate.
You can also omit the drawers. Be sure to leave “room for growing” like my mother did when she bought me clothes and shoes when I was a boy.
Made to Fit
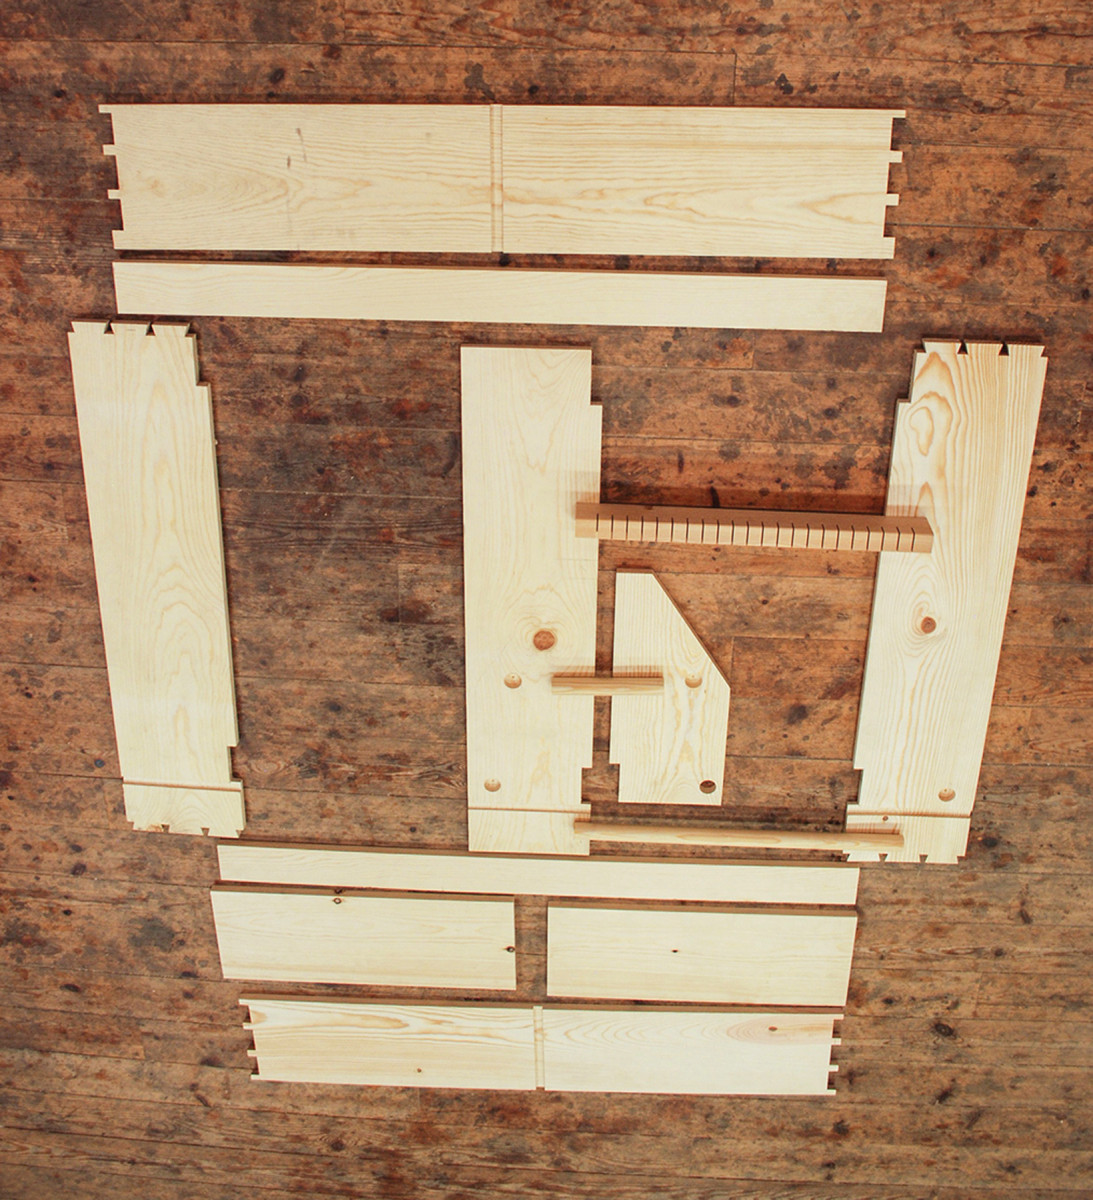
Assembly required. This exploded view of the till’s components shows the blind holes for the support rods, the dados and the saw separator.
We decided on lumberyard pine for our project. At first, Tod thought it was “curly pine” but then he realized it was just knife marks from the planer. We used 1×10 material, which made the case 95⁄16” deep after assembly.
I started by placing my longest saw on a board and marking the location of the dowel the totes would rest on, as well as where I thought the slotted separator that holds the sawplates should go.
From panel saw to half-rip to miter saw, I placed several saws on the drawing to ensure the placement worked for most saws. I did the same for the location of a higher dowel to hold shorter backsaws.
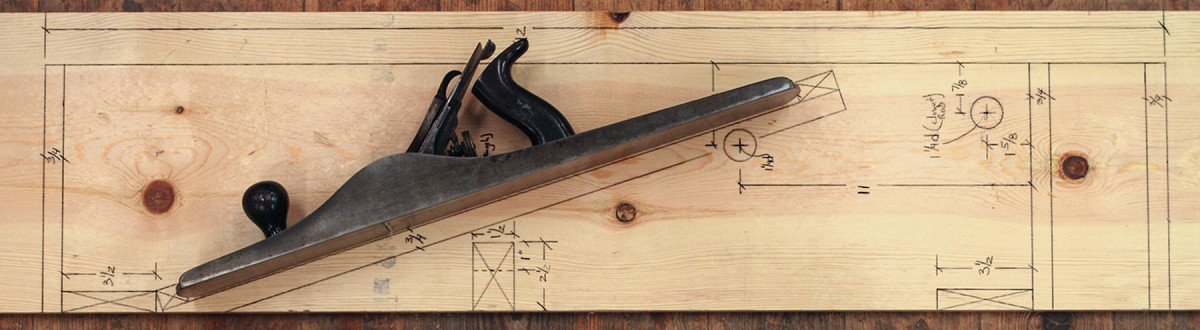
I used my longest plane to set the length of the plane till and work out the location of the rabbeted top cleat and the bottom cleat that the planes rest on.
I drew everything on the same board as the parts for the plane till are easy to tell from the parts for the saw till.
The outer case is joined with through-dovetails and dadoed for the shelves and divider.
Saw Till Cut List
No.ItemDimensions (inches)Material
t w l
❏ 2 Sides 3⁄4 x 9 5⁄16 x 42 Pine
❏ 1 Divider 3⁄4 x 9 5⁄16 x 41 Pine
❏ 1 Top 3⁄4 x 9 5⁄16 x 50 Pine
❏ 1 Bottom 3⁄4 x 9 5⁄16 x 50 Pine
❏ 2 Hanging cleats 3⁄4 x 3 1⁄2 x 50 Pine
❏ 1 Dowel 1 1⁄4 dia. x 24 7⁄8 Closet rod
❏ 1 Dowel 1 1⁄4 dia x 8 Closet rod
❏ 1 Saw separator* 1 1⁄2 x 2 1⁄2 x 23 7⁄8 Pine
❏ 1 Rod support 3⁄4 x 9 5⁄16 x 19 5⁄8 Pine
❏ 2 Shelves 3⁄4 x 9 5⁄16 x 24 1⁄4 Pine
❏ 1 Plane till panel 3⁄4 x 23 7⁄8 x 26 9⁄16 Pine
❏ 2 Plane till cleats** 3⁄4 x 1 1⁄2 x 23 7⁄8 Pine
❏ 2 Plane till battens 3⁄4 x 2 3⁄4 x 23 7⁄8 Pine
❏ 8 or 9 Plane dividers 1⁄2 x 1⁄2 x 24 Pine
❏ 4 Drawer fronts 3⁄4 x 3 1⁄4 x 11 5⁄8 Pine
❏ 8 Drawer sides 1⁄2 x 3 x 8 5⁄16 Pine
❏ 4 Drawer backs 1⁄2 x 3 x 11 5⁄8 Pine
❏ 4 Drawer bottoms 1⁄4 x 8 5⁄16 x 11 5⁄8 Pine
*1″ notches, 1⁄8” wide, spaced 1″ apart; **One cleat has a 1⁄2” x 1⁄2” rabbet.
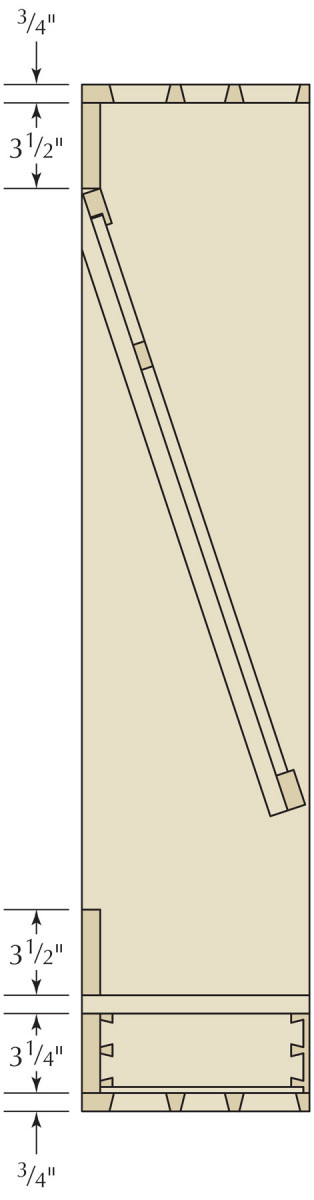
Left Profile section
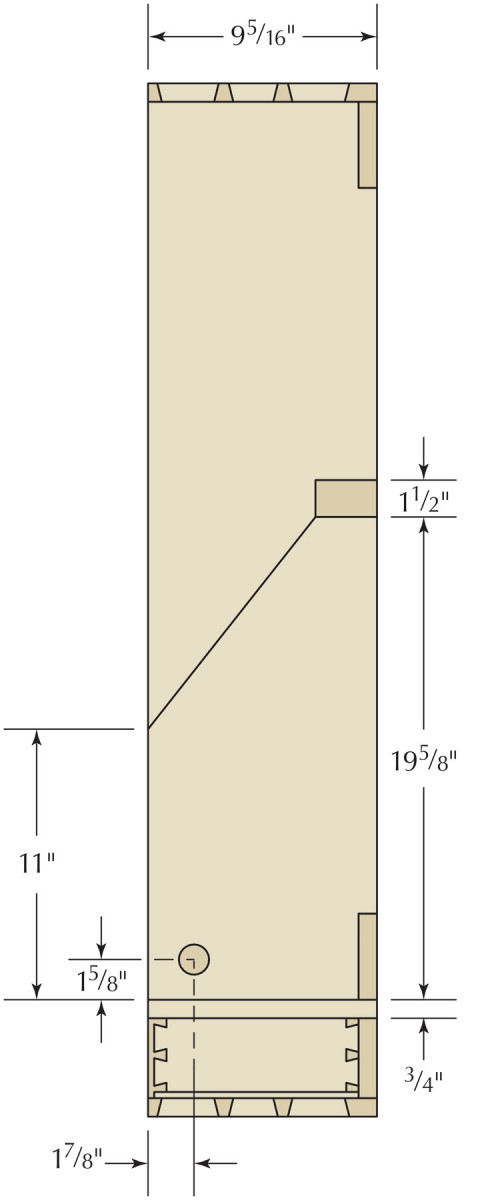
Right Profile section
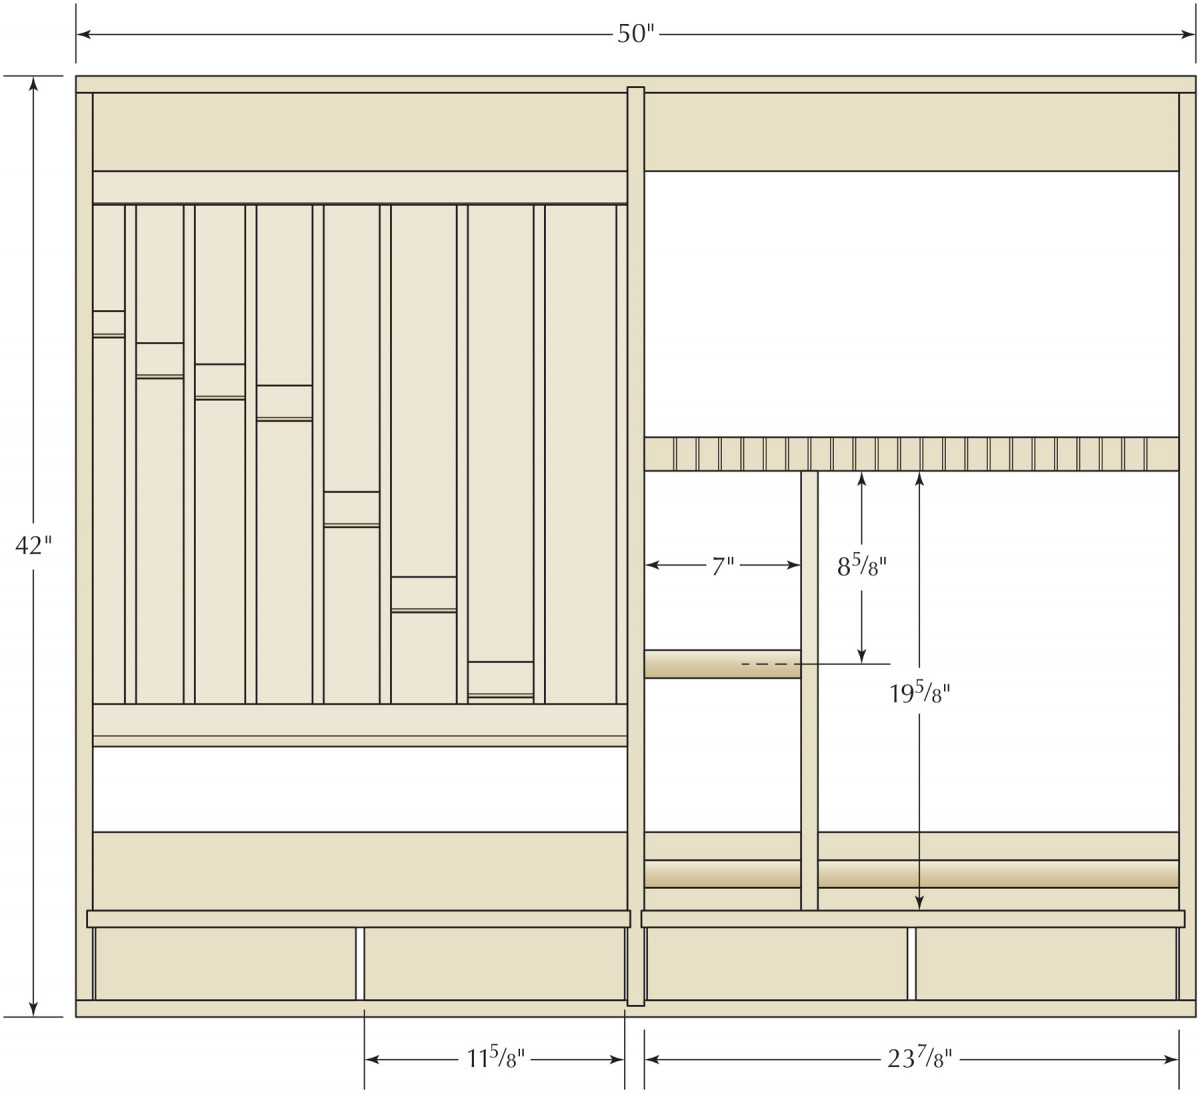
Elevation
Start Cutting
Once you are sure of your dimensions, cut your outside pieces to length.
Using a saw, chisel and router plane, Minion Tod and I cut 1⁄4“-deep dados in the sides, top and bottom. Then we cut 1⁄8“-deep dados in either side of the center divider to hold the shelf pieces.
Cut the vertical rod support piece that will hold the short dowel rod and notch it for a hanging cleat. Make the same notches on the two ends and the center divider. When I hang a case like this, I just screw through the cleats and into the wall, but you could add a French cleat if you go for that sort of thing.
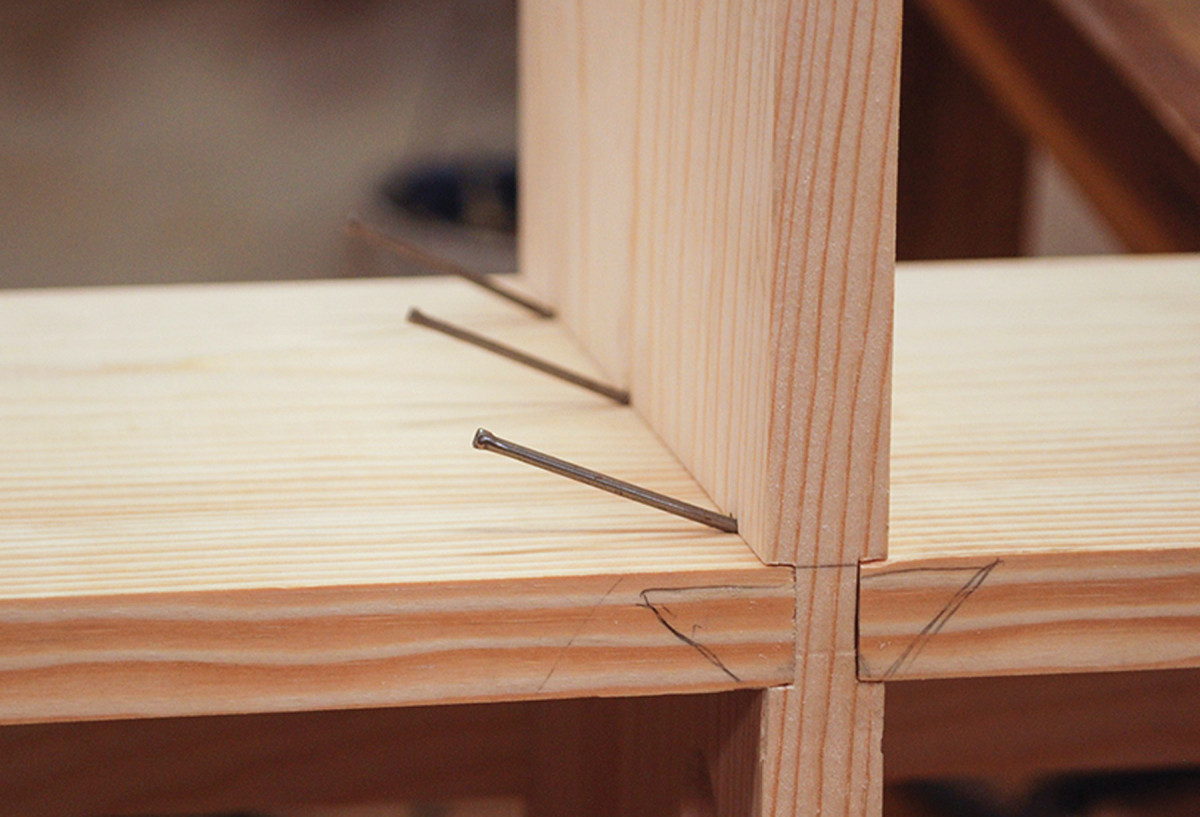
Now cut the dovetails, but be sure to remember the 3⁄4” x 31⁄2” notch for the hanging cleat when you lay out the dovetails at the top. The pins for the dovetails should be on the top and bottom boards for easier assembly.
Now bore the holes for the dowels that will hold the saw handles. Lay out and drill 1 1⁄4“-diameter blind holes 1⁄2” deep in the divider, case side and rod support piece for the long dowel. Then, drill a through-hole in the rod support for the long dowel.
Cut the long dowel to length (it should be 1″ longer than the opening.) Cut the two hanging cleats to length (they should be the width of the case).
Sand the inside of the case to clean it up a bit, and you are ready to assemble. And go wash your hands – you don’t want to dirty up your sanded parts.
Get it Together
Playing the angles. One shelf is fastened with nails driven through the dado. For the other side, drive the nails in at an angle from the opposite side.
Begin assembly by inserting one of the shelves into the dado in the center divider and drive a 6d nail through the opposite side of the dado. Insert the other shelf and fasten it with a 6d finishing nail driven from the bottom face of the first shelf. Angle the nails and set them with a nail set.
Center and attach the bottom cleat to the shelves with 8d nails driven from the bottom face of the shelf into the cleat. Then drive a 2″ screw into the divider from the back of the cleat.
Center and nail the top cleat to the back edge of the top with 8d nails. Make sure you nail through the upper face of the top piece, or your dovetail pins and dado will be in the wrong orientation.
Insert the center divider into the dado in the top and screw the top to the divider with 1 5⁄8” screws. Using 2″ screws, attach the cleat to the divider. Insert the center divider into the dado in the bottom board and attach it with 1 5⁄8” screws.
Slide the long rod through the rod support and insert the dowel into the lower blind hole in the center divider.
Apply glue to your dovetails and fit the ends to the top and bottom, making sure the rod goes into its blind hole and the shelf into its dado. Screw the side to the shelf with 15⁄8” screws. Drive 2″ screws through the hanging cleats into the sides. Square up the case and let the glue dry.
Saw Separator
Holding power. The cleats at the top and bottom run the full width of the case, fitting into notches on each side piece.
While the glue is drying, make the saw separator from a tight-grained 2×4. It should be the same length as the width of the opening it fits into.
Because saw handles are typically 7⁄8” thick, make the notches 1″ on center. The notches are 1⁄8” wide and 1″ deep. I used a powered miter saw for this because the blade cuts a 1⁄8“-wide kerf and has a depth stop.
Slide the rod support over to the divider and mark it at the top to locate the position of the saw separator; slide it over to the side and do the same.
Matched set. Use a single board for your drawer fronts to keep the grain matching across your till.
Place the separator where you want it, leaving the number of slots you think you will need on either side of the rod support. Attach the separator with a 2″ screw through the divider and the case side.
Measure and cut your short rod to 1″ longer than the opening (because the blind holes are 1⁄2” deep). We used 8″, giving us a 7″ opening for Tod’s backsaws.
The rod support will center on a saw slot. To attach it, screw up through the shelf into the rod support and through the hanging cleat with a 2″ screw and down through the separator with a 3″ screw. If you decide to change the location of the rod support later, you can take out the screws and move it to where you want. You’ll need to make another short rod or cut off the short rod you have, depending on which way you move the rod support.
Take a step back and admire your work! Enjoy a cool beverage and look around your shop, put some things away and tidy up a bit; savor your life.
Enough of that, get back to work!
Nice Drawers
Drawer Detail. Drawer front rabbeted for drawer bottom. Drawer bottom glued & nailed to assembled drawer.
For your drawer fronts, pick a nice 3⁄4“-thick board the length of your case and the height of the drawer opening.
Cut four equal-sized drawer fronts from this board, allowing about 1⁄16” between the fronts in each opening. (After planing the sides there will be a bit more play.)
Keep your drawers in order so the grain will match along the fronts when the drawers are installed.
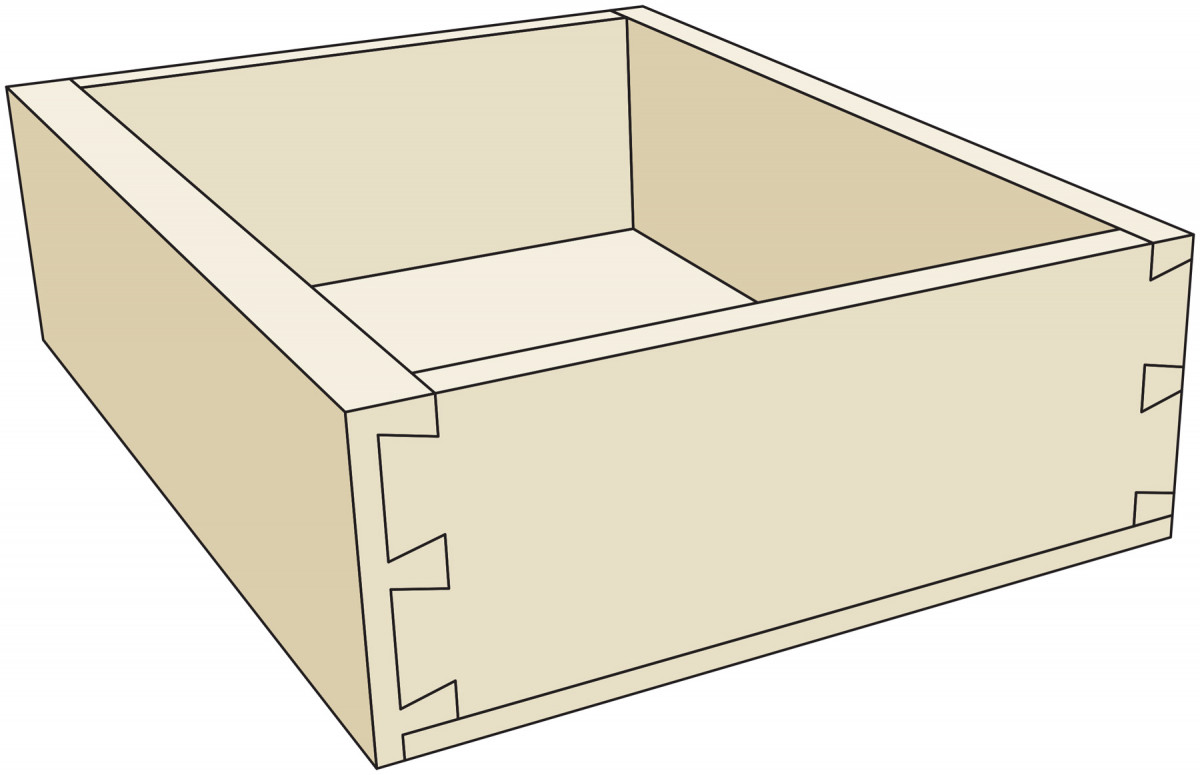
The drawers are dovetailed at the corners with the bottoms nailed on.
The sides and back of the drawers are 1⁄2“-thick material and are 1⁄4” narrower than the opening and your drawer fronts. The bottoms are 1⁄4” thick, the same length as the drawer front and 1⁄4” narrower than the total depth of the drawer.
The drawer backs are the same length as the front. Each drawer side is 1⁄4” less than the drawer depth.
We gang-cut the tails in the sides and cut half-blind dovetails in the fronts and through-dovetails in the back.
Cut a 1⁄2” by 1⁄4“-wide rabbet in the bottom back edge of the drawer front to receive the 1⁄4“-thick bottom. Glue and nail the bottoms on each drawer using 7⁄8” nails and setting the heads below the surface.
The grain in the bottom runs the same direction as the grain in the drawer front. Be sure to glue the front lip of the drawer to the bottom so it doesn’t break off.
After the glue dries, plane the sides to clean them up and fit them to the case. While you’re at it, plane to clean up the dovetails on the case.
The Right Order
Be sure to number your drawers so they will go back in the proper order. I like to use Roman numerals at the top edge of the drawer front.
A single chisel strike is a I; a double strike II; and so on. Look at a clock dial if you get stuck. (By the way, there are II kinds of people in the world: those who can read Roman numerals and those who can’t.)
The drawer stops and drawer guides are actually four nails. To make the drawer stops and guides, first drill pilot holes and drop an 8d headed nail that is snipped to about 11⁄4” long through the shelf next to the divider at the inside edge of the drawer at the front corner. Then make similar holes through the shelf next to the carcase sides.
Put the nails about 3⁄4” from the front edge and about 9⁄16” in from the verticals, where they will act as stops and rude guides for the drawers. To remove a drawer, just pull out the nail.
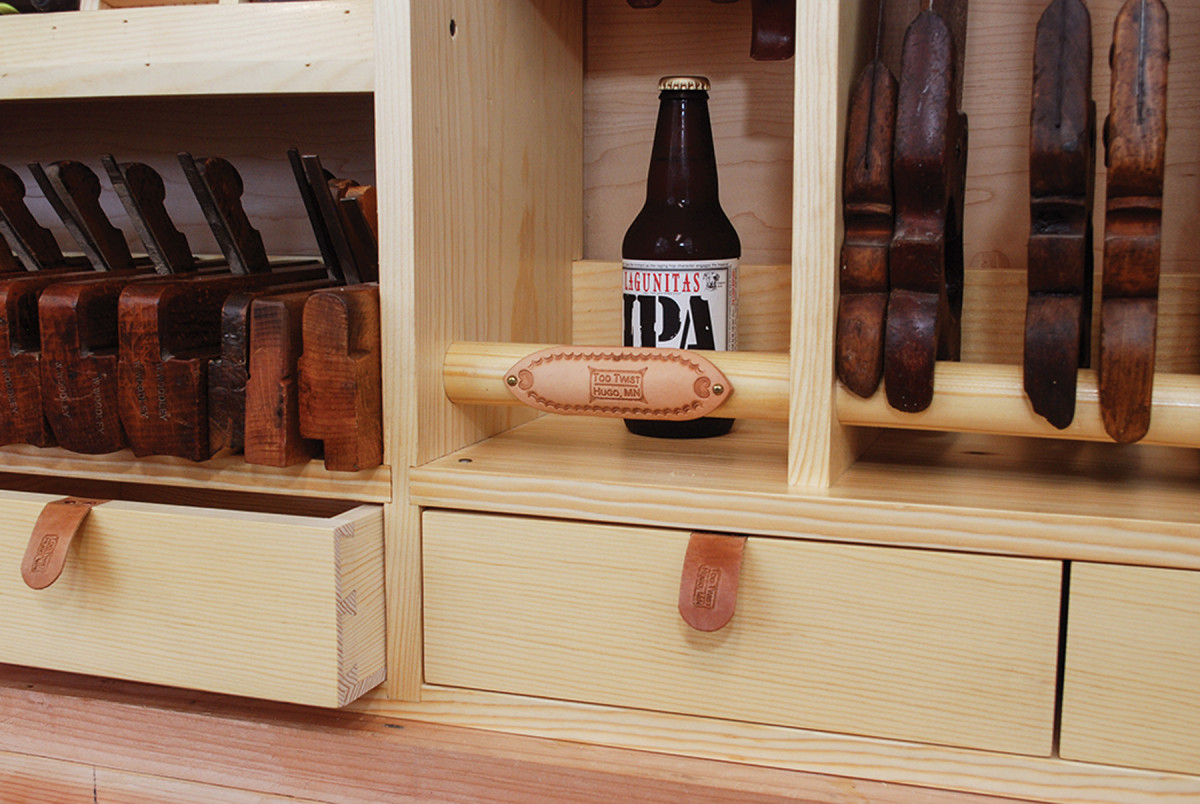
Tod is a leather worker, so he made leather pulls for his drawers and stamped them with his maker’s mark.
Plane Till
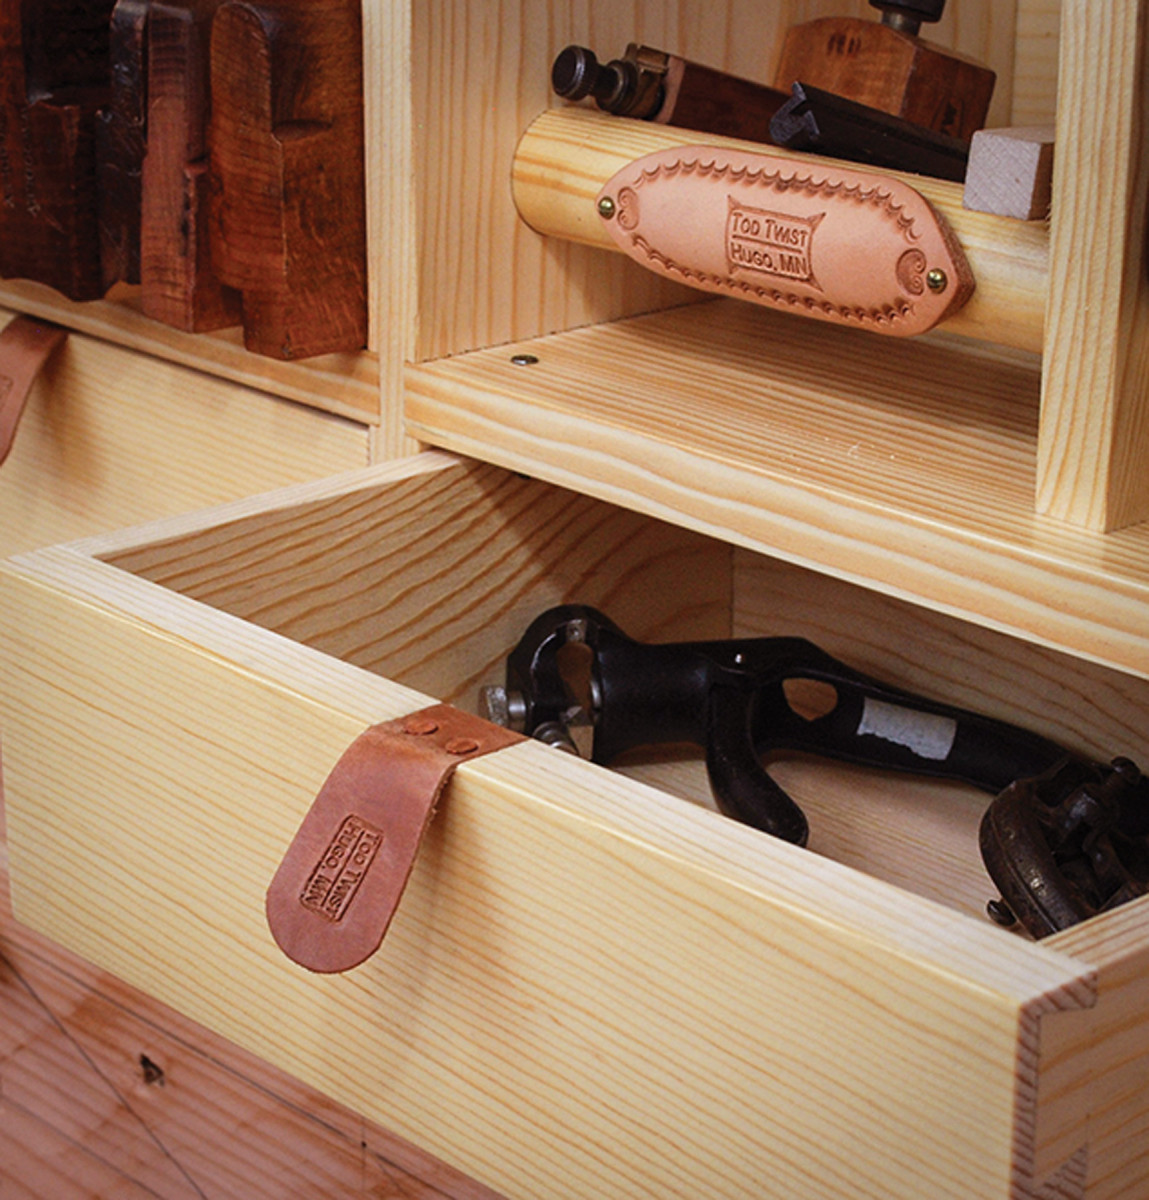
Organic form. Tod created leather pulls and stamps, complete with his mark, for this till – exercise your creativity and make your till your own.
Construct the plane till so it is the width of your opening and the length of the longest plane it will hold, plus 2 9⁄16“.
Refer to your drawing to see how much of an angle to put on the top back edge to create more clearance for the till.
Our plane till is just under 24″ wide after assembly, so we used three pine boards, 3⁄4” thick x 8″ wide. The boards could be splined or joined tongue-and-groove, but we just butted ours together without glue.
Attach the top notched cleat (1 1⁄2“x 3⁄4” with a 1⁄2” x 1⁄2” rabbet) in the corner of the front face with some glue and small nails. Orient it with the rabbet on the lower back of the cleat, giving the plane toes a convenient retention lip. Set your longest plane in place and attach the bottom front cleat in the same way, leaving about 1⁄16” to ease moving the plane in and out.
Lean back. Your drawing will help you determine the best angle for your plane till for both clearance and good looks.
Flip the panel over and attach the 2 3⁄4” x 3⁄4” back batten to the panel with 1 1⁄4” screws. The upper batten should be low enough that it doesn’t stick out past the back and contact the wall when installed. The bottom batten is nailed flush to the bottom edge.
Fit the plane till in place with its top against the top hanging cleat and the bottom just behind the cabinet’s front face. Mark around the ends with a pencil so you can locate your screw holes, then remove the panel.
Drill through the divider and the end inside the lines so the screws will go into the boards of the till. Three 2″ screws per side should be plenty, with one screw 2″ from each end and one in the center. You might need to move the screw locations around to avoid problems with saw till pieces on the other side of the divider.
Sticking Sticks

Ruler trick. A ruler and a few sticks are all you need to set the spacing between your planes.
Make up a batch of square sticks to use as dividers for your planes – the number depends on the level of your plane-buying problem. The sticks need to fit under the rabbet in the top cleat, so they will be just under 1⁄2” square.
Using small nails, attach one stick to each outside corner of the till.
Set your longest plane in place, then place a ruler between the plane body and the next stick, then attach the stick.
Repeat the process for your next plane, using the plane and ruler to set the width. Next, cut a 1 1⁄2” x 3⁄4” block the width of the spacing (a plane plus ruler thickness) and nail that block in place below your plane, leaving just a bit of room to ease removing and replacing the plane.
If you have wooden planes, make a taller rabbeted block for the top and screw it to the till.
All of this is easier to do if you lay the till on its back.
Our opening just happened to be the right width to put in each plane from No. 1 through No. 8 so it looked nice for the photo.
Almost Done
Give everything a light sanding and a coat of your favorite finish. We used clear shellac.
While the finish is drying, figure out how high the bottom of the cabinet should be from the floor
Cut two pieces of 2×4 to that length, then locate your studs. Get a helper and set your cabinet on the 2 x 4s, have your helper hold the cabinet against the wall so it can’t fall forward or move side to side. Drive 3″ to 4″ screws through the hanging cleat and into the studs.
After completing the till, we got the same question from several people. What goes in the space under the short backsaws? This is your own personal space, a place for your Chris Schwarz commemorative bobblehead from Woodworking in America 2004, first-aid supplies, your favorite emergency beer or just pile it full of marking gauges.
For me, it is a shrine for my St. Roy action figure complete with sharp tools and a wound that bleeds.
Plan: Download a free SketchUp Model of this project.
Here are some supplies and tools we find essential in our everyday work around the shop. We may receive a commission from sales referred by our links; however, we have carefully selected these products for their usefulness and quality.