


We may receive a commission when you use our affiliate links. However, this does not impact our recommendations.
Editor’s note: Read Part 1 by clicking here.
After deciding what was the right alignment between the top and the base, I looked for the best way to attach it to the base’s hooped apron. I knew that I needed to use hardware that would allow the top to expand and contract freely, but I also understood that whatever technique I chose, it would have to take into account the reality that the table’s base is already assembled.
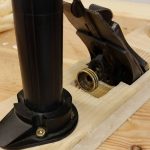
To connect the top I chose to use Tabletop Mounting Clamps from Lee Valley. These steel clips are inexpensive, yet very effective for this job. My challenge was to create four narrow mortises, located in the inner wall of the hooped apron, to allow the clips’ tongue to glide in and out as the tabletop expands and contracts during the year. Drilling most of the mortises with a 1/8” drill bit, then excavating the remaining fibers with a chisel seems to be impractical (and difficult) because the table’s base was already assembled. So, I decided to use my Rockwell Sonicrafter, which is an oscillating tool*, for this job. I first outlined the permiters of the mortises with a square and a cutting gauge, then I offered the tool’s blade to the wood and began to bore the mortise. True, I could have turned the base upside down on the floor and set a block underneath the mortise’s location to support the blade for a more accurate procedure, but I decided to take the risk and work freehand. After excavating two rows of wood, one above the other, I reached for my narrow chisel and pared the little wood fibers that remained. The results were OK and, since no one will see it, I was not worried too much.

A. I first outlined the parameters of the mortises with a square and a cutting gauge


B. Then I offered the tool’s blade to the wood and began to bore the mortise


Now, if you like this method and would like to incorporate it in your projects, I do recommend boring the mortises on the furniture components prior to assembling them. One easy way to do this is:

1. Clamp your part firmly on the bench.
 2. Tuck a spacer block, milled to match the distance between the lower line of the mortise and the edge of the part, in front of the mortise location.

3. Offer the blade of your oscillating tool to the part and start plunging in.

4. After you clear the first excavation line, place a shim on the spacer and repeat the above. This will allow you to precisely control the width of your mortises. Re-plunge to bore the mortise and finish the job. If needed, excavate the remaining fibers with a narrow chisel.


* Oscillating tools can be fitted with all kinds of accessories including saw blades of different widths. The one I used for the mortising job was a regular “Plunge Cut Blade.” (Recently, I discovered a new blade with a “Japanese” tooth pattern that I am very curious to try.)
Here are some supplies and tools we find essential in our everyday work around the shop. We may receive a commission from sales referred by our links; however, we have carefully selected these products for their usefulness and quality.


I use a biscuit jointer for this operation at a fraction of the time and risk for error of the method shown here. A slot bit on a router also works very well.
Not everyone has a biscuit joiner, but lots of us have some version of the oscillating tool. The method shown is a good way of putting its blade in the right places. Cutting the slots with just a chisel might work before assembling the apron, but probably would be awkward to do precisely when working sideways inside an assembled table top.
It appears to me if you needed to clean up the mortise with the chisel perhaps there was room to chop the mortise with the chisel. It seems problematic to setup the machine for the work. But if you did not have clearance to chop the mortise this was an option. I have experienced a similar issue on a repair where there was no room to chop the mortise so you need to be creative.
Ray.
Looks like a good job for a biscuit joiner.