


We may receive a commission when you use our affiliate links. However, this does not impact our recommendations.

Tricky joint; simple jig. Three pieces of plywood are all you need to cut a housed sliding dovetail socket.
Improve your router techniques with these four simple, shop-made router jigs that are easy to use and just as easy to build.
I’m a power-tool woodworker. Sure I use hand tools for some parts of furniture building, specifically when cutting dovetails. But I doubt you’ll ever catch me with a Bridge City Tool Works VP-60, Veritas router plane or a Lie-Nielsen shoulder plane if I’m trying to complete a project quickly. It’s just not my thing. The jobs completed with those tools, I accomplish with my router and a router jig.
The next time you venture into your shop to work on a project, take a survey of what’s stacked around your shop. I’ll bet you have the material to create a boatload of simple, useful jigs that, when combined with your router, will increase your woodworking abilities. The routing techniques shown in this article are a combination of the correct router bits along with dirt-simple jigs made from leftover pieces from other projects, such as scraps and plywood.
Also read: Check out a list of some of the author’s most-used router bits.
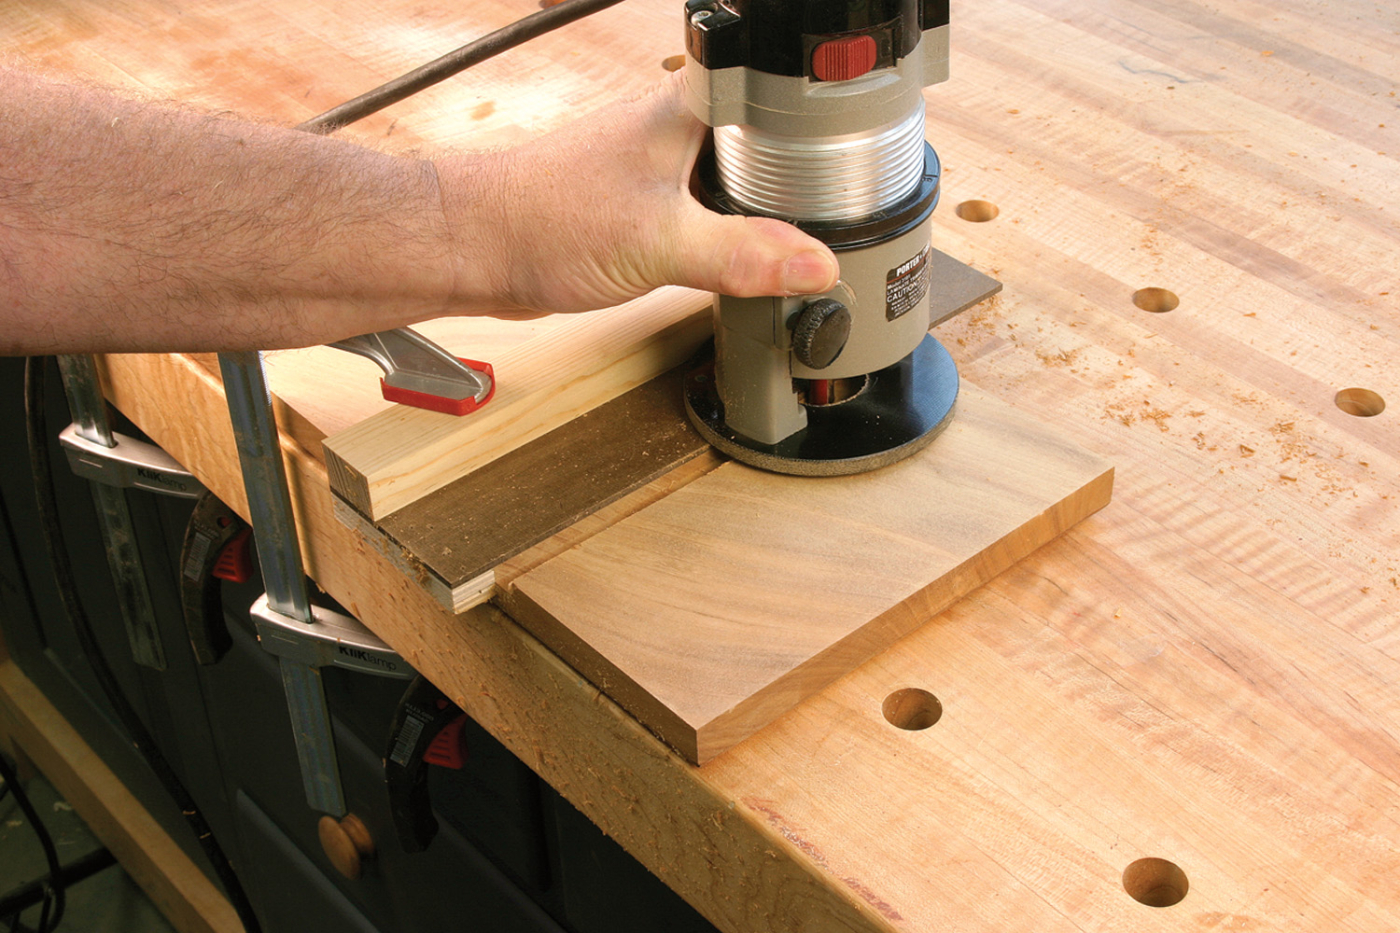
A Square-platform Jig
We all know you can guide your router by placing the router’s base against an edge to make a straight cut, but who wants to calculate the offset of the base each time you go to use it or struggle with clamping requirements? If you use my favorite router jig along with a pattern bit, you have a setup that is a multi-tasker and is as easy as can be to position for accuracy.
That jig I call a square-platform jig. To make the jig, start with two pieces of plywood cut to the same size. Attach the two with glue and a few brads (keep the brads away from the edges), then add a third piece to the front edge to act as a lip – similar to a bench hook – and the jig is ready for work. The key is to keep the edges of the jig straight and square with that third piece, which I call a catch rail.
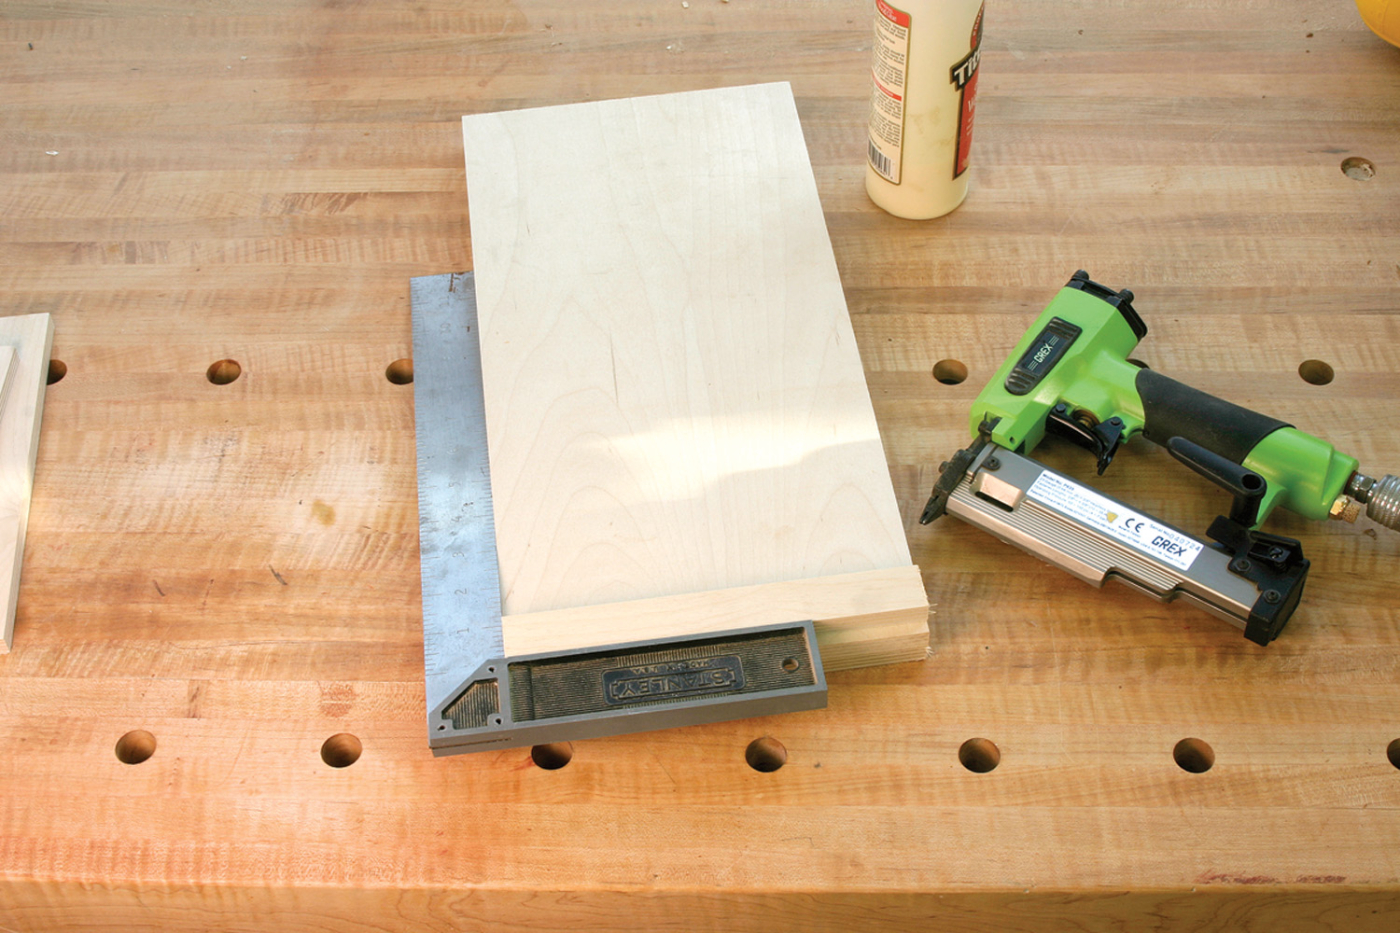
Keep it square. The key to this jig is to keep the edges perfectly square with the catch rail that is attached to the bottom face of the jig. Glue and brads are the joining force.
This jig is best when used for cutting dados for shelves or for creating a dovetailed socket for drawer dividers. Due to its usefulness, I have more than a few of these jigs in my shop made in different sizes and thicknesses for different techniques and for use with different router bits, but my favorite setup is a 1″-thick jig (two pieces of 1/2″ plywood). This thickness is perfect for working with a 3/4″-diameter, top-mount bearing router bit with a 1″ cutting length.
The greatest thing about this jig is the ease of clamping. No longer is it necessary to use more than a single clamp. One clamp holds the jig to the workpiece and does not allow any movement of the jig. When a clamp is positioned at the lower left-hand corner of the jig as shown in the photo below, the jig cannot move away from the workpiece due to the clamp. And the jig cannot slip to the left because the front piece acts as a catch. As long as the clamp is secure, no amount of force will allow a shift in the jig. This makes it easy to clamp and quick to adjust from one work area to the next.
Quick and secure. The design of the platform jig allows a single clamp to hold the jig in place. This allows the jig to move to the next layout line quickly. Once the clamp is tight, it’s all but impossible to slide the jig in either direction.
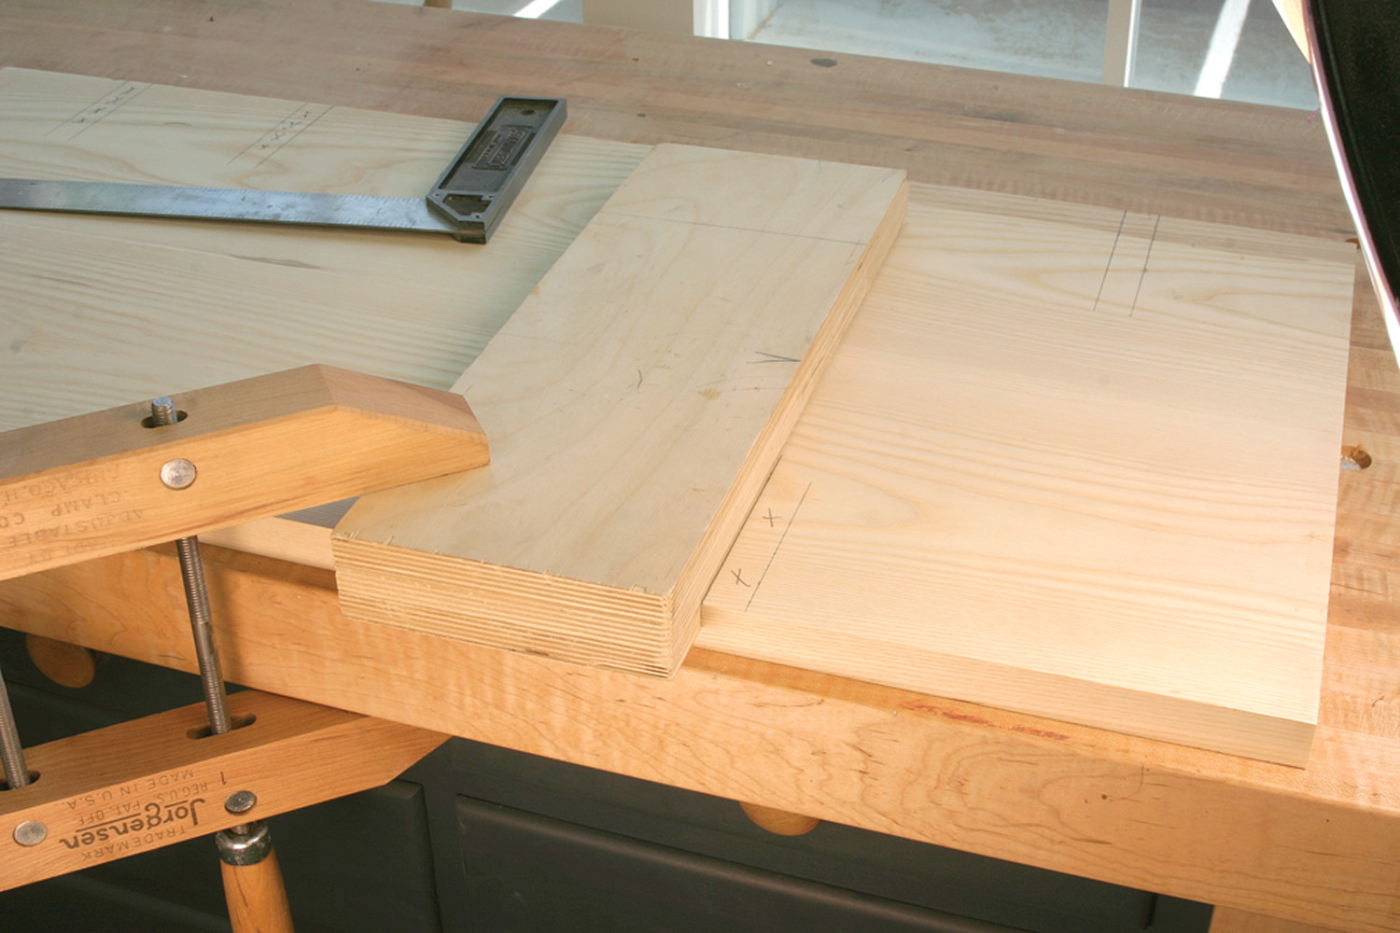
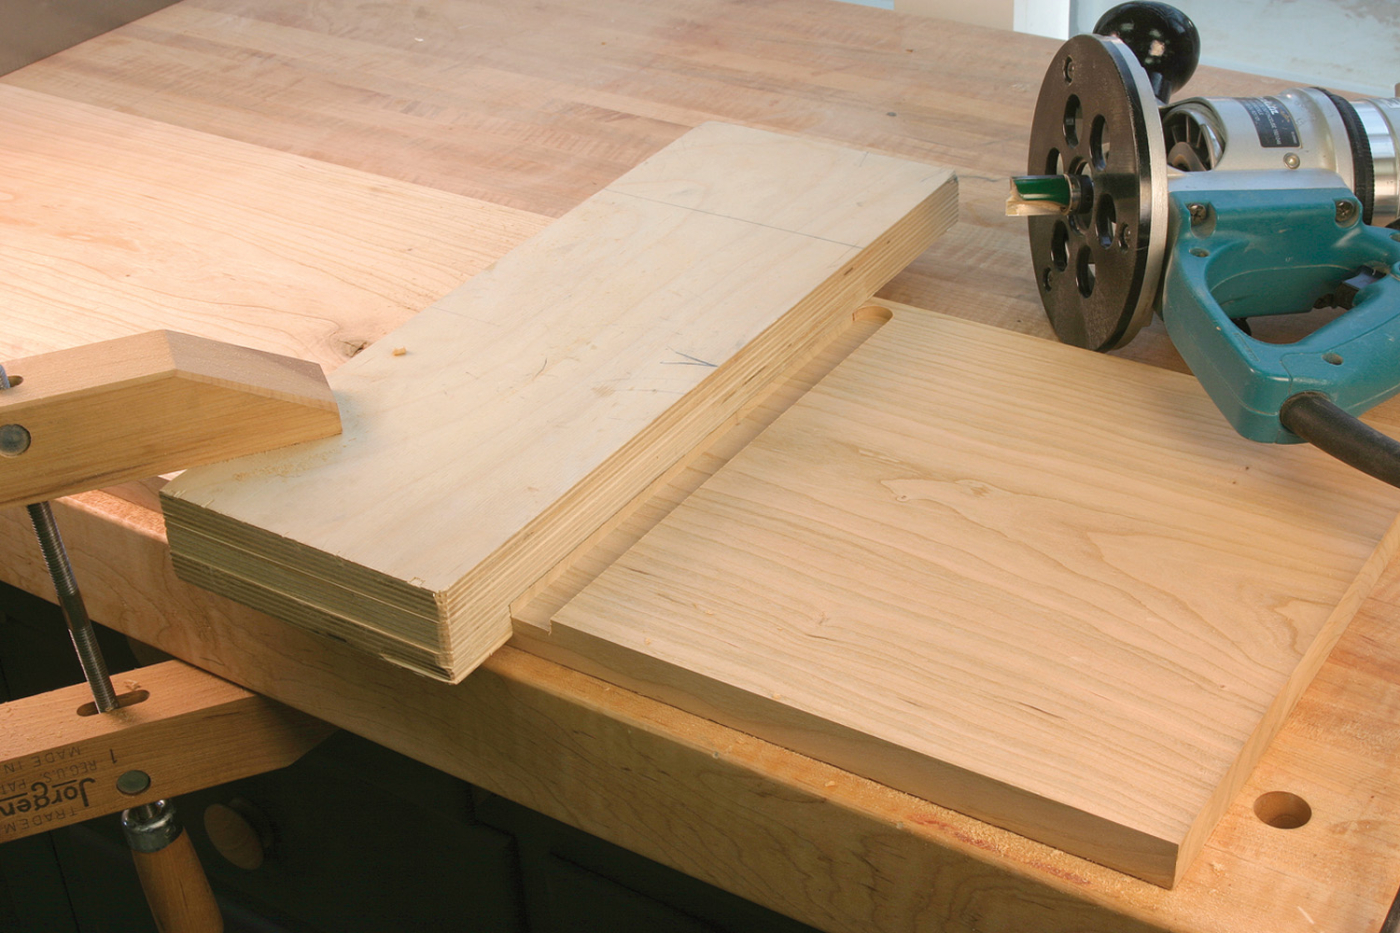
To use this jig, do any layout work, then slide the jig into position, always aligning the jig to the left of the work area because the normal operation of a router pushes the tool to the left (if the jig were set to the right of the work area, it would be a struggle to hold the router firmly against the jig in use). Next, add a clamp keeping a clear path for your router base and allow the pattern-bit bearing to ride along the edge of the jig. With this setup, wherever the jig is, the router bit follows.
Use the Same Jig for Dados
I began using this jig due to the ghastly dado bottoms produced by my older dado stack. My stack had exterior blades that were slightly higher than the chippers and this caused an unwelcome profile at the bottom of the dado. When bookcase shelves were routed through, that shape showed – and it wasn’t pretty.
Because most bookcase units I built were 12″ or less in depth, I made my first platform jig 16″ long. At that length, the jig stretched across the entire width of the sides and created a dado in a single pass. To make the cut, allow the router base to sit on top of the jig while the bearing rolls against the jig’s edge. Use a pattern-routing bit that is 3/4″ in diameter and the resulting cut is exactly 3/4″ wide with a bottom that’s flat. There is no ghastly profile to try and hide. Cut one dado or 100 dados and the results are the same – predictable and accurate.
One-pass dado. The correct router bit along with this jig provides a simple and quick method for cutting dados that are through, or simply stop before reaching the end of the workpiece to create a stopped dado.
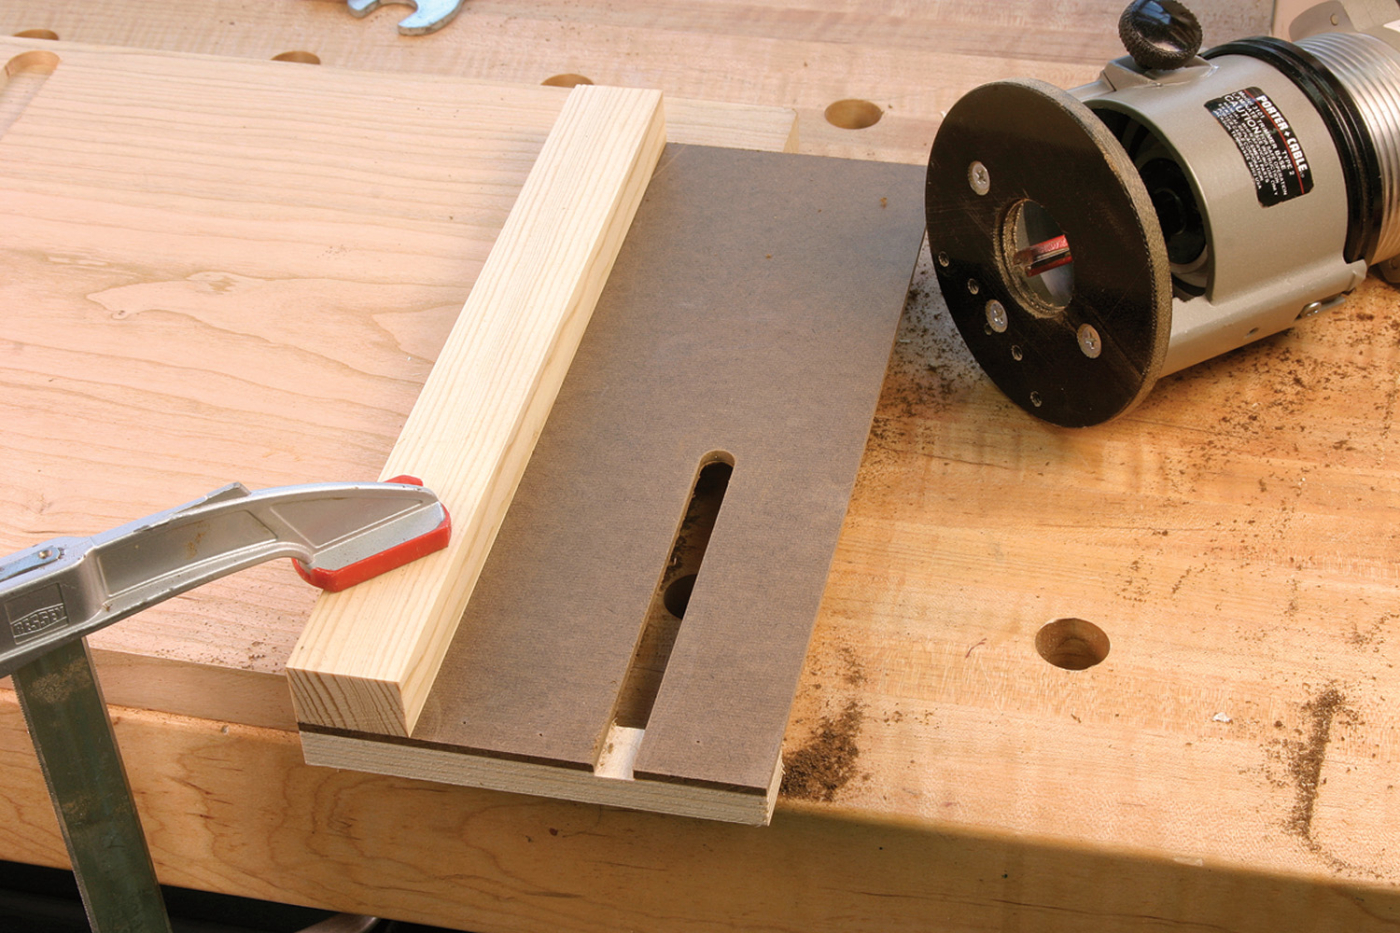
Perfect Sliding Dovetails
Having so much success creating dados with this jig, I wondered what other operations I could make easier by using this setup. One area that came to mind was drawer dividers. Most chests I build use sliding dovetails for joining dividers to the case sides. How could I adapt this jig?
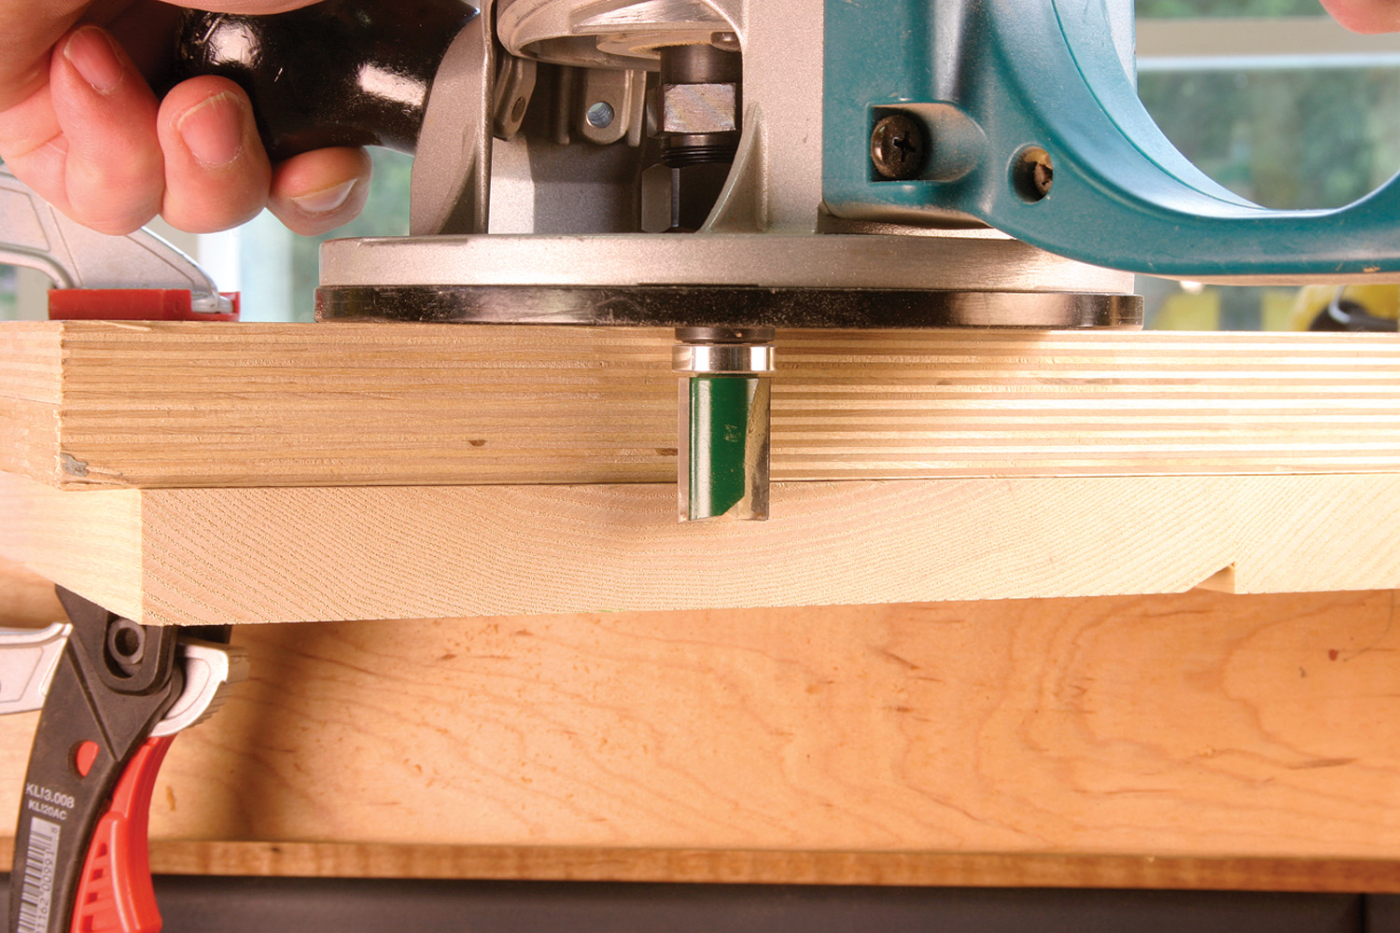
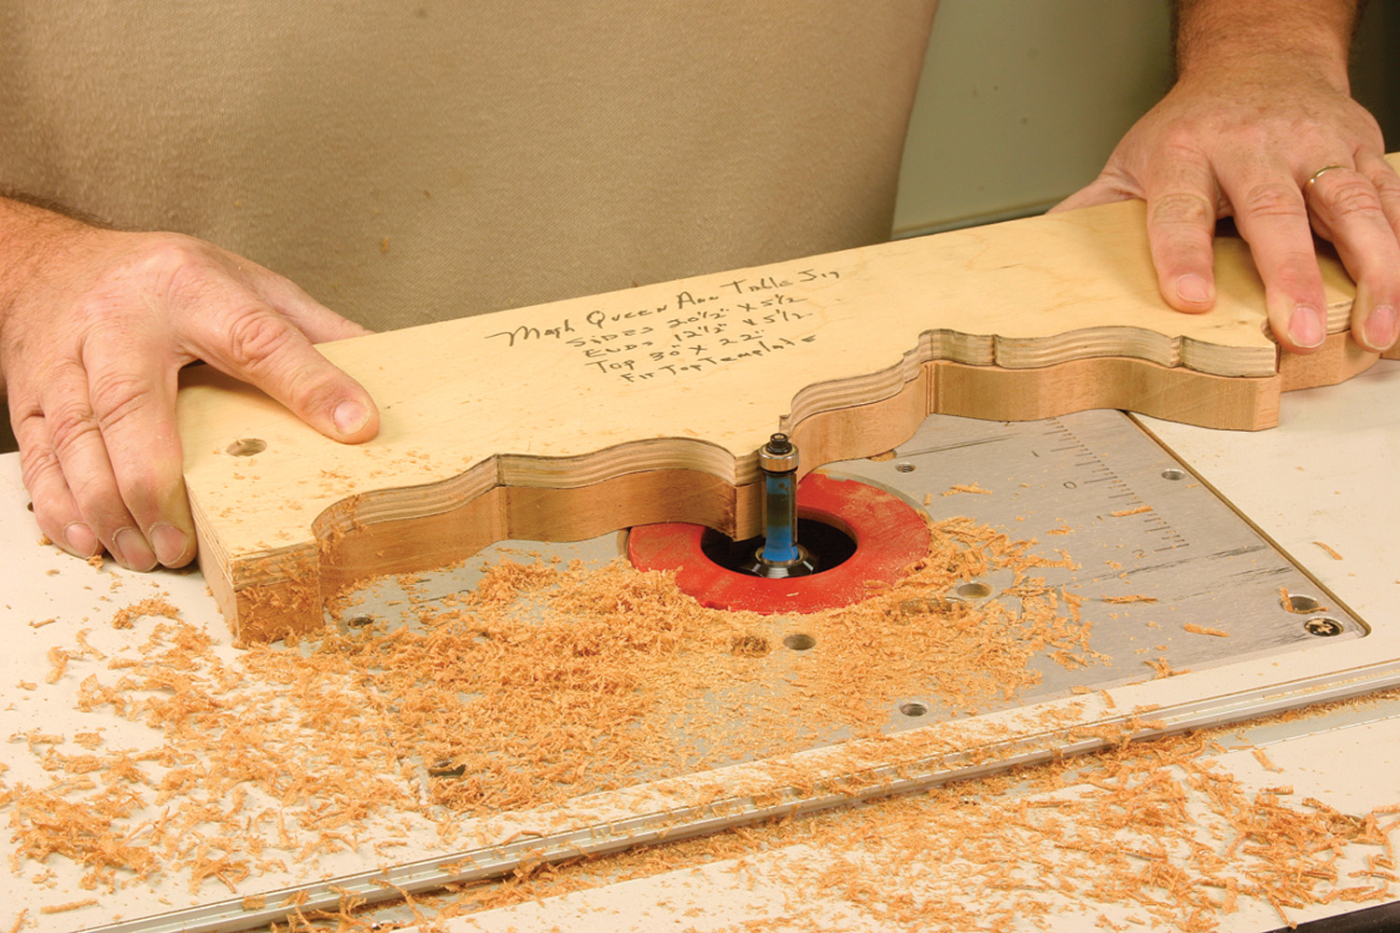
What I discovered was that I had to change the router setup, not the jig. I typically use a 3/4″ dovetail bit when cutting the socket for my dividers, but I didn’t have a bearing to ride against the jig. I had tried bearings on dovetail bits, but I wasn’t satisfied with the results. So I turned to a 3/4″ outside-diameter bushing. You might think it’s impossible to use a 3/4″-diameter dovetail router bit with a 3/4″ outside-diameter bushing, but if the bit extends below the bushing (aim for at least a 1/2″-deep socket into the case sides), everything works perfectly.
Again, simply align the jig with your layout marks, add a clamp, then cut the dovetail socket into your workpiece. Cut into the case side to the width of your divider and you’re golden. This creates a perfect sliding-dovetail socket, and it’s a simple move from a completed socket to the next socket area. Additionally, remember to use the same router bit to create the male part of the joint. The second half of this operation is completed at a router table. No guesswork needed. Once built, the jig is a snap to align with layout lines; hit the mark every time.
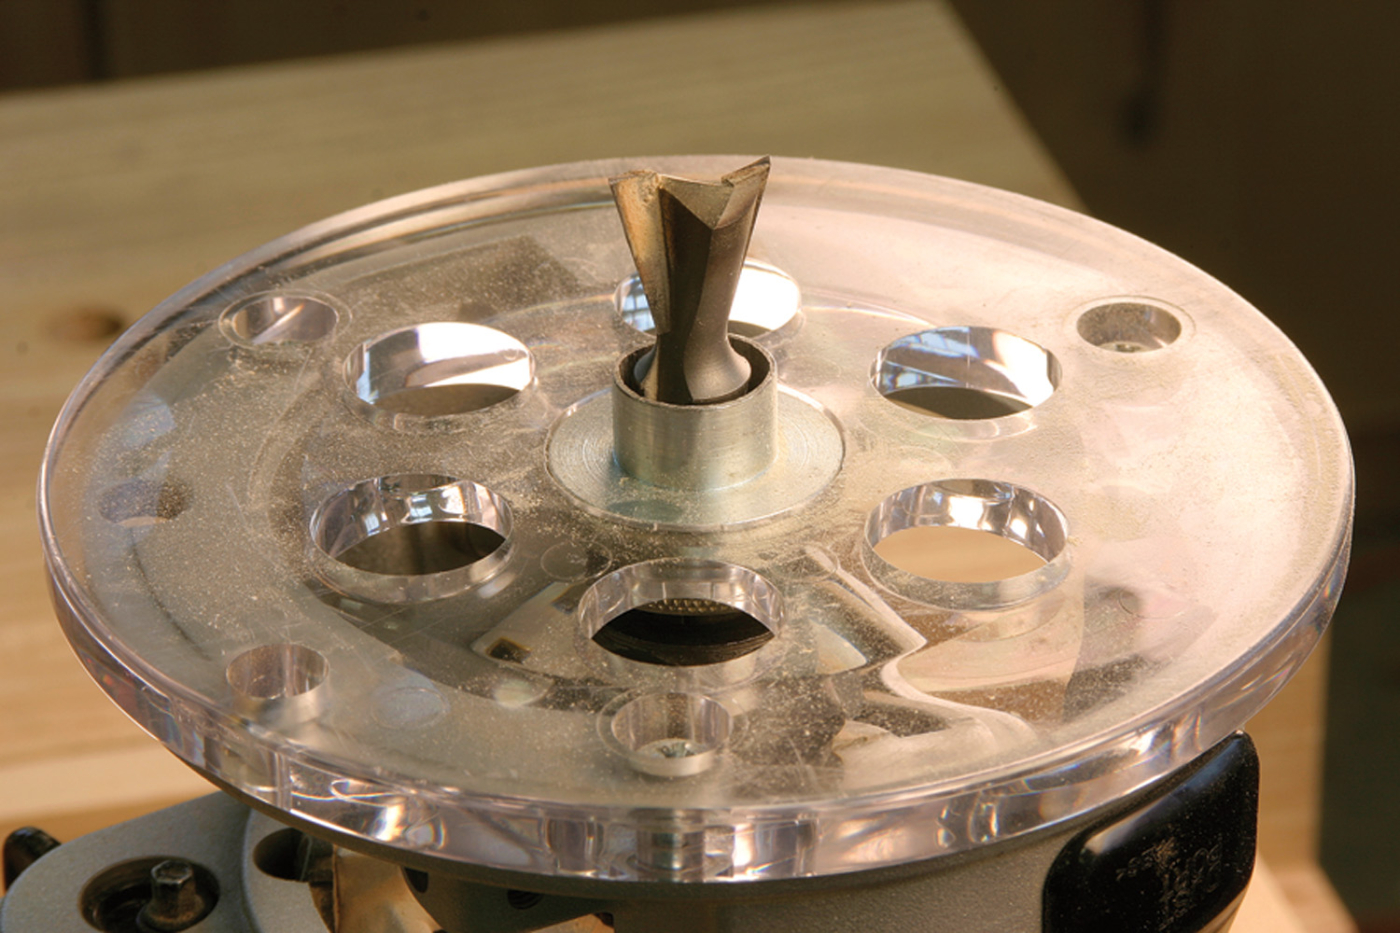
Designed to fit. The equal width of the bushing and the widest portion of the dovetail bit is what makes this setup work. The dovetail bit cuts exactly to the outside edge of the bushing. As the bushing travels the edge of the jig, the dovetail slot is perfectly aligned.
If you’re wondering about hogging out the waste with a straight bit prior to cutting with a dovetail bit, I seldom, if ever, take the time to work this way. My router bits are sharp and able to make this cut without difficulty. If this extra step is important to you, I would mount a 3/4″ bearing on a 1/2″ straight bit so I was always registering off the jig.
How about housed dovetail sockets? The beauty of this jig is that you simply make a first pass with the 3/4″ pattern bit to make the shallow dado. Then follow up with the dovetail bit in a second router, as shown in the opening photo of this article. The entire operation is completed with one clamping setup.
Also, here’s a tip: Create the dovetail slots while your case sides are wider than the final dimension by 1/8″. Once the joinery is complete, trim the extra material from the edges to leave a clean front edge.
Are you wondering why I suggested you keep the brads located away from the edges of the jig? When you nick the jig’s edge – and you will ding it with your router bit spinning – you can simply take a pass at the jointer to straighten the jig’s edge.
A Simple Jig for Smaller Router Bits
Another jig I use, which is not far from the design of the platform jig, is based off of a circular saw guide’s jig. When using those saw guides, the base of the saw rides on top of the guide while the blade cuts at the edge. This setup is great for aligning the guide to the cut line. I adapted this idea to use with my small router bits in lieu of guide bushings or bearings. It works great for plowing small grooves or dados such as when routing out cubbyhole dividers in desk interiors.
Constructing jigs such as these is simple. Here, too, I have a few scattered about the shop that work with specific router bits. I even take the time to label each jig so I know with which bits it works. Begin with a piece of 1⁄8″ tempered hardboard or 1⁄4″ plywood that’s about 5″ wide and 10″ or so long. Next, add a piece of 3⁄4″ material along one edge of the plywood to act as a fence. Add a front piece to this setup just as in the platform jigs – it’s important to keep the relationship of the front piece at an accurate 90 ° to the fence piece.
-
No bearing is no problem. Design this simple jig to have the base plate rub the fence as the cut is made. Make one for each router bit.
No guesswork needed. Once built, the jig is a snap to align with layout lines; hit the mark every time.
To complete the building of the jig, install a router bit into the router, set the depth of cut to a bit stronger than the hardboard or plywood, then with the router base running against the fence, make a cut. The newly created edge is the exact cutline of the router bit and aligning this jig is as easy as clamping to your layout lines.
A Simple Straightedge Jig
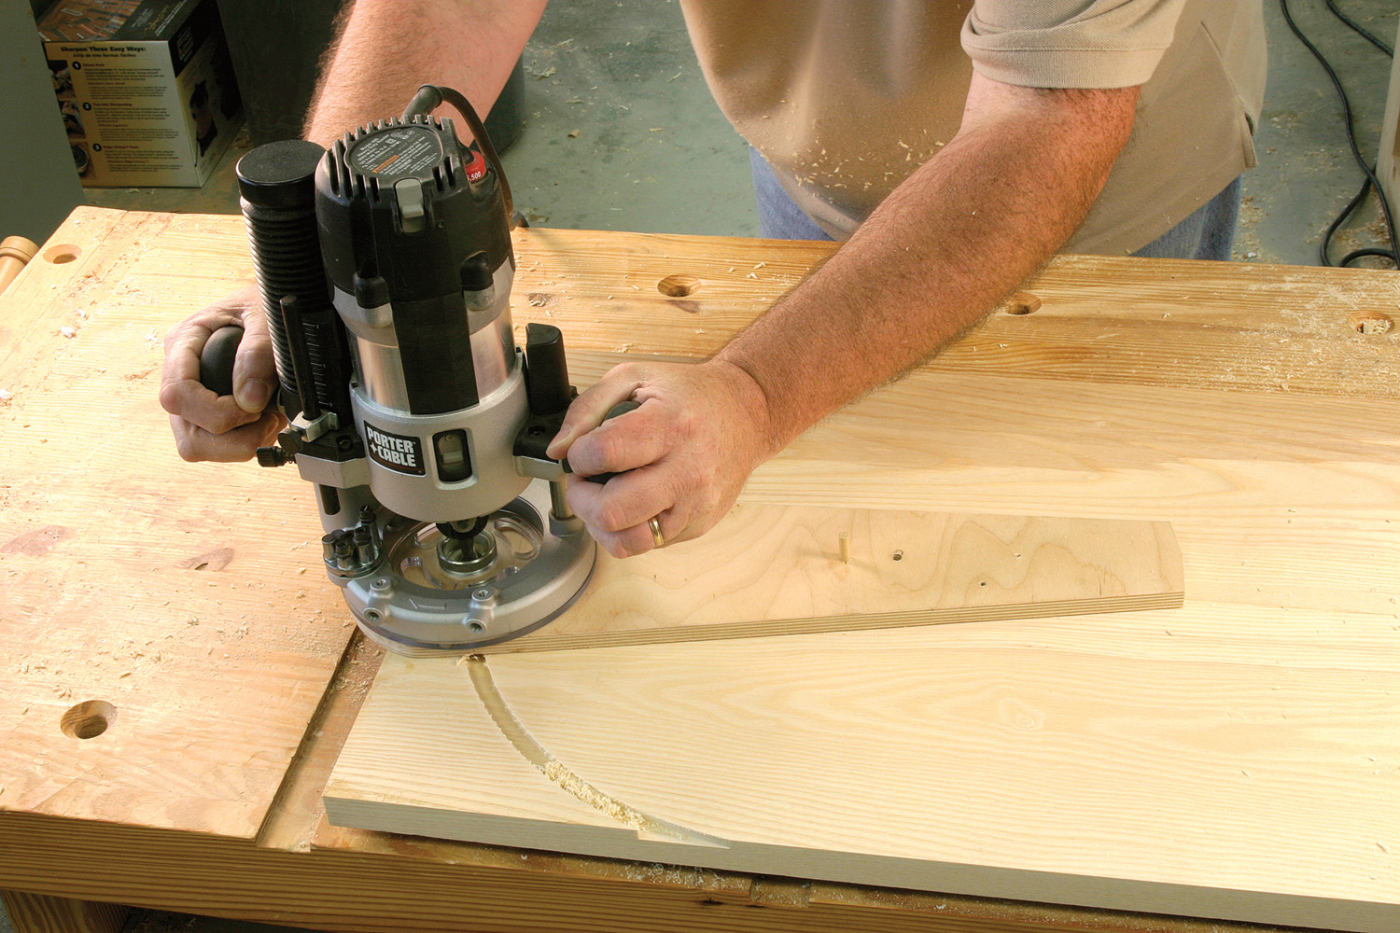
Not all the best shop-made jigs are pieces of plywood arranged in some design. One of the most useful jigs is simply a straight piece of stock or two pieces stacked together, what I call a straightedge jig. There are a couple operations where these shine. One use is for simple straight cuts on pieces too large or too awkward to hoist onto the table saw. A second use is to create a tenon for installing breadboard ends on a tabletop. Or, you can use this to create everyday, run-of-the-mill tenons.
Each of these operations works with a pattern bit; the depth of cut determines the layers of plywood needed for the jig. If I plan to create a smooth cut across an edge, a single thickness of plywood is best. This style of jig allows the standard pattern bit with a 1″ cutting length to extend completely through a 3/4″-thick workpiece while the bearing rubs the jig.

Ideal edge treatment. A pattern bit matched with a single layer of plywood is a perfect way to trim ends of wide panels or large tops. With the bearing running along the guide, a clean, straight cut is achieved.
For example, if I were trying to cut the angled slope on a case side of a slant-lid desk, it would be nearly impossible to hoist the panels up to a band saw, or to control a panel at a table saw. But trim close to the line with a jigsaw, clamp a plywood straightedge at the layout line, then make a pass using your router while the pattern bit rides smoothly along the guide. The completed cut is square and needs little sanding or smoothing before finish – it’s that smooth.
The same operation is perfect for squaring large panels, too. You know how hard it can be to trim a large top with a panel-cutting sled. Once you achieve parallel sides at a table saw, use a square to lay out one end cut, position a plywood straightedge at the layout line, clamp the jig in place and trim the end square. Repeat the same steps at the opposite end of the top.
I don’t like to perform this operation with a circular saw – as you may have seen done a number of times – due to the sometimes-wonky finish of the cut. It’s easier to sand a routed cut than that of a circular saw – but I will trim the end close with a jigsaw prior to routing.
Change the Thickness, Change the Cut
If you require a cut that’s not a through cut such as making a tenon, you will need to stick two pieces of plywood together because of the cutting length of the router bit. A single thickness of plywood is sometimes not thick enough to allow the bearing to ride against the guide without cutting into the workpiece too deeply. A second thickness of plywood remedies that problem. Now it’s possible for the bearing to ride the jig and set the depth of cut where needed.
I use this two-piece setup to create tenons on large panels or tabletops. I cut a 1-1/4″ long tenon to create a breadboard end (the 1/4″-thick tenon slides into a matching slot formed in the breadboard end). To do this, just set the two-thickness guide on your layout lines, adjust the depth of cut on the router, then waste away the excess from each face, leaving a tenon intact and centered. By using a pattern bit and plywood jig or guide, you clamp directly on your layout lines and go for it. That’s much easier than determining the offset for the router base.
-
Two layers for tenons. A second layer of plywood builds the jig to make it possible to rabbet the end. This is a great setup for the first step for breadboard ends.
More Work for a Pattern Bit
As you can tell, I use a pattern bit with plywood jigs for many operations. And bit diameter is not important. I use a 3/4″-diameter bit as well as a 1/2″-diameter router bit. Additionally, I use bits with either a top or bottom-mount bearing.
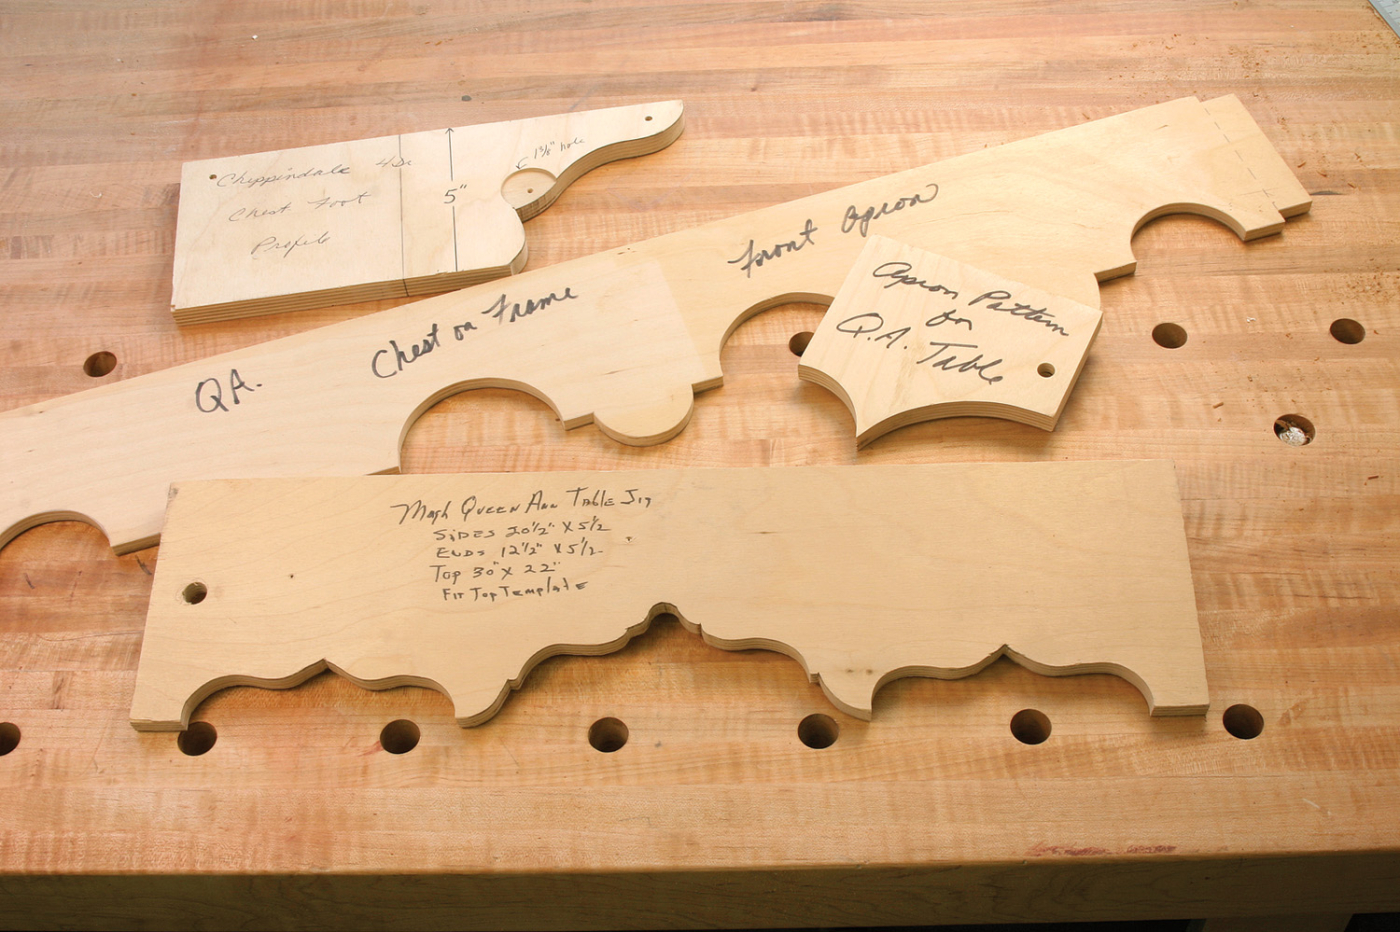
Until now we’ve primarily discussed work accomplished with straight jigs. However, plywood is also where I turn for intricate work with patterns. I’ve built quite a few tea tables over the years and the most fancy was a Massachusetts design with extremely scalloped aprons at both ends and sides.
Possibilities abound. Teaming plywood patterns with a pattern-routing bit opens the door to design and detail – and it makes repeatability achievable.
Instead of transferring the design onto each apron separately, I drew the design one time onto plywood – use a piece that’s 1/2″ thick at minimum – and used that to repeat the layout on each piece. But the plywood pattern did double duty. Not only could I use the piece to trace the pattern onto the aprons, I used the plywood and a pattern bit to cut the intricate design at a router table.
If you attach the plywood pattern on top of the workpiece, you’ll need a bottom-mount bearing, but a top-mount bearing is used if the pattern is positioned below the workpiece. As you make the jigs for this type of work, make sure to extend the ends of the pattern an extra inch or more to allow contact between the bit and pattern prior to cutting the work.
Fundamental pattern routing. A bottom-mount bearing follows the pattern as a smooth and accurate cut is made on the workpiece below.
There are a number of techniques where this setup works great other than table aprons. Before I added a spindle sander to my shop, I would create a pattern for bracket-style feet and cut the design using my router. It’s more efficient to create the feet other ways, but this works if needed. Furthermore, I use this technique for high chest aprons and sculpted drawer dividers such as those on block-front or serpentine chests.
Running in Circles
Step into most woodworking stores and you’ll find many commercially made jigs for cutting circles of all sizes. In fact, these jigs are so involved that you have to read the instructions before beginning work (something we all hate to do). For the most part we use a few sizes of circles specific to our work. We don’t need all those settings. I looked for something different.
Another simple setup. One hole in the middle of the circle-cutting jig, plus a guide bushing, equals a great method for creating circles.
My first circle-cutting jig was an elongated base added to my plunge router. I used the existing bolts to affix the base to the router, then cut a circle. Seemed easy enough. But I ran into an issue. With the router bolted to the jig, there’s a point as you rotate and make a cut that you have to let go of the handles in order to complete the circle because the router doesn’t turn as you spin the jig. Your hands should always be in control as you use a router.
To eliminate the handle problem, I turned to a guide bushing. Again using plywood, I fashioned a jig for circle cutting. This time, instead of affixing the jig to the router base, I positioned a ¾”-diameter hole where the router bit would be located. The hole, which could be sized to match any size guide bushing, allows the bushing that’s installed in the router to spin freely as a circle is cut. The ability to spin during use means my hands stay in contact with the router throughout the cut.
Safe and secure. The guide bushing turns in the hole as the circle is cut. At no time is it necessary to remove your hands from the router. Elevate the workpiece or the bench is will also get a groove.
Using the jig is a walk in the park. Select a guide bushing that matches the hole in the jig, then install the desired router bit and the bushing to the tool. Measure accurately for your needed diameter and pin the jig to the workpiece with a dowel. All that’s left is to cut a circle. Use a plunge router for this technique and step through the cutting process; don’t try to complete the cut in a single pass.
You don’t need scads of money. You don’t need complicated commercial jigs. You don’t even need to keep the jig once it serves its purpose. All you need is a few pieces of plywood used in conjunction with certain router bits and you can increase productivity in your shop. It’s as simple as plugging in a router.


