We may receive a commission when you use our affiliate links. However, this does not impact our recommendations.
Buy it by the case. Masking tape, a multi-tasking workhorse in the shop, has earned a place of importance hanging on my tool rack. Take it out of your drawer – it’s not just for painters anymore.
Find magic in the mundane using this humble problem solver.
One of the most important lessons I’ve learned as a woodworker is to never underestimate the seemingly mundane. I have found great utility in common household materials: old Tupperware, measuring cups, shelf liner, string, Dixie cups and old T-shirts, just to name a few. But here’s a fair warning: Don’t take these items out of the house without permission. Certain family members might not appreciate their favorite coffee grinder being used to pulverize shellac flakes!
One item, however, deserves to be purchased specifically for your shop and stands out as the ultimate multi-tasker – masking tape. Just when I think I have exhausted its list of uses, I come up with another way to incorporate the sticky stuff into my workflow. As a result, I buy this stuff by the case!
Origins of Masking Tape
To understand the real magic of masking tape, we should first learn about its origin. Masking tape was invented by the 3M company, in 1925, at a time when the company’s primary business was abrasives.
A clever employee, Dick Drew, saw a need for a less aggressive tape in the automotive painting industry, and realized his company already had two of the key ingredients, which are paper and adhesive. Soon after, rolls of this moderately sticky paper were being mass-produced and they soon found their way into homes and shops everywhere.
So here is a quick introduction to some of my favorite woodworking shop uses for masking tape. Although you can use regular masking tape for most of these tasks, my preference is for the blue painter’s variety. It holds well and leaves little to no residue. The green tape works well too, but I reserve that for special applications where I need increased holding power and greater chemical resistance.
Hiding from the Finish

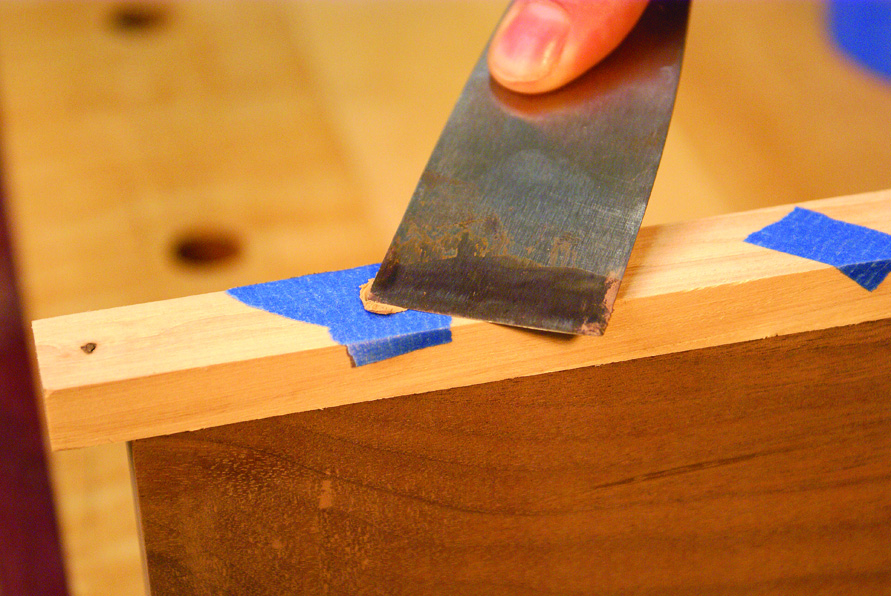
Peel away problems. A strip of blue tape protects the inside of the groove from finish materials and keeps the fit tight.
The one function of masking tape that should be obvious is, of course, masking. When creating a two-tone finish, proper masking is essential. I most often use blue or green tape, along with brown paper, to protect specific areas from the accent color.
For most woodworkers though, the most useful type of masking comes into play while applying finish on projects prior to assembly and during assembly. On some projects, it just makes more sense to finish the components prior to the glue-up. The risk we run, however, is getting finish on our joinery. The finish seals the wood and the result is a much weaker glue bond.
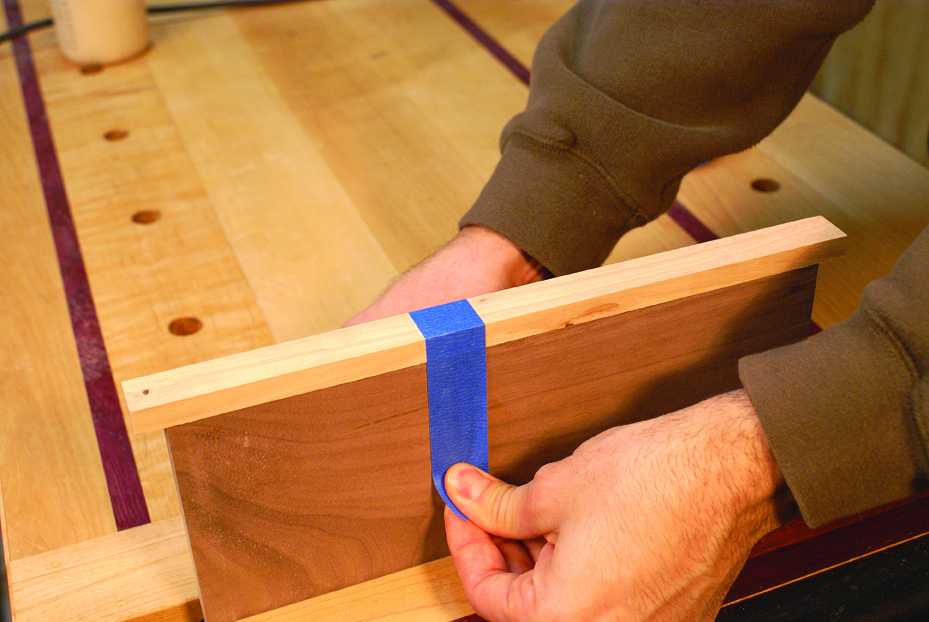
To prevent this, I use masking tape to protect the joinery from any finish. Dados and rabbets can be protected with a long piece of tape; tenons can be protected by a full wrap.
Now whether you add finish before you assemble your work or not, glue squeeze-out is always an issue. By masking off all your joints with tape during a dry fit, you can easily protect the surface from that inevitable wayward glue at final glue-up.
The Quickie Clamp
Thrifty clamps. Stretch the tape over the edging with as much pressure as possible. The more stretch, the more holding force.
Anybody who’s tried to attach solid wood edge-banding to casework knows how tricky it can be to secure the banding while the glue dries. Edge clamps aren’t cheap, and you don’t always want to use brad nails.
By stretching a 4″ to 5″ piece of masking tape over the edging, you can achieve a reasonable amount of clamping pressure. Place a strip every few inches along the length of the board, and you are on your way to nice, solid wood edges without taking out a second mortgage for 30 edge clamps.
Perfectly Filled Holes
Shot through the tape. Masking tape ensures any wood filler is directed into the hole only and not into the surrounding wood pores.
Many woodworkers are big fans of brad nailers. And why not? They make quick work of attaching trim of all shapes and sizes. A major drawback is the hole that remains after the nail is driven through the wood.
In most cases, the filler not only fills the holes, but it also penetrates surrounding pores in the wood. Unfortunately, this spot usually reveals itself once the finish is applied. How can we prevent this? Next time you pull out the brad nailer, try applying small pieces of masking tape everywhere you plan to shoot a nail. Then just shoot right through the tape.
Keep the tape on while you fill the hole with your filler. Once the filler is dry, remove the tape and you’ll see a nice tidily filled hole.
Veneer Clamp
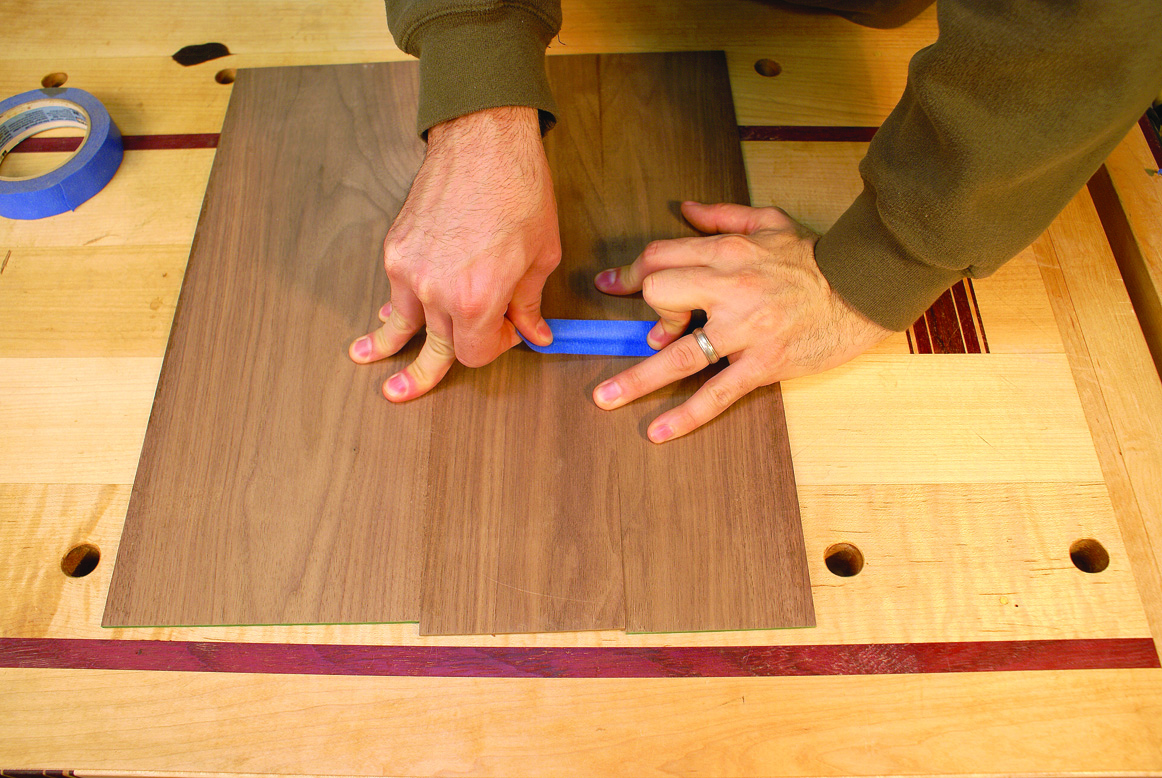
Veneer tape with a kick. Stretch tape over a veneer joint, then as the tape shrinks back, the butted veneers come together tight and secure.
When veneering, it is frequently necessary to attach multiple pieces together along their thin edges in order to get the width you require, just like with solid wood. But unlike solid wood, it’s hard to secure the two pieces of veneer with clamps. So I like to stretch pieces of masking tape over the joint every 3″ to 4″, stitching it together as I go.
The tape has the ability to stretch and spring back, so you can use that to your advantage. Securely attach the piece of tape to one end, then hold it down with your finger while stretching the other end over the joint and secure it to the other side. When you let go, the tape shrinks back just enough to close the gap and hold the two pieces securely together.
Tear-out Reduction
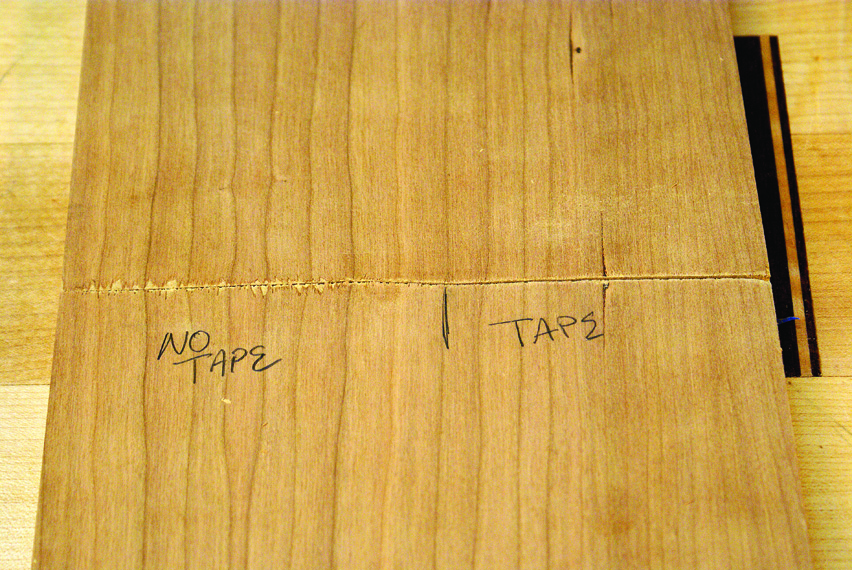
Smooth out a cut. Masking tape significantly reduces the amount of tear-out caused by an aggressive jigsaw cut.
As many woodworkers have discovered the hard way, both plywood and solid wood have a tendency to tear out during crosscuts. Sharp blades and zero-clearance inserts can help, but sometimes these options aren’t available to us or they are just not effective enough. In most cases, with a little extra support during the cut, the fibers will remain intact.
Once again, masking tape to the rescue! By laying down a strip of masking tape on the cut line, the fibers are completely supported during the cut and the cut quality increases dramatically. This trick is especially useful when cutting expensive plywood with a jigsaw.
These are just a few examples of the many nifty “magic tricks” you can do with masking tape. Is it a cure for all that ails ya? Nope. Will it take all the dust nibs out of your finish? Not likely. But you will be surprised by just how many things it can do.
So the next time you’re faced with a dilemma and you’re at a loss for a solution, look around – it’s not difficult to find magic in the mundane. The answer might be found in a simple roll of tape. Just don’t tell the tape company because they’ll raise their prices.
Here are some supplies and tools we find essential in our everyday work around the shop. We may receive a commission from sales referred by our links; however, we have carefully selected these products for their usefulness and quality.