We may receive a commission when you use our affiliate links. However, this does not impact our recommendations.
Routing stopped or “blind” cuts is much easier when you build a fence with adjustable stops.
This extra-long mortising fence helps you cut “blind” joints in your work.
Cabinets and furniture often have “blind” joints − dados, grooves or rabbets that are stopped at one end so you can’t see the joint on the outside of the case. Sometimes these joints are “double-blind,” meaning they are stopped at both ends. A mortise is a perfect example of a double-blind dado or groove.
The key to cutting a blind joint accurately is to stop the cut precisely at the right point. To make a double-blind joint, you also must start the cut precisely.
That’s where a mortising fence comes in handy. This is a long fence that can be clamped to your table saw, router table, drill press or mortiser. It has two stops − one to start the cut and the other to stop it.
Making the Fence
To rout a mortise or a similar double-blind joint, put a piece of masking tape on your router table just in front of the spot where the work will pass over the bit. Using a small square, mark the diameter of the bit on the tape. The line to the left (as you face the fence) is your starting point; the line to the right is the stopping point.
There are just five kinds of parts to the fence − the base, the face, the braces to hold the face square to the base, the stops and the dowel pins to keep the stops aligned.
The face is slotted and the braces are notched for the carriage bolts that hold the stops in place. Rather than rout this slot in a single board, I instead made the face from two pieces of wood, glued together with 3⁄8” x 3⁄4” x 1″ spacers between them at the ends.
To make the fence as true as possible, I jointed the face square to the base after it was assembled. I made the face, base and braces from cabinet-grade plywood. Then I glued the pieces together, using no nails or screws. I made sure to let the glue cure for 24 hours before I trued the assembled fence’s face by passing it over the jointer. (I recommend you make your fence’s face from hardwood, which is easier on your jointer’s knives.)
The stops are beveled on the business ends, which keeps sawdust from building up between the work and the stop, interfering with the accuracy of the cut. Bevel the end of the stops so they come to a point. Each stop gets two 3⁄8“-diameter holes − one hole for the alignment pin and one hole for a bolt to hold the stop in place during use.
Extra-long mortising fence cut list
No. item dimensions (inches) material
T W L
❏ 1 Base 3⁄4 x 2 1⁄2 x 60 Plywood
❏ 1 Face 3⁄4 x 3 3⁄4 x 60 Hardwood
❏ 11 Braces 3⁄4 x 2 1⁄2 x 3 Plywood
❏ 2 Stops 3⁄4 x 3 3⁄4 x 3 1⁄4 Hardwood
❏ 2 Dowel pins 3⁄8-dia. 1 1⁄2

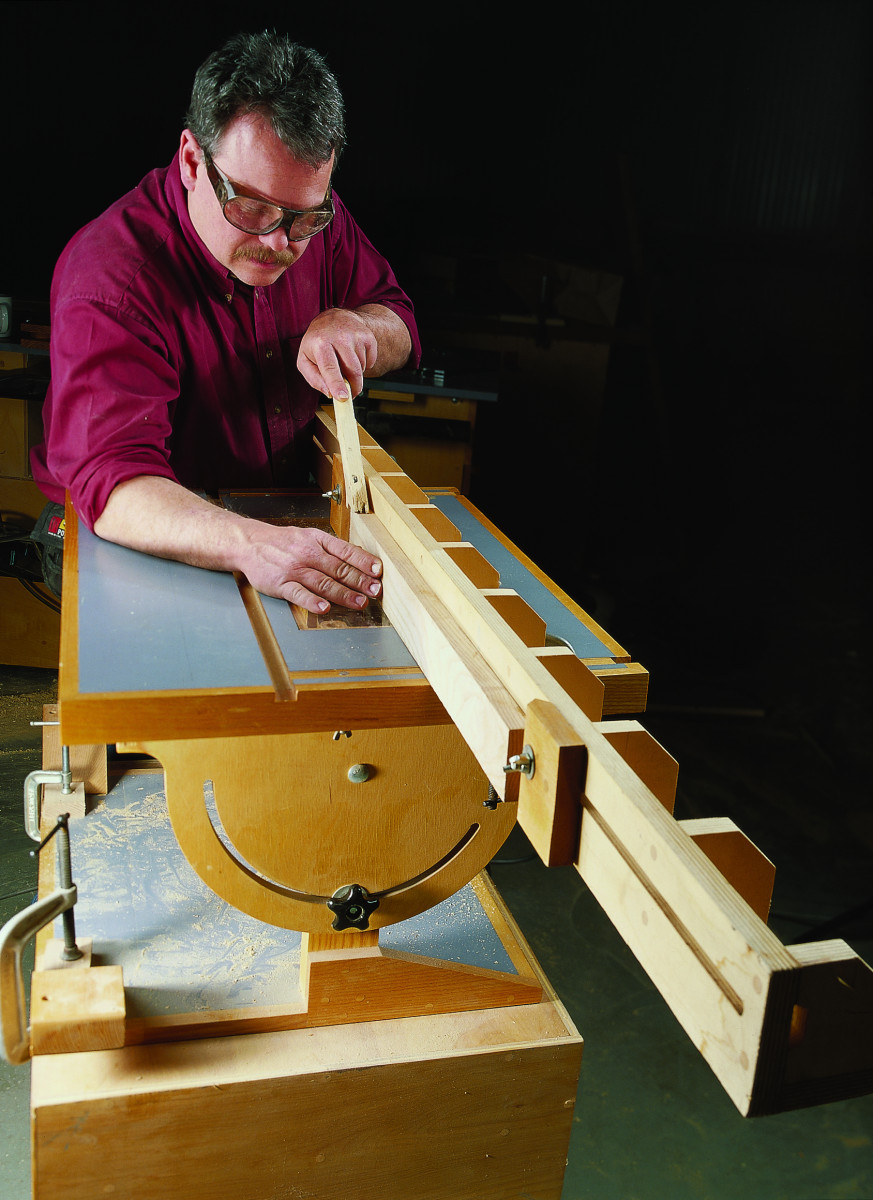
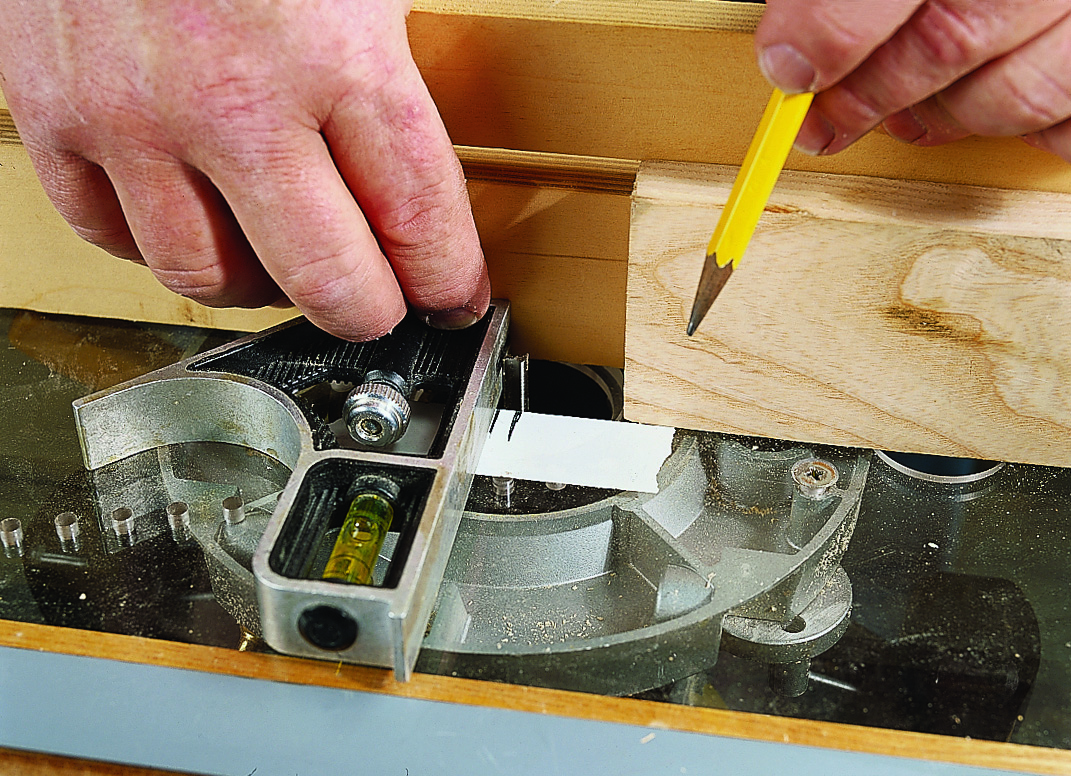
 Using the Fence
Using the square again, transfer the layout lines that indicate the ends of the mortise to the surface of the wood. Lower the router bit below the table surface and align the starting end of the mortise with the starting point on the tape. Slide the right stop against the end of the work and tighten the wing nut that secures it to the fence. Slide the work so the other end of the mortise aligns with the stopping point on the tape and set the left stop. Raise the router bit and make the cut, sliding the wood between the stops.
How you use the fence depends upon the joint you’re cutting and the tool you’re cutting it with. If the joint is blind on one end, remove one stop and set the other to halt the work when the cutter reaches the desired location. I usually set up my fence so the cutter stops a hair short, then I finish the cut with a chisel. Because blind joints typically have squared ends and most cutters leave a curved end, you have chisel work to do anyway.
To make a mortise or a double-blind joint, use the second stop to start the cut at the desired location. Place the end of the work against the stop and slowly lower the work on the cutter. To avoid kickbacks and add accuracy, cut the joint in several passes.
Because router bits and dado blades cut the underside of the wood, you can’t see the cut as it progresses. To compensate for this, mark the cutting diameter of the bit on the table as shown in the photo below.
Transfer the layout lines that mark the joint’s blind ends to a surface on the board that will be visible when you make the cut. This surface must be adjacent to the indicator lines on the table. To monitor the progress of the cut, watch the layout lines on the wood as they move between the indicator lines. PW
Nick, author of more than 50 books on woodworking, has built and flown a replica of the 1903 Wright Flyer, the first true airplane. He is now working on the 1905 version.
Here are some supplies and tools we find essential in our everyday work around the shop. We may receive a commission from sales referred by our links; however, we have carefully selected these products for their usefulness and quality.