We may receive a commission when you use our affiliate links. However, this does not impact our recommendations.
An essential part of your turning tool arsenal.
There’s a theory in woodturning—popularized by some British turners—that wood “prefers” to be cut rather than scraped. While I agree with this notion, I’ve also found that scraping tools play an essential role in woodturning.
Scraping tools are used primarily for bowl turning, vessels and end-grain hollowing. They’re rarely used for spindle work, because cutting tools are better suited to the task. Scraping tools excel at roughing out shapes when the quality of the cut isn’t critical, and in situations where a cutting tool can’t be presented to the wood practically or safely—a situation that commonly occurs while hollow turning.
1. Used the traditional way, a scraper leaves torn and crushed fibers (above). But after refining its surface and edge and using a technique called “shear scraping,” the same tool leaves a near-perfect surface (below).
1B.
Surprisingly, a scraper can also be used as a fine finishing tool (Photo 1). Elevating the humble scraper to such a high level of performance may seem like creating a silk purse from a sow’s ear. But as I’ll show, it actually depends on how the tool is refined, how its edge is prepared and how the tool is presented to the wood.
Cutting vs. scraping
In this story, I’ll focus on the traditional notion of scrapers and scraping; that is, using only the edge, with no bevel support on the wood. Most turning tools (including gouges, skews and parting tools) are cutting tools, designed to work with support from the bevel—the tool is presented at an angle, so the bevel bears against the wood as the edge cuts. Scraping tools, on the other hand, are presented nearly straight on, so the edge receives no support from the bevel. Of course, cutting tools are sometimes used this way. And scrapers are sometimes used as cutting tools, by riding the bevel. Hence, the angle at which you present the tool really determines whether you cut or scrape.
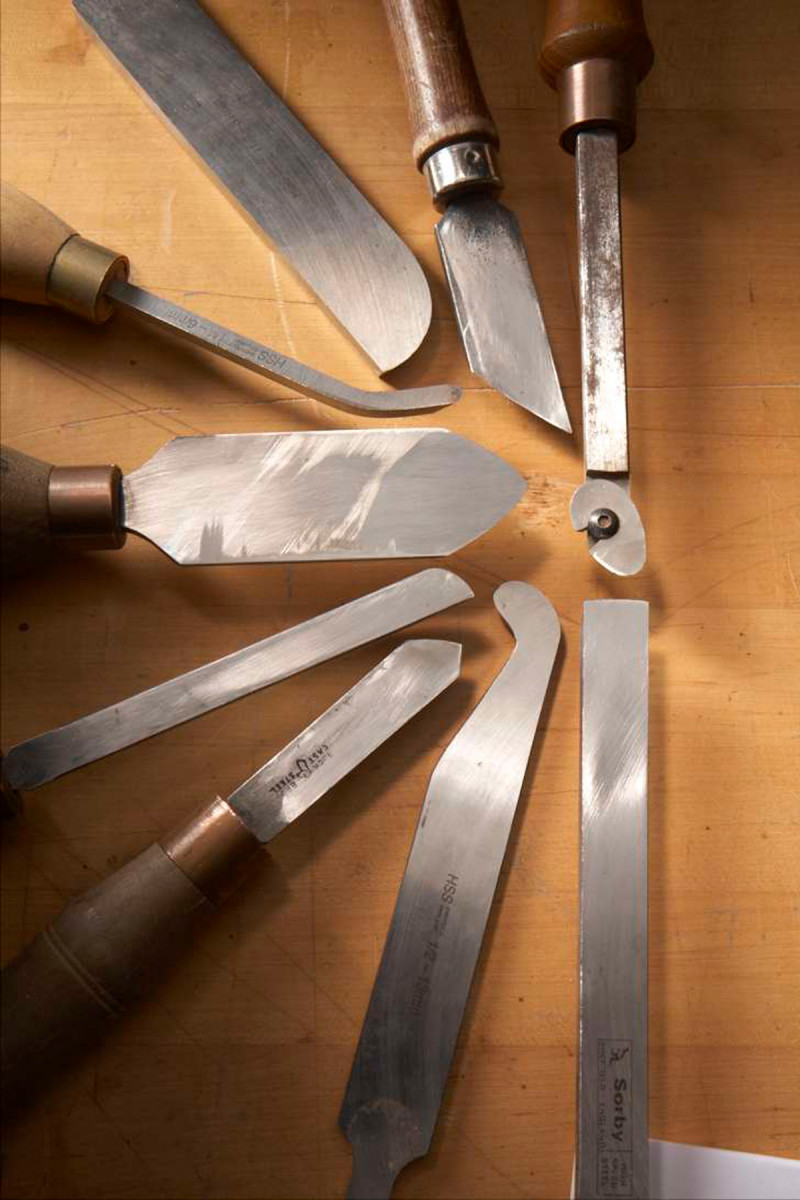
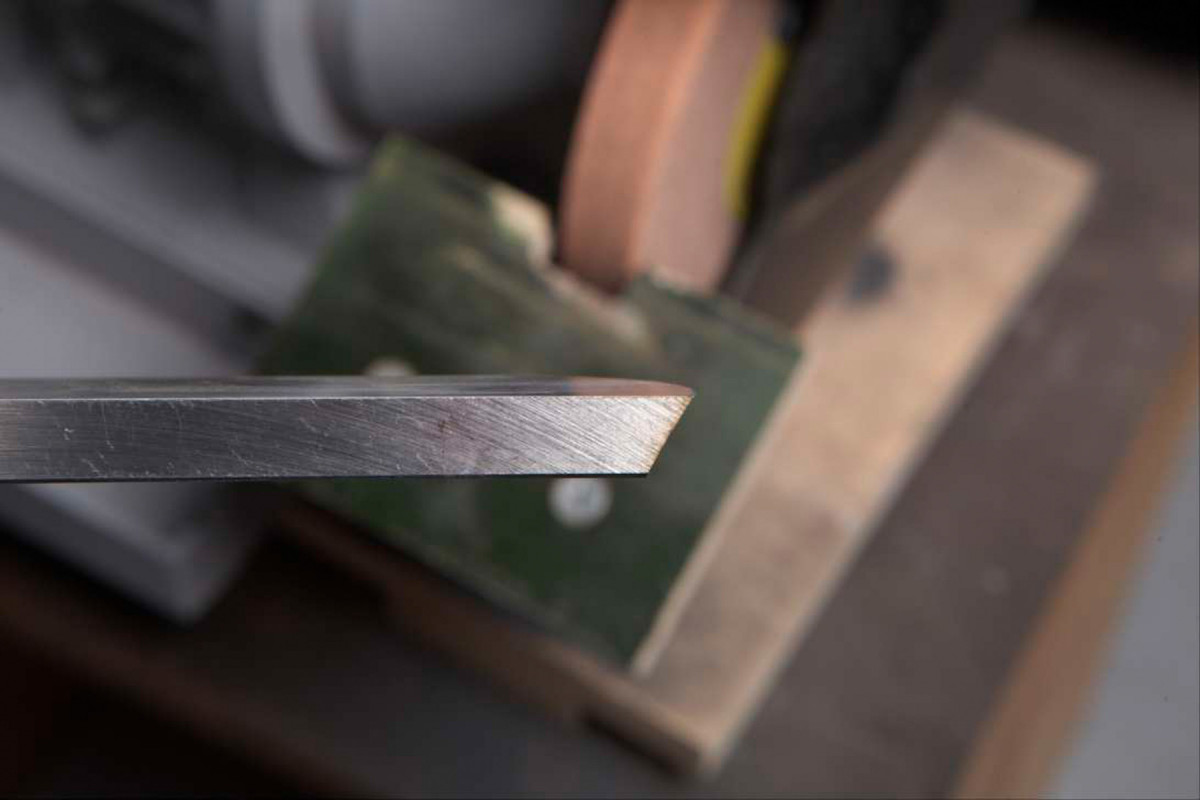
Woodturning scrapers have two basic attributes, flat steel and a bevel ground on only one side. The shape of the edge is almost endlessly variable—straight across, skewed, half-rounded, full-rounded, side-cutting with a relief behind the edge, even profiled to fit the shape you wish to create—virtually any shape the turner desires.
Refine the tool
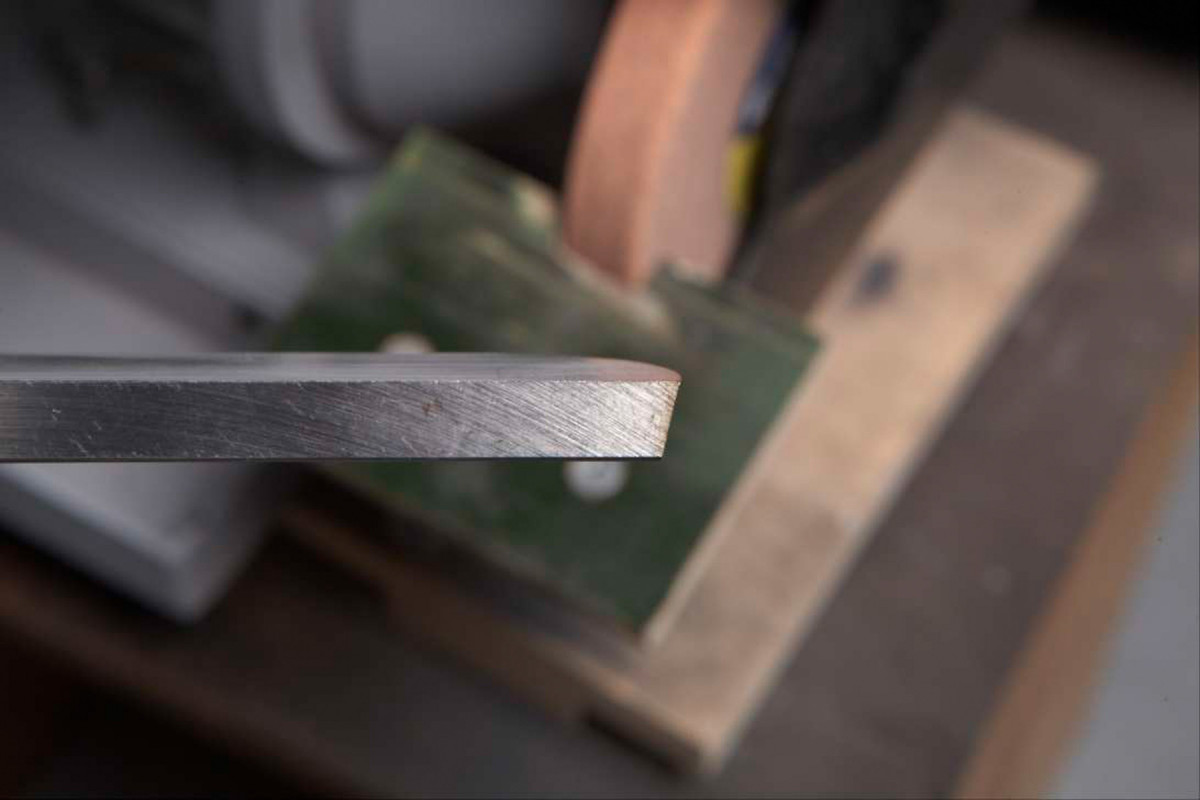
2. Two flaws commonly appear on the top surfaces of new scrapers: rough surfaces from little (or no) milling, or deep marks left from milling, along with very sharp corners.
New scrapers often show problems right from the start. The top surface of the steel can be quite rough, or even pitted, which means it has had little or no milling. Or, it can show deep milling marks or very sharp corners along its entire length (Photo 2).
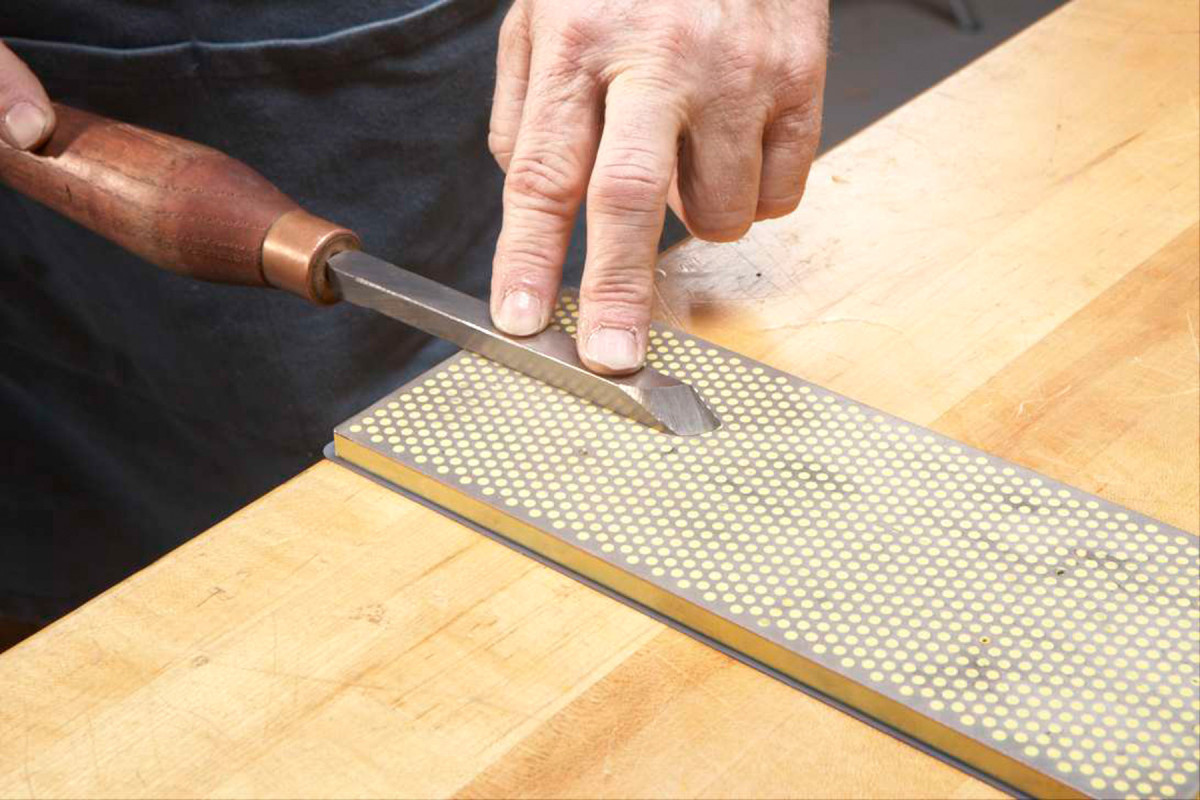
3. Smooth the scraper’s top surface by rubbing it on a large, flat diamond hone to remove the pits and coarse mill marks. Concentrate on the last inch or two.
Smoothing the scraper’s top surface gives the tool a more consistent edge. This step is especially important for fine finishing applications, because it dramatically improves the quality of the cutting burr that sharpening creates. To remove pits or mill marks, rub the top surface on a medium or fine flat diamond hone (Photo 3).
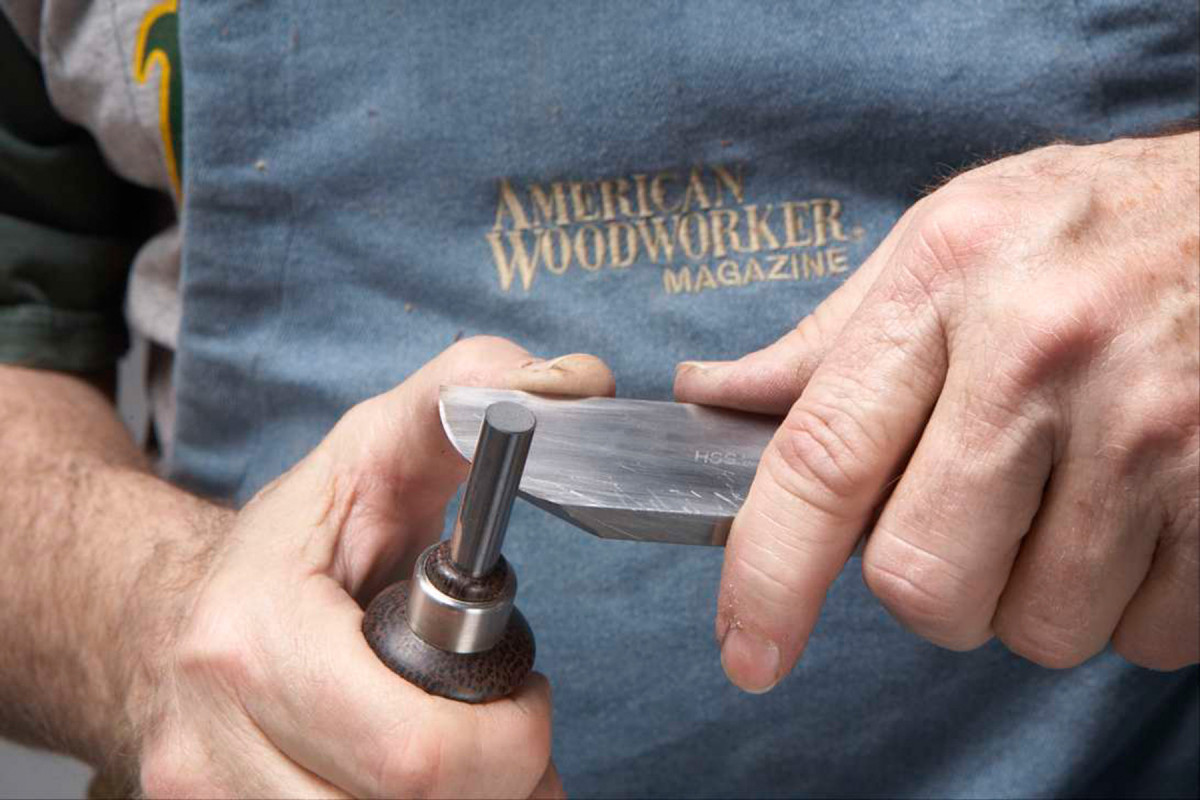
4. Soften the four long, sharp corners using a medium-grit wheel. Remove the tool rest and then freehand each corner from the leading edge to the ferrule.
Softening or fully rounding the scraper’s corners from behind the cutting edge all the way to the ferrule makes the tool much friendlier to grip and helps it glide smoothly across the tool rest (Photo 4). I often follow the grinding by running the diamond hone along those edges to smooth them a bit more.
Shape the profile
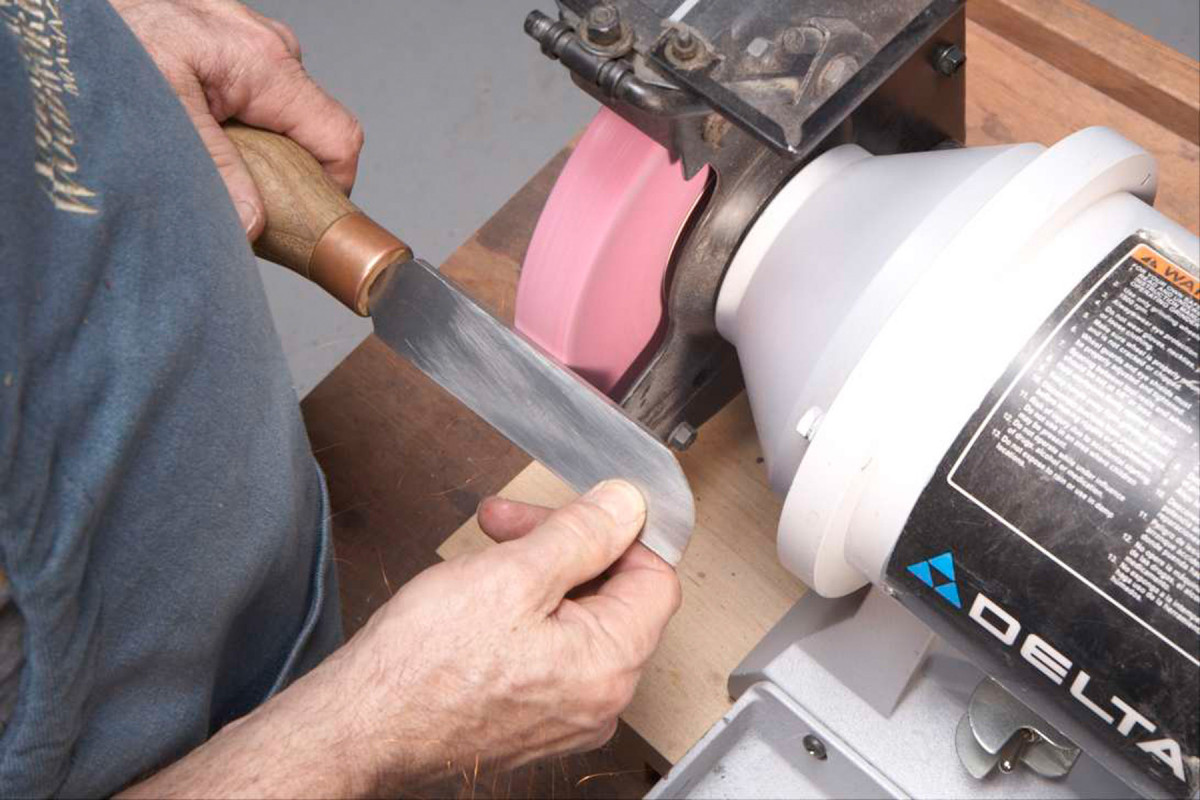
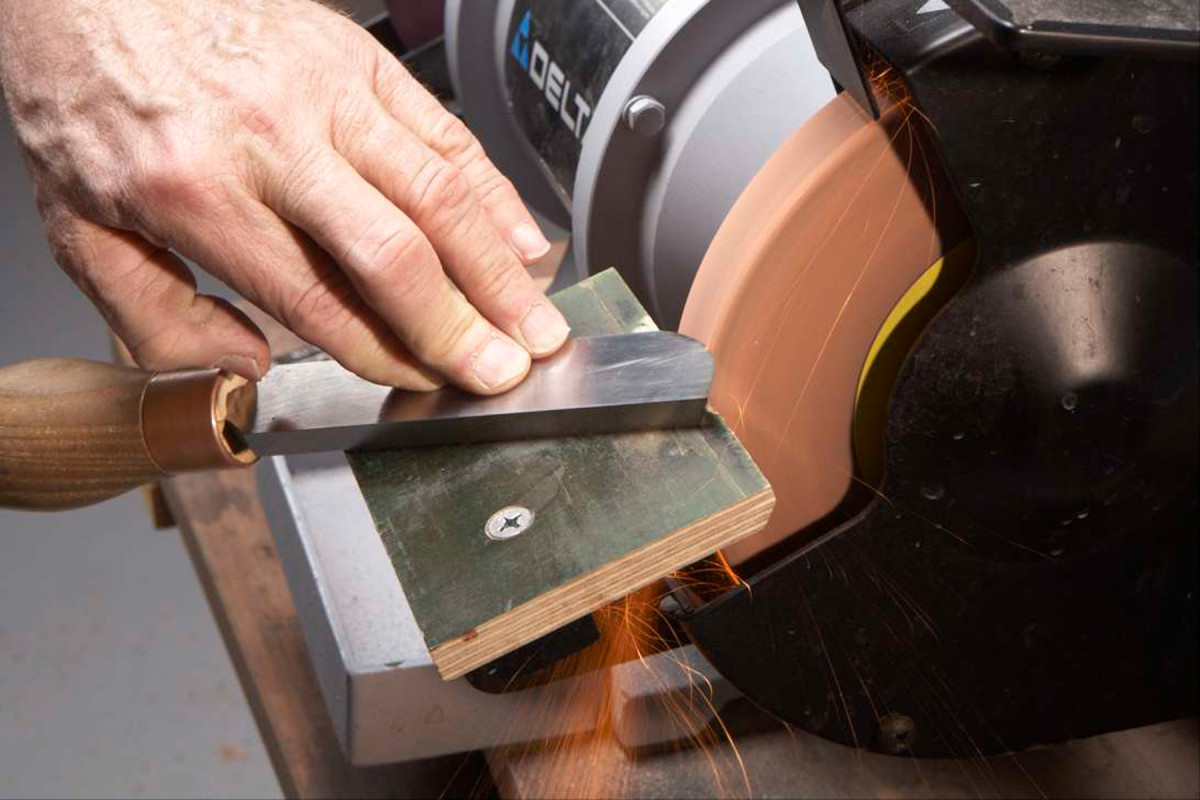
5. Shape the leading edge of the scraper, using a coarse wheel and the tool rest set in a horizontal position. You can grind the edge to almost any profile.
The good news about scrapers is that their profiles can be quickly and easily changed, whether for a particular application or personal preference. Install a coarse (46 grit) wheel in your grinder and set the rest horizontal to the wheel. Then move the tool quickly and continuously to shape the edge (Photo 5).
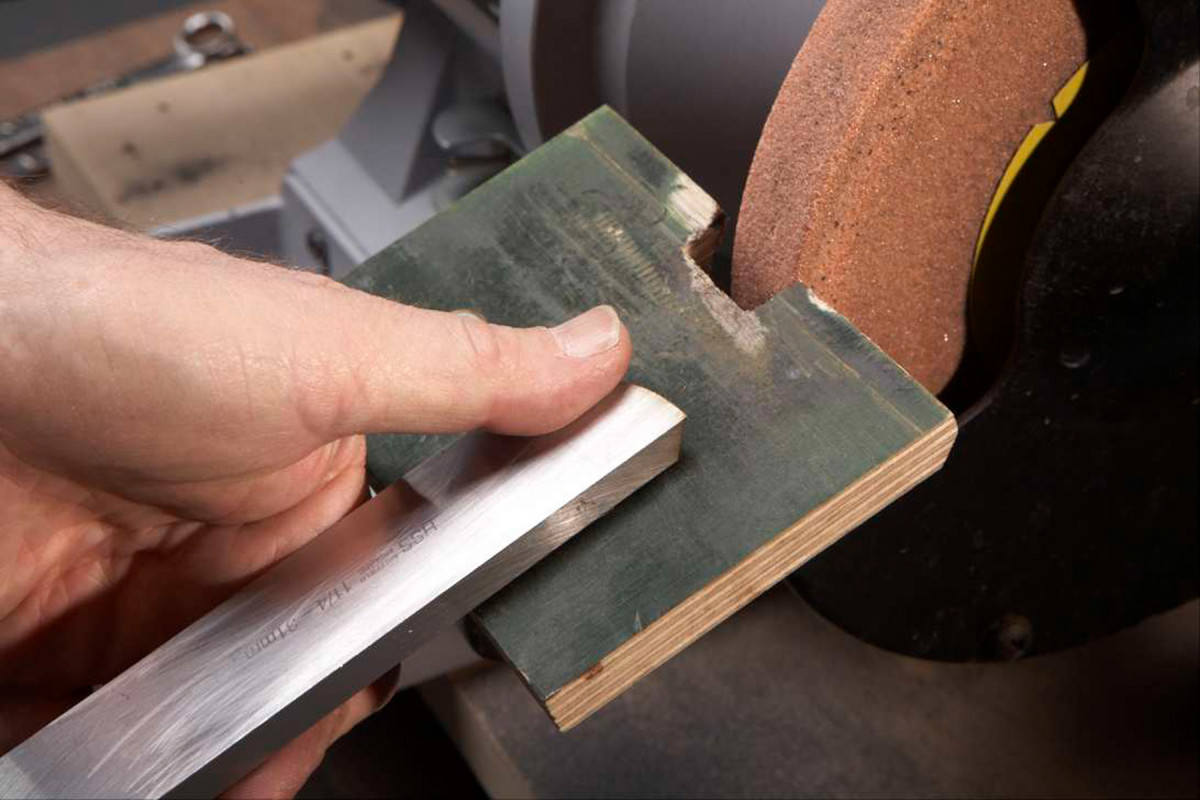
6. Reduce the bevel angle to provide better clearance. The factory bevel (above) is often too steep. Tilt the tool rest to 60° and then regrind the bevel by following the profile (below).
6B.
The next step is to reduce the bevel angle. Unlike the bevel on a cutting tool that supports the cut, the bevel on the scraper is more for clearance (although it will also be used for support). Scrapers often come with steeply angled bevels (80° to 85°). But if the bevel inadvertently touches the wood while scraping, it can cause problems. Therefore, it’s better to reduce the angle to between 60° and 70° (Photo 6). Change the angle on the grinder’s tool rest and follow the shape of the edge as you grind. Keep the tool moving constantly, to avoid overheating.
Create the edge
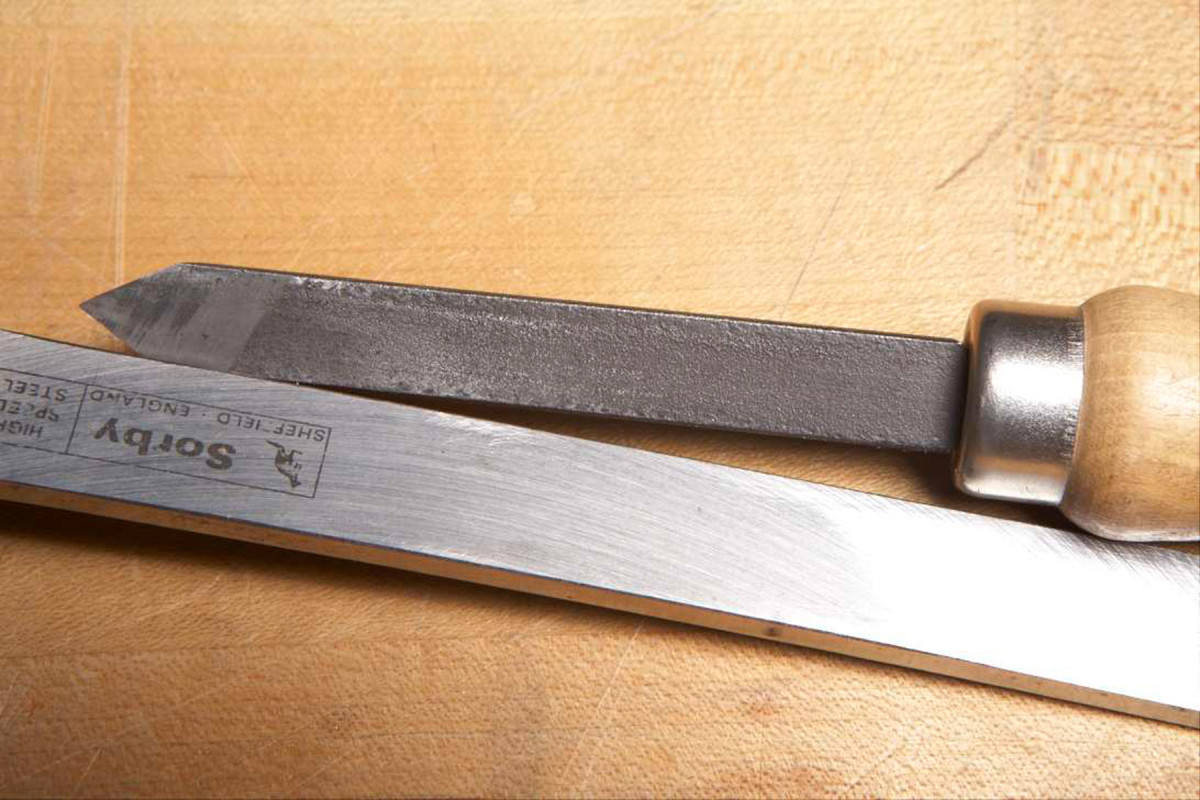
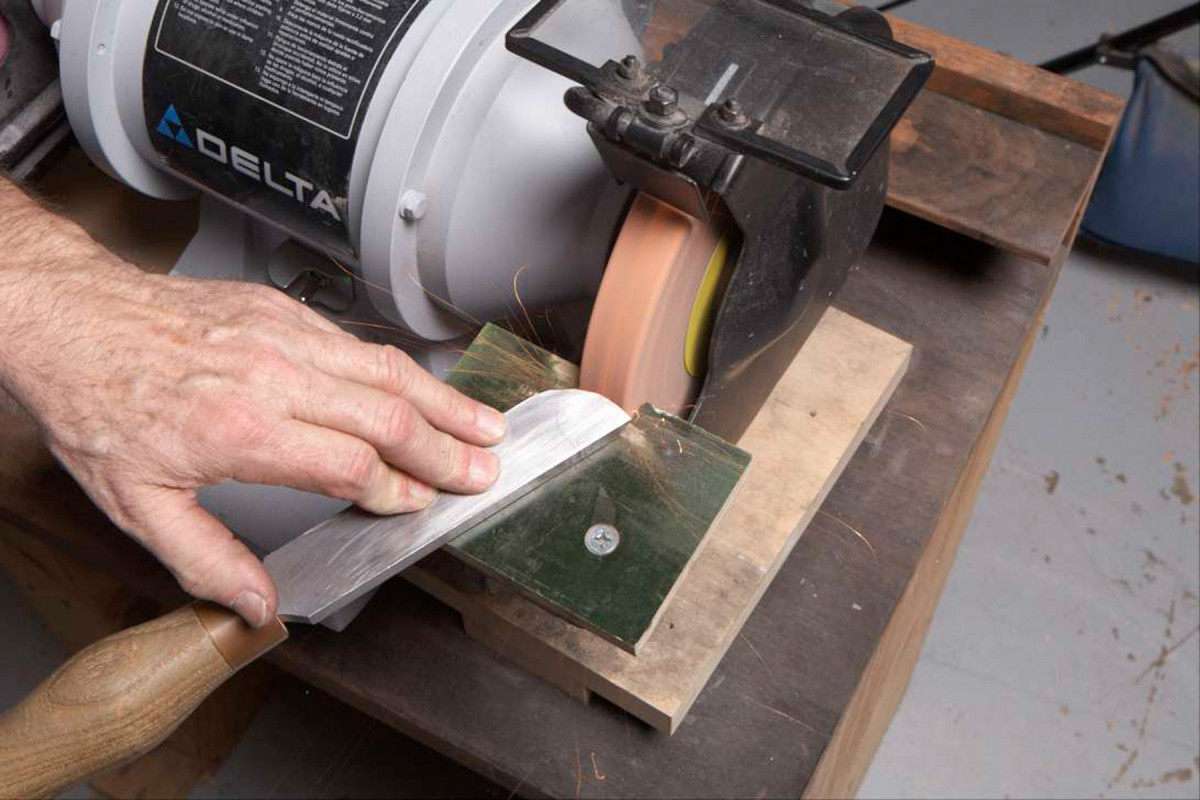
7. When tiny sparks appear at the top edge, the new bevel is fully ground and a burr is being formed.
The final step in producing the bevel angle also produces an edge. Sparks consistently traveling over the top of the tool indicate that a heavy burr—a curl of steel along the edge—is being formed (Photo 7). This burr must be consistently formed across the scraper’s entire profile for the tool to work properly. You can test for a consistent burr by feel (Photo 8). Your thumb is sensitive enough to detect even the faintest burr.
8. Test for the presence of a burr by running your thumb off the end of the top edge. This ground burr serves as the cutting edge for most scraping tasks.
For subsequent sharpenings, you’ll need to periodically regrind the edge—usually with a finer wheel, 60 or 80 grit. Simply match the rest to the bevel angle, follow the shape as you grind, and watch for the sparks.
9. Sharpening for finish work requires a finer edge. The first step is to remove the ground burr by polishing the scraper’s top edge with a diamond hone/slipstone.
A ground burr is a suitable cutting edge for at least 90% of scraping jobs, such as rough shaping and other coarse applications. However, to use a scraper for finish work, a finer, even more consistent burr is necessary. Start by removing all traces of the ground burr (Photo 9). A few passes with a diamond slipstone does the trick. Then replace the ground burr with a burnished burr (Photo 10).
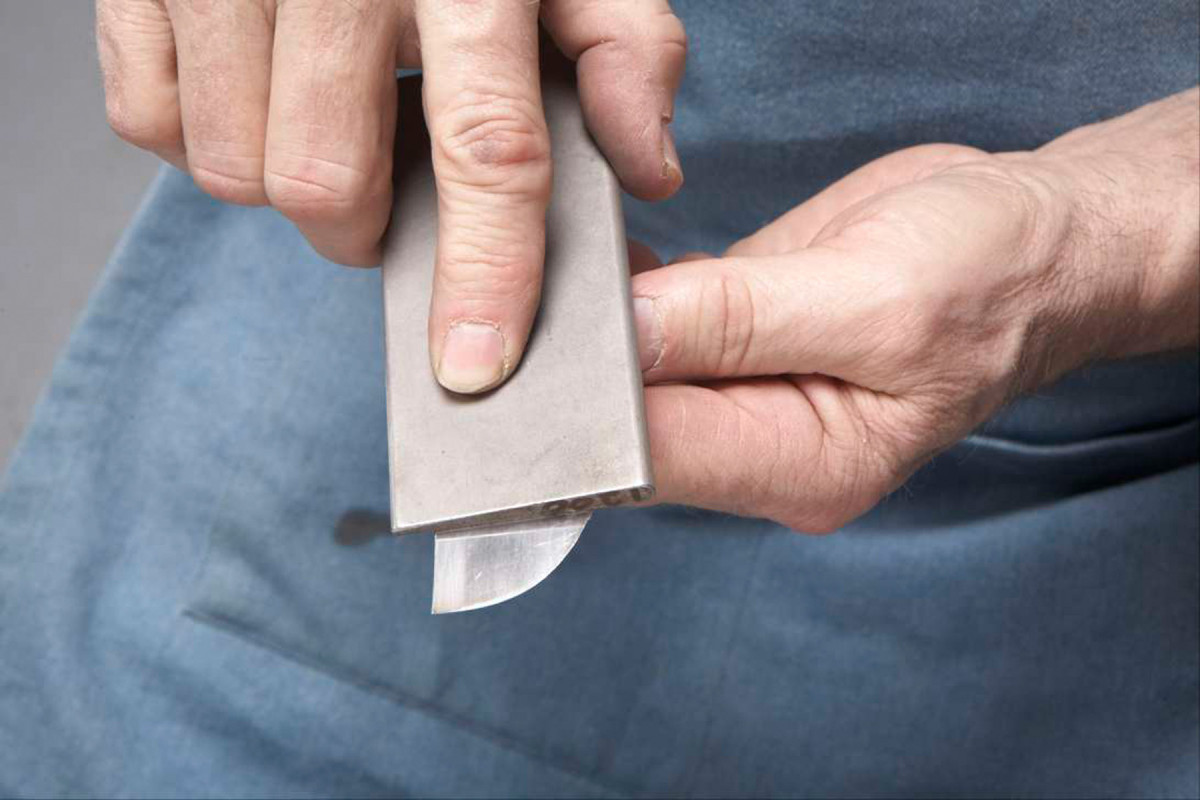
10. Create a new, finer burr by burnishing the edge. Tilt the burnisher about 5° toward the top of the scraper and pull it once across the entire edge.
Use a burnisher to raise (or pull) the burr. Any material harder than the steel will work for burnishing, whether a carbide rod mounted in a handle or a cabinetmaker’s burnisher used to sharpen card scrapers. With a single pass, pull the burnisher across the edge while holding it at a slight angle towards the top. The amount of pressure you apply dictates the size of the burr. For finishing work, the burr should be very light—almost undetectable to the touch, but certainly there.
This tiny burr wears down fairly quickly during use, but it can be easily renewed by re-burnishing. However, each time you burnish, the edge is slightly rounded. After using and pulling a burr five to 10 times, you’ll need to return to the grinder to create a new “sharp edge” and then repeat the process of removing the ground burr and pulling a burnished burr. Always remove the previous burr before pulling a new one, whether ground or burnished.
Tip: Renew the burr when the surface it cuts on the wood begins to degrade or when the shavings become short or turn to dust. Both results indicate the tool is dull.
Using scrapers
11. Traditional scraping technique tips the tool’s cutting edge slightly downward by raising the handle in back, while keeping the tool flat on the lathe’s rest. This method leaves torn and crushed fibers, as shown in Photo 1.
The most common scraping method is to place the tool flat on the rest and slightly tip up the handle at the back, to keep the bevel away from the wood (Photo 11). As the bevel doesn’t ride against the wood for extra support, the tool rest must be positioned as close as possible to the work—this is a fundamental rule for using scrapers.

12. Create a smooth surface during end-grain hollowing by shear scraping. Tilt the tool up onto its corner (45° degrees or higher) and angle it towards the work. Then move from the center to the left in order to follow the grain.
This method is great for rough hollowing in face-grain bowl work or for end-grain hollowing of goblets and lidded boxes. (You can use a gouge for these tasks, but using a scraper is often easier.) However, scraping often tears the grain—especially end grain—and it’s harsher on softer woods than harder woods (see Photo 1).
Creating a smooth surface with a scraper requires a technique called “shear scraping.” This method, which can produce a surface that requires very little sanding, works well on the inside of end-grain hollowed items (boxes, vessels, bowls, goblets, etc.) and on the outside of face-grain shapes.
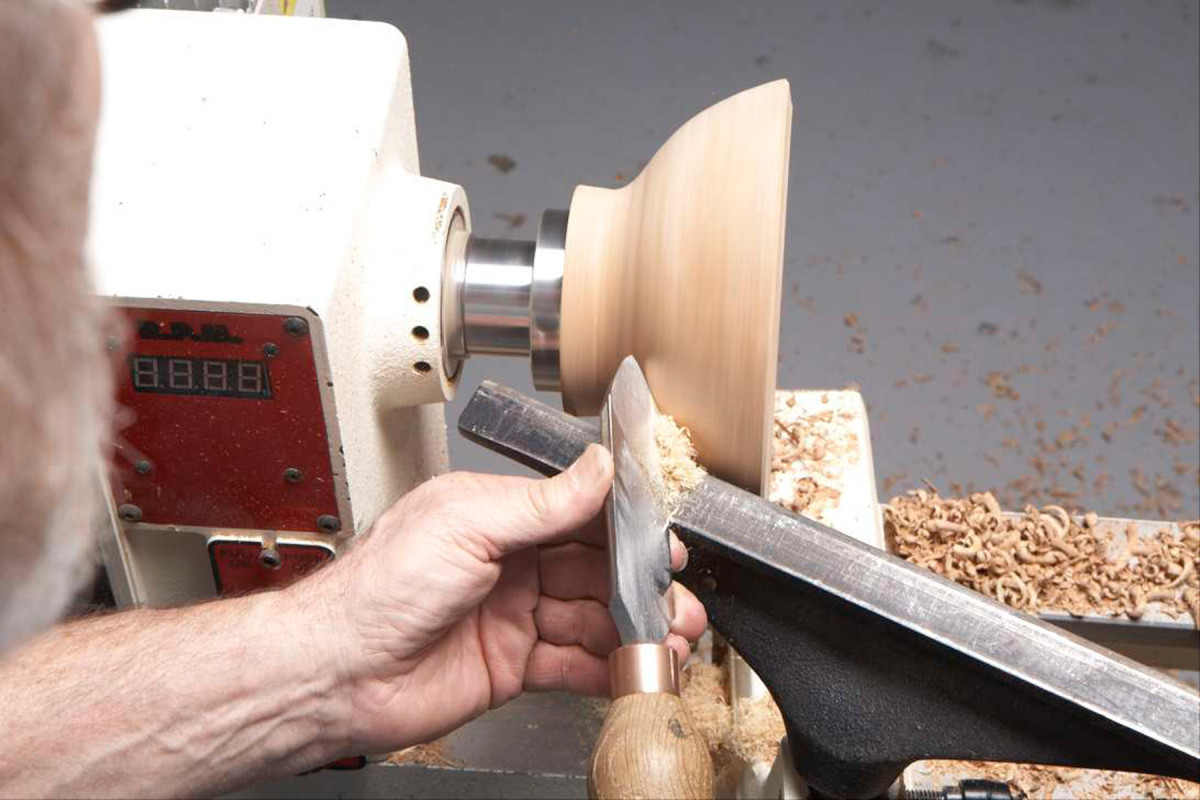
13. Shear scraping works well on the outside of a face-grain bowl because it’s cutting across end grain. Lift the tool 45° in the direction of the cut and work from smaller to larger diameter.
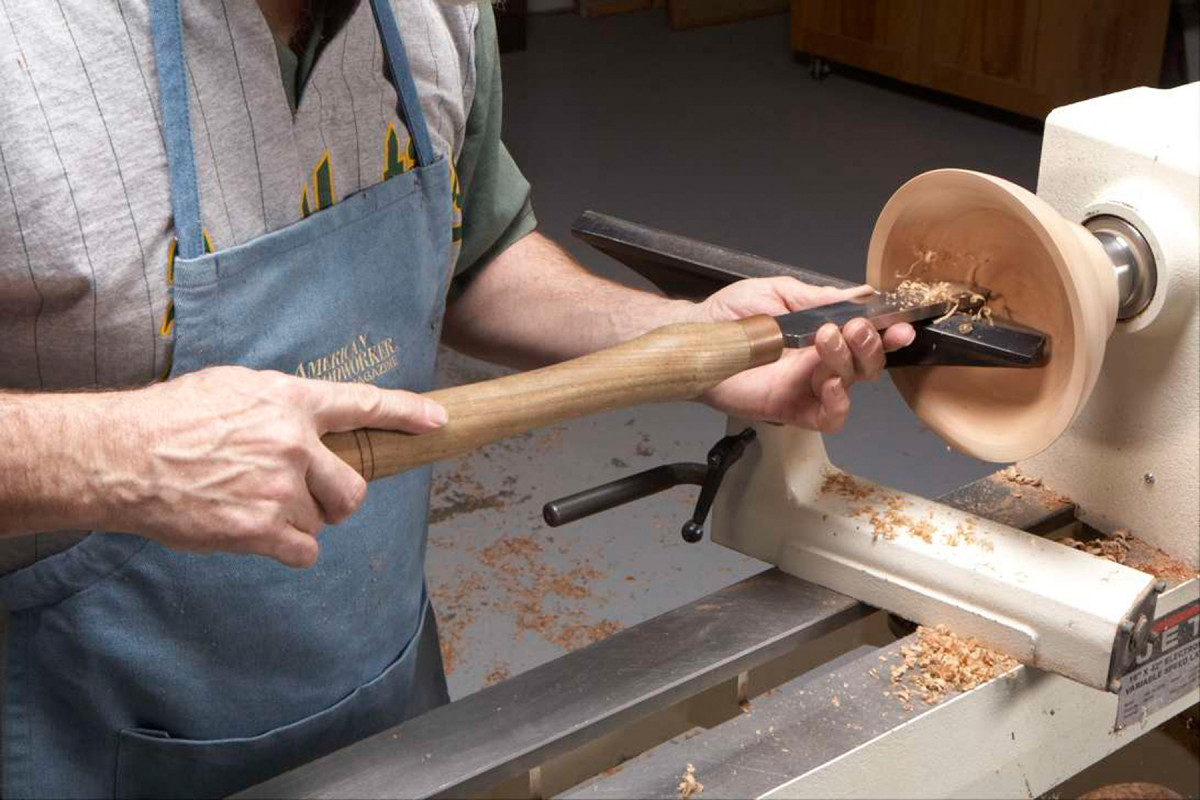
Tip: A bowl gouge can be used to work most of the inside of a face-grain bowl, but the scraper, held flat on the rest and close to the work, is great for blending from the lower sides to the center.
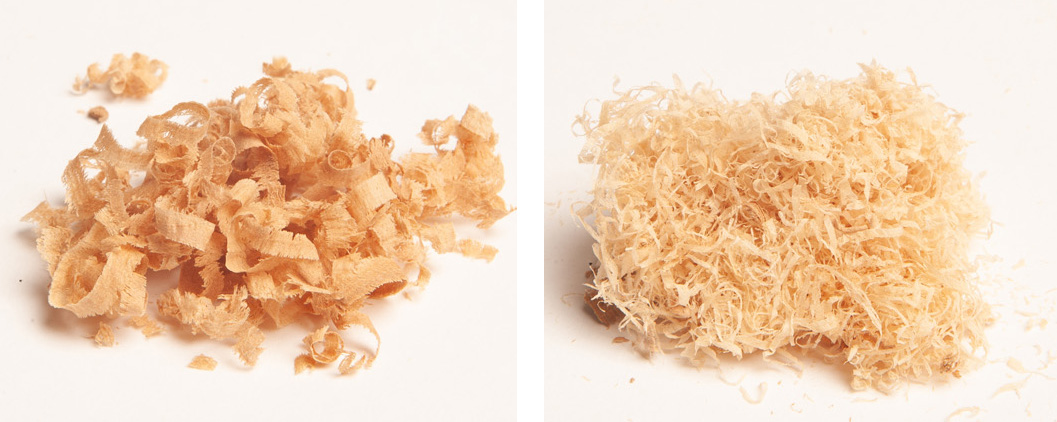
14. The shavings tell the tale when the scraper is tilted at the correct angle for shear scraping, because they’ll change from ribbons (left) to fine, twisted curls of wood (right).
Start by lightly burnishing the edge to create a fresh burr. Next, rather than holding the tool flat on the rest, twist it in the direction of the cut to 45° or higher. When hollowing end-grain vessels, work from the center to the edge (Photo 12). When shear scraping the outside of face-grain objects, work from small to large diameters (Photo 13). When shear scraping is executed correctly, a fine, twisted fiber of wood rolls off the edge (Photo 14). Slowly elevate the scraper onto its corner while making a cut. When you see the shavings change, you’ve reached the correct angle for shear scraping.
Here are some supplies and tools we find essential in our everyday work around the shop. We may receive a commission from sales referred by our links; however, we have carefully selected these products for their usefulness and quality.