We may receive a commission when you use our affiliate links. However, this does not impact our recommendations.
 Have modern glues and clamps rendered this ancient joinery technique obsolete? Absolutely not.
By Christopher Schwarz
Woodworking Magazine, Autumn 2005, pages 12-15
Drawboring is one of the simple reasons that so much antique furniture survives today, some of it as sound as the day it was made.
What is drawboring? It’s a technique that greatly strengthens a mortise-and-tenon joint, transforming it from a joint that relies on glue adhesion into a joint that has a permanent and mechanical interlock. In essence, you bore a hole through both walls of your mortise. Then you bore a separate hole through the tenon, but this hole is closer to the shoulder of the tenon. Then you assemble the joint and drive a stout peg through the offset holes. The peg draws the joint tight.
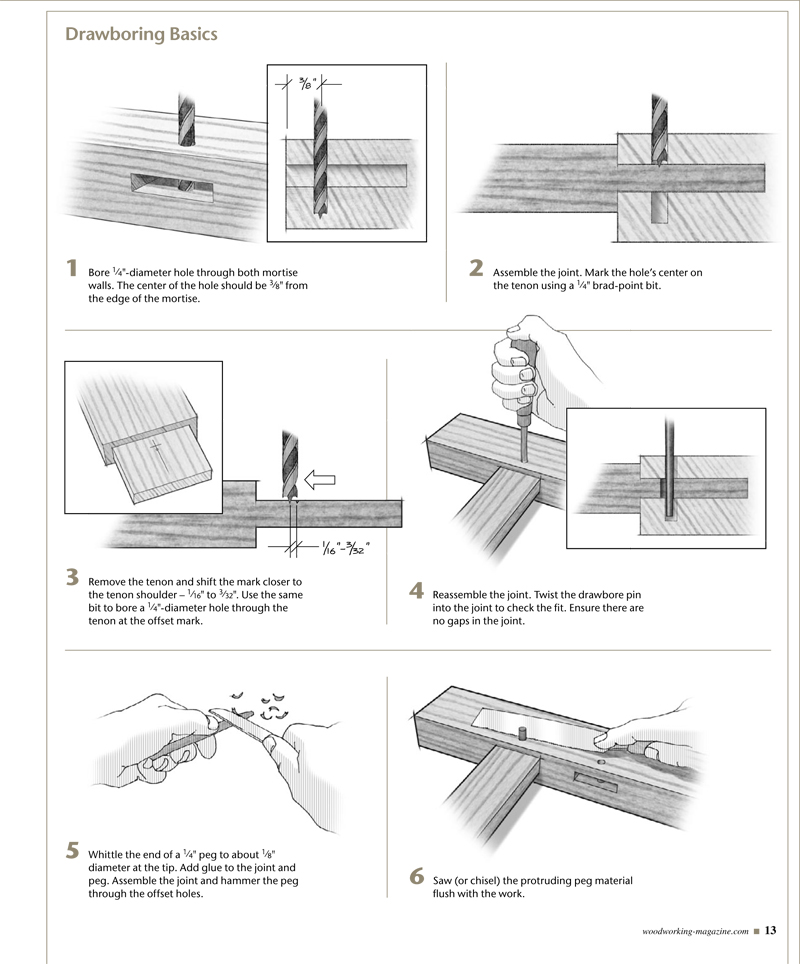
Drawboring Basics. Click for full-size image.
Drawboring offers several advantages compared to a standard glued mortise and tenon:
■ The joint will remain tight. A common problem with mortise-and-tenon joints is that the joint can open up and develop an ugly gap at the shoulder. Sometimes this is caused by the wood shrinking as it reaches equilibrium with a new environment (such as your living room with its forced-air heat). Sometimes this gap is caused by simple seasonal expansion and contraction, especially with woods that tend to move a lot, such as flat-sawn oak. The peg in a drawbored joint keeps the tenon in tension against the mortise during almost any shrinkage.
■ The joint can be assembled without clamps. Drawboring is excellent for unusual clamping situations. Driving the peg through the joint closes it and clamps are generally not needed. Chairmakers use drawboring to join odd-shaped pieces at odd angles. It’s also an excellent technique when your clamps aren’t long enough. Or when you don’t have enough clamps. Drawboring also allows you to assemble a project one piece at a time if need be.
■ The joint can be assembled without glue. There is good evidence that drawboring allowed early joiners to assemble their wares without any glue. This is handy today when you’re joining resinous woods (such as teak) that resist modern glues or when you’re assembling joints that will be exposed to the weather, which will allow water to get into them and destroy the adhesive.
■ The joint doesn’t have to be perfect. The mechanical interlock of drawboring means that your tenon’s cheeks don’t have to have a piston fit with your mortise’s walls. In fact, you might be surprised at how sloppy the joint can be and still be tight after hundreds of years. Drawboring requires you to be careful only when fitting the tenon’s shoulder against your mortised piece. The other parts of the joint are not as important. And while I never argue against doing a good job, drawboring ensures that every joint (even the less-than-perfect ones) can be tight for many lifetimes. For this reason, I think drawboring is an excellent basic skill for beginning woodworkers.
So why has drawboring become an almost-lost art? It’s a good question, and one that I cannot fully answer. I suspect that modern glues and machine-made joinery made the technique less necessary, particularly for manufactured furniture. Drawboring does require several extra steps, and the benefits of it – particularly the long-term durability of the joint – is not something that is apparent to a customer.
Another reason the technique has fallen out of favor, I suspect, is that manufacturers have stopped making drawbore pins. These tapered steel tools allow you to temporarily assemble the joint to check the fit and to ease the path that the wooden peg will later follow. You can drawbore without drawbore pins by relying on the peg (and luck) alone. But once you use a proper set of drawbore pins, you will wonder why they are not in every tool catalog. Fortunately, you can make your own set of drawbore pins inexpensively. The story starting on page 14 shows you how.
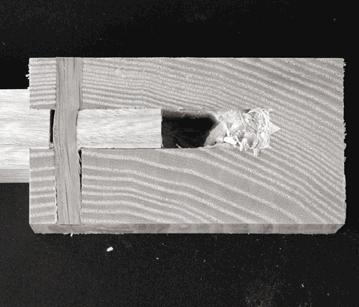
I sawed apart a completed drawbored joint to show how the oak peg bends through the offset hole. This was a 3⁄32″ offset in ash.
Joint Details
I have drawbored many joints during the last five years or so and have found the methods described here to be highly effective. My method is based on historical descriptions of the process from the 17th century and my own work.
The first detail to tend to is the size and location of the hole through the mortise. I have found that a 1⁄4″-diameter hole is good for cabinet work. For larger-scale work (workbenches, doors and windows for homes) a 3⁄8″-diameter hole is better because the peg is stouter. In general, place the hole 3⁄8″ from the opening of the mortise in furniture work and 1⁄2″ in larger work. Make the hole as deep as you can. Usually this requires boring it through the entire assembly, though the hole can be stopped in thick stock. The goal is to ensure that the untapered part of the peg passes into the other wall of the mortise.
Historically, many of the drawbore pins I’ve encountered are a diameter that’s best suited for a 3⁄8″-diameter hole and peg. Entryway doors and large windows are appropriate for this larger hole and peg. I have encountered (and own) a set of old pins that work with a 1⁄4″-diameter hole, however, so this approach is historically accurate.
The next thing to consider is how much to offset the hole in the tenon. The bigger the offset, the sounder the joint, but the bigger the risk that you’ll destroy the tenon or peg during assembly.
The traditional joiner was advised to offset the holes by the width of a shilling, according to Joseph Moxon’s “Mechanick Exercises,” a 17th-century how-to book on woodworking. I had difficulty locating a shilling from the middle to late 17th century (I did try), but according to one knowledgeable collector of English coins, a 17th-century shilling would be about 1⁄16″ thick.
An offset of 1⁄16″ will indeed almost always work and is easy to assemble. But I’ve found that it’s sometimes not enough to get the job done. Some of the joints I assembled with this small offset were just a bit wiggly. For furniture-scale work, I prefer a 3⁄32″ offset. For big-scale work, I’ll push that offset to almost 1⁄8″ if the parts of the joint are large and the wood is a tough species, such as ash or elm. Experience will be your guide. Begin with small offsets in a sample joint and gradually increase them. You’ll know when you’ve found the sweet spot.
Marking the offset on the tenon must be done with a bit of care because small changes can make a significant difference and cause the tenon to split in fragile woods, such as cherry. If you mark the offset with a slightly dull pencil, it can shift your mark by 1⁄32″ or so. I recommend you use a sharp mechanical pencil or (even better) a knife.
The shape of the peg is important, too. I whittle mine so the last 1⁄2″ tapers to an 1⁄8″ tip. In almost all cases, I use straight-grained white oak for my pegs. It must be completely dry; wet pegs will shrink in time and allow the joint to loosen up. Typically I’ll split out my pegs from some dry oak using a pocketknife and mallet. This is called “riving,” and it is a technique used by chairmakers to produce durable chair parts. Wood that is shaped by riving is stronger because it splits along the wood’s grain lines. Sawing cuts across the grain lines, which can create a more fragile peg in some cases.
I then whittle the pegs round or roughly octagonal. Another option is to pound them through a steel plate with the correct-size hole bored in it. When pressed for time, I’ll use dowel stock, which I have found to be satisfactory as long as I choose dowels with straight grain.
When you knock the peg home, you’ll sometimes create a small gap between the hole and the peg as the peg leans heavily into one side of the mortise as it makes its twisty path through your joint. If this gap is unsightly, try a different strategy on your next joint. Whittle your pegs slightly larger in diameter and switch to an octagonal shape. Again, a bit of practice in a couple sample joints will help you get it right.
Despite everything I know about drawboring, I still glue most of my joints and even coat the peg with glue before driving it in. It cannot hurt. But I do take great satisfaction in knowing that when that modern glue has given up, the peg will still keep everything in place so the joint will be just as tight as the day I made it. WM
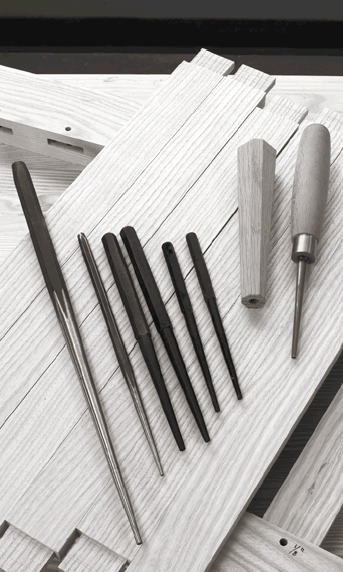
Making your own drawbore pins is easy using an inexpensive alignment pin and a scrap of sawn (or turned) hardwood.
Sidebar: Make Your Own Drawbore Pins in One Hour
Proper drawbore pins are absolutely the key to successfully and consistently executing a drawbored joint. The pins allow you to work with bigger offsets, to know exactly how the joint will fit before final assembly and to pave the way for your peg by slightly distorting the hole through the tenon.
You can purchase traditional pins from dealers of antique English tools, though you will spend $45 to $80 for a pair, and you must sometimes search for the smaller-sized drawbore pins. I’ve had good experiences with two dealers: Tony Murland’s Antique Tools (www.antiquetools.co.uk) and Classic Tools (classictools.com). Both are British dealers that sell to the United States.
The other option is to make your own. It’s easy and takes only about an hour once you have the materials in hand.
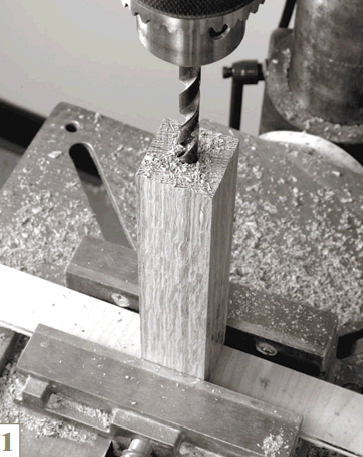
Bore a hole vertically into your handle blank. The hole should be slightly undersized compared to the largest dimension of the steel pin.
The metal part of the tool is easy to find. Machinists, bridge builders, mechanics and anyone who works with metal has a set of tools they use that are much like drawbore pins. They’re sometimes called drift pins, alignment tools or line-up tools. And they come in a wide variety of sizes and tapers.
To make your first set, any alignment pin from Sears will do the trick. And the company sells them individually and in sets.”
One of the alignment tools in the set has a 5⁄32″ tip that tapers to almost 3⁄8″ over a span of almost 4″. This is a decent tool for furniture-scale work, though it will be much easier to navigate the offset if you grind the tip a bit smaller. The other alignment tool has a 3⁄16″ tip that tapers up to a bit shy of 1⁄2″ over a span of 45⁄16″. This is a good size for larger work.
The first thing to do is to sand the black paint off the tapered section of the tool, which will come off on the wood eventually. Then you need to set the alignment tool into a wooden handle. Drawbore pins must be twisted in and out of their holes to work properly in my opinion. (Striking them is not a good idea.) I prefer a traditional tapered octagonal handle, which is easy to twist in and out of the holes. However, a lathe-turned handle will work nearly as well.
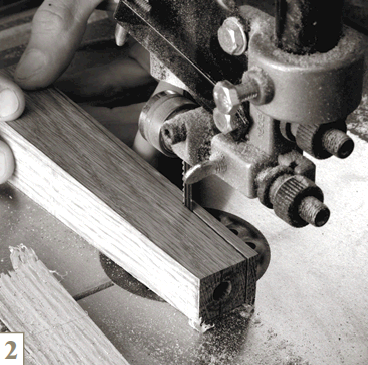
Taper the handle using your band saw.
First bore a hole straight into the end grain of a 11⁄4″ x 11⁄4″ x 63⁄4″ scrap of wood that will accommodate the hex-shaped end of the tool. For the smaller tool, use a 13⁄32″ bit for the hole (this is why you bought that fancy set with so many bits!). For the larger tool, bore a 17⁄32″ hole. If your bit isn’t long enough to go deep enough, finish up the hole with a long auger bit that is a bit undersized (3⁄8″ or 1⁄2″).
With the holes bored, shape the handle to your liking. I tapered my handles to 7⁄8″ or 1″ square at the small end.
Now comes the fun part. Get a propane torch and heat up the hex shank of the tool for a minute or two. Then knock the handle onto the tool. The heat will char the wood as you insert the steel and prevent the handle from splitting as its driven on. Allow everything to cool down and then add a couple coats of wiping varnish to your handle. Now you are ready to explore this ancient joinery technique for yourself. WM
Get all 16 issues of Woodworking Magazine on DVD (or as a download).


Here are some supplies and tools we find essential in our everyday work around the shop. We may receive a commission from sales referred by our links; however, we have carefully selected these products for their usefulness and quality.