We may receive a commission when you use our affiliate links. However, this does not impact our recommendations.
 How to make strong mortise and tenon joints with a plunge router and a tablesaw.
 How to make strong mortise and tenon joints with a plunge router and a tablesaw.
Imagine turning the clock back 500 years and visiting a fellow woodworker in any large European town. You could instantly strike up a conversation about the fine points of building a door with mortise and tenon joints—he’d know exactly what you’re talking about. Woodworkers figured out this joinery a long time ago, and we use the same design today.
Making the Mortises We’ll be using a new type of router jig that automatically centers the mortises in the grooves.
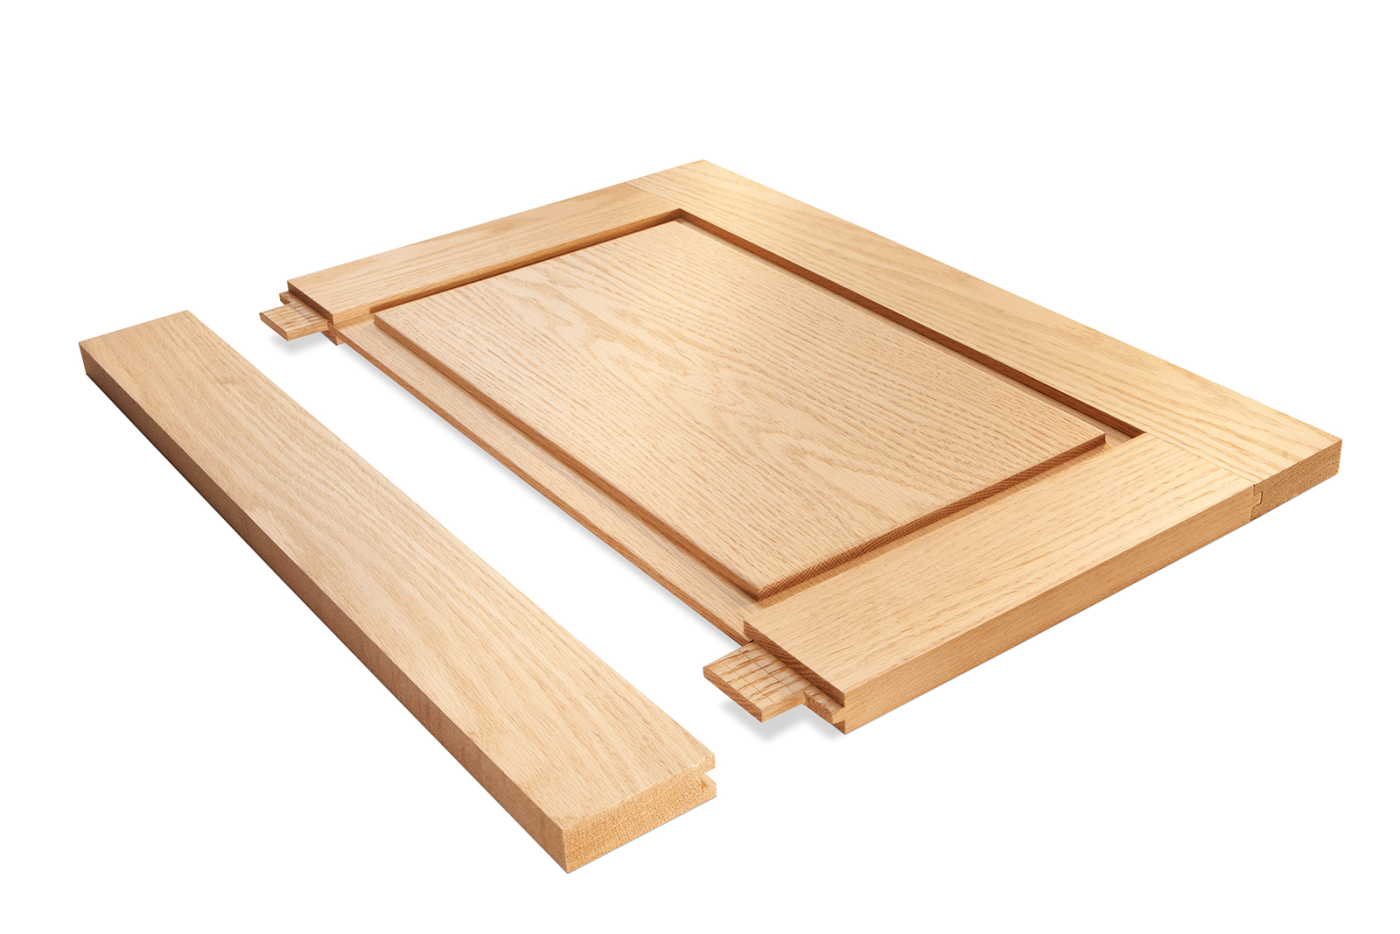
Of course, we also have modern methods of building doors, such as cope-and-stick joinery, but when it comes to making a large door with a loose panel, the mortise and tenon joint is still the way to go. Properly made, it will never sag or come apart.
Making the Tenons We’ll be using a dado set and a dedicated sled to get a precise fit.
There are many ways to make a door with mortise and tenon joints. I’d like to show you how to do it using very basic power tools—a plunge router and a tablesaw. Just about any plunge router will do, but I prefer using a small one, equipped with an upcut spiral bit. (A small router is easier to balance than a large one.) You’ll need a dado set for your tablesaw.
When making mortise and tenon joints, it’s standard practice to make the mortises first, then cut the tenons to fit. Let’s begin by looking at a new style of mortising jig I’ve devised.
 Making the Mortising Jig
 Making the
Fig A

Fig B
How to build it
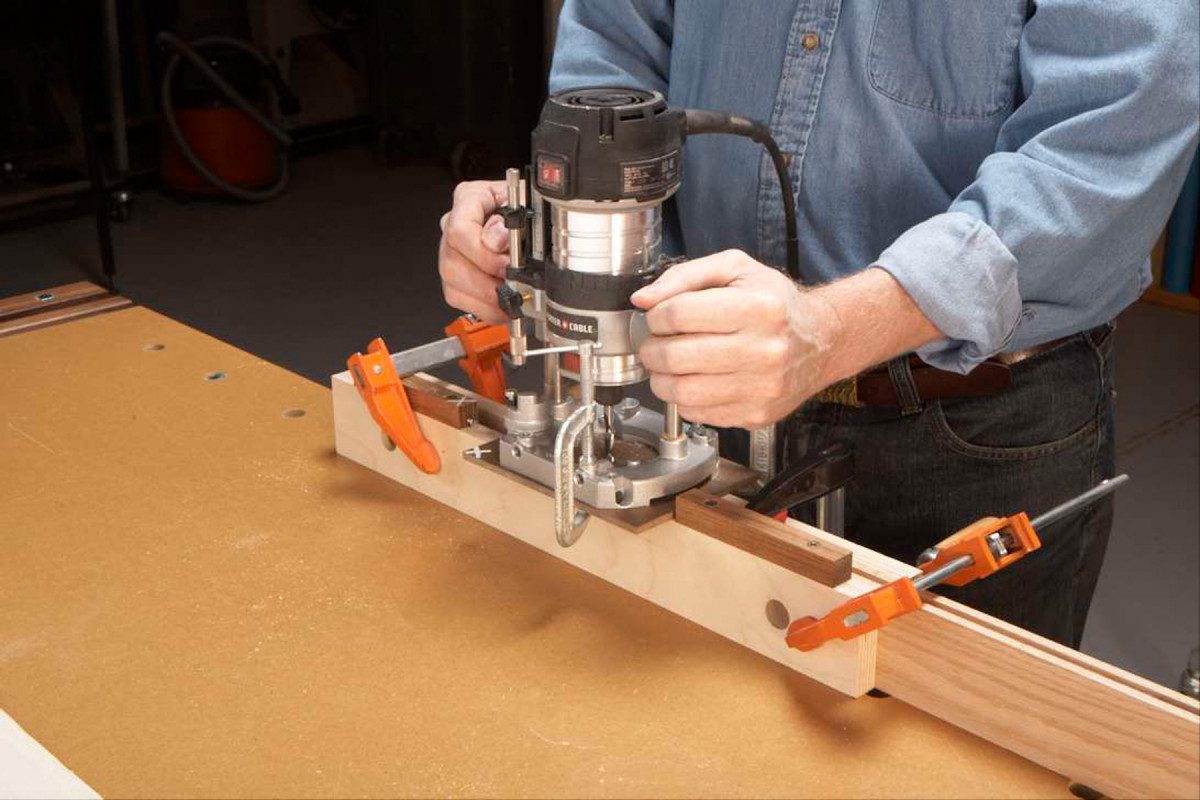
This jig is composed of two simple parts. First, there’s a replacement sub-base for your router (the Guided Sub-Base, Fig. B). It slides in the groove that will receive the door panel. Second, there’s a board that supports the router as you cut the mortise (the Stop Support, Fig. A). This block has stops that limit the router’s travel, controlling the length of the mortise.
To make the Guided Sub-Base, start by cutting a piece of 1/4″ tempered hardboard or MDF (A) about 1/2″ wider and 1/2″ longer than the base of your router. Drill a 3/8″ hole in the center of the piece. Next, cut a 1/4″ groove down the approximate middle of the piece, using a dado set. Make the groove 1/8″ deep.
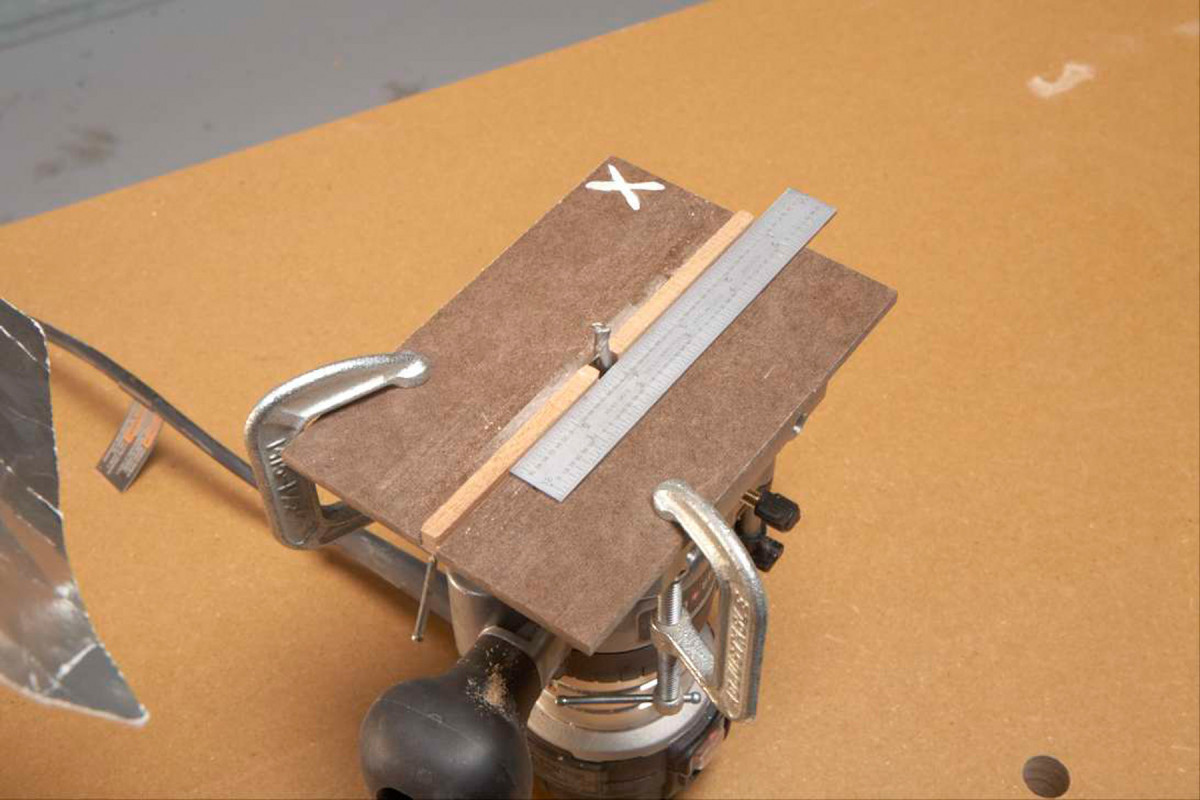
Clamp or screw the Guided Sub-Base to your router. Using a ruler as a straightedge, position the Sub-Base so the 1/4″ wide guide strips are exactly in line with a 1/4″ bit.
Make two guide strips (B), from one longer piece, to fit snugly into the groove. Glue them in place. Using the dado set, cut a 1/4″ x 1/4″ groove in a scrap piece and test fit the Sub-Base in the groove. It should slide easily, but should not wiggle. You may have to sand the sides of the guide strips to get the right fit. Rub a little paraffin wax on the Sub-Base to keep it sliding smoothly. Clamp the Sub-Base to your router.
To make the Stop Support, cut two pieces of 3/4″ plywood or solid wood the exact same width as your door stiles and about 20″ long (C). Set one piece aside, for use later. Drill two 3/4″ dia. holes near the ends of the other piece. Make a large stop block with a pointed end (D), and fasten it to this piece. Lastly, make two smaller stop blocks (E). Drill pilot holes in the ends of these blocks, then run in two small screws most of the way. Drill pilot holes for fastening the blocks to the Stop Support–you’ll attach them later.
Set up the jig’s stops
Begin by milling all your stiles and rails to final width and length. (Make a few extra pieces for testing the setup operations ahead.) Mark the face sides of each piece. Using a dado set, cut a 1/4″ x 1/4″ groove for the door panel along the inside edges of all the stiles and rails, keeping their face sides against the tablesaw’s fence. The groove doesn’t have to be exactly centered; close is good enough. It can be offset, too.
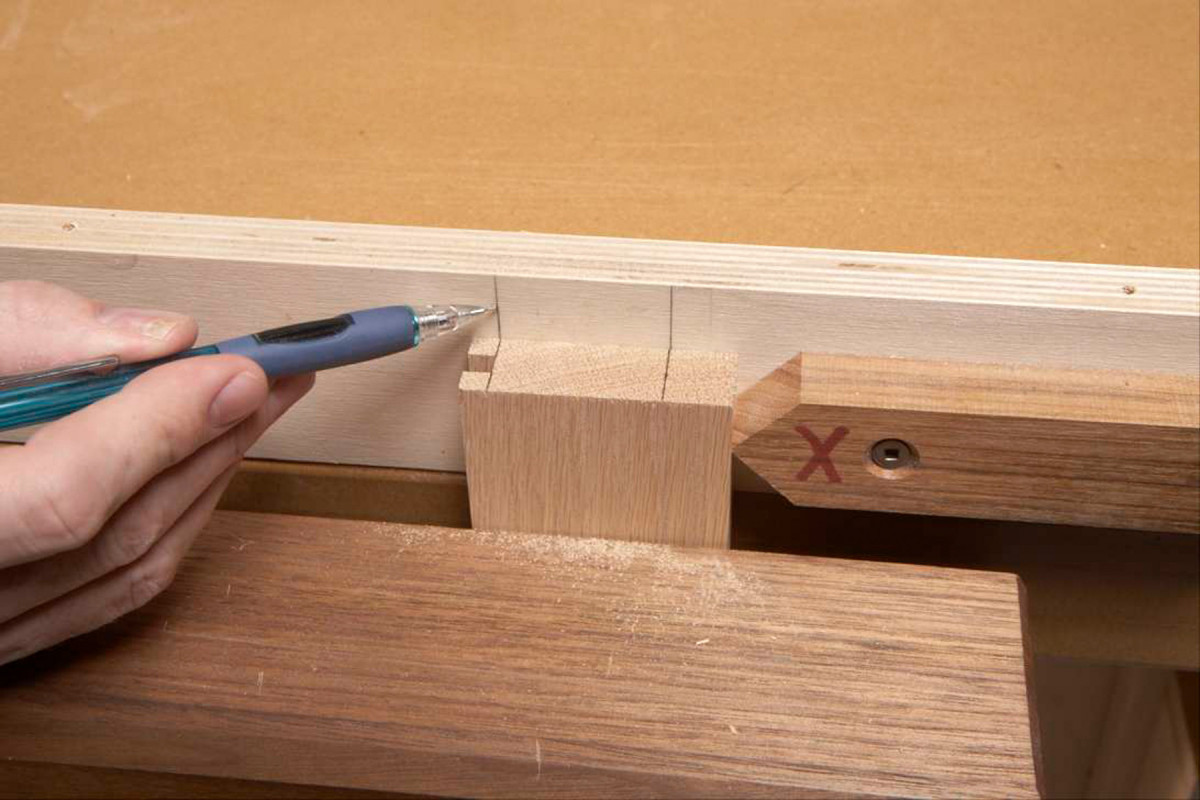
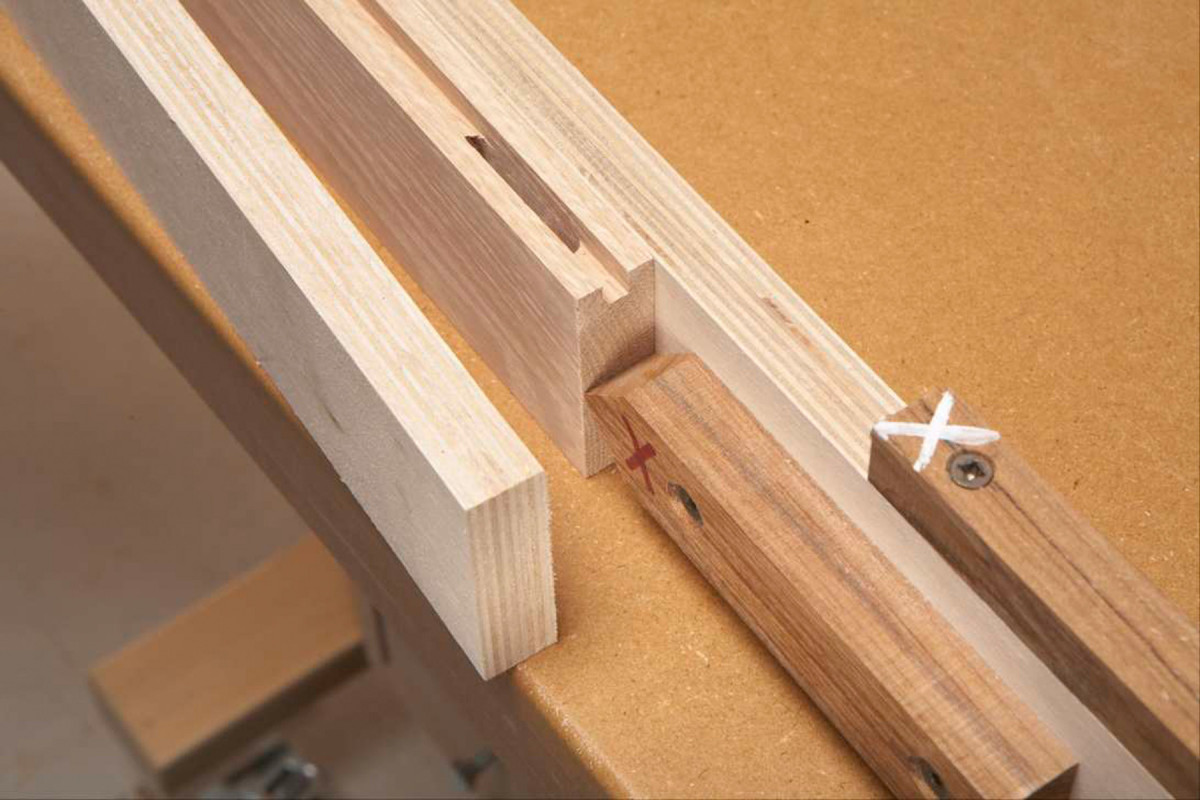
1. Draw layout lines on the mortising jig’s Stop Support directly from one of the door’s rails. Cut 1/4″ x 1/4″ grooves in all the stiles and rails first, then draw the width of the tenon on the end of one of the rails.
Draw the width of your tenon on the end of one rail (Photo 1). Clamp the rail in a vise and butt the Stop Support against the rail. Make sure the large stop on the Support is tight against the rail. Transfer the lines from the rail to the Support.
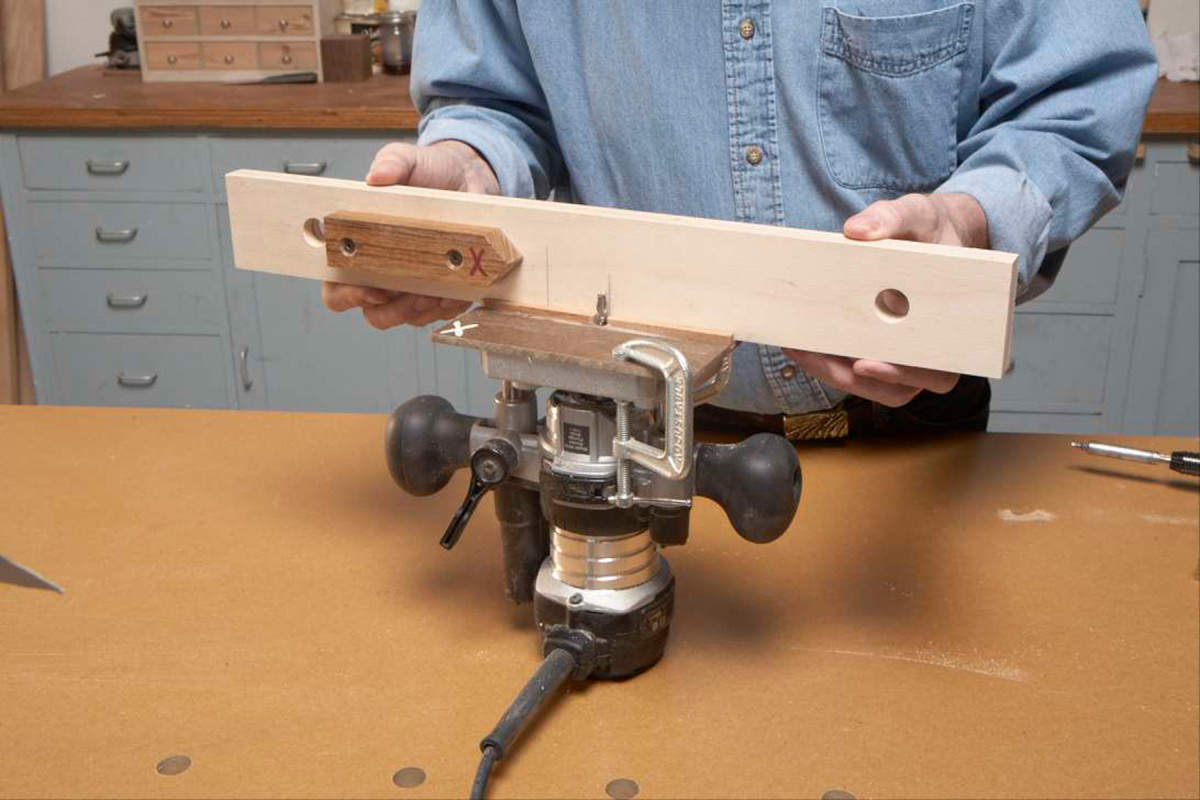
2. Place the Stop Support on top of the router. Line up the bit with the right-hand line on the Support. Note the Xs on both parts of the jig—these marks will help you orient the router the right way when you turn it over.
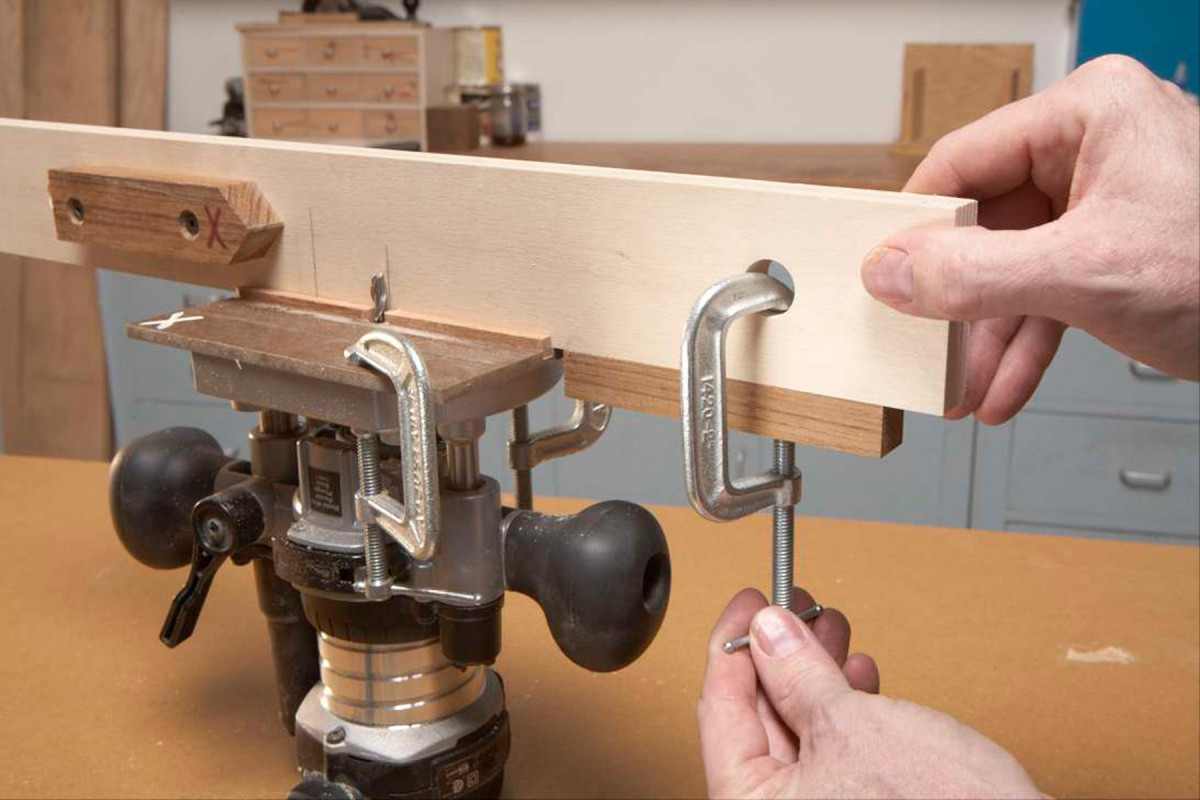
3. Clamp one of the stop blocks to the Support, so the adjusting screw in the end of the block butts against the Guided Sub-Base. Repeat this operation for the other stop block, then screw both blocks to the Support.
Turn the router upside down and place the Support on the router (Photo 2). Draw a large X on the corner of the Guided Sub-Base nearest the large stop. Align the bit with the right-hand line on the Support. Clamp one of the small stop blocks to the Support (Photo 3). Slide the Support so the bit aligns with the left-hand pencil line and clamp the second small stop block in place. Draw an X on top of this stop. Remove the Support from the router, clamp the Support in a vise and screw the stops to the Support.
Cut the mortises
4. Set up the jig and rout a mortise in a stile. The stile is clamped between two support pieces to steady the router. Adjust the screws in the stop blocks, if necessary, to fine-tune the mortise’s length. Once you’re set, use the same setup to rout all the mortises.
To assemble the jig, place the test piece against the Support. Butt the end of the piece up to the large stop (Photo 4). Place the second Support Piece (it’s just a plain board) against the test piece, making a three-board sandwich. Clamp all the pieces together, and clamp the whole assembly down to the bench.
4B.
Place the router on top of the jig, with the X mark on the Sub-Base near the X on the Support. Plunge the bit about 1/4″ into the wood, then move the router back and forth between the stop blocks. Plunge the bit another 1/4″ and repeat the operation until you’ve reached the full depth of the mortise.
Remove the router and make sure the mortise is in line with the groove; if it isn’t, adjust the position of the Sub-Base. Also, compare the length of the mortise with your original layout lines. Adjust the screws in the stop blocks as necessary. Be fussy about the end of the mortise farthest away from the end of the stile—it has to be spot on. Once the screws are set, rout both ends of all the stiles.
Saw the tenons
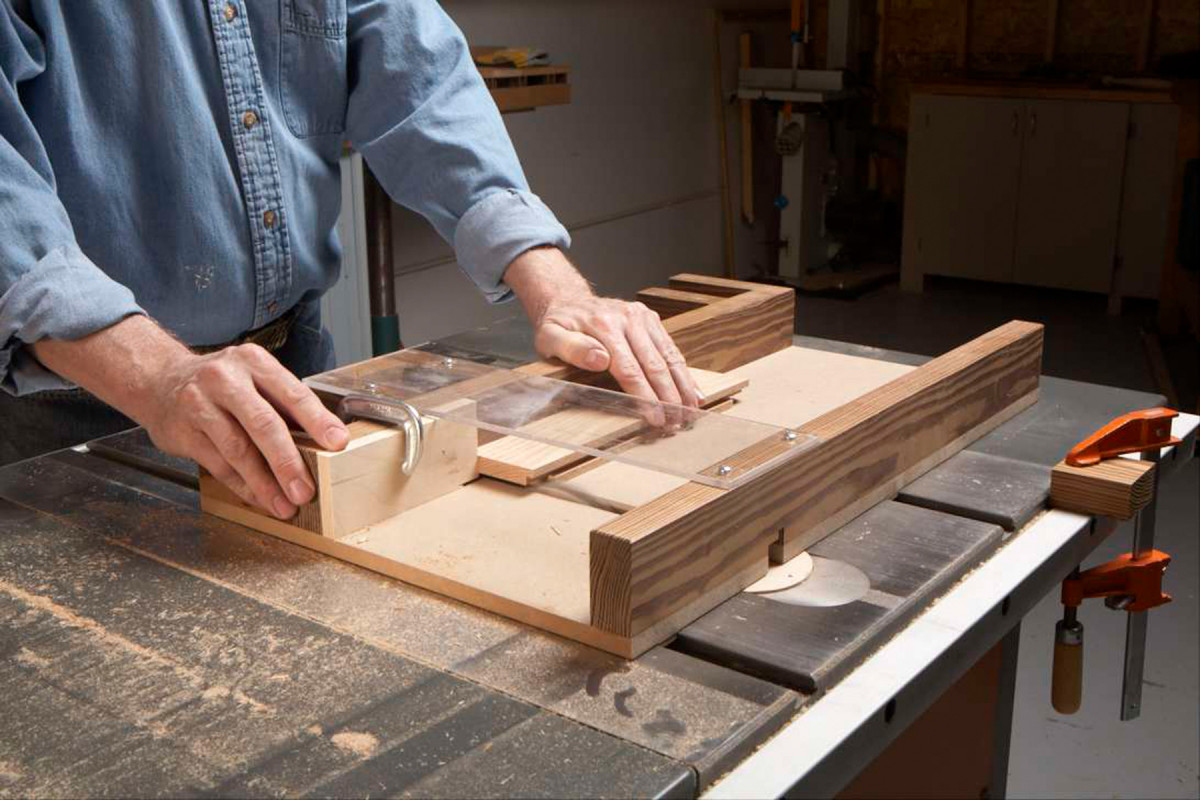
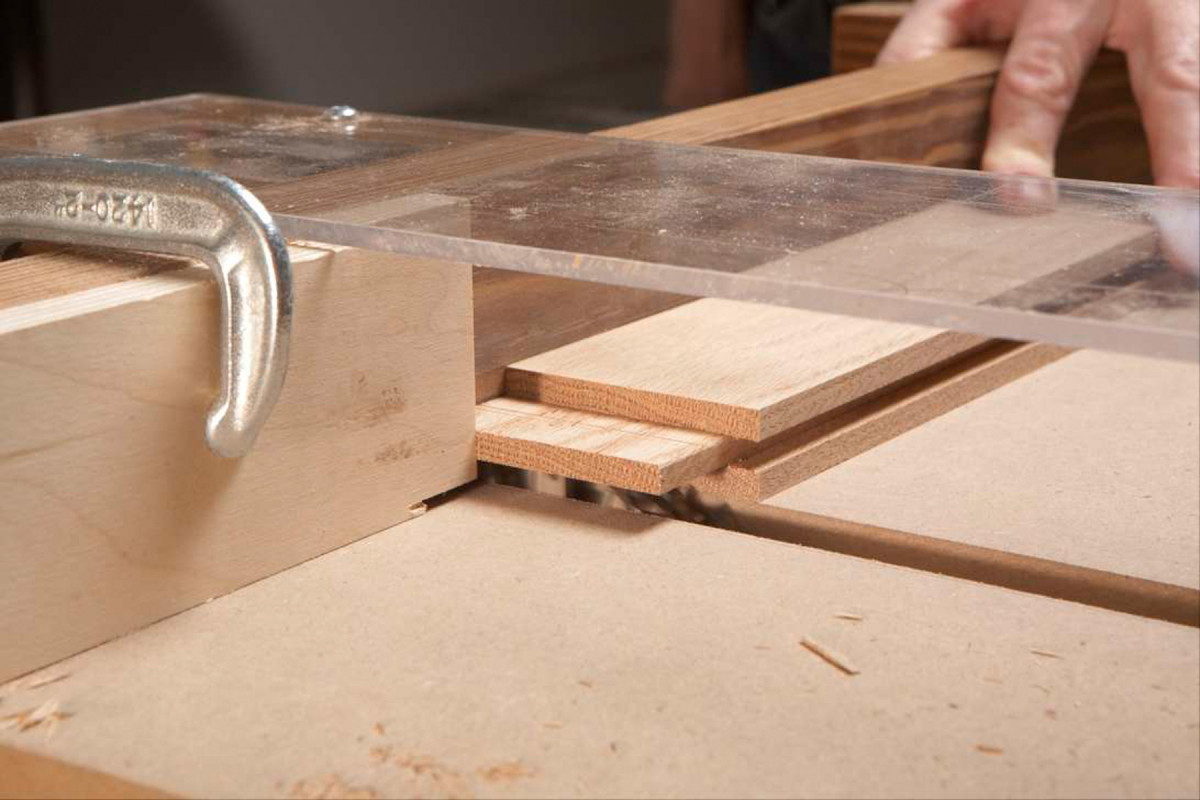
5. Cut the tenons with a dado set, using a sled or a miter gauge. Butt the rails against a stop, so all the cuts are equal in width. First, cut only one face of a test piece.
Set up a 3/4″ wide dado set in your saw. Door tenons are usually at least 1″ long, so cutting them will require at least two overlapping passes. Clamp a stop block to your sled or miter gauge’s fence to ensure that all the tenons are the same length (Photo 5).
6. Check the depth of the cut. Place the rail against a stile, face to face; the rail’s face should be flush with the groove in the stile. Adjust the height of the dado set, if necessary, then cut the face sides of the tenons on all of the rails.
Place a test piece on the sled, face side down, and raise the dado blade to cut about 1/32″ lower than the panel groove. Cut both passes, then compare the depth of the cut to one of the door’s stiles (Photo 6). Raise the blade in small increments, recutting the test piece, until the face of the test rail is perfectly flush with the groove. Once you’re set, cut tenons on the face sides of all the rails.
7. Cut the opposite sides of the tenons, starting with a test piece. Lower the dado set a bit, so the tenon starts out a bit fat on the first try. Then raise the blade little by little, making more cuts, until the tenon is the right thickness.
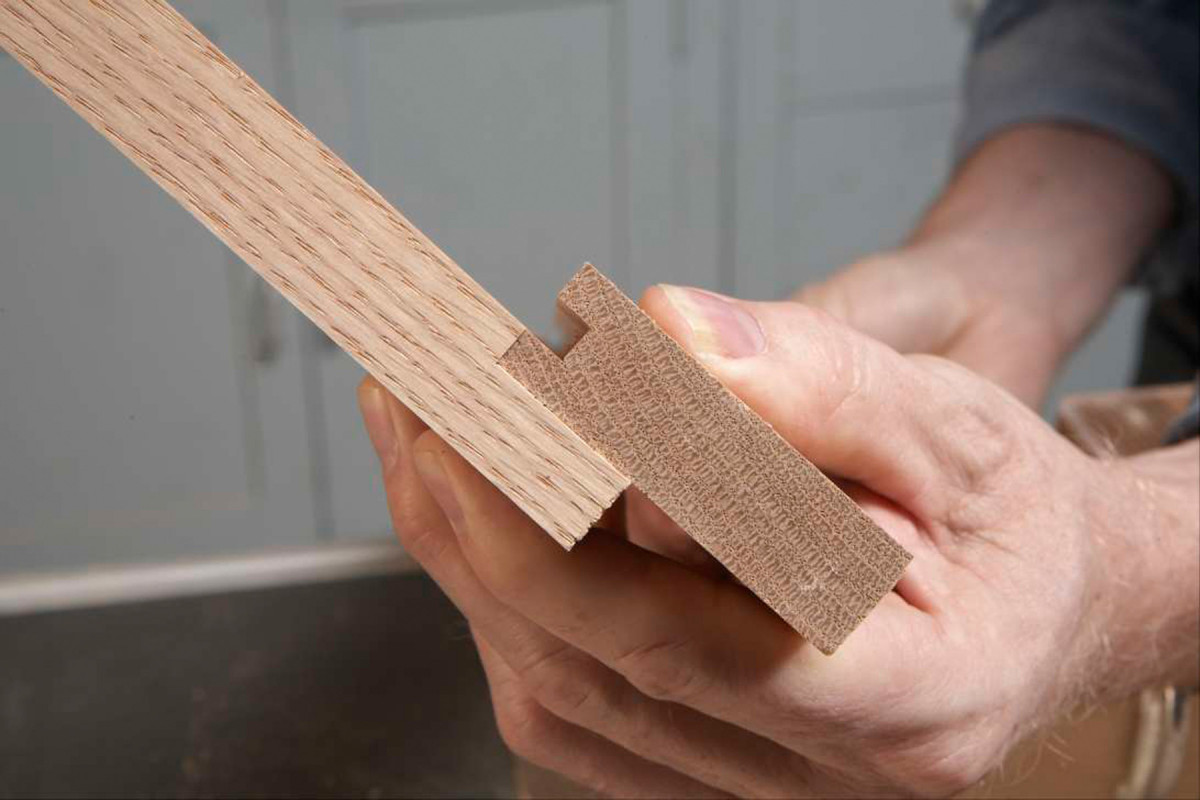
Turn over the test rail and repeat the same procedure, starting with the blade 1/32″ lower than the groove (Photo 7). Check the fit of the tenon in a mortise (Photo 8). At this point, the tenon should be too tight, or not fit at all. Raise the blade in small increments, making more test cuts, until the fit is correct.
8. Test the fit of the tenon in a rail. Once the dado set is at the correct height, and the test tenon slides in nicely, cut the back side of the tenons on all the rails.
How tight should the joint be? If you have to pound or push hard on the rail to get it in the mortise, it’s too tight. If there’s a gap between the tenon and mortise that’s greater than the thickness of a piece of notebook paper, it’s too loose.
Cut out the haunches
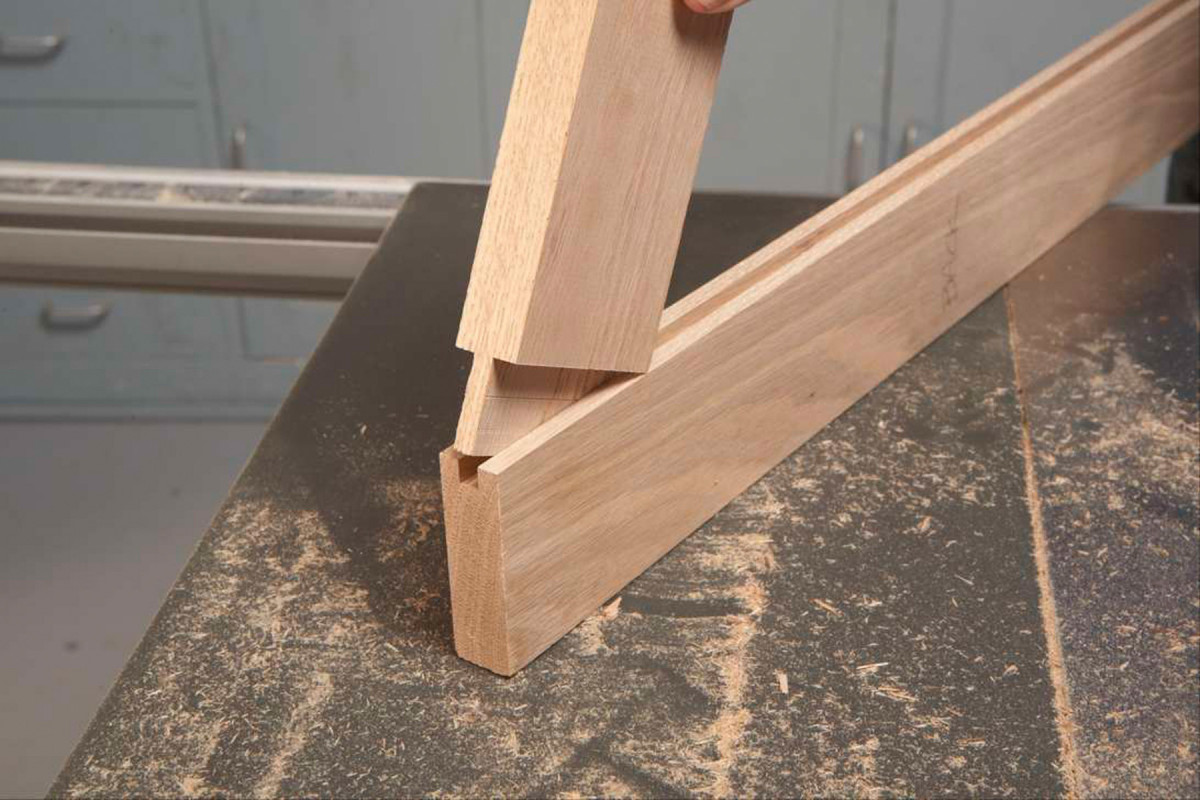
9. Lay out the haunch—a notch above the tenon—directly from a mortise. Clamp a stile in your vise, level with the face of the tenon, to make this line easier to transfer.
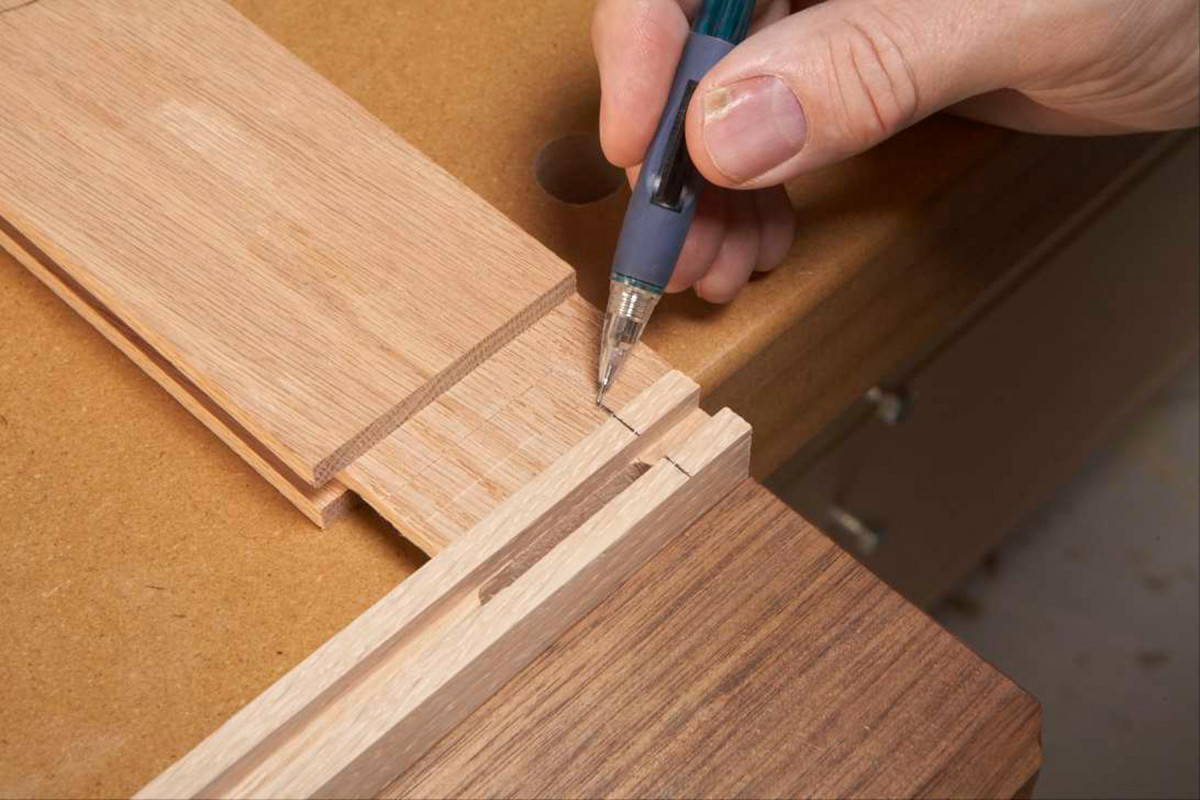
The last step in making the joint is to cut a notch just above each tenon, leaving a small stub to fit into the panel groove. This stub is called a “haunch,” making this a “haunched mortise and tenon joint.” The best way to lay out the haunch, which is identical on both ends of each rail, is by directly marking from a stile. First, mark the width of the tenon, so it’s exactly as wide as the
mortise (Photo 9). Second, mark the length of the haunch (Photo 10).
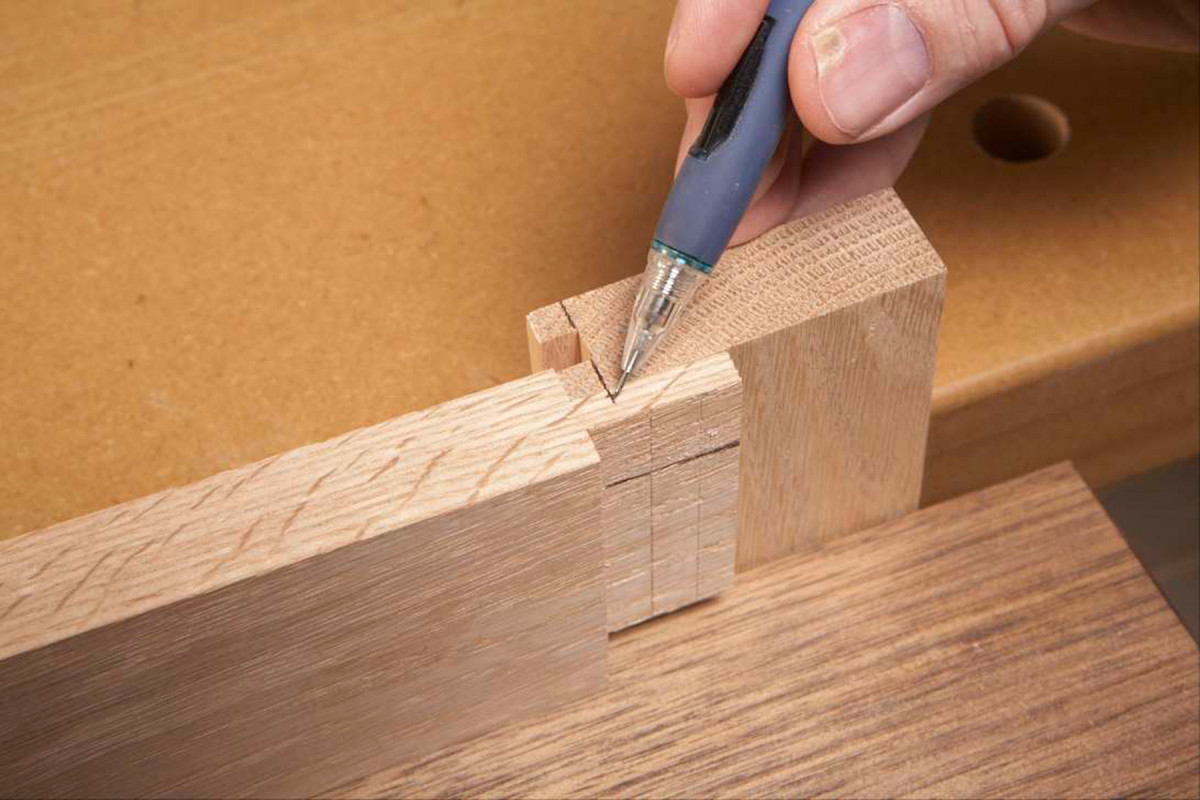
10. Mark the length of the haunch directly from the same stile. This time, clamp the stile so it’s even with the top edge of the rail.
You can saw the haunches by hand, but it’s faster to use a bandsaw. Set up a rip fence to cut on the first line you laid out. Clamp a stop to the fence to limit the length of the cut.
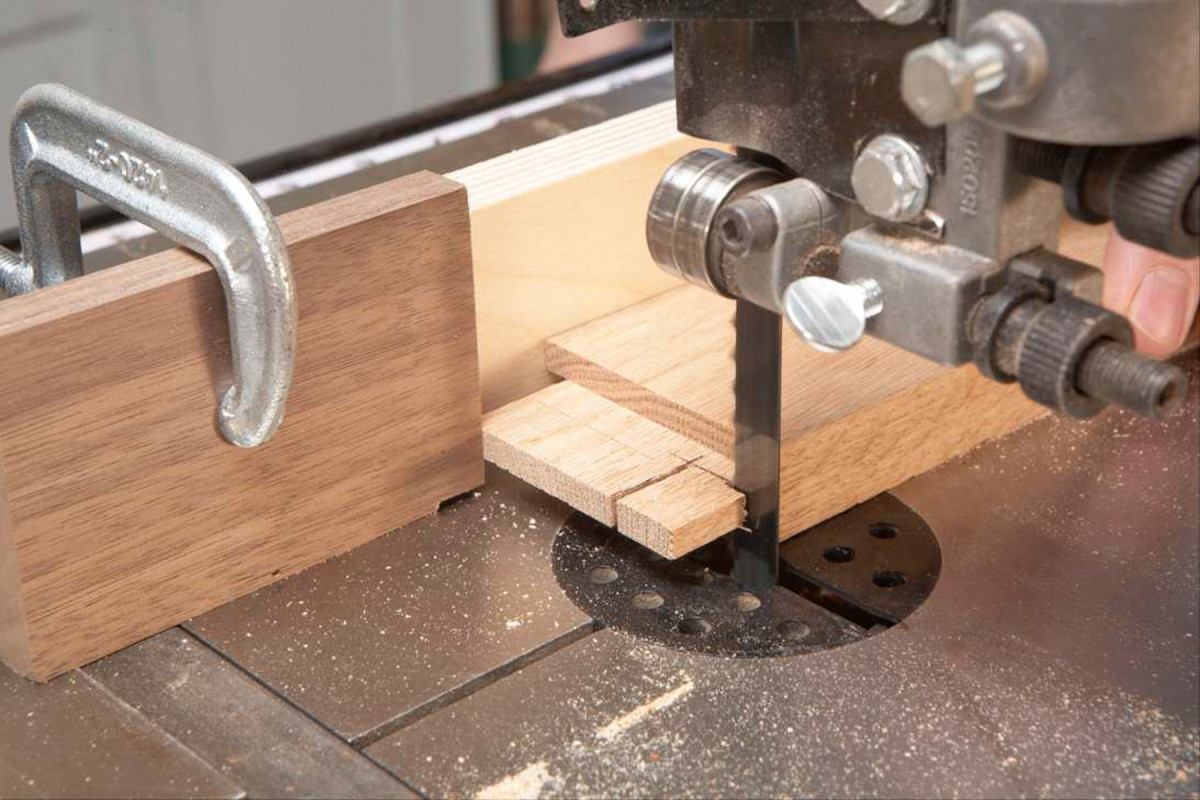
11. Saw all of the haunches on the bandsaw. Set up a rip fence for the first cuts; use a miter gauge for the second cuts.
Use a miter gauge equipped with a fence and stop block to make the second cut (Photo 11). Make this cut about 1/32″ off the line, so the haunch doesn’t quite bottom out in the panel groove (this guarantees that the tenon’s shoulders will draw up tight).
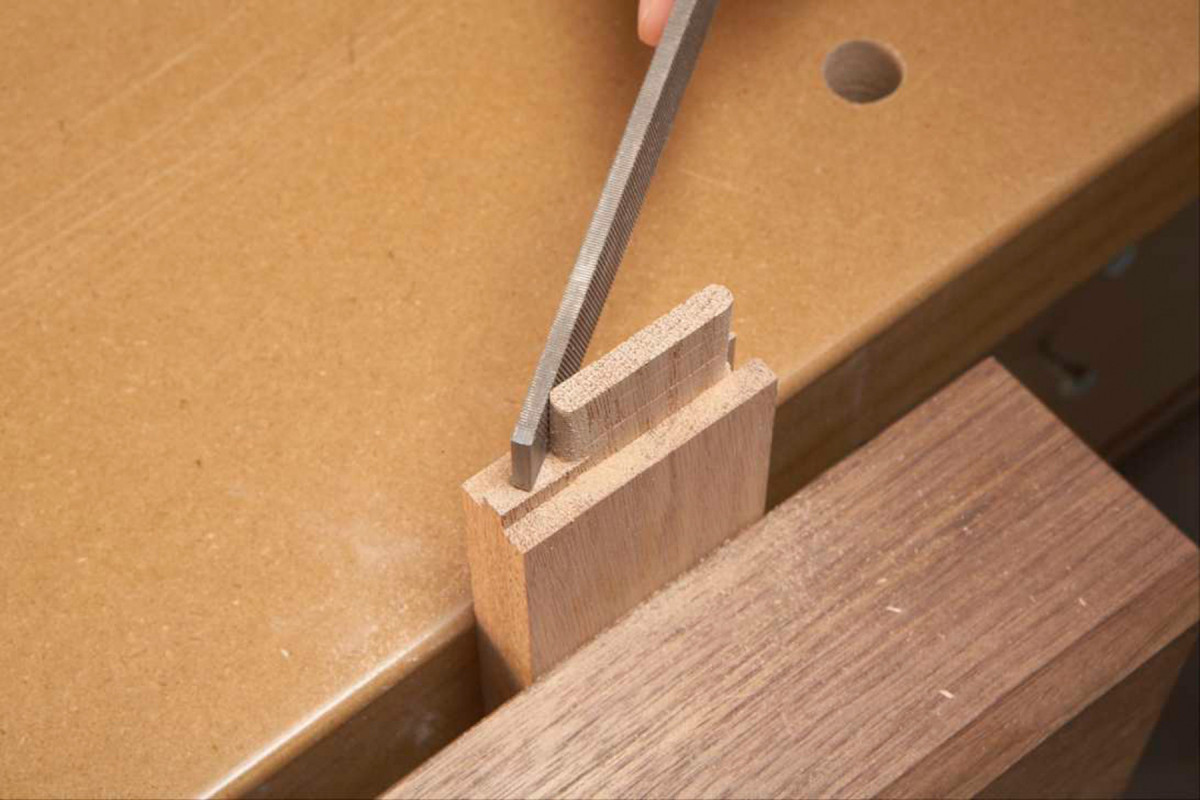
12. Round the tenons with a file, to match the rounded ends of the mortises.
Finally, round all the tenons with a file (Photo 12). A 10″ double-cut flat bastard gets the job done very quickly. Place a mortise nearby for reference; you’ll be able to copy the round shape, by eye, quite easily.
Why Use A Sled To Make Tenons?
To make tenons with a dado set, you must be able to make a perfect right-angle cut on your tablesaw. Sad to say, many stock miter gauges aren’t capable of this level of precision because their bars have too much play in the saw’s miter slots. If the head of the miter gauge wiggles just a little bit as you make a cut, the shoulders of your tenons won’t be straight or square or in the same plane, front and back. And that leads to gaps or joints that are out of square.
Here are a few solutions to the wiggle problem: First, scrounge a second miter gauge and attach both gauges to a long wooden fence. The fence will prevent both gauges from wiggling. Second, use an aftermarket miter gauge whose bar can be adjusted to custom-fit your miter slots. Third, build a sled with two runners. Normally, a sled is just used for crosscutting with a standard blade; if you use the same sled with a dado blade, you’ll create a huge opening in its base and fence, which is not ideal. It’s far better to build a dedicated sled for making tenons—it will pay off many times over.
Bonus: Check out the plans for the tenoning sled here.
Here are some supplies and tools we find essential in our everyday work around the shop. We may receive a commission from sales referred by our links; however, we have carefully selected these products for their usefulness and quality.