We may receive a commission when you use our affiliate links. However, this does not impact our recommendations.

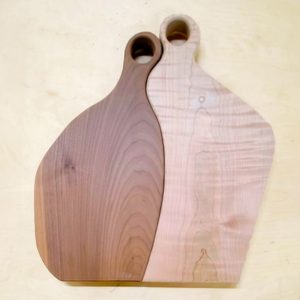
This low-resolution image was created in SketchUp using a free version of Maxwell Render.
Whenever I take on a new cabinet or built-in project, I like to model it in SketchUp. I sometimes have trouble visualizing how things are going to fit together, and an accurate 3D model helps me think through a project thoroughly before I start. Often, I like to go even further with a model, using it to produce photo-realistic renderings that show me exactly how my finished project will look.
A photo-realistic rendering is an excellent way to make sure you’re going to be happy with your work when it’s finished. It’s also helpful when you need to sell someone else, like a spouse, on an idea. You can show that person what you want to do instead of trying to describe it.
Producing a rendering of a woodworking project is simple. There are several SketchUp plugins that will let you do the work right inside the program. Most of these cost about $100 for the full version, but at least one has a free demo version that will do a decent job. Maxwell Render offers their plugin with a low-resolution option that’s free. Once you’ve downloaded and installed it, you’ll see a new toolbar inside SketchUp that you’ll use to create your renderings.
The Maxwell toolbar
There are several tools in the Maxwell palette, but for basic rendering, you’ll only need a few. The most important one is called the Scene Manager, and you get to it by clicking the pencil icon. The Scene Manager is where you edit the materials, camera and environment in your model. Once you know the basics of this tool, you can create photo-realistic images.
The first tab in the Scene Manager allows you to edit the materials in your model. You can change a texture from matte to glossy with the Roughness slider bar. Slide it to the left to increase the sheen of a material.
The next tab is where you’ll change the camera settings, but for a beginner, there really isn’t anything in here that needs to be adjusted. If you want to change the brightness of a rendering, adjust the focus or change the lens to something like a pinhole camera, you can do that in this tab. You can experiment here, but again, photo-realistic images are possible without any changes to the camera settings.
The environment tab seems to have the most influence on the realism of a rendered image. In this tab, you can adjust things like sky, sun, color source and ground plane. Changes to any one of these can have a dramatic impact on the rendering. I’ve always had a hard time getting realistic results with the sun turned out.

The Scene Manager lets you adjust settings for realistic images.
When you have all the settings correct in the Scene Manager, you click the Fire tool in the top of the Maxwell toolbar to render the image. With the free version of Maxwell, you’re output is limited to a resolution of 800 x 378 pixels. This means you’ll end up with a grainy image, but it’s surprisingly good for something you don’t have to pay for. If you want a better quality rendering, you’ll have to pay the $100 for a full version of the plugin.
I should mention one other option for rendering SketchUp models that’s completely free and open source. It’s called Kerkythea. It’s a little more difficult to learn, and the rendering work takes place outside of SketchUp. I’ve found that getting a photo-realistic image in this program is challenging, but at least the resolution isn’t limited to 800 x 378.
If you’re comfortable drawing 3D models in SketchUp and would like to take your work even further, check out some of the rendering plugins like Maxwell, V-Ray and Kerkythea. You’ll probably be surprised by the quality of images you can produce.
Want to learn about using SketchUp in your kitchen cabinet and built-in projects? Check out Designing Kitchen Cabinets in SketchUp from Popular Woodworking University. You’ll draw a kitchen from scratch, including appliances and trim. When you’re done, you’ll know everything you need to design your own kitchen.