We may receive a commission when you use our affiliate links. However, this does not impact our recommendations.
Solar Kiln
Dry Your Own Wood Fast and Hassle-Free
By Dave Munkittrick
|
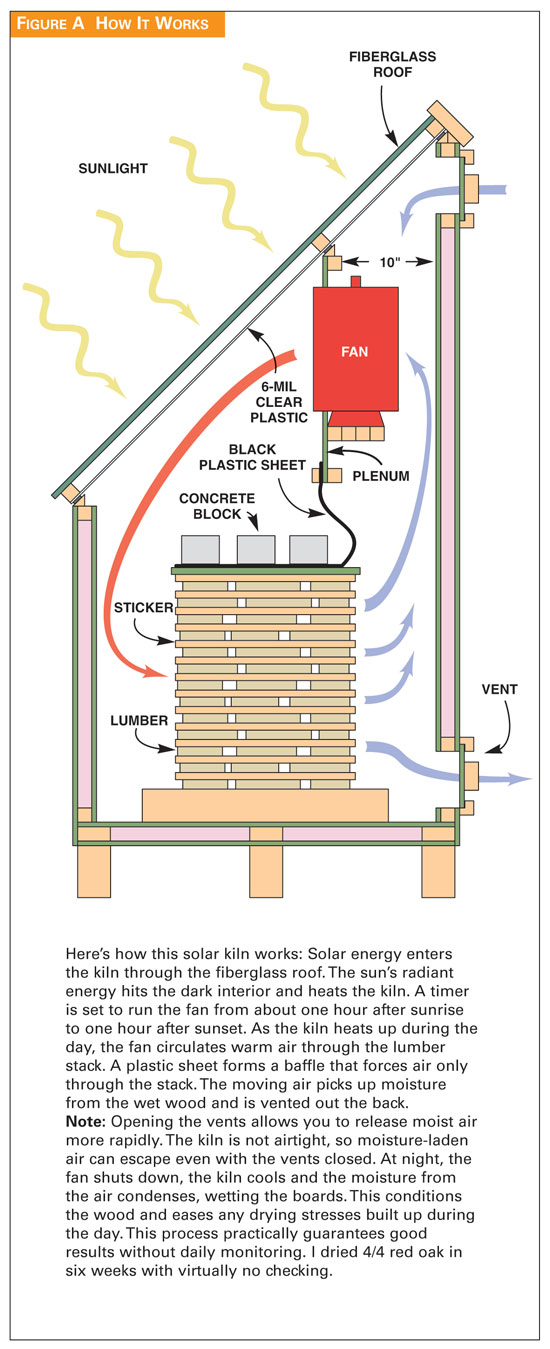
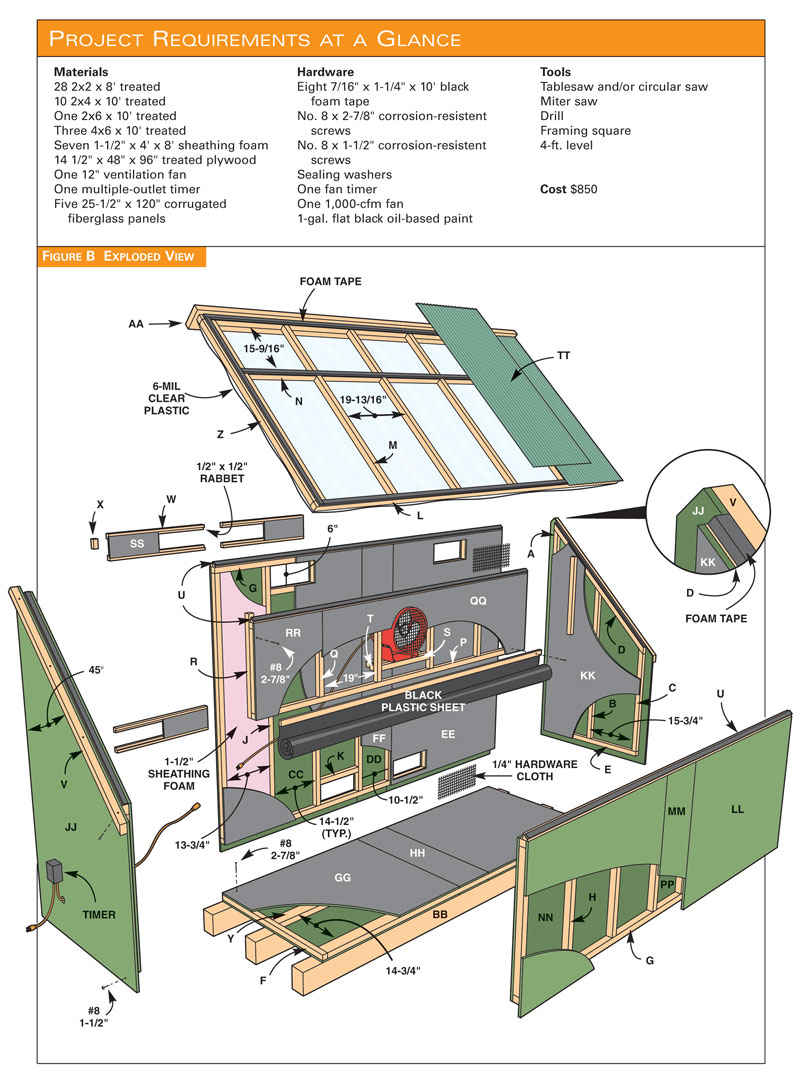
Wood is expensive. And extra-wide or figured wood is practically beyond reach. Over the 25-plus years I’ve been a professional woodworker, wood seems to have taken a cue from oil: The price keeps going up. There are ways to use less oil, but when a project requires 100 bd. ft. of walnut, you gotta buy 100 bd. ft. of walnut. That’s why I was so thrilled to discover a simple solar kiln developed by Dr. Eugene Wengert, an extension forest products specialist at the University of Wisconsin–Madison. Wood is relatively inexpensive before it’s dry. I have managed to obtain green wood at a lumberyard at a fraction of the price of dry wood. Granted, there is a fair amount of sweat equity involved in stacking and transporting larger amounts of wood, but the savings are well worth the effort. A solar kiln is the simplest and safest way to dry green wood quickly. Because the wood is protected from the elements, this solar kiln offers more control with much less chance of defects than air-drying provides. Unlike air-drying, it’ll dry wood to the moisture level needed for interior use. And unlike other kilns, it is designed so that it’s nearly impossible to dry 4/4 wood too fast. It’s as close as you can get to a “set it and forget it” system. After the kiln is loaded, all that’s required is some minimal vent adjusting while the wood dries. No sweating over daily drying rates and continual monitoring of the drying process. I talked with a number of solar-kiln owners for this article. I discovered they all share one problem: where to store all their wonderful solar-dried wood. Kiln designI downsized Dr. Wengert’s kiln design to dry about 300 bd. ft. of 4/4 I installed a single fan rated at 1,000 cubic feet per minute (cfm) Roof angle is important. Determine your latitude; then use that Set it and forget itThe beauty of this solar kiln design is that it’s almost impossible to dry 4/4 wood too quickly. Even so, most hardwoods can be dried in six weeks during the peak summer months. Our load of basswood took only four weeks. A conventional kiln dries the wood continuously and has to be monitored closely to prevent exceeding the safe drying rate for that species (see “Safe Drying Rates,” below). A solar kiln is cyclical (Fig. A, below). During the day, the kiln heats up and the fan comes on to circulate hot air through the stack. Moisture is drawn from the wood into the air and is vented outside through the vents or leaks out naturally through the kiln’s joints and seams. At night, the cooling cycle begins. The temperature drops, the fan shuts down and the moist air condenses. The surface of the wood gets wet and cool, relieving any drying stresses that built up during the day. It’s like having an automatic conditioning cycle built in. For most 4/4 stock, it’s OK to start with the vents open an inch or two (Photo 8). This helps remove the moist air quickly. At the same time, however, you’re also letting out heat, so there is a trade-off. After the majority of the moisture is out of the wood, which usually takes a week or two, go ahead and shut the vents to maximize the temperature. Moisture can still escape the kiln because it’s not airtight. For figured, thick, prized or check-prone wood, it’s best to start the drying process with the vents closed. This keeps the humidity in the kiln from dropping too quickly and slows the drying process. This is especially necessary with stock thicker than 4/4. (For fast-drying or white woods, leave the vents wide open until the wood reaches 20 percent moisture content.) After a few weeks with the vents closed, most of the moisture will be out of the wood. Open the vents a few inches to help expel the remaining moisture. Shut the vents for the last week or so. You may find it’s easiest to simply leave the vents closed all the time for thick or hard-to-dry wood. Drying thicker wood does require some monitoring of the drying rate. For safe drying rates, see “Safe Drying Rates.” To slow the drying process for thick wood or when the kiln is less than full, you can block off parts of the roof with an opaque covering or tarp. You can learn all there is to know about solar kilns and wood drying at www.woodweb.com. Click on The Wood Doctor. Build the kilnBuilding the kiln is straightforward. All the materials are readily available at home centers or lumberyards. Be sure to use corrosion-resistant fasteners throughout the kiln (see Sources, below). The kiln is made up of six panels (Fig. B, below)—floor, roof, front, back and sides—that can be built in the comfort of your shop (Photo 1). Insulation in the walls and floor helps the kiln retain heat, which helps speed the drying process. All of the interior surfaces are coated with a flat black oil-based paint. The oil base prevents moisture from penetrating into the wood, and the flat black color absorbs heat from the solar energy. The solar-panel roof is made with translucent corrugated-fiberglass roofing material. It offers the best combination of low cost and durability. The corrugated roof must be sealed against the roof frame at the top and bottom edges. Corrugated roofing manufacturers offer various solutions to this problem, such as wood strips cut to match the undulating roofline or strips of foam that conform to the corrugations. To increase the insulating value of the roof, I also stapled clear 6-mil-thick plastic sheeting on the underside of the roof frame. This added layer greatly improves the kiln’s performance. Assemble the kilnIt’s important to locate the kiln with a south-facing exposure that’s free of shadows. I set down treated landscape timbers to hold the kiln up off the ground (Photo 2). The timbers provide a level platform for the kiln to rest on. I started by securing the floor to the timbers, then added the back and sides (Photo 3). After attaching the fan plenum (Fig. B) to cleats mounted on the side panels, I drilled a hole for the fan cord. Finally, the kiln was ready for loading. All I needed was some green wood to dry. Load the kilnLoading the kiln is a breeze with the roof and front panel removed (Photo 4). If you’re drying check-prone wood, such as oak, use an end sealer (see Sources, below) on the wood before it’s stacked. Note: Be sure to stack the wood to leave at least a 6-in. airspace in front and back and under the fan plenum. I added a couple of remote sensors in the middle of the stack so I could tell when the wood was dry without having to open the kiln (Photo 5). I used a commercial kit (see Sources, below). You can substitute two nails for the sensors; set them about an inch apart and driven to one-quarter depth of a board. Attach a wire to each nail with alligator clips and run them out a hole in the side of the kiln. To take a reading, simply clip the wires onto the prongs on your moisture meter. When you’re done stacking your green wood, attach a plastic sheet to the bottom of the fan plenum and drape it over the stack (Fig. B). The plastic directs the air so it circulates through the stack. Weight the stack down with cement blocks (Photo 6). Run an extension cord from the outdoor timer to the fan through a hole drilled in a side panel (Fig. B). Attach the front panel and the roof (Photo 7) and set the vents (Photo 8). Your green wood is on its way to being kiln-dried. Sources(Note: Product availability and costs are subject to change since original publication date.) McFeely’s, mcfeelys.com, 800-443-7937, No-Co-Rode Drivers, #2 x 2”L, #HX-0222; ProMax No-Co-Rode Dekkers, #8 x 2-7/8” self-drilling, flat-head screw, #0827-FPX; Promaster No-Co-Rode Saw Tooth Screws, #8 x 1-1/2”, #0814-FAX; Sealing Washers, #0800-GSW. Spa Depot, spadepot.com, 800-823-3638, Outdoor Electronic 24-Hour Timer w/ Single Outlet, #BX9982. Home Depot, homedepot.com, 800-466-3337, GE 15 Amp 6-Outlet Yard-Stake Timer, model 15107, #100685871 (can be wall-mounted). Nasco, eNasco.com, 800-558-9595, 12-in. ventilation fan, #C13098N. Lignomat, lignomat.com, 800-227-2105, Kiln Package: 1-mini-Ligno E/C, pair of PKB-Probes, 6 ft. PK-mini cable, # E-11. Woodcraft, woodcraft.com, 800-225-1153, Green wood end sealer, #150809, 1 gal. Home Centers, Fiberglass roofing panels, treated lumber, treated plywood and insulation. Cutting List
Plywood Cutting Diagram
This story originally appeared in American Woodworker October 2006, issue #124.
|
Click on any image to view a larger version.
With care, a solar kiln can dry wood pieces that are just about any shape or size. You can often dry mixed species and thicknesses in the same load. A solar kiln makes it easy.
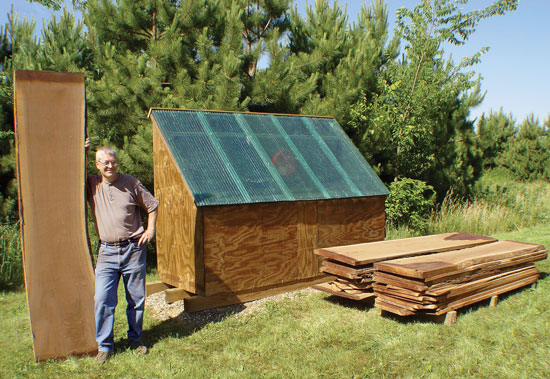
Buying wood green and drying it yourself saves a lot of money. The big pile of green wood in front cost the same as the tiny pile of kiln-dried wood behind me.
With this kiln, you really can “set it and forget it.” While your wood dries, you can get back to your shop or other interests.
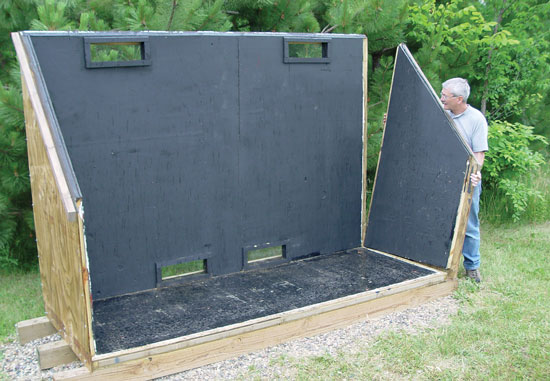
1. I built the kiln’s panels in my shop using deck screws. Foam insulation board helps hold the heat in when the sun is down. Treated wood and plywood resist decay in the high moisture environment of a kiln.
2. To prepare a base for the kiln, I leveled treated landscape timbers on a bed of river rock in my backyard. A sheet of plastic under the river rock discourages weed growth.
3. The panels go together easily. I painted the kiln’s interior surfaces black to protect the wooden walls against moisture penetration and to help absorb more heat from the sun.
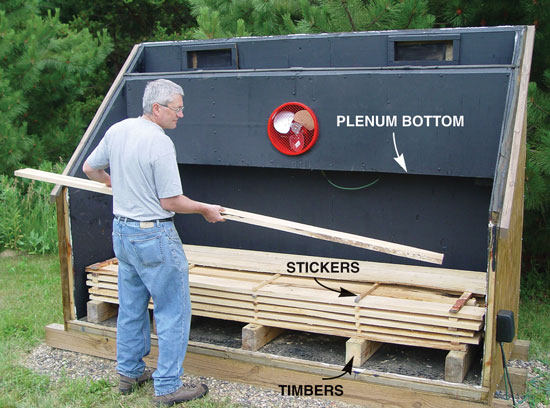
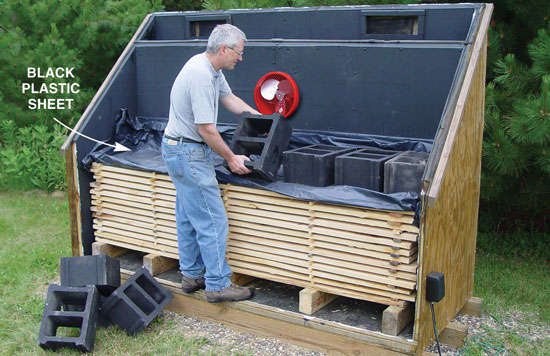
4. I started the stack with timbers to keep the drying wood up off the wet floor. I stacked the green wood to within about 6 in. of the bottom of the fan plenum. Stickers create a gap between each layer so hot air can be driven through the stack by the fan.
5. Two probes are hammered into a board in the middle of the stack. Wire leads are run out of the kiln, where a moisture meter can take readings. Sensors allow you to monitor the wood without having to open the kiln.
6. I topped the stack with cement blocks painted black for heat absorption. The weight from the blocks reduces warping in the drying wood. A plastic sheet attached to the plenum and draped over the top of the stack forces air through the stack.
7. With the help of a friend, I set the roof on the kiln. The removable roof hooks over the peak and is secured with screws through a cleat on the side.
8. Vents allow moisture to escape during drying. They are closed toward the end of the drying process to help maximize heat and get the wood down to the target 8 percent MC. Fig. A: How It Works
Fig. B: Exploded View
Safe Drying Rates
|


Here are some supplies and tools we find essential in our everyday work around the shop. We may receive a commission from sales referred by our links; however, we have carefully selected these products for their usefulness and quality.