Even though I have a small fortune
invested in tools, I always seem to be
short of wooden handscrew clamps.
But daydreaming about buying ten more of
these versatile tools runs smack into the
reality that such a purchase requires spending
anywhere from $200 to $450, depending
on the size of clamp. Ouch!Several years ago, I resolved to satisfy my
need for clamps by making my own, using
the chunks of this and that from my scrap
pile, which waxes and wanes with the seasons.
In September, this pile spills out across
the shop floor, but by late December, the
frigid Maine weather has reduced it to nothing.
Until spring, the morning race to get
some heat in the shop becomes a little like
the Mississippi River steamboat races of the
1800s, the crew dismantling cabins and
upper decks to provide fuel for the roaring
boilers. So, my rule of thumb is to make
clamps before the heating season starts.The first batch of clamps that I made
were similar to Jorgensen handscrews,
except for having wooden screws. I turned
maple and ash on my lathe to make my own
wooden screws, and threaded them with a
screw box. The resulting clamps worked
well, with one important exception: They
were a bear to adjust; cranking them open and shut was laborious. When a tricky glueup
was writhing on the bench like a crazed
anaconda, and speed was of the essence,
these clamps wouldn’t do.
Then, while flipping through a book I
purchased at a flea market, I spied two
wooden clamps in a photograph taken at
Old Sturbridge Village in Massachusetts.
These clamps were similar to the ones I had
made, with a crucial difference. Where both
screws on my early clamps threaded completely
through the opposing jaw, the Sturbridge
examples had one screw that passed
through the threads and one that seated in
a stopped hole. Both screws were secured
to this jaw with garters. So as the screws
turned, they either forced the jaws open or
pulled them closed. Shouting the (unprintable)
Maine equivalent of “Eureka,” I
rushed to the shop to build a prototype.
There must be an unwritten rule sacred to
cabinetmakers (at least to me, anyway), that
the paying work isn’t nearly as interesting
as the harebrained schemes that we invent.
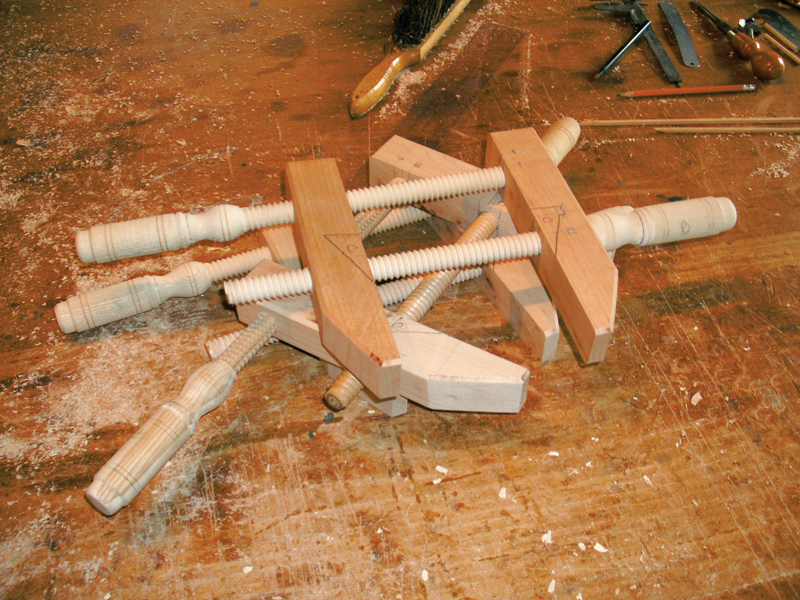
Several hours later, I held in my hands a
clamp which effortlessly twirled open and
shut. Here’s how to make your own wooden
handscrews, like the one I devised.
Make the jaws

I usually make these clamps in batches.
Start by milling and sawing kiln dried stock
for the jaws. The dimensions for each jaw
block are 1-3/8″ wide on the clamping face,
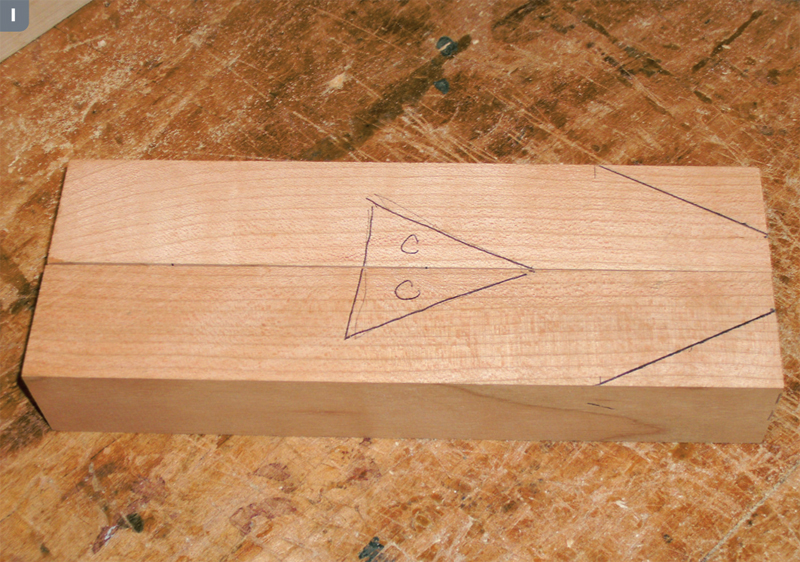
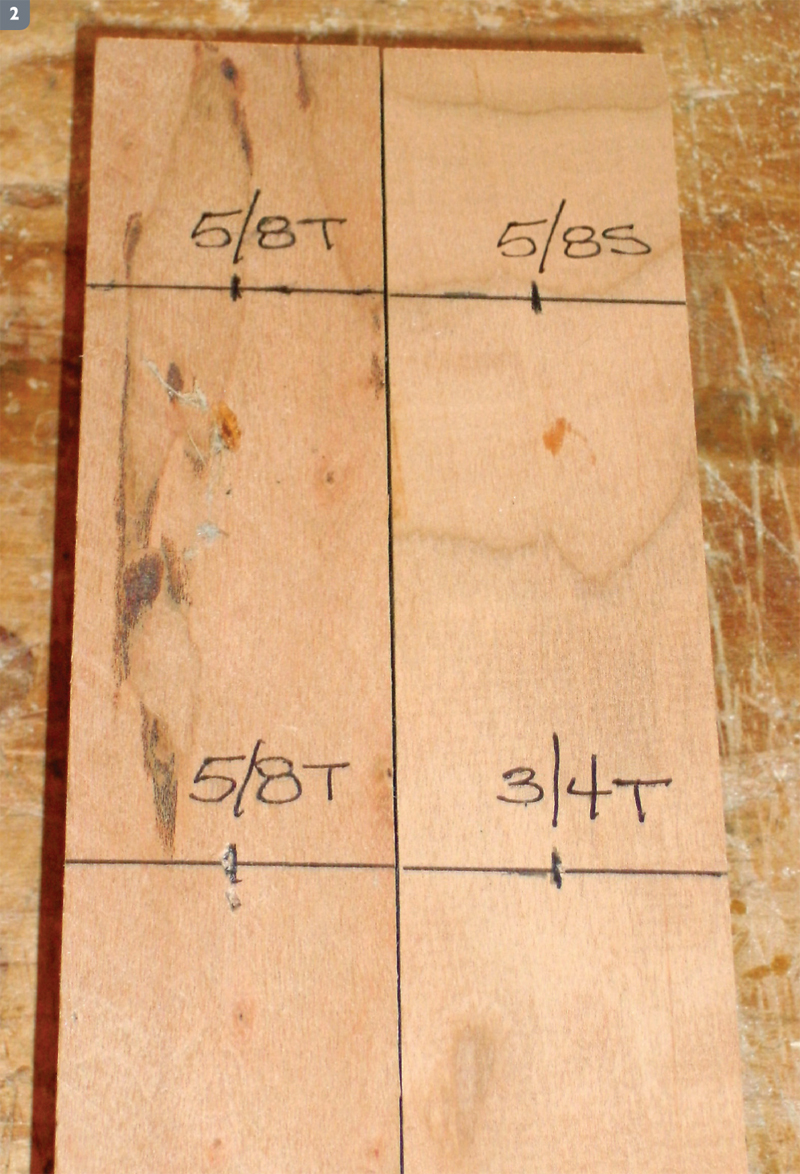
1-1/2″ inches thick, and 9″ long. Arrange
the blocks in pairs and mark the outer side
or cheek of each pair with a triangle that
points to the mouth of the clamp (1). Open
each pair of blocks to their clamping faces
and mark two points on one, 1-1/4″ and 4-
1/2″ from the back end. Hold the blocks
together, with their ends flush, and use a
square to strike lines across both faces, running
through the points you’ve marked.
Mark the center of each line to locate the
screw holes. Then label the diameters and
indicate whether the holes go through or
are stopped (2). Taking this step avoids confusion
if you make these clamps in multiples.
Also, mark the jaw faces “left” and
“right” and “top” and “bottom.”
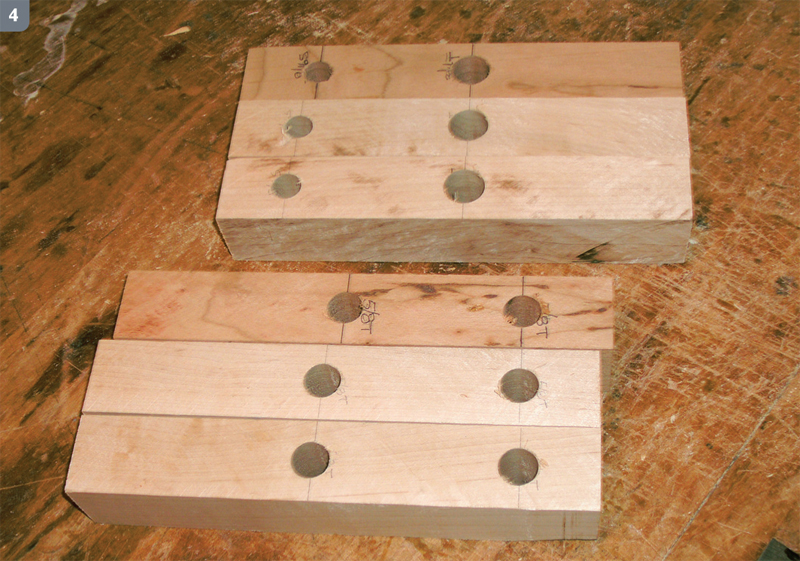
Chuck a 5/8″ brad point bit into your
drill press and position a fence so the bit’s
point lines up with the center points you’ve
marked on the jaw block. Always keep the
marked cheeks of each pair of jaw blocks
pointing outwards (3). This ensures that
the drilled holes will be equidistant from
the fence in each block, so that the holes—
and the jaws—will be coplanar when the
clamps are assembled.
If you’re making a batch of handscrews,
now is the time to clamp a temporary stop
block to the fence, to ensure that holes are
drilled consistently in each set of blocks.
Place the left jaw blank on the table, against
the fence. Bring the bit down and align its
point with the mark that’s nearest the
block’s top end. Clamp the stop block
behind the jaw block.
Drill a 5/8″ hole completely through the
block. This will become the threaded hole
for the top screw. After drilling matching
holes in all your remaining left jaw blocks,
reset the stop block and drill the second
(lower) hole in each left block.
Remove the stop block and reset the
depth stop to drill the 5/8″ x 1″ deep
stopped hole in each right jaw block. Place
the right jaw, clamping-face up and marked
cheek out, against the fence, with the brad
point centered on the location of the top
hole. Install the stop block and drill the 1″
deep hole. Do the same for any other right jaw blocks. Install a 3/4″ brad point bit,
reposition the stop block and drill a 3/4″
inch hole completely through the jaw block
at the location of the lower screw. You
should now have left jaws with two through
5/8″ holes and right jaws with one stopped
5/8″ hole, and one 3/4″ through hole (4).
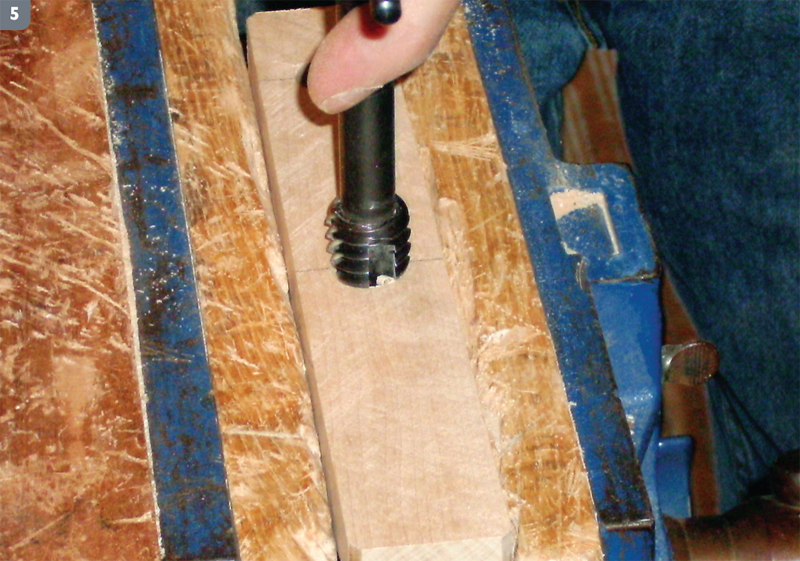
Clamp each left jaw block clamping-face
up in your bench’s shoulder vise. Then,
using a 3/4″ tap, carefully tap both 5/8″
holes (5) to accept the 3/4″ dia. screws you
will make next. A 3/4″ woodthreading kit
(tap and thread box) is available from
Woodcraft (#12T14). Note: I start with 5/8″
dia. holes, because the root diameter of my
tap is 19/32″. The holes’ additional 1/32″
dia. make it easier to get the cutter started.
Check your tap’s root diameter and adjust
the size of the starter holes you drill, if necessary.
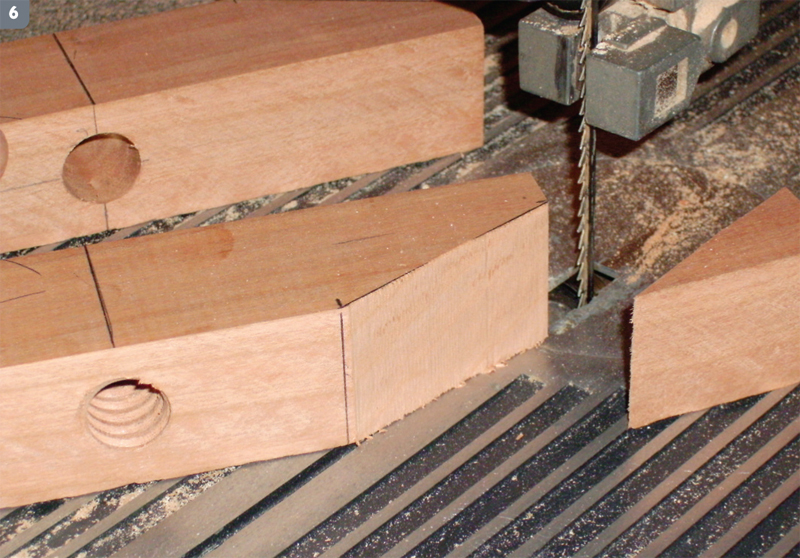
Cut the angled face on the outside corners
of each pair of jaw blocks to form the
clamp’s mouth (6). Clean up the angled
cuts with a disc or belt sander. Finish the
jaws by easing the outside edges with a 45°
chamfer router bit.
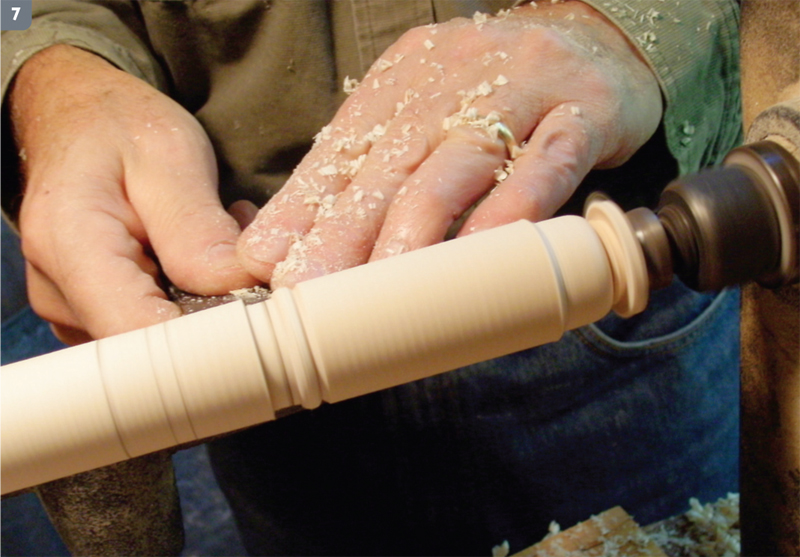
Turn the screws
I have lots of split-off pieces of green
maple and ash lying around, because I primarily
make Windsor chairs. I turn my
screws from this leftover material, because
it turns and threads easily. I split out 1-3/8″
to 1-1/2″ square billets, trim them to 16″
lengths and turn them on my lathe to 1-
1/8″ dia. Then I mark out the handle, allowing
for some waste on the end. My handles
are based on the profile of the handles on
a set of chisels of which I am particularly
fond (7). Personalize your clamps by turning
the shape of your handle as you wish.
Turn the remainder of the shaft to 3/4″ dia.
I have always found it best to turn my screw
shafts slightly undersize at this stage. Whether
or not my calipers are slightly out of sync with
my drill bits (and every other blessed thing),
it is a fact that a shaft that’s turned too large
will bind when its fed into a screw box. So
don’t get fixated on being overly precise (see
“Performance vs. Art,” below).
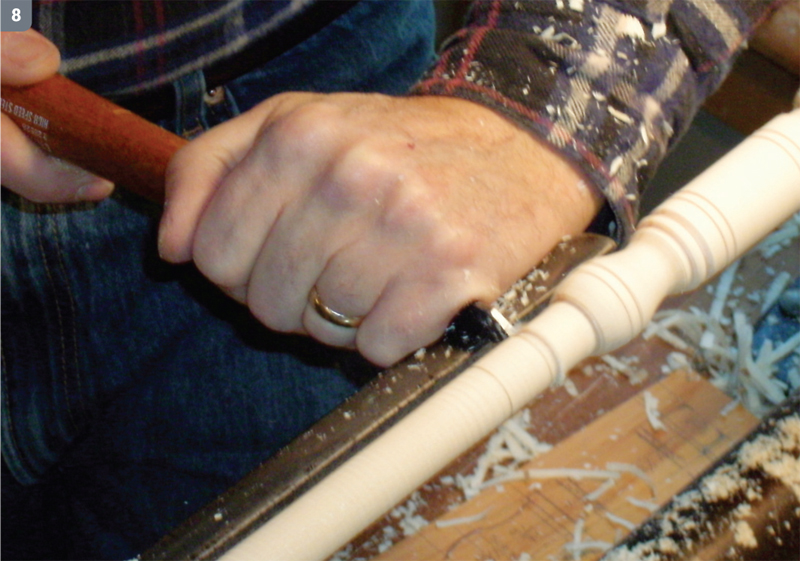
Mark out and cut the grooves in the
screws that will engage the garters in the jaws
when the clamp is assembled. Notice that
these grooves are located at opposite ends of
the two screws. On the lower screw (the one
that installs nearest the jaw mouth), the
groove is located near the handle (8). On the
top screw, the slot is on the opposite end. I
turn the end of this screw down to just
under 5/8″ dia., and then cut the garter
groove. This section should be a little longer
than 1″, to allow for trimming.
Thread the screws
Cutting the threads is a simple process,
because green wood works so easily.
Clamp the screw in your bench’s shoulder
vise, shaft up. This frees up both hands to
turn the screw box. The box’s guide (or starter) block keeps the shaft aligned with
the thread cutter as you start to feed the
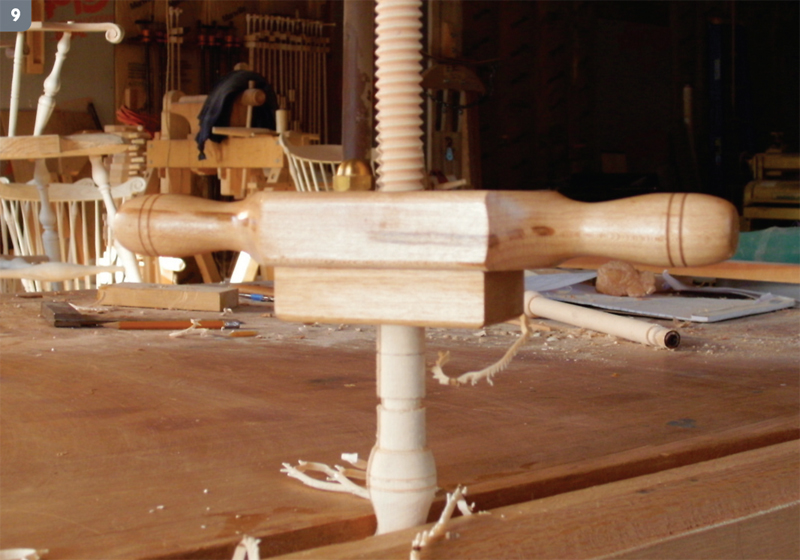
work into the tool. The threads on the bottom
screw run from its tip to the flat section
that precedes the garter groove (9).
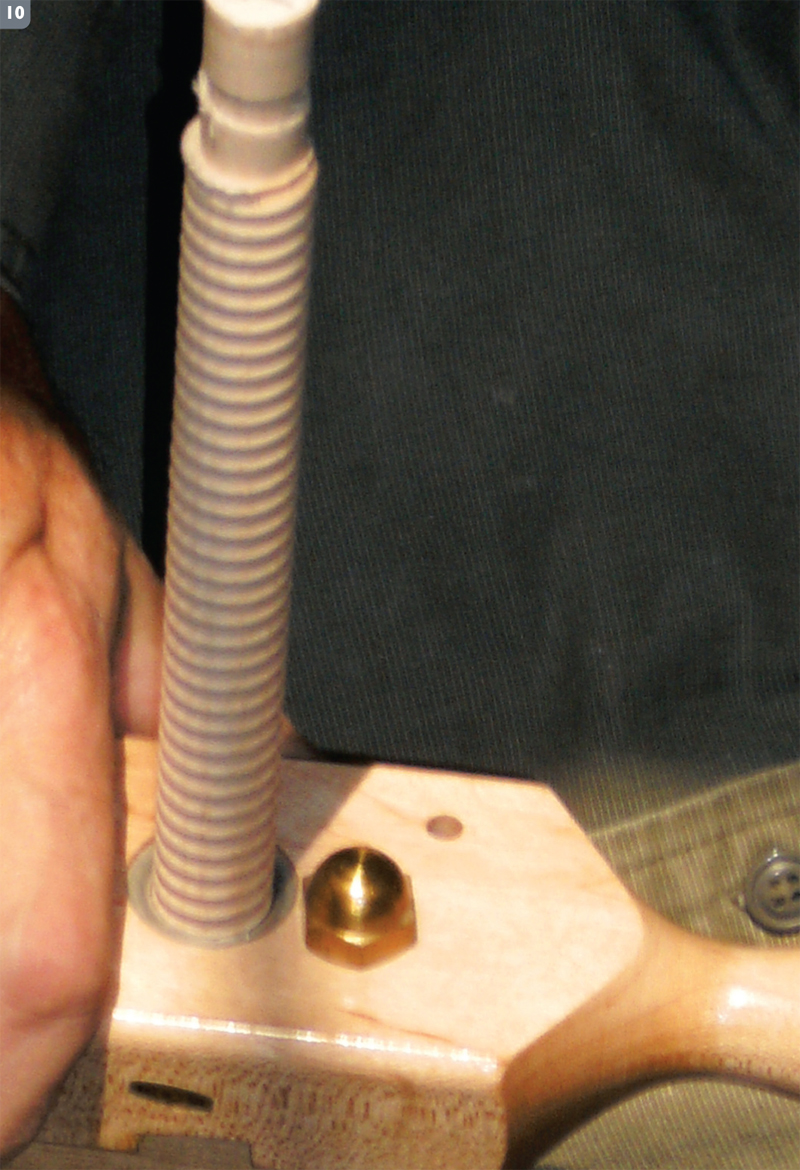
The top screw threads start beyond the
garter section on the end and extend all the
way to the handle (10). The screw box’s
guide block will bottom out against the handle
before the last threads can be cut; the
block must be removed to finish the job.
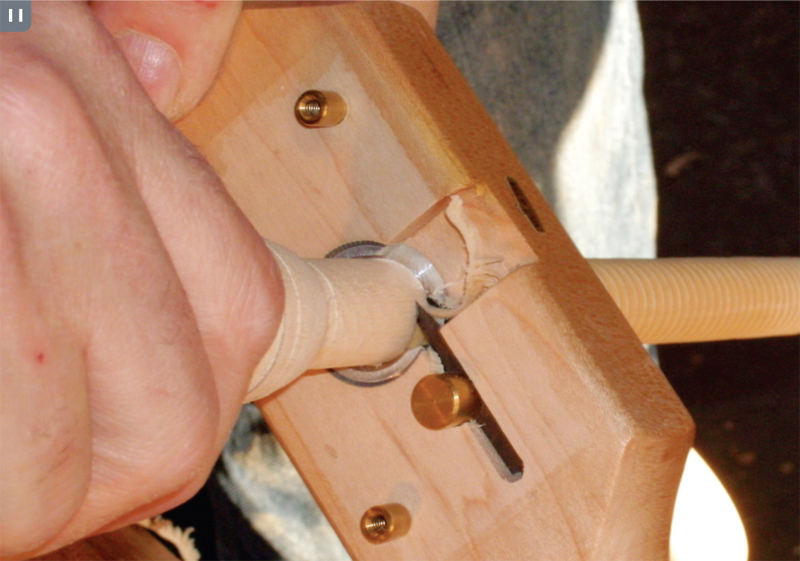
First, back the screw box off the threaded
portion of the shaft. Then unscrew its guide
block. Removing this block exposes the Vcutter
that actually cuts the threads. Take the
partially-threaded screw out of the vise and
rethread it into the screw box: Carefully turn
the screw by hand, until its threads engage
the screw box’s threaded body. Then turn
the screw box like a nut to move it down the
threaded shaft. The exposed V-cutter will
engage the final unthreaded section and cut
threads very close to the handle before it
bottoms out (11).
Before you try out your newly threaded
screws, set them aside for a week to dry out.
They will shrink enough in diameter to
turn easily in the threaded jaws. If you are
working with kiln dried stock, you don’t
have to wait, but you may have to run the
threads back and forth through the screw
box several times, and do the same with the
tapped jaws, to get a looser fit (see “Kiln
Dried Screws, below). Loose is good.
Remember that threads are really spiral
wedges, so they tighten as they close. A
loose fit allows the clamps to twirl easily
when you are adjusting them.
Assembly
Make sure the non-threaded 3/4″ and
5/8″ dia. portions of the screws fit smoothly
in the appropriate holes drilled in the jaws.
Resize the shafts, if necessary. Test fit both
screws to ensure that the two jaws will seat
tightly together when closed (12). First, seat
the 5/8″ end of the top screw into its
stopped hole in the jaw. Then trim the end,
if necessary, until the threads seat against
the jaw’s clamping face. Next, test the nonthreaded
portion of the lower screw in its
3/4″ dia. hole. The threads should extend
slightly into the jaw’s body. If necessary,
take another turn with the screw box. But
be careful not to cut the threads too close
to the garter grooves. (Clamping puts pressure
against the garters, which in turn put
a lot of pressure on the garter groove shoulders—
they can break out if there isn’t
enough heft between the threads and
groove.) Complete the screws by trimming
the waste off the end of the handles.
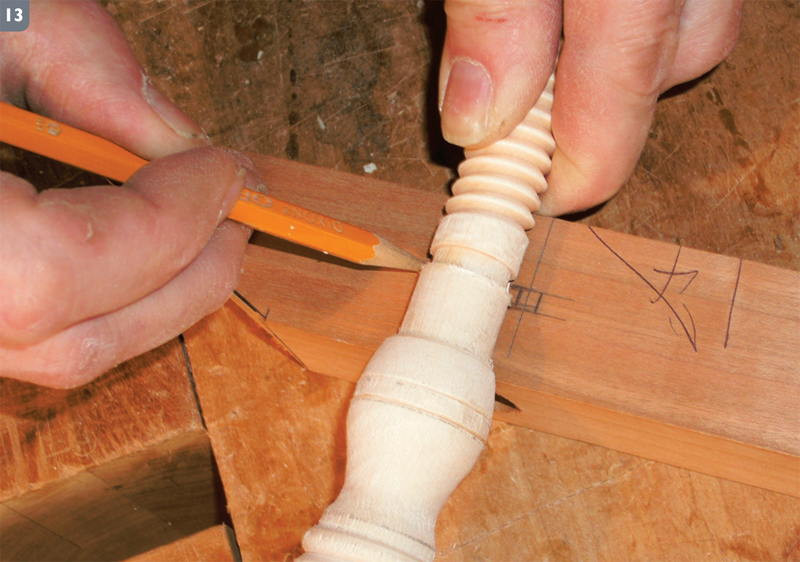
Mark the location of the garters for both
holes in the right jaw. The best way to do
this is to lay each screw in place on the jaw
and tick off the garter locations with a pencil
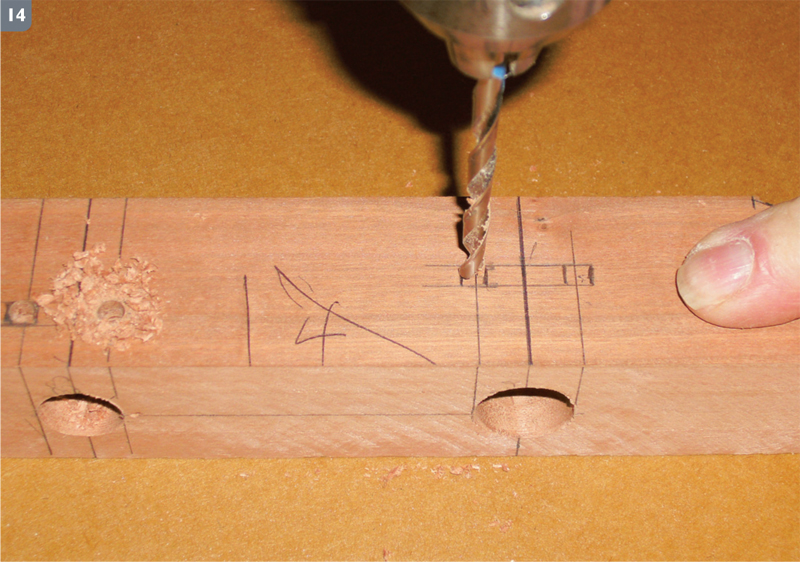
(13). I drill 3/16″ x 1″ deep holes (14),
being careful that they are far enough apart
so that the garters (3/16″ square pins that are driven in) don’t rub or bind the screw
shaft as it turns. I aim for the garters to protrude
1/16″ to 3/32″. Any less, and the screw
grinds the garter to dust and runs over it.
Any more, and the shaft binds when the
screw is turned. When I have an overly tight
garter, I have two choices: keep working the
screw back and forth until the garter and
screw wear in, or be patient and wait until
the green screw shrinks a bit more.
Make the 3/16″-square garter pins out of
any available hardwood. I cut mine about
1-1/2″ inches long. Thread both screws onto
the jaws and seat both garter sections. Then
drive the garter pins into the round holes
and trim them flush. Finally, clamp the
assembled handscrew on your workbench
and belt sand both sides until the jaws are
flush. This removes any misalignment introduced
when the holes in the jaws were
machined at the start of the project. Once
you have made one handscrew, you can use
the same technique to create them in any
size. The process is the same. |
|
Click any image to view a larger version
Performance vs. Art
First and foremost, these clamps are tools which I expect
to put to hard use in my shop. I have gotten to the point where
I no longer sand the screw handles, or do more to the assembled
clamps than give them a quick pass or two with a beltsander
to flush up the sides of the jaws when the clamp is
closed. I find that the turning-tool marks, left unsanded on the
handles, add to their “grippyness.” I also don’t worry about wane,
small checks or other defects in my handles, because the screw
doesn’t have to be visually perfect to work. In the same vein,
small chip-outs in the wooden threads are acceptable, because
a screw thread is, in reality, an inclined plane. Even with small
chip-outs, there is still a lot of bearing surface between the male
and female threads of the screw and jaw. Only if a number of
adjacent rows of threads are chipped out or broken off is the
screw ruined.
Kiln Dried Screws
Green wood cuts like a dream, but dry stock can be both
tough and brittle. Threads can chip off if the wood is really dry.
If you use kiln-dried material for screws you can (1) either run
the threaded tap back and forth through the threaded jaw while
applying side pressure, to help open up the width of the
threaded opening, or (2) carefully adjust the depth of the V-cutter
in the thread box itself, so it cuts deeper while threading.
Another option is to liberally wipe the screw shaft with turpentine
before you cut the threads—I’ve found that wetting the
wood this way helps the screw box cut more cleanly. |