


We may receive a commission when you use our affiliate links. However, this does not impact our recommendations.

The late Thomas Moser popularized Shaker design. This side table is my ode to him and his contributions to the woodworking community.
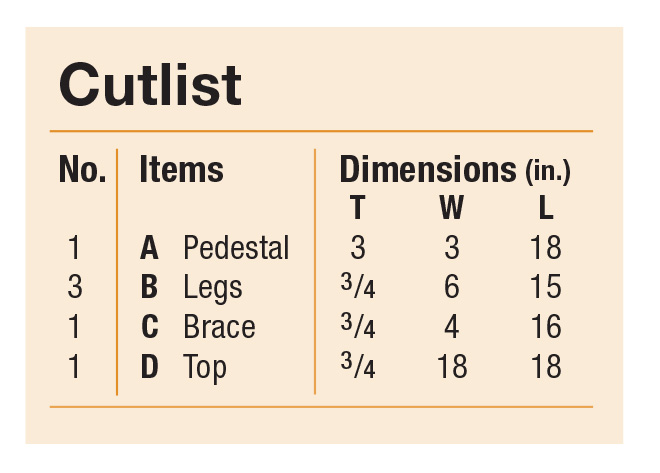
Project #2508 • Skill Level: Advanced • Time: 4 Hours • Cost: $20
Inspiration in your woodworking journey can come from many different places. One of my inspirations has always been furniture designer Thomas Moser. His elegant designs have deep roots in the Shaker style and are oddly classic, yet modern. Back in 1972, Thomas left teaching to build handmade furniture in Maine. Over the next 50 years, Thomas built a thriving business building furniture. He published several books that outlined his construction methods and offered shop drawings for other craftsmen to utilize. In early 2025, Thomas Moser passed away at his home in Maine, surrounded by family. This round side table is built directly from “Thos. Moser’s Measured Shop Drawings” book. This book is available second-hand on various websites, and has a permanent place in my library.
Side tables, such as this, are found in many of the Shaker Villages and Museums. The size of the top varies, as does the shape of the base, depending on where and when it was built. In traditional Shaker communities, these tables are made from hardwood, such as cherry, walnut, or maple. Sometimes, they were painted; often, they were not. I have a section of ash from a friend which had great figure in it. While the Shakers would not go out of the way to use figured wood in their furniture, I am no Shaker. Curly ash it is.
Online Extra: View the pedestal and leg templates.
Additional reading: Learn more about traditional shaker construction methods.
No lathe? No problem: Check out this North Carolina candle stand project.
Turned Shaker Candle Stand Cutlist and Diagrams

Download The Full-Size PDF Templates for the pedestal and legs
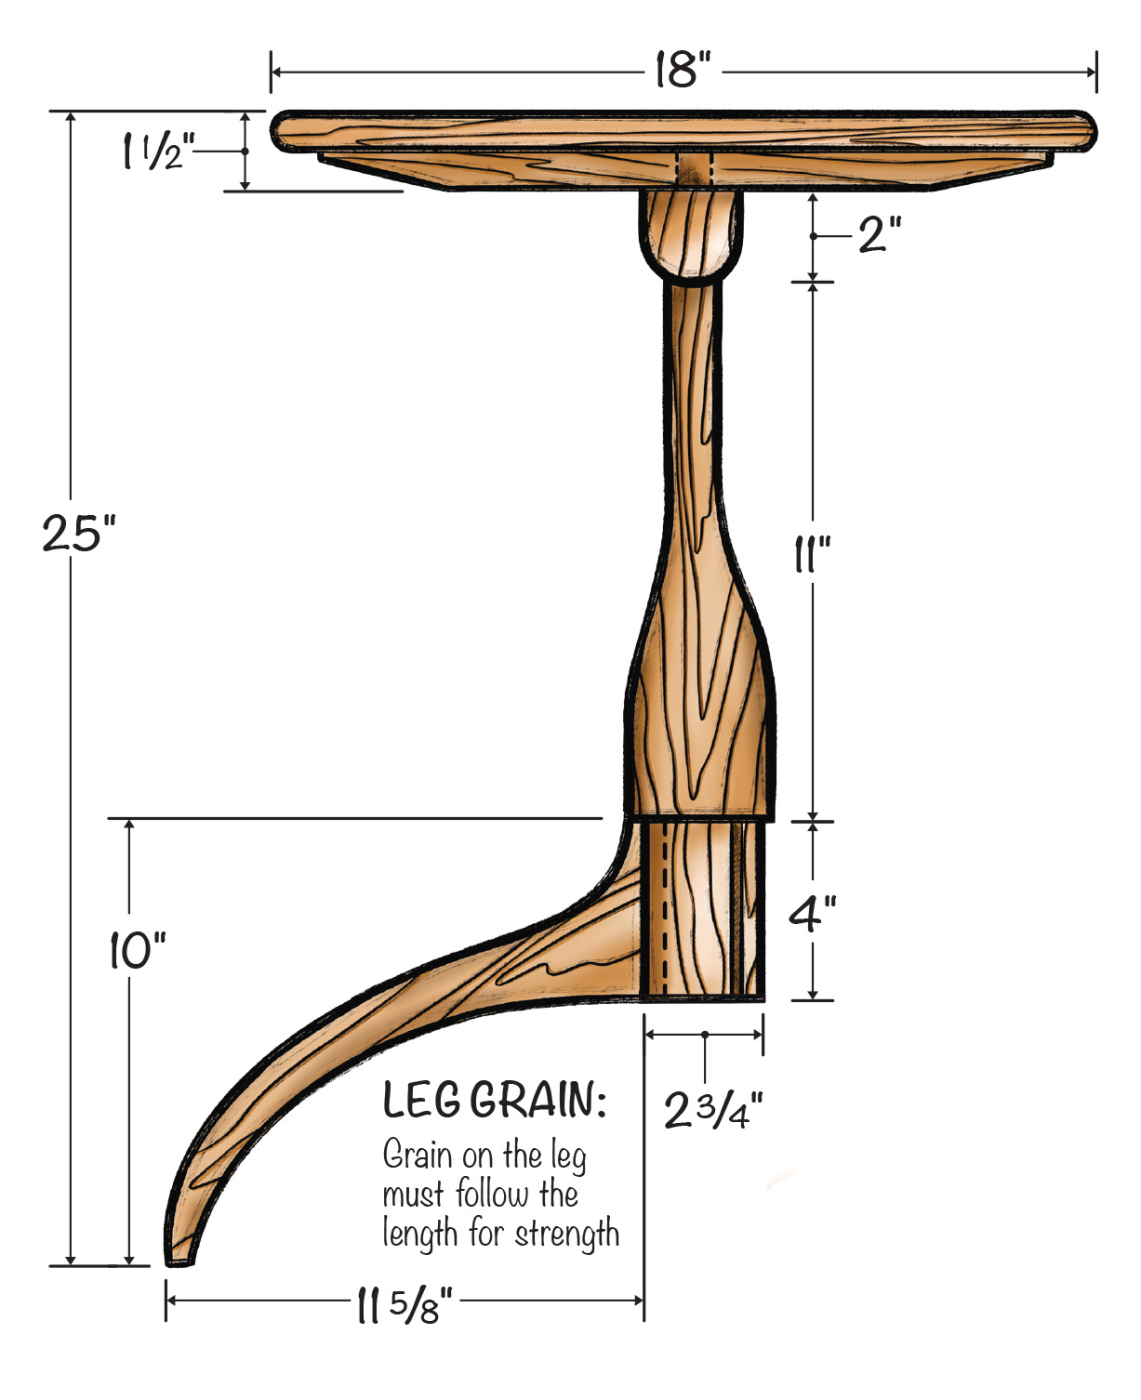
The Pedestal
The central pedestal of this style of table is its core. Everything attaches to it, and that’s where the joinery is located. I love the simple design of these pedestals — I made mine a fairly smooth curve. Some have more of a “wine bottle” type look, and I feel they are a bit chunkier. I like the smooth, flowing curve look.
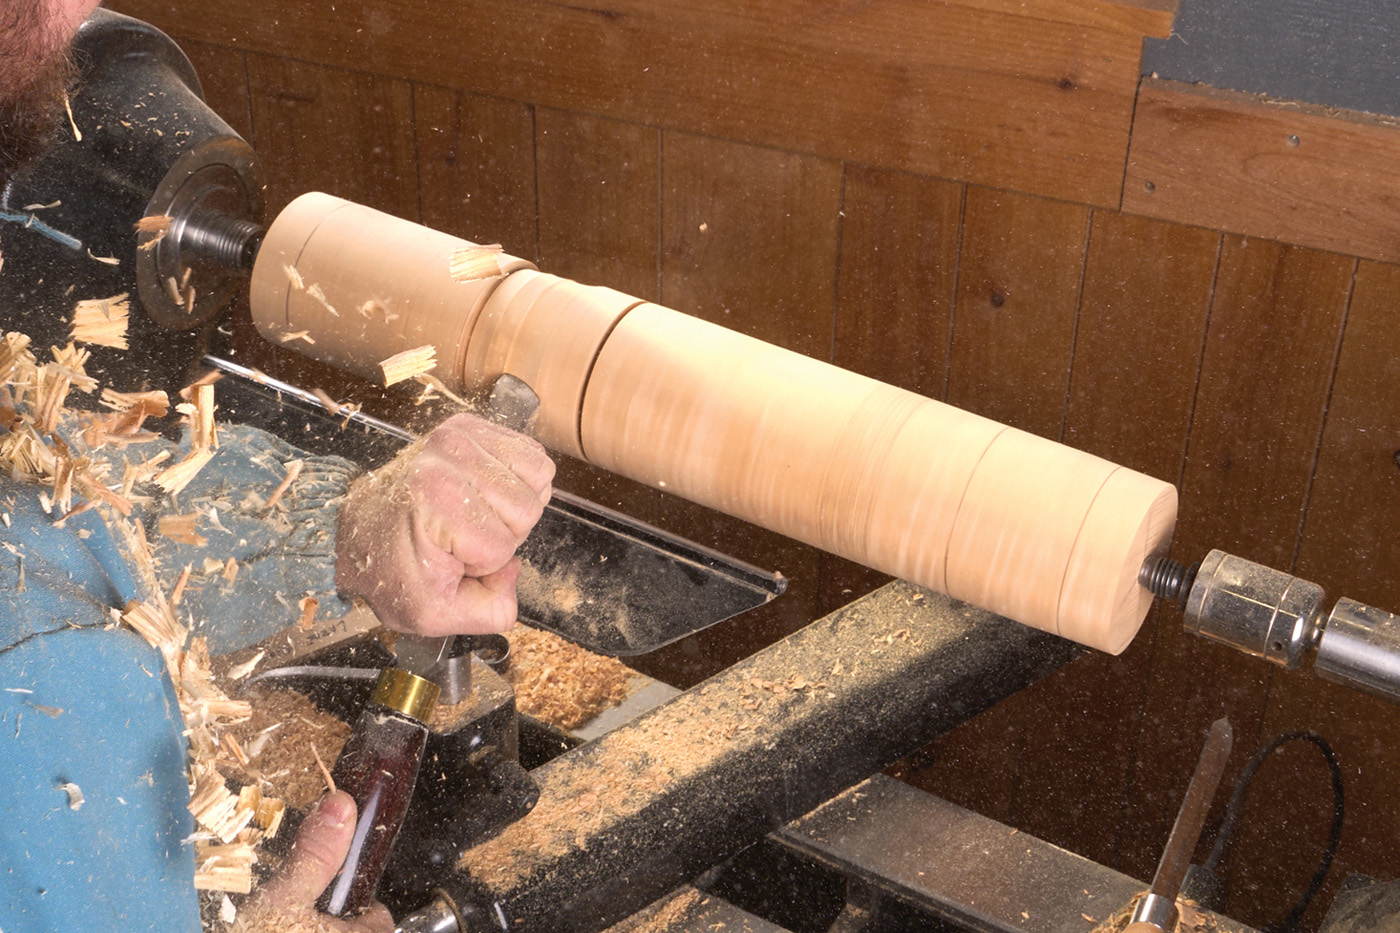
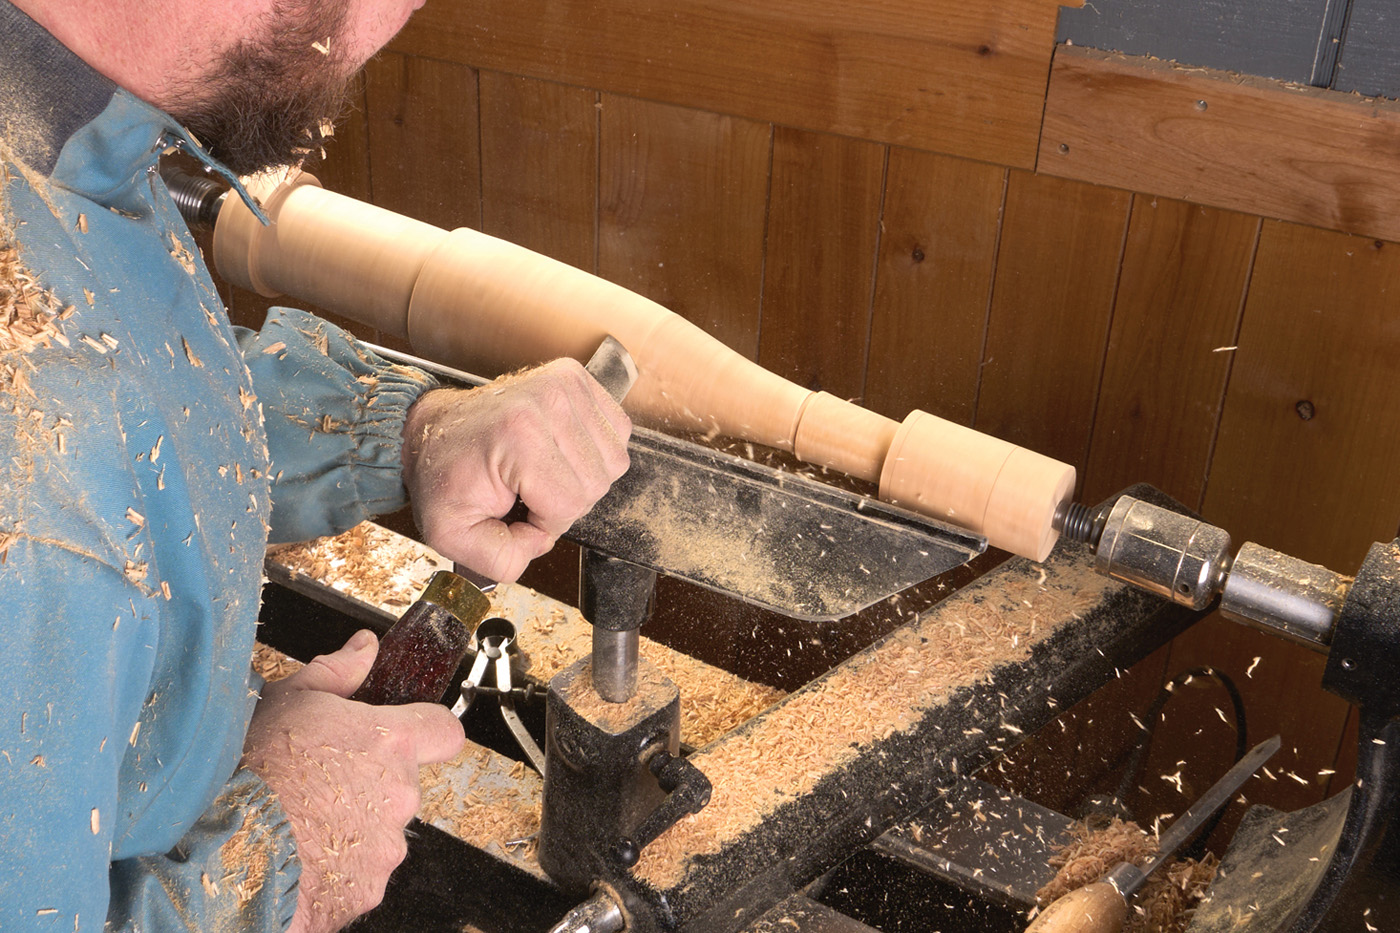
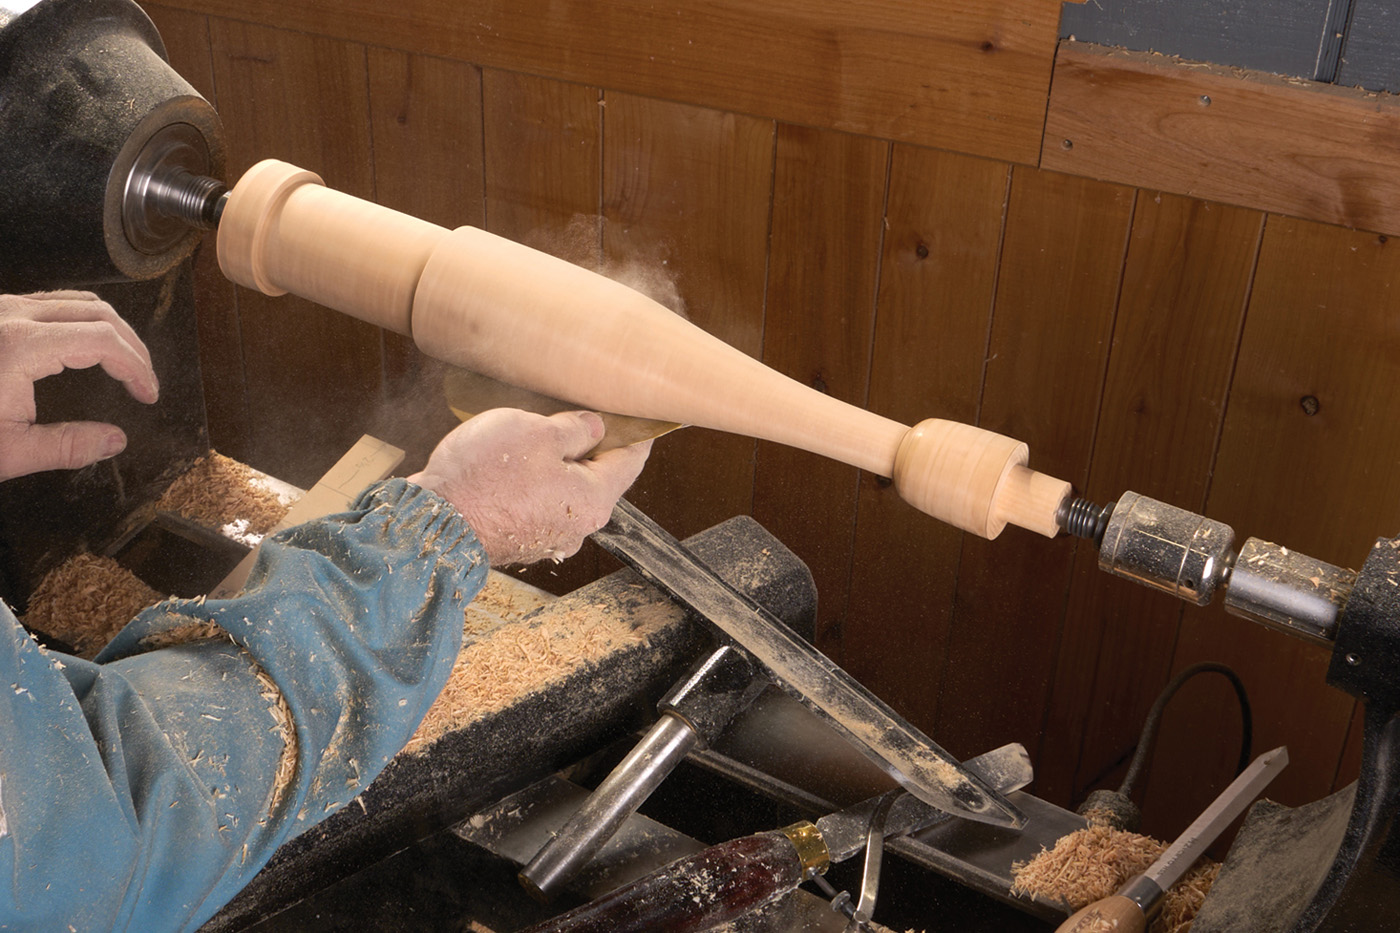
The pedestal is turned at the lathe. After roughing the blank round, I used a template that I had made to lay out points along the length. You can see my template in Photo 1. After laying out the marks, I use a parting tool and calipers to define critical diameters (photo 2). The parting tool kerfs act as a guide to help you create the correct shape while turning. I swap out the parting tool for a skew chisel and start working down to the parting marks.
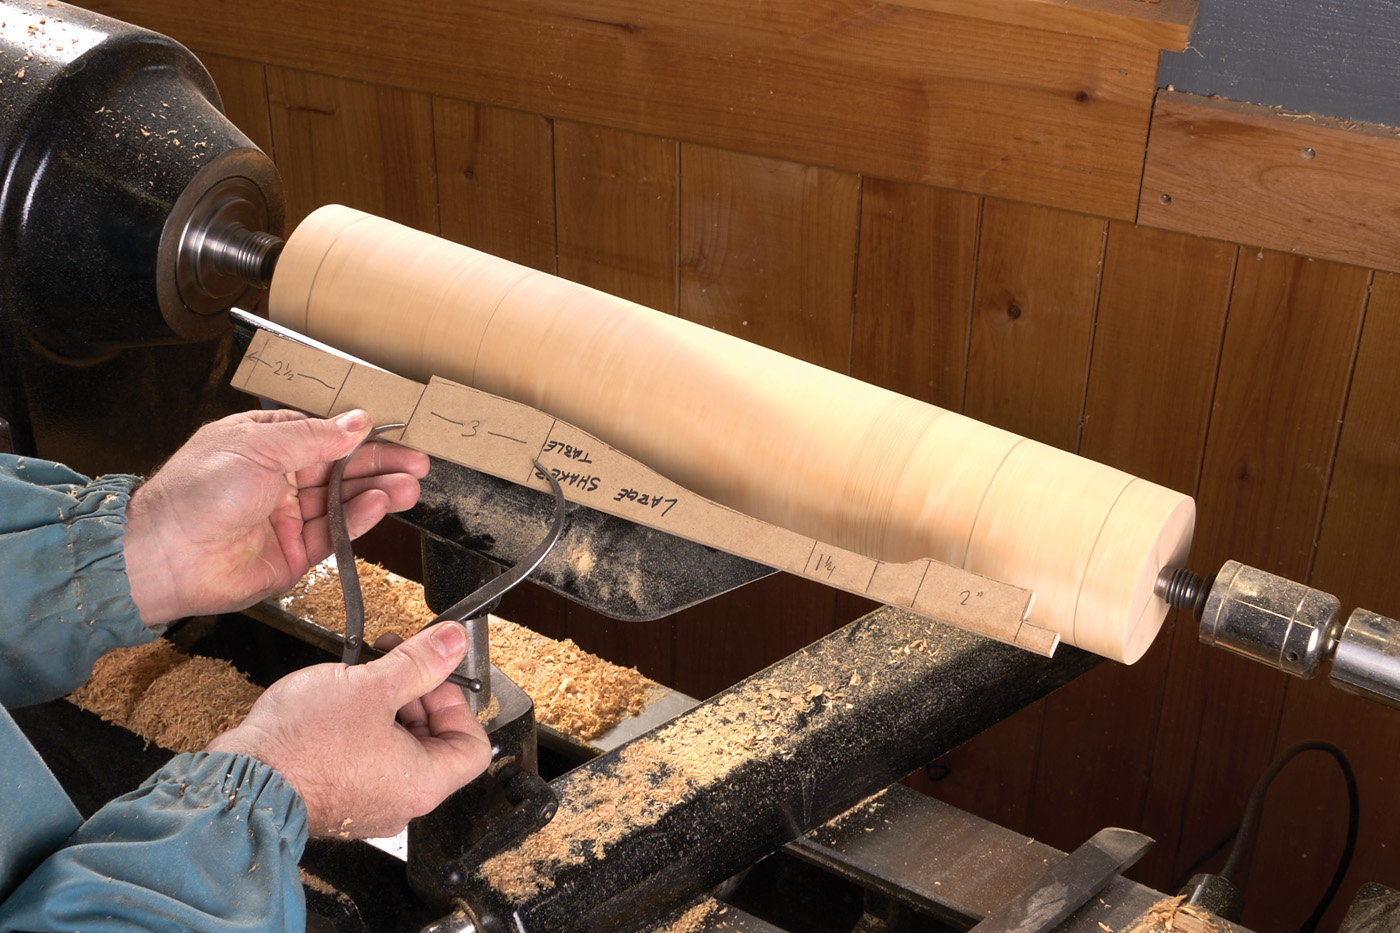
1 The template that I use shows both the (half) profile of the turned pedestal, as well as measurements that are used to set the calipers.
2 Make parting cuts until the calipers slip over the blank.
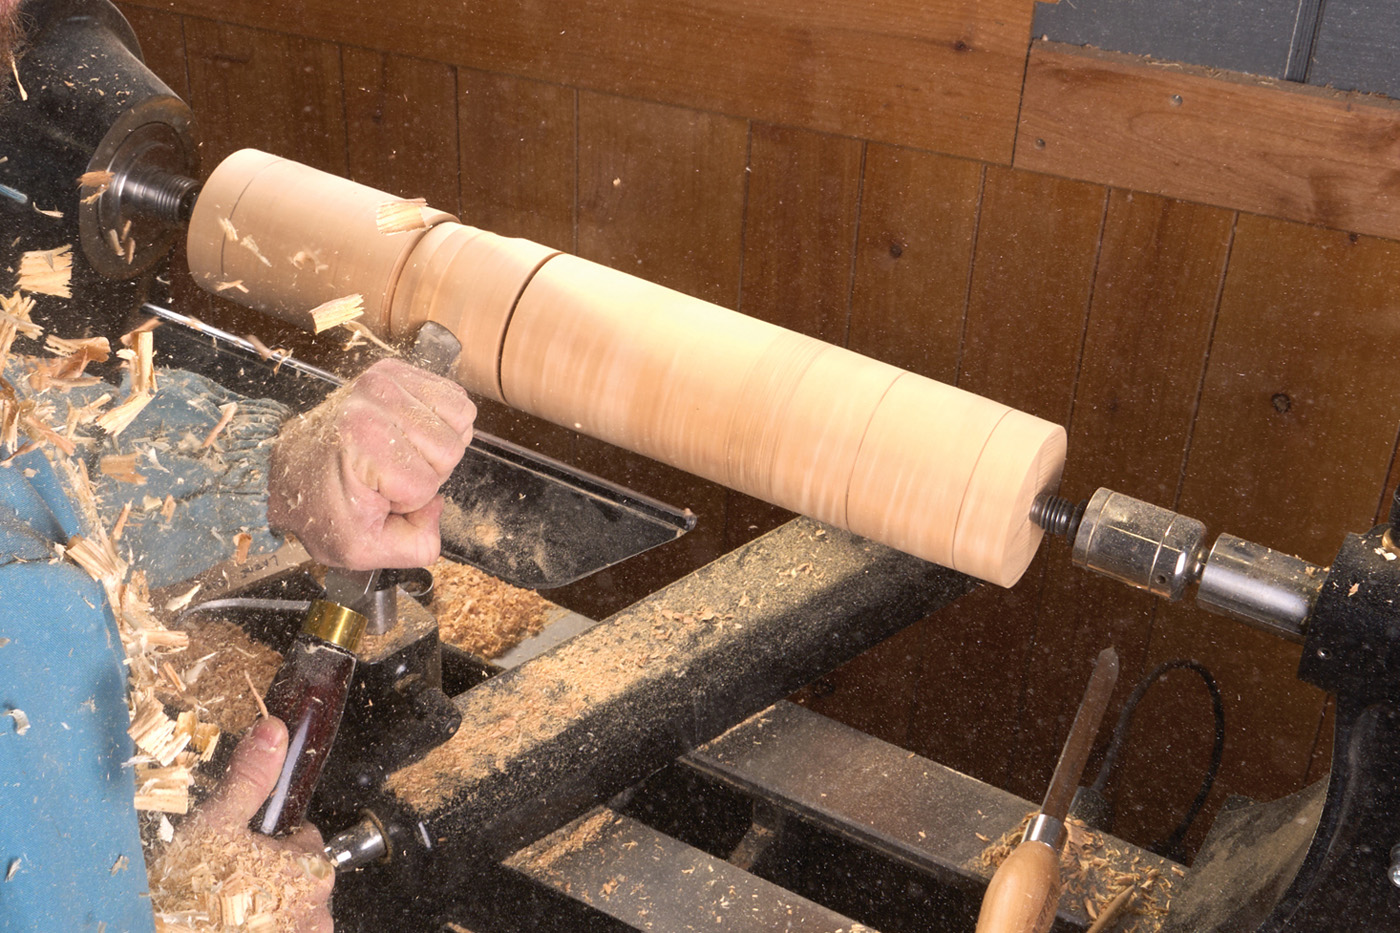
3 A skew chisel is a great tool to remove material and get a finished, smooth surface.
The first part of the pedestal is at the bottom—a wide, flat area where the feet will mount. This needs to be perfectly smooth and flat. It’s also about a quarter of an inch smaller in diameter than the largest part of the pedestal. This allows the legs to register on the bottom of this lip. After turning, use a hard, flat sanding block to make sure this area is flat and not tapered.
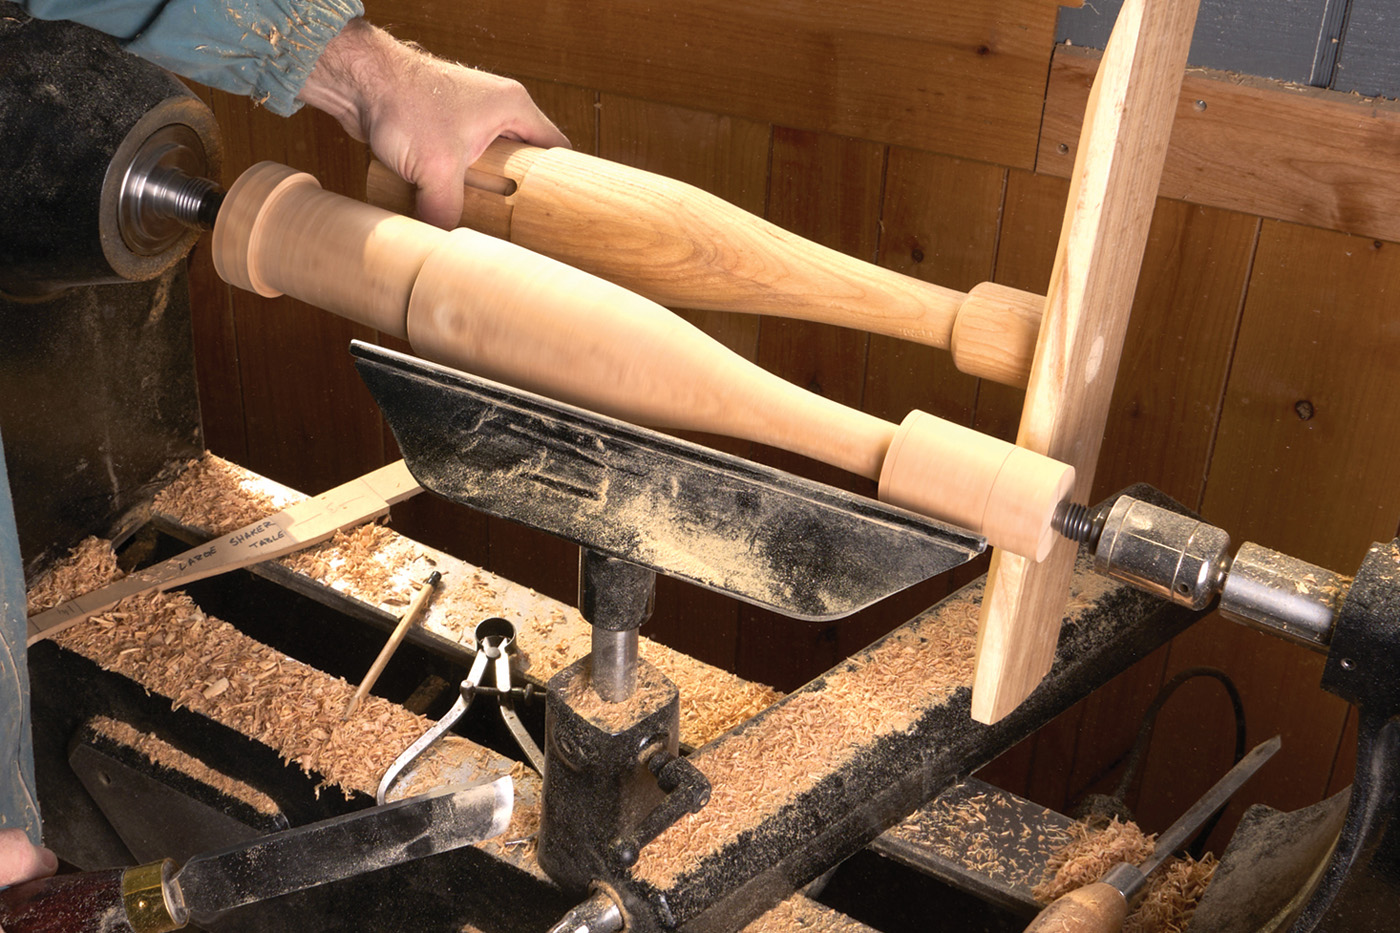
4 Start to work down the neck of the pedestal.
5 A skew chisel does much of the heavy waste removal and shaping.
6
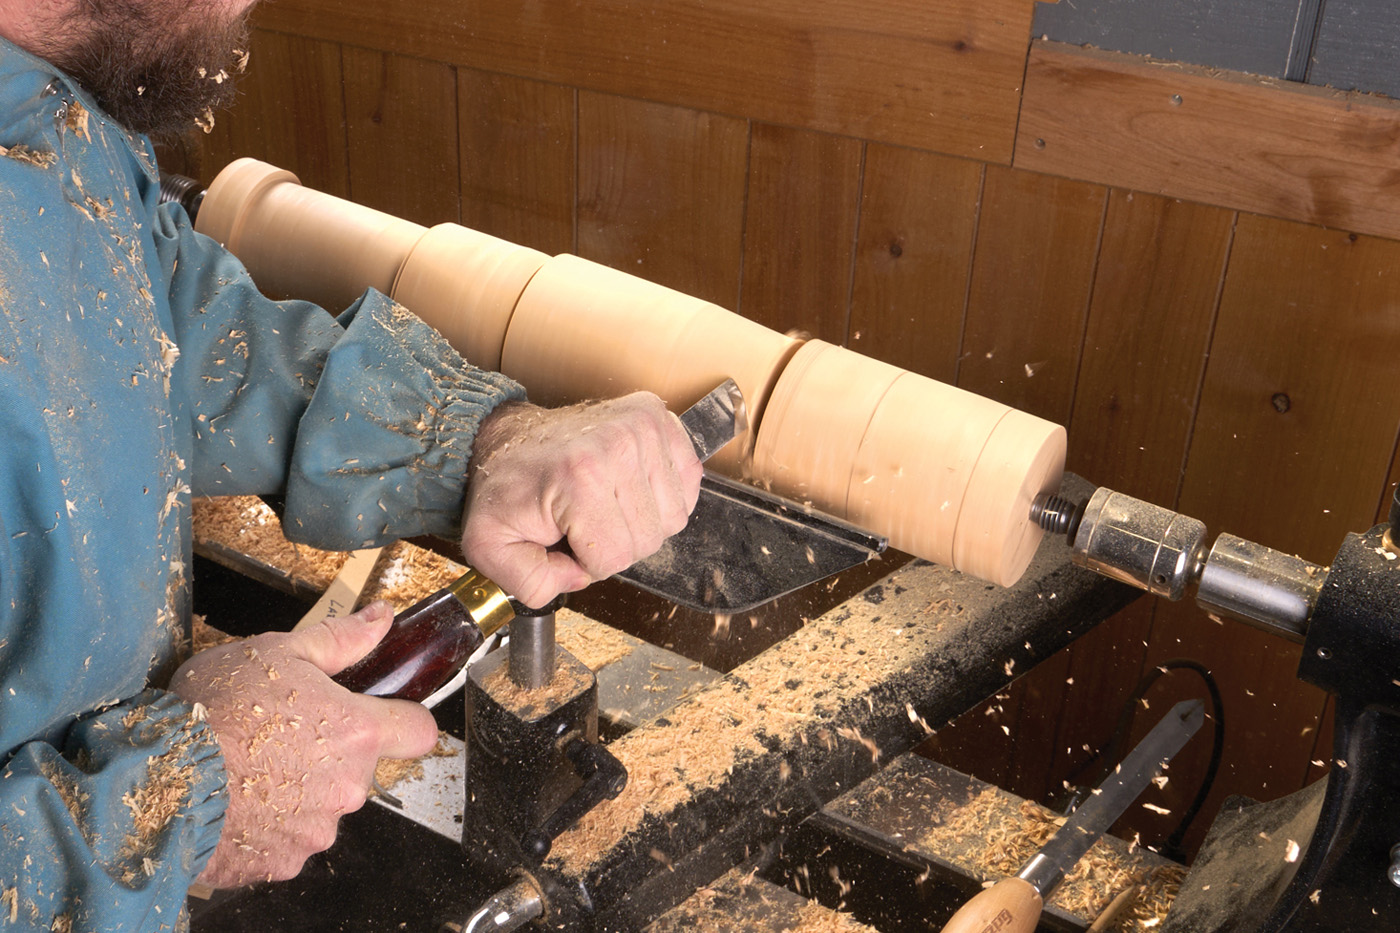
By far the hardest part of this pedestal to turn is the smooth, gentle curve where it necks down from the biggest to the smallest diameter. A spindle roughing gouge is easiest to get this shape, but you may need to clean it up with a bit of sanding. However, I like turning this entire pedestal with a skew. Light planing cuts leave a smooth surface, and using the bevel to guide your cut, I found it naturally wants to create a curved profile.
7 When making sets, I like to compare the shapes to ensure they look like they belong in the same family.
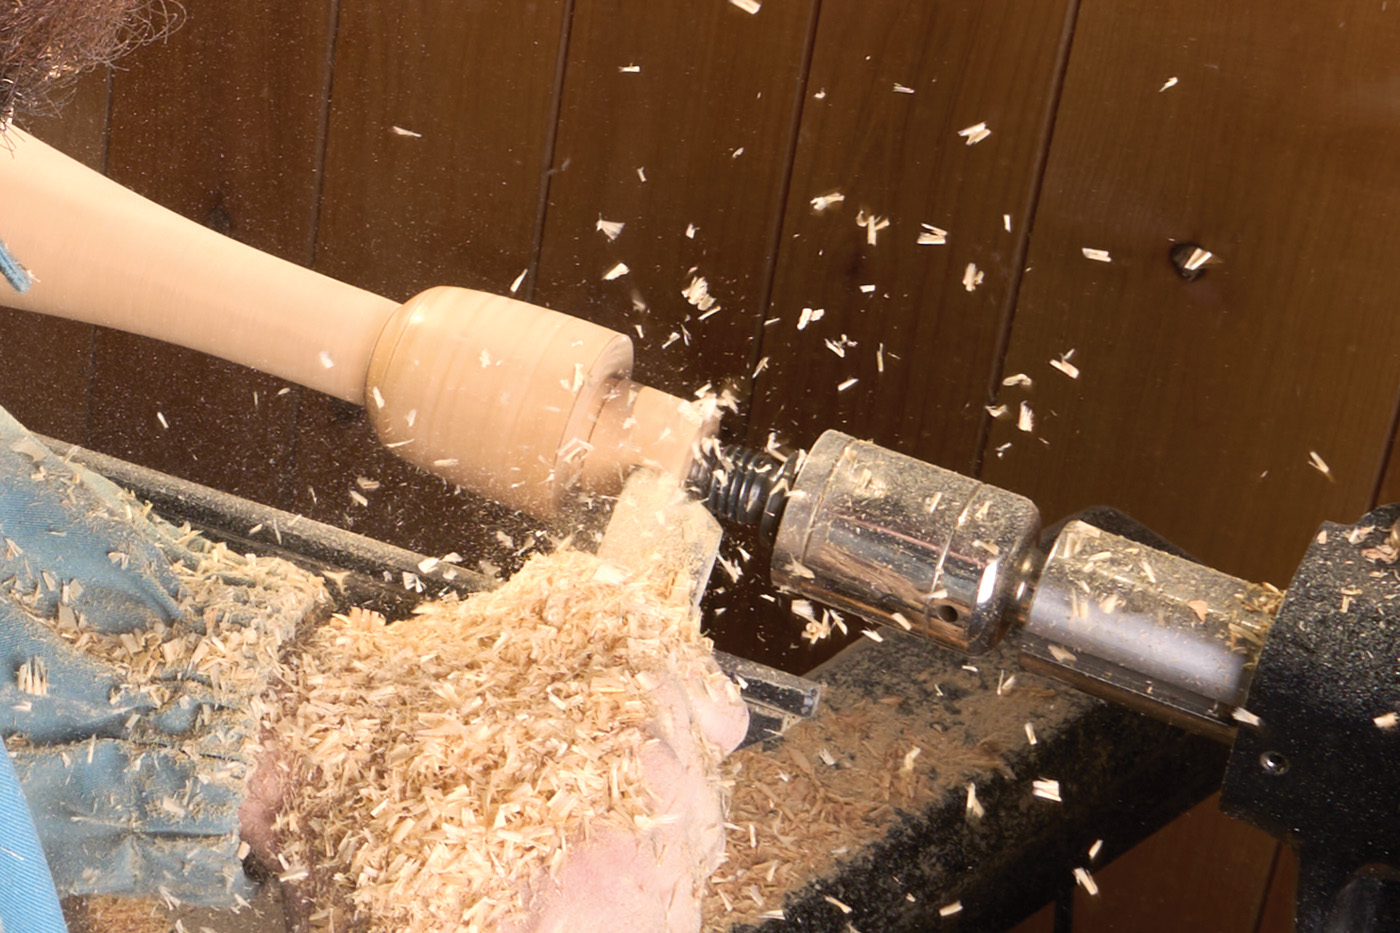
When turning these pedestals, I turn my Harvey lathe up as fast as it will go—about 3,500 RPM. The faster the speed, the easier and smoother the cuts will be.
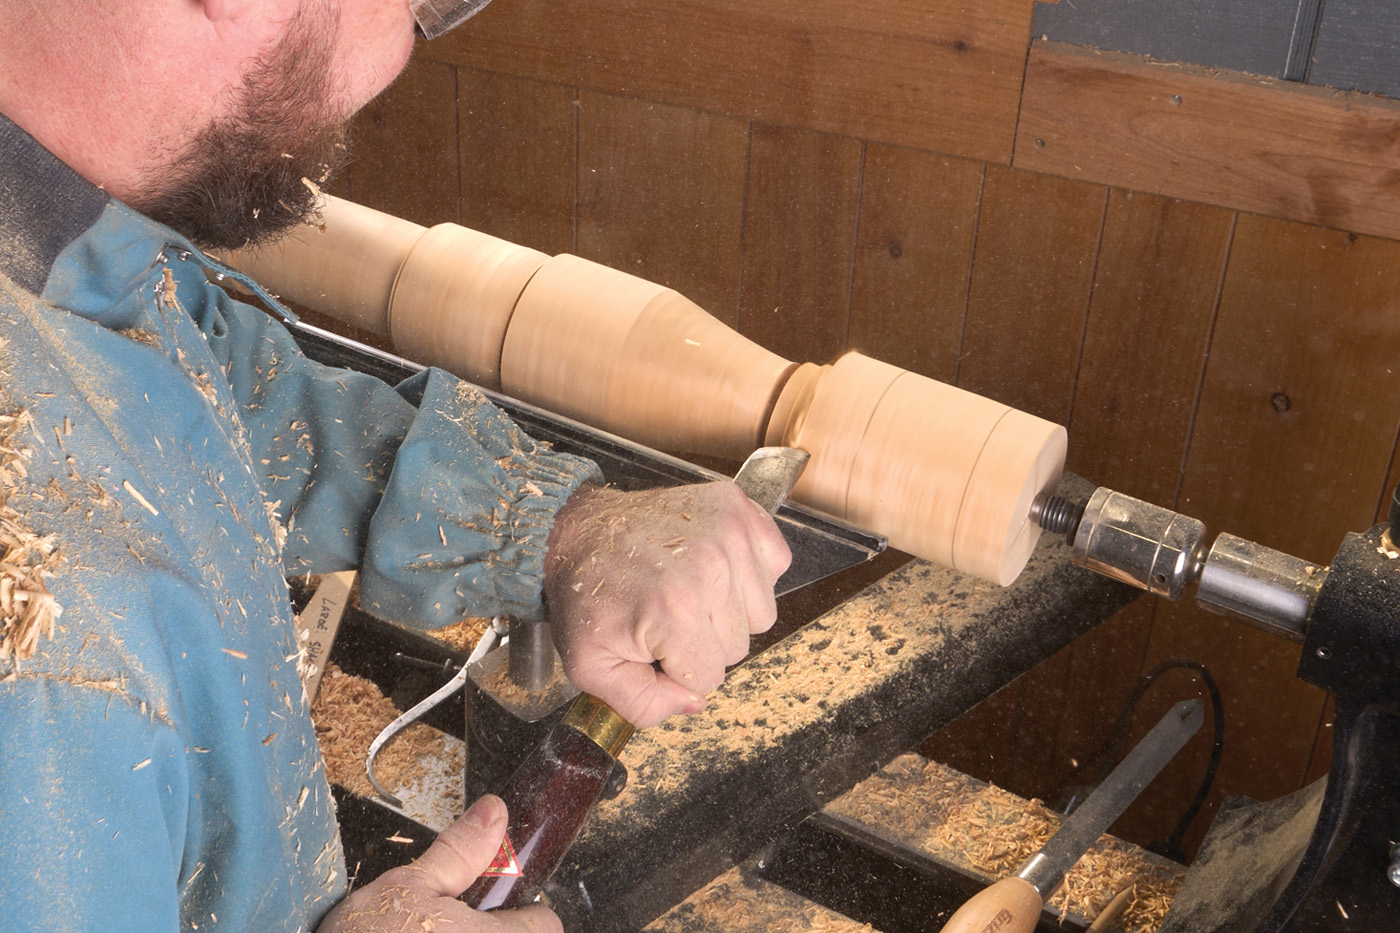
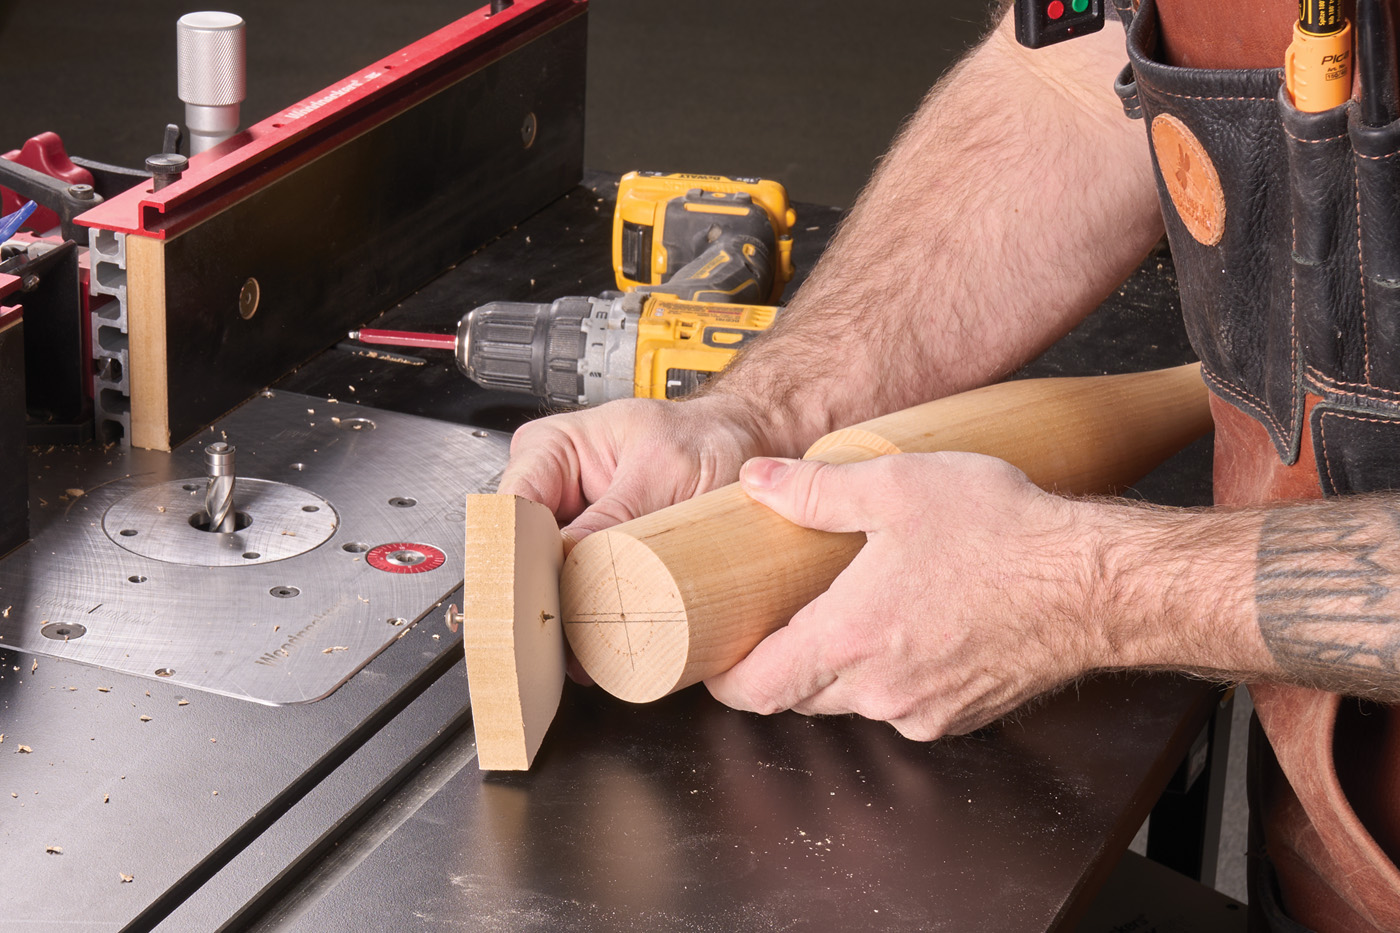
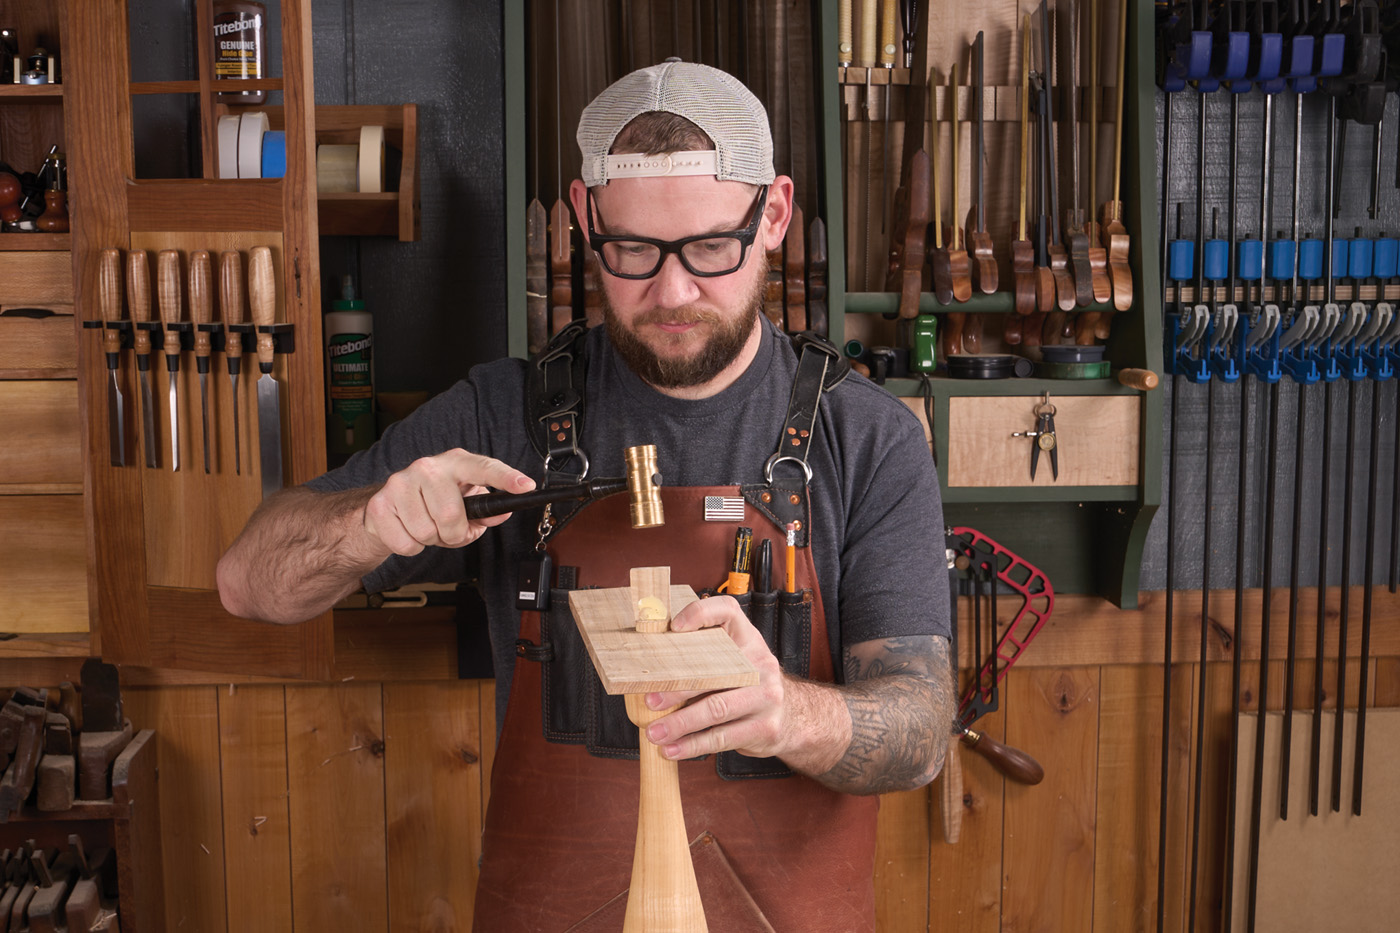
After the curve has been shaped in (I check it against another I have, just to judge consistency), you can turn (har har) your attention to the top of the pedestal. The pommel at the top is curved (and is sometimes referred to as a tulip, which makes sense, looking at its shape). Above the pommel is a tenon—size this to match a Forstner bit that you have in your shop. Mine is 1“ diameter. Sand the pedestal, stopping between grits to sand along the grain. Apply a coat of finish to the pedestal, avoiding the glued areas (mainly the tenon up top).
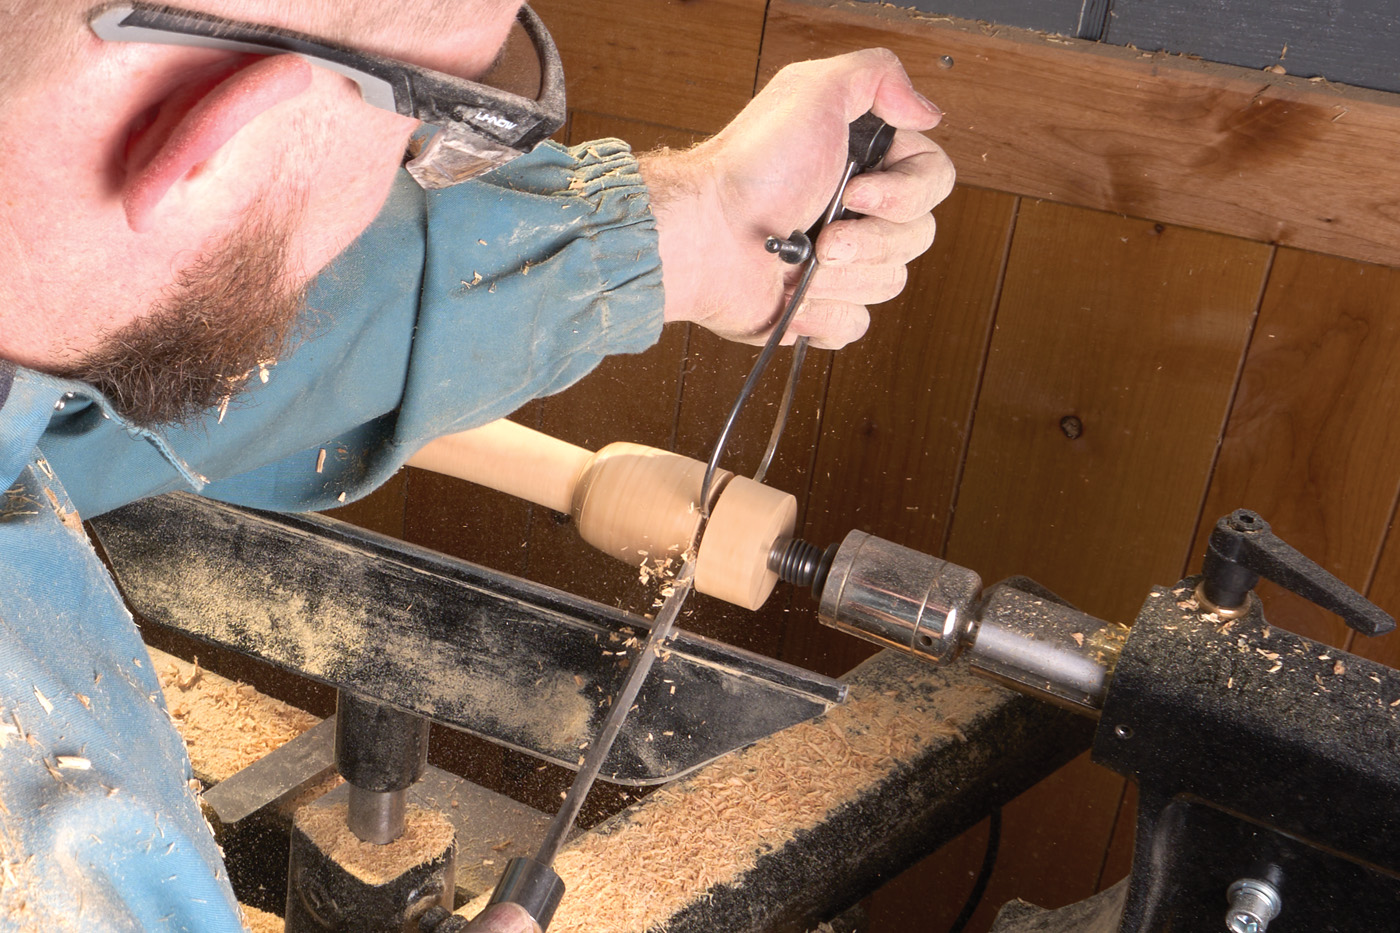
8 The only critical dimension is the tenon on the top.
9 Its size doesn’t matter, but make sure it matches a Forstner bit in your shop.
10 Sand and finish the leg while it’s on the lathe.
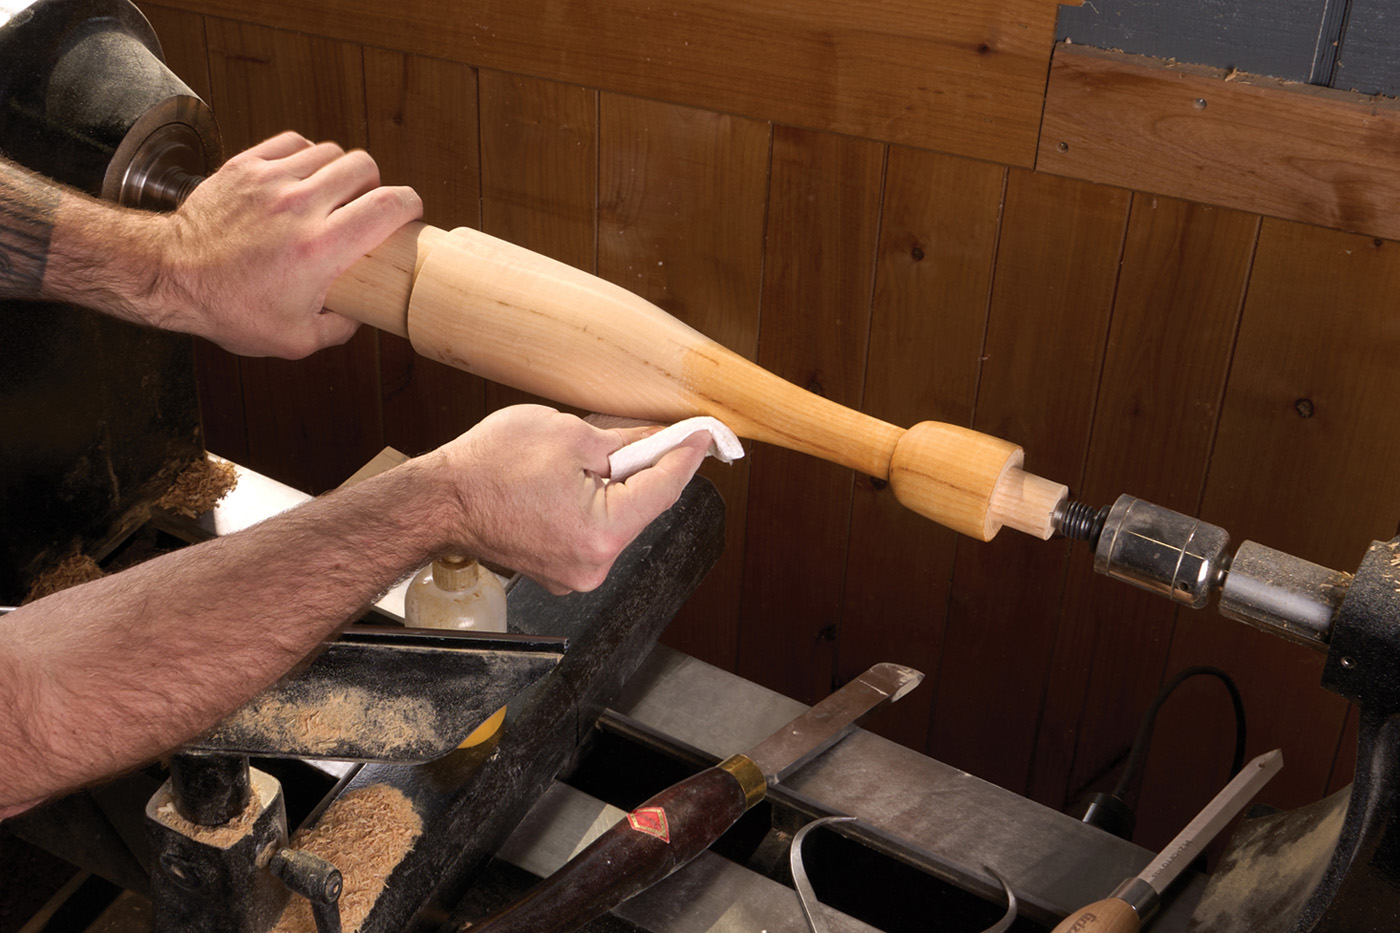
11 Check out my finishing formula for this piece here.
Legs Next
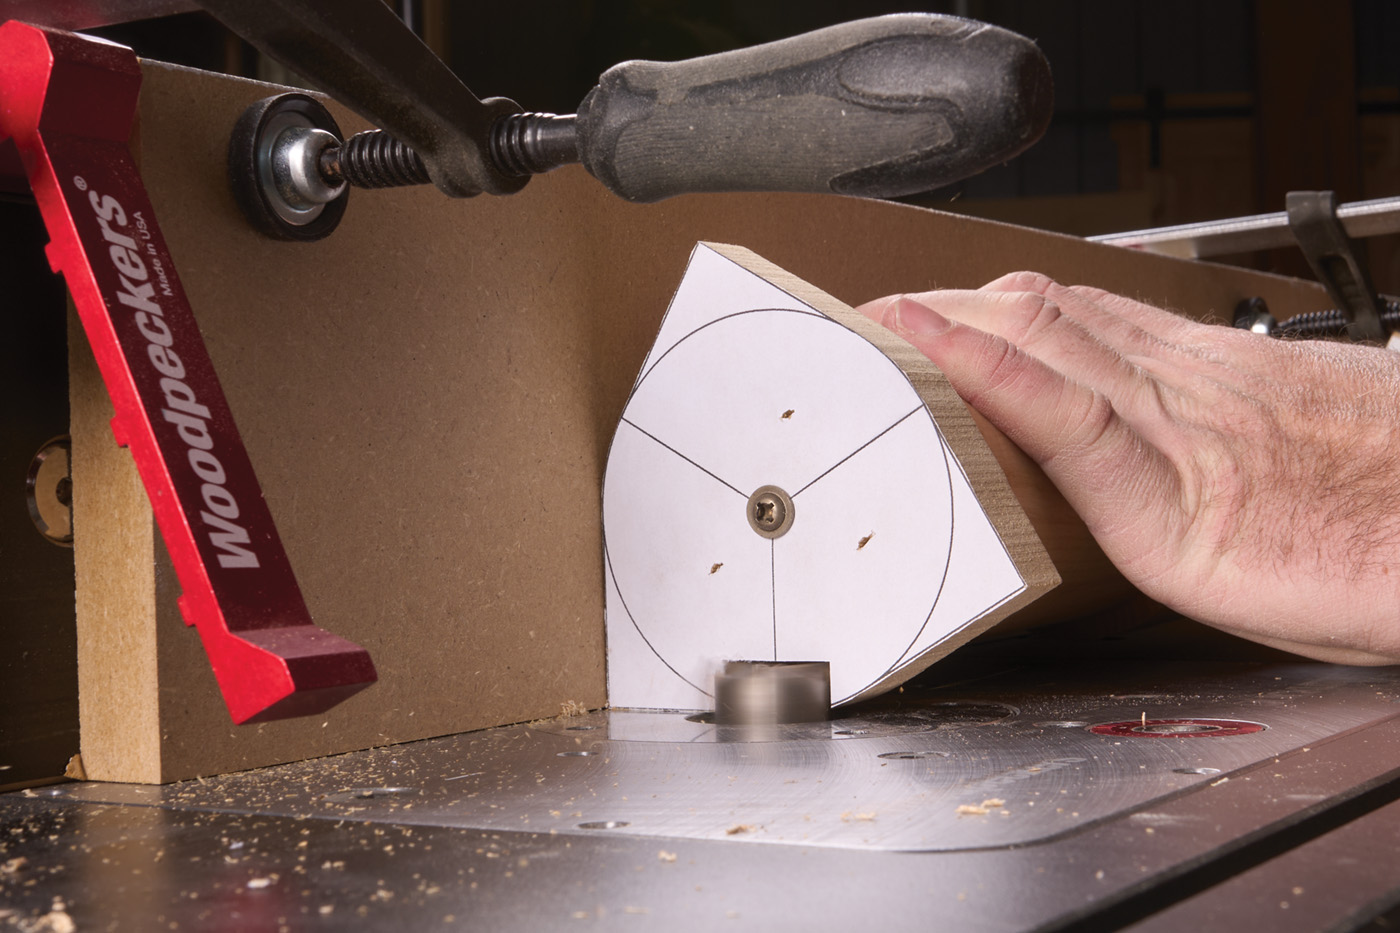
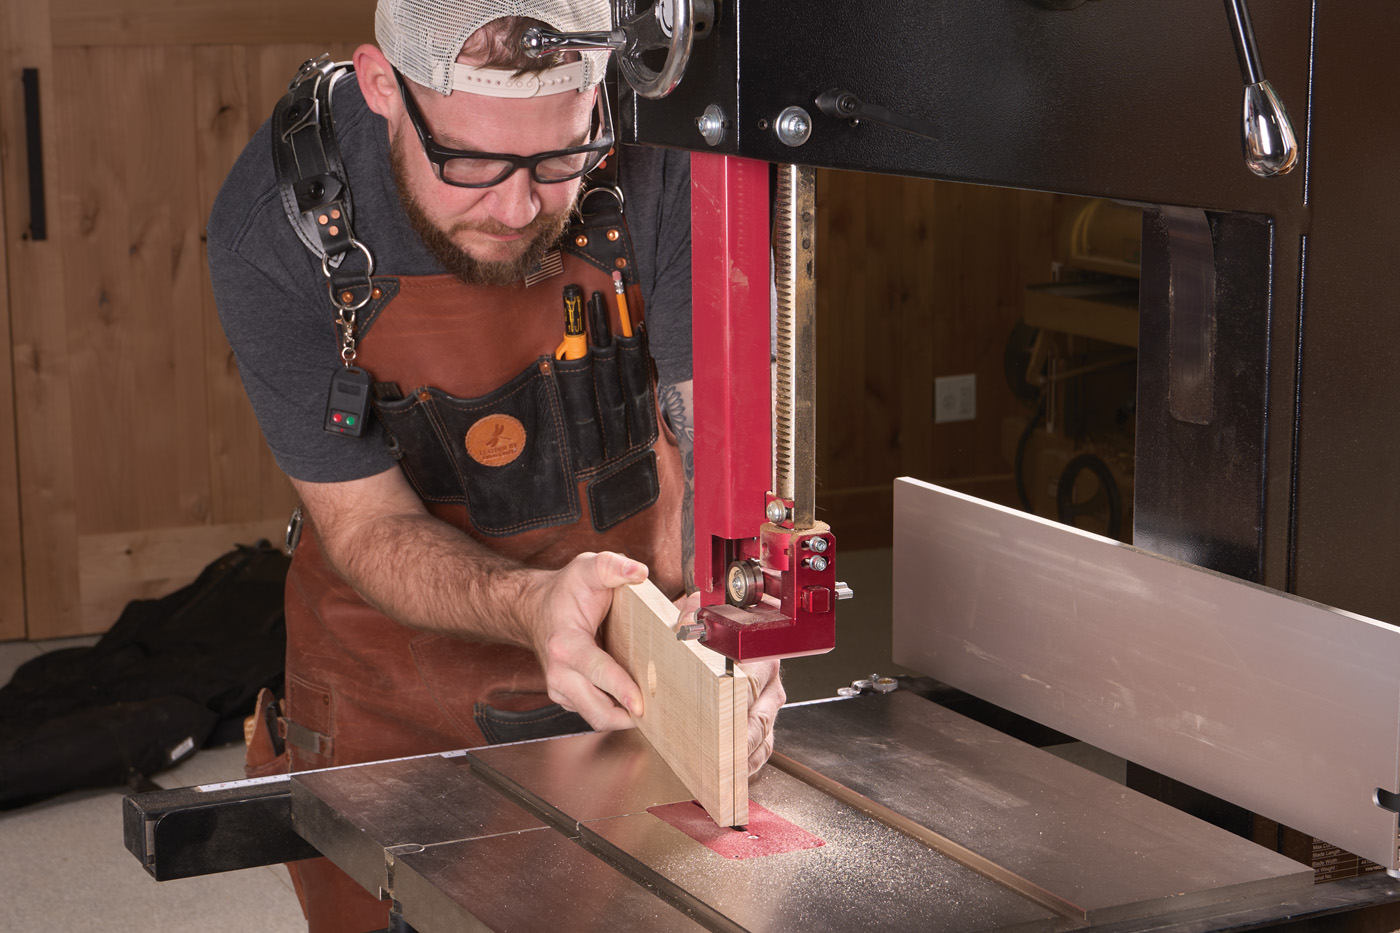
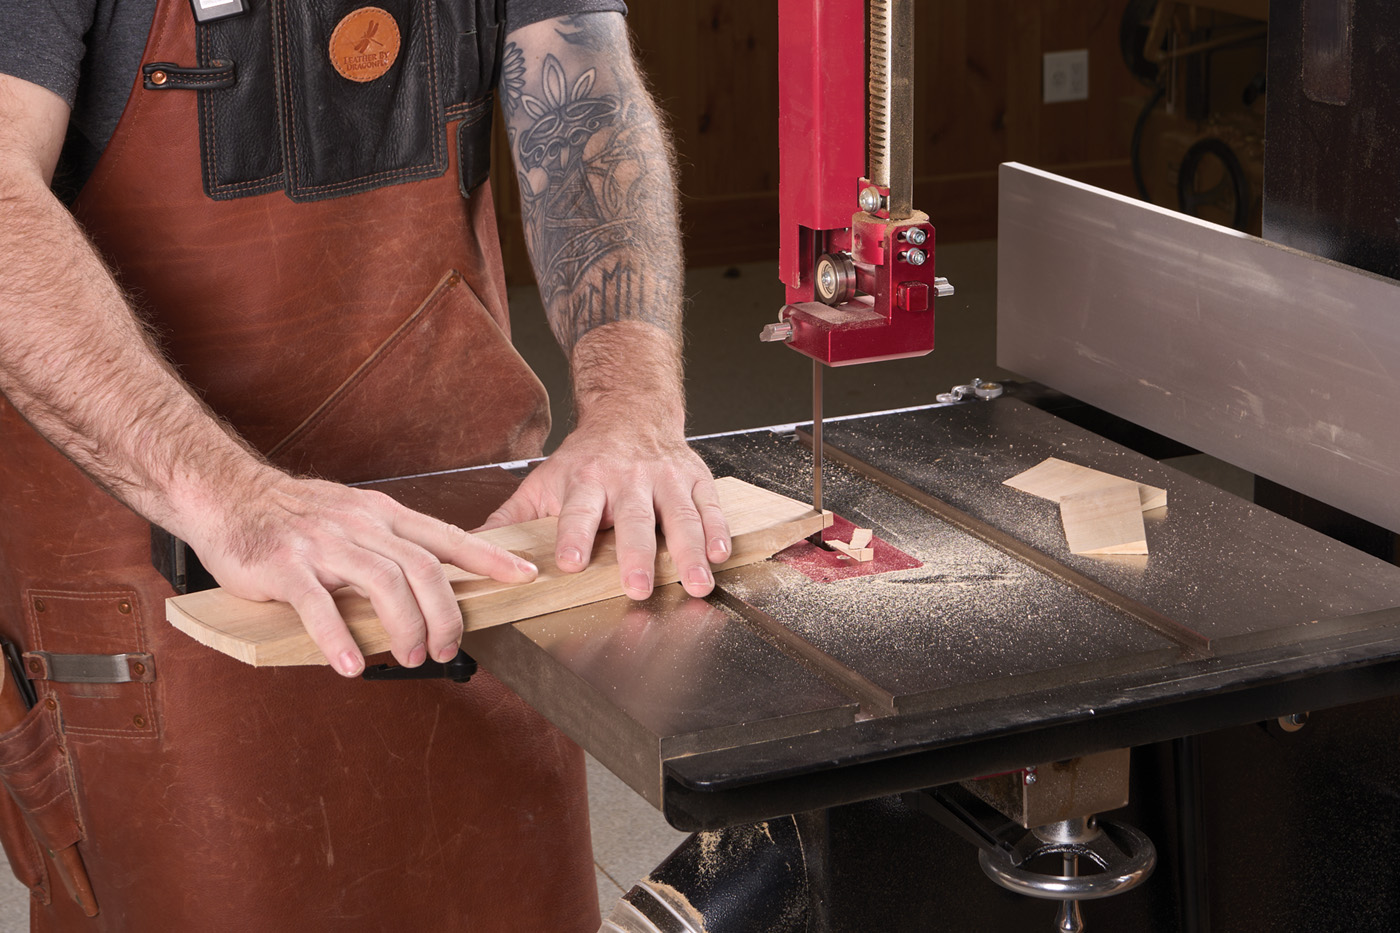
The legs are up next. Now, because of the spindly nature of these, you need to pay attention to the grain direction. You want the grain to be as continuous as you can, along the entire length of the leg. In my instance, I cut fresh leg blanks off the hunks of ash, as you see in photo 12. Trace the legs onto your stock, and cut them out at the band saw. Because of the direction of the grain, cut the legs as close as you can to the layout line, leaving just a hair of waste—this is to help with the next step, which is routing.

12 Start to break down stock for the legs. Here, I used a hunk of curly ash from which the entire table came.
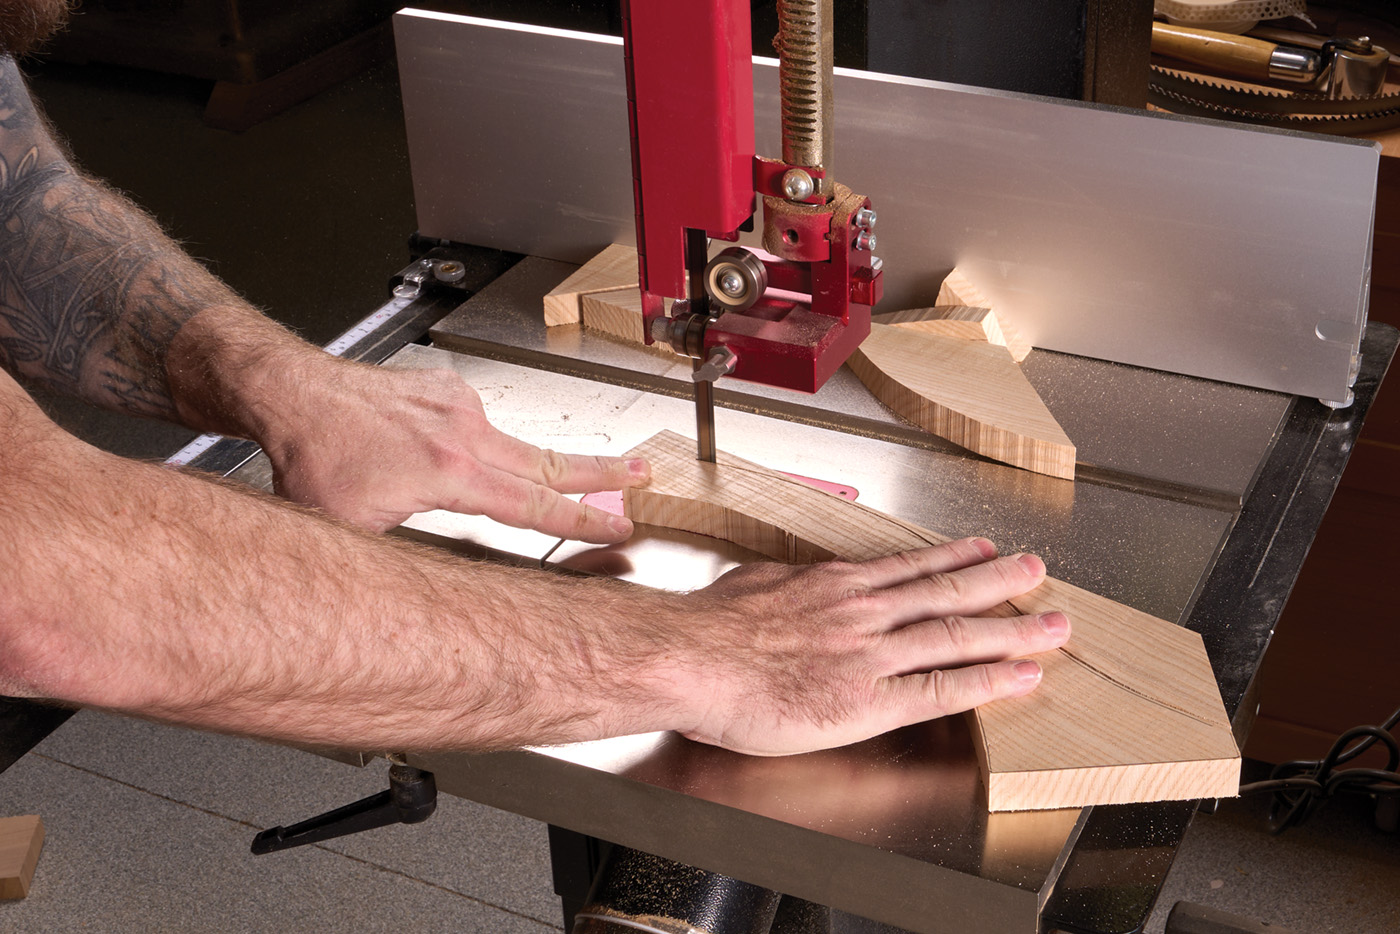
13 Rough cut the legs at the bandsaw. The key here is to stay as close to the line as possible and not leave a bunch of waste.
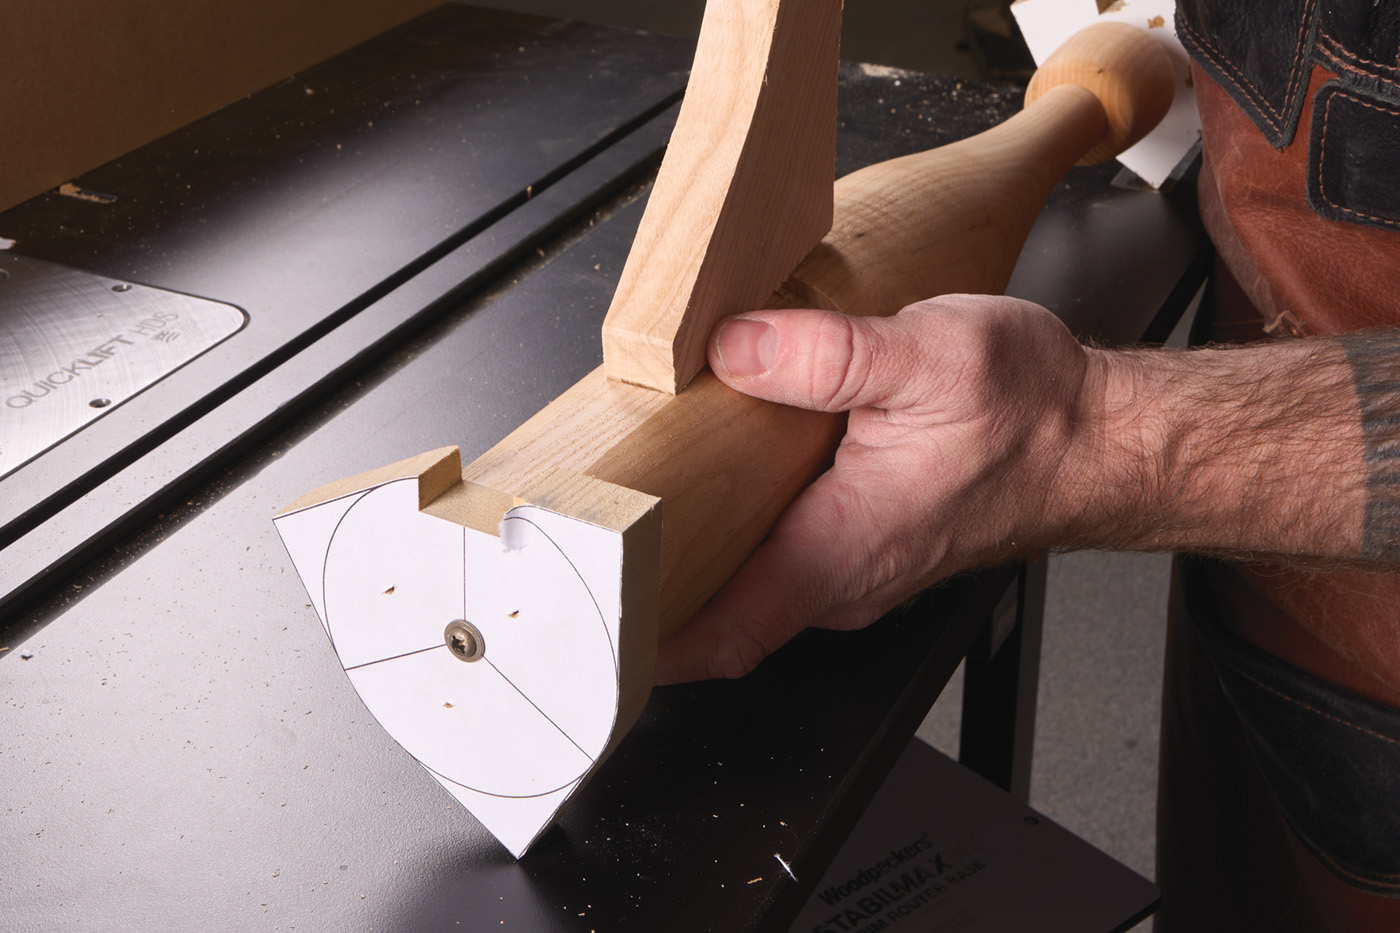
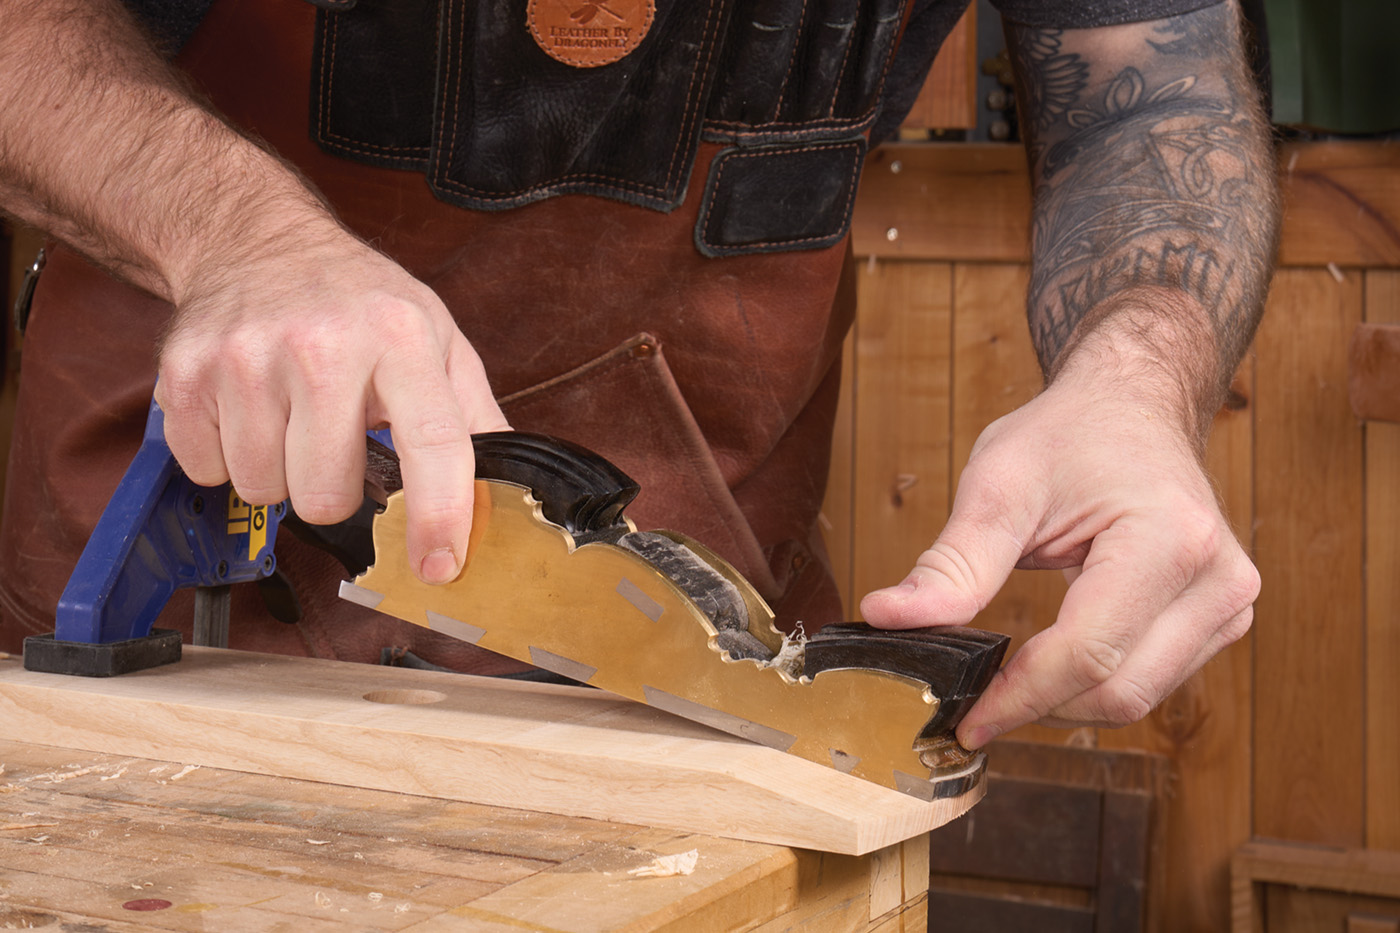
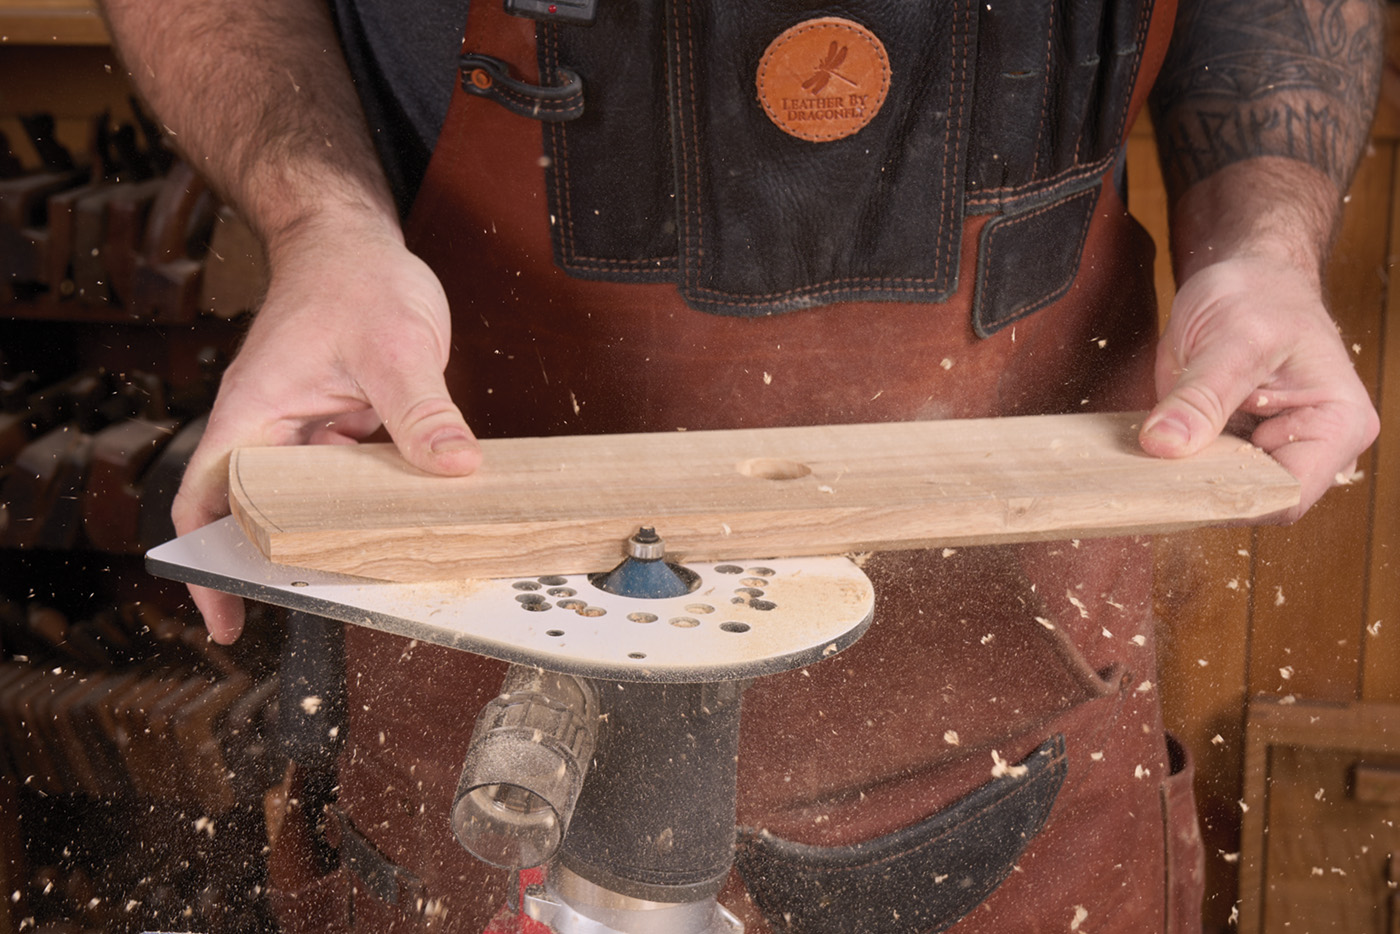
Once again, the leg pattern is made from MDF, and is the easiest way to make a set of legs that match. Use double-sided tape to hold the template to the cut legs. Now, at the router table, you’ll want to rout away the waste. Use a sharp bit (I like the spiral pattern bits from Woodpeckers) and pay attention to the grain direction. If you left just a sliver of waste, I found you can rout against the grain without a whole lot of problems. If your band sawing is not up to snuff, make sure to flip the blank around and always rout downhill. This will avoid any major tear-out.
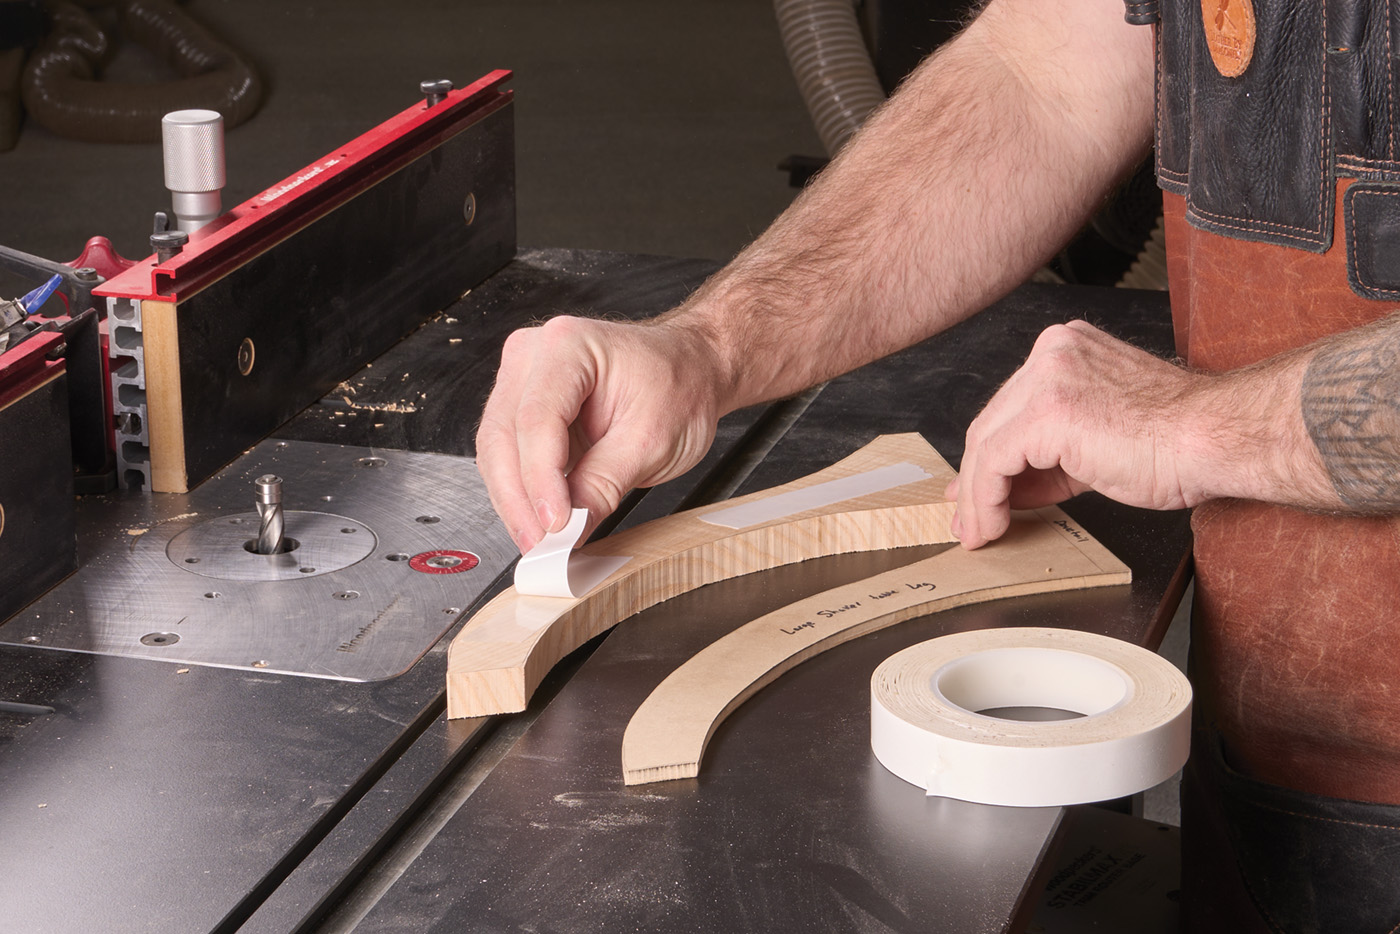
14 Stick the template onto the legs and trim away the waste.
15 Pay attention to the grain direction to avoid blowout.
Joinery
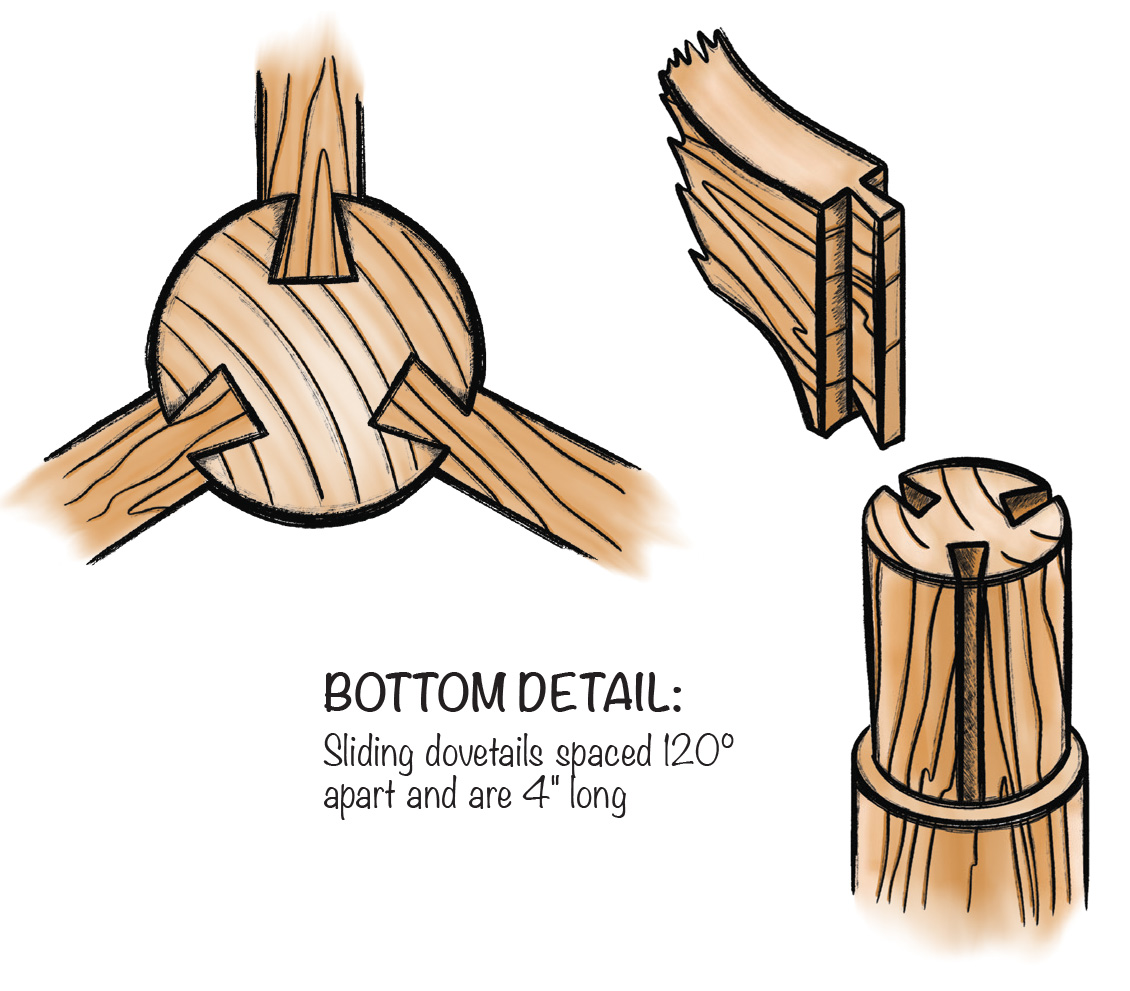
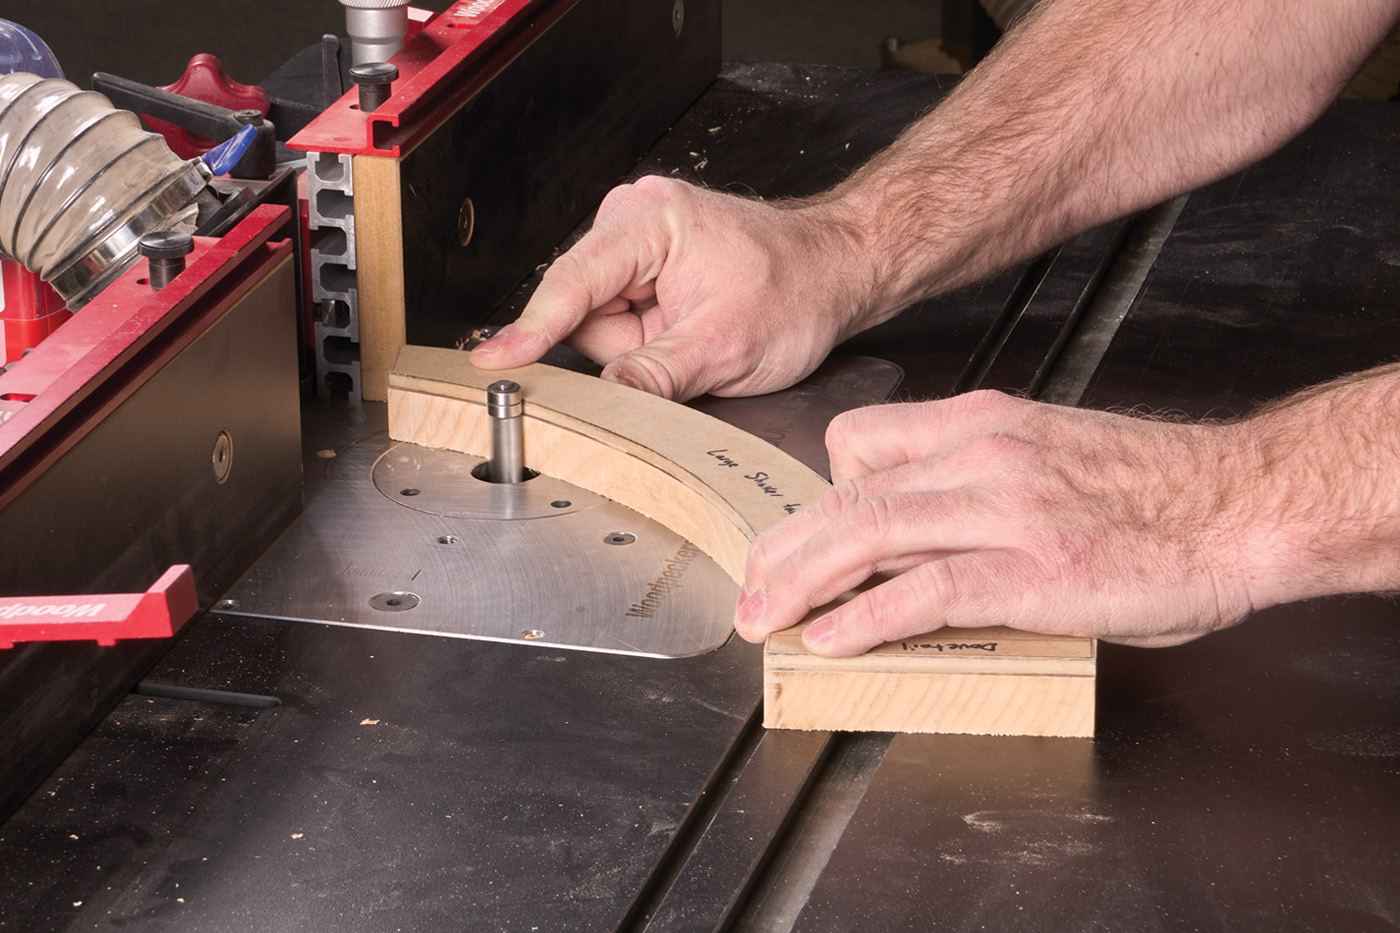
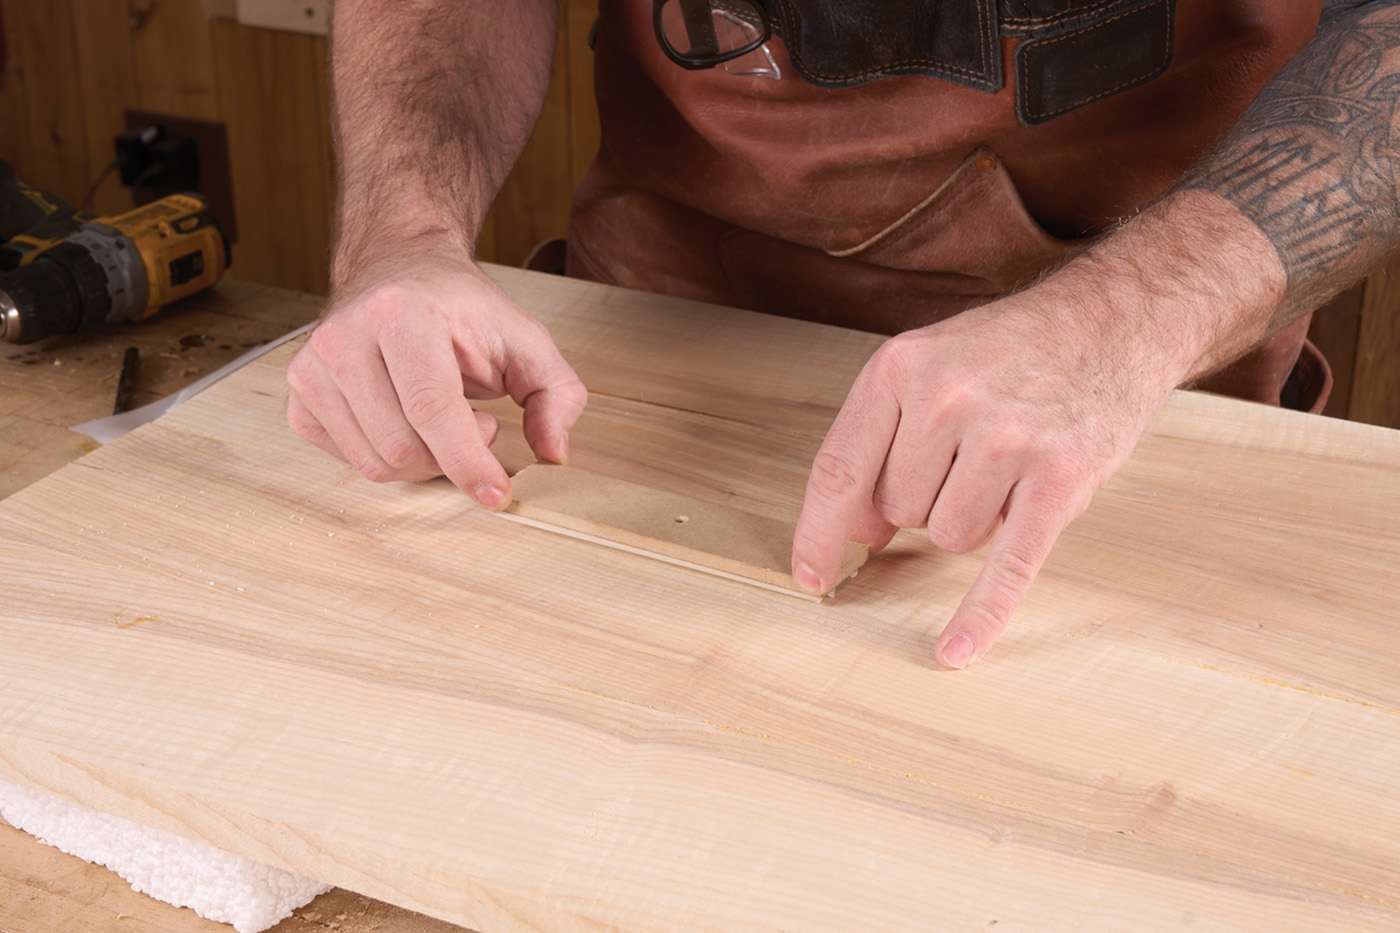
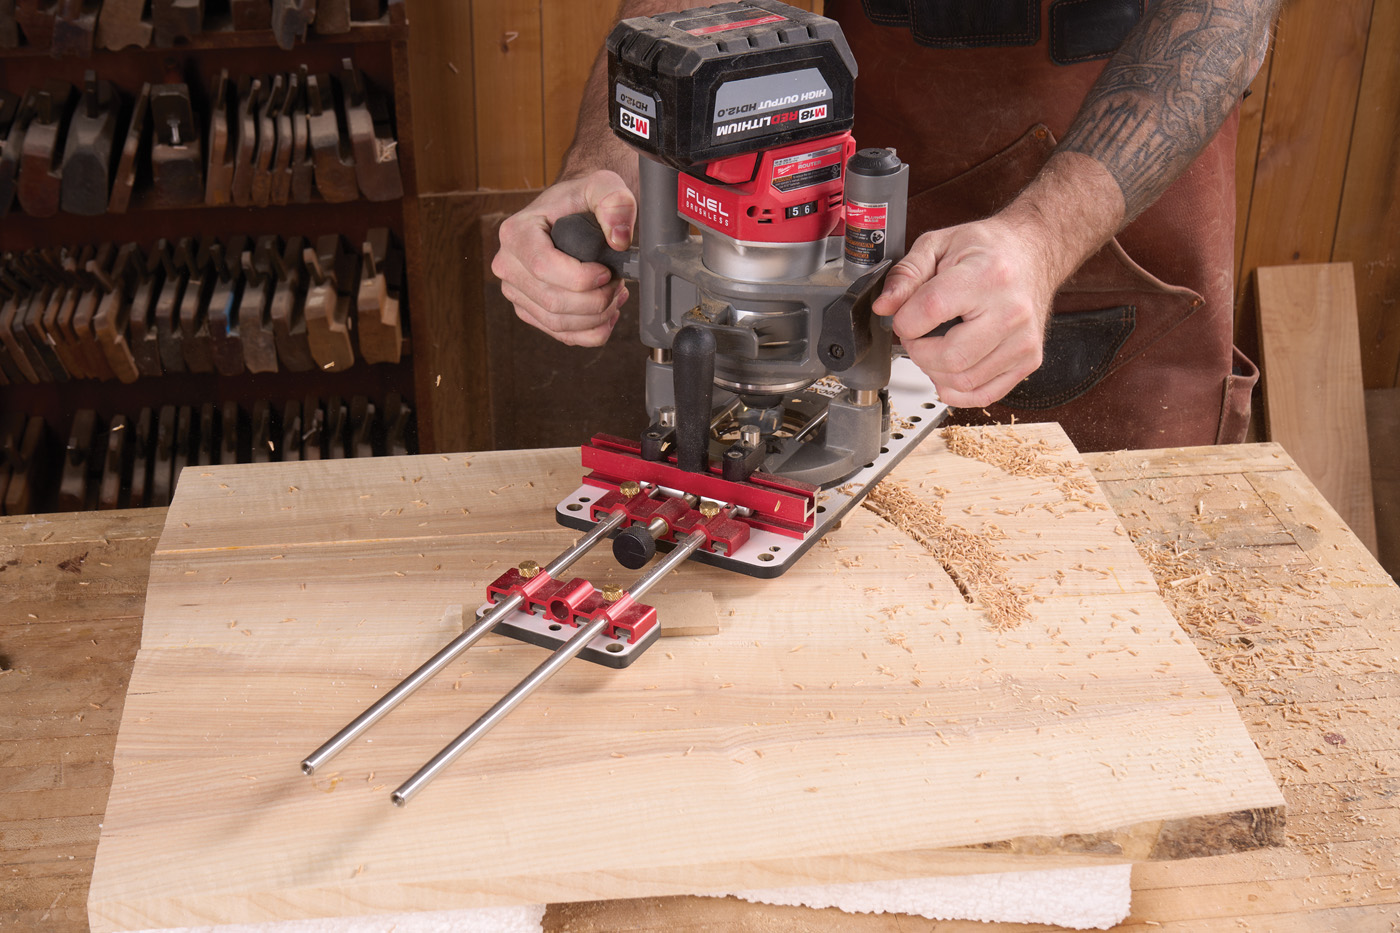
Now comes the trickiest part of the table—forming the sliding dovetail joint that attaches the legs to the pedestal. There are several ways to do this. Christian Becksvoort, a former employee of Thos. Moser and master of Shaker furniture, suggests cutting them by hand. Maybe I’ll have that confidence some day. Until then, the method I use is shown below. Using a pair of guide blocks screwed to the center point of the pedestal allows you to clock the pedestal in 120° increments. The dovetail is routed in three steps. The first is done with a wide rabbet bit to create a flat face for the leg to mate against (photos 17- 18). Then, without moving the fence, I use a straight bit to remove most of the waste from the dovetail slot. Then, swapping out the bit for a dovetail bit, I cut the rest of the slot. You can see the waste grooves and the start of the dovetail slot in photo 19.
16 The dovetail slots are cut using support blocks on each end of the pedestal.
17 Start by routing a flat in each of the three locations.
18 Size the flat to match the leg stock.
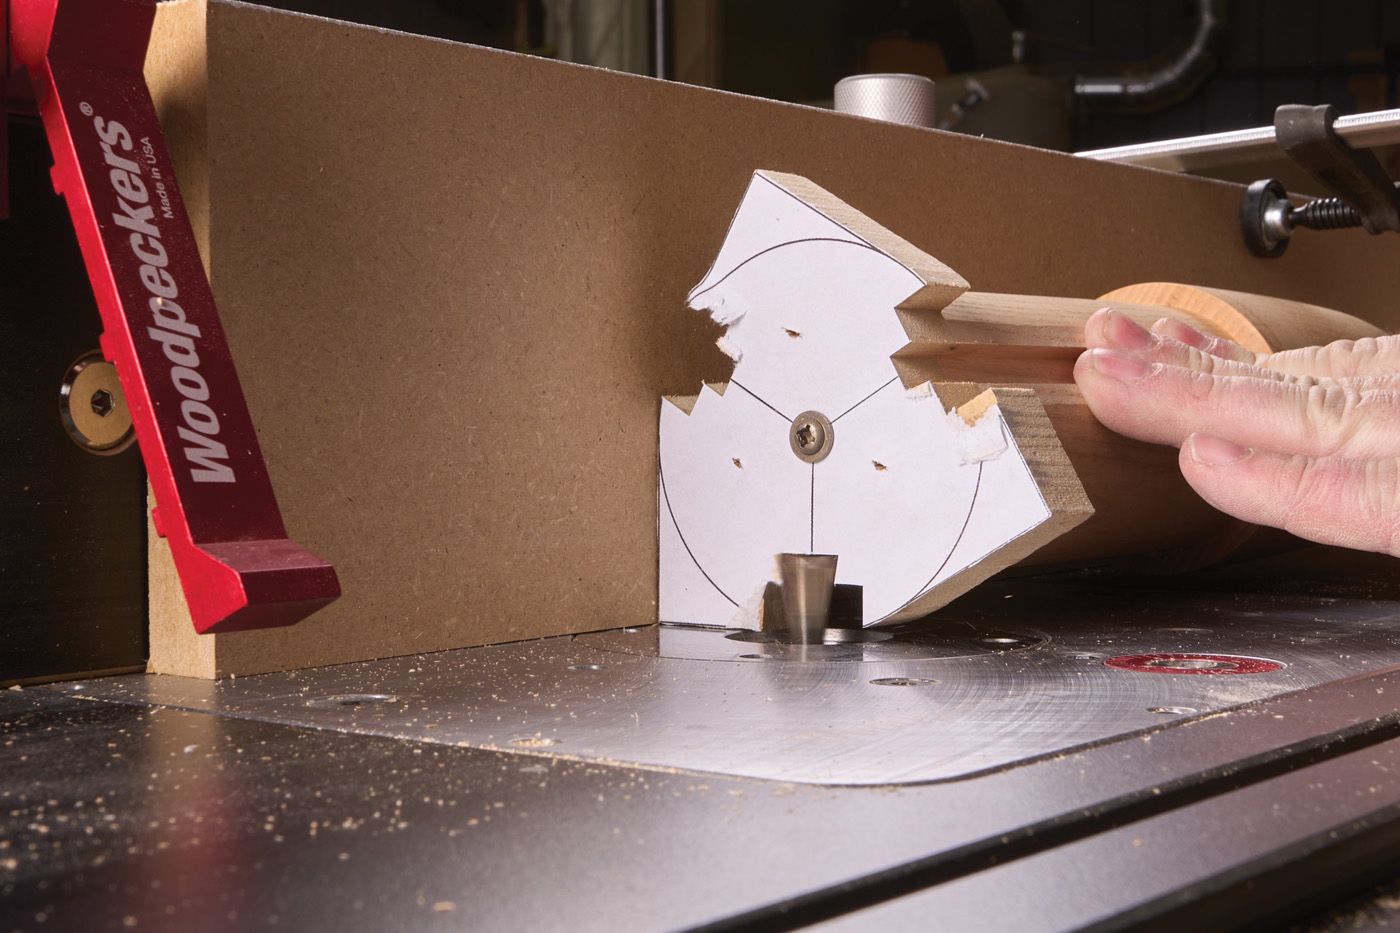
19 After routing a groove to remove the waste, rout the dovetail.
Cutting the matching dovetail on the legs is fairly straightforward. Leave the dovetail bit in the router table, and lower it to match the depth of the slot. Make a few test cuts on a piece of scrap the same thickness as your leg. You can make the dovetail wider or narrower by adjusting the fence. Pay attention to the depth of the dovetail as well, and adjust the bit height as necessary for a good, snug fit.
20 The legs are routed using the same dovetail bit, buried in an auxiliary fence. Check the fit until it slips in with firm pressure.
Final Fitting
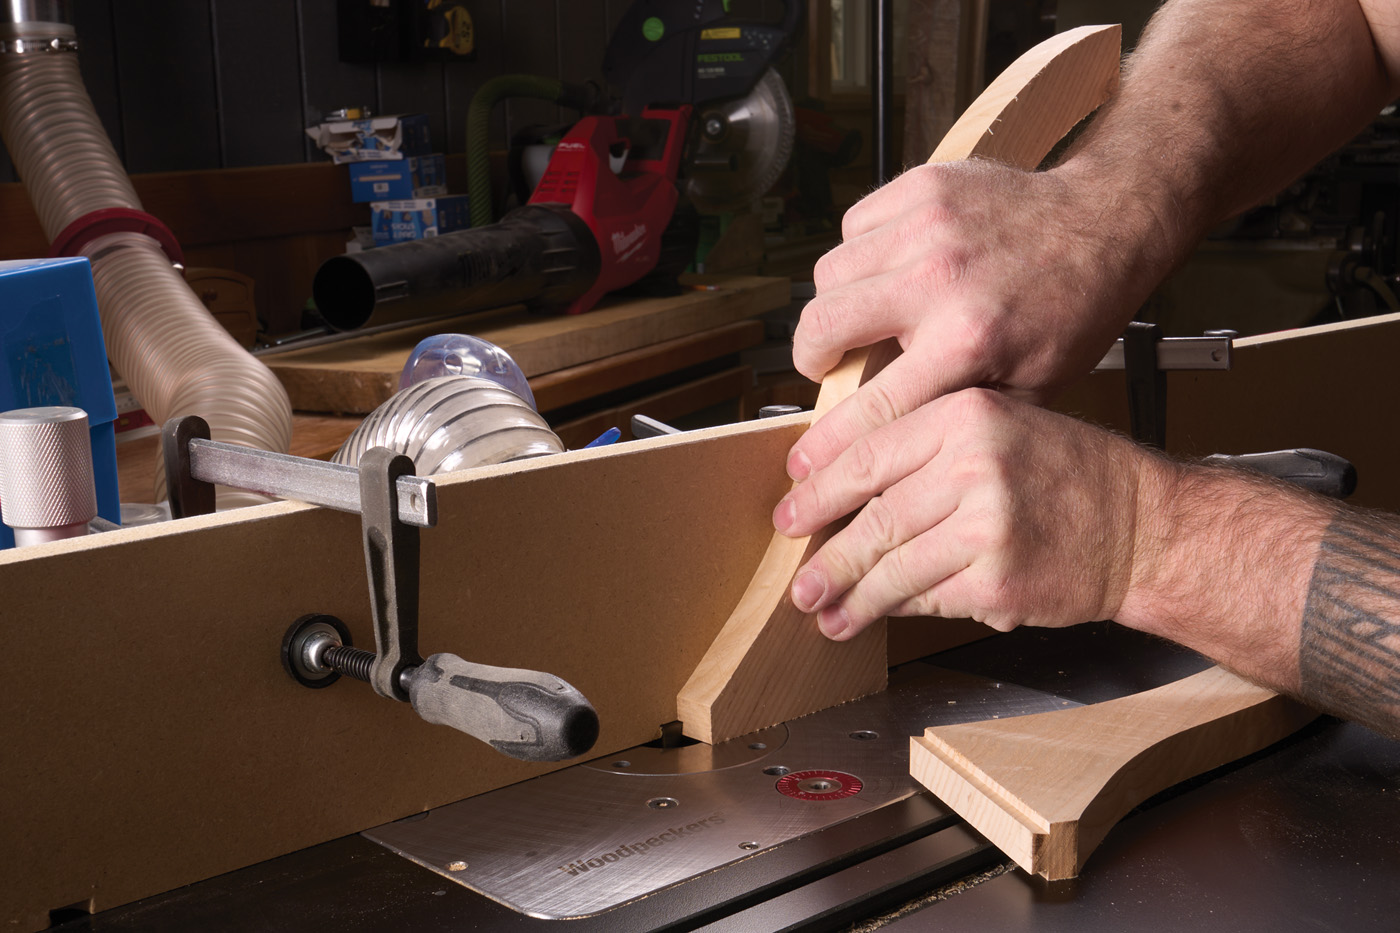
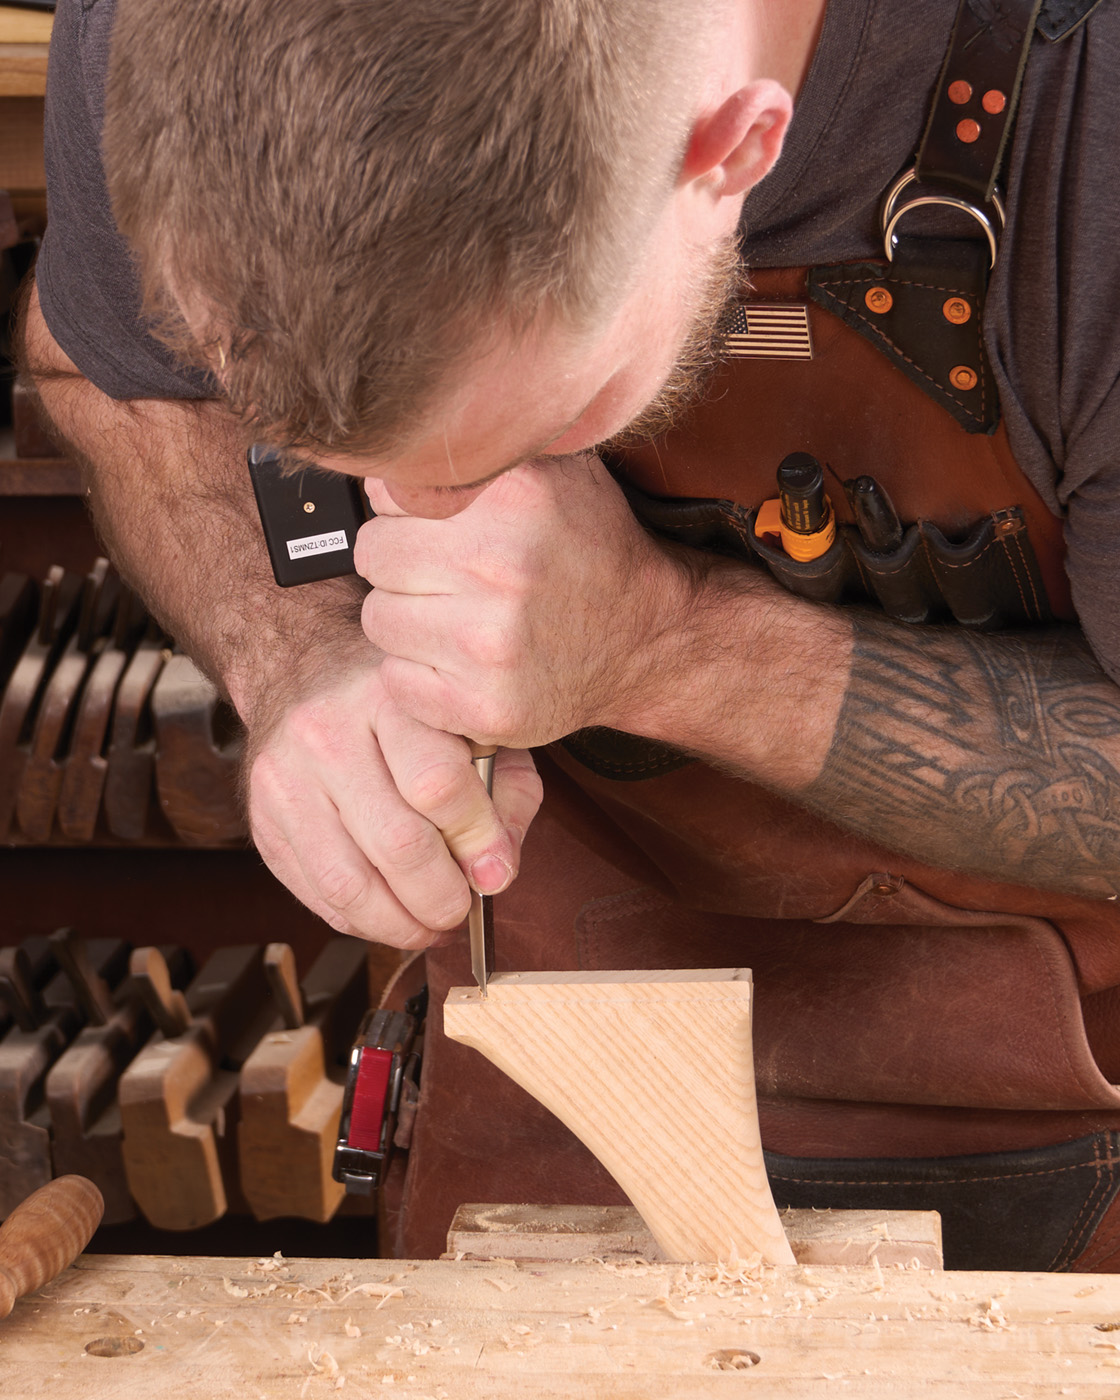
Once the dovetails fit in the pedestal, there are still a few details to take care of. First, the legs get a slight roundover. Zip around both edges of the legs, being careful to avoid going across the top edge. Now, the top edge of the dovetail needs to be knocked off. This will allow the leg to seat fully into the pedestal. Test the fit in and make sure the legs seat fully. Once they do, trace the curve of the pedestal onto the top of the leg. You’ll use a spokeshave to blend the roundover into the larger diameter shape of the pedestal. You can see this in photo 23. The tenon on the top of the leg will get glued into the brace in a bit. But first, a kerf needs cut in the tenon for a wedge. You could do this at the band saw, or with a hand saw (photo 24).
21 Roundover all of the edges of the legs.
22 Remove the top section of the dovetail on the leg.
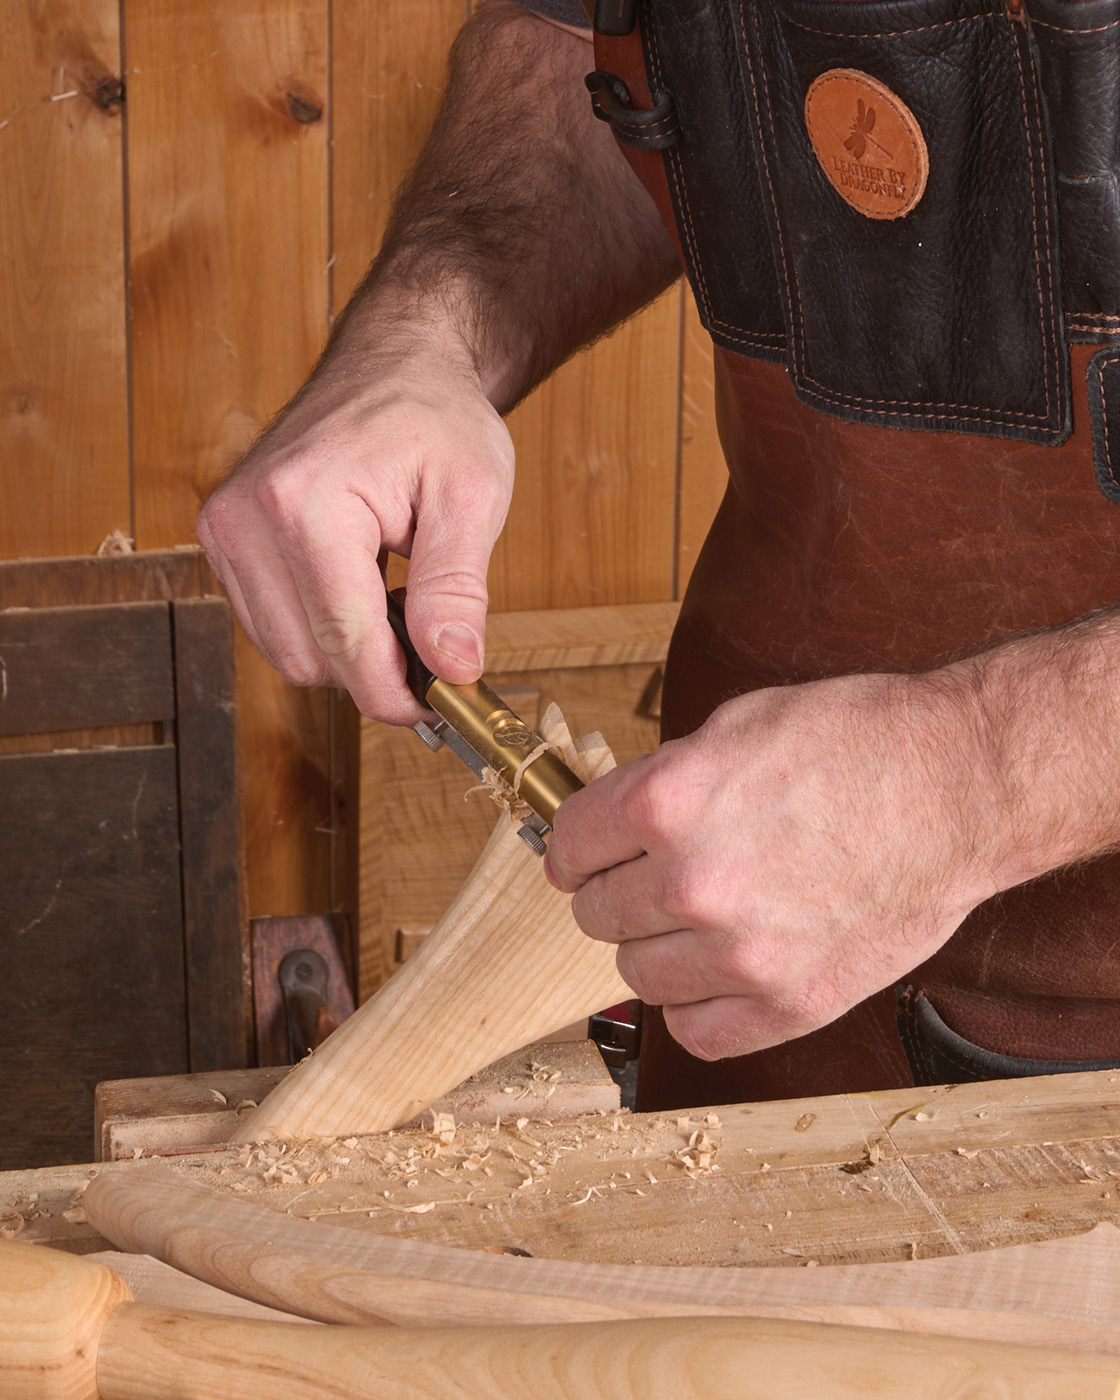
23 A spokeshave helps blend curve of the leg to the pedestal.
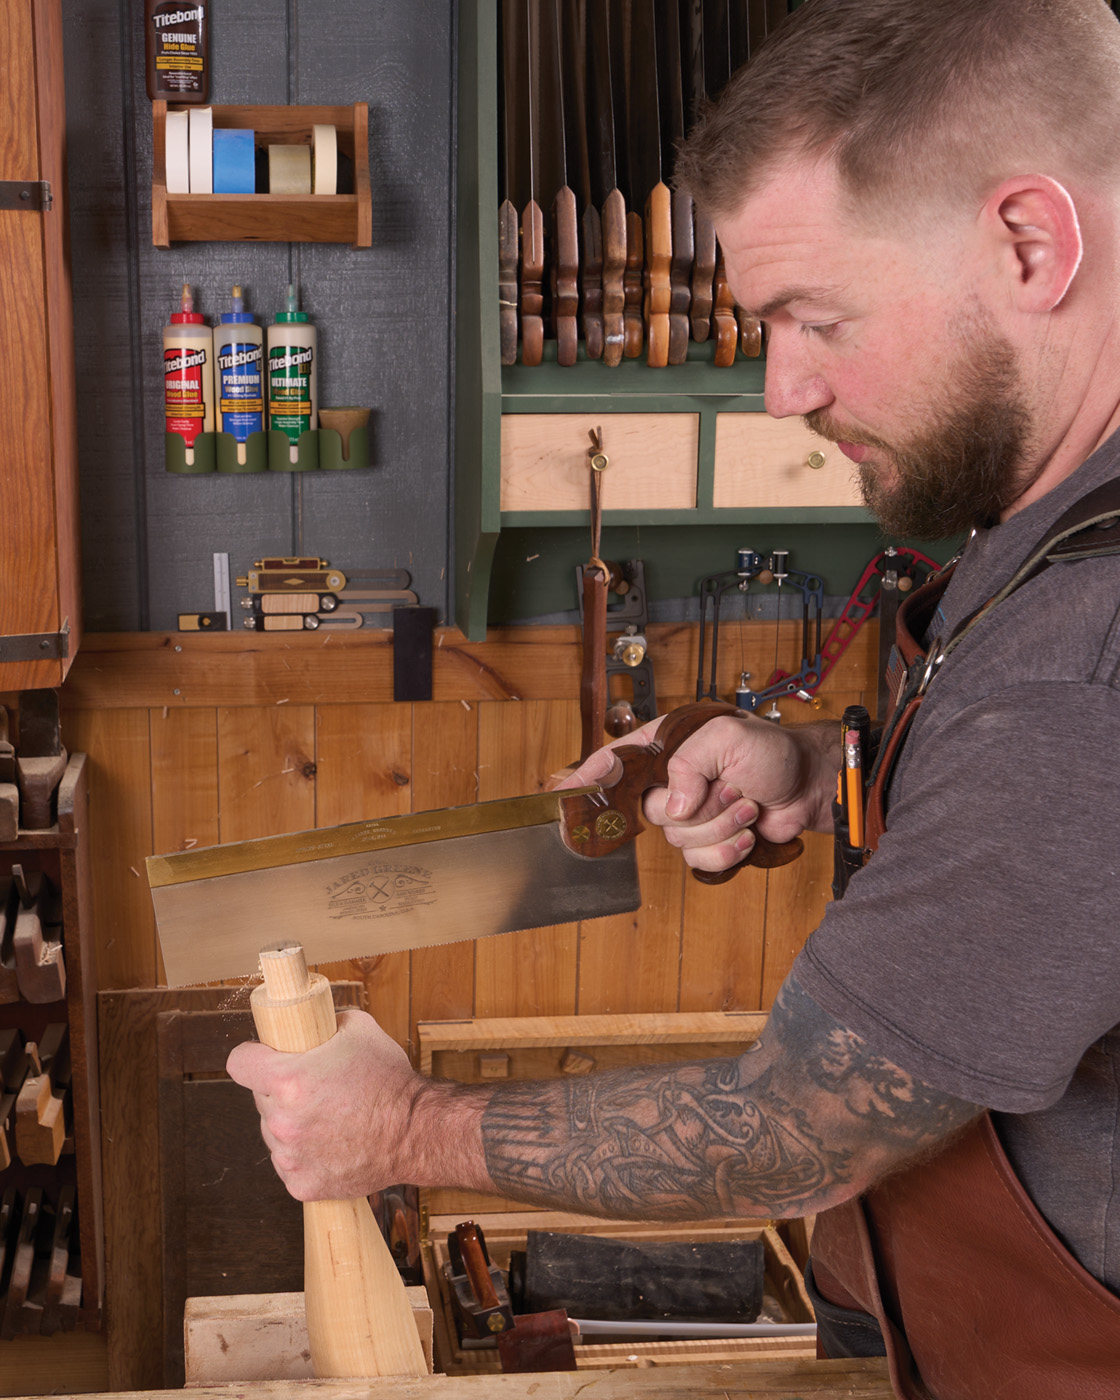
24 Slot the tenon with a backsaw.
After sanding the legs, they can be glued in place. Apply glue to the dovetail, and drive the legs home. Once the glue is dry, you can sand the bottom of the pedestal flush with the legs. I use a spindle sander for this, but an orbital sander would work as well, just a bit slower.
25 Drive the sliding dovetail into the pedestal with glue. The pedestal bottom should be a little long, and hang past the bottom of the legs.
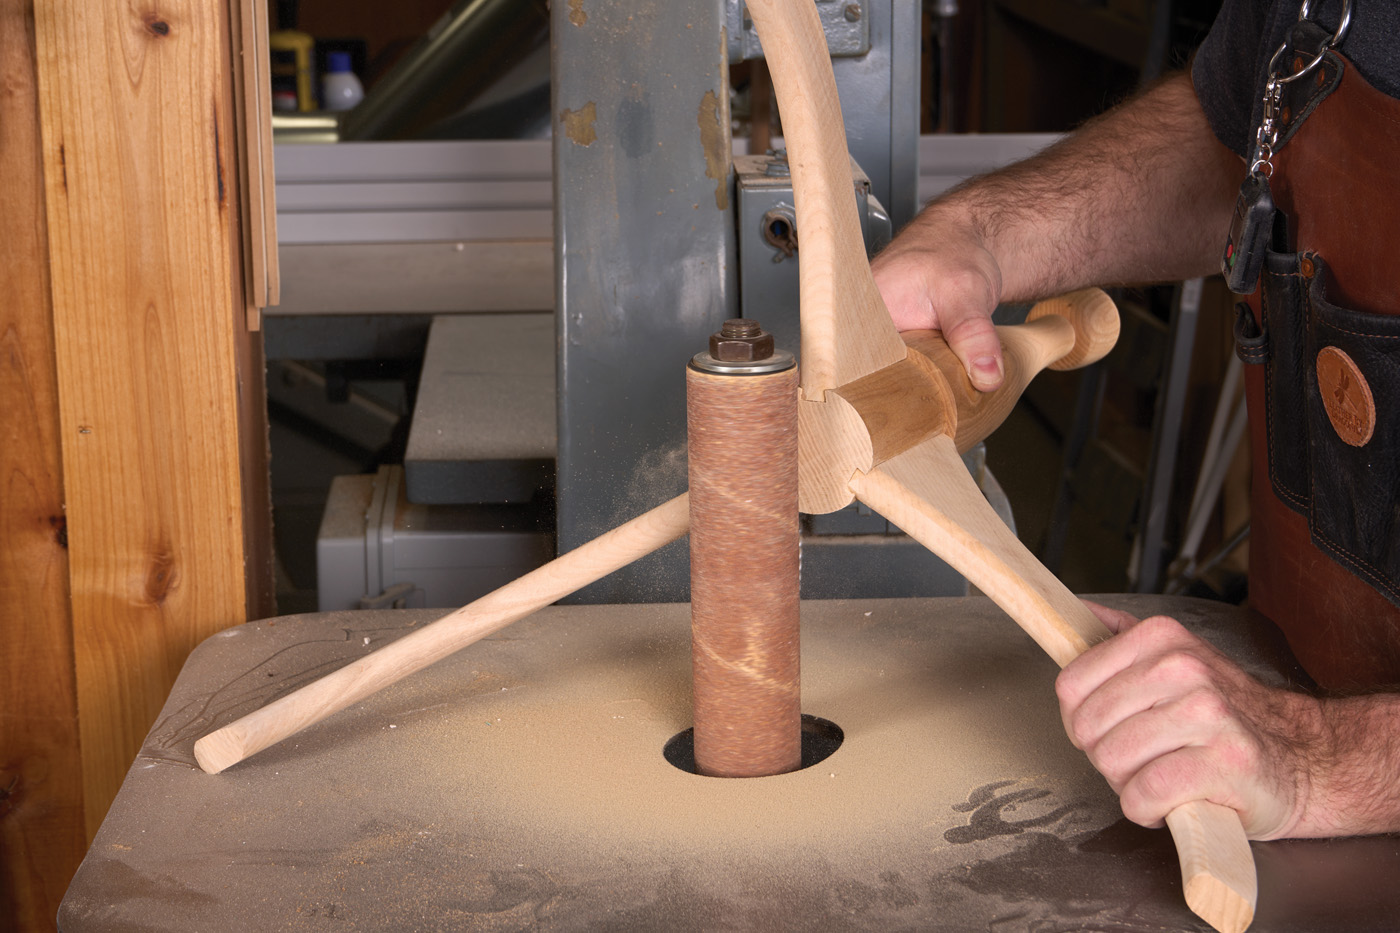
26 A spindle sander is a good way to flush the bottom of the pedestal with the bottom of the legs.
Now, let’s switch into top mode. The top needs to be 18“– diameter. I glued mine together from several boards, using the slip-match method. This gives a clean, uniform appearance, even though it is glued together. While the top was drying, I switched over to the brace. This brace is drilled with a center hole to match the tenon. The ends are slightly rounded (to match the shape of the top). They also have a long bevel on the ends. These details cause the brace to blend into the table and pretty much disappear.

27 Glue up the top.
28 The brace is beveled.
29 Then the ends slightly rounded.
30 Clean up the bevels with a hand plane. Extra points for a fancy plane.
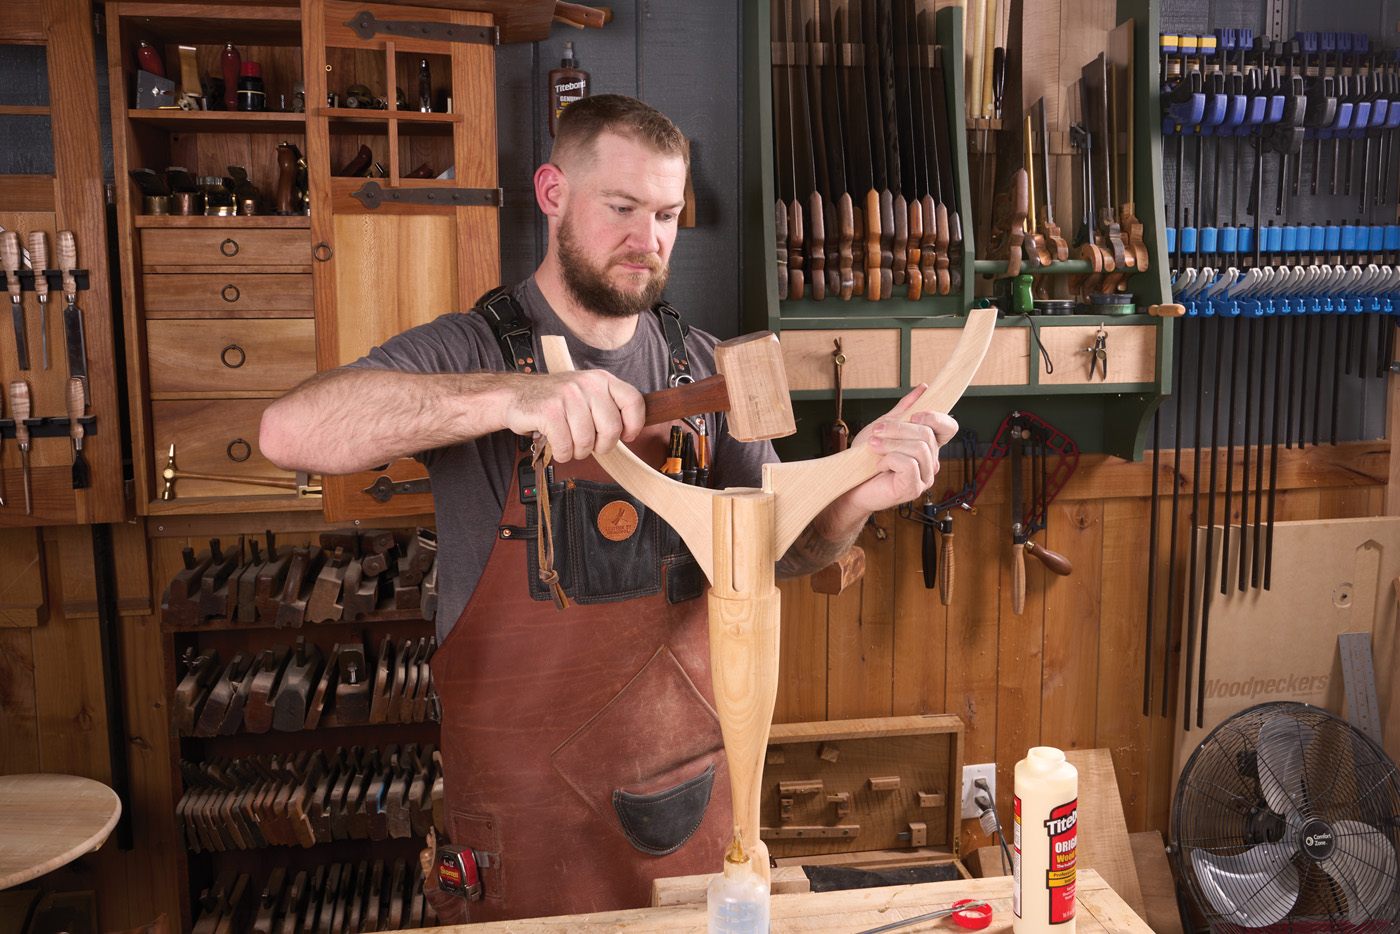
Both the bevel and the rounded ends are cut at the band saw. I free-hand cut the bevels, simply striking a line and cutting close. Likewise, I rounded over the ends in a similar fashion. At the bench, I used a plane to smooth out the bevel and the rounded ends. The long edges of the brace get a heavy chamfer with a router. Once the brace is sanded and a finish is applied, it can be attached to the pedestal. Glue the outside of the tenon, and then glue a wedge in place. Smack the wedge firmly with a hammer until it bottoms out. The remaining tenon and wedge can be trimmed flush with a pull saw.
31 Next, chamfer the edges of the brace.
32 Glue the brace in place and drive a wedge to lock it home.
Finish the Top
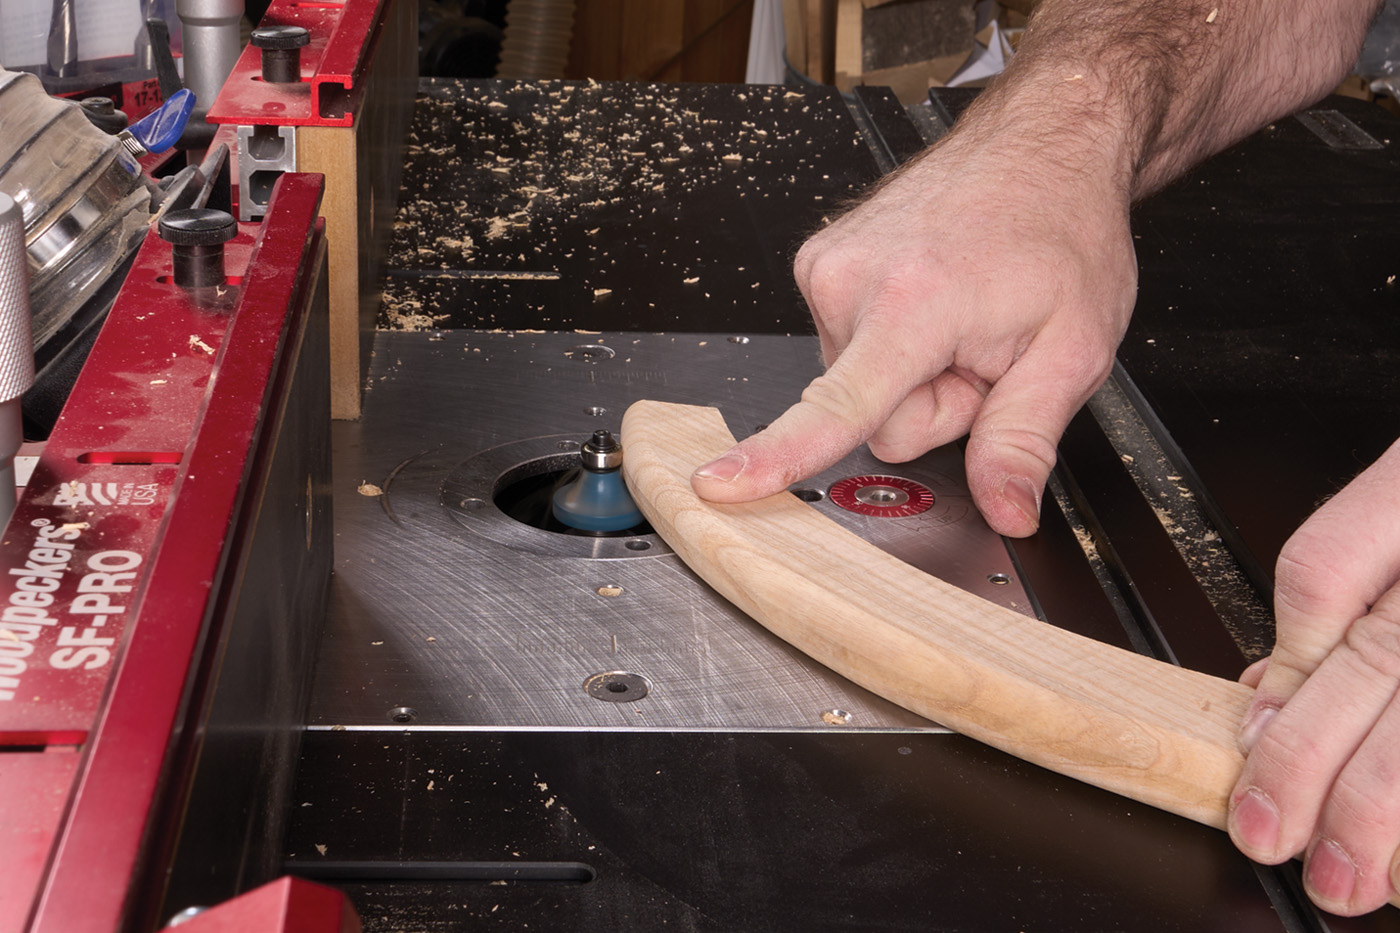
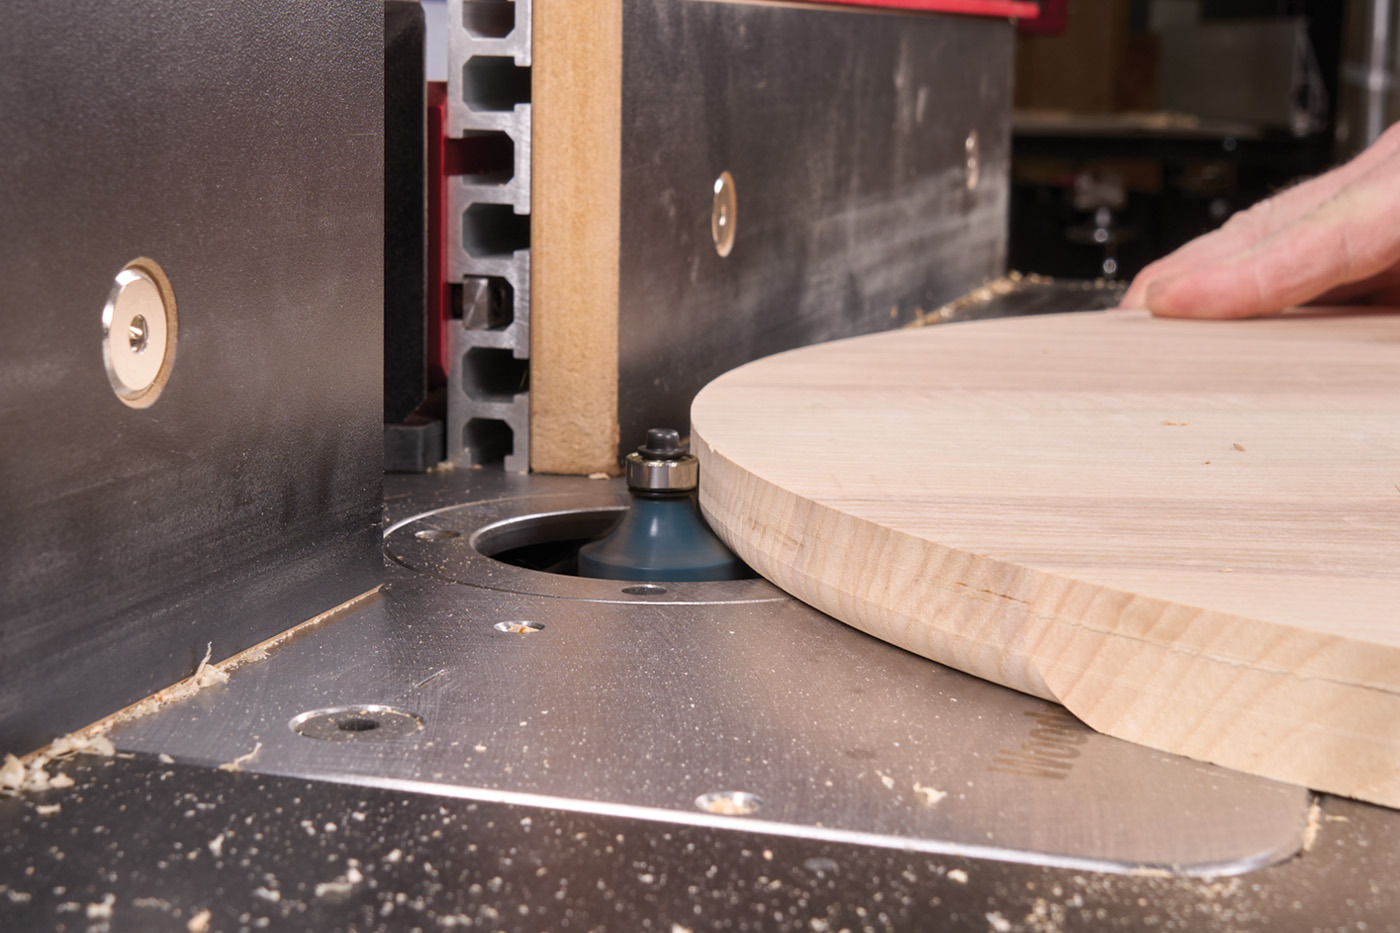
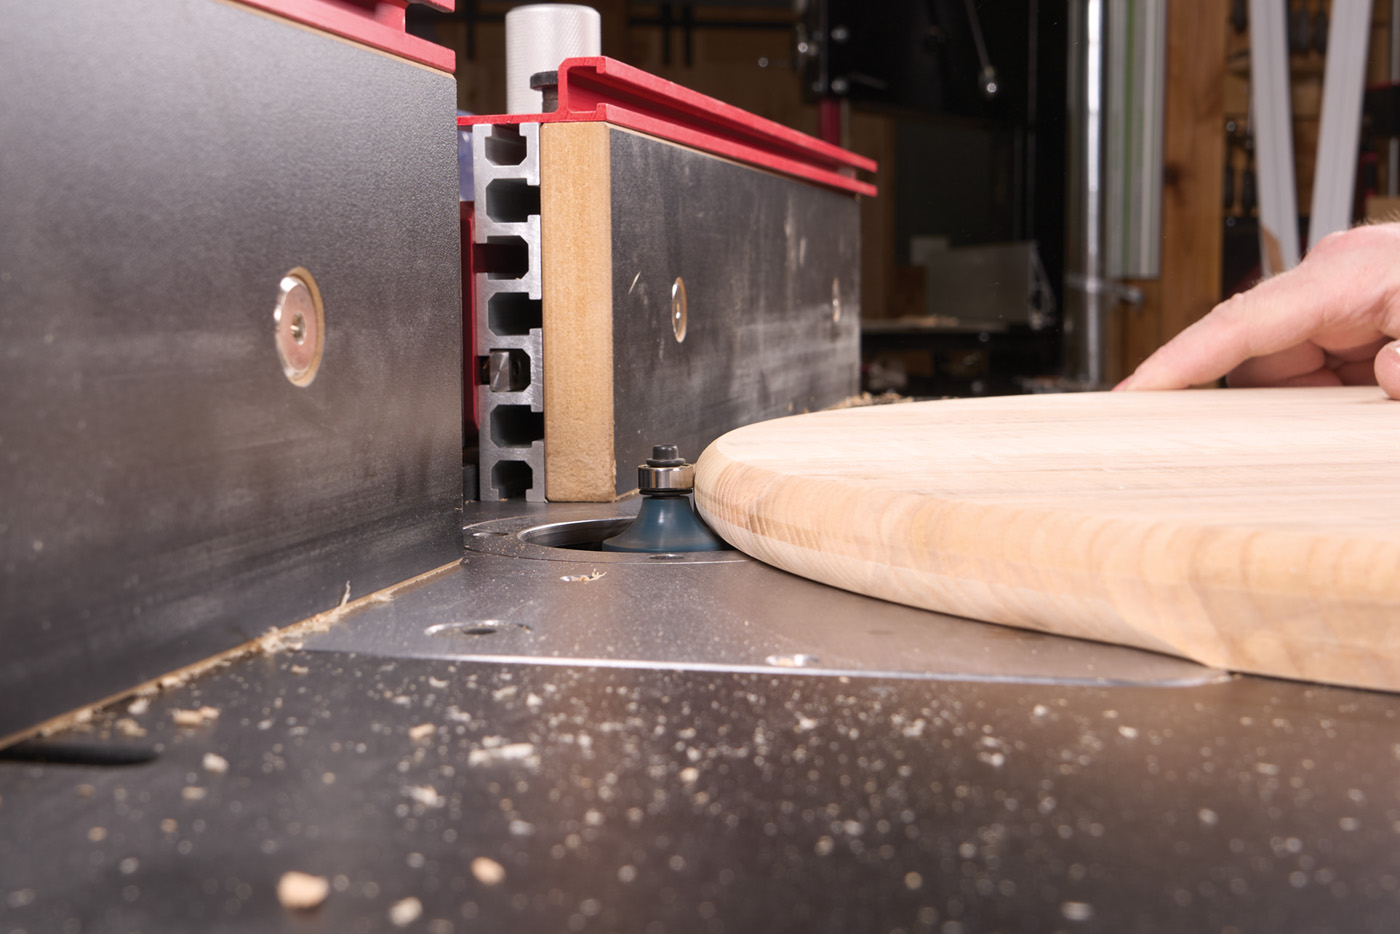
With the glue on the top panel dried, you can cut it to shape. Cutting the circular top can be done in a few ways. If you must, a jigsaw will suffice. You’ll need to clean up the edges with rasps and sandpaper, more than likely. The next best option is a band saw. If you have a circle cutting jig, this is easy. If you free-hand it, there will still be a bit of clean-up to do. I feel as though the best method to cut clean circles is with a router trammel, as you see in photo 34. I use a scrap block as a pivot point (inset photo 33) taped to the center of my panel. The trammel is located in the drilled hole in the scrap block and swings the router around the central point. Using a spiral upcut bit and making multiple passes, you’re left with a circle that is super clean and only requires a light hand sanding to clean it up. The best part of all is that using a scrap block means you don’t need to drill into your blank unnecessarily.
33 A scrap block taped onto the top is a pivot point for the router trammel.
34 Rout the top out in a few passes.
The top gets the same roundover treatment that the legs got earlier. The goal here is to create a round-over that is almost a bull-nose. Take time to dial in the height of the bit to leave a flat for the bearing to ride on as possible. Make a pass around one edge first (photo 35), and once that’s done, flip the top over and do the other side (photo 36).
35 The edge gets rounded over in two passes.
36 You’re going for a near bull-nose profile.
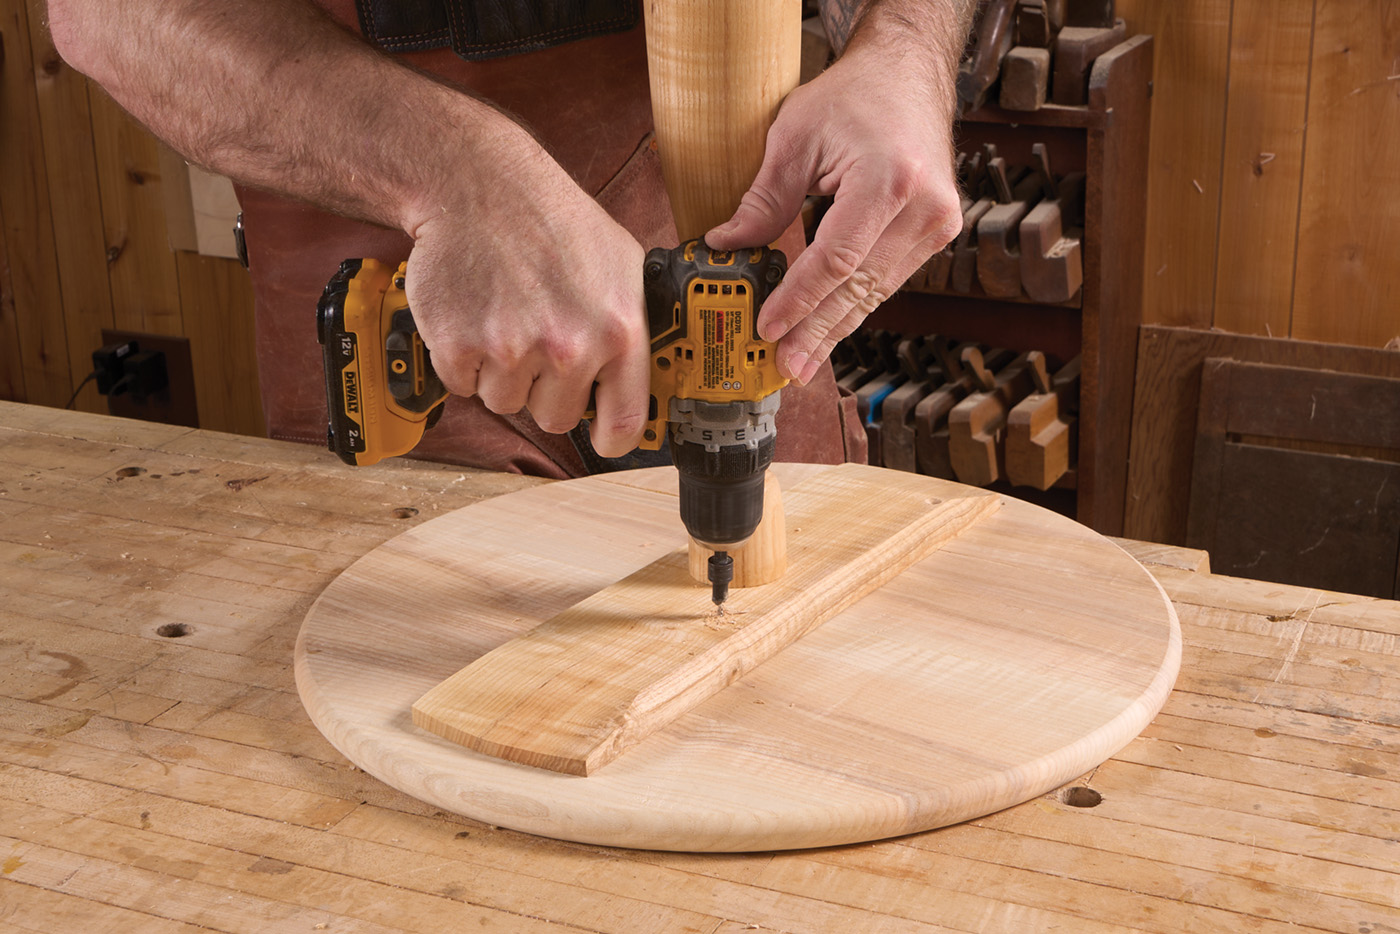
As long as you don’t have a center pivot hole drilled in your blank, take a look at the top and decide which grain pattern looks the best, and make that the top of the table. Position the pedestal and brace centered on the bottom of the top. Make sure the brace is going across the grain—this will help keep the top flat. Yes, you’ll need to worry about expansion and contraction, so when you drill pilot holes for screws, simply rock the drill back and forth to elongate the holes on the far ends of the brace. This adds some expansion room. (To be fair, because my top is fairly quarter-sawn, it won’t expand and contract a ton.) Before attaching the top, I mark the mating ends (simply because the holes are free-hand drilled, and only fit one direction). The top can be sanded and finished. My finishing schedule can be seen here. Attach the top with a few screws and flip the table over to see how it looks.
37 The brace is installed cross-grain.
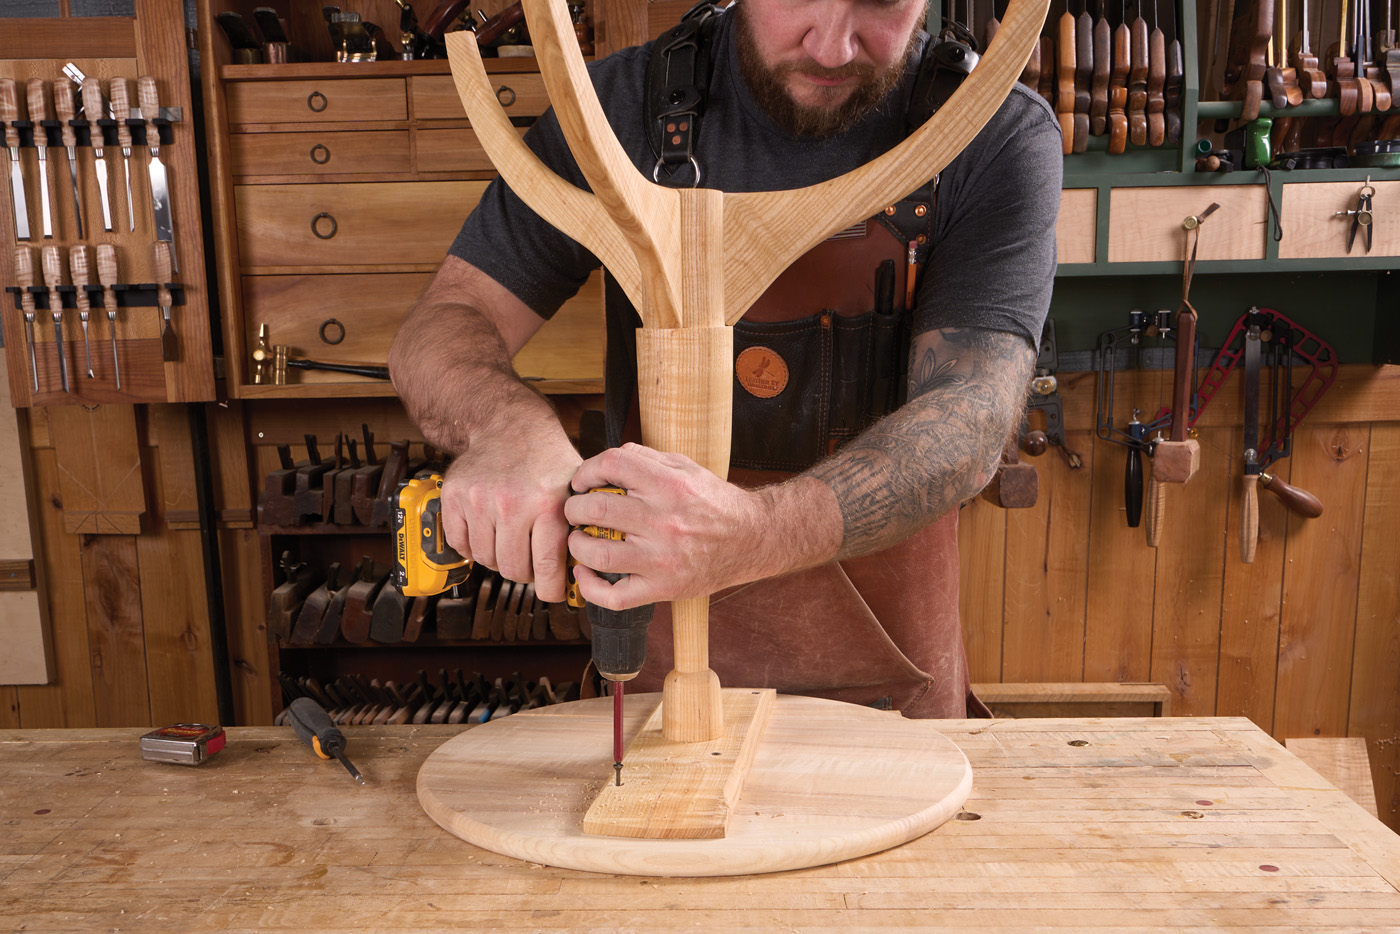
38 So make sure to wallow out the outer holes so that the top has room to move.


