We may receive a commission when you use our affiliate links. However, this does not impact our recommendations.
 Bold oak and classic craftsman style make this arm chair a joy to build. When finished, it’s sure to become your favorite seat in the house.
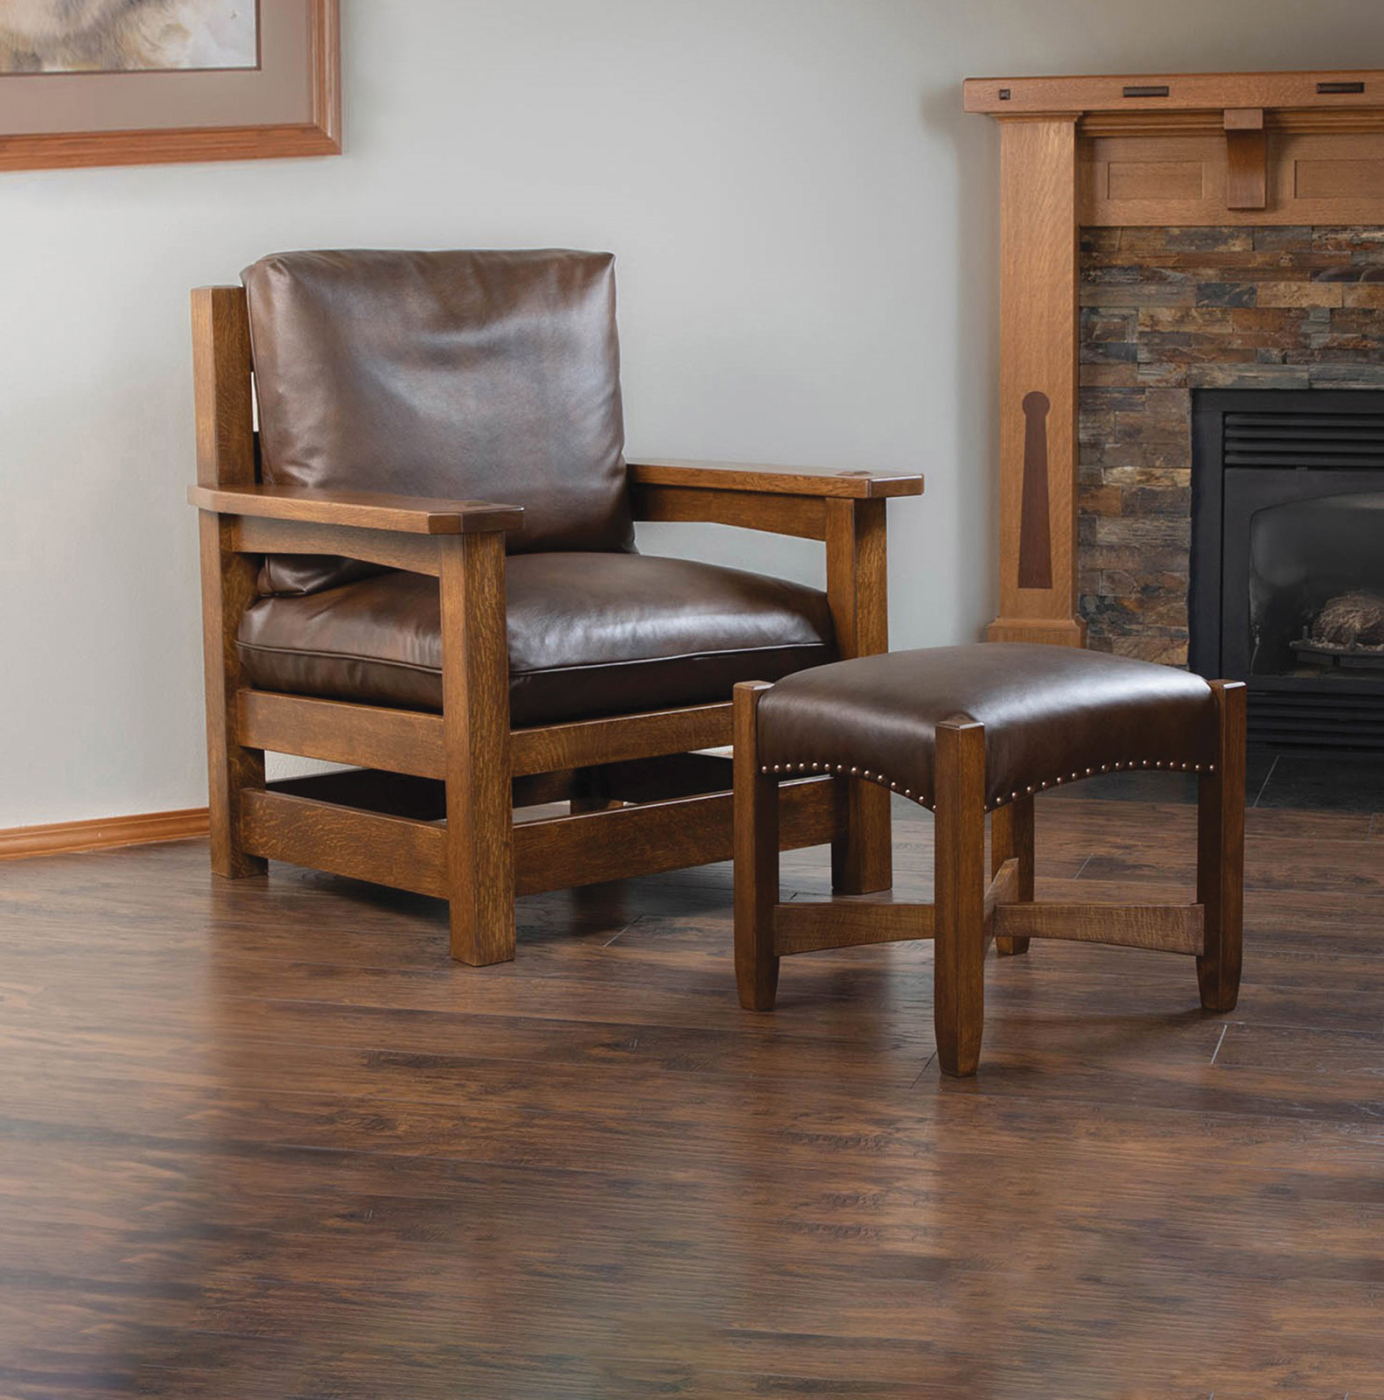 Bold oak and classic craftsman style make this arm chair a joy to build. When finished, it’s sure to become your favorite seat in the house.
Project #2402 • Skill Level: Intermediate • Time: 3 Days • Cost: $250
Want to build the matching ottoman? Check out the plans here: Eastwood Ottoman
Popularized by the Stickley magazine, The Craftsman, the Arts & Crafts movement took hold and has been an American fixture ever since. Styles come and go, but Craftsman furniture is now a mainstay, and harmonizes surprisingly well with rustic, traditional, or modern furniture. This stout chair was designed and built for the earliest Gusatv Stickley catalog in 1901 and was an immediate success. Named for a neighborhood in Syracuse, New York, the Eastwood chair is truly a massive and imposing form. The only attempt to soften the look was a V-shaped cutout from the armrest supports and curved backrest slats. Clipped corners complete the scant details on the fully 1-1/4“ thick armrests.
The chair received renewed interest in 1989 when L&JG Stickley, Inc. was commissioned to build a custom version for the Dalai Lama. Three of these extra-wide chairs were built, one of which resides at the Stickley Museum in Manilus, New York. In 2014, Stickley re-issued a limited edition of just 100 Dalai Lama chairs, based on the original Eastwood design, were snapped up by collectors.
The Eastwood chair appears to be a stocky cube-like form on first inspection. However, it’s deceptively complex with angled joinery, through tenons, and deeply curved backrest rails. Luckily, I’ve come up with a simple jig to handle the most challenging aspect of this built—cutting tenons on the curved backrest rails. All great reasons to hone your woodworking skills—and your hand plane—to build this turn of the century classic. Perhaps The Craftsman magazine was hinting at the intricacies of chair building with the motto “The Lyf so Short, the Craft so Long to Lerne.”
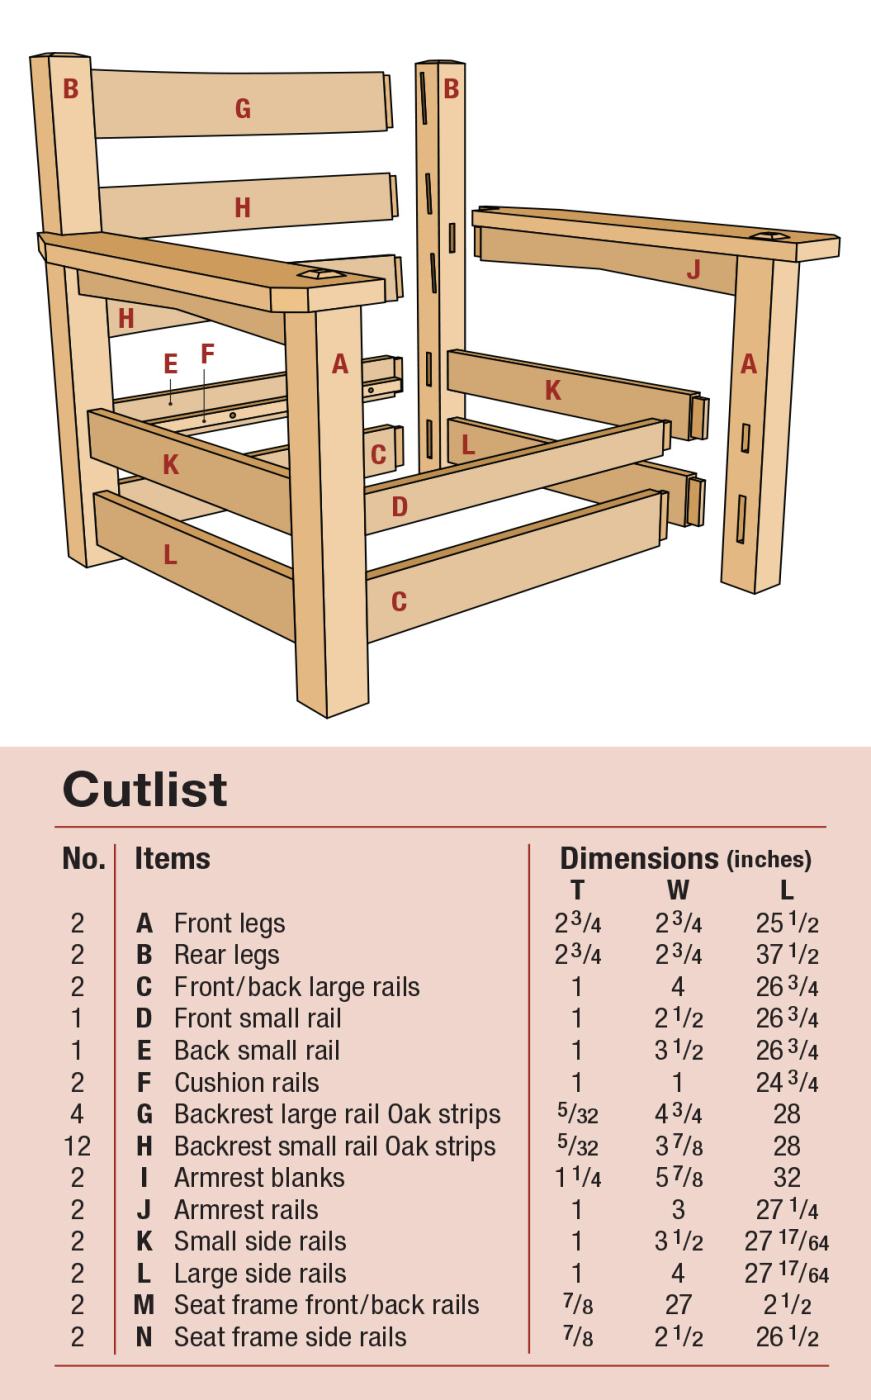
Cutlist and Diagrams


 1 Leg in Front of the Other

 1 Leg in Front of the Other
I suppose the 2-3/4“ square legs could be cut from 12/4 white oak. If you go that route, select rift sawn stock for consistent grain pattern on all four sides. I’ll assume you don’t have access to kiln dried lumber that thick and demonstrate two additional methods to create thick legs from thinner stock. The front legs are laminated from four strips with veneers glued over the joint lines. I call this the “Gus” methods because Gustav Stickley favored this approach for creating legs with quartersawn figure on all four sides. Later, L&JG Stickley pioneered the “quadrilinear post” and I’ll demonstrate a modern version of that for the rear legs. Letting the joinery show is a central tenant of Craftsman furniture, so the exposed locking miter joints are a welcome sight.
Locking Miter Joint for Rear Legs
You need a special router bit to tackle the locking miter joint, but it’s useful for many projects. The basic idea is to mill one board flat on the router table and the adjacent board held vertically against the fence. This creates a perfect joint with one bit and one setup. I’ve also come up with my own techniques to improve cut quality and avoid any tear-out or snipe. Luckily, anyone can incorporate these tips into their locking miter routine and all it takes is a few strips of 1/4“ MDF. I recommend making all cuts in two passes with this router bit.
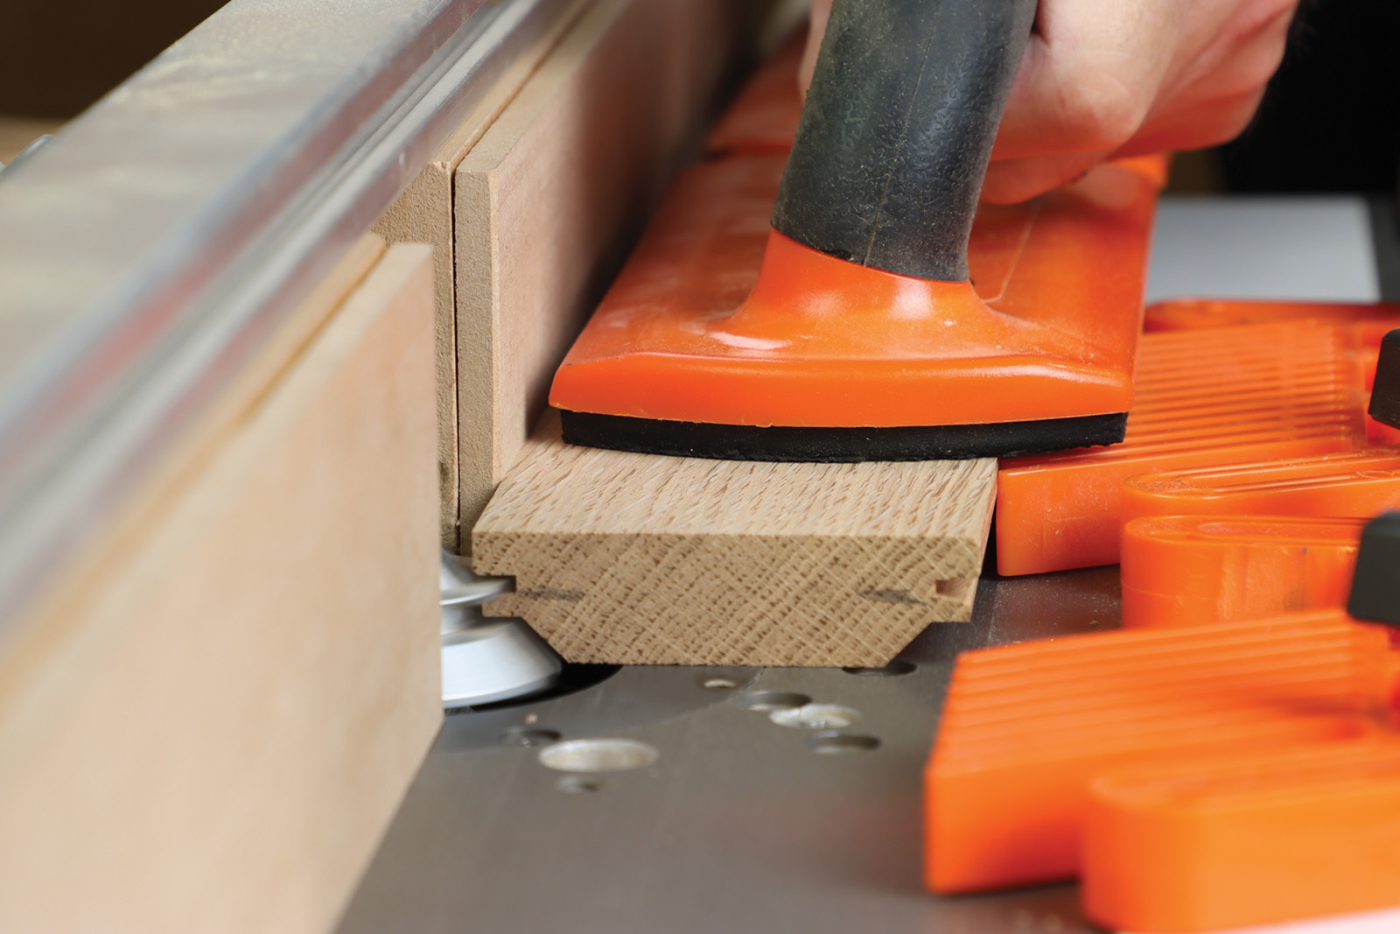
1 With spacer strips attached to the router fence, rout the first pass on the horizontal boards.
First set the proper bit height and fence position, according to your material thickness. Once a sample cut shows everything is set correctly, temporarily secure strips of 1/4“ MDF to your router fence with double-sided woodworking tape. Make these the same sizes as your router table fence, as you’ll be able to reuse these strips for multiple projects. Make the first pass on all work pieces with these spacer strips in place on the fence. This essentially removes less material and leads to a much cleaner cut with less strain on the router. An important note about planning for successful assembly: rout the same profile on both edges of each board. Then rout the opposite profile on both edges of the mating board. This way, the leg blank can be drawn together by clamping in primarily one direction.
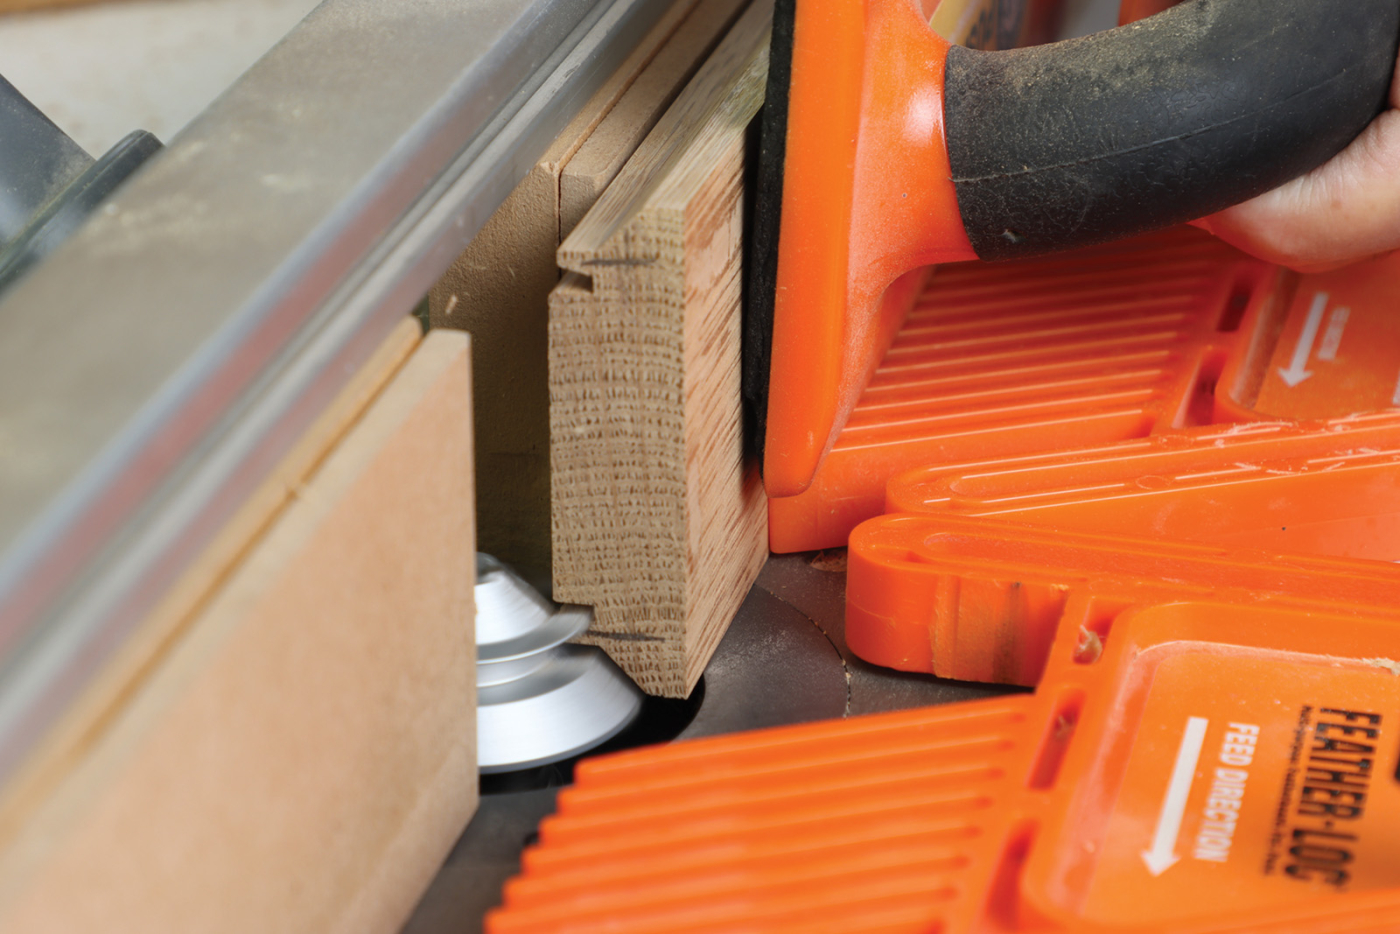
2 Next, rout the first pass on the vertical boards.
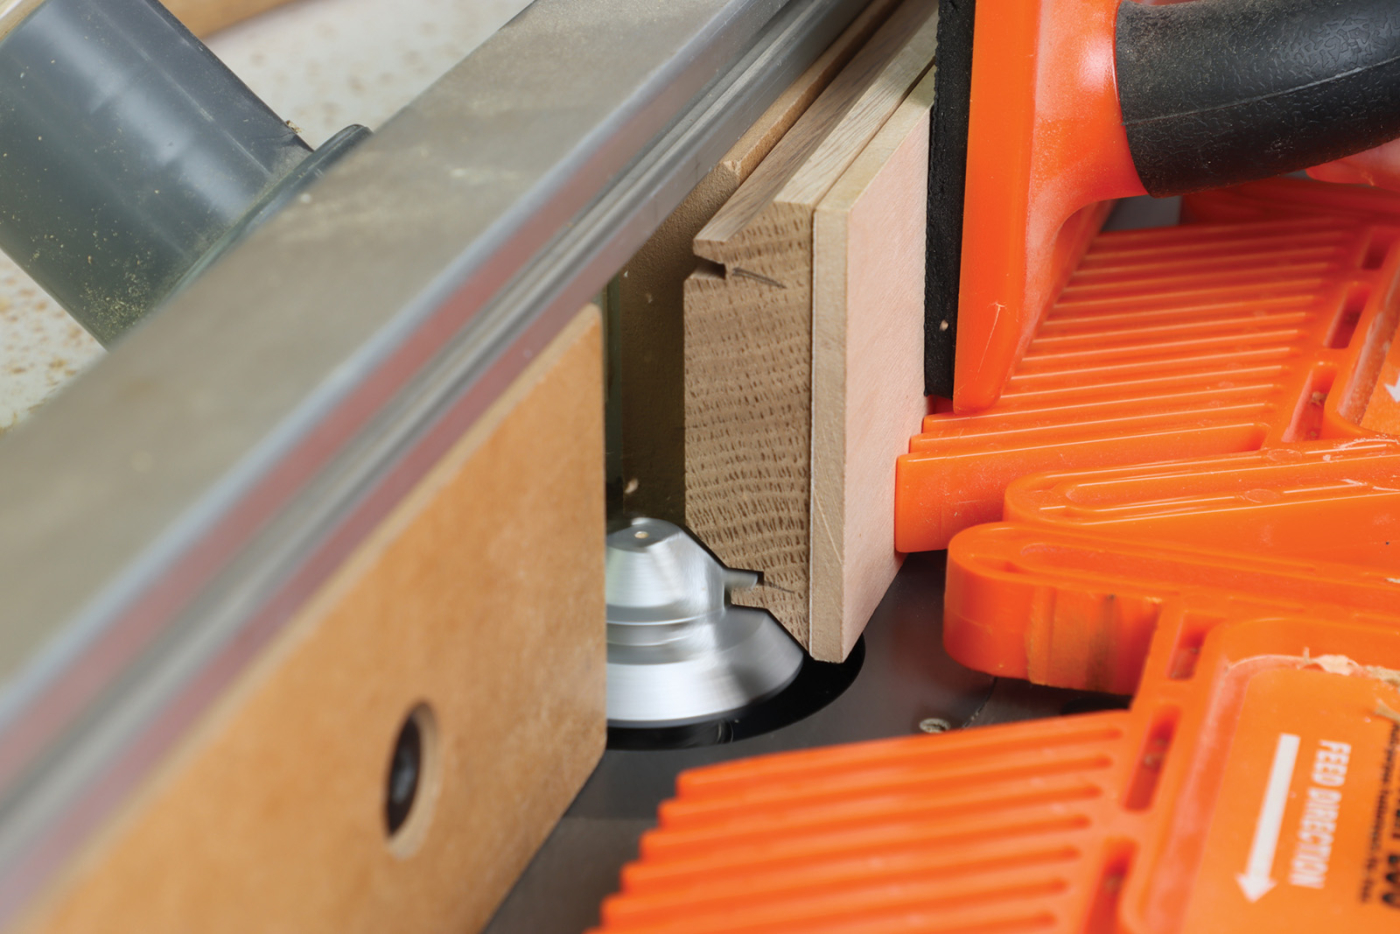
3 Remove the spacer strips from the fence and attach a 1/4″ MDF strip to the workpiece to complete the second pass on all parts.
Once the first pass is complete on each workpiece, remove the spacer strips from the router fence, and get ready to make the second pass. It’s worth noting that the bit height and fence position are unchanged from the first pass. This second pass will form the typical “knife edge” we expect with a locking miter joint. To protect that delicate edge and support the workpiece as it passes over the router bit, add strips of 1/4“ MDF (or plywood) with double-sided tape. I made just one strip to save material and transferred it from one workpiece to the next to cut the right components required. The strip is simply sized to match the length and width of your workpiece. This is a very important step and yields consistent cuts, while avoiding common problems like snipe as you push the board past the bit. Complete the second pass on all boards and dry assemble the rear legs to determine the size for a solid core to fill the central void. It should be about 1-1/4“ square and is installed as the lock miter legs are assembled.
4 Assemble the rear legs with a solid core in the middle and glue the parts together.
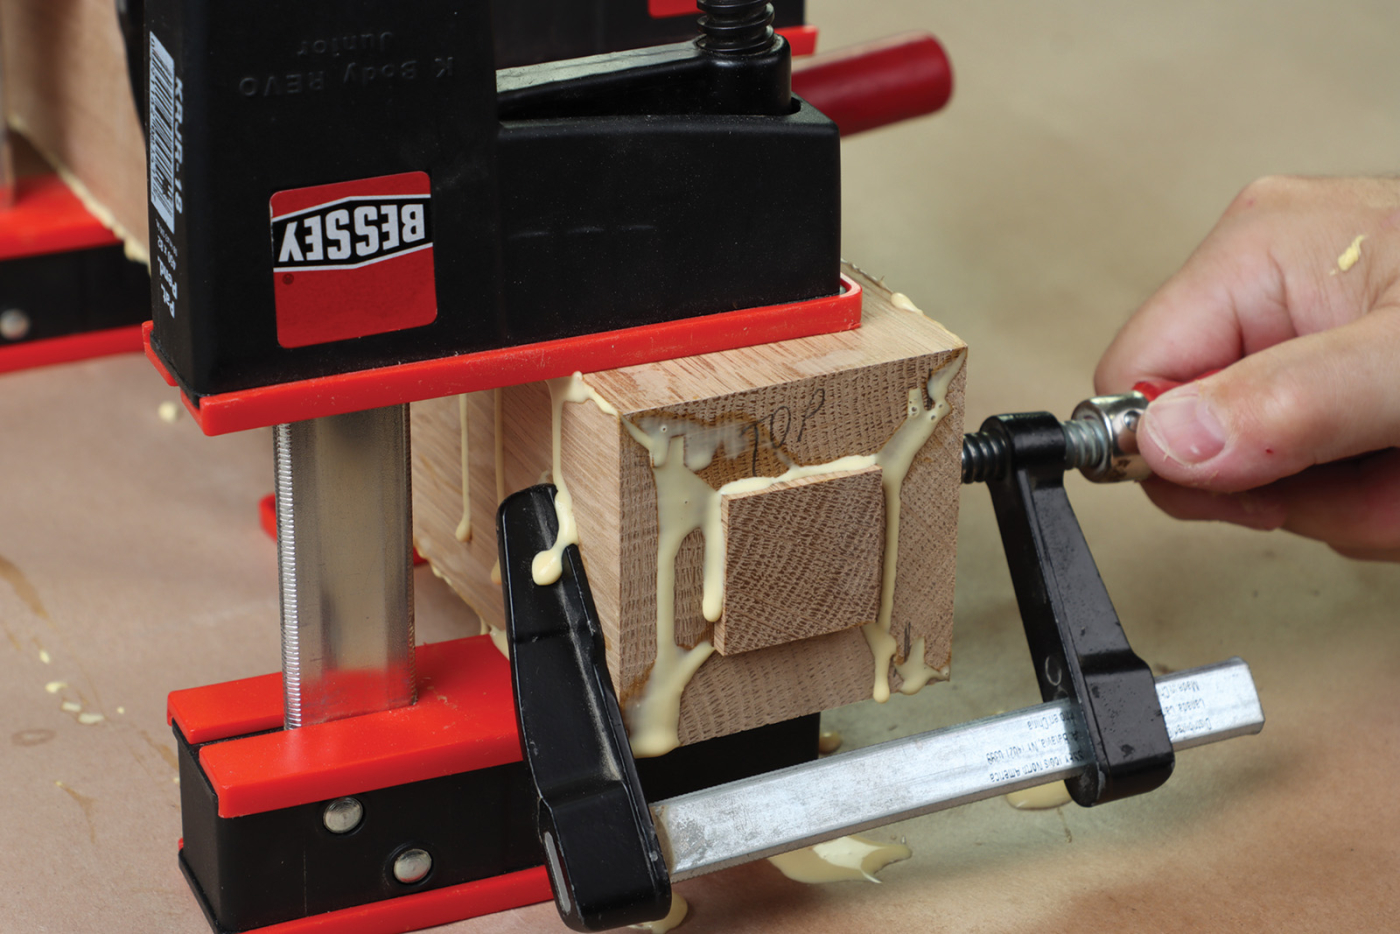
5 Make the solid core about 0.005″ undersized to allow room for glue and to ensure the locking miters seat fully.
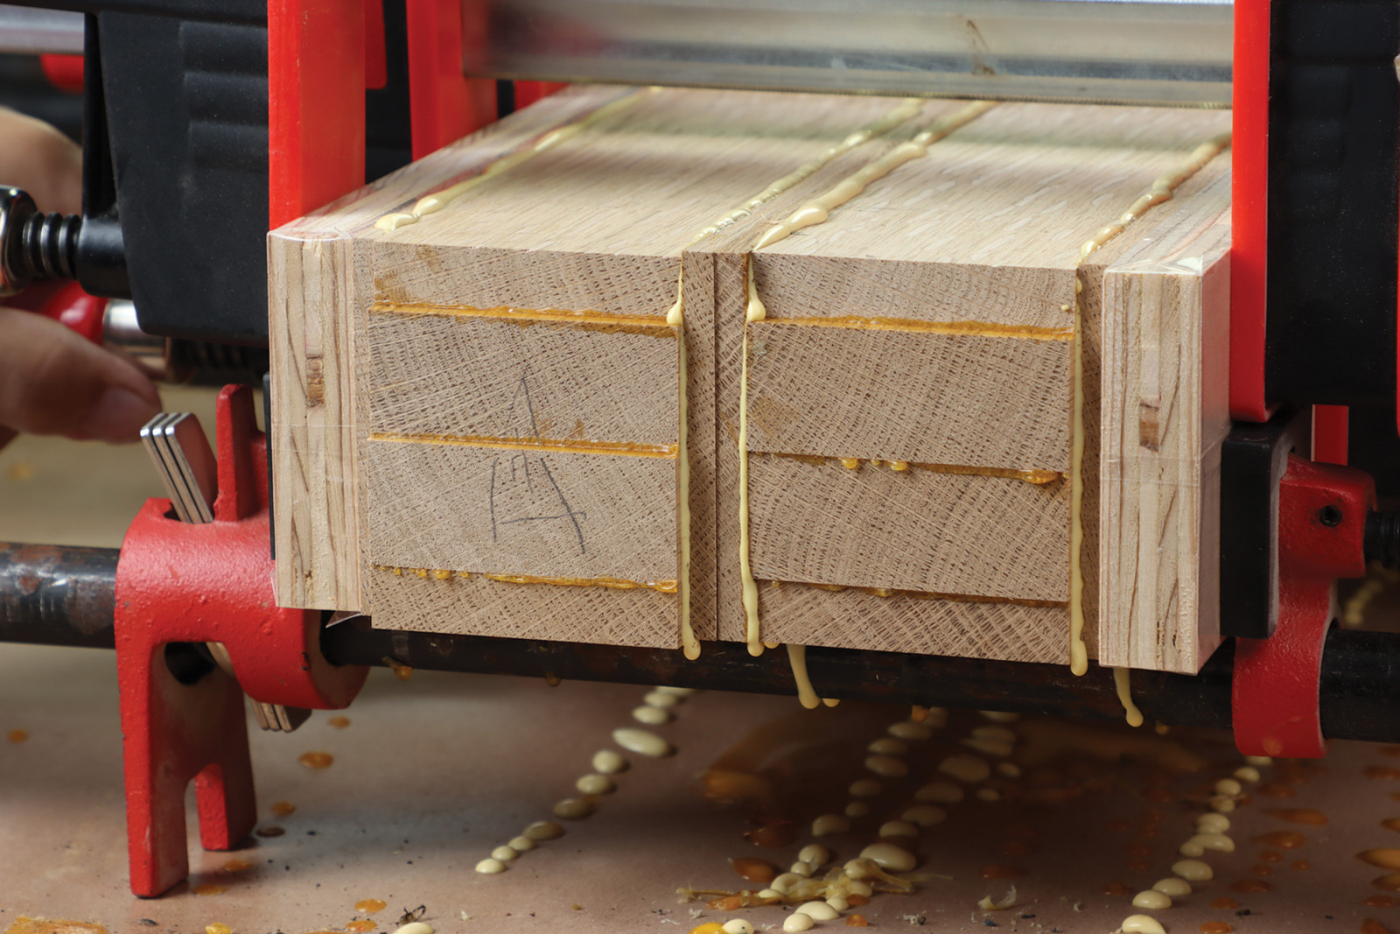
6-Way Laminated Front Legs
Luckily, the front legs are more straight forward to build. They’re comprised of 6 strips of oak and built with a two-part assembly strategy. Starting with 1/2″ and 1″ thick stock, rip 2-3/4“ wide strips at the table saw. For assembly you glue four strips together — the middle two strips are 1“ thick, while the outside strips are 1/2“ thick. This way, only two boards will be visible in the through tenon that projects through the armrest of this chair. Once this initial assembly comes out of clamps, joint an edge clean and plane the leg blank to 2-1/2“ wide x 3“ thick. For the second stage, glue “skins” on two edges to hide the glue lines. Although the final thickness of these thin strips will be 1/8“ or less, you’ll get better results by starting with 1/4“ thick strips. Once the glue cures, simply trim it away with a flush trimming router bit and plane the front legs to their final dimensions of 2-3/4“ square.
6 Resaw two strips of 7/8″ thick stock to yield 1/2″ and 1/4″ thick parts.
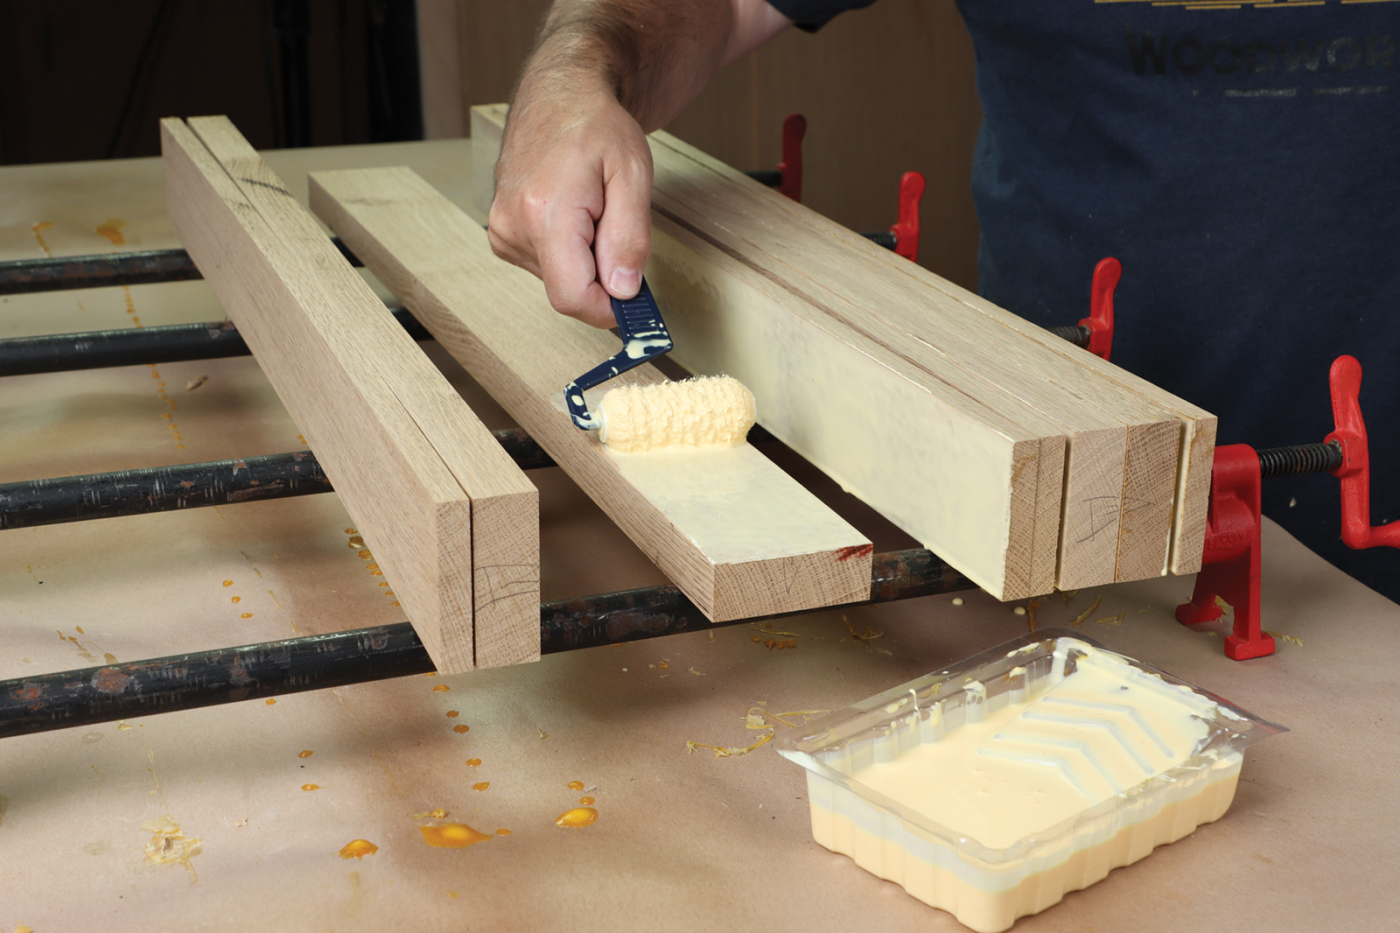
7 Use a disposable paint roller to apply glue evenly to the 23/4″ wide strips. Only one of the two mating surfaces needs glue when applied with this technique.
8 Each leg blank consists of two 1″ thick strips, flanked with two 1/2″ thick strips (in this photo two legs are being glued up at the same time). After the glue cures, joint one edge flat and square and plane the blank to 2=1/2″ wide x 3″ thick for the next step.
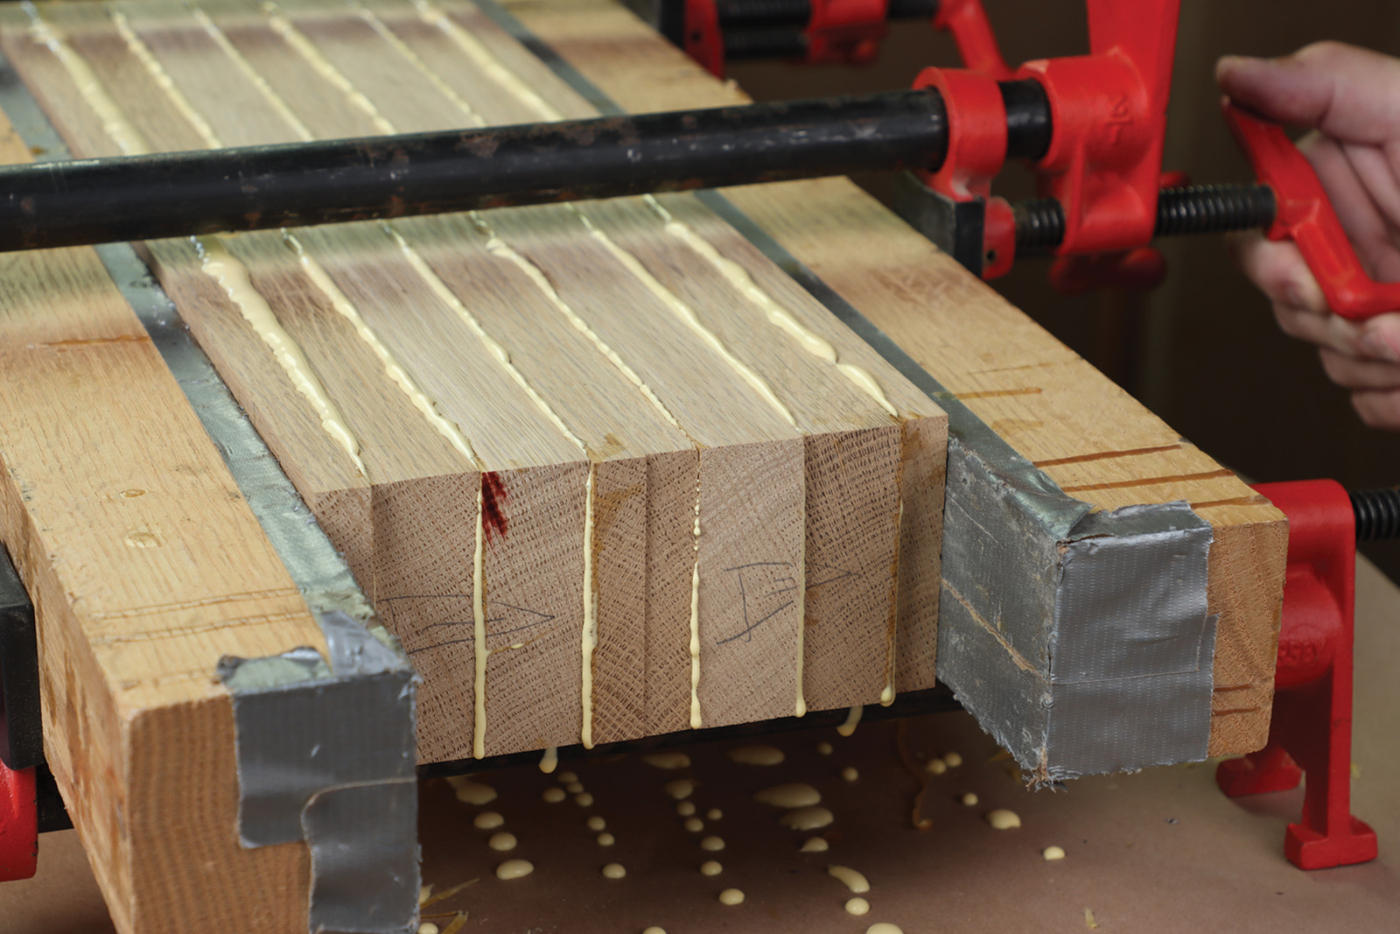
9 For phase two of the assembly, add two 1/4″ thick skins to each leg blank. Glue together. 3/4″ thick plywood strips are covered with packing tape and used as cauls to evenly distribute clamping pressure.
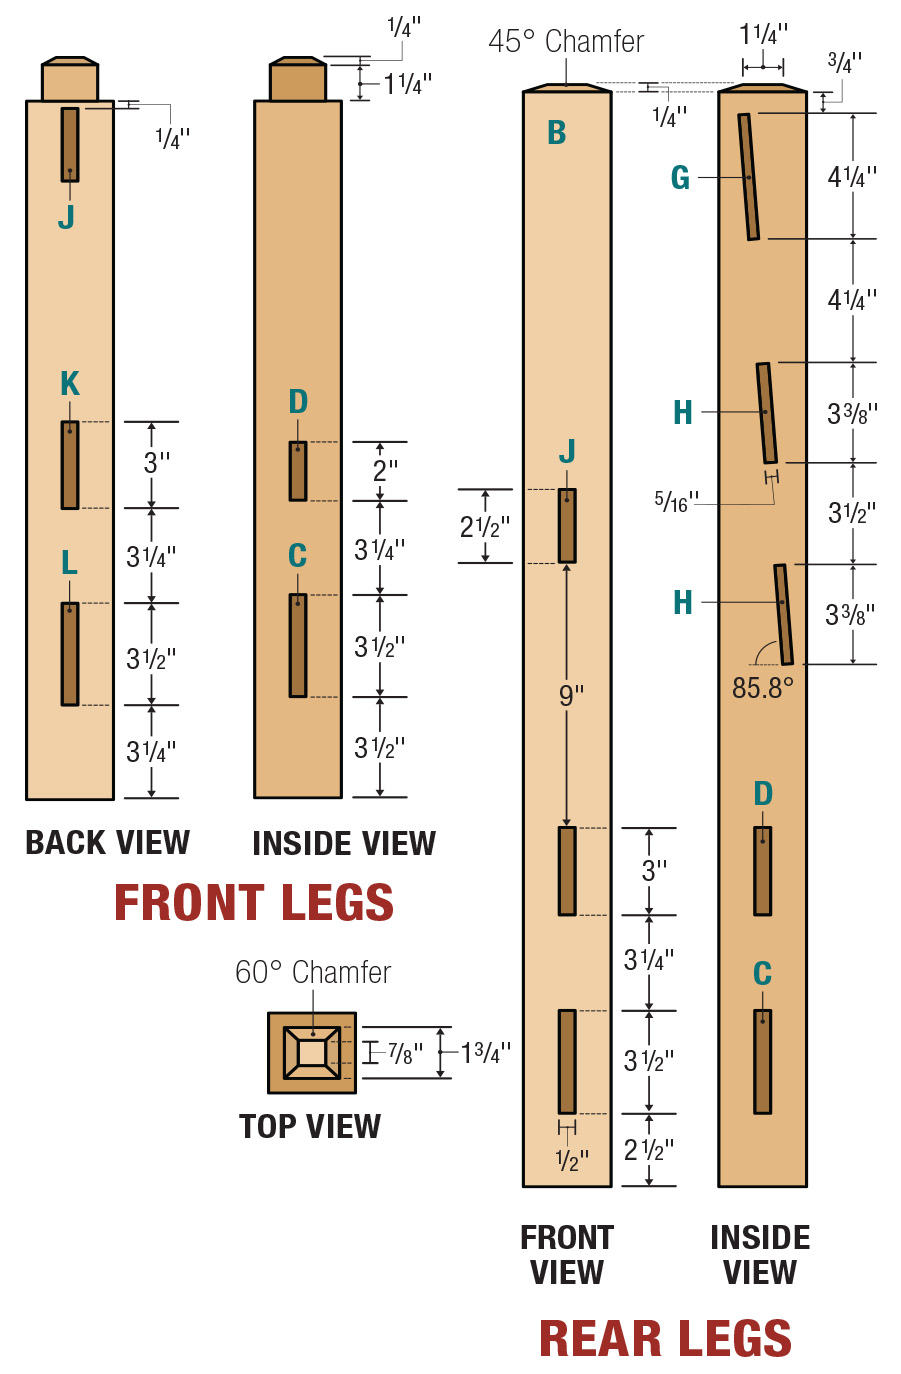
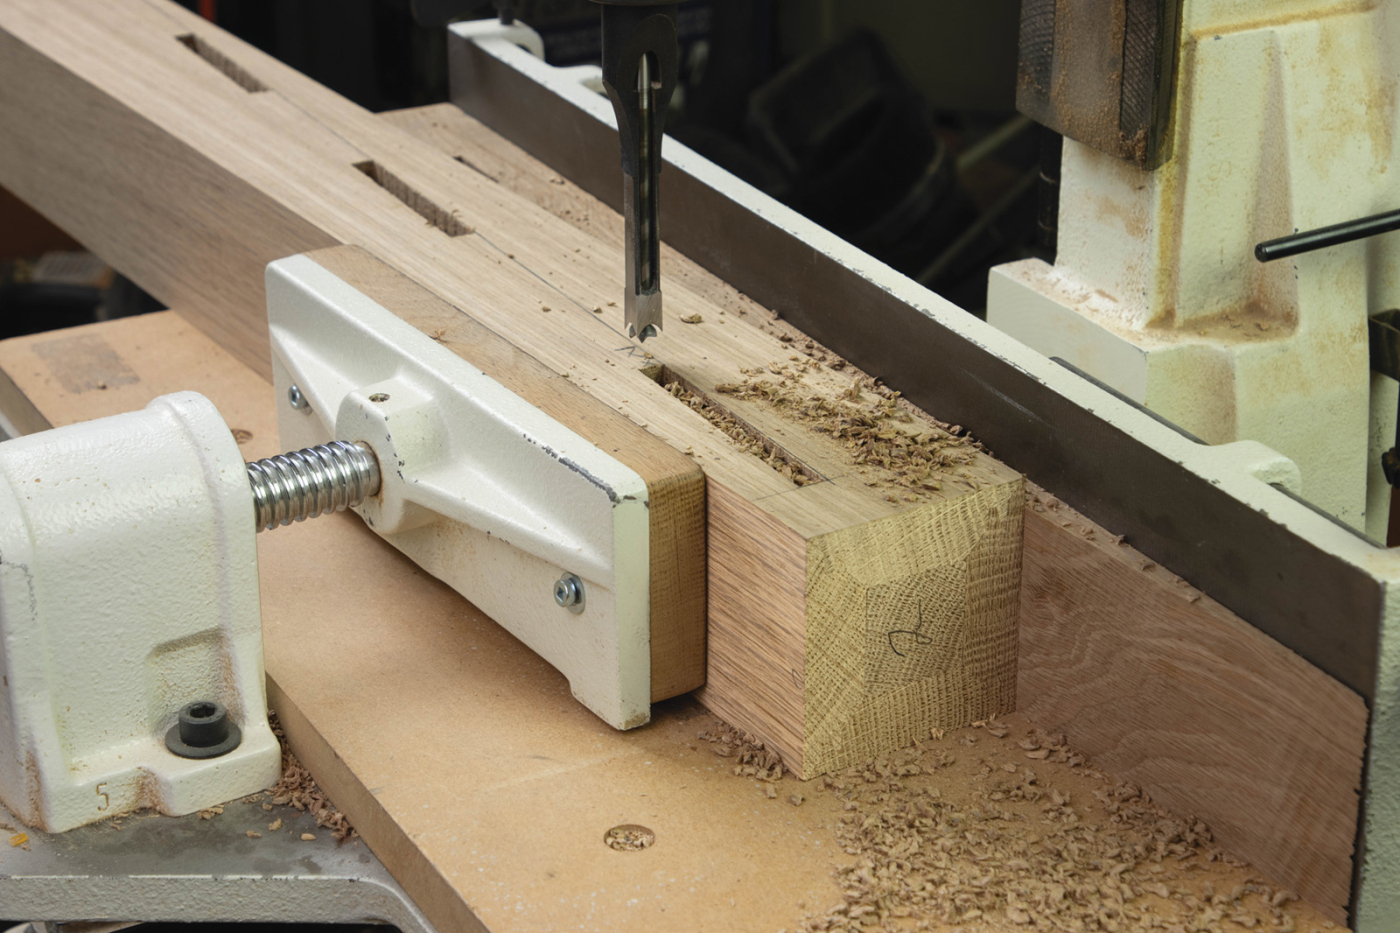
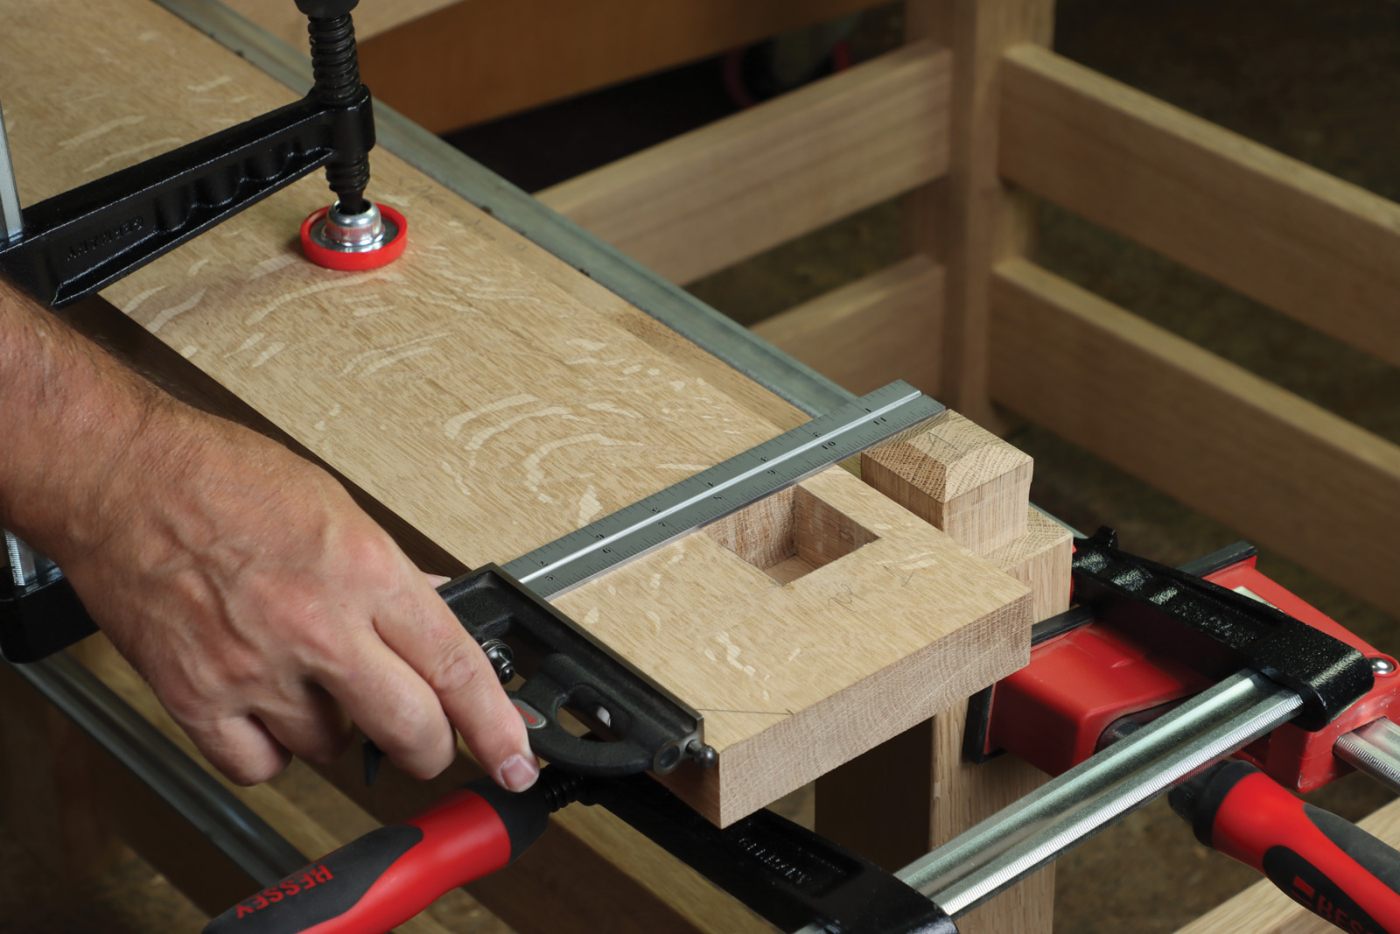
Angled Backrest Mortises
Most of the mortises for the chair frame are pretty standard. They’re all 1/2“ wide and 1“ deep—except for the mortises which receive the backrest rails. Those are 5/16“ wide mortises, chopped to a depth of 5/8“. This row of three mortises on each back leg are also at an angle to the face of the leg. This reclines the backrest somewhat, making this large armchair feel more like a Morris chair. My hollow chisel mortiser is the X-Y moving table variety, so I made an angled block to set the proper angle. Cut a chunk of wood 21“ long and taper it from 11/2“ thick at one end, feathered down to a wedge at the other. Use double-sided tape to secure the block to your mortiser fence. If the face clamp on your machine is adjustable, set it to fully contact the angled rear leg. If not, just use a pair of offsetting wedges to get good clamping pressure with the face clamp. If you have a benchtop mortiser, you can still make these cuts, but you might want to build a sled type jig. A simple pair of plywood scraps screwed together at a 90° angle should do the trick. This will allow you to move the wedge, leg, and jig all at once for these mortises to set along an angled line. Study the detail rendering for correct mortise sizes and location.
10 Mortise the rear legs for the backrest slats using a wedge attached to the mortiser fence.
Curved Backrest Rails
If you’ve built many chairs, you’re keenly aware of the three basic ways to make curved parts. You can cut the curve from a solid timber, use steam bending, or laminate the curve. Glued lamination was the technique selected due to the highly repeatable results.
 Start by making a universal bending form from 6 layers of 3/4“ MDF. Refer to the detail renderings for dimensions, and cut and fair one layer, then pattern rout the other layers to match and screw them together. It can be used for a multitude of projects including rocking chairs, curved, and backrest rails too. Resaw a 1“ thick board to yield four strips for each curved rail. The strips need to finish at 5/32“ thick to net a 5/8“ backrest rail, and a drum sander works best for this step. If you don’t have access to a drum sander, a planer can do the job—but leave the strips extra-long to account for the invariable snipe. Next, make a center mark on the strips as well as the form, which will be useful later for the joinery on the curved parts. Use a disposable paint roller to apply glue liberally to one side of each strip as they’re assembled on the bending form. Add a flexible caul on top of the stack and clamp it down starting at the center. The caul is just a strip of 1/4“ plywood with small wooden cleats on either end to help keep the outer clamps in place. Both the bending form and caul should be covered with packing tape to prevent glue from sticking. I’ve tested this technique with thin and thick strips, both with and without cauls. I’ve found 5/32“ is the minimum thickness recommended (unless you have a vacuum press) and the flexible cauls make a night-and-day difference in the quality of the glue joint.
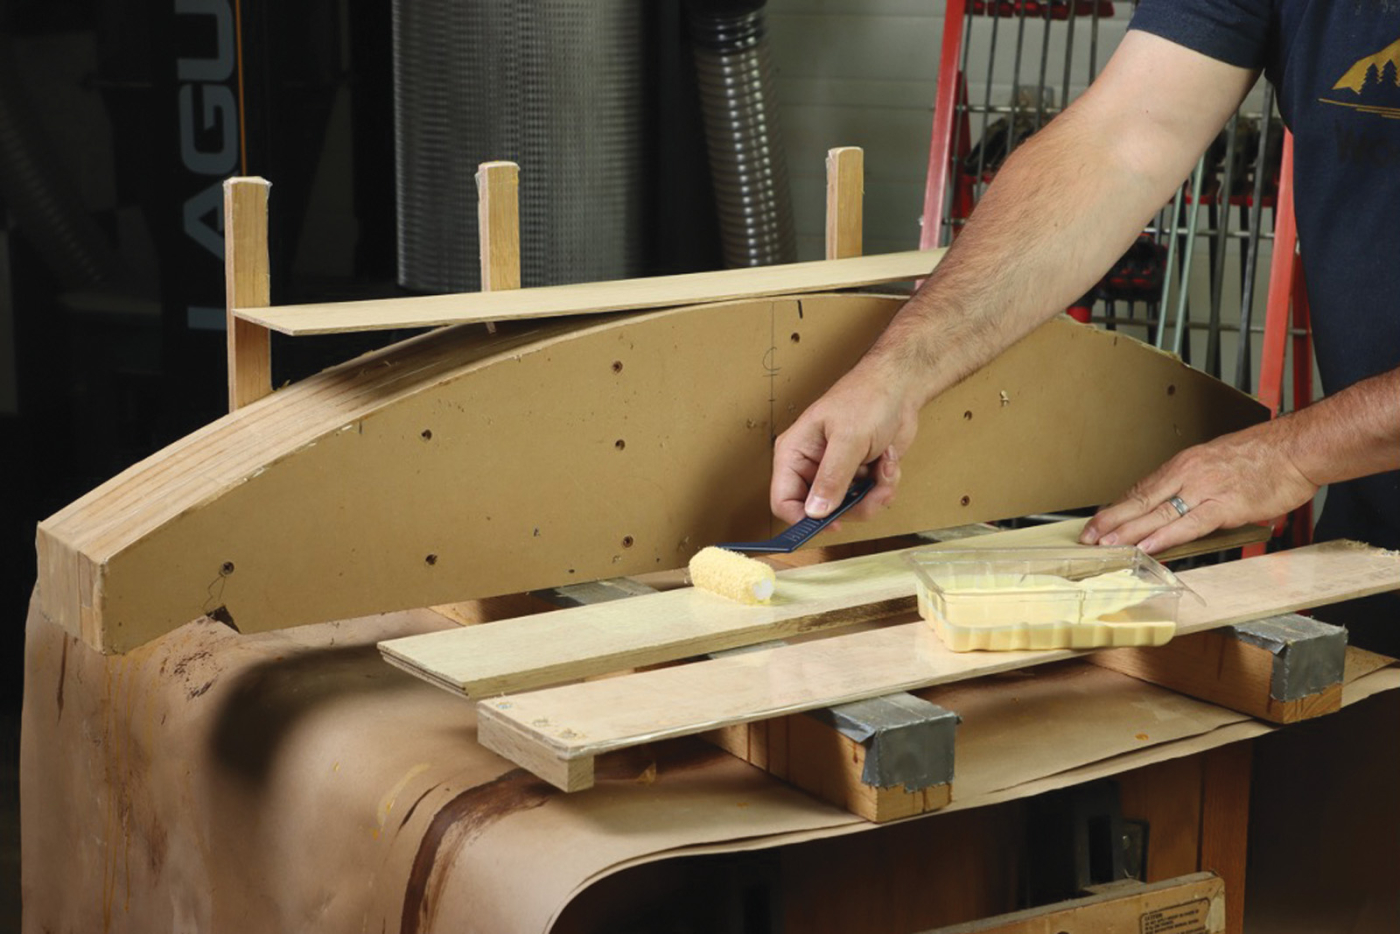
11 Glue 4 strips of wood over a universal bending form to make the backrest slats.
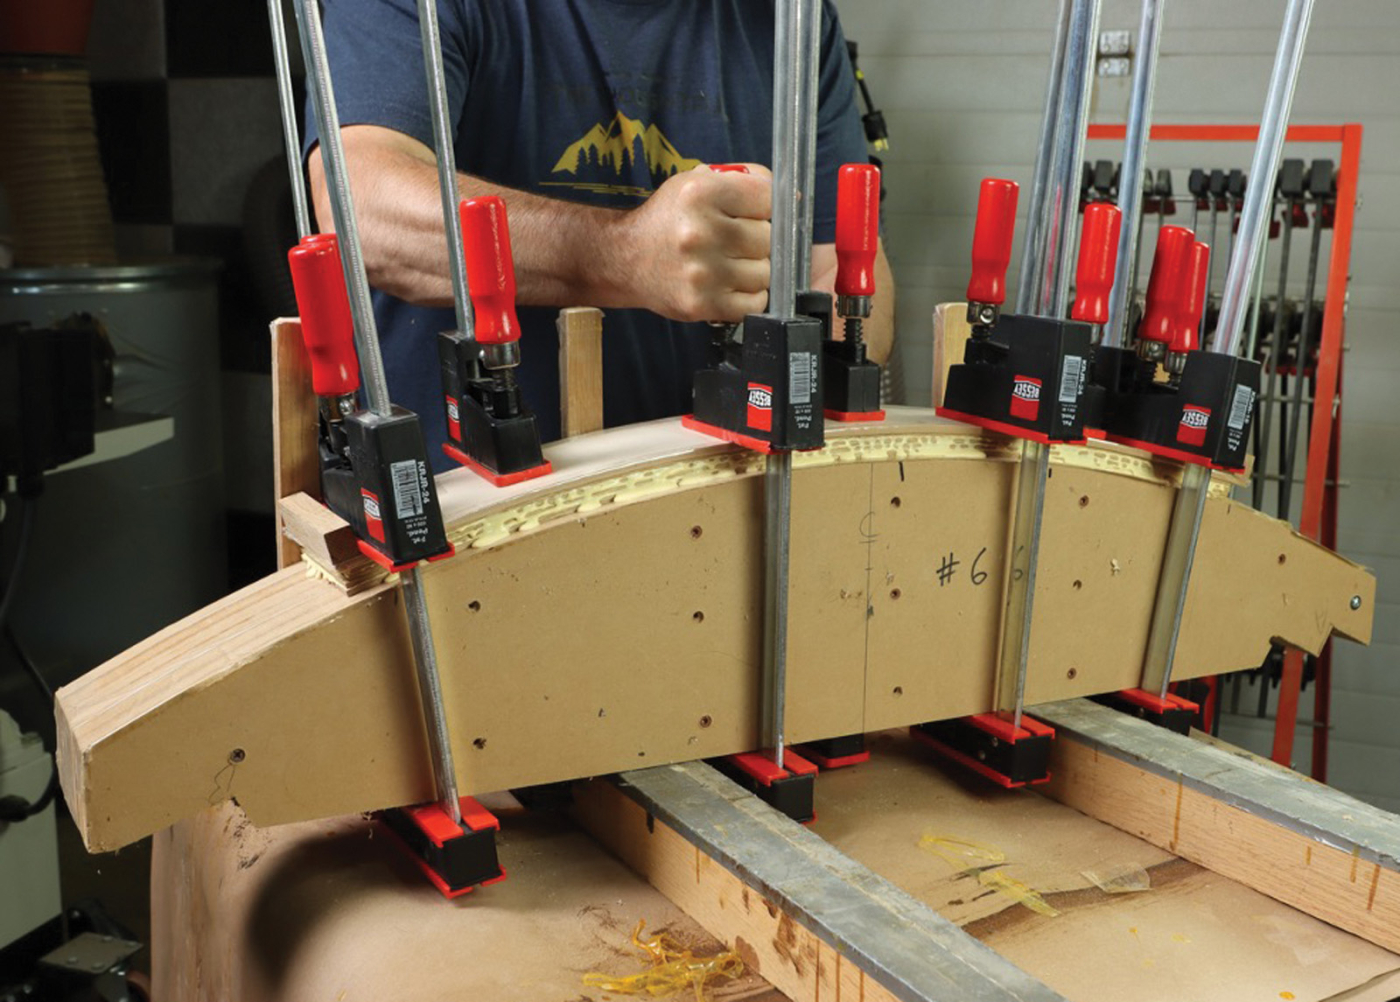
12 Add a 1/4″ plywood caul and clamp the strips to the form.
Once the curved parts have cured, clean up one edge at the jointer. Then head to the table saw and rip the backrest rails to final width. It’s a surprisingly easy cut to make with the concave side up, so long as you clamp a feather board to the rip fence. Now decide how you want to cut the tenons on the curved parts. Some people will elect to cut these by hand, and that’s fine, but I’ve come up with a slick little jig to accomplish this task at the table saw. The jig is quite simple to make, and lets you trim the curved parts to final length as well as make both cheek cuts. Learn more about this jig in the Cut Tenons on Curved Parts article.
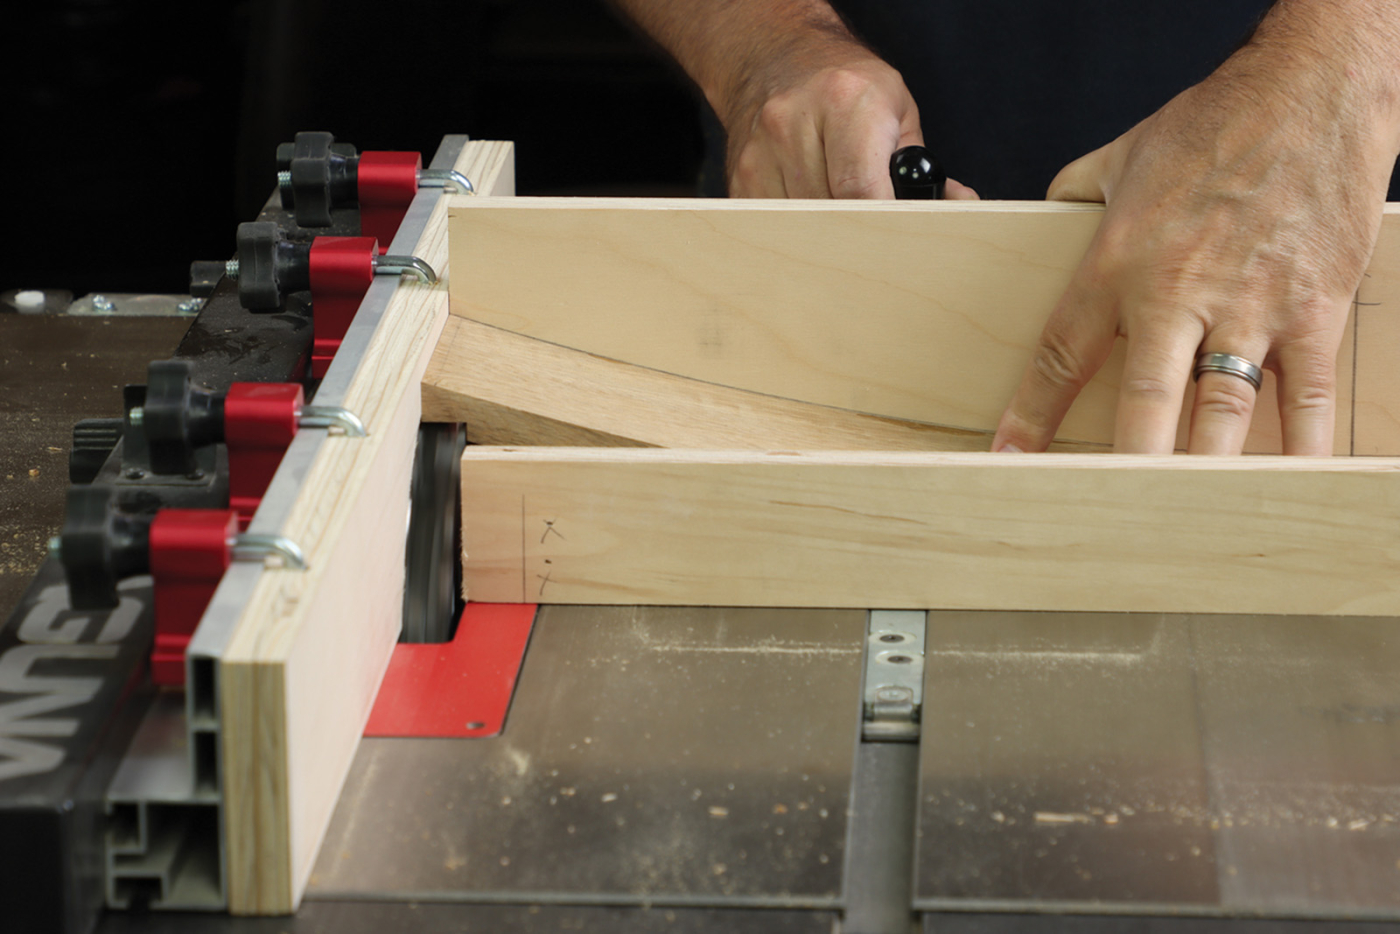
13 A simple jig helps cut the curved parts to length as well as form tenons.
Angled Side Rails
Anytime you have angled joinery to contend with—which is common in chair building—a decision must be made. Should you angle the tenons or angle the mortises? In this case, the side rails are angled at a modest 1.7°, which makes them drop lower in the back of the chair. With such a small angle, I prefer to angle the tenons and use standard mortises. To that end, rip the rails to width and set a miter gauge to 1.7°. Using an auxiliary fence and stop block on the miter gauge, trim all four rails to final length. The rail blanks are about 27-3/8“ long initially, before being trimmed. Ultimately, the shoulder-to-shoulder length needs to match the armrest support component (25-1/4“), which does not have angled joinery.
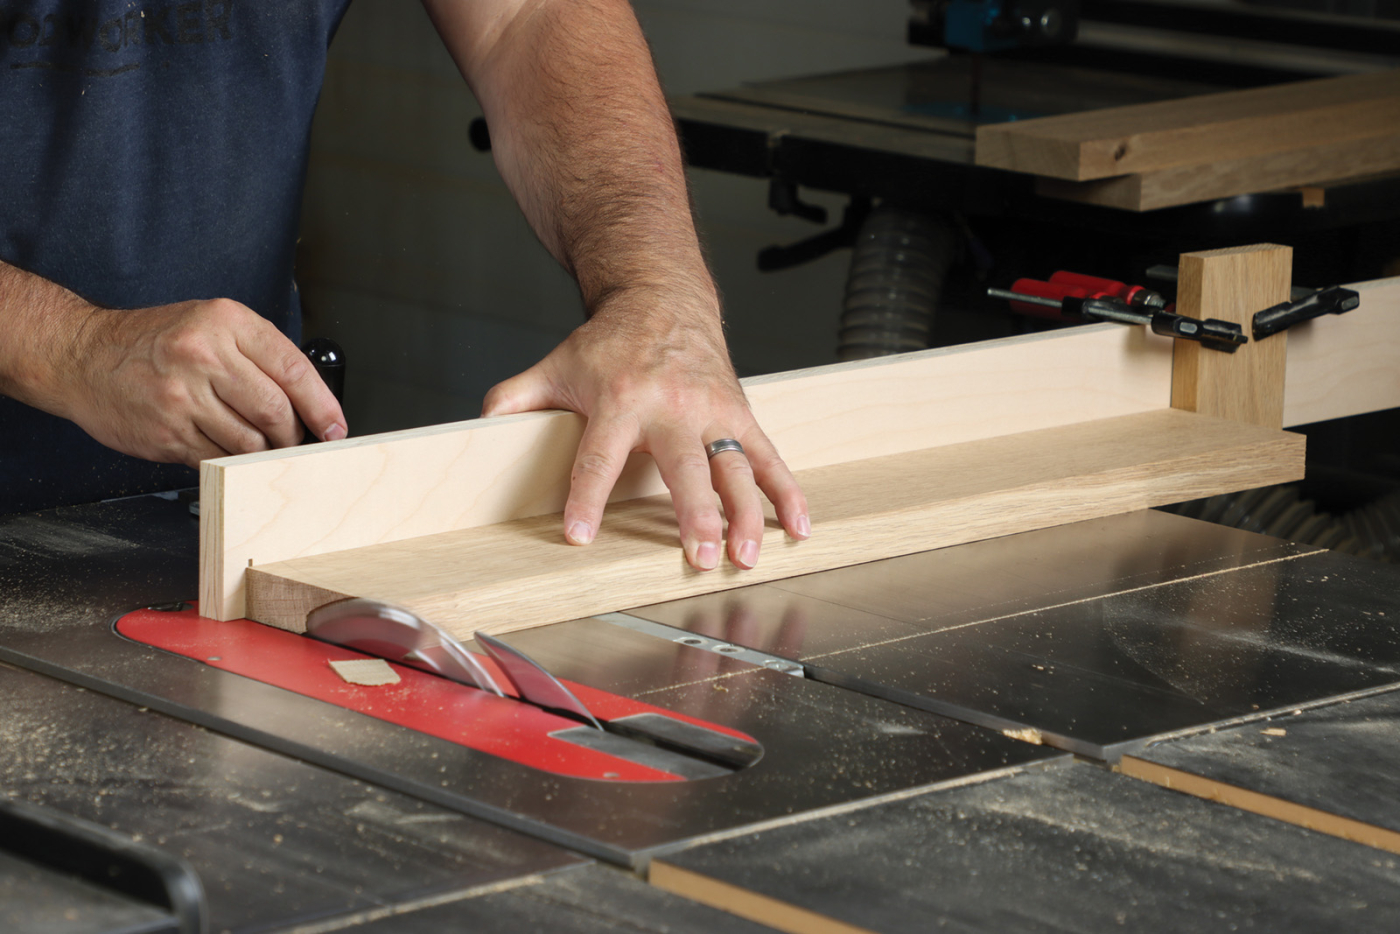
14 Angle both ends of the side rails to 1.7°. Use a stop block to ensure a uniform length.
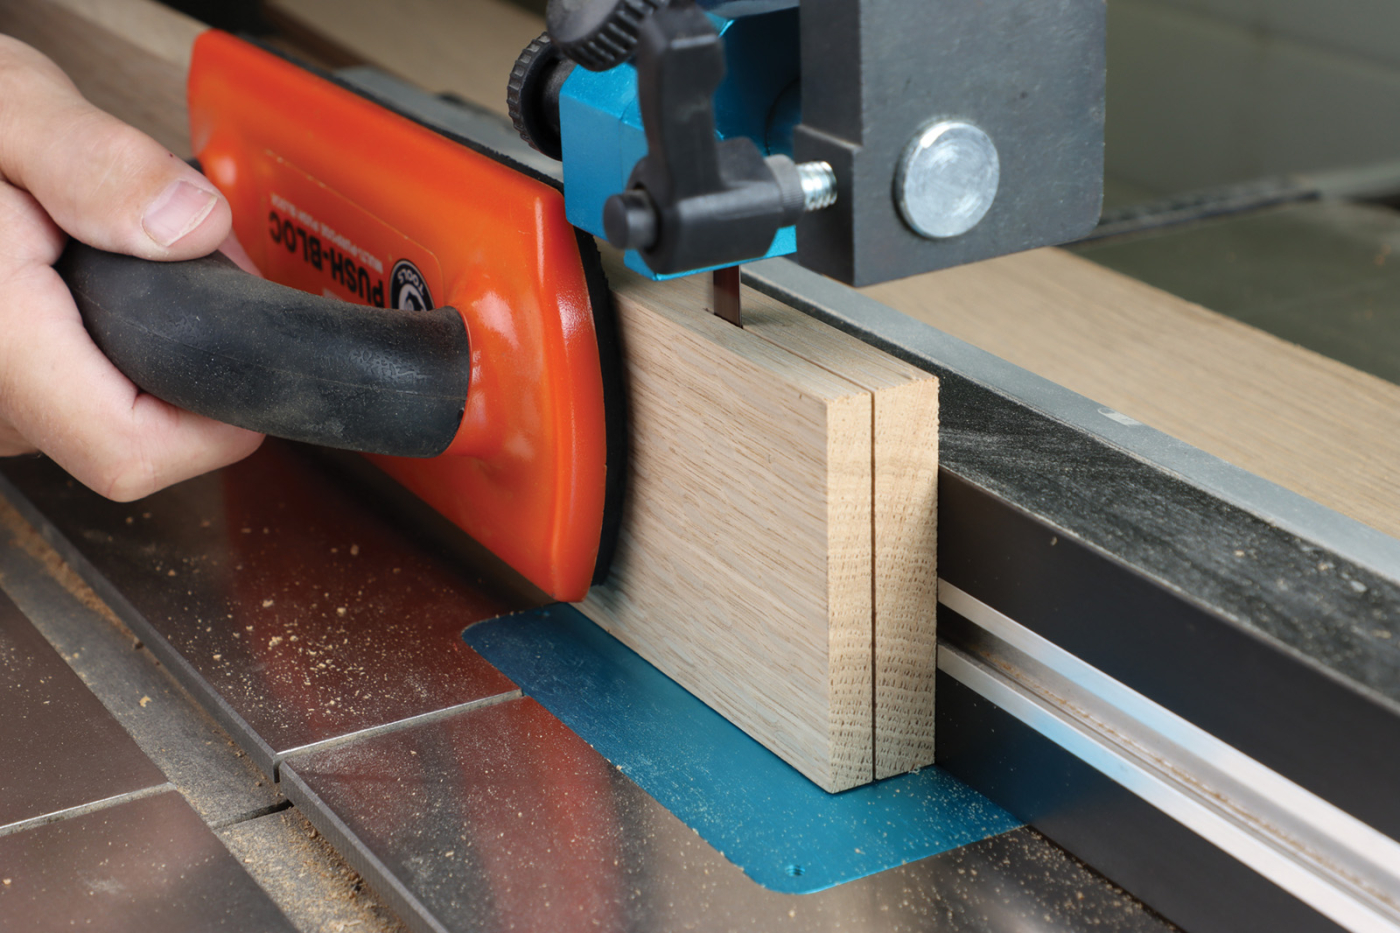
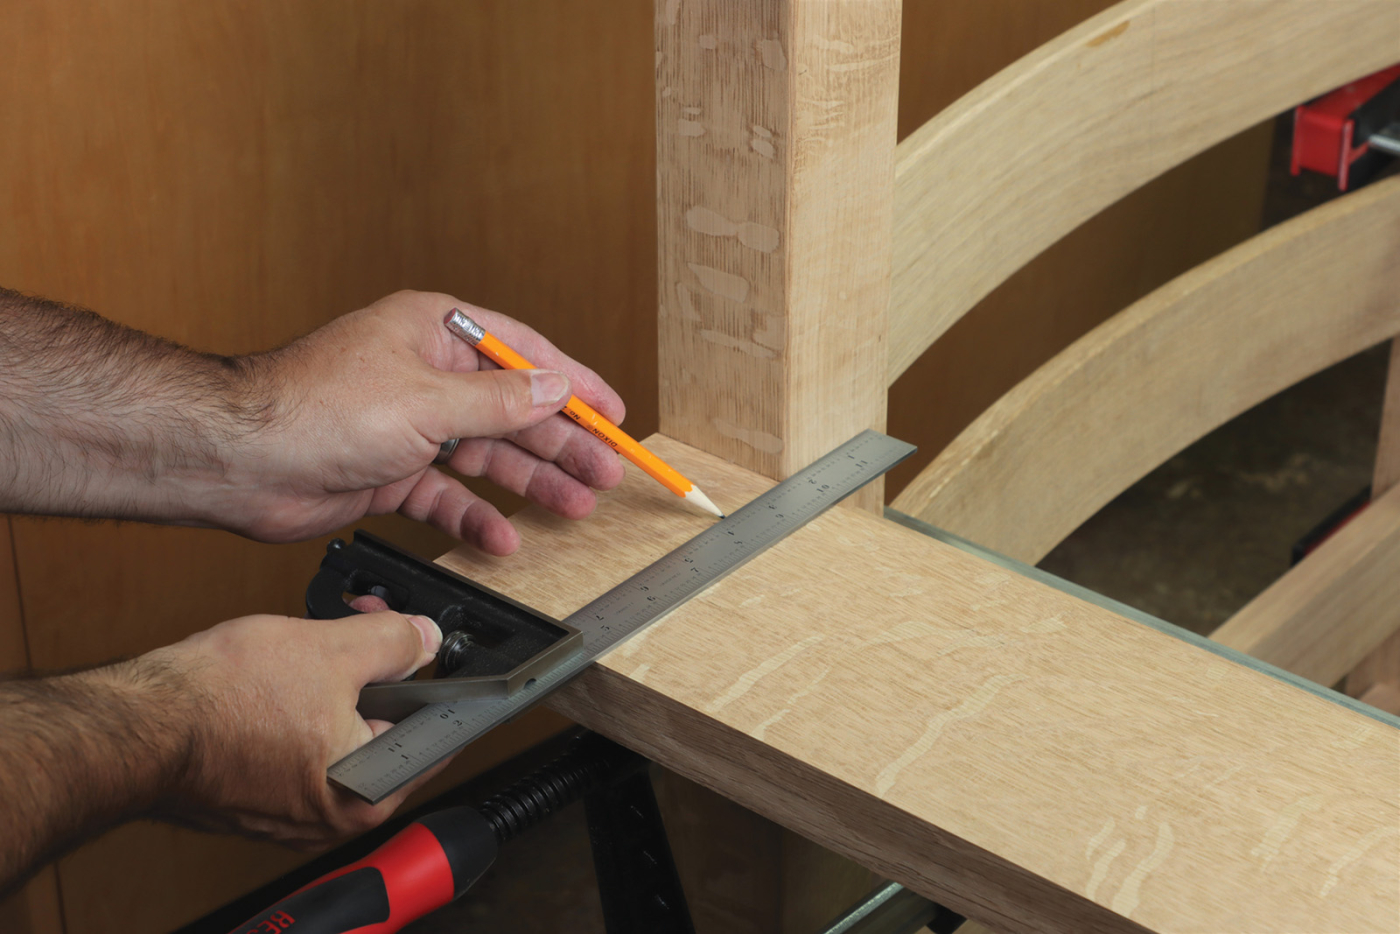
Once the ends of the side rails are angled, it’s an easy matter to cut the tenon cheeks with a dado blade. With a miter gauge still set to 1.7°, butt the workpiece against the rip fence and establish the cheek cut on one side. This setup lets you cut half of the side rail tenons, before resetting the miter gauge 1.7° in the opposite direction, to complete the last four cheek cuts. Finally, trim the 1/4“ shoulder at the bandsaw. At this point, you’ll be anxious to do a test fitting and assemble the chair. Confirm that you have tight shoulders on the angled side rails, as well as the armrest support boards. If everything looks good, tip the chair on its side, and mark an angled cut line on the legs. Use a long straightedge to strike a line from your 3/4“ mark at the back, down to the tip of the front leg. Extend the lines with a combination square and trim all four legs at the miter saw. For reference, these cuts are made at a 1.4° angle, but you can confidently follow your pencil line. The angled rails, angled backrest mortises, and overall posture of the chair work together for a comfortable reclined position.
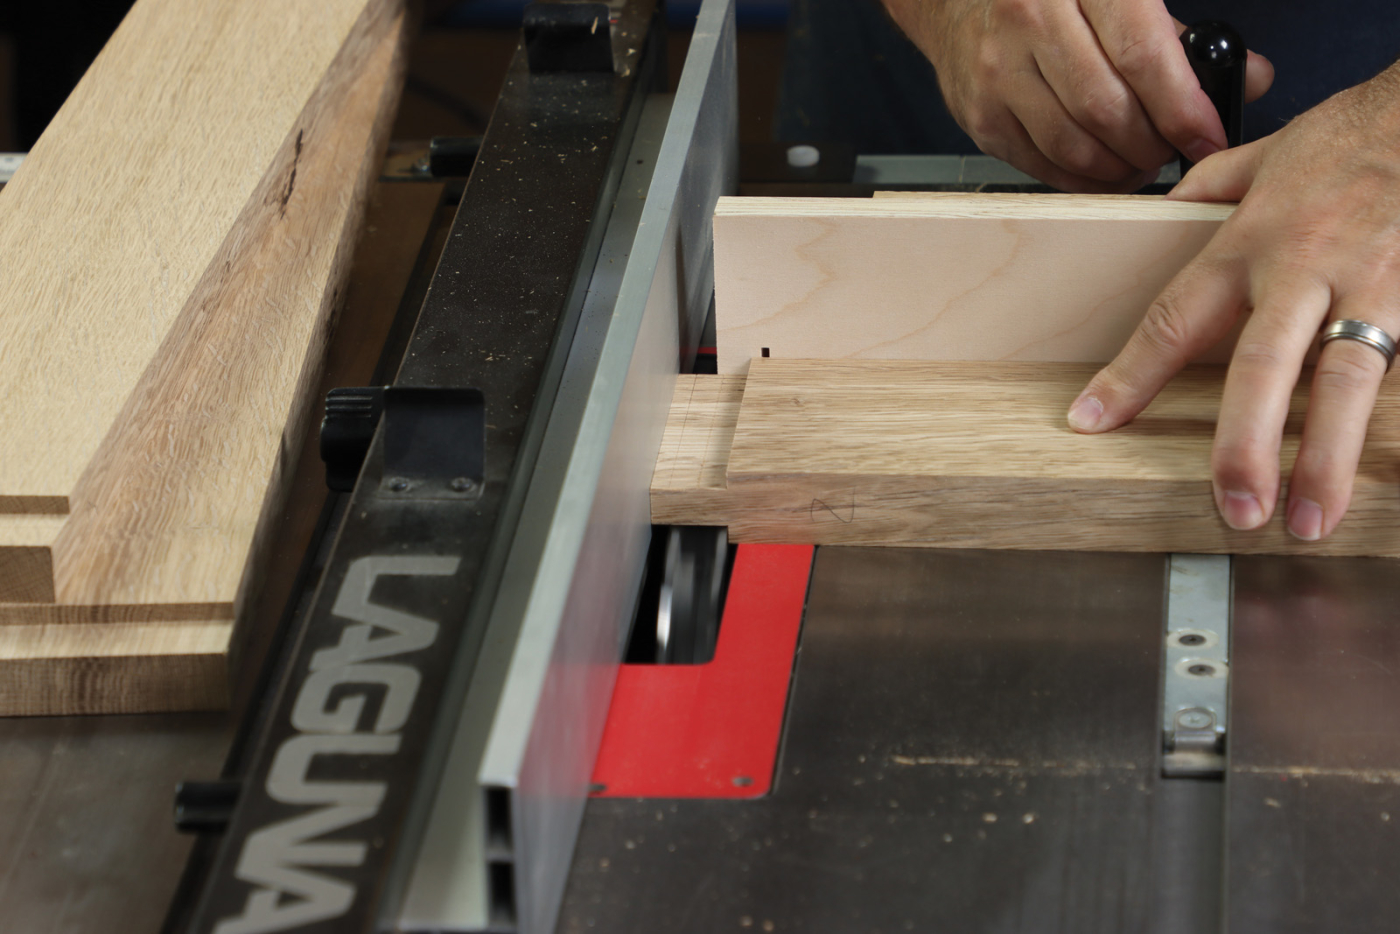
15 Cut angled tenons on side rails with a dado blade and miter gauge.
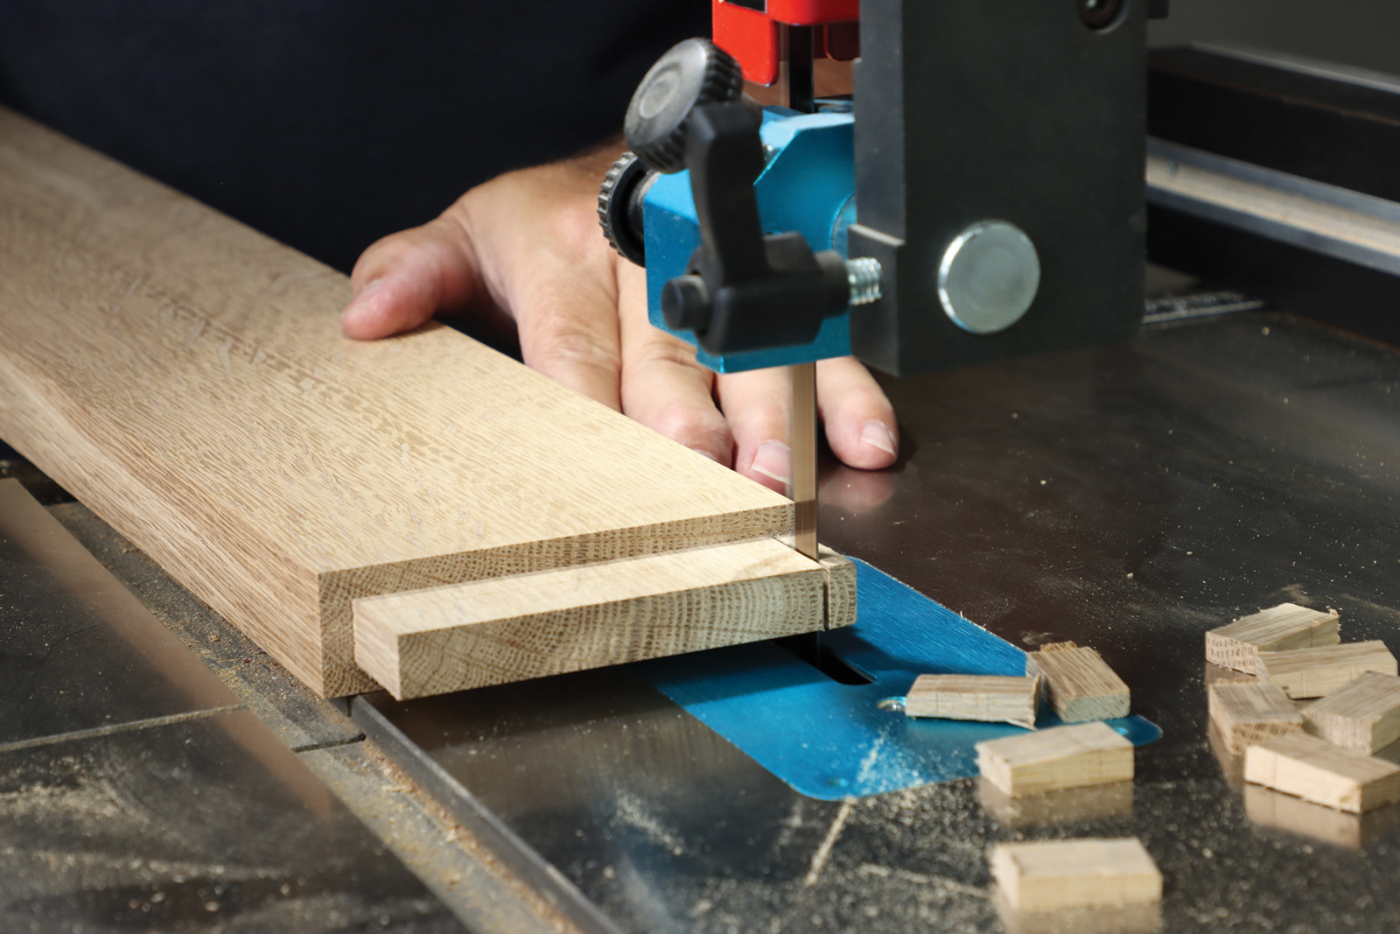
16 Trim the small shoulders at the bandsaw.
17 Clean up the tenons with a shoulder plane as needed.

18 Mark an angled cutline to remove 3/4″ length from the back legs. The front legs are trimmed to this line as well.
Fitting Armrests
There’s often a question of which to cut first—the mortise or the tenon. In this case, we’ll go the traditional route and cut mortises first. I used a 1/2“ hollow chisel at the mortiser, but there are lots of ways to knock it out. Then mill the 1-3/4“ square tenon on the front legs, to a length of 1-1/2“. If you have a fine-tooth dado blade, you can get clean results for the exposed joinery. Increase the blade height incrementally until the tenon just fits into the top of the mortise. At that point, stop cutting the tenon and make any required adjustments to the mortise wall. This is a key point to ensure crisp, accurate exposed joinery.
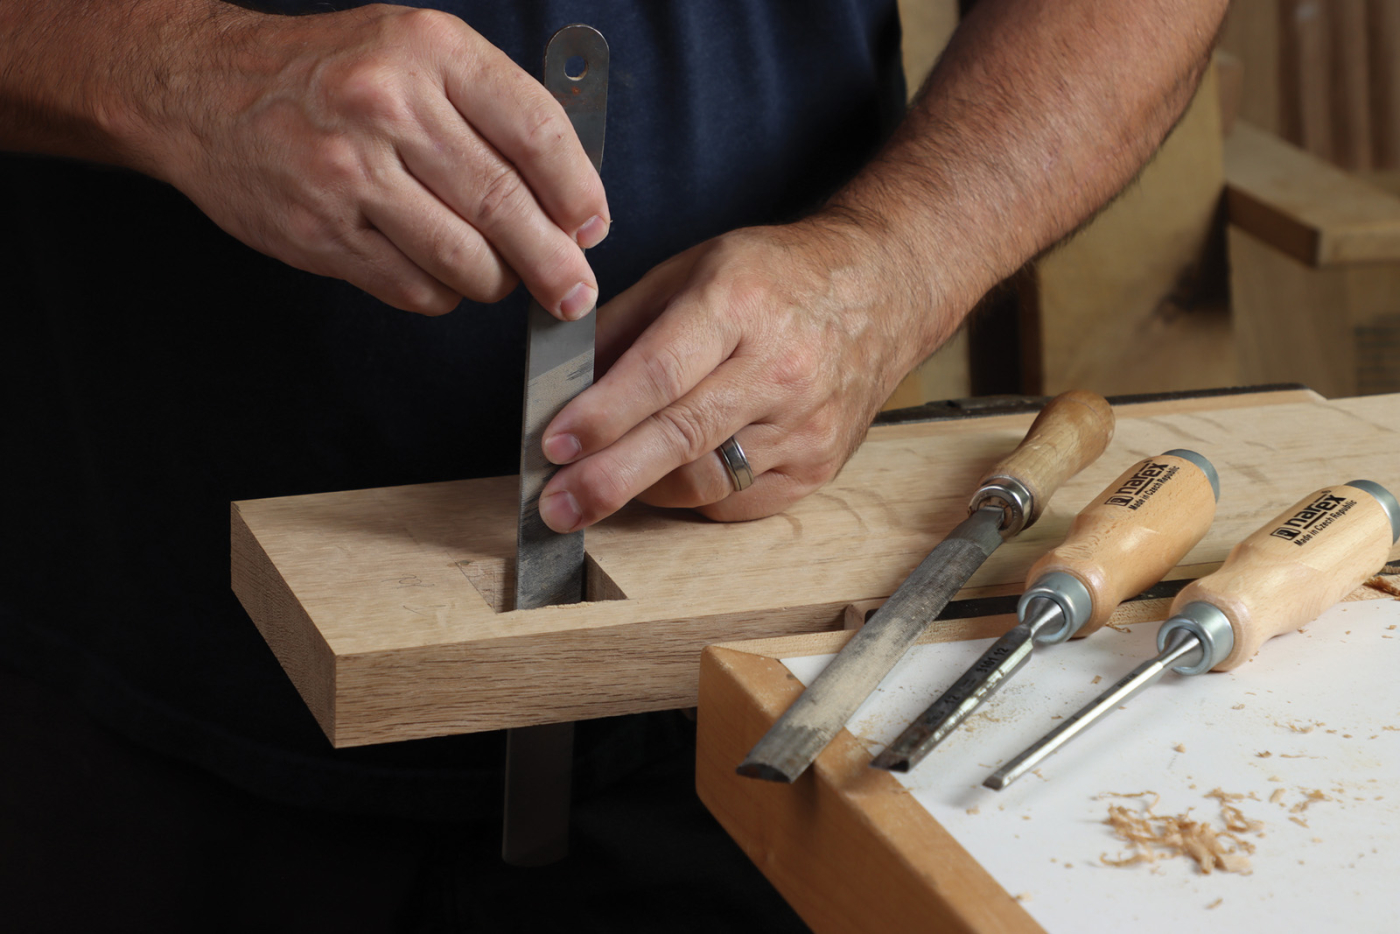
19 Clean up the mortise walls with a file or chisels.
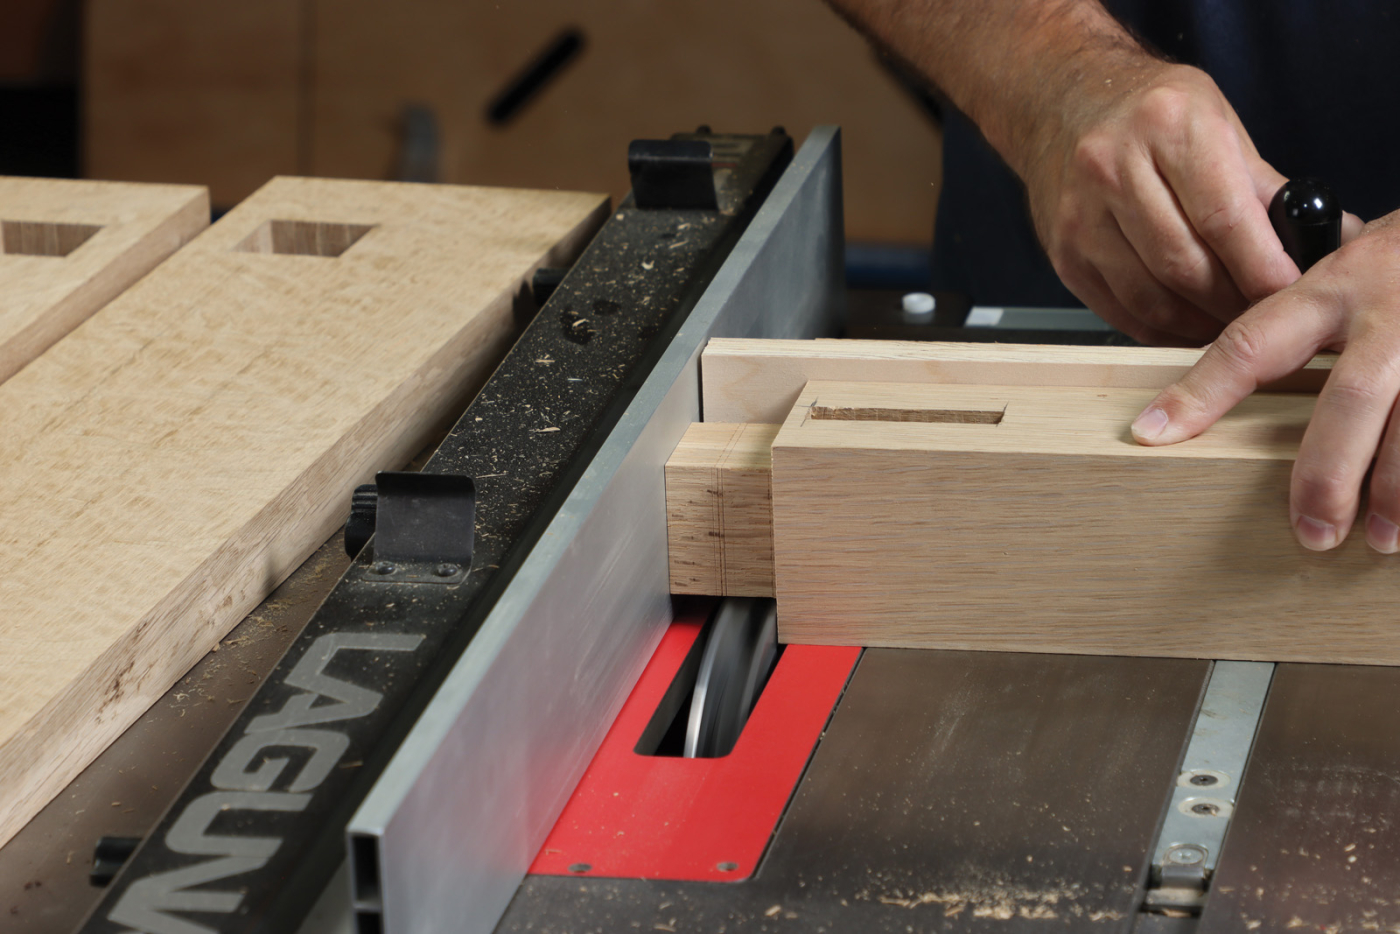
20 Cut square tenons on the front legs, raising the dado blade until the tenon fits the mortise you made earlier.
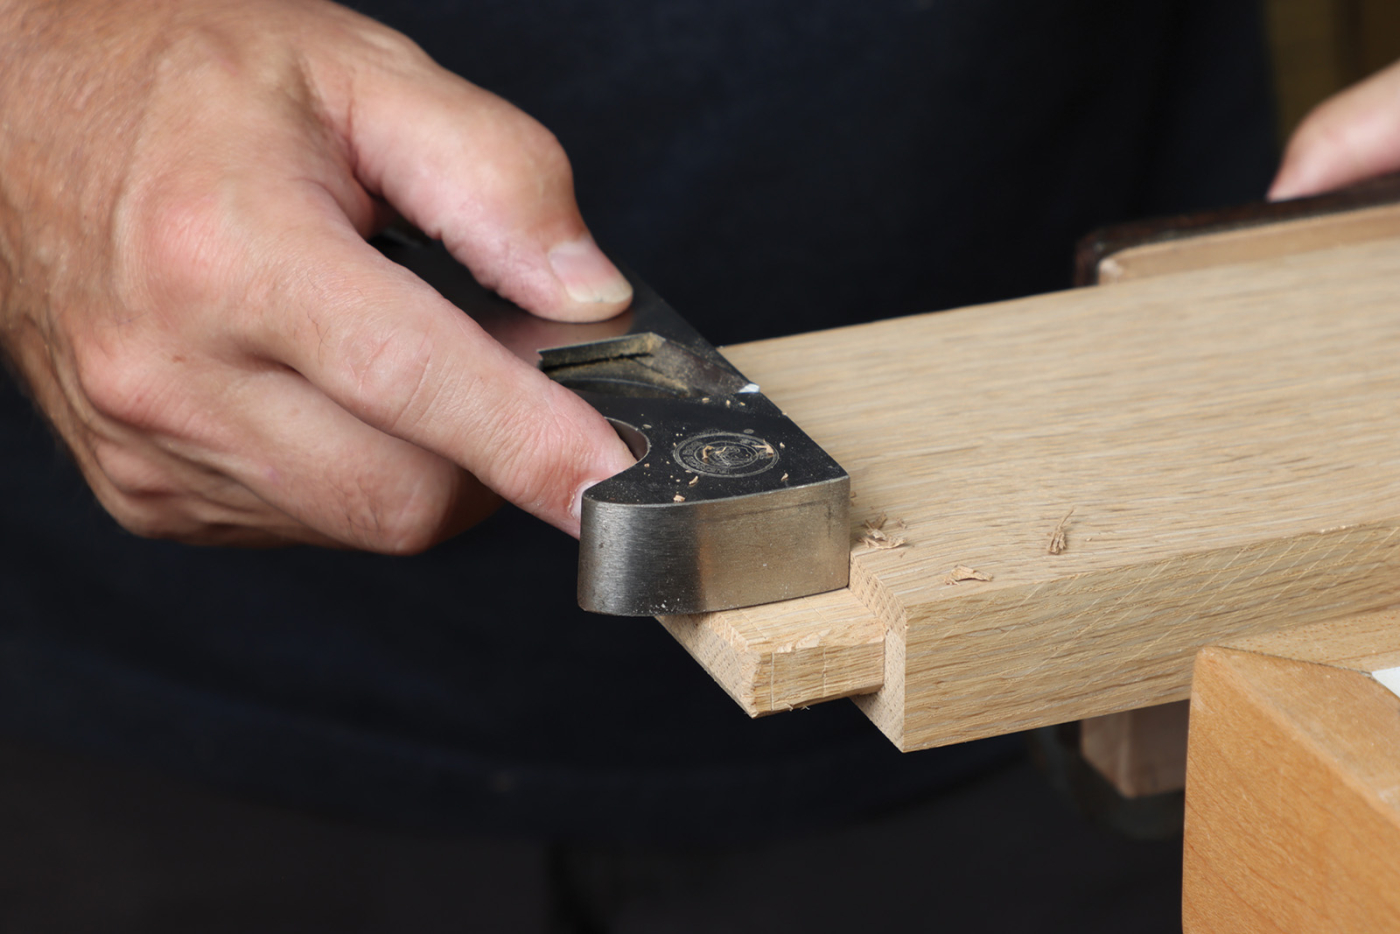
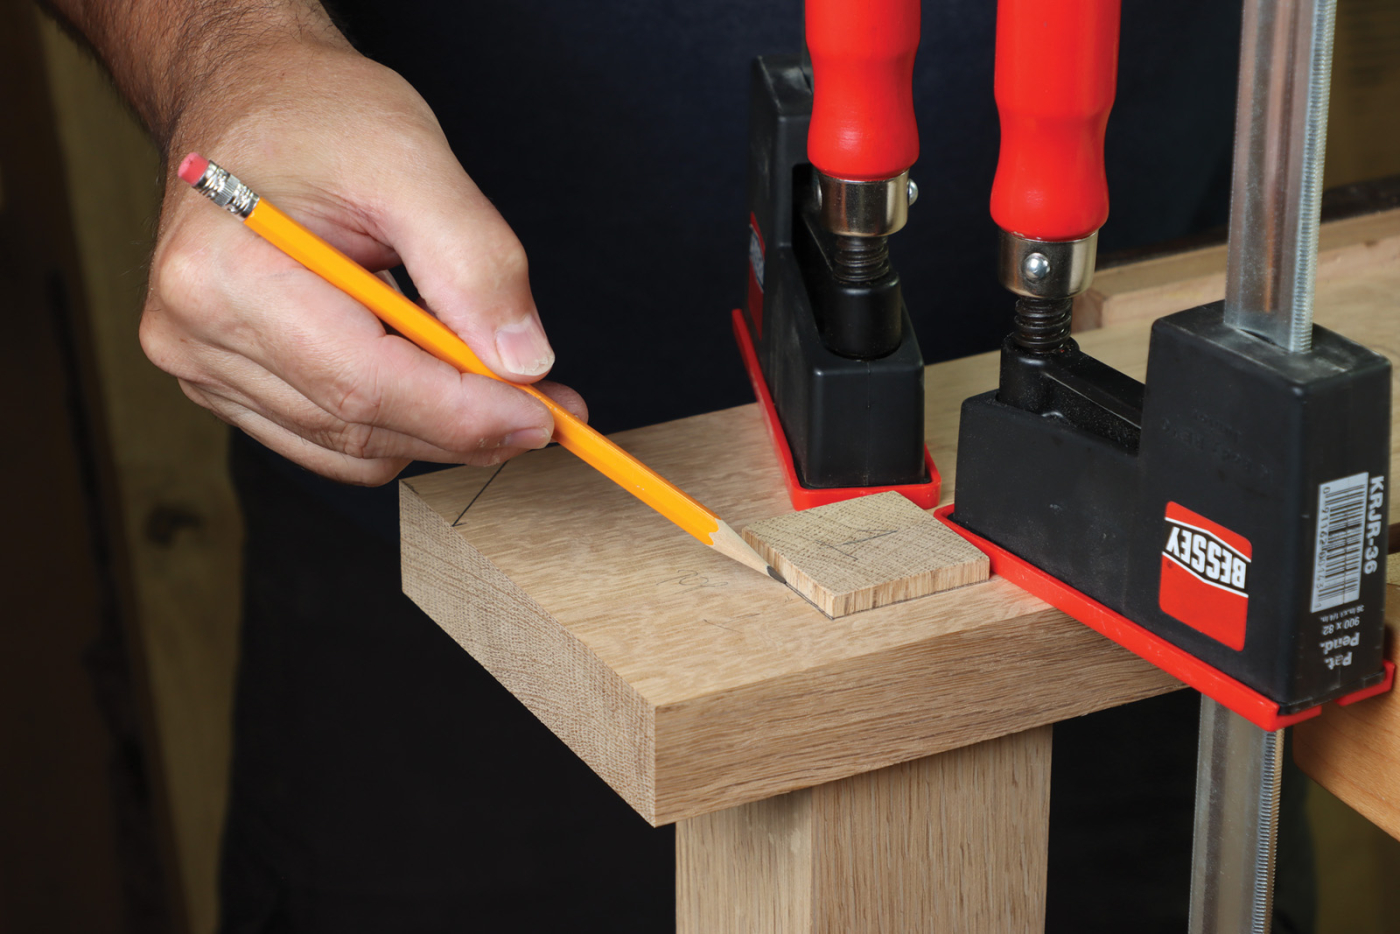
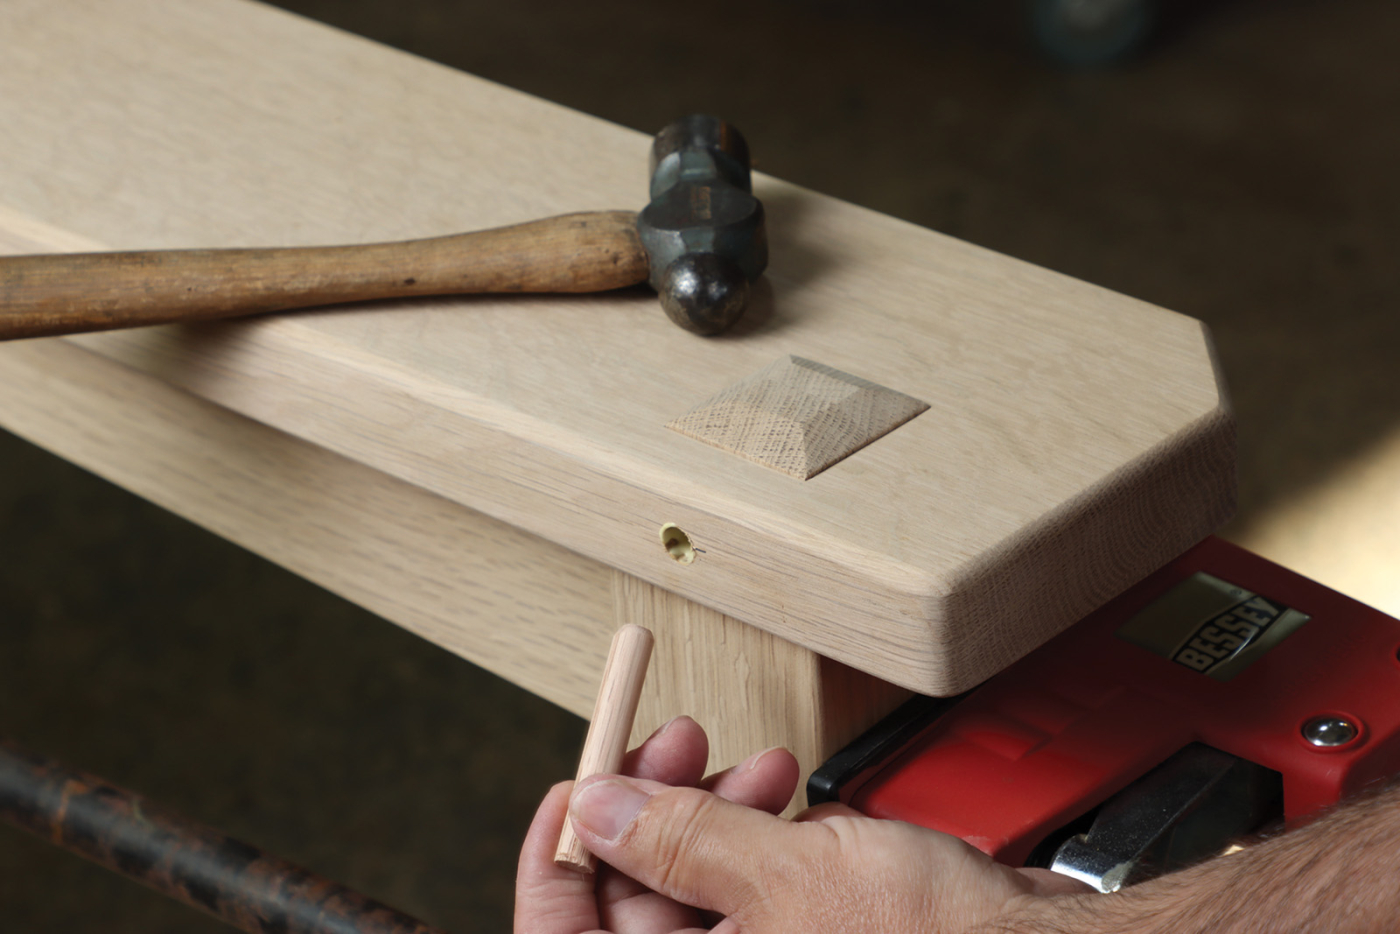
Then dry assemble the exposed joints to mark how far the tenon projects above the armrest and shape the tenon as desired. I formed a flattened pyramid shape to match the rear legs at the oscillating belt sander, but a block plane could do the same. Then clamp a scrap board alongside the legs, so it supports the armrest. Position the armrest so the mortise aligns with the tenon and mark the extent of the required notch. Remove the waste at the bandsaw and finish shaping the armrest, including the clipped corner.
21 Mark the projection of the through tenon, which should be 1/4″ and shape the tenon to a flattened pyramid.
22 Clamp a scrap board alongside the two legs to support the armrest and position the mortise directly across from the tenon.
23 Mark the width of the notch at the back of the armrest, which should be about 3″.
Final Prep & Glue-Up
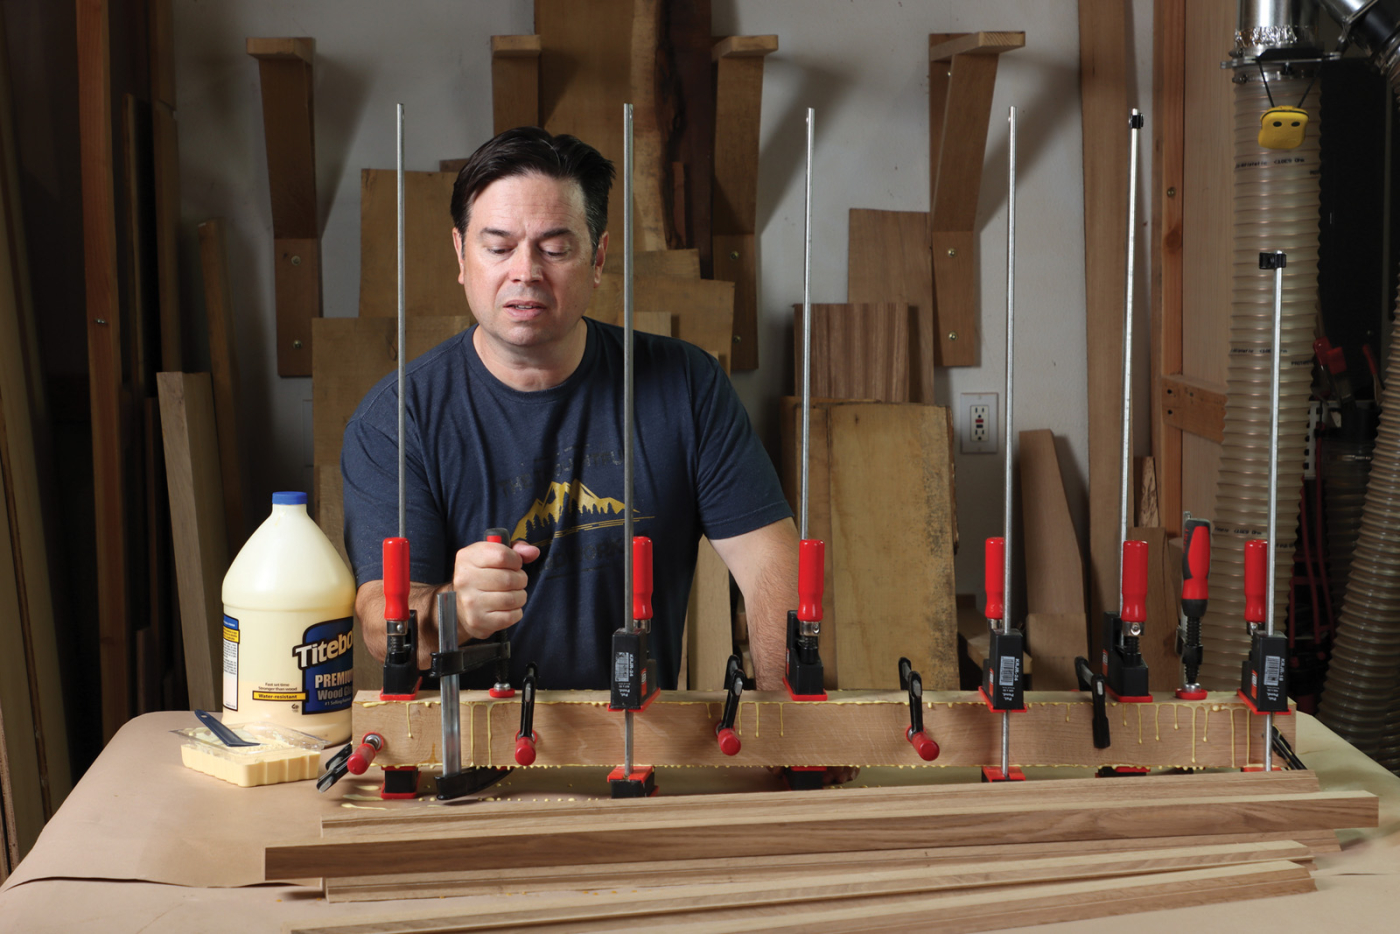
Test the final fit of the armrests, before knocking the chair apart for surface prep. Sand all the parts and ease corners as appropriate with a 1/8“ radius roundover bit. Be sure to leave a crisp edge where parts intersect such as the top of the V-shaped armrest support rails. For comfort, a heavier 1/4“ roundover is appropriate for the top of the armrests. Final assembly is a two-stage affair starting by gluing the two back legs together with five rails. At the same time, glue the two front legs together with the front seat rail and lower rail. Once these two sub-assemblies come out of clamps, connect them with the side rails and armrest support to complete the chair frame. If you have adequate room for clamps, go ahead and attach the armrests with glue. The armrests are also reinforced with a screw driven into the side of the back leg. Plug the screw holes and cross-peg the 1“ long tenons, before applying the finish. The finish in this case is a stain-over-dye approach with Dark Mission Brown TransTint dye applied to the raw wood and then sealed with a light coat of sprayed shellac. The dye is mixed at a concentration of 1-1/2 ounce per quart of solvent-based NGR thinner (a 50/50 mix of denatured alcohol and lacquer thinner, plus 5 tablespoons of lacquer retarder). Next, General Finishes Antique Walnut gel stain is used as a glaze and top-coated with two coats of precatalized lacquer.
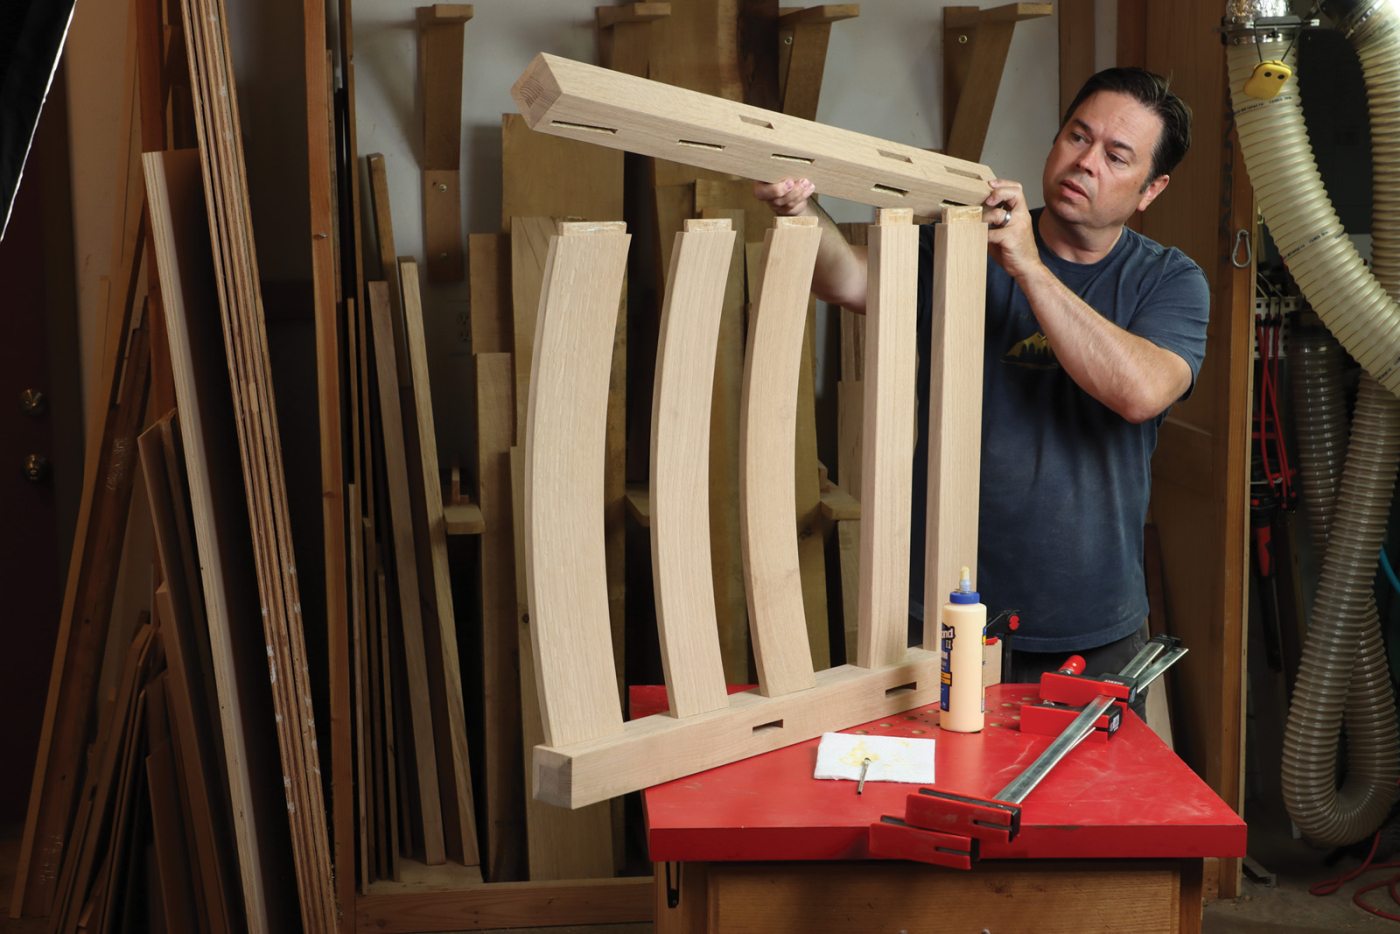
24 Glue the back legs together with 3 curved and 2 straight rails.
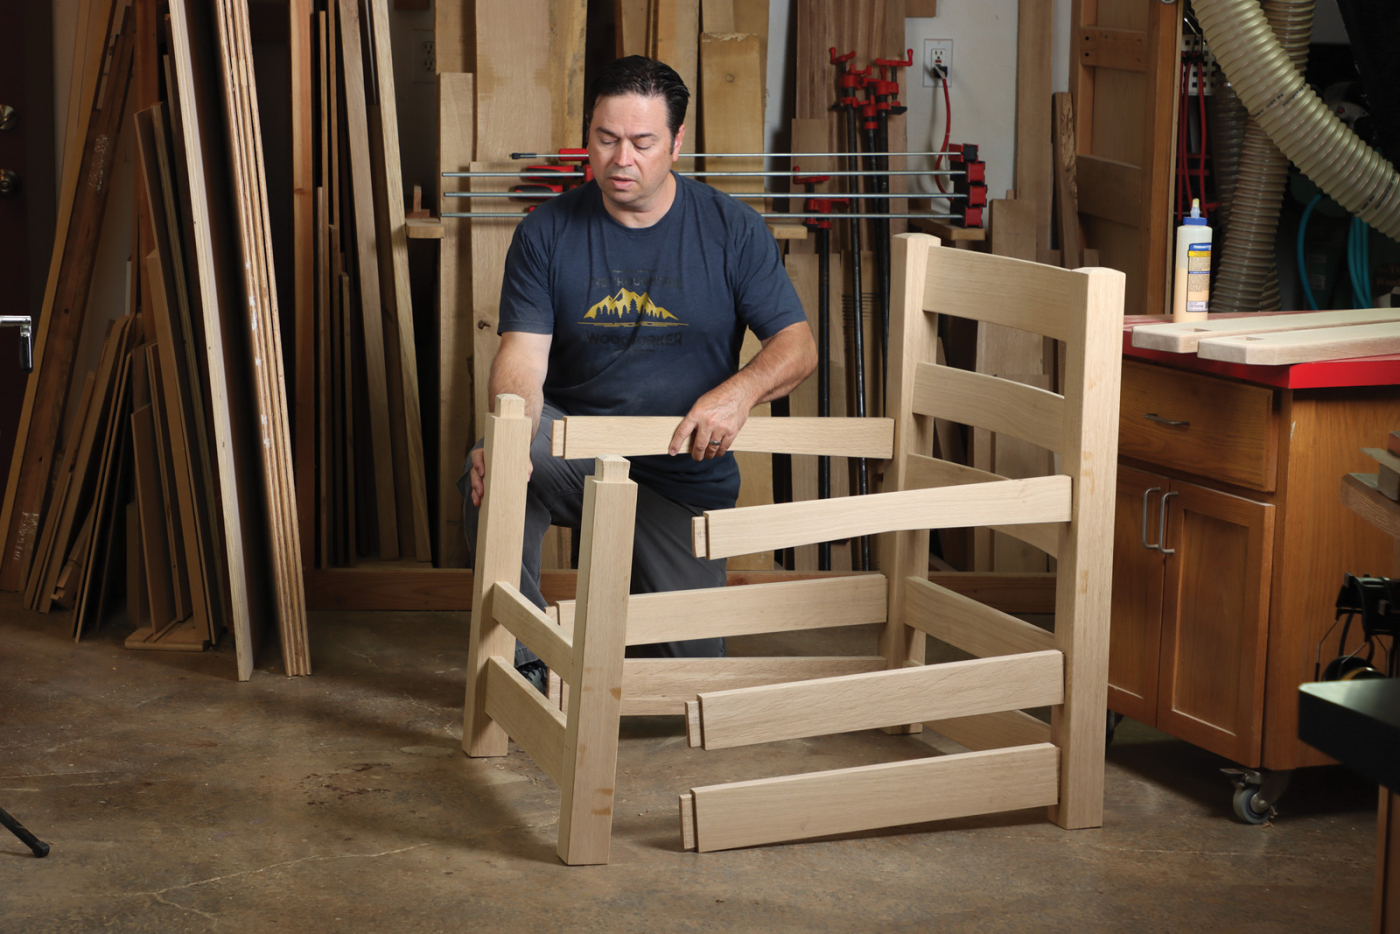
25 Bring the front and back sub-assemblies together with the side rails and armrest supports.
26 Cross-peg the through tenons and 1″ long tenons on the chair frame.
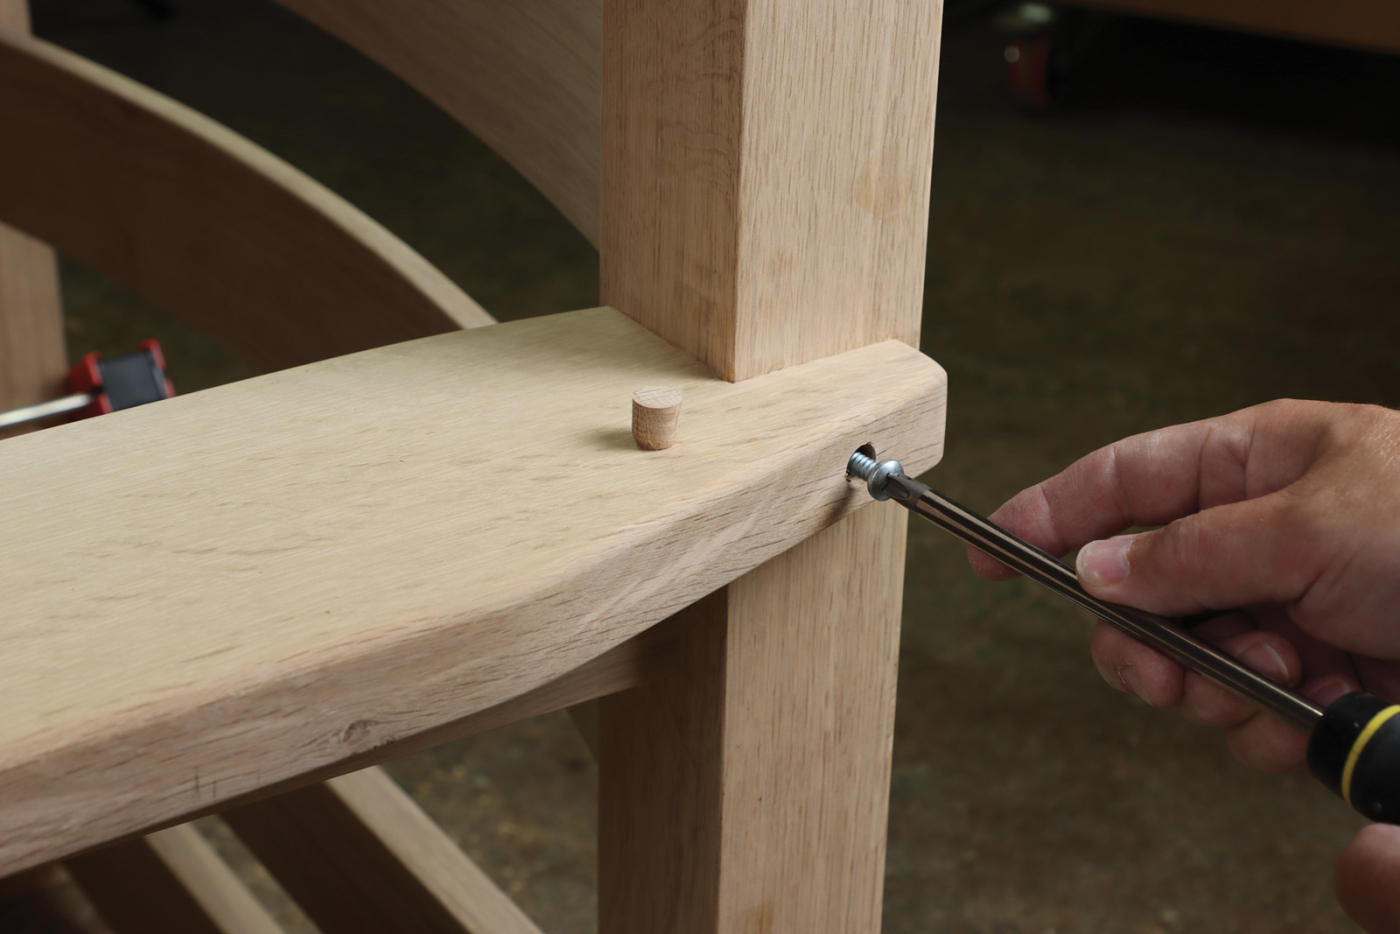
27 Reinforce the armrest with a 2″ long x 1/4″ screw, capped with an oak plug.
Upholstery
The chair has loose cushions for both the seat and backrest. They’re quite soft and forgiving thanks to the down envelope that surrounds the 3“ thick “1834” medium density foam for the seat and 3“ thick “1818” soft foam for the backrest. A half-lapped seat frame is built to fit the opening in the chair and traditional jute webbing is applied with a webbing stretcher. The webbing can actually be installed on either the top or bottom of the seat frame and I chose to install it on the underside. This leaves a cleaner, flatter surface for the leather upholstery trim that will cover the seat frame. However, it also leaves a void inside the frame that must be filled with dense foam, such as “rebond” foam (so named because it’s made with multicolored scraps of foam), or something similar.
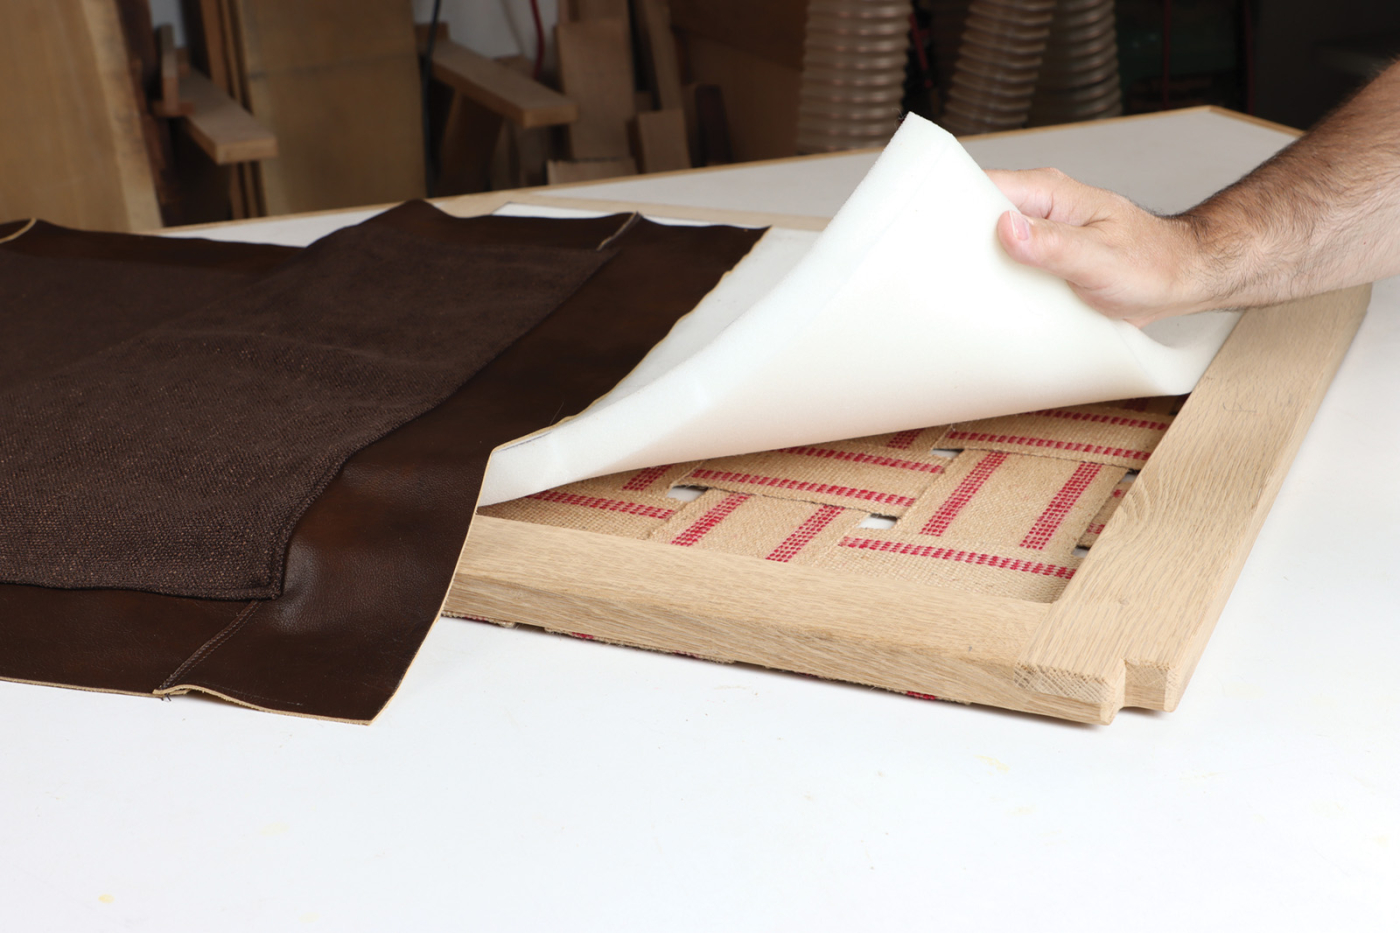
28 Apply jute webbing to the bottom of the half-lapped seat frame with a webbing stretcher. Add a 1″ layer of dense foam, before trimming the frame out in leather.
Down envelopes are custom ordered from upholstery supply houses like FoamOrder.com. If you don’t want the expense and lead-time of down envelopes, you can wrap foam in two layers of high-loft batting for a similar effect. Generally, down envelopes give a softer, more rounded looking cushion compared to foam, which can look somewhat square and block-like. For best results, take dimensions for the cushion covers directly from the cushions. Fabric is an option, but I couldn’t imagine the Eastwood chair in anything but leather. Sew the faux-box style cushions up with 5/32“ piping and #4.5 YKK nylon zippers. A faux box simply means it looks like a regular box cushion but has only one central seam. To manage excess slack at the corners, squares of leather are removed and sewn with a simple blind stitch. If you’re going to work with leather, you’ll need an industrial walking foot machine. Otherwise, hire a local upholsterer, and show them pictures of the desired cushions. I’ve seen many upholstery shops churn out well-built couch cushions that had no business on a Morris chair or craftsman style armchair.
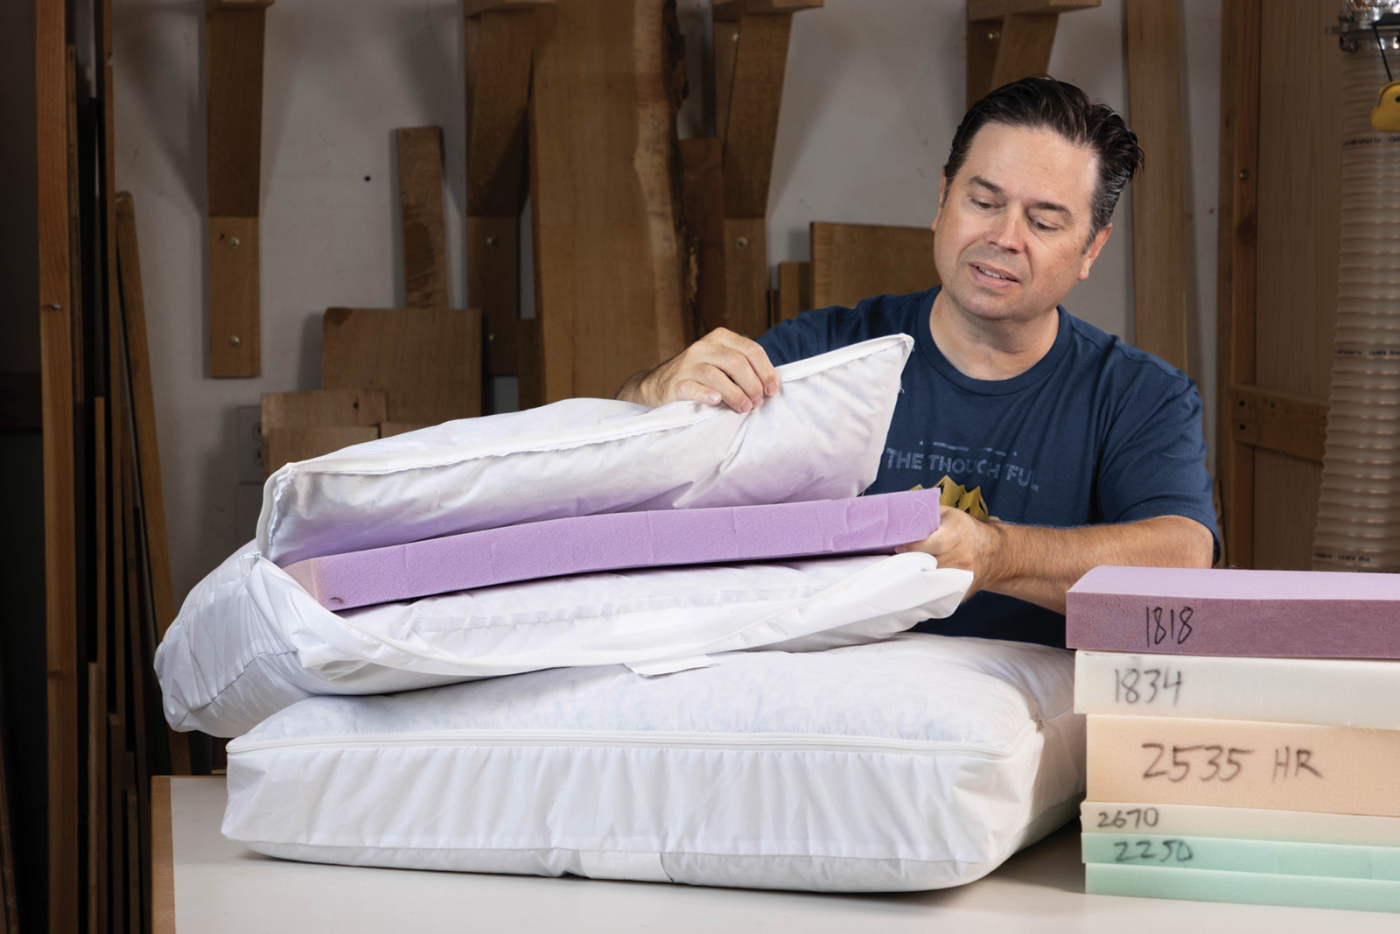
29 Foam-filled down envelopes are custom ordered and filled with high quality upholstery foam.

30 Next, staple piping to the front cushion panel with a plier-
nose stapler.
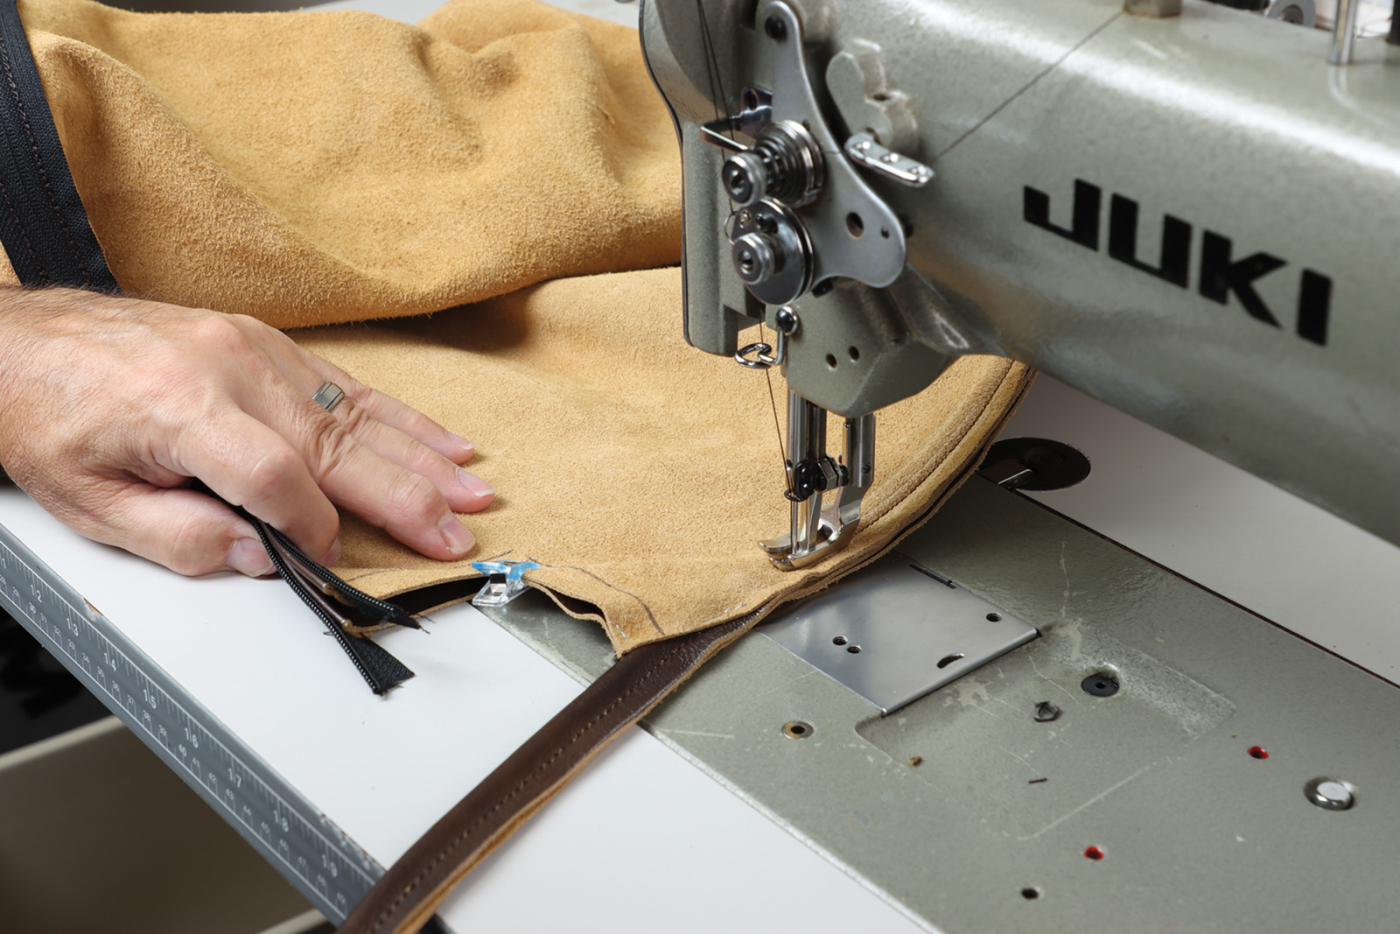
31 Stapling leather parts together helps keep them from shifting as you sew the cushion covers together. Sew right off the bottom of the cover, before closing up the bottom corner notches. Find detailed videos of each process, from wrapping the seat frame in leather to stuffing down envelopes and sewing leather cushion covers on Willie’s Youtube Channel, The Thoughtful Woodworker.
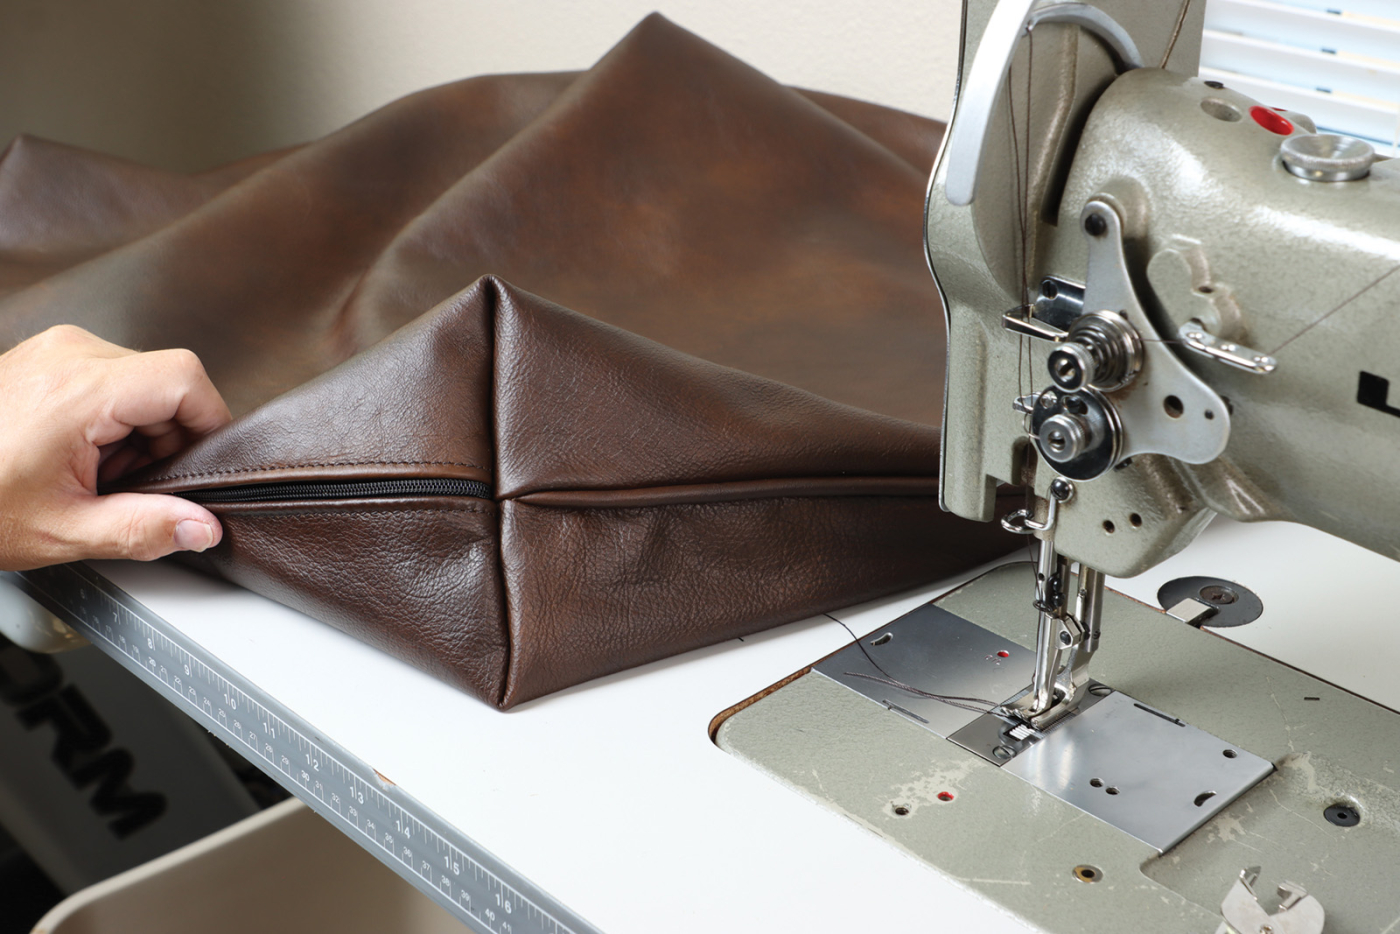
32 A top stitched zipper closes the cushion covers. Terminate the piping (AKA cording or welting) just above the bottom corner-notch seam.
Perhaps you can find a friend or local maker space with a walking foot. With a little practice, and the right resources, you’ll be sewing faux-box cushions to be proud of. By the way, that fetching Eastwood Ottoman was featured in the December 2022 issue of Popular Woodworking (issue #268). You’ll find helpful resources online for building and upholstering that project as well.
Here are some supplies and tools we find essential in our everyday work around the shop. We may receive a commission from sales referred by our links; however, we have carefully selected these products for their usefulness and quality.