We may receive a commission when you use our affiliate links. However, this does not impact our recommendations.

Cantilevered Display Shelves
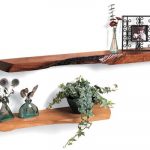
Strong, glueless joints support these elegant, cantilevered shelves.
By Dave Munkittrick
|
Whatever you collect—rocks, porcelain, folk art
or photos of your Schnauzer—it’ll get the attention
it deserves when displayed on these
shelves. The simple design is wide open at the front and sides
so nothing interferes with what’s on display. The stepped back
shelves allow ambient light to flood each shelf.
If you’re thinking
of making some gifts
for the holidays, consider
these shelves.
It’s almost as easy to
make a dozen as it is
to make one. Best of
all, these shelves knock down to five easy pieces and six
little screws that can be boxed up and shipped to anyone on
your list. If you’re like me, building these shelves is a lot
easier than writing a holiday letter!
These shelves are:
– sturdy
– lightweight
– easily knocked down for shipping
– fun to make
– easy to mass produce
|
|

You may also like…
Floating Shelves
Free-Form Wall Shelf
Modern Mission Cabinet
|
|
Cut the deep dado on the front side
of the support using a long miter gauge
fence and a starting block. This is the first
step in creating the bridle joint that locks
the shelf onto the supports.
The blade guard must be removed
for this cut. Be careful.
|
|
Click on any image to view a larger version.

|
|
Cut the two shallow dadoes on
the sides of the supports after slipping
a 3/8" spacer board under the
workpiece. You must cut all the dadoes
for each shelf before moving on to the
next. That way you keep the same fence
and blade setting for each cut, which
guarantees perfect alignment of the
dadoes on all three sides of the support.
|
|

|
|
Cut a keyhole slot on the back of the
supports using your router table and a keyhole
bit. Brace the top of the support
against a starting block and lower the vertical
support onto the keyhole bit until it
rests flat on your router table. Slide the support
forward against the stop block to finish the cut.
|
|

|
|
Cut the tapers on the supports
with a shop-made jig, or on
a bandsaw. Taper the sides first.
– Set a 5/16" gap between the two halves
of the taper jig for the first side cut.
– Set the gap at 5/8" for the second
side cut.
– Move the fence 1/4" farther away from
the blade, set the gap at 3/4" and cut
the front taper.
– Mark each setting on the jig for
future reference.
|
|

|
|
Plane the shelf stock to fit the dadoes
in the supports. Use some scrap to
determine the proper planer setting. Try
for a slightly tight fit to allow for sanding.
|
|

|
|
Cut the notches in all the shelves at
once. First, make test cuts on scrap to
determine the proper width and height
settings for the dado blade. Mark the center
of each shelf and lay out the notches on the
small shelf. Align the shelves in a stack held
together with double-faced tape. Clamp the stack to a tall fence
fastened to your miter gauge and make your
first cut. Reposition the stack, clamp and
make the second cut.
The blade guard must be removed
for this cut. Be careful.
|
|

|
|
Drill and countersink pilot holes for
the screws after dry fitting the shelves.
|
|

|
|
Taper the ends of each shelf on the
bandsaw. You want to remove a 1/4" thick
wedge that ends about 1-1/2" from the notch.
Use a block of wood as a guide to keep the
shelf perpendicular to the table. Stick the
block to the shelf with double-faced tape.
|
|

|
|
Lay out the curve on the front edge of
each shelf. Clamp a 1/4" hardboard strip on the
ends of a 40" long piece of wood or plywood
and add a 3/4" spacer block in the middle.
Taper the ends of the plywood to create a fair
curve. Cut the curve on the bandsaw.
|
|

|
|
Cut an 8° angle on the shelf ends using a
miter gauge on the tablesaw.
|
|

|
|
Shape the bottom taper (grid area)
with a hand plane or power sander. The
object is to create an even 1/4" thickness
across the ends and a sweeping curve on
the front of the shelf. Take care
not to remove any material around the
notch or you’ll ruin the fit of the shelf to
the support.
This story originally appeared in American Woodworker October 2001, Issue #89.

|
|

|
Product Recommendations
Here are some supplies and tools we find essential in our everyday work around the shop. We may receive a commission from sales referred by our links; however, we have carefully selected these products for their usefulness and quality.


