


We may receive a commission when you use our affiliate links. However, this does not impact our recommendations.
Greene and Greene-Style Hall Table
Exquisite detailing turns ordinary into extraordinary.
By Bruce Kieffer
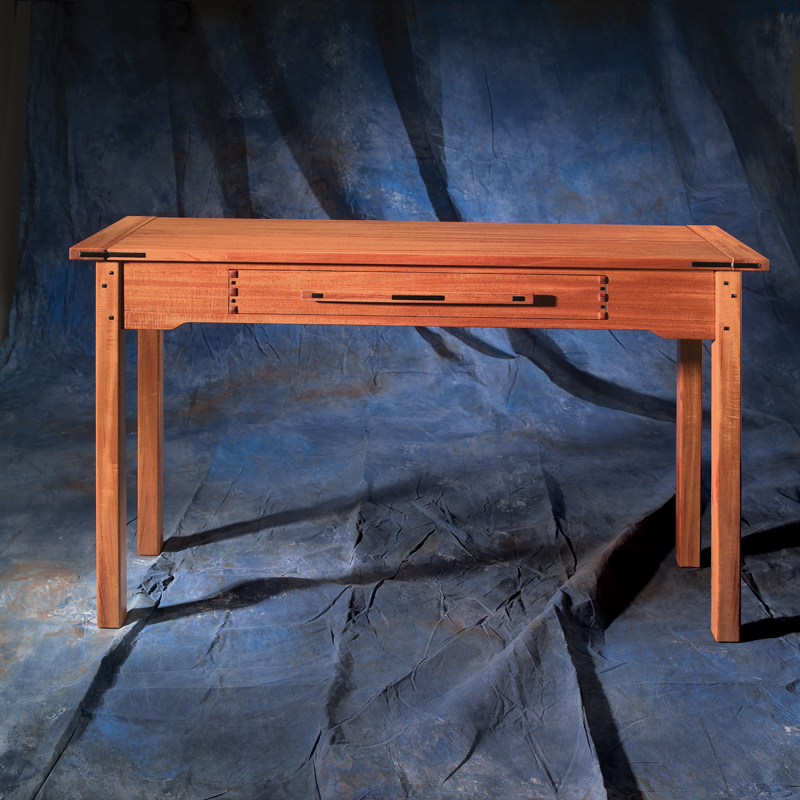
People just love this wonderful little table with its soft-colored mahogany, ebony accents and finger-jointed drawer. The spectacular detailing is characteristic of furniture designed by Charles and Henry Greene. The Greene brothers were prominent architects and furniture designers in Pasadena, Calif., during the early 20th century. They worked closely with Swedish master woodworkers John and Peter Hall to design one-of-a-kind furniture.
The top’s breadboard ends with ebony splines was a favorite Greene & Greene design element. Breadboard ends are short boards fastened to each end of the top. The breadboards keep the top flat and conceal unsightly end grain. The Greenes’ unique design allows the solid wood top to expand and contract, even though the breadboard ends are fastened cross-grain. Ebony splines (R) cover the breadboard’s tongue-and-groove joints and help conceal the movement of the top (Fig. B, below). The ebony plugs (S, T, Fig. A, below) serve as covers for screw holes.
The drawer is a real eye-catcher. It features protruding, unequally spaced finger joints and a gently curved drawer handle. The “cloud lifts” on the aprons are another well-known Greene & Greene design element. Without the details, this table just wouldn’t be the same.
Building the drawer is not as difficult as you might think. We devised a simple system using spacers to position the cuts. You’ll see how easy it is after you’ve made a few test finger joints.
Don’t let all the decorative plugs scare you, either. A couple of inexpensive mortising machine chisels take the tedium out of making square holes and guarantee perfect results.
This project requires you to work with precision. At the same time, the techniques we’ve developed will minimize the headaches. Be sure to make plenty of extra pieces to test your router and saw setups before machining the final pieces.
Materials and machines
We ordered two 12-ft.-long pieces of 5/4 mahogany and asked that the boards come sequentially from the same tree.
We cut each 12-ft.-long board into three 47-in. boards. The resulting six boards, from which we’ll choose our top, share similar grain and color. The remaining boards will be used for the aprons.
A jointer, planer, tablesaw, bandsaw, router table, drill press and biscuit joiner are required for this project. You’ll also need a handful of standard router bits: a 3-wing slot cutter with arbor and bearing, a rabbeting bit, 3/8-in. and 1/4-in. straight bits, a flush-trim bit, and 1/4-in. and 1/8-in. round-over bits (see Sources, above). Even if you don’t own a mortising machine, you’ll want a pair of 3/8-in. and 1/4-in. mortising chisels to square all the holes and slots for the ebony plugs. They’re much faster and more accurate than using a regular chisel. OK, enough talk; let’s cut some wood.
Make the top
1. Joint and plane the rough stock to 1-in. thick. Choose your best mahogany boards for the top (A) (Photo 1) and rip them to 5 in. wide. Plane these boards to 7/8-in. thickness.
2. Edge glue the top boards one joint at a time to ensure the joints are absolutely flush.
3. Sand the top with 120-grit paper to remove any irregularities. Then cut the top to its final length.
4. Plane some scrap wood to the same thickness as the sanded top for testing router table setups.
The breadboard ends
The breadboard ends (B) are thicker than the top. The tongue-and-groove joint is offset so the breadboard end is flush with the top’s bottom and stands proud of the upper surface. This offset calls for special care when machining the breadboard ends, because the tongue on the top is centered but the corresponding groove in the breadboard end is not. It’s easy to get disoriented and rout a groove or a slot in the wrong place. The same is true with the grooves for the ebony splines and plugs (Fig. B). Be sure to clearly mark the top and bottom of each piece.
5. Cut and plane the breadboard ends to size. Make four scrap wood extras exactly the same size for testing all the routing setups.
6. Rout a radius on the outside edges and outside corners of the breadboard ends with a 1/8-in round-over bit. Ease the top inside edges and inside corners to about a 1/16-in. radius (Fig. B, below).
7. Cut the tongue grooves (Fig. B) on the mahogany breadboard ends (Photo 2) and on your test pieces.
8. Rout the offset 3/8-in.-wide spline grooves (Fig. B) in the breadboard ends (Photo 3).
9. Rout the 3/8-in.-wide plug grooves (Fig. B) on the edge of the breadboard ends (Photo 4).
10. Square the corners of the spline and plug grooves (Photo 5).
Fit the breadboard ends to the top
11. Cut the tongues on the top (Photo 6). Make test cuts on your scrap pieces first to ensure the breadboard ends and the top are flush at the bottom and the tongue fits snugly in the groove.
12. Cut the spline grooves in the edges of the top using a router table with a tall fence and a 3/8-in. straight bit. Use a featherboard to hold the top tight to the fence and a stop block to control the grooves’ length. Again, use your scrap pieces and make adjustments until the groove in the top matches the groove in the breadboard end exactly.
13. Square the end of each groove with a mortise chisel.
14. On the drill press, drill three 9/64-in. holes centered in each plug hole in the breadboard ends. For now, these holes are sized only to hold the No. 6 screws in place for marking the pilot holes in the ends of the top.
15. Mark the screw locations on the top (Photo 7). Drill pilot holes in the top tongues.
16. Enlarge the two outside screw holes in the breadboard ends with a 1/4-in. bit. The oversize holes allow the top to expand and contract on either side of the captured center screw.
17. Finish-sand the top and breadboard ends and use screws to attach the breadboard ends to the top (Fig. A). Note: Do not use any glue on this joint. Set the top aside for now.
Make the base
When your table is a collection of loose parts, it’s easy to lose track of what piece goes where. To avoid confusion, label the front, back, inside, outside, top and bottom of the legs and aprons.
For a seamless look, we’ll show you how to cut the drawer front right out of the apron.
18. Plane the 1-in. stock left from making the top to 7/8 in. Choose the best-looking piece for the front apron (D).
19. Lay out the drawer front (F) and the rip lines on the front apron (see Fig. A, Detail 2, below). Rip the front apron into three pieces and crosscut the drawer front from the middle piece. Then, reassemble the front apron (Photo 8). This yields a seamless grain match for the drawer front.
20. After the glue dries, plane the apron stock to 3/4 in. and cut to length. Note: Cut an equal amount off both ends of the front apron so the drawer opening stays centered. Leave the drawer front 7/8 in. thick until after the finger joints are cut.
21. Make 1/4-in.-thick fiberboard templates for the cloud lifts (Fig. A, Detail 2). Then, rout the cloud lifts (Photo 9).
22. Cut the legs (C) to size and sand smooth.
23. Lay out the ebony plug holes. On the drill press, make 3/16-in.-dia. holes 1/4 in. deep for each plug. Square the holes with a 1/4-in. mortise machine chisel.
24. Lay out the locations of the biscuits that join the legs and aprons. The aprons are set back 1/4-in. from the faces of the legs (Fig. A, Detail 2).
25. Place a 1/4-in. spacer on the face of your apron and adjust your plate joiner to cut at the center of the apron (Photo 10).
26. Use the same fence setting to cut the slots in the legs without the spacer.
27. Rout a 1/4-in. round-over on the long edges and around the bottom of the legs.
28. Rout an 1/8-in. round-over on the aprons’ bottom edges.
29. Finish-sand the legs and aprons before assembly.
30. Glue and clamp the back legs to the back apron and the front legs to the front apron. Then glue and clamp the front and back assemblies to the side aprons to complete the base assembly (Photo 11).
31. Cut the apron cleats (L), drawer runners (M) and drawer guides (N) to size.
32. Drill and counterbore the screw holes in the upper apron cleats for attaching the top. Elongate the screw holes in the upper rear apron cleat so the top can expand and contract. Make sure the counterbore is deep enough to keep the screw heads from interfering with the drawer.
33. Lay out the biscuit grooves in the apron cleats for the drawer runners. Use a biscuit joiner to cut theses grooves. Cut the drawer stop notch (Fig. A, Detail 1).
34. Cut the grooves all the way across the ends of the drawer runners using a router table and a 5/32-in. x 1/2-in.-deep slot cutter.
35. Glue and clamp the apron cleats to the assembled base. The lower apron cleats are set 1/16 in. above the lower edge of the drawer opening in the front apron (Fig. A, Detail 1).
36. Glue biscuits in the apron cleat biscuit grooves and add the drawer runners (Photo 12).
Add the ebony accents
Despite being one of the denser woods on the planet, ebony is surprisingly easy to work with. If you’ve ever worked with hard maple, you won’t find ebony to be much different.
37. Rip the blanks for the ebony plugs and splines (Photo 13).
38. Sand pillow shapes on the tops of the ebony plug strips. Cut the plugs (X) to length (Photo 14). Repeat until all the plugs (and a few extra) are made.
39. Add a drop of glue to the hole and tap the plug in place (Photo 15).
40. Cut, fit and shape the breadboard end splines (R). When you’re done, glue the splines to the top spline grooves only.
41. Cut, fit and shape the breadboard end plugs (S and T). The long plugs need to be tapped in with care because the laminate shield can’t be used here.
Build the drawer spacer
sticks are used to cut the unusual protruding fingers on the drawer joint. The 5/8-in. and 3/4-in. spacers must exactly equal the cut your dado blade makes. To size your spacers, use your dado blade to cut a 5/8-in. notch in a block of wood. Cut a second 3/4-in. notch. Cut test spacers from 3/4-in. fiberboard and check their fit in the notches (Photo 16). Adjust the width of the spacers until they slip into the notch with minimal pressure. You’ll need three 5/8-in. x 7-in. spacers and two 3/4-in. x 7-in. spacers to cut the drawer joints. Label the fronts of the spacers so you keep them oriented correctly.
You’ll also need a tall fence attached to your miter gauge. The fence is just a doubled up piece of fiberboard with an adjustable stop block screwed to one end (Photo 17).
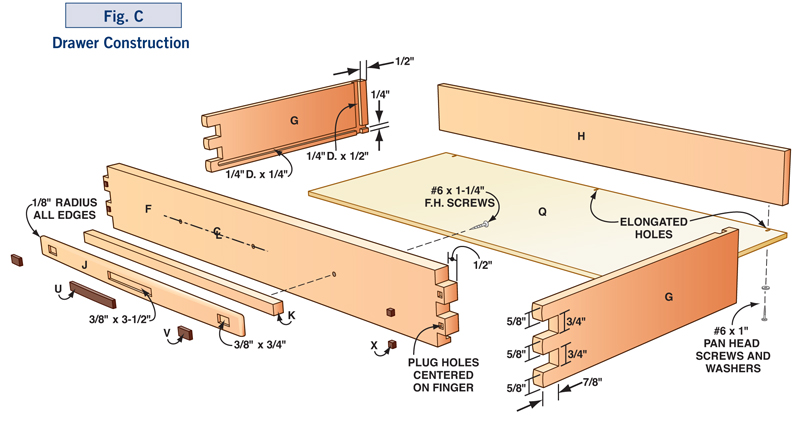
42. Cut the drawer sides (G) to size, but leave them 5/8 in. thick for now. Make four extra sides from scrap wood for testing the setups.Trim the drawer front and a test piece to finish width.
43. Set a 3/4-in. dado blade 7/8 in. high. Attach the tall fence with a stop block to the miter gauge so the distance between the stop and the dado blade is equal to the width of the drawer front.
44. Lay out the finger cutouts on a test drawer side. Make the first cut on a side piece using a 5/8-in. and a 3/4-in. spacers (Photo 17). Always keep the top edges of the drawer pieces against the spacers.
45. Make the second cut (Photo 18). Then measure the outside fingers—a caliper works great for this. Adjust the stop and keep making new test cuts until both fingers are equal in width. Note: Don’t cut your final pieces yet.
46. Lay out the drawer front fingers on a test piece. Make the first cut on the drawer front (Photo 19). Add one 5/8-in. and one 3/4-in. spacer to the setup and make the second cut. Add another 5/8-in. and 3/4-in. pair of spacers for the third cut.
47. Check the fit of the two test pieces together. They should fit beautifully. If they’re loose, your spacers need to be slightly wider. If they’re tight, your spacers need to be slightly narrower.
48. When you get a good test fit, go ahead and make the cuts on your final drawer parts.
Assemble the Drawer
49. Plane the drawer sides and front to their final thickness. This should remove any blowout that might have occurred.
50. Cut dadoes on the drawer sides to fit the drawer back (H). Rout the stopped grooves for the drawer bottom (Q) in the drawer sides. The groove on the drawer front is cut all the way through.
51. Cut the drawer back to size, and size the drawer bottom so it slides easily in the grooves.
52. Drill and chop the square holes for the ebony plugs on the drawer front just as you did on the legs.
53. Sand the pillow-top shapes on the finger ends of the drawer sides. Finish sanding the rest of the drawer parts.
54. Add the ebony drawer front plugs (X) before assembly. Note: These plugs should fit easily in the holes. A tight fit could cause the short grain on the end of the drawer front to break out.
55. Glue and clamp the drawer parts together, making sure the drawer is square (Photo 20).
56. When the glued drawer parts are dry, sand the drawer front fingers flush to the sides.
57. Drill three elongated holes near the back edge of the drawer bottom. Put a small amount of glue in the dado groove in the drawer front. Slide the drawer bottom in the drawer and insert the screws.
Fit and finish the drawer
58. Mount the drawer guides (N) to the runners (M, Photo 21).
59. Start with a 3-in.-wide blank to make the drawer handle (J). Rout the ebony plug grooves while the stock is still square.
60. Cut the curved shape (Fig. C, Detail 1) on your bandsaw and rout the 1/8-in.-radius round-over on the edges.
61. Rip the drawer handle front off the blank on the tablesaw.
62. Use the remaining stock to make the drawer handle back (K). Glue and clamp the drawer handle front and back pieces together. Add the drawer handle plugs (U and V).
63. Make and attach the drawer stop (see Fig. A, Detail 1). Insert the screw head flush with the bottom of the apron cleat, so the stop will hang down and hit the back of the drawer.
64. Drill the drawer handle screw mounting holes in the front of the drawer. Align and screw the drawer handle to the drawer.
Finishing touches
65. Align the base on the top and screw them together (Photo 22).
66. Unscrew and remove the top, drawer handle and drawer bottom. Do any additional finish sanding.
67. Apply two or three coats of natural Danish oil finish. When the finish is dry, reassemble the table. Then step back and be prepared to accept the kudos!
Sources
(Note: Product availability and costs are subject to change since original publication date.)
Groff & Groff Lumber Inc., groffslumber.com, 800-342-0001, Two 7-in. x 12-ft. 5/4 mahogany; One 7-in. x 6-ft. 5/4 mahogany; 6-in. x 6-ft. 8/4 rift-sawn mahogany; Two 6-in.x 8-ft. 4/4 poplar; 1/2 bd. ft. 4/4 ebony.
Bolt Depot, boltdepot.com, 866-337-9888, Six #6 x 2-1/2-in. round-head wood screws, #7384.
MLCS, mlcswoodworking.com, 800-533-9298, 1/4-in. x 1/2-in.-deep, 1/4-in. shank (1/2-in. shank also available); 3-wing slot cutter assembly with arbor and bearing, #5348; 32-in. 3-wing slot cutter, #306; 2-in.-deep, 1/2-in. shank rabbeting bit, #7693; 8-in.-dia. x 1-in., 1/4-in. shank (1/2-in. shank also available); straight bit, #5472; 4-in.-dia. x 3/4-in., 1/4-in. shank (1/2-in. shank also available); straight bit, #5470; 2-in.-dia. x 1-in., 1/4-in. shank, pattern/flush trim bit, top bearing, #6506; 4-in.-radius, 1/4-in. shank (1/2-in. shank also available); round-over bit, #6352; 8-in.-radius, 1/4-in. shank (1/2-in. shank also available); round-over bit, #6350.
Woodcraft Supply, woodcraft.com, 800-535-4482, 3/8-in. mortising machine chisel and bit set, #143998; 1/4-in. mortising machine chisel and bit set, #143996.
Cutting List

Fig. A: Exploded View

Detail 1: Drawer Stop

Detail 2: Aprons and Plugs
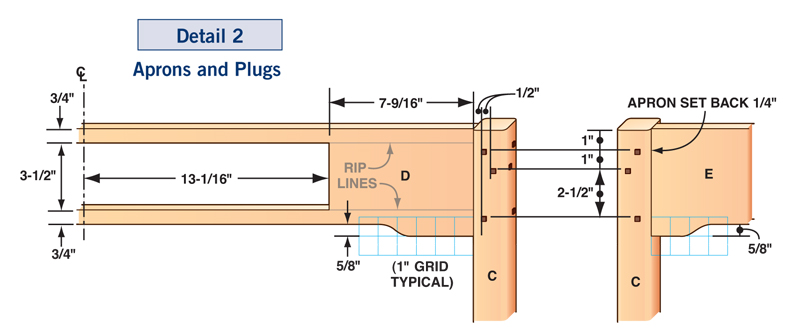
Fig. B: Breadboard End
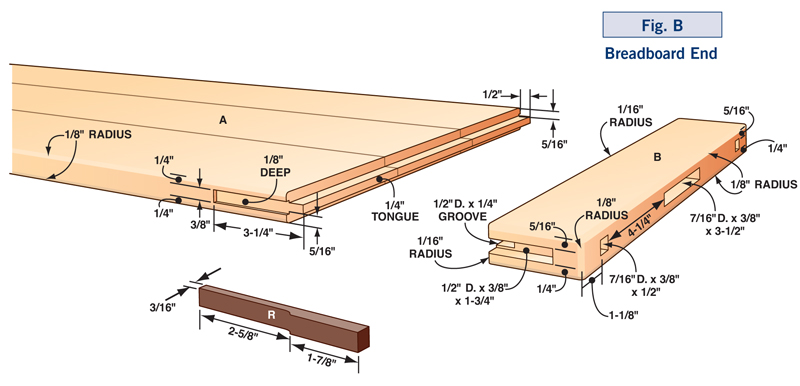
Fig. C: Drawer Construction
Detail 1: Drawer Handle

This story originally appeared in American Woodworker July 2004, issue #108.

Click any image to view a larger version.

1. Choose your best boards for the top. Look for boards with similar grain and color. With luck, the joints will be almost invisible on the finished top.

2. Rout a tongue groove on the breadboard ends using a slot cutter. These boards help the top stay flat. Featherboards make routing safer and more accurate.

3. Rout stopped grooves for ebony splines in the breadboard ends using a straight cutter. Clamp a stop to your fence to limit the groove’s length. Clamp a support board to the breadboard end and push them together for greater stability. Note: One groove is cut with the top surface against the fence; the other with the underside against the fence. This requires testing and resetting the fence for each pair of grooves.

4. Rout plug grooves in the breadboard ends. Stops establish the beginning and end of each groove. Drop the piece onto the bit, slide it forward and then lift it off. Use scrap cut to the same size to fine-tune the setup.

5. Square the ends of the plug grooves with a mortising machine chisel. A wooden mallet prevents damage to the top of the chisel.

6. Rout tongues on the top with a rabbeting bit. Clamp blocks to both edges to prevent the ends from chipping out. The blocks also prevent the router from accidentally sneaking around a corner and cutting on the front or back edge.

7. Mark the screw holes’ location on the top by lightly tapping the screw heads. Make sure the breadboard ends are centered on the top. Remove the breadboard end and drill the pilot holes in the top.

8. Glue the front apron back together after it’s been ripped and crosscut into five pieces. Because the drawer front is cut out of the apron, it seamlessly blends into the surrounding pieces.

9. Shape the bottom of the aprons with a router, flush-trim bit and template. This creates the Chinese-inspired “cloud lift” curve widely used by the Greene brothers. Most of the waste is removed with a bandsaw prior to routing.

10. Join the apron to the legs with biscuits. Offset the joint by placing a 1/4-in.-thick spacer under the biscuit joiner’s fence when cutting the aprons. Remove the spacer for the legs.

11. Glue and clamp the base together. Two 10-in.-tall L brackets are like having an extra pair of hands to support the front assembly as you apply the clamps.

12. Glue the drawer kickers and runners into place. Create the long grooves on the ends of each piece with a 5/32-in. slot cutter.

13. Rip the ebony into strips on the bandsaw. It’s safer than a tablesaw and wastes less of this expensive wood. A fine-toothed saw blade makes a smooth cut that requires minimal sanding.

14. Cut short plugs after sanding the gently rounded shape on the end. A simple wooden jig holds the ebony strips in place.

15. Tap the plugs into their holes. The plugs stand slightly proud of the surface. Use a spacer made from plastic laminate to make sure all the plugs are equal in height.
Oops!


16. Make spacers that exactly fit cuts made by your dado set. The spacers are used to cut the finger joints in the drawer. Test-fit fiberboard spacers into 5/8-in. and 3/4-in. notches cut by your dado set. Shoot for a snug fit.

17. Cut the first finger joint on the drawer side using a 5/8-in. and a 3/4-in. spacer. The tall fence is screwed to the miter gauge and has an adjustable stop to fine-tune the setup. The spacers are held in place with a short hold-in bar.

18. Add two more spacers for the second cut on the drawer sides.

19. Cut the first finger joint groove on the drawer front with a single 5/8-in. spacer. Set a 5/8-in.-wide dado blade 9/16 in. high. Shim out the hold-in bar with washers to accommodate the 7/8-in.-thick drawer front.

20. Assemble the drawer with bandsawn clamp blocks. The finger joints’ ends stick out past each other. The blocks put pressure only where it’s needed. Drill relief holes in one set of blocks to accommodate the plugs.

21. Screw guides to the drawer runners with the drawer in place. Create the perfect gap between the guides and the drawer sides with two playing-card shims.

22. Screw the base to the top. Make your own “sideways” screwdriver with a ratchet wrench to get into this tight space. Use a 1/4-in. socket and a screwdriver bit from a cordless drill.
Here are some supplies and tools we find essential in our everyday work around the shop. We may receive a commission from sales referred by our links; however, we have carefully selected these products for their usefulness and quality.


