We may receive a commission when you use our affiliate links. However, this does not impact our recommendations.
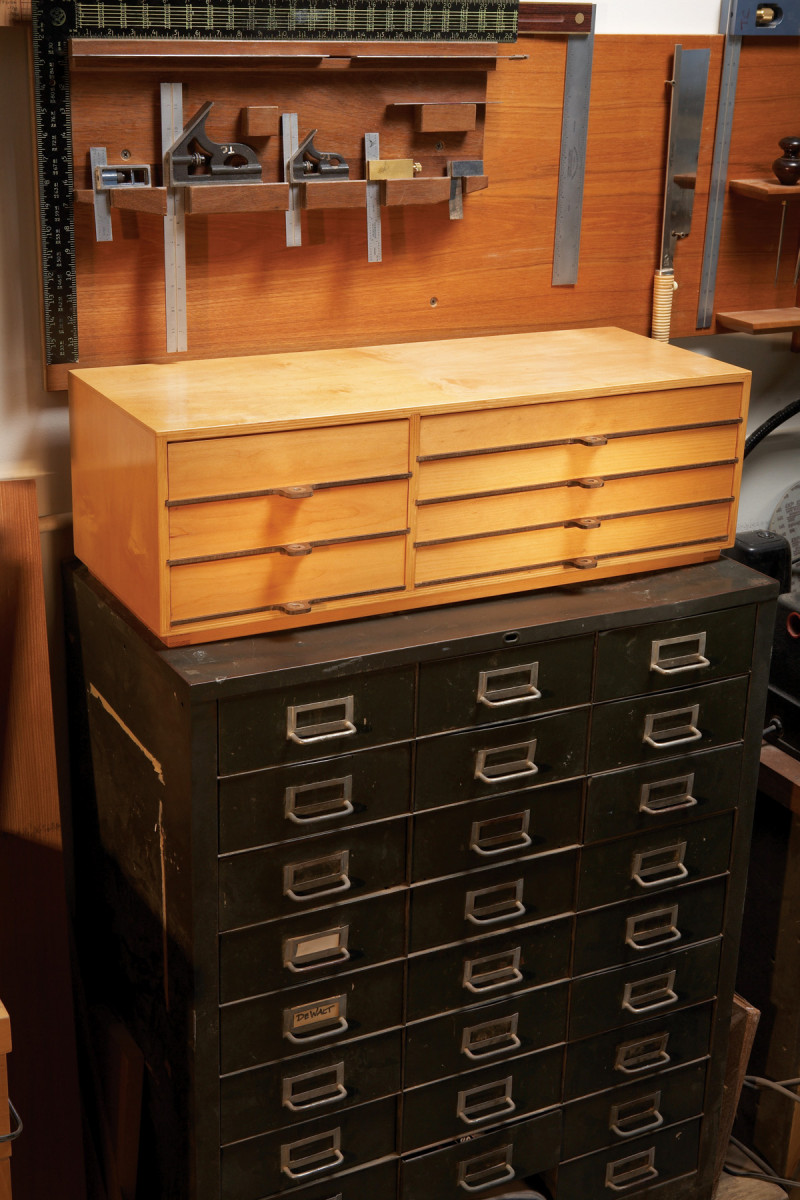
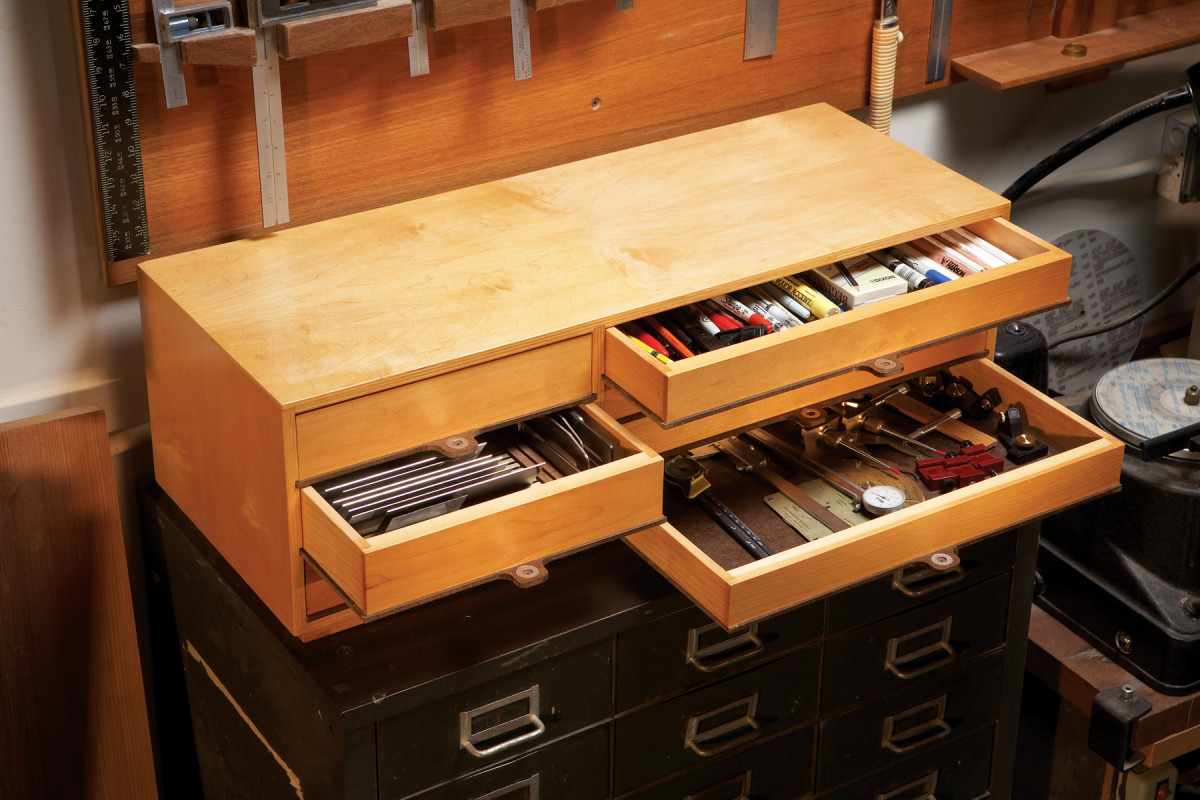
Simple joinery creates a compact cabinet with full-size storage.
When I spied an old machinist’s chest loaded with narrow drawers in my neighbor’s garage, I knew my small tools were finally going to have a permanent home. My version isn’t nearly as grand, but it’s just as useful, and it only took a couple of weekends to build.
Simple joinery is the key. Everything assembles with rabbets and dadoes, glue, and nails. The drawers feature applied bottoms with integral pulls. The upper drawers slide on grooves sawn in the cabinet. The bottom drawers operate traditionally—they aren’t as “groovy.” The cabinet shown here requires one half sheet (30″ x 60″) of 1/2″ Baltic birch plywood, one half sheet of 1/4″ tempered hardboard and about 8 bd. ft. of solid wood. The design is easily modified, so feel free to make changes based on your tool collection or available space.
Build the cabinet
1. Cut the top, bottom, ends, and divider to final size (A through D, Fig. A, and Cutting List below).
2. Cut 1/4″ deep rabbets in the ends of the top and bottom for the sides. Baltic birch plywood is undersize in thickness, so use a scrap piece to determine the rabbets’ exact width.
3. Use the same setup to cut rabbets for the back in the top, bottom and ends.
4. Cut dadoes in the top and bottom for the divider. Size the dadoes to the thickness of your plywood and make sure they line up.
5. Cut a 1/8″ deep by 1/4″ wide dado in a piece of scrap plywood. Then test-fit your hardboard—which is usually undersize in thickness—to make sure it fits and slides easily. If your hardboard binds, widen the dado slightly. When you’re satisfied with the fit, cut dadoes for the hardboard drawer bottoms in the ends and divider (Fig. B).
6. Clamp the box together without glue. Then cut the back (E) to fit.
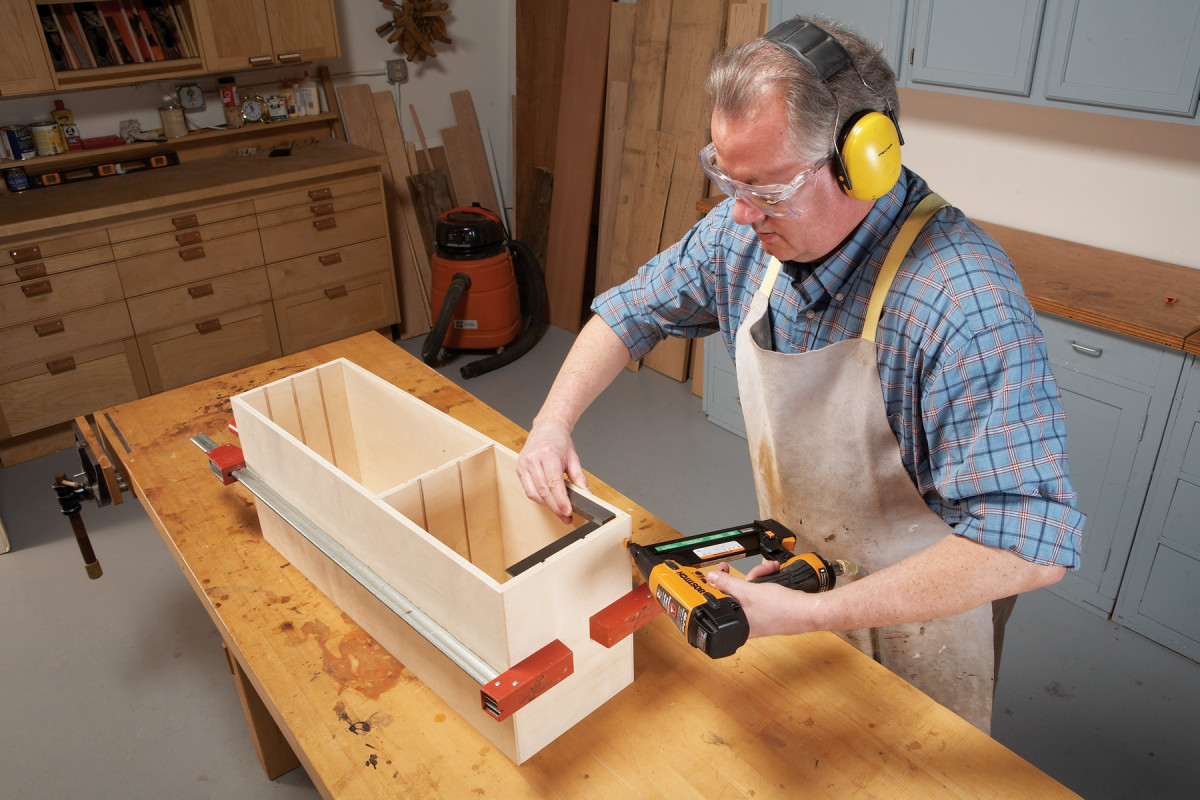
1. Make sure the box is square. There aren’t a lot of parts in this project and the joinery is simple, just rabbets and dadoes. But if the box isn’t square, the drawers will be tough to fit.
7. Assemble the box with glue and nails (Photo 1). This assembly must be square. Remove any squeezed-out glue, including the corners inside the cabinet, between the bottom and the sides and divider. Hardened glue left in these corners may affect the operation of the bottom drawers.
8. Cut the base sides and ends (F and G) to final size.
9. Use the tablesaw or bandsaw to cut tenons on the sides and matching open mortises on the ends. Glue and clamp the base together.
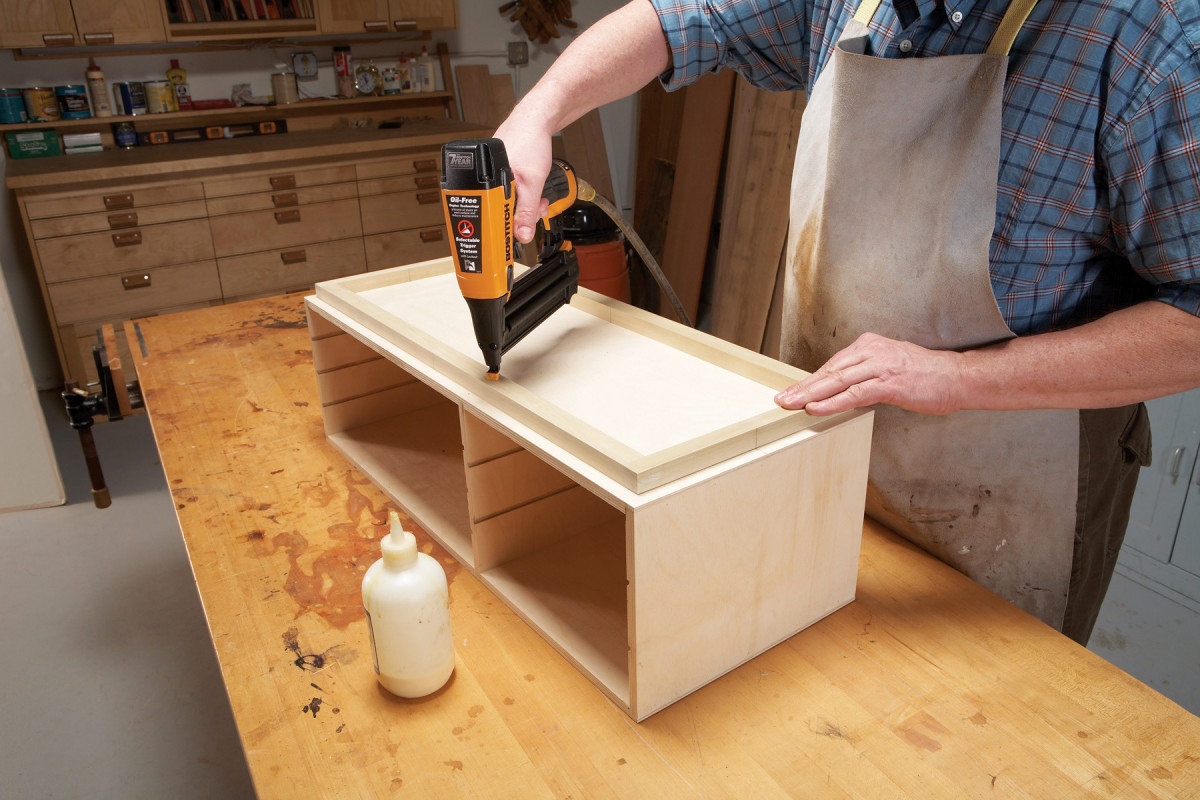
2. Fasten the base with glue and nails. The base raises the cabinet to provide extra clearance for the bottom drawers.
10. Fasten the base to the cabinet (Photo 2). To center the base, simply align centerlines marked on the base and cabinet.
Build the drawers
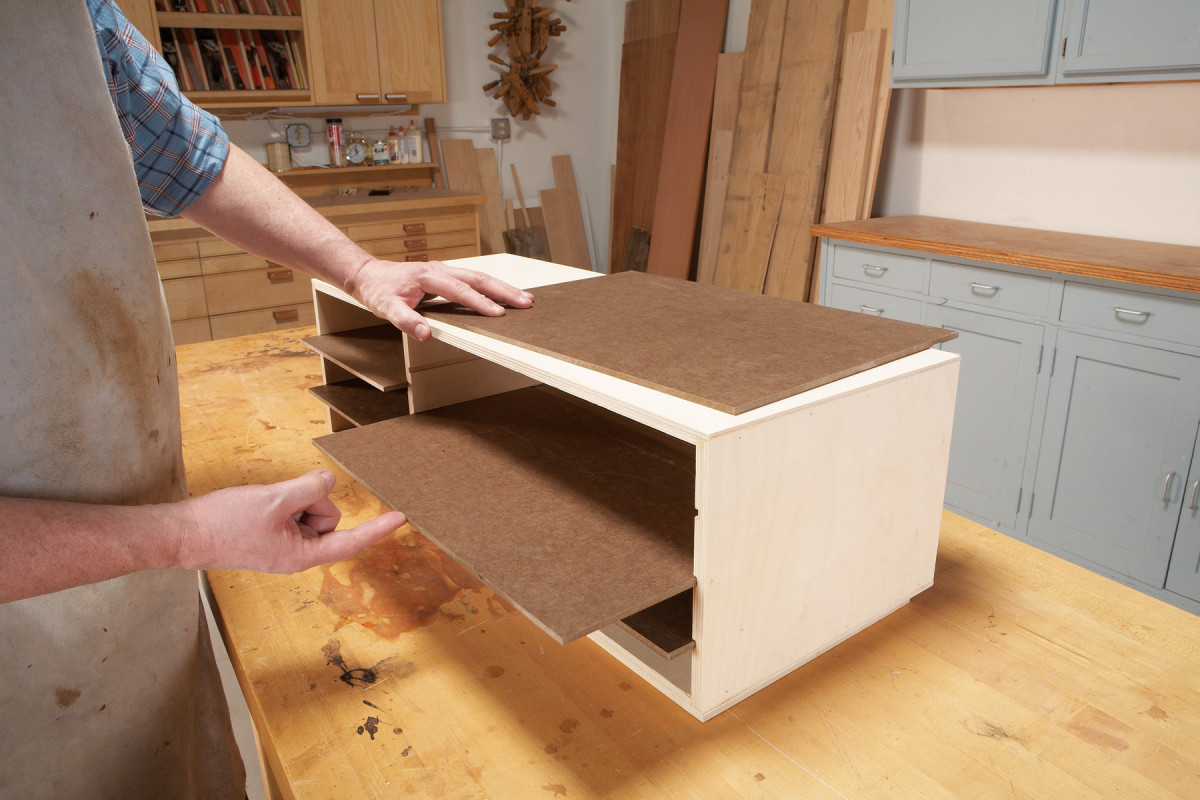
3. Test-fit the drawer bottoms in the dadoes. Each one should slide smoothly without binding and protrude 1″ when it butts against the back of the box.
11. Start by cutting hardboard drawer bottoms (H and J) to fit the dadoes in the cabinet (Photo 3). The gap from side to side should measure 1/16″ or less; 1/32″ is optimal. Ease the hardboard edges by sanding, if necessary, to make each bottom slide smoothly.
12. The two lowest drawer bottoms slide directly on the cabinet—cut them exactly 1/32″ narrower than the drawer openings.
4. Cut shallow grooves in both ends of each drawer bottom. These grooves accurately position the drawer front and back.
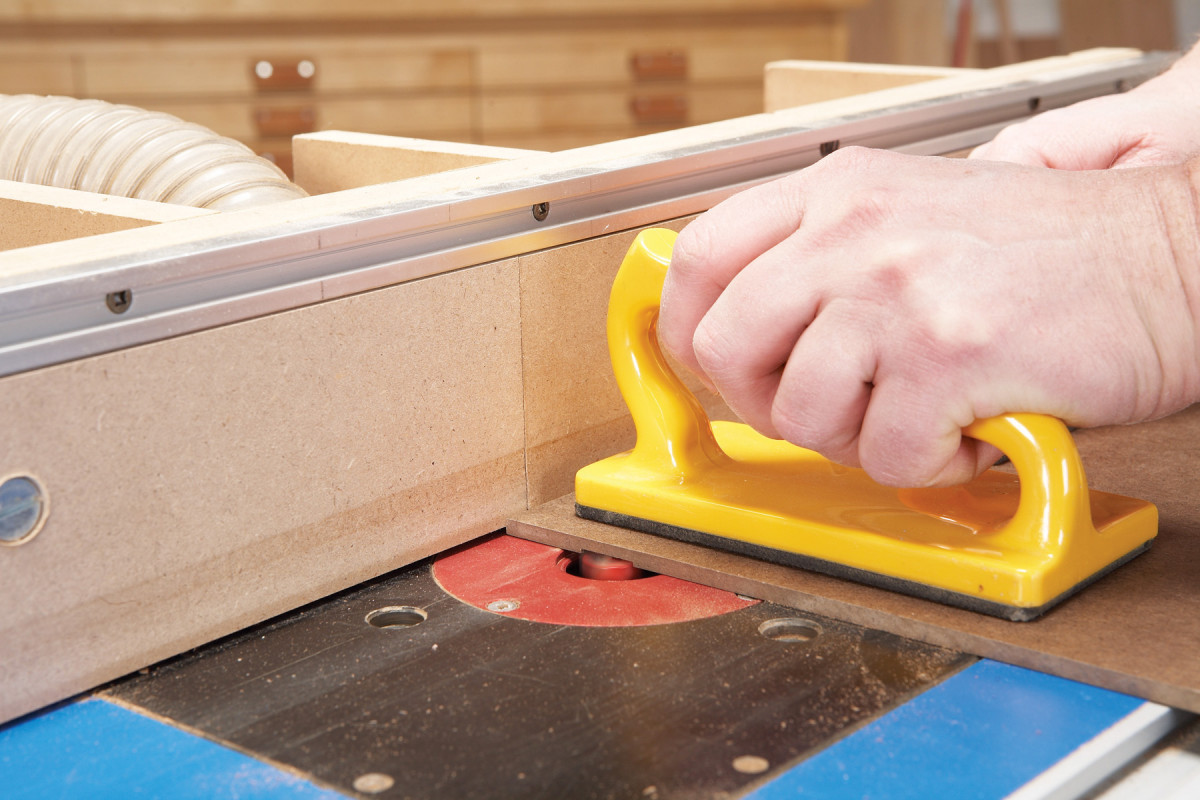
13. Rout 1/32″ deep by 3/4″ wide grooves in each drawer bottom, one 1-1/8″ from the front edge and one 3/8″ from the back edge (Photo 4).
14. Pencil a centerline on each drawer bottom and drill a stopped hole for the washer (Fig. C).
15. To cut the drawer bottoms’ straight front edges, install a fence on your bandsaw and cut in from both ends, stopping at the pull profile. Saw the profile separately, after the front edges have been cut. Tidy up the profile’s curves, if necessary, with a sanding drum mounted in a drill press or in an oscillating spindle sander.
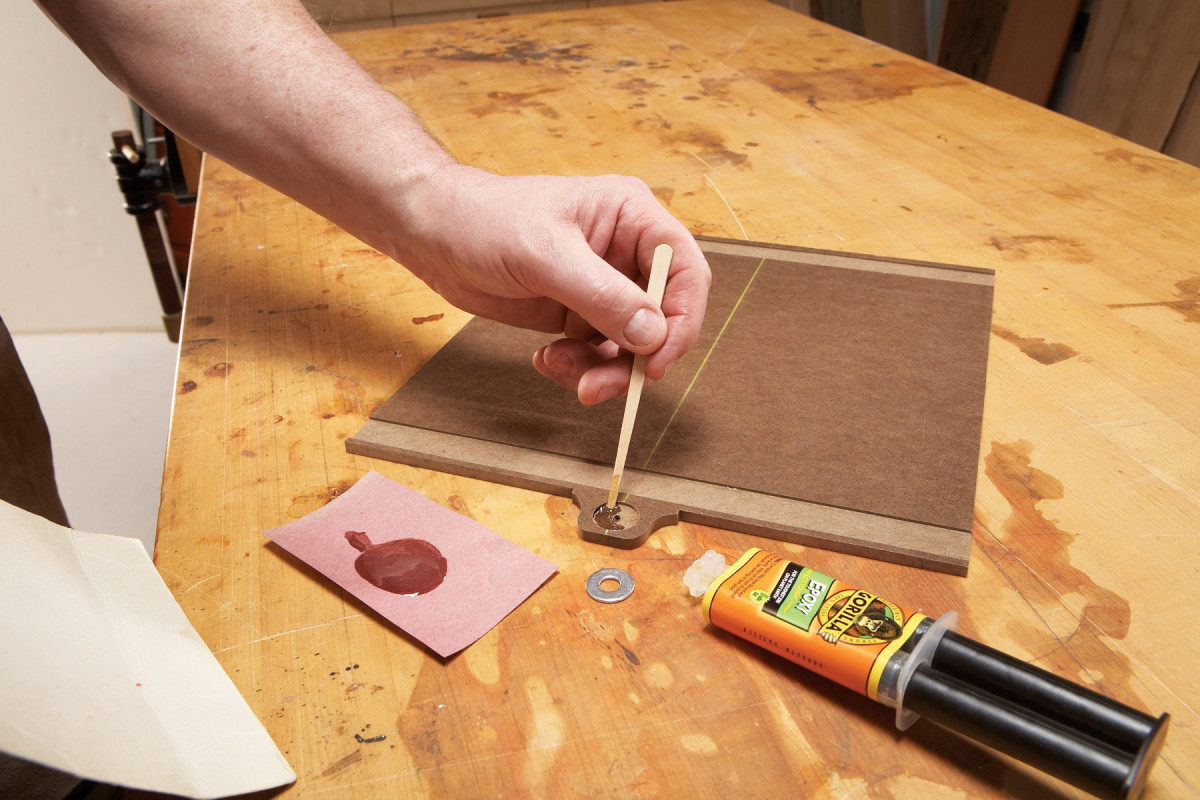
5. Complete each drawer pull. After bandsawing the profile on the front of each drawer bottom, drill a stopped hole and glue in a washer. The washer makes the pull easy to grip.
16. Glue in the washer (Photo 5).
17. Mill the drawer fronts and backs (K through N) to fit the grooves in the drawer bottoms and cut them to final width. Next, carefully cut the drawer fronts to length, 1/32″ shorter than the drawer openings. Finally, cut the drawer backs to length, 3/32″ shorter than the drawer opening. This will make the assembled drawer shorter at the back, to ease entry into the cabinet. As the drawer slides in, the fit will gradually improve, and when the drawer is fully closed, the gaps between the cabinet and the drawer front will be negligible.
18. Mill the drawer sides (P and Q) to thickness.
19. Cut 1/2″ x 1/2″ rabbets for the drawer sides in the ends of the drawer fronts and backs.
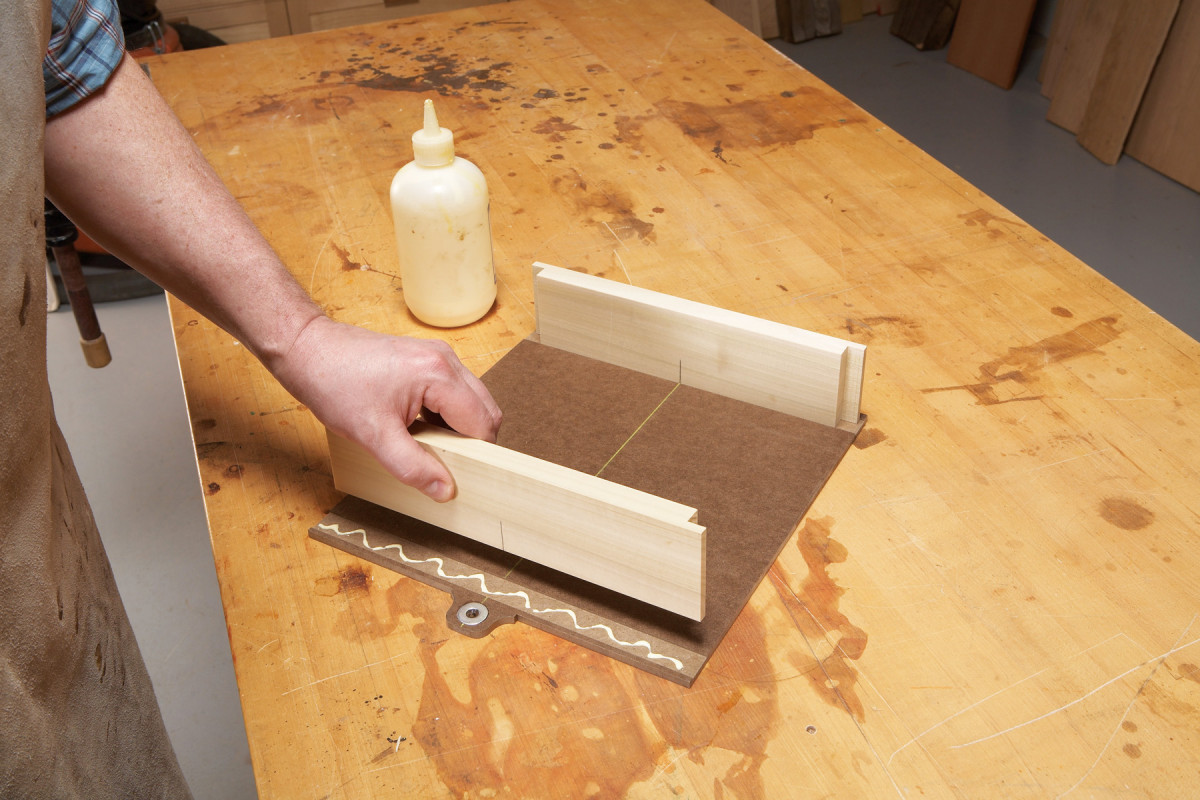
6. Center the drawer front and back when you glue them to the bottom.
20. Mark the centerline of each drawer front and back. Then carefully center them when you glue them to the drawer bottoms (Photo 6). Note that the edges of the two bottom drawer fronts should be flush with the edges of their hardwood bottoms.
21. Cut the drawer sides to width, so they’re flush with the tops of the drawer fronts and backs.
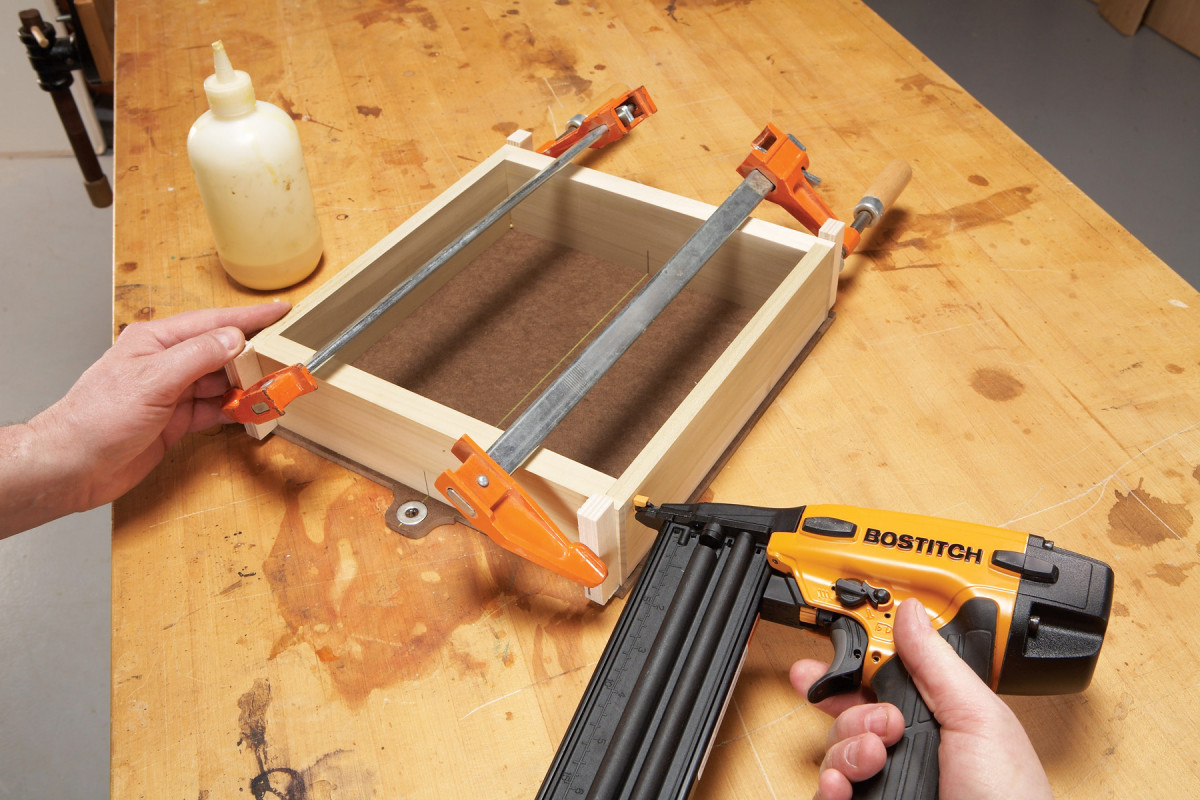
7. Fasten the drawer sides with glue and nails. Cut the sides slightly narrower than the drawer front and back, so the drawer’s top edges are flush.
22. Cut the drawer sides to length, to fit between the rabbeted drawer fronts and backs. Then glue and nail them in place to complete the drawers (Photo 7).
Small Tools Cabinet Cut List
Overall Dimensions: 30″L x 11-3/4″D x 9-1/4″H
|
Part |
Name |
Qty. |
Material |
Th x W x L |
|
A |
Top |
1 |
Baltic birch plywood |
1/2″ x 11-3/4″ x 30″ (a, b) |
|
B |
Bottom |
1 |
Baltic birch plywood |
1/2″ x 11-3/4″ x 30″ (a b) |
|
C |
End |
2 |
Baltic birch plywood |
1/2″ x 8-3/4″ x 11-3/4″ (a, c, d) |
|
D |
Divider |
1 |
Baltic birch plywood |
1/2″ x 8-3/4″ x 11-1/4″ (a, d) |
|
E |
Back |
1 |
Baltic birch plywood |
1/2″ x 8-3/4″ x 29-1/2″ (a) |
|
F |
Base side |
2 |
Soild wood |
3/4″ x 1″ x 29″ |
|
G |
Base end |
2 |
Solid wood |
3/4″ x 1″ x 10-3/4″ |
|
H |
Short drawer bottom |
3 |
Hardboard |
1/4″ x 11-15/32″ x 12-1/4″ (e, f) |
|
J |
Long drawer bottom |
4 |
Hardboard |
1/4″ x 17-15/32″ x 12-1/4″ (e, f) |
|
K |
Short drawer front |
3 |
Solid wood |
3/4″ x 2-1/2″ x 11-7/32″ (g) |
|
L |
Short drawer back |
3 |
Solid wood |
3/4″ x 2-1/2″ x 11-5/32″ (g) |
|
M |
Long drawer front |
4 |
Solid wood |
3/4″ x 1-13/16″ x 17-7/32″ (g) |
|
N |
Long drawer back |
4 |
Solid wood |
3/4″ x 1-13/16″ x 17-5/32″ (g) |
|
P |
Short drawer side |
6 |
Solid wood |
1/2″ x 2-15/32″ x 10-1/4″ |
|
Q |
Long drawer side |
8 |
Solid wood |
1/2″ x 1-25.32″ x 10-1/4″ |
(a) Thickness is nominal; all dimensions are based on actual 1/2″ plywood thickness.
(b) Cut 1/4″ D x 1/2″ W (nominal) rabbets on both ends and back.
(c) Cut 1/4″ D x 1/2″ W (nominal) rabbet on back.
(d) Cut 1/8″ D x 1/4″ W dadoes for drawer bottoms.
(e) Cut the lowest drawer bottom 1/32″ narrower than the drawer opening.
(f) Cut 1/16″ D x 3/4″ W dadoes for drawer front and back.
(g) Cut 1/2″ D x 1/2″ W rabbets on both ends.
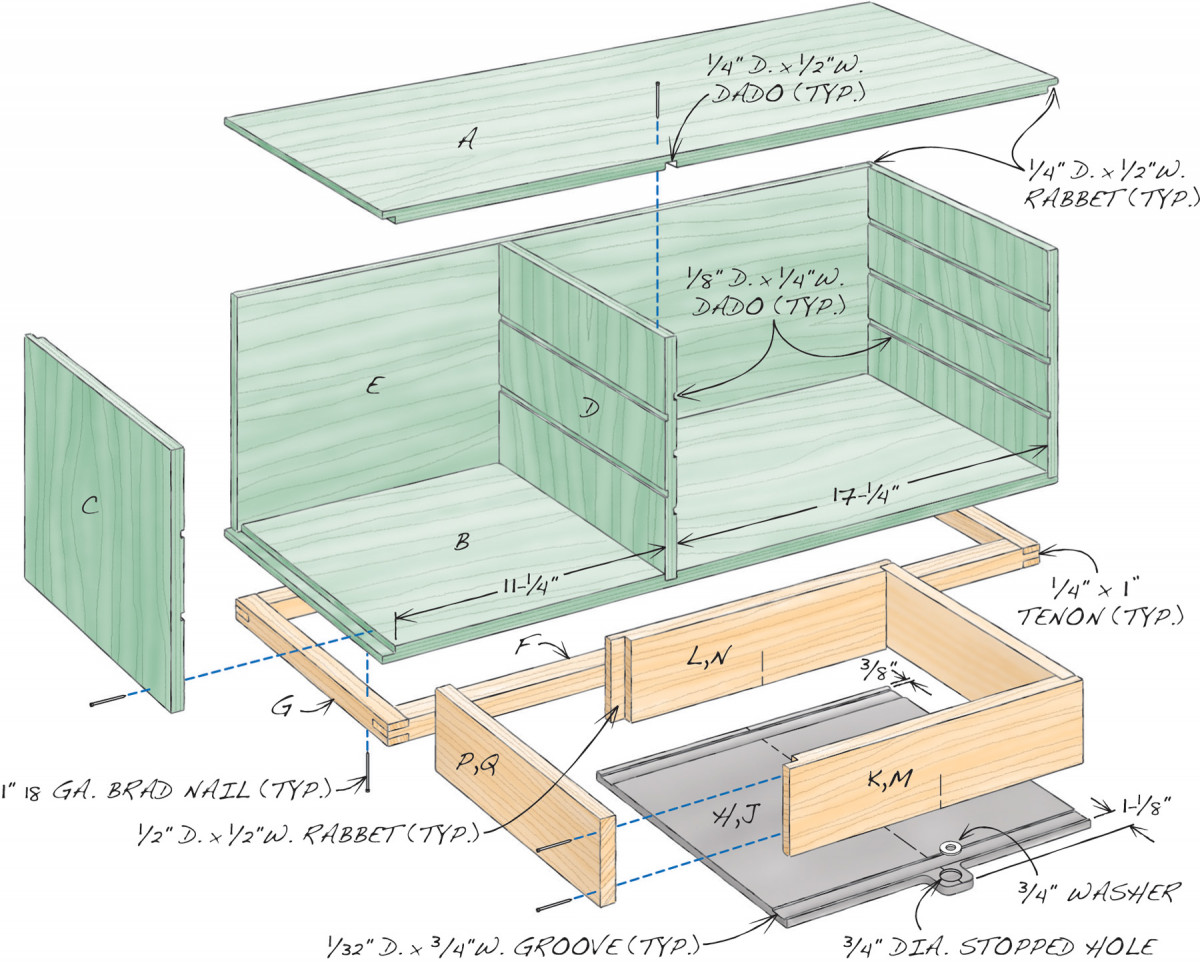
Fig. A) Exploded View
Fig. B) Drawer Dado Details
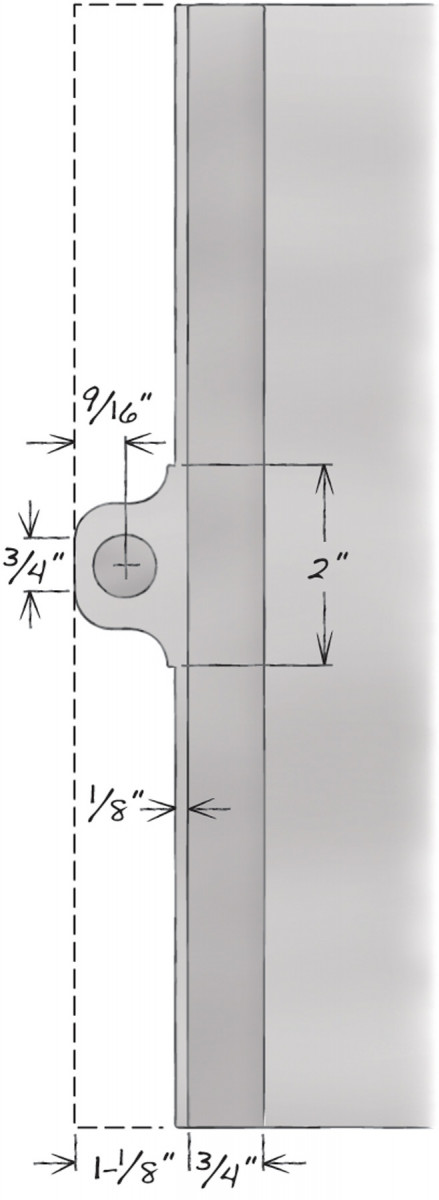
Fig. C) Drawer Pull Profile
Final assembly
23. Test-fit each drawer and make any necessary adjustments. To make the drawers slide like glass, rub a bit of wax on the edges of the drawer bottoms and in the cabinet’s dadoes. You can adjust the drawers’ fit from front to back by trimming or shimming the back edge of their hardboard bottoms.
 24. Finish-sand the cabinet and drawers. Then apply your preferred finish. For this type of project, I prefer shellac.
Here are some supplies and tools we find essential in our everyday work around the shop. We may receive a commission from sales referred by our links; however, we have carefully selected these products for their usefulness and quality.