


We may receive a commission when you use our affiliate links. However, this does not impact our recommendations.
If you recall, a few weeks ago, I wrote about the unexpected repair job I performed on one of our newly bought solid mahogany chairs (read parts one and two here). What I didn’t expect is that I would have to revisit one of our misfortunate chairs on such short notice – yet again.
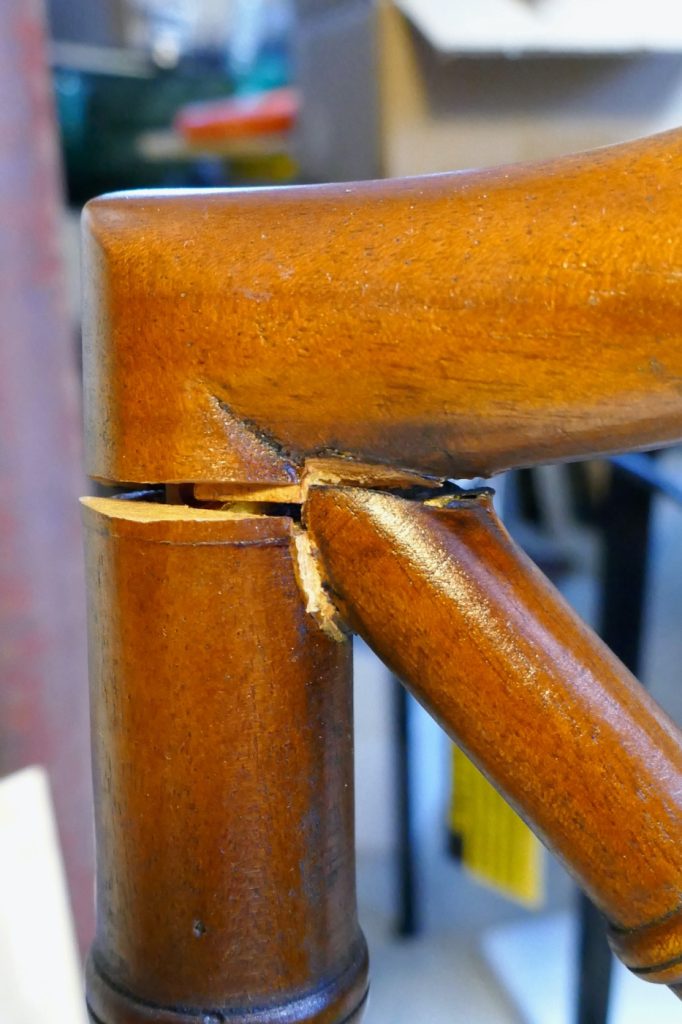
This time it was the crescent rail that gave up. I noticed that the rail and a few of the intersecting bamboo-looking burs underneath it were loose, and upon inspecting it, I saw that one of the joints between the top of the back leg and the rail had broken off while the other was wobbling.


At first, I decided to pour CA glue into the seams, clamp them for a few minutes and call it a day. But then the Jiminy Cricket in me insisted I take this task more seriously, open the joint and fix it properly.
After slowly removing the rail and pulling out the loose bars and the brads that secured them, I discovered that the maker had made a lousy joinery decision. The dowels that connect the legs to the rail were way too narrow for the mortise holes in the rail. To compensate for the gap, the maker used some elastic glue (most likely some sort of hot-melt glue) which was a sub-par solution.


To improve the epoxy-to-wood adhesion, I removed all residues of the soft glue from the mortise and tenon.
Since I needed a quick fix, I knew the best gap filler I should use was epoxy mixed with fine sawdust. That mixture could also be instrumental in filling the gaps between the diagonal bars, the crescent rail, and all the mating surfaces between the bars. But I also wanted to secure one critical joint between two burs with a concealed screw instead of a brad. The only problem was: how to drill a hole and a countersink for that concealed screw when I can’t use a regular drill due to the confined space.


Below are some of the techniques I considered:
- The BOSCH Flexiclick 5-In-1 Drill/Driver System, which in some situations, lets you tuck in a short drill bit at an off-set configuration.


- A small gimlet. Unfortunately, the one in the picture is no longer in production, but others (the French-made that Lee Valley is selling) can be bought and used in tight spots.
- An L-shaped bit handle is another good tool that, in tandem with a stubby drill bit set, will get you the desired result.
- And there is one other way which is to use a ¼” ratchet handle with a 1/4-Inch socket/drive bit adapter.


To countersink the hole, use a countersink with a ¼” hex shank that can fit into one of the tools I mentioned.
All that was left for me now was to install the screw and hope that this misfortunate chair would cease and desist from any additional falling apart activity, at least for the foreseeable future.
Enough is enough!

Here are some supplies and tools we find essential in our everyday work around the shop. We may receive a commission from sales referred by our links; however, we have carefully selected these products for their usefulness and quality.


How are you concealing the screw head?
The short answer is that I didn’t since this wasn’t a priority, as the screw head points down and is practically invisible. But if I intended to hide it, I would have counterbored the hole just enough to allow me to plug it with a wooden plug that could be trimmed flush with the surface. I showed this technique in part one of the restoration story. By the way, I would have used wooden connectors such as short dowels if this chair was an antique piece.