We may receive a commission when you use our affiliate links. However, this does not impact our recommendations.

We evaluated liquid hide glue from two major manufacturers to see which brand to buy. Along the way we discovered that it’s not difficult to make your own, if you’re so inclined.
Hide glue has been around woodworking since it began. Sure it takes a pot in which to mix the glue, a heat source to melt the hide glue crystals or pearls, and once that’s over, there is a short pot life in which to use the glue. Why, then, would woodworkers insist on using this glue? The main reason in modern times is reversibility.
In woodworking shops during the 19th century, woodworkers discovered a secret to working with hide glue. If you added urea (a high nitrogen compound used primarily in fertilizer today) to animal protein glues (of which hot hide glue is but one), you could lengthen the gel time of the hide glue, or keep the glue in a liquid state much longer, thus allowing more intricate work to be completed before the glue set.
As we moved into the 20th century, woodworkers (and manufacturers) understood how additives could affect the properties of hide glue even more. In the 1930s, anti-gelling agents were added to hide glue and the result was products that could stay liquid at room temperatures and achieve a slower set time but continue to be totally reversible.
A point to be made here is that these additives all reduce the strength of hide glue. But that is not a critical issue due to the fact that liquid hide glue, although slightly weaker than hot hide glue, is still stronger than the wood itself.
Jump ahead some 80 years and today we have two primary manufacturers of liquid hide glue. There’s Old Brown Glue produced by Antique Refinishers (W. Patrick Edwards) and Titebond Liquid Hide Wood Glue made by Franklin International. These glues have similar working properties and both provide sound a glue joint for furniture conservation or construction.
Head-to-head Comparison
Let’s first take a look at the make-up of these two products. Old Brown Glue is a mixture of animal collagen and urea with no other additives. Titebond Liquid Hide Wood Glue lists cyanoguanidine (used in the manufacture of plastics and pharmaceuticals) and ammonium thiocyanate (used chiefly as a herbicide and in textile printing).
Old Brown Glue appears opaque or cloudy when squeezed from the bottle, and getting it from the bottle is no easy task when the glue is at room temperature. According to the manufacturer, Old Brown Glue is best used at 80º Fahrenheit (F). On a summer’s day that is easily achieved, but during the cold months in northern climates, that means you have to first warm the bottle and its contents.

It’s clear that these glues are not created equal. Additives to the glues make the Titebond product (left) transparent while the Old Brown Glue is nearly opaque.
Of course that’s not a difficult task. Editor Christopher Schwarz, an ardent user of Old Brown, simply deposits the bottle into a pail of hot tap water. After a few minutes, the glue is ready to use.
Titebond liquid hide glue, when dispensed from the bottle, is very clear, almost transparent. The glue pours from the bottle with ease, even with the ambient air temperature, and the glue, at 66º F.
How will your nose react to these glues? We often hear woodworkers disparage the smell of hot hide glue. It is animal-based so you wouldn’t expect a pleasing bouquet. But does the liquid version of this smelly adhesive possess the same attributes? We blindly tested the smell of the two glues within the Woodworking Magazine shop. What we discovered was a landslide winner – if you can call it a winner. Every member of the staff chose the Old Brown as the smelliest.
But we didn’t limit the fun to ourselves; we trekked through the building of our publishing company to ask idle co-workers their opinions. Interestingly, after we finished our non-scientific poll, we found that there was a tie in the race for the most-smelly glue. Non-woodworkers, for the most part, preferred the Old Brown smell and found the Titebond glue more offensive.
More Interesting Comparisons
A rub joint, wherein you add glue to two pieces of wood and rub them together until the glue achieves its initial tack, is a benefit of hot hide glue. And while most everyone agrees that you cannot get a true rub joint with liquid hide glue as you do with the hot hide glue, there’s still a certain amount of tack available.
So, we tested the initial tack with the two glues. The Titebond product had virtually no perceivable tack. When the Old Brown product was rubbed, you could immediately feel a tack in the process. No, there was not the same tack as with hot hide glue, but you could feel a slight grab as the two pieces were joined. Score one for Old Brown.
However, we remembered that the Old Brown glue was heated and wondered if that preliminary tack was due to the glue gelling as it cooled. To keep the test equal, we heated the Titebond glue and performed the same test. Our original findings held. The Titebond glue exhibited less tack than was found with the Old Brown Glue.
The Most Important Comparisons
Smell, color, transparency and initial tack are notable characteristics of these two liquid hide glues, but the important features are how the glue joint holds up and what it takes to reverse glued-up joints.
The holding power of the glue joint is of primary importance when building or constructing a project. If you experience failure, your project is nothing more than a pile of sticks.
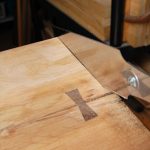
There are two types of failure as shown in the photo below. The first is glue failure (the left-most pieces), where the glue bond fails and the two pieces come apart directly on the glue line. A second failure is wood failure (the right-most pieces in the photo). This is what you hope to find if you have a problem. A wood failure means that the glue bond held and the wood itself gave way to stress. While this is not something you wish for, it happens to a single joint, for the most part, and not throughout your project.

A rub joint with liquid hide glue is not as strong as when hot hide glue is used, but it’s still useful in some circumstances.

Pieces on the right side, with ragged edges, clearly show wood failure. As you move to the left, you’ll notice the smooth edges, which indicate glue failure.
To test the glues for failure, we assembled 10 sets of joints using Eastern white pine, five joints per glue. After a 24-hour period we placed the pieces with one edge resting 3⁄4″ above the bench, hammered the pieces until we achieved separation then examined each result for a specific type of failure.
What we found from our basic test was that 60 percent of the failures were in the wood, 30 percent involved partial wood failure and 10 percent were a complete glue-joint failure. What was interesting is that both liquid hide glues experienced identical results. The only difference was in the partial wood failures. More wood fibers were apparent on the Titebond assembly than on the joint glued with Old Brown glue.
Let’s talk reversibility. Hot hide glue is reversible with heat and moisture. Liquid hide glue has the same characteristic. The simple test we did to discover which product is most-easily reversed was to apply heat from an ordinary hair dryer. If we didn’t see results with this test, we were prepared to move to a damp cloth and a steam iron. In 6:34, the Titebond glue separated. The break was about 80 percent glue failure. Additional patience might have kept the wood preserved. It took only 5:20 for the Old Brown glue to reverse and that was a true reversal – no wood breakage.

A simple test to determine if joint failure is a result of glue failure or wood failure, is to assemble a few joints then whack the assembly with a hammer. Something has to give. Just hope it’s the wood – because that means the glue is stronger than the wood.

Heat from an ordinary hair dryer was all it took to reverse these small joints, but with a more traditional glue joint, a damp cloth and stronger heat source might have been needed.
Option No. Three
While we have dissected and evaluated the two chief liquid hide glues on the market, we have yet to mention the possibility of making your own liquid hide glue. We contacted an expert, Don Williams, senior furniture conservator at the Smithsonian’s Museum Conservation Institute, to find out how we can make our own hide glue that stays liquid at room temperatures. You’ll be fascinated by how easy this process is.
In general, Williams finds that the fewer ingredients, the better, because it’s a fresher product in the end. If you have a lot of preservatives, how do you know how old the glue is?
To make a batch of liquid hide glue takes about three minutes of active work, according to Williams,but it’s three minutes spread over a 48-hour period. And you don’t need anything special in addition to the hide glue – except table salt.
To begin, you have to make hot hide glue. I’m sure if you have yet to purchase a glue pot (a special pot for making and reheating hot hide glue), you’re not of the mind to do so for this single purpose. You don’t have to. You can use an electric hot plate, a saucepan, a small glass jar and a small amount of hide glue flakes or pearls, along with salt.
Here are the steps: The first day, mix two parts hide glue flakes with three parts water into the jar and let everything soak. The following morning, heat water in the saucepan to a temperature of 140º F (a thermometer helps with accuracy), add in one part salt to the jar then cook everything for about two hours. Next, immediately stick the cooked mixture into your refrigerator for the balance of the day (quick cooling is key).
On morning three, fire up the burner and cook the mixture for another two hours (Williams always cooks the glue twice). Once the batch cooks the second time, you have liquid hide glue. Williams adds that he seldom makes more than a pint of glue at a time. He pours it into a plastic ketchup or mustard squeeze bottle for easy dispensing.

Homemade liquid hide glue is as simple as 1,2,3 – one part table salt, two parts glue and three parts water.

All you need is a hot plate, saucepan and a small jar if you decide to brew your own liquid hide glue. That and a clothespin for your nose.
And here is the most interesting part of home-made liquid hide glue: The salt makes this product stay liquid at room temperature and salt preserves the glue so there is no spoil date – just as salt has done throughout time in salting meat.
Buy It or Brew It?
In the end, you can easily make liquid hide glue in your shop or in your kitchen, and the product is fresh. But sometimes it’s just best to purchase the glue, especially if you’re opposed to the odor associated with hot hide glue. If that’s your scenario, we think it’s a toss up. Old Brown Glue has a fewer number of ingredients and a noticeable initial tack. Titebond Liquid Hide Wood Glue performs just as well and is more readily available. WM
– Glen D. Huey
Here are some supplies and tools we find essential in our everyday work around the shop. We may receive a commission from sales referred by our links; however, we have carefully selected these products for their usefulness and quality.