We may receive a commission when you use our affiliate links. However, this does not impact our recommendations.
 Vintage woodworking machinery can be a great bang for your buck.
 Vintage woodworking machinery can be a great bang for your buck.
Vintage woodworking tools have always held a certain appeal to me. Earlier this year, I was out in California with David Marks working on an upcoming project. In David’s shop, he has a 24“ jointer of vintage make, and if you’d watched his TV show “Wood Works” when it aired on HGTV, you may have caught a glimpse or two of it.
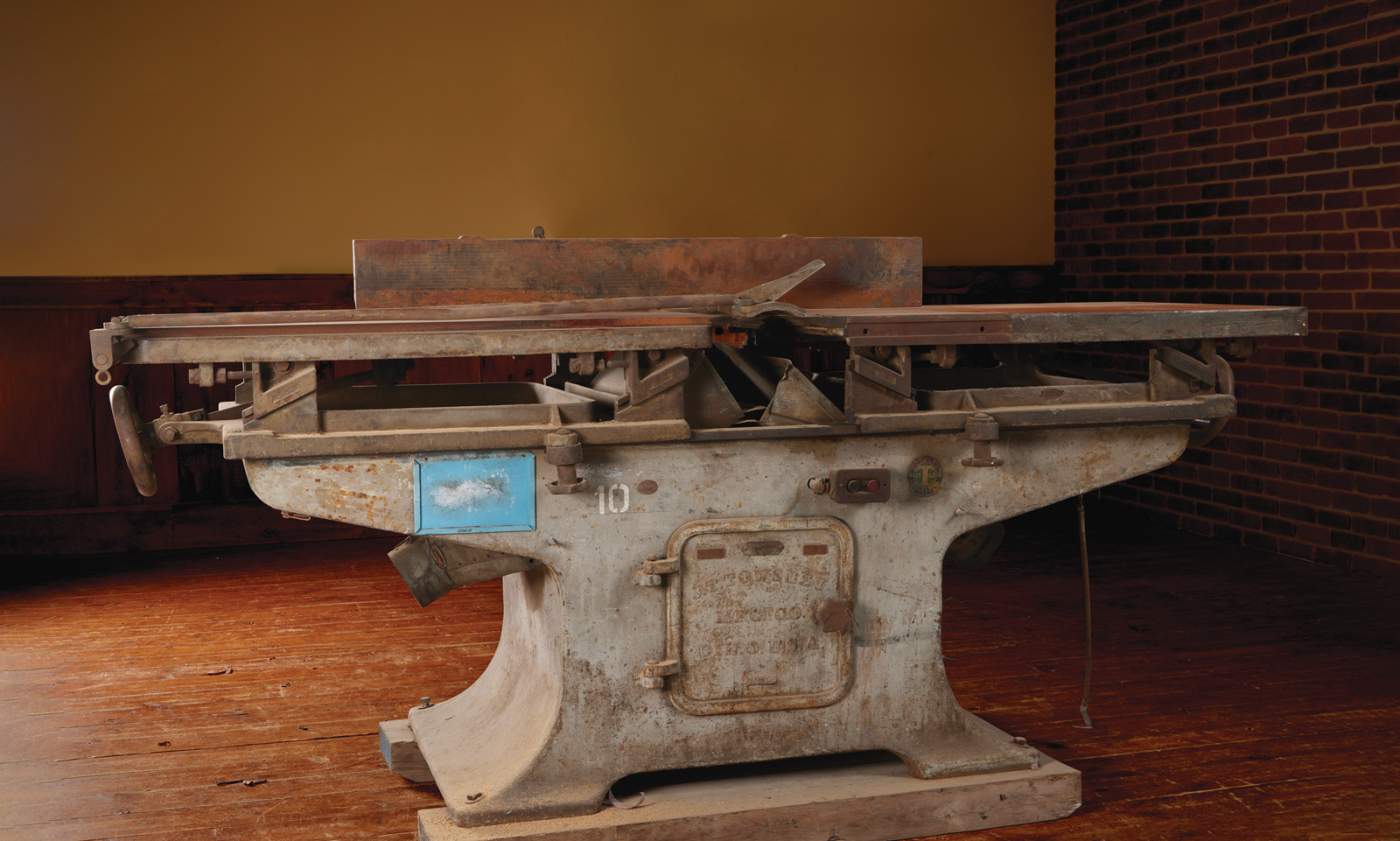
Seeing David’s jointer wasn’t my first introduction to vintage power equipment, but it certainly re-ignited a desire that I had to own some of these machines for myself. Fast forward several weeks, and I happened to stumble upon the beauty that you see above. An acquaintance of mine had posted this jointer for sale. The said gentleman has several large pieces of woodworking machinery already, and some of his coworkers/business partners persuaded him to let go of a few pieces that were “projects.” So, I called a buddy of mine to get his opinion. Fortunately (or unfortunately), my buddy Bobby is about as nuts as I am, so we jumped in the truck, hooked up a trailer, and drove the hour’s drive to pick her up. I figured that, being woodworking nerds like me, you may enjoy reading about what goes into restoring a machine such as this.
J.T. Towsley
The jointer you see above is, now, my pride and joy. She’s big, ugly, and broken, but she’s mine. This gal is a 24“ jointer made by J.T. Towsley in Cincinnati, Ohio. Now, not surprisingly, there’s not much information on some vintage machinery such as this. Thankfully, there’s just a little bit floating around, thanks to various users at Keith Rucker’s VintageMachinery.org website.

1 The original Towsley decal is visible on the front of the jointer. I’ll reproduce this and have it printed on water transfers so I can stay true to the original.
It appears that the John T. Towsley Manufacturing Company was founded in 1886 and started by producing a line of factory carts (think of the large “industrial” style carts). Sometime after the turn of the century, Towsley started offering woodworking machinery and “gluing appliances.” While a lot of the Towsley offering were saws (both table and rip saws), the first mention of a jointer being offered was around 1920 in a catalog. In 1929, J.D. Wallace & Co. purchased the rights to sell Towsley Machinery, and it was later sold to J.A. Fay & Eagan Company. A copy of a 1930 J.D. Wallace & Co. flier shows a 24“ jointer identical to this beaut.
What Makes a Good Machine?
Now, obviously, with a piece of vintage machinery, there are going to be several considerations that you need to take into account when searching, so here’s mine. The first was proximity. In the middle of Iowa, vintage woodworking machinery is uncommon. So, finding one close was a huge factor. If I was on the east coast or around the industrials hubs on the great lakes (such as Cincinnati), the amount of machinery would be significantly higher, and I could be pickier.
The next factor was the general shape. Overall, this machine is in pretty good condition. Sure, there are some issues, but after a hundred years, I bet you won’t look like your former self either. From the photos I first saw, it looked as though it was missing the fence. While I could have rigged up something, an important item (such as a fence), would have been a big deal. This one is missing something (more on that later), but nothing “mission critical.”

2 The cast door reads “J.T. TOWSLEY MFG. CO, CIN. O. USA.” It opens up to a storage area within the “belly” of the jointer.
The final consideration was the price. This is a subjective subject. What I consider a good price may be higher than you are willing to pay. However, when taking into consideration that a new 24“ jointer will run you close to $20,000 (no kidding!), I figured that the $1,200 I paid for this was a fair price (considering it needed some attention).
The Good.
Let’s start off with the good things about this particular machine. Overall, as I alluded to, this machine is in pretty good shape. The table appears to be flat, and you can still see the original milling marks on it. That tells me that this machine, when it was in service, led a relatively easy life. Side note—for what it’s worth, I can only assume a jointer of this size was either in a large millwork shop doing massive casework (think of the lobby of a giant skyscraper) or in a shipyard on the GreatLakes. Both of those, of course, are just guesses.

3 Both of the tables ride on these ways with adjustable gibs. The four ways on each table allow you to adjust the tables for parallel.
The other great thing about this machine is that the fence is there and unbroken, as is the cutter guard. The cutter guard isn’t original (I don’t believe it came with one), and it needs a little brazing to repair a cracked bracket, but it’s a guard.
Looking at the photos you’ll notice that rust, while present, is minimal. Nothing’s pitted, and every single nut and bolt that I’ve put a wrench to moves as it did the day it came off the assembly line. Heck, even the massive handwheels that lower and raise the infeed/outfeed tables move freely. There’s still a layer of grease on the milled surfaces, which reinforces my thoughts that it was a well-taken care-of machine.
The Bad.
Of course, there are a few things that need replaced to get this gal back in service. First and foremost, there’s a distinct lack of a motor. The 1930 flier states that this would come with a 5 or 7.5 hp. electric motor that was direct drive. (It was also available as a pulley drive off a jack shaft). So, I will need to come up with some form of motor for it. My plan is to slap a 7.5-10 hp. 240v, 3-phase motor with a variable frequency drive. If that sounds German to you, don’t worry— more on that in a later article.

4 Massive hand wheels on each end raise and lower the tables on the ways. The outfeed table can be adjusted to compensate for shorter, sharpened knives.
There are also a few threaded knobs missing. In particular, the knobs that attach the fence to the table are missing. That’s not big of a deal—it’s a common thread, and I can fabricate some knobs for it. Of course, with the motor missing, I’ll need to replace all of the wiring on it. Even if the original motor was there, the old, screw-in style fuses are antiquated.
The Ugly.
Here’s where I’ll have people questioning my sanity (I am also, so treat this as an invitation to do so). At some point, this jointer had a large crash. The cutter head (not pictured here) is bent up. The bearings that hold the cutter head are missing. And, the infeed lip (which is simply mild steel) is torn up. My best guess is that someone got an enormous catch in this jointer and it destroyed the cutter head, bearings, motor and infeed lip.

5 The infeed lip has been damaged and torn up in the past.
Now, this all seems like it will add up in repairs. And yes, it will. However, the head isn’t pictured here because it’s with Byrd Manufacturing, so they can make me a helical head to replace the original one. So, the head’s taken care of. Next, the bearings.
Most machinery of this vintage would have had babbitt bearings. A babbitt bearing is, essentially, a housing to hold the shaft with a soft alloy (babbitt) poured around it. The babbitt will have oil grooves cut in it to carry oil to the shaft and lubricate it. Babbitt bearings get a lot of hate and turn people away, but they are actually fantastic. With a well-maintained (or freshly poured) babbitt bearing, you’d be hard-pressed to convince me to swap to ball bearings— they work that well. In fact, some high-wear bearings today are still poured babbitts.
However, I recently received an email from a subscriber that’s in the process of restoring this very jointer (no kidding). Rob has been so kind as to send me pictures of his bearing blocks, and it appears that this jointer came with ball bearings from the factory. So, installing ball bearings is the way I’m going to go. Keith Rucker, the owner of VintageMachinery.org has hooked me up with a small foundry that is actually going to pour (new) cast iron bearing blocks for this jointer. It’s a bigger deal than simply installing new pillow-block bearings, however, it will appear as close to the original as I can get.
The Tear-down.
Now that I knew what I was working with, it was time to strip this jointer down to its bones. When you get right down to it, a jointer’s pretty simple, and there’s not a whole lot going on. (Which is good, as this is my first machinery restoration). As you can see on the previous page, the majority of the work here is getting the tables off. Luckily, the tables on this Towsley jointer are simply held on with two brackets each. The threaded knobs release the brackets and the tables can be lifted off. Well, “lifted off” may be an understatement.

6 The tables are held down with a pair of “clamping knobs.”
This jointer, as it sits, is about 1800lbs. I have to guess that about half that weight is the tables. As you can see in Photo 7, the best way that I could come up with to get these tables off was by employing an engine hoist. I’m guessing each of these tables are in the 400lb range. They’re heavy.

7 An engine hoist is used to remove the tables from the jointer.
The tables themselves will be some of the most labor-intensive items to restore. I think we’ll probably do an entire (short) article on restoring those. It’s interesting how they’re constructed and function, so I think it will be fascinating to tackle.

8 Without the tables, this jointer is still massive, but two people can slide or (very quickly) lift the base up to add blocks under it. A pallet jack is about the best way to move the table.
As you can see in the photo above (Photo 8), with the tables removed, this is a pretty awesome-looking base. I believe that the two dust collection shrouds were added at a later point. As you can see in Photo 9, there are a few threaded rods drilled through the base casting that bolt these in place. If these were original, the manufacturer would have a more elegant solution to attaching them. As I work to fix this gal up, I’ll see if I can come up with a better way to tackle this. However, I think these shrouds need to remain, so I’ve taken them off and will keep them safe for the rebuild.

9 The cast Iron base has had several “modifications” over the years, adding many unnecessary bolts and nuts to it.
Much of the remaining items on the base are ancillary. There is an original copper factory plate indicating the machine and lot number. That will be cleaned up and replaced after painting. The blue tag holder, I assume, would have been for some form of machine identification or machine warning. The pins holding this on are peened over, and I’ll need to chisel the heads off to remove this. On the backside, we have a bit more of a mess to deal with.

10 Red cedar chips from its working days are lodged under the dust shroud.
As you can see in Photo 11, there are a few different fuse boxes attached to the base. It’s hard to tell if these are original, however, I doubt it. These, with the power button on the front, had to have been added sometime in the 1950’s-1960’s. The updated electronics that I’m planning on adding will not really need any of these, so they simply get removed with a few screws and bolts. In fact, I’ll probably sell some of these boxes on Ebay and make a little money back, as some folks are hunting for these types of electrical boxes (which, admittedly, have a cool look about them).

11 The electrical panels, while cool-looking, are antiquated and need replaced.
So, what are the next steps here? Now that I have this base stripped down to a black casting, the plan is to sandblast it down to bare metal. With a massive casting like this, I’m certain that I’ll find some body filler somewhere in it. It’s nearly impossible to pour a casting of this size and not have to use filler to fix small pock-marks and such. Of course, there are some machined surfaces that I’ll want to protect (such as where the bearings and tables ride).
I do think that the base will clean up pretty quickly. The tables may be a different story, however. The critical surfaces were originally planed with a metal planer (versus a milling machine). I’d like to preserve these as much as possible. However, the lower table surfaces will require some sandblasting and sanding to clean up before painting or polishing.
Then, there’s the motor situation. With this machine missing a motor, I’ll need to re-power it, as I mentioned before. I’m planning on attaching a hinge plate to the base of the jointer to add tension to the belts attached to the cutter head. Power will be transferred via a three-belt pulley on both the motor and the cutter.
Of course, I’m not an expert on restoring machinery. I am an avid researcher however, so I let many people’s experiences guide me along the process of restoring this jointer. However, if you have any thoughts or suggestions on this process, I’d love to hear from you. Heck—if you happen to know of any other Towlsey machines for sale, I’d love to hear from you. Please feel free to shoot me an email at lwittmer@aimmedia.com. Until then, give me your thoughts on the paint color. I’m thinking “British Racing Green”?
Here are some supplies and tools we find essential in our everyday work around the shop. We may receive a commission from sales referred by our links; however, we have carefully selected these products for their usefulness and quality.