We may receive a commission when you use our affiliate links. However, this does not impact our recommendations.
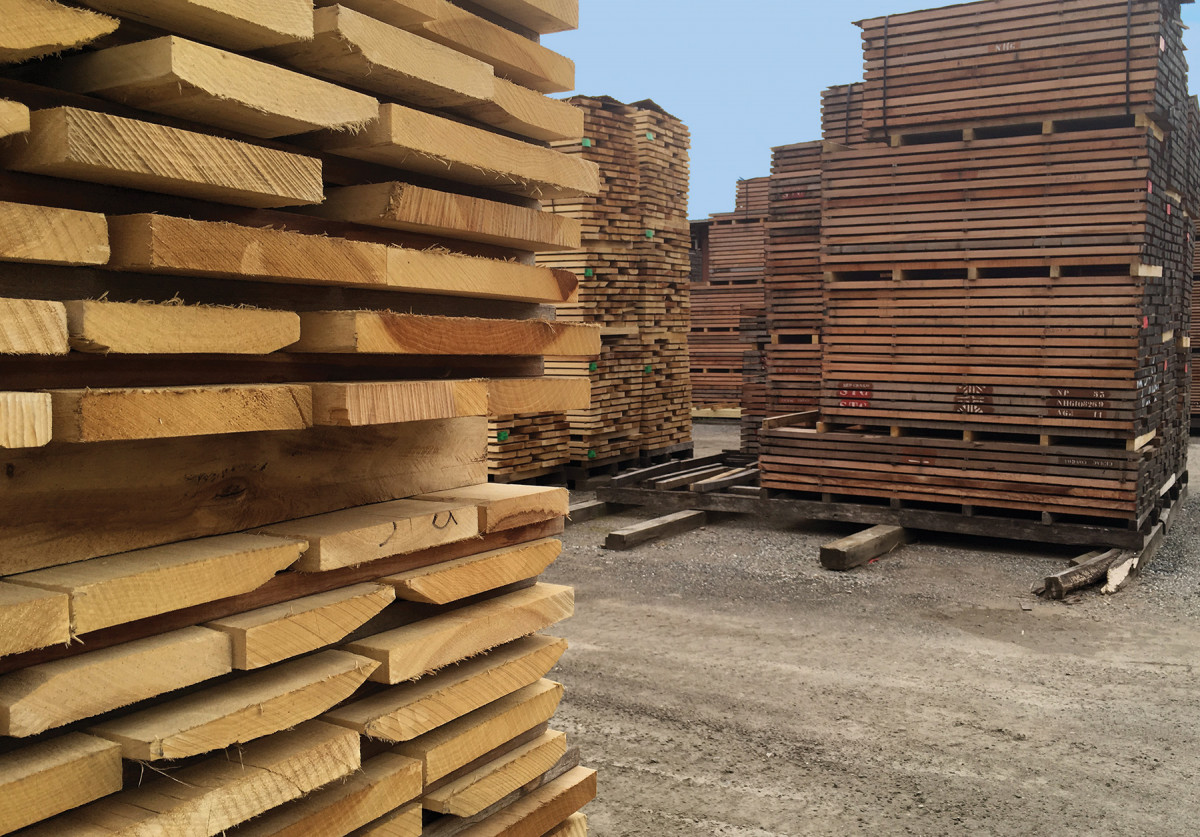
Arm yourself with a good plan (or two) and your buying trip will be a success.
I have a 10″-wide piece of 8/4 purpleheart sitting on my lumber rack. I bought it eight years ago when I visited the lumberyard. I still haven’t used it.
The funny thing is, I went to buy cherry for a blanket chest. What’s worse is that when I got home I still didn’t have all of the cherry I needed to build that chest…but I had a really cool purpleheart impulse buy.
Now don’t get me wrong. I work for a lumber company – we love impulse buys. The woodworker in me also recognizes when to jump on a unique board or deal for that yet-to-be-realized dream project. In the end, however, without a game plan in place before you go to the lumberyard, you will never get the boards you actually need to build your current project.
Contrary to popular belief, poor planning rarely leaves you short on lumber. We all know to buy extra boards; that mantra has been beaten into us. Usually poor planning leaves us with too much lumber that isn’t useful. Follow these tips, and your next trip to the lumberyard will be more successful.
Start With a Wish List
Blanket chest. A good model or drawing is the starting point for figuring out what lumber you need for any project.
I get very excited at the beginning of a project and used to rush to buy my material. I’ve shown up at the lumberyard with no plan and a sketch in my hand. It’s probably no surprise that I ended up having to make another trip to get the boards I needed. What’s more, I wondered later why all my parts were different colors!
I sometimes arrived at the lumberyard full of myself because I had a board foot total in my hand. I had even added 20 percent to the total, as is often directed. So what could go wrong? That was the purpleheart trip.
In both cases, though, I had done little or no actual planning. A sketch and/or a board foot total is only half the story; you need to spend some time planning to develop your wish list of materials. Simply put, this is your parts list. In addition to the sizes, a plan details the color matches and grain patterns that you want to achieve your vision. This starts with a good look at your design.
The goal is to create a cutting list. Think of those plywood diagrams that show all the project parts neatly stacked on a 4′ x 8′ sheet. I like to fire up SketchUp and draw a bunch of rectangles to represent the boards I need to buy. You can do this just as easily on paper.
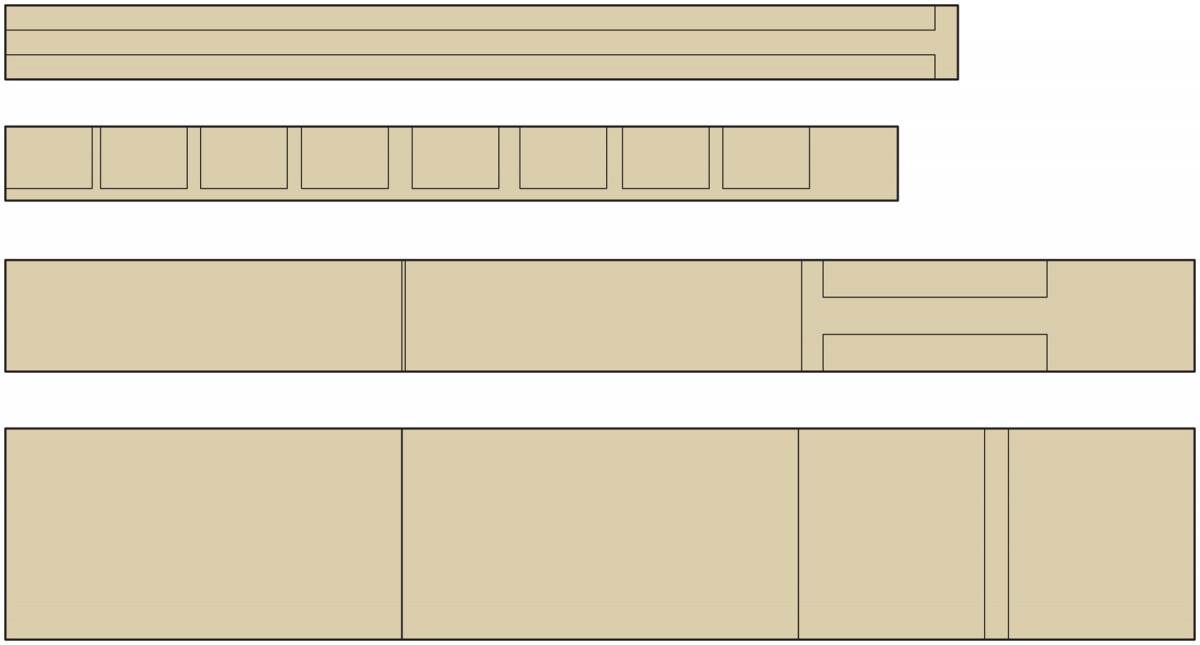
Plan A. This diagram shows my wish list for the blanket chest – a representation of four ideal boards with the parts laid out.
Just make sure you pay attention to scale so you aren’t putting more parts than are possible into a board. And don’t forget to leave a little room for the saw kerf.
This visual representation of your project is helpful as a reference when you start to write down each part and its approximate size.
But don’t get exact here. In fact, I round everything up an inch and only work in whole numbers.
Also, don’t worry about what sizes of boards you think you can get at your local dealer. This is a wish list. Let your design be the guide and assume a perfect world where all the boards are wide and long.
I’m currently building another blanket chest for my students at the Hand Tool School (handtoolschool.net); I’ll walk through that design as an example.
I want to make a bold statement by using curly cherry for the case. Ideally I want to get the entire 16″ x 32″ x 15″ case and drawer front from the same wide board so I can ensure the best color and grain match. Plus, how cool would single-board front, side and back panels look? Not to mention the time saved by not having to glue up wide panels. Above is the wish list I created in SketchUp.
It’s pretty simple when you look at it this way – four specific boards with notes on the size, figure and grain pattern for each. Color match is also important, but because each element of the chest is (ideally) coming from a single board, color match will be easy to achieve.
Certainly, I want the top and the case boards to be similar in color, but it isn’t imperative that they be perfect. Even the mouldings will naturally contrast (that’s what mouldings do) against the figured cherry case, so their color can be slightly different.
The case is the most important part of this design. Wide curly cherry boards, dovetailed at the corner, will be stunning. Getting a figure and color match around the whole case (or at least the front, drawers and sides) is an absolute must. I plan, therefore, for all four case parts and drawers to come from the same board.
Now I like figured wood as much as the next woodworker, but I also believe that it should be used sparingly. Knowing that I will have a large 16″ x 32″ statement made with this figured box, I’m going to use straight-grained material for the top and breadboards to contrast that. Additionally, the stability gained with a quartersawn top will ensure the top won’t cup over the years, and vertical-grain wood is easy to match together into a multi-board panel.
The top is 17″ x 34″, and, even in a perfect world I’ll never find quartersawn cherry that is 17″ wide. This means I’ll have to glue up at least a two-board top. The top boards and the two breadboards should be a good color match, so I have grouped them all into the same board just like the case.
Likewise, I want straight grain in the mouldings so they contrast the figured case without interfering with the statement. (Plus, I’ll use moulding planes to cut the moulding; for that, straight grain is a must.) A quartersawn or rift-sawn board will give me nice, straight grain and make sticking the profiles much easier. Each profile wraps three sides of the chest, so I need a single board that’s wide enough to rip into 2″ strips and long enough for 7 linear feet of moulding.
The bracket feet don’t need to be special – just no sap wood and they should all be from the same board for a good color match. While an exact match to the case isn’t necessary, I aim for something close.
The remaining parts are interior parts, so there isn’t much preparation needed here. This is secondary lumber, so no special characteristics needed; tallying up the board footage will suffice.
 For the purpose of this example, I won’t list each but, after adding up the parts, 12 bf of run-of-the mill “first and seconds” (FAS) cherry will cover it with one extra board for the “oops” factor. I’ll let the FAS grade dictate the sizes (more about that in a minute).
This is my wish list. Notice that it is both a parts list and a board-foot tally. It is also a detailed diagram of which parts will come from which boards. It tells me what size boards I need to find but also details the importance of color and grain match. I can print this out and, at a glance, I can tell exactly what I need when I go shopping.
Lumber Grades
Grade Percent Clear Minimum Size Clear Yield
FAS 83.3 6″ x 8′ 4″ x 5′ or 3″ x 7′
#1 Common 66.6 3″ x 4′ 4″ x 2′ or 3″ x 3′
#2 Common 50 3″ x 4′ 3″ x 2′
*Defects are knots, checks and worm holes; Sap wood, gum pockets and mineral stain are not considered defects in any grade.
Take a Reality Check
So what happens when you get to the lumberyard and you can’t find any boards to match your wish list? Suddenly you’re scrambling to find boards that you can glue together to make wide panels, and in the heat of the moment you don’t buy enough or you make silly decisions.
I remember one instance when I was looking for 9′-long boards but couldn’t find them. Instead, I bought 8′-long boards. Later, back at the shop, I had a whole bunch of 10″-12″ long offcuts from all of my boards. My smallest part was 15″ long, so every one of those pieces was useless. I think I had eight or 10 board feet of lumber in those scraps. I didn’t have a plan for not finding the 9′-long boards on my wish list and ended up short (and with a lot of waste).
So a reality check is imperative. Are the boards on your wish list even available to buy? I think the major reason many of us head to the lumberyard unprepared is we have no idea what to expect when we get there. Why spend time planning for certain size boards when the lumberyard may not even have them? So we wing it.
Lumber Cuts
Flat-sawn or Plain-sawn
 Grab a log and saw it straight across the thickness. This yields a board where the grain runs parallel-ish to the width of the board. These boards will move the most because they expand and contract along the grain lines. They can cup and twist, and you need to plan for seasonal movement the most when building with them.
Sometimes you will find the term “through and through sawn”; this is a flat-sawn board the entire width of the log, so it has two live edges. An entire log that is sawn this way and kept in order is called a “boule.” A “flitch” is part of a boule (usually three to four consecutive pieces from the log).
Quartersawn
 Here the growth rings run perpendicular to the wide face of the board. The official specifications state the growth rings should intersect the face between 60° and 90°. Most discerning customers are looking for something more like 80° to 90°. This produces a stable board where the seasonal movement is across the thickness, which results in little to no cupping or twisting. These boards are great for moving parts where expansion could freeze a drawer or bind a lock in a chest lid. Quartersawn boards also have a lovely appearance with straight, parallel grain lines on the face and, in some species, striking medullary ray figure.
Rift-sawn
 The growth rings in a rift-sawn board will intersect the face between 30° and 60°. A rift-sawn board is quite stable, though a bit less so than a quartersawn board. However, these boards are more about appearance than stability. Often called “vertical grain,” with the diagonal grain lines you get lovely parallel grain on all four faces of the board, making it perfect for table and chair legs or rails and stiles in frames. However, rift-sawing produces the most waste, so these will be the most expensive boards…if you can find them at all.
Flat-sawn boards are the most common because they produce the most yield per log. Next is quartersawn, then rift-sawn – but it is rare that you will find quartersawn or rift-sawn boards in any species other than oak. Specialty lumberyards or small operations that custom saw will produce these cuts in other species, but usually you have to glean your rift and quartered boards from a stack of mostly flat-sawn boards. Keep this in mind when you go shopping. It doesn’t hurt to ask if a dealer has lumber sorted this way, but don’t be surprised if the answer is no, followed by a laugh.
— SR
Lumberyard Tips
Below are just a few interesting notes and some things to keep in mind when searching for the perfect lumber.
■ Don’t be afraid of “wholesale only” dealers. Current market trends have even commercial buyers purchasing in much smaller lots, as fewer and fewer builders maintain an inventory of lumber. Call ahead to your wholesaler and ask them if they have any packs of lumber near your board total footage in inventory – you might be able to get deal pricing for taking the whole pack instead of forcing them to break it and maintain a small pack of leftover stock.
■ Market demands mean that 80 percent of the stock at your local lumberyard will be grade FAS or better. But if your project parts are not very big, you might be able to save big bucks by specifically searching out common grade lumber. Just be aware that more waste will result and color and grain match can be difficult.
■ Wholesalers will often have returned material that has been milled S4S, sometimes with moulded profiles. You can get great deals on this material if it fits your needs. While you’re at it, ask if the dealer has packs of short and narrow lumber (less than 8′ in length and narrower than 6″). This material is usually culled from packs for commercial jobs and can be had for a song by the inquisitive woodworker
■ Did you know that most lumber we buy has been ripped down to a narrower size? Its not that wide lumber isn’t available because the logs are small, but that there is little commercial demand for wider lumber. Therefore, sawmills rip material to meet the minimum sizes as dictated by the grades.
■ Finding quartersawn and rift-sawn lumber is difficult because rarely will a dealer sort lumber this way (white oak is the exception). But wide, flat-sawn boards usually include smaller rift-sawn and quartersawn areas. So don’t overlook these. — SR
Look to the Grades
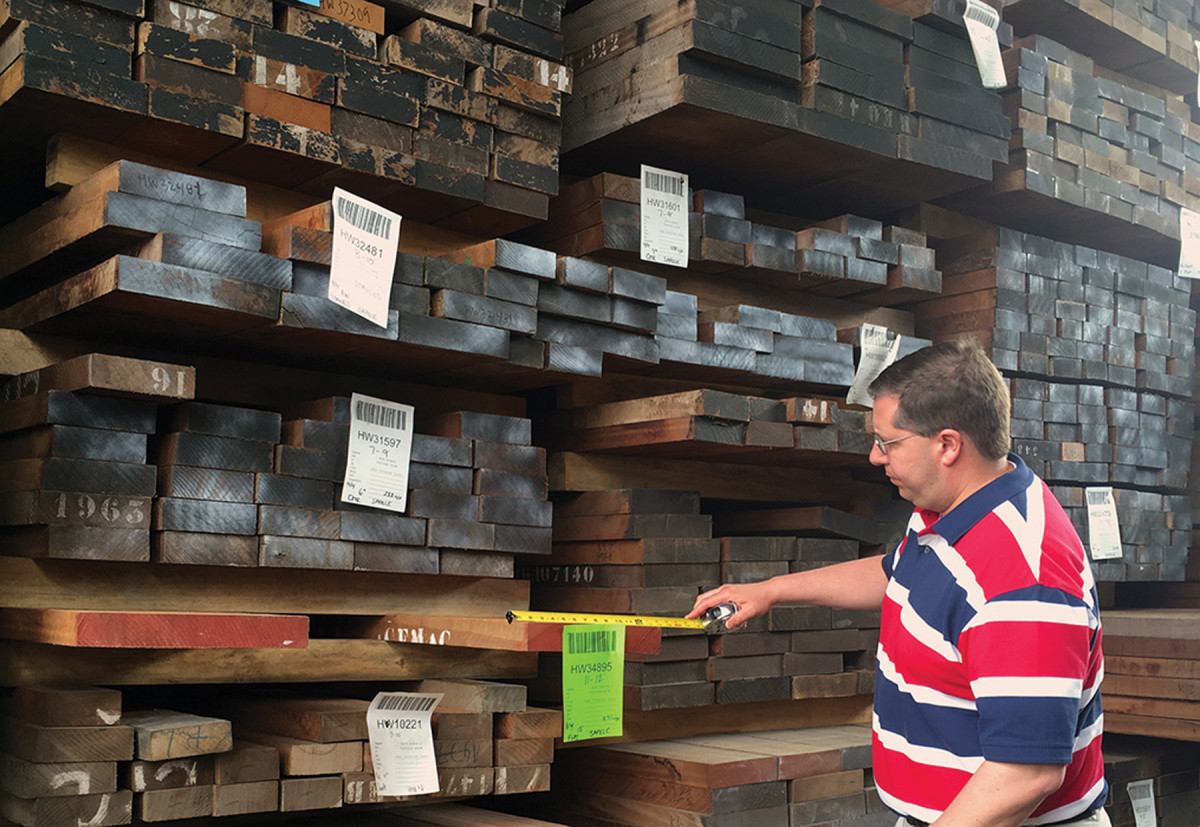
Buried treasure. If the lumberyard allows access to the stacks, don’t be afraid to choose the perfect board, even if it’s buried. That’s what forklifts are for.
What if I tell you there is a way to guarantee what sizes of boards you will find? You need to look no further than the lumber grading system.
National Hardwood Lumber Association (NHLA) lumber grades indicate a percentage of the board be clear of defects, and each grade will have a minimum board size as well as a minimum cutting size that will be 100 percent free of defects. This means that when you buy FAS lumber you can count on at least a 6″x 8′ board that is 83 percent clear and you will be able to get a 4″ x 5′ or 3″ x 7′ area totally free of defects. And these are the minimums to meet the grade, so you will likely find clearer, wider and longer boards.
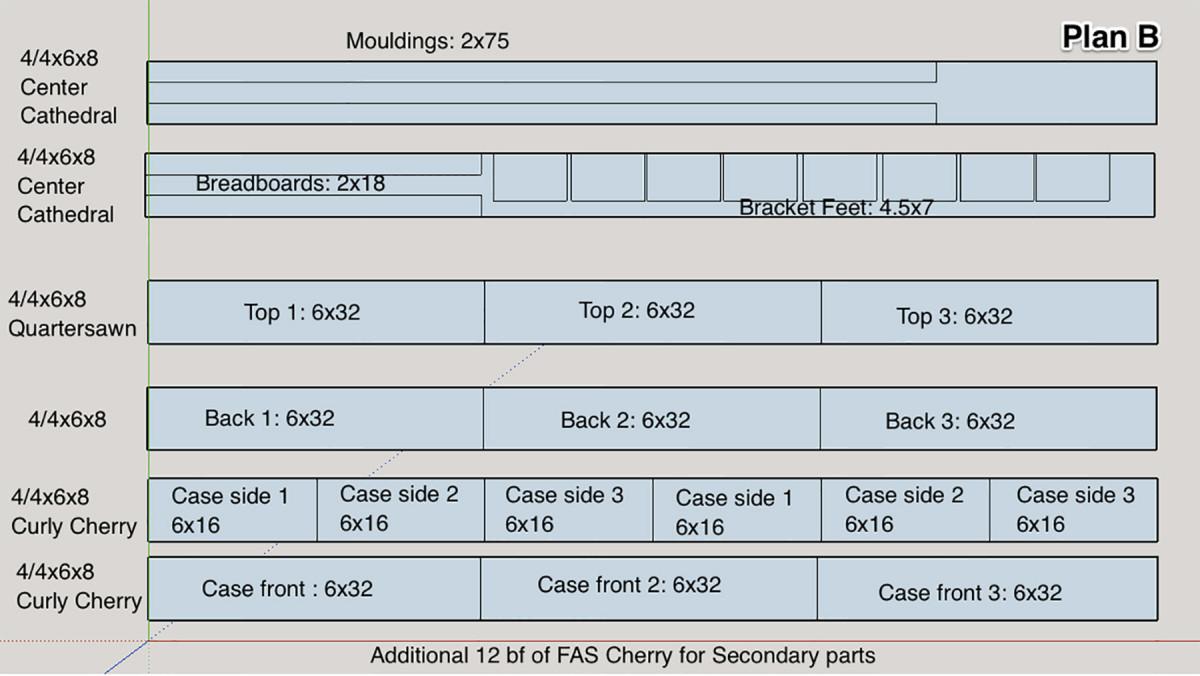
In fact, much of the market demands much higher grades than this. You see, when NHLA developed these grades, the furniture industry was king. Today, hardwoods are consumed mostly for millwork, where clear, long boards are essential. Though FAS is considered the top grade, it’s common to find boards well above that. Armed with this knowledge, you can build a second diagram assuming that all of your boards will be the minimum 6″ x 8′ that FAS grade demands. We’ll call that Plan B (above).
Immediately, you can see that I have to make quite a few compromises. I’ll have to make the case parts by gluing up three-board panels. This will make color and grain matches more difficult, so I make every effort to get each part from a single board. The front and two sides of the case will be from curly cherry; I’ll use more pedestrian cherry for the back panel, because it will be against a wall and mostly unseen.
I have a similar issue with the top, where I’m forced to make a three-board panel instead of my original two-board wish list plan. Still, if I make the panel from pieces that are all from the same board, my chances of a color match are much improved.
In this scenario, I’ll pull my breadboard ends from another board and stack those pieces to the edges. In a typical flat-sawn board where the cathedral grain is centered, the edges will be straighter grain, and if you look for it you can find rift-sawn and even quartersawn sections at the edges. Because the breadboards are only 18″ long, I’ll have the rest of the board left over. From that, I can easily get my bracket feet parts with plenty of stock to avoid any defects.
I’ll get my moulding parts from another board and look for a center cathedral board with straight grain at the edges. That way I can stack each strip of moulding to the edge for the best grain. Just look out for sapwood here and check both faces. You may not have sap on one face, but once you start cutting the moulding profile, some sapwood from the backside might emerge.
The good news is that, despite a few compromises with the case parts, much of my original plan isn’t really affected with Plan B. I do have some clear goals in mind for the straight-grain pieces, but most of the color matching task is solved for me by grouping all the multi-board panels from a single board. I do need to find similar colors between the boards that make up the case front and case sides but, with only two boards needed, that should be easy to achieve.
Time to Call the Lumberyard
Now you have to develop your game plan for the lumberyard. Every yard is a little bit different, but generally they are organized in one of two ways.
1. The lumber is in accessible bins where you can pull out the boards on your own.
2. The lumber requires a forklift to access a pack for you to sort through.
But you will find one common element in just about every yard. Wood will be sorted by thickness first, width second and length usually never.
Many yards just have random width/random length (RW/RL) bins or packs. That’s where most of us get a little lost and our plan goes off the rails. Call it sensory overload, but the average woodworker faced with walls of gorgeous wood tends to lose his or her mind.
If the lumberyard isn’t going to sort out different widths, then it definitely won’t sort by color or grain. This means that to realize your grand design, you’ll have to dig through some boards to find the color and grain match you need. Add up the board footage on your list by thickness – just like the lumberyard will do it – so you have a total footage for all the 4/4, 8/4, etc. boards per species.
Don’t get picky here; just round up. The rule of thumb I follow is that a 4/4 x 6″ x 8′ board is four board feet. I don’t reach for a calculator or an app to get more exact; I just estimate off that four board foot average per piece. When I get my final total, I double it or even triple it. Don’t panic – expect to sort through boards to get the right ones for your project.
Call ahead to the lumberyard to make sure it has on hand your inflated footage totals per thickness. If necessary, have the yard pull the material so you can access it when you arrive. If you have special needs, such as figured cherry or wide boards (anything more than 10″ is considered wide), it’s a good idea to ask first if they have it.
Armed with your two diagrams, you can arrive at the lumberyard knowing exactly how many pieces of a certain size are needed and where you need to be picky about grain and color and where you do not. This allows you to ease the confusion with all of the small secondary parts. By picking out the stock you need for those parts right away, you can then focus on the critical parts where size, grain and color are imperative.
Lumberyard anxiety is caused by a big list of board feet and being unsure of what sizes you really need. Your diagrams ease that anxiety and everything becomes a lot simpler – for both you and the lumberyard employees.
With my lumber bought, I now just have to make sure I don’t screw it up in the shop…maybe I should go ahead and buy a few more boards just in case.
Ooh and there’s a piece of bocote with a knot in the shape of Roy Underhill’s face – it can keep my purpleheart company.
Here are some supplies and tools we find essential in our everyday work around the shop. We may receive a commission from sales referred by our links; however, we have carefully selected these products for their usefulness and quality.