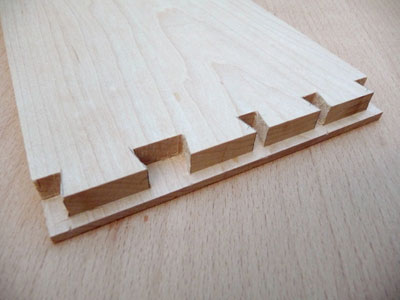
I suggest using a fine-toothed dovetail saw cutting a fraction on the waste side of the line (Photo 5). The bulk of the waste is removed using a router (Photo 6) and the final waste removal is done with a chisel (Photo 7 & 8).
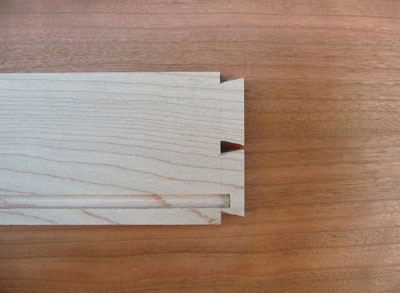
The tails are marked out from the pins. First cut a rebate on the ends of the sides equal to the thickness of the ends plus about 1½mm. I used an inverted router to cut these (Photo 9). Now place the pins onto the ends of the box sides and using a scalpel carefully mark out the tails (Photo 10). The waste material is removed by first cutting the tails on the waste side of the line using a fine toothed dovetail saw taking care not to cut the lap and also cutting the shoulders. Then the waste material is removed using a chisel. (Photos 11 – 15)
Dry fit the dovetails to ensure they fit. Once all the dovetails have been tested the insides of the box can be sanded and the inside of the lid area and small strip on the bottom edge can be lacquered. I used masking tape to mask off the areas I did not want to apply lacquer. (Photo 16) The thinking behind applying a finish to the bottom edge of the sides is to prevent glue from sticking to the sides when the base is glued in position.
Now the box can be dry assembled and clamped together to check that it fits as it should. It is also good to have a practice run prior to the final gluing up process. If all is as it should be the box can now be glued up. Before gluing up the box it is a good idea to mark the centre of the large pin i.e. where the cut for the lid will be made. Good preparation is the key to any successful glue up process.
I covered my glue blocks with paper to reduce the chance of then sticking to box after the glue has cured (Photo 17). Having gone through a dry clamp routine all the clamps should already be set up correctly. I used a Urea Formaldehyde based adhesive such as Extramite / Cascamite as this will provide a longer working time compared to PVA type adhesives.
Once all the clamps have been fitted the surplus glue can be removed from the inside of the box. A brush, cloth and warm water and be used to do this.
Next we need to check the diagonals of the box to ensure that the box is square. (Photo 18) Adjustments to the clamps can be made if the diagonal measurements are not the same. The box can now be left for the glue to fully cure.
Insides
The top, bottom and tray bottom are constructed using 120mm wide and 25mm thick Maple which is cut into 2 pieces 120mm x 10mm thick. To cut the Maple for these components I used a table saw cutting half the width, in 2 stages then turning the timber round and cutting the second half in the same way, (Photos 19 & 20). A band saw could also be used.
Once cut these can be planed to the finished thickness. In due course these will be glued together in book matched pairs. When gluing the top and bottom alternate the clamps to ensure even pressure and reduce the chance of bowing (Photo 21)
Once the glue has cured the clamps can be removed and the top and bottom cam be cut to size leaving about 2½mm surplus all round. A 4mm deep rebate can be cut on the inside faces of the top and bottom. I used an inverted router to cut these. (Photo 22)
The inside face of the top can now have the finish applied. The bottom does not require a finish, as it will eventually have a felt lining although a narrow band of finish could be applied to outer edges to prevent adhesive sticking to the base where it is not needed.
The top and bottom can now be glued to the sides, I used scrap MDF and put a paper barrier between the top & bottom and the MDF to prevent surplus adhesive from sticking the MDF to the Maple (Photo 23)
Once the adhesive has cured the overhang can be trimmed either with a plane or router & trimming cutter (Photo 24)
Banding and stringing
Next comes the cutting & fitting of the cross banding. Using the lengths of the previously prepared Cherry the cross banding can be cut into strips of 15+mm wide. I clamped a stop to the fence of the table saw (Photo 25) and placed 4 strips of Cherry together onto a scrap piece of timber to prevent break out when cutting. (Photo 26)
Once enough cross banding has been cut the rebates on the box can be cut to take the cross banding. I used an inverted router to cut these. (Photo 27) I cut these one face at a time, fitting, gluing and trimming and rough sanding the cross banding before moving on to the next face. This will ensure that the mitres meet in the corner.
Start with a corner then work your way around. (Photo 28) The mitres of the cross banding are first scored with a Stanley knife (Photo 29) then cut using a sharp chisel (Photo 30), taped in position using masking tape (Photo 31) and glued in position using PVA glue. Once glue has been applied apply pressure using F and sash clamps. Don’t forget to put a paper barrier between the box and clamp block (Photo 32)
Once the cross banding has been applied to all faces and cleaned up the rebates can be cut for the Ebony stringing. A router and rebate cutter was used to cut these (Photo 33).
The Ebony stringing can now be fitted. A sharp chisel and mitre square was used to cut the mitres (Photo 34). Once all the stringing has been fit to size it can be glued in place using a PVA type glue and held in position using masking tape (Photo 35).
Once the glue has cured the stringing can be cleaned up using a scraper (Photo 36) followed by abrasive paper.
After all sides of the box have been cleaned up we can think about cutting the grooves for the 1½mm Ebony stringing that will fit between the Cherry cross banding and the Maple. A 1½mm single flute router cutter was used to cut these grooves. (Photo 37) Take care not to over cut these grooves and I suggest you stop the grooves just before they meet (Photo 38) then clean out the corner using a sharp chisel. (Photo 39)
Once all the grooves have been cut and corners cleaned out we can start cutting the mitres on the stringing. I worked on one side of the box at a time.
Cut one mitre on one end of each piece then place the mitred end in a corner and mark out the opposite end. (Photo 40) Once all the mitres have been cut the stringing can be glued in position.
Fill grooves with adhesive, I used Titebond for this, and use the flat end of a pin hammer to carefully push the stringing into the bottom of the groove. (Photo 41)
Once the adhesive has cured the surfaces can be cleaned up using a scraper and abrasive paper.
Cutting the lid
Next we need to separate the lid from the box. I used a circular saw fitted with a fine blade with narrow saw kerf (3mm) but a tenon saw could also be used. The fence is set to the required distance from the blade, so the saw cut will be in the centre of the lid line we marked on the box (Photo 42).
I then sawed onto a scrap piece of MDF which would reduce the chance of unwanted brake out. Cut one side then rotate the box to cut the end them rotate again to cut next side & so on (Photo 43).
Once the lid had been separated from the box, (Photo 44) the sawn edges need to be planed to remove any saw marks (Photo 45). This is also the time to remove any glue that may have squeezed out when gluing the bottom & top. This can be done very carefully using a sharp chisel.
Edging
We now need to fit the Cherry edgings that will cover the sawn & planed edges of box and lid. The mitres on the Cherry edgings can be cut using a sharp knife and if necessary planed with a block plane. These can be held in position using masking tape and glued and clamped (Photo 46). Both the sawn & planed edges of the box & lid can be edged.
When the adhesive has cured, any excess Cherry edging can be removed using a combination of block plane, sharp chisel and abrasive paper (Photo 47).
Next we need to fit the stringing to the corners of the box & lid. This is done using a knife & chisel (Photo 48 & 49). Make sure that these line up exactly with the stringing on the sides of the box & lid. The corners are done in the same way. This will give the appearance of unbroken stringing lines.
Lining
The Maple for the lining can now be cut and planed to the finished dimensions. A rebate needs to be cut onto which the lift out tray will sit. An inverted router fitted with a tenon cutting cutter is used to cut this. Cut the rebate in stages (Photo 50 & 51).
Once cut, the lining can be mitred, sanded and the top edges can be rounded over using a block plane and abrasive paper. The upper rebate can be lacquered and dry fitted to box. Make sure that linings are not too tightly fitted as they will need to be removed to fit the hinges.
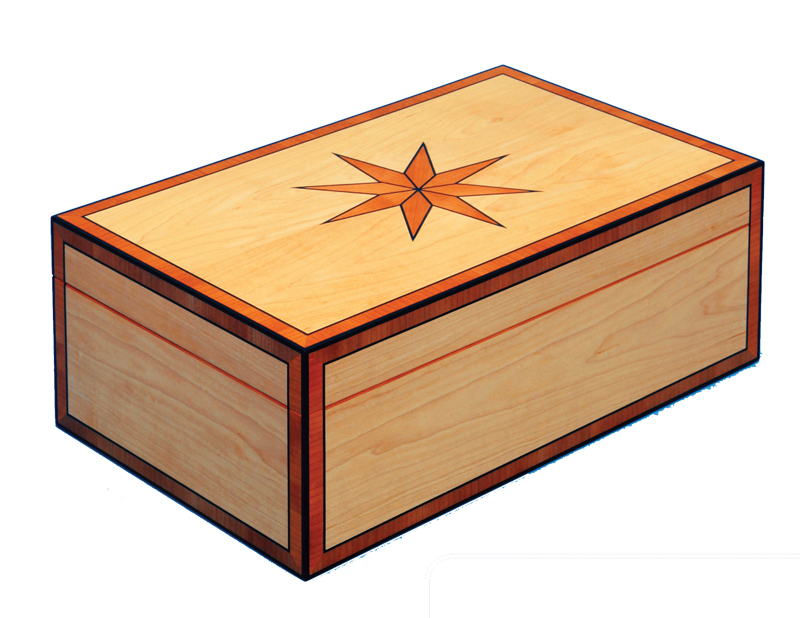
Inlay
Now we can move onto the star inlay on the lid. Print out the full size detail of the star inlay without the stringing line and using a scalpel carefully cut out all segments of the star.
Next cut the Cherry previously prepared into 8 pieces 90mm x 25mm. Place each cut out paper segment onto one of these pieces of Cherry (Photo 52) and using a ruler and scalpel carefully cut around the paper template (Photo 53). Number each segment once it has been marked out.
These can now be roughly cut out using a bandsaw. Take care to cut on the waste side of the line (Photo 54). The 8 segments can be carefully planed up to the knife cut lines using a block plane. The finished segments can be temporarily joined together using masking tape.
Once the star has been constructed mark horizontal & vertical centre lines on the top of the box. Place the star so that 4 of the points are in line with the centre lines, this will ensure that the star is centrally placed (Photo 55).
Hold the star firmly and mark the outer edges using a scalpel. The recess for the star needs to be cut. Use a router to do this. First fit a 9mm/10mm cutter and set the depth to a little less than the thickness of the inlay. Start at the centre and work outwards going as far as possible. Don’t cut up to the knife lines, leave about a millimetre waste. Then fit a 6mm cutter and again go as far as possible. Repeat the process with a 1.5mm cuter (Photo 56).
Using a sharp chisel the star cut out can be cleaned out and cut to the knife lines. (Photo 57) The corners of the star points should be first cut with a craft knife/scalpel to the depth of the inlay thickness (Photo 58) and the final waste removed using a 1.5mm chisel.
Dry fit the star to check it fits (Photo 59). Make adjustments if necessary. The star can now be glued and clamped between some flat scrap MDF with a paper barrier between the inlay and the MDF. When the glue has cured the star can be cleaned up using a scraper and abrasive paper.
We now need to cut the grooves for the stringing going around the star. These are cut using a router fitted with 1.5mm cutter and are cut to a depth of a little less than the thickness of the Ebony stringing. Clamp a straight edge to the box lid so the cutter will cut equally into both the Cherry and Maple (Photo 60).
The points of the stringing lines are done in the same way as the star. First use a knife and then a chisel. Be careful not to over cut the points of the star (Photo 61). The Ebony stringing lines can now be carefully cut & fitted (Photo 62). Once all the string has been cut these can be glued in place and cleaned up when adhesive has cured.
We can now fit a 3.4mm Ebony stringing line to the inside corners of the lid. This will have two functions. It will conceal any gaps there may be between the top and sides of the lid it will also provide a contrast detail when the lid is open. The stringing can be cut and dry fitted. Before gluing in place the lacquer needs to be removed where the stringing will go so the adhesive has a good surface to bond to. Cut a number of thin pieces of timber that will fit between the stringing in order to apply pressure while the adhesive is curing (Photo 63).
Tray construction
The maple for the tray can now be prepared and cut to size. The tray is jointed together using through dovetails and the divisions by stopped housing joints.
Start by marking out the dovetails as shown in the full size drawing. Unlike the double lap dovetails that were used on the box, where the pins were cut first. With through dovetails the tails are cut first. Use a dovetail saw for cutting these taking care to cut a fraction on the waste side of the line. The waste on the shoulders can be cut off and cleaned up with a chisel. The waste between the 2 tails can be removed using a piercing or fret saw fitted with a fine blade cutting just above the knife line then a 3mm chisel can be used to remove the final waste timber.
The pins are marked out by tracing around the tails using a scalpel (Photo 64). A scalpel is used as it has a fine narrow point that can easily fit between the tails.
Next the shoulders can be marked and scored with a Stanley knife. The vertical cuts can be made using a dovetail saw. The waste is removed using a piecing saw cutting about 1mm away from the knife line on the waste side (Photo 65), and then the remainder of the waste is removed using a chisel (Photo 66).
The Maple for the tray bottom can be planed to the finished thickness and rough width. This can be glued together (Photo 67).
Once the tray bottom has been cleaned up and sanded the grooves to take the bottom can be cut into the inside faces of the tray sides. The grooves must be stopped before the ends of the tails so that they don’t show from the outside (Photo 68). An inverted router fitted to table is used to cut these. Make sure the groove width matches the thickness of the bottom.
The housings for the centre division can now be marked out. These can be cut using a chisel and mallet working across the grain and cut to 3mm (photo 69). Dry assemble the tray and take a note of the dimension between the tray ends. This dimension will be the measurement between the shoulders of the centre division.
The centre division can now be cut to length and the shoulders can also be cut. Once cut, the tray can be dry assembled. Make a note of the dimension from the centre division to the sides; this will be the measurement between the shoulders of the 4 short divisions.
Before cutting these we need to cut the housings to take the 4 short divisions. Make sure that these are accurately marked out. The housings in the centre division can go right through the division. The housings on the sides are stopped housings. The 4 short divisions can now be cut.
The tray can be dry assembled to check that it goes together OK (Photo 70). The curve for the handle on the centre division can now be marked out and cut (Photo 71). The curve can be cleaned up using a combination of file, scraper & abrasive paper.
The tray bottom can now be cut to size. Prepare some glue blocks and dry assemble and clamp the tray to confirm that it all goes together as it should. If all is OK the tray can be glued up after the underside of the bottom has had a finish applied (Photo 72).
Once the adhesive has cured the tray can be cleaned up using a block plane, scraper and abrasive paper. Test fit the tray in the box; it should ‘float’ down and rest on the rebate of the box lining. If it is a little tight work on those areas until it fits correctly.
The outside of the tray & top edges of divisions can now have the finish applied.
Next the lining of the compartments needs to be fitted. I used blue baize for this. The baize is glued to thick card such as Daler Board or mounting board using PVA adhesive. Cut the board and baize for the compartment bottoms first, cut these oversize and apply adhesive to one surface then the baize. Once dry the bottoms can be cut to the correct size then fitted. The fit should be tight but not so tight that is causes the card to buckle (Photo 73).
Next cut strips of board for the sides of the compartment. The baize for these needs to be double the width of the card as these will be covered on both sides (Photo 74). Once the baize has been glued & trimmed the compartment side linings can be cut to length & fitted (Photo 75). A sharp Stanley knife works well for cutting card & trimming baize.
The process is repeated for the large compartment without divisions at the bottom of the box. But only do this after the hinges have been fitted.
Hinging Lid
The lid is hinged using quadrant hinges that incorporate a stay to keep the lid in an open position (Photo 76).
First, mark out the position of the hinge on both the lid and box. This can be done using a mortise gauge and square. Using a craft knife cut across the grain to prevent break out when removing the timber. Also mark out the depth of the hinge recess.
Next the position of the recess to take the stay needs to be marked out. Mark a centre line to enable accurate drilling (Photo 77). Once the marking out has been completed drill 2 or 3 holes as close together as possible using a spur point drill bit. Masking tape can be wrapped around the drill but to give a depth indication (Photo 78).
These holes can now be made into a slot using a sharp chisel. A router could also be used for this but great care would be required. The remainder of the hinge recess can be removed either using a router or chisel & mallet. Offer up the hinge and check that the stay fits into the drilled and cleaned out slot to just over half its height. Make adjustments if necessary.
The hinges can now be screwed in place. Fit the baize into the bottom compartment of the box. Finally the box can have its finished applied; I used acid catalyst lacquer for this.
Photo Credits:
Martin Greshoff, Ellen Freijser, Jan Freijser, Claire Greshoff, Jessica Greshoff & Robert Greshoff Photography
|