


We may receive a commission when you use our affiliate links. However, this does not impact our recommendations.
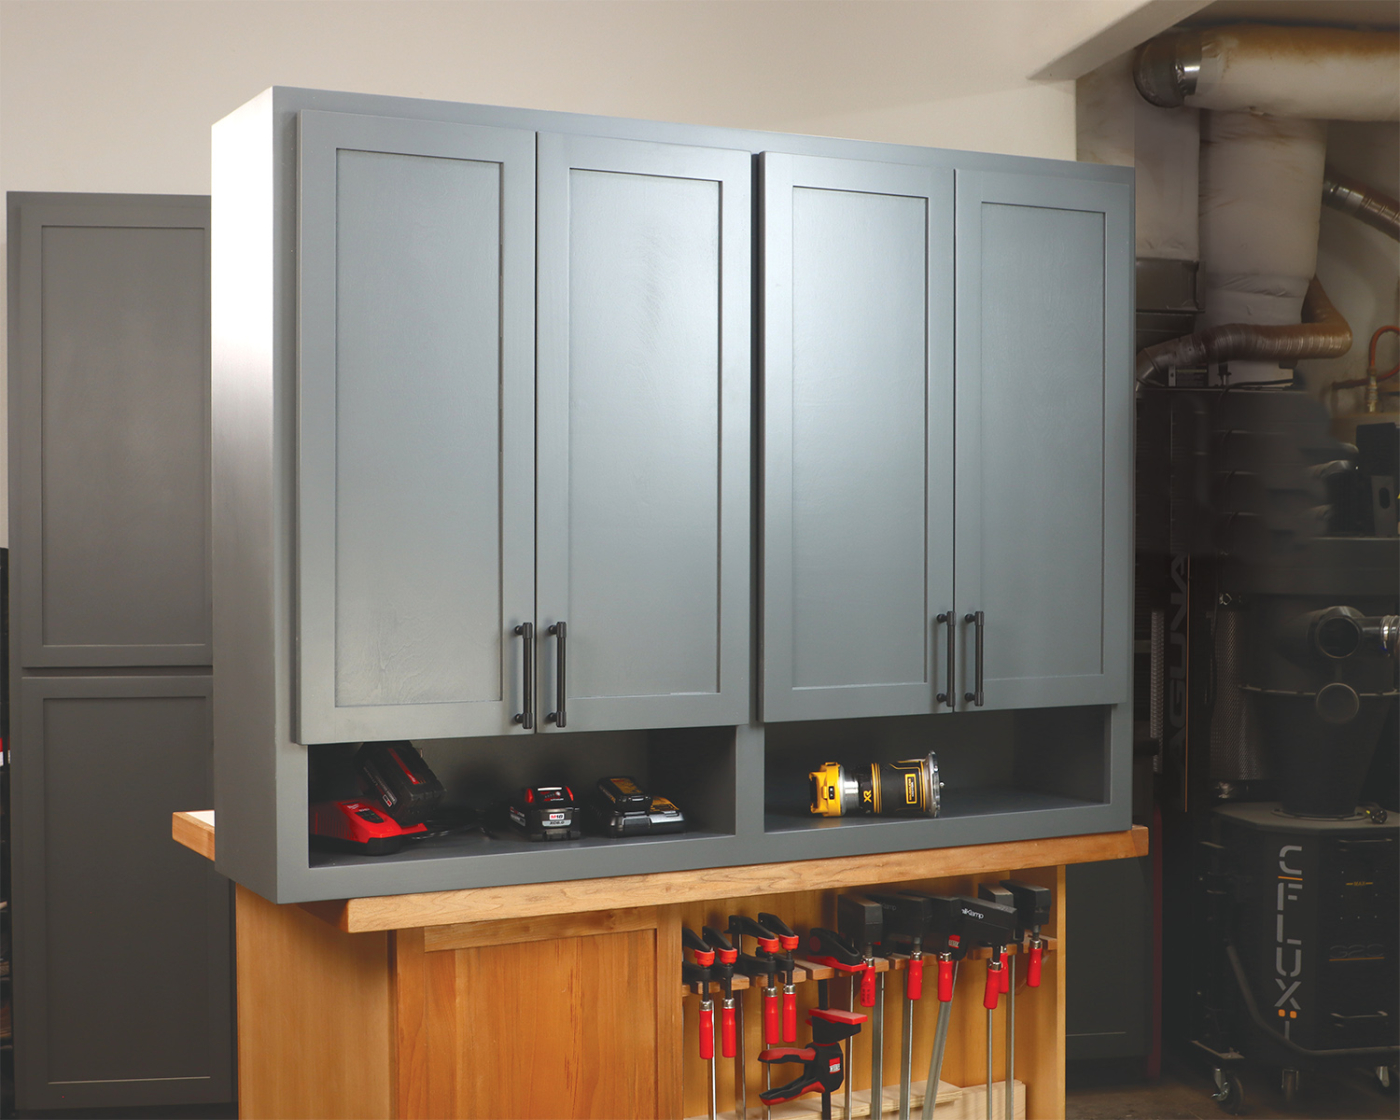
Build the perfect place to store and charge your growing collection of batteries and cordless tools.
Cabinet making is a great skill to have, and once you successfully tackle your first cabinet, you’ll have confidence to make another. Plus, you can customize the size and features for your specific needs and make them strong enough to handle the rigors of shop life. With so many cordless tools available, it’s nice to have a dedicated charging station for all those batteries. This is especially true if you own multiple brands and platforms of cordless tools. Throw in some yard tools and an eBike, and the batteries can overrun your shop, so let’s get started on a handy cabinet built to house all those accessories.
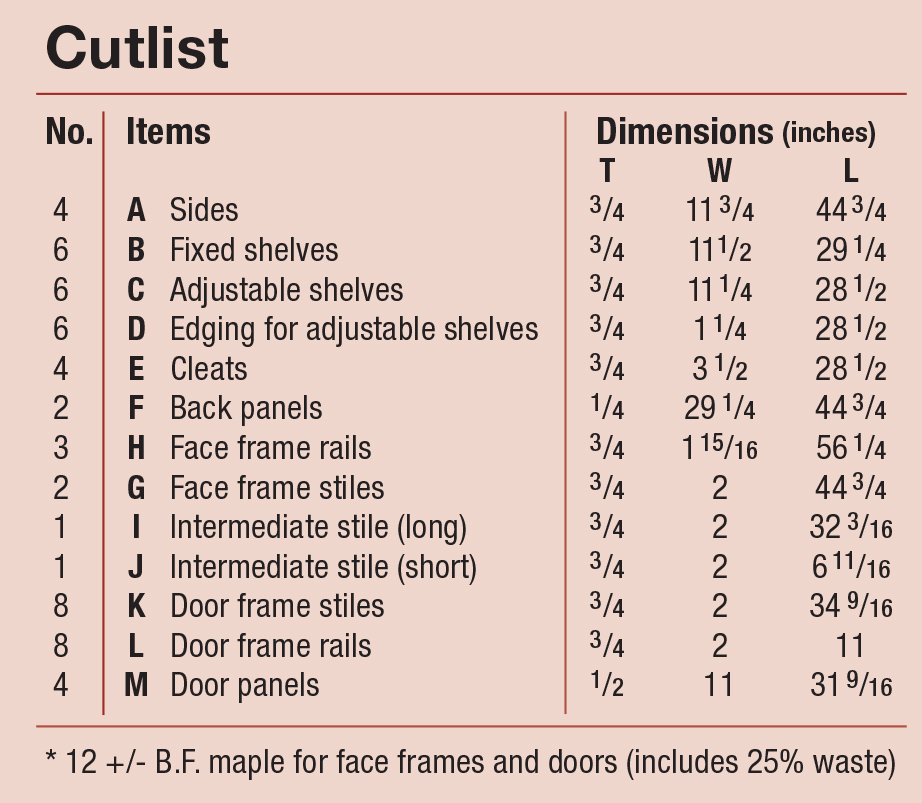
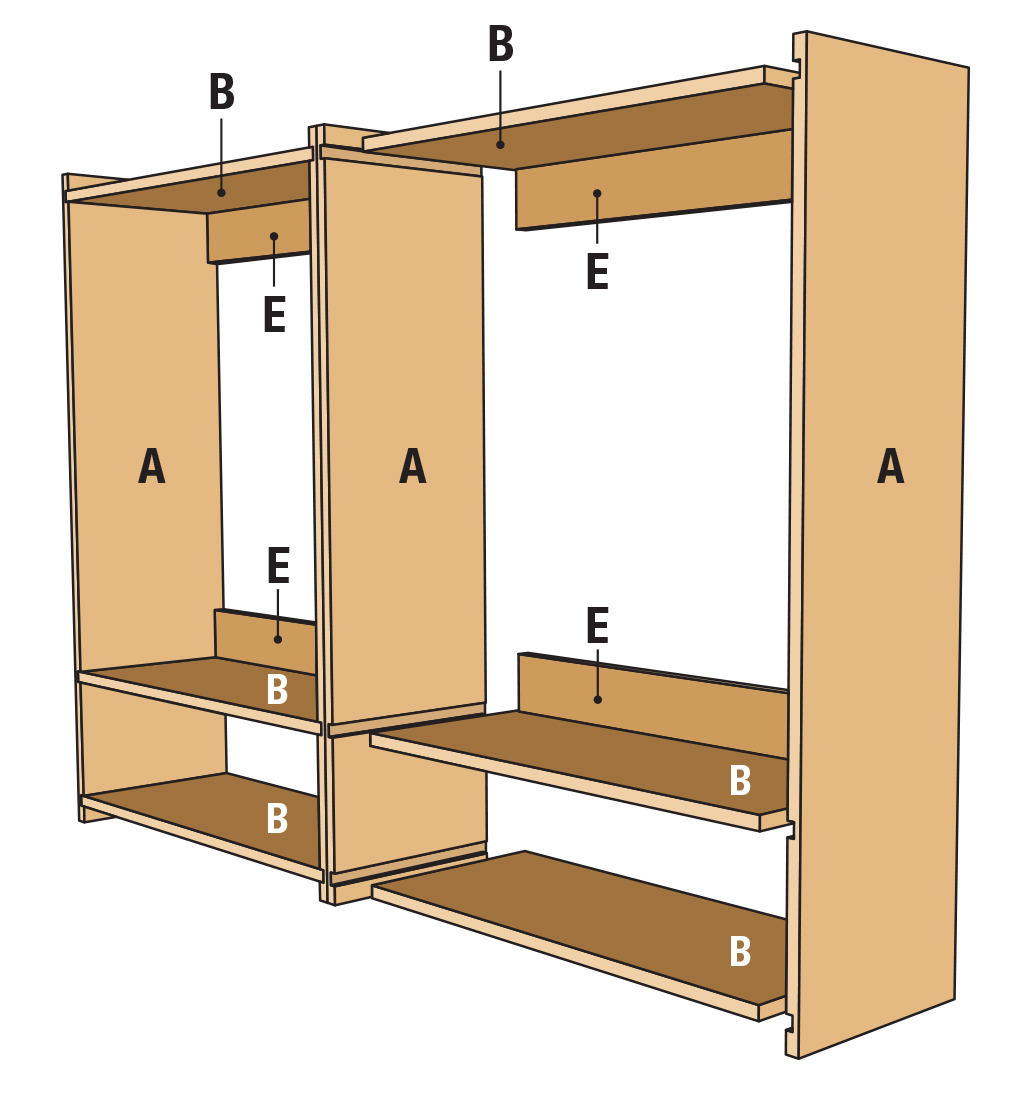
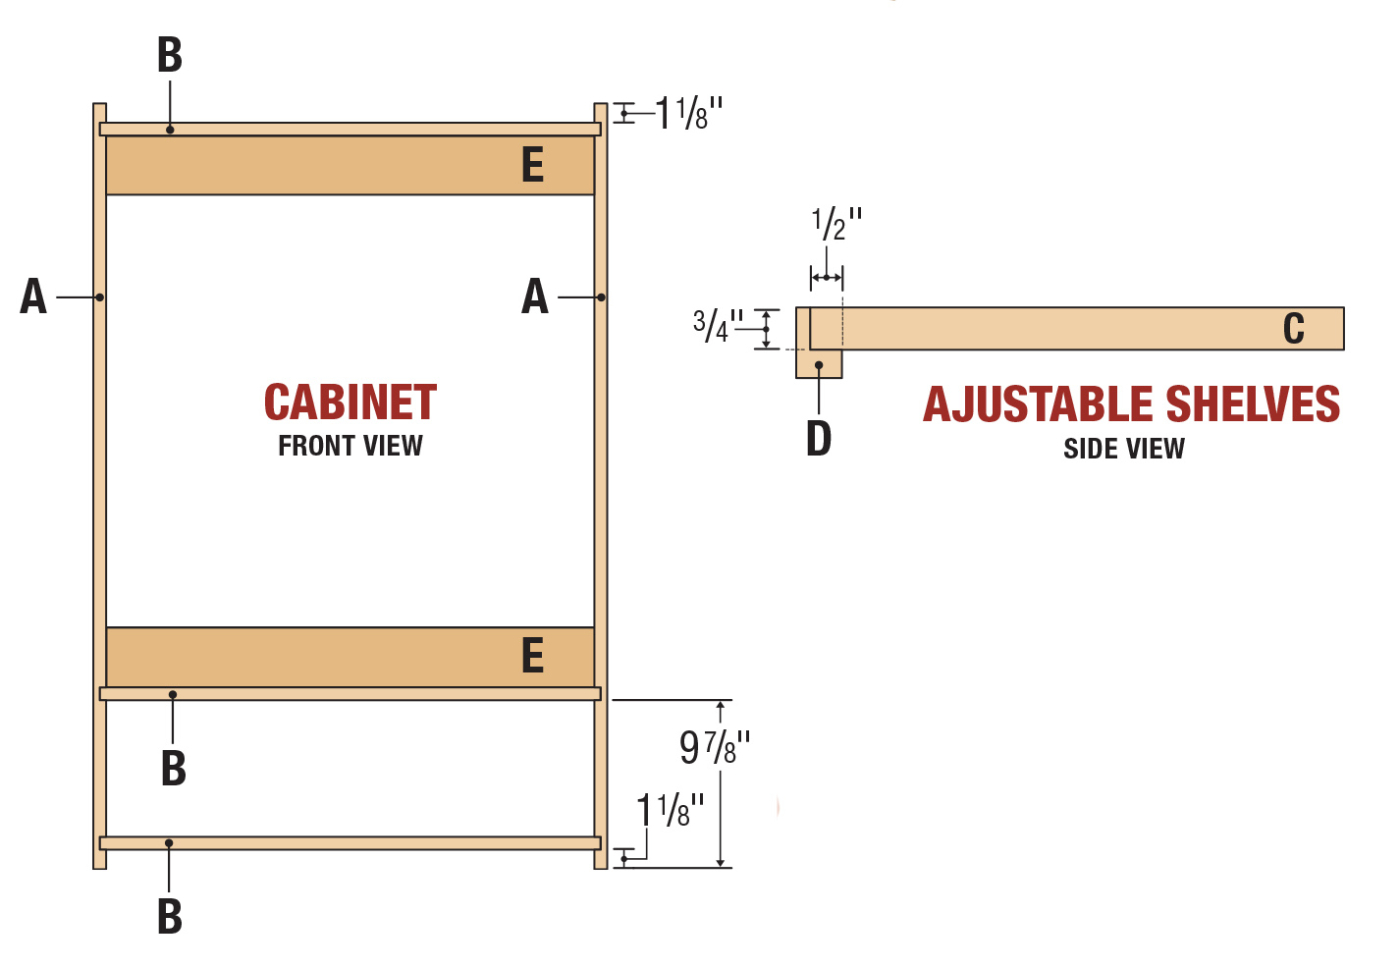
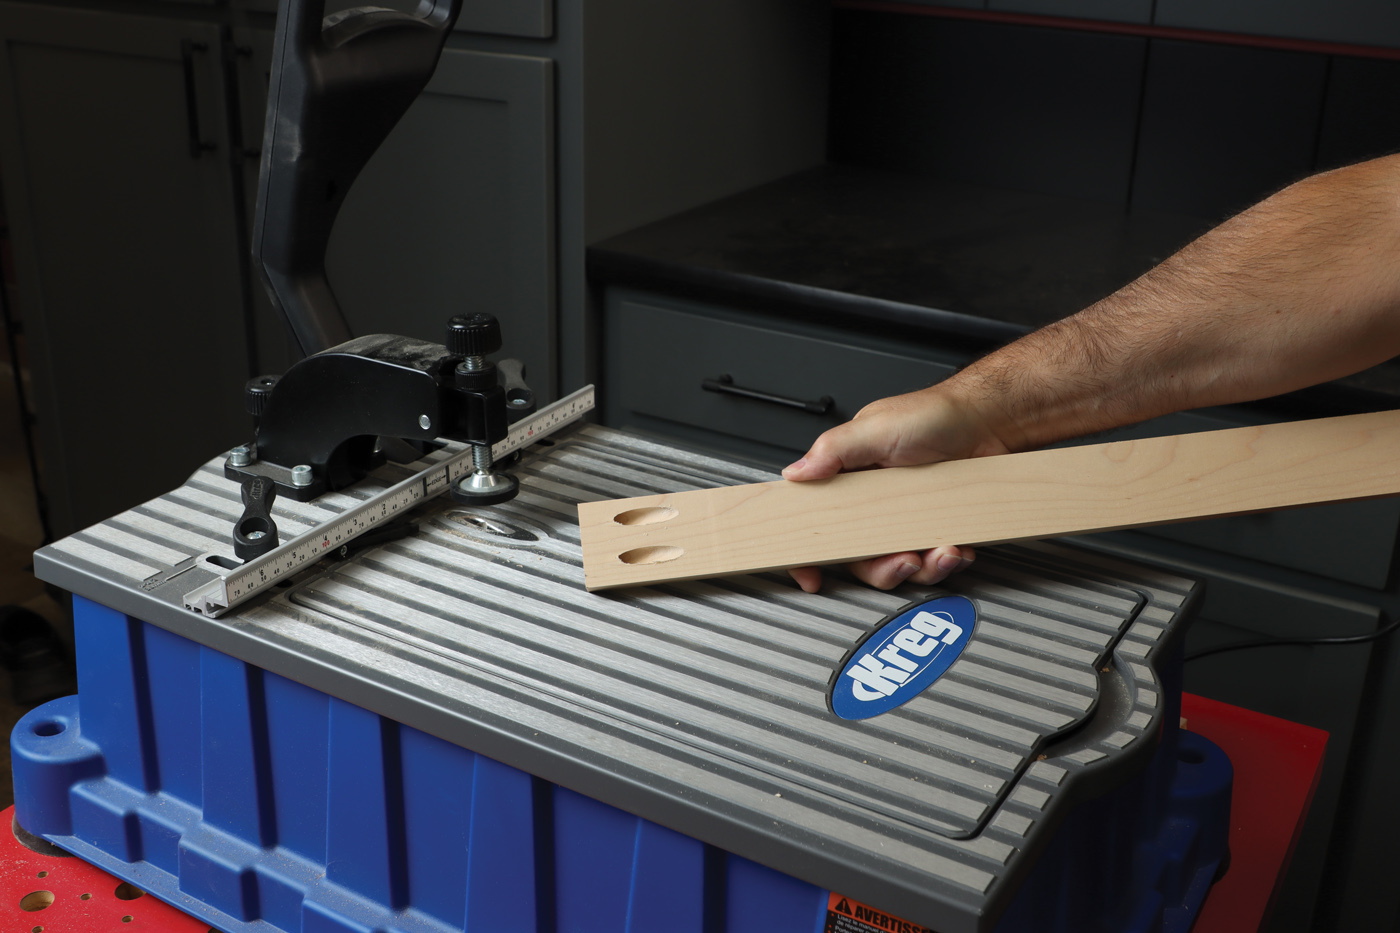
 One of the main challenges in cabinet building is breaking down full sheets of plywood. Make sure to have some featherboards and plenty of outfeed support to control the panels. Often, I’ll break panels down with a track saw or cordless circular saw, before taking more manageable pieces to the table saw. Size the plywood panels according to the materials list, starting with the side panels and fixed shelves. Since we’re basically building two 30“ cabinets ganged together, you’ll need 4 side panels. Normally wall cabinets have only 2 fixed shelves per unit, but due to the addition of the open charging cubbies, this wall unit uses 3 fixed shelves per unit, for a total of 6.
More to make: Read Willy’s article on shaker shop cabinets to match this charging station.
In our store: Purchase video plans from Chad Stantion to build a stacking tool caddy.
Fill your cabinet: See our favorite 12V drills.
Online extra: Check out the SketchUp model of the charging station.
Cutlist and Diagrams
 Basic Joinery
Most of the joinery is cut in the side panels, so that’s a good place to start. Take a moment to set up a dado stack that exactly matches the thickness of your plywood. Aim for an easy friction fit that lets the parts come together without much struggle. Once test cuts confirm the right dado width, you’ll want to cut three dadoes in each side panel. Two are located 1-1/8“ from the end of the panel, so it makes sense to mill those all at the same time. Then reset your rip fence and cut the final dado for the middle-fixed shelf, which is located 9-7/8“ from the bottom of the side panel.
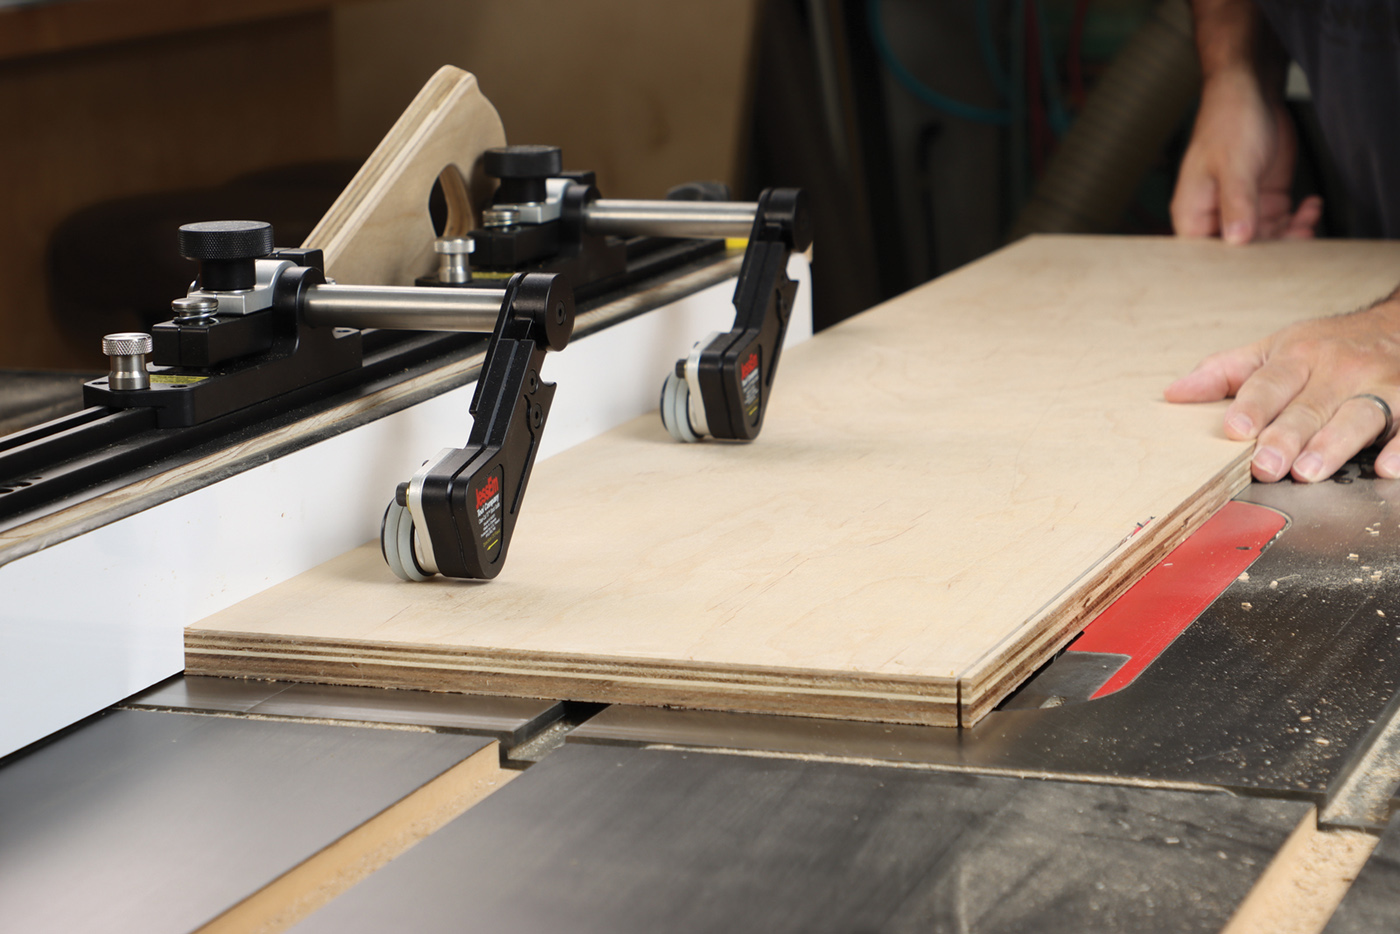
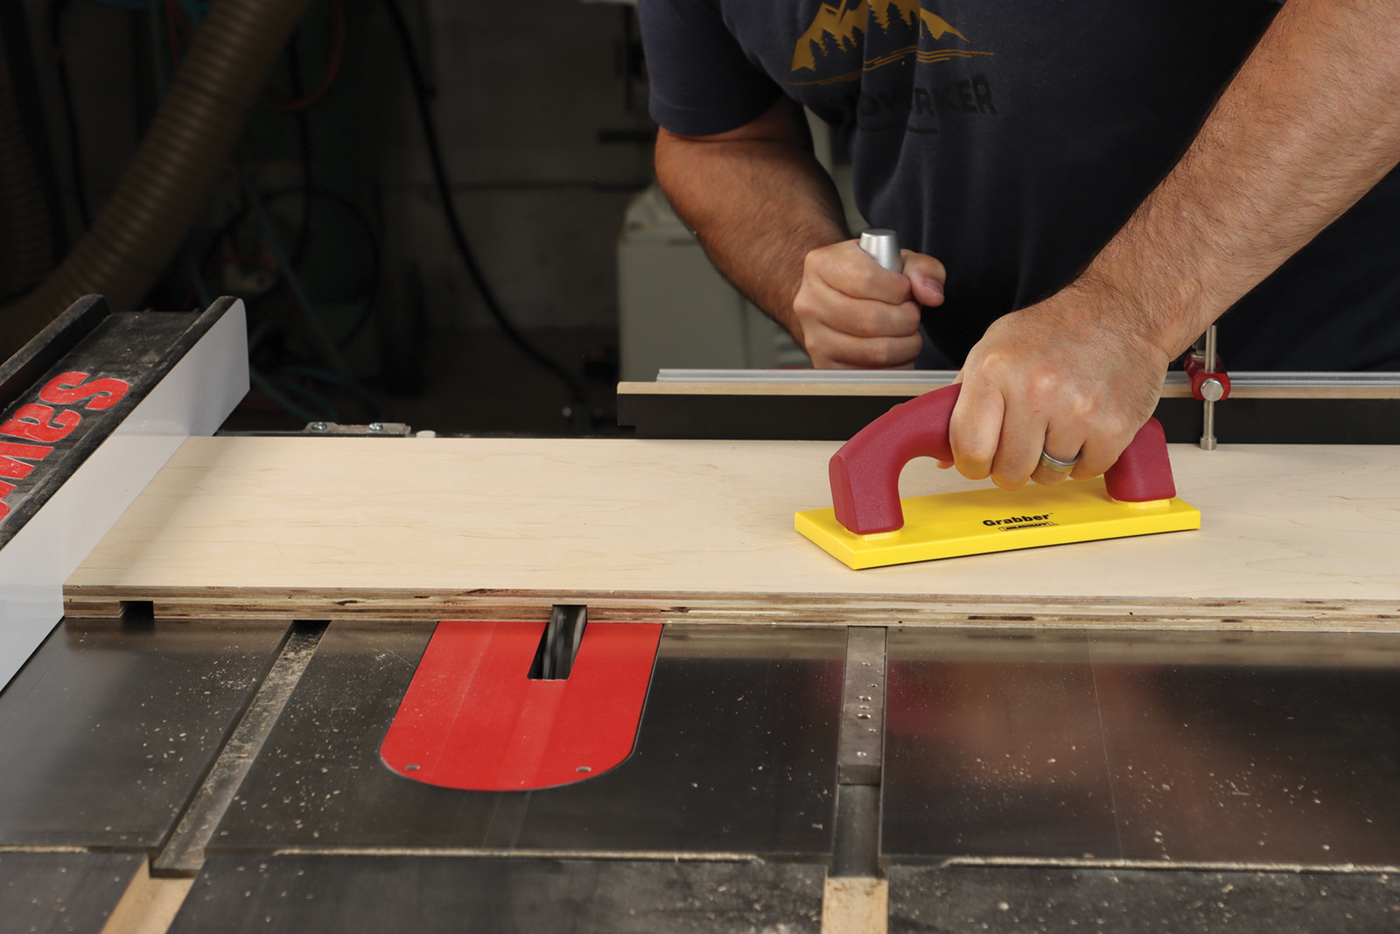
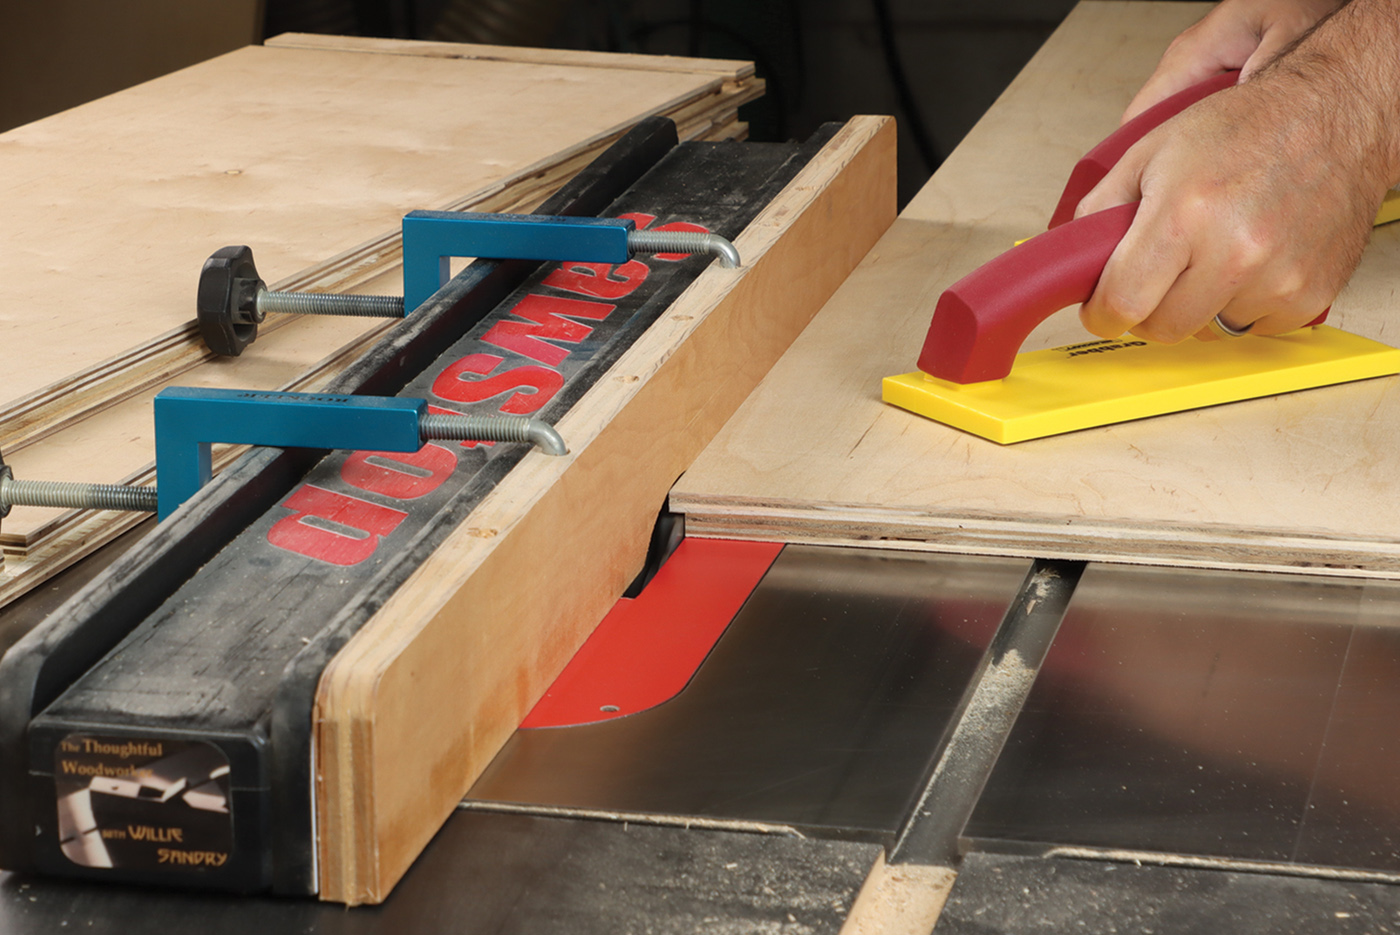
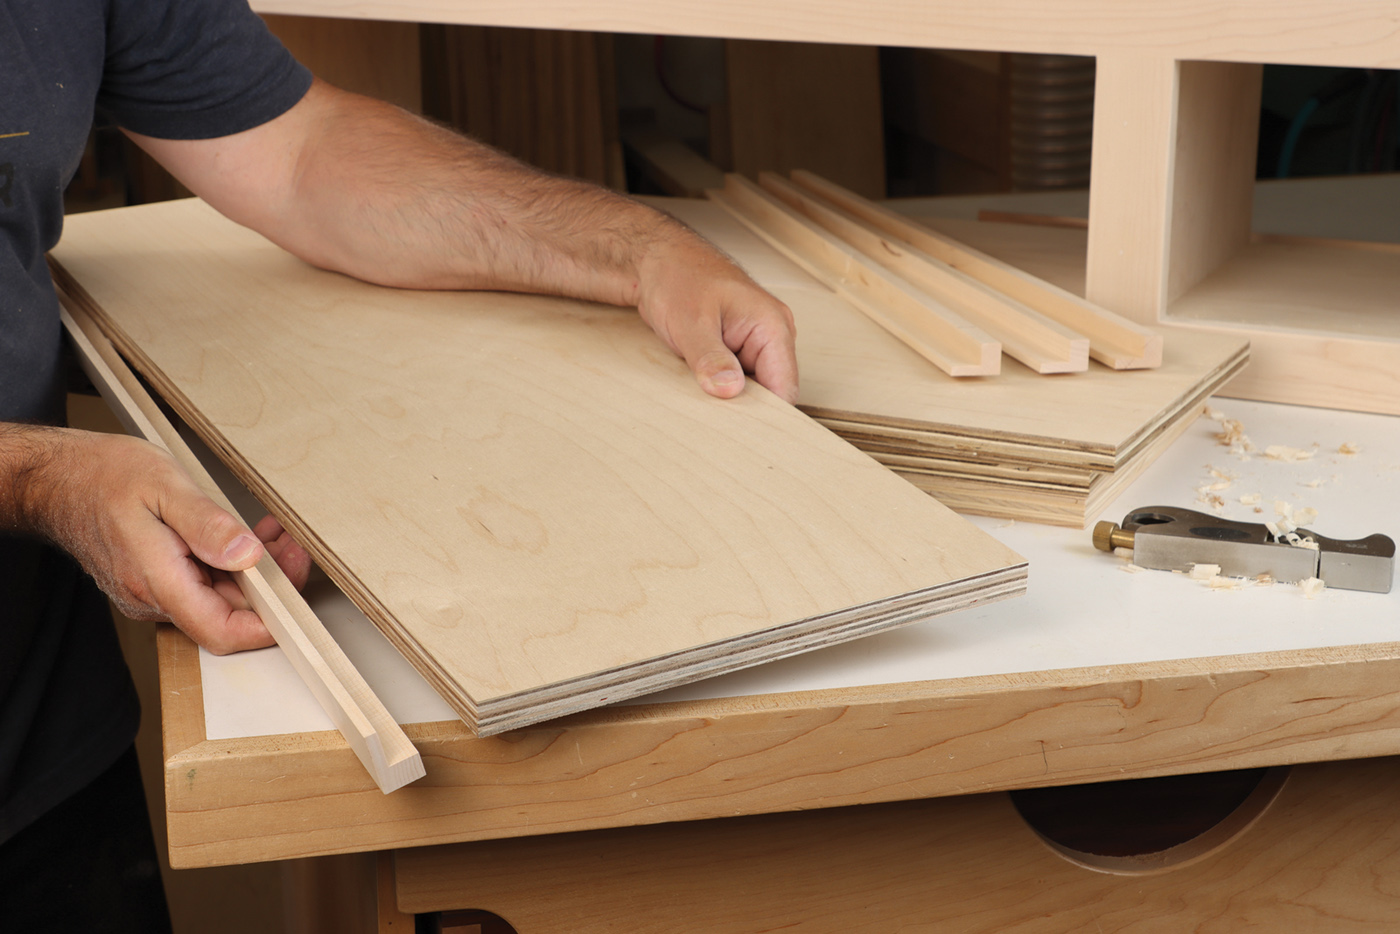
1 Rip parts to size at the table saw with safety gear. My favorite option is Jessem’s Clear Cut Stock Guides which hold the workpiece down and against the fence simultaneously. They’re great for ripping full sheets of plywood where a featherboard won’t work.
2 Install a dado blade matching the thickness of your plywood and cut three dadoes in the side panels to receive the fixed shelves. With a sturdy miter gauge and a push paddle, you can handle these mid-sized panels at the table saw.
It may feel like you just started building the cabinet boxes, but you’re also nearly done! That’s the beauty of cabinet making—it proceeds much quicker that building hardwood furniture. With the same dado blade still installed, add a sacrificial fence to your saw, and create a rabbet along the inside back edge of all four side panels. The rabbets are 3/8“ wide, and just deep enough for your 1/4“ plywood back panels. Now sand the parts you’ve made and assemble the two cabinet boxes. If a test fitting looks good, go ahead and glue each carcass together.
3 With a sacrificial fence setup, use the dado blade to make a rabbet along the back edge of each side panel. Set the rip fence to expose 1/4″ of the blade, or the exact thickness of your ¼” plywood. Blade height is 3/8″ for this step.
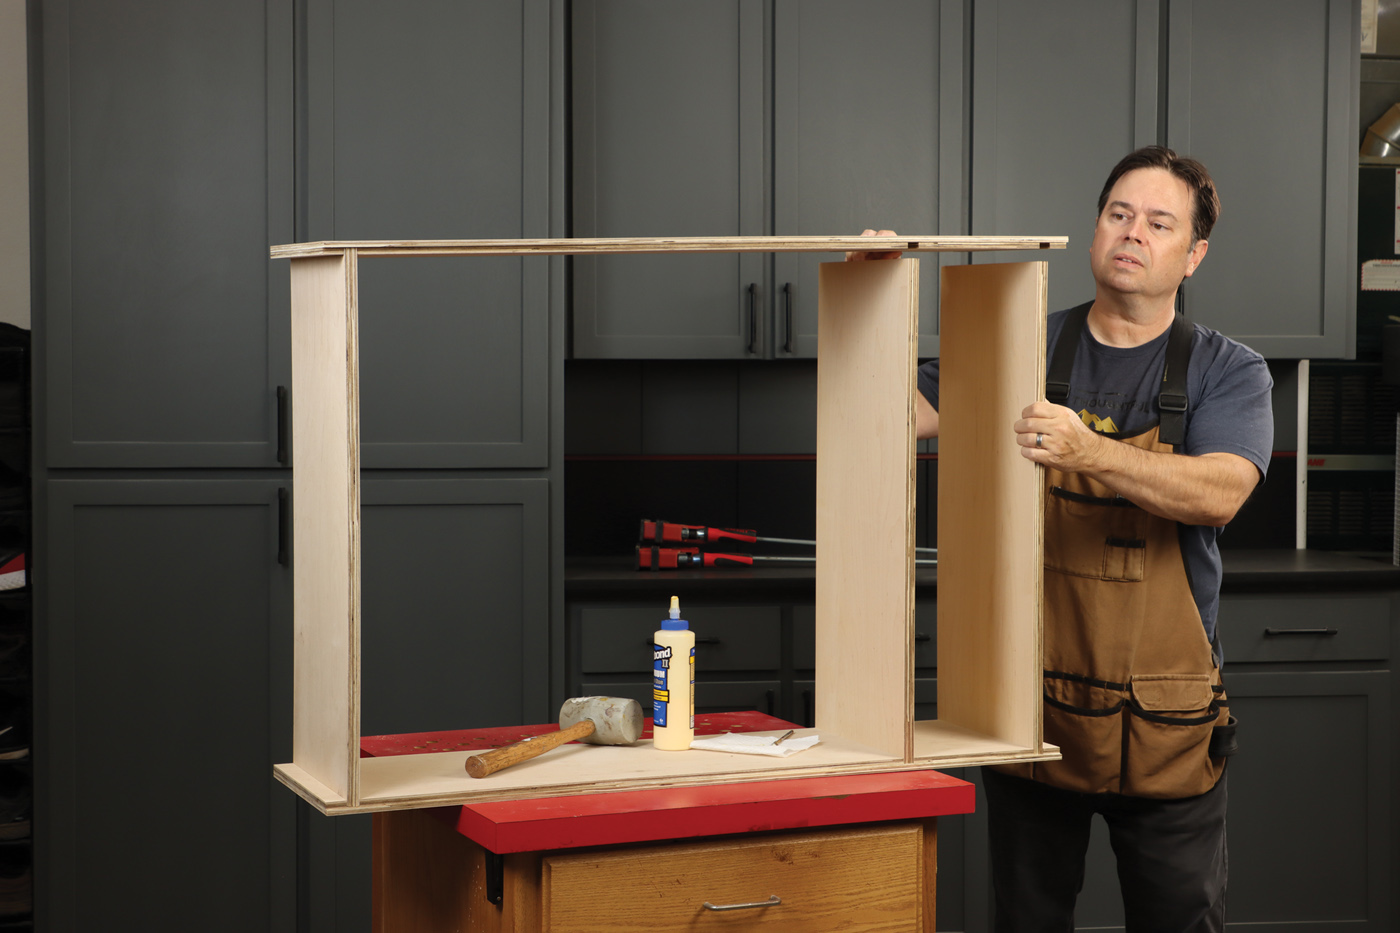
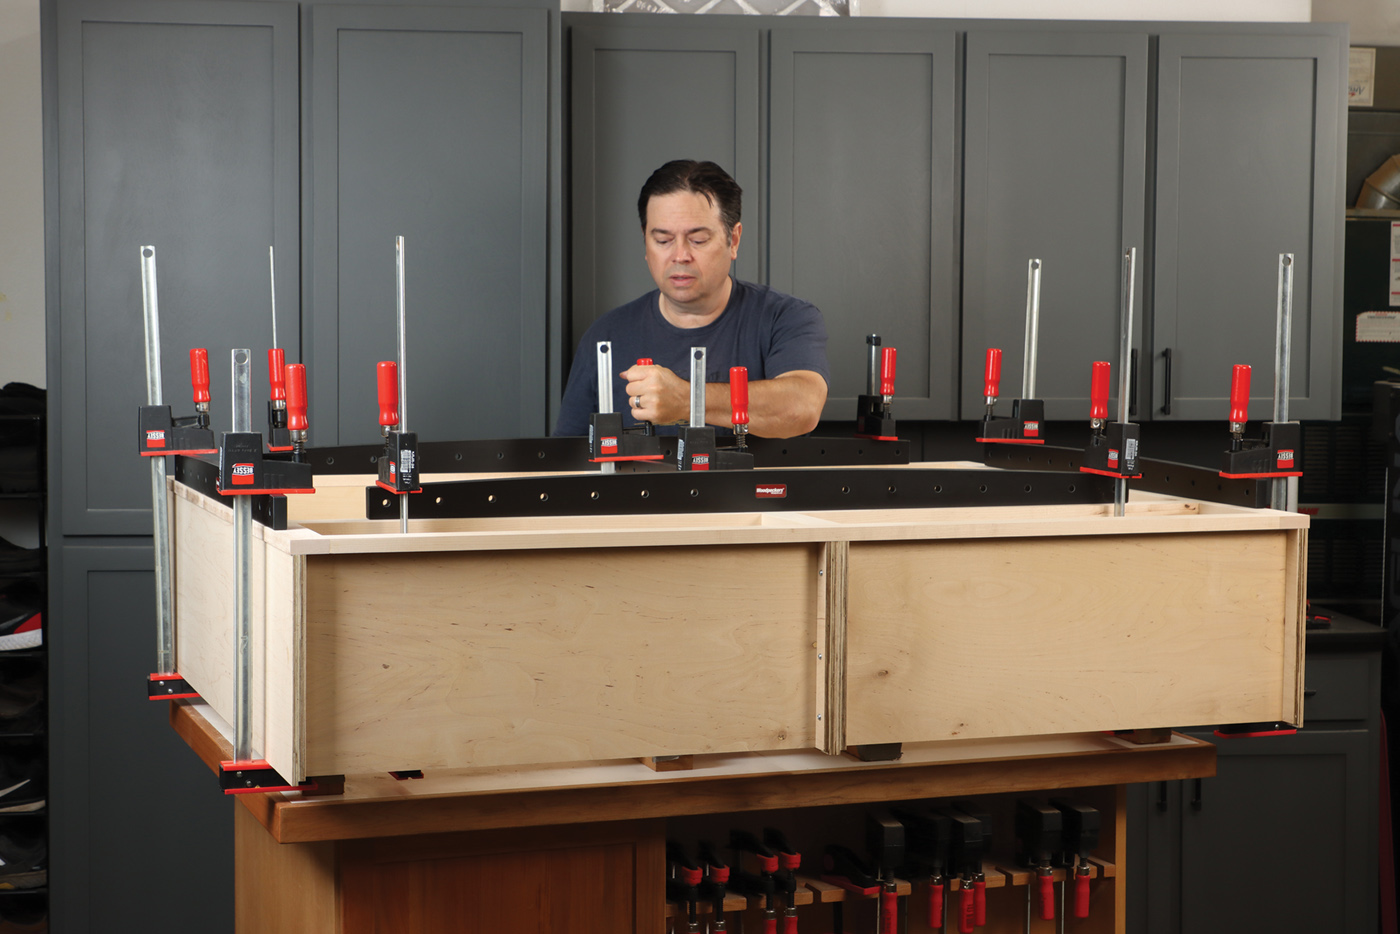
4 Test fit the parts and glue the cabinets together. Be sure to check for square as you tighten the clamps.

5 Cauls are helpful to close the middle dado joint, where placing clamps would otherwise be very difficult.
A Few Simple Details
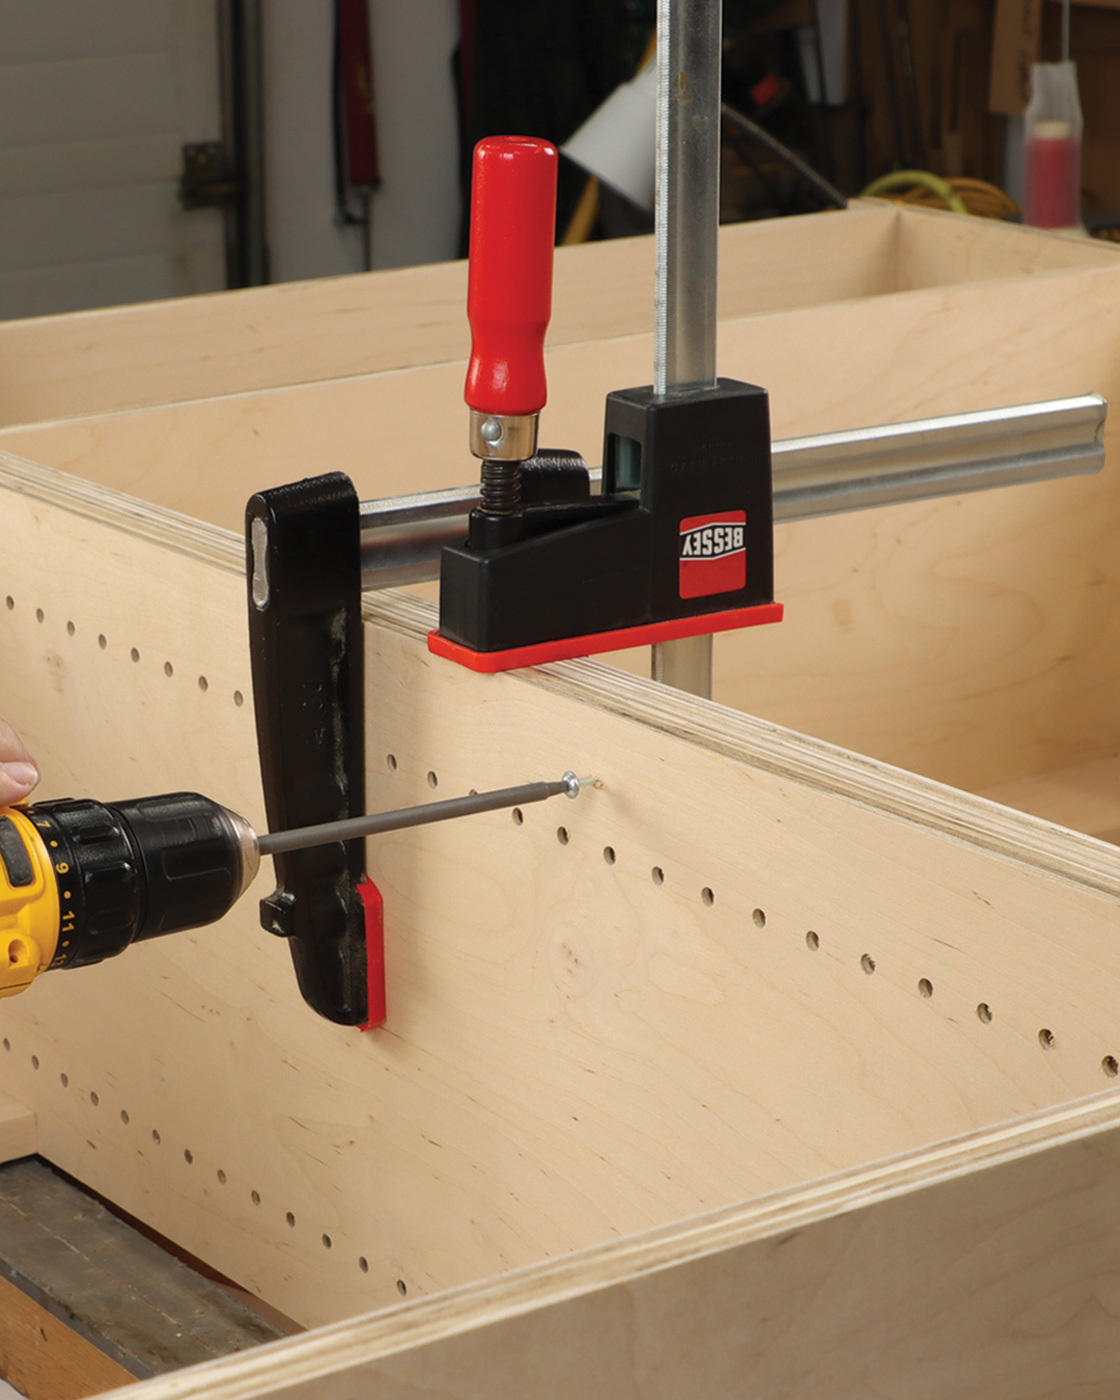
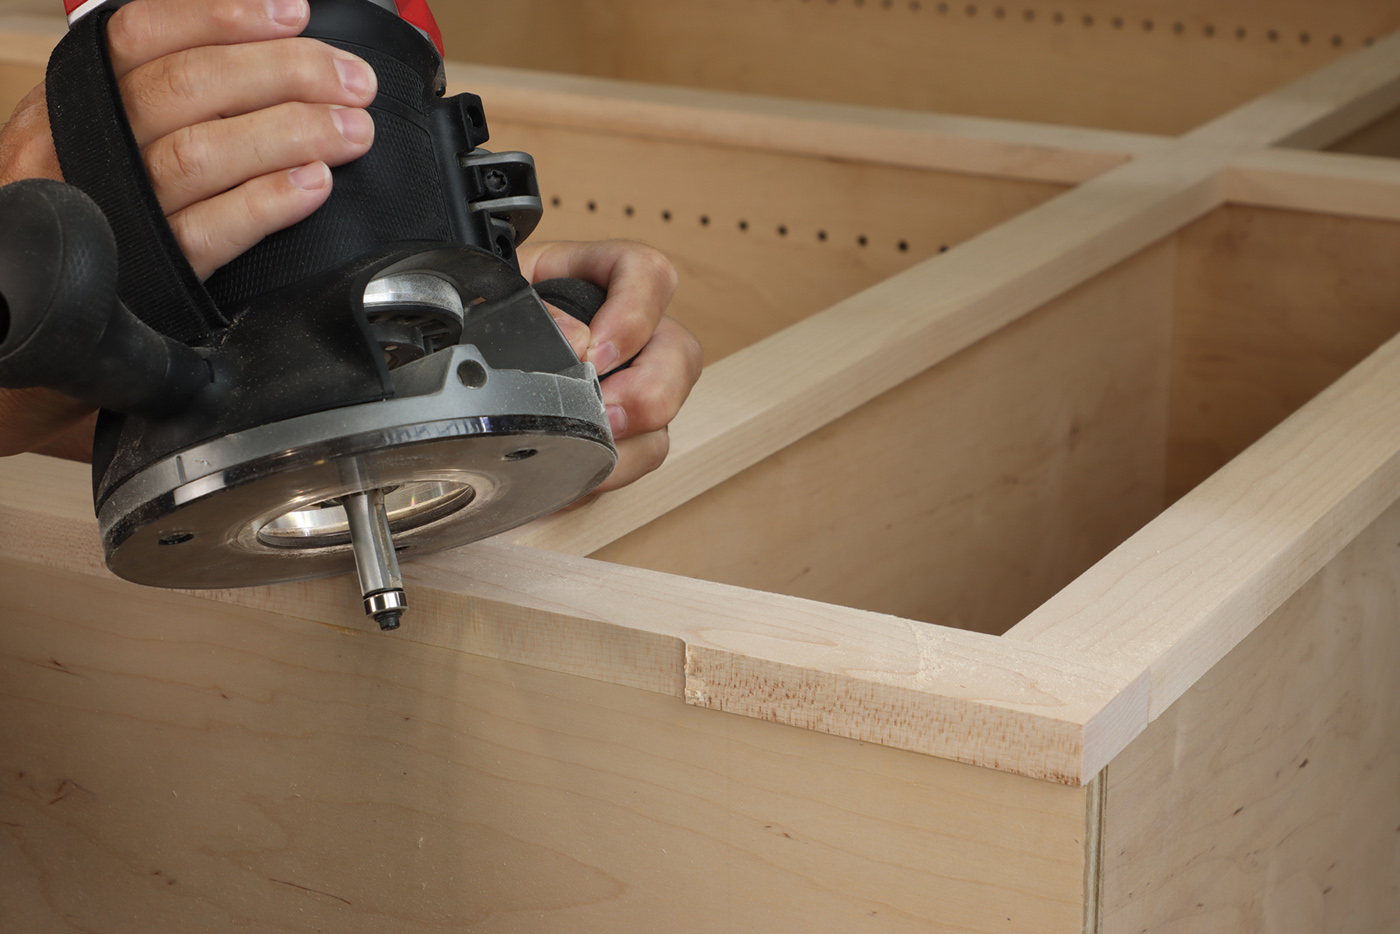
While production cabinet shops may drill shelf pin holes before assembly, I actually prefer to drill them after the cabinet box is assembled. Most DIY cabinet drilling jigs use some sort of template and a depth-limiting drill bit. To be honest, I’ve had terrible luck drilling shelf pin holes with a drill and switched to a plunge router setup years ago. If you equip the router with a 3/8“ guide bushing, you can still use a commercially available acrylic templates. But instead of the included drill bit, use a 1/4“ upcut spiral router bit. This method creates crisp, professional-looking shelf pin holes that are perfectly perpendicular to the cabinet sides. Next add two cleats to the back of the cabinet box. These are 3-1/2“ wide strips of plywood, secured to the cabinet box with pocket hole screws and glue. The cleats provide a secure means of attaching the cabinet to the wall, once your project is finished. It’s obvious when you’re building it, but worth noting, the cleats (as well as the fixed shelves) will align flush with the rabbet at the back of the cabinet.
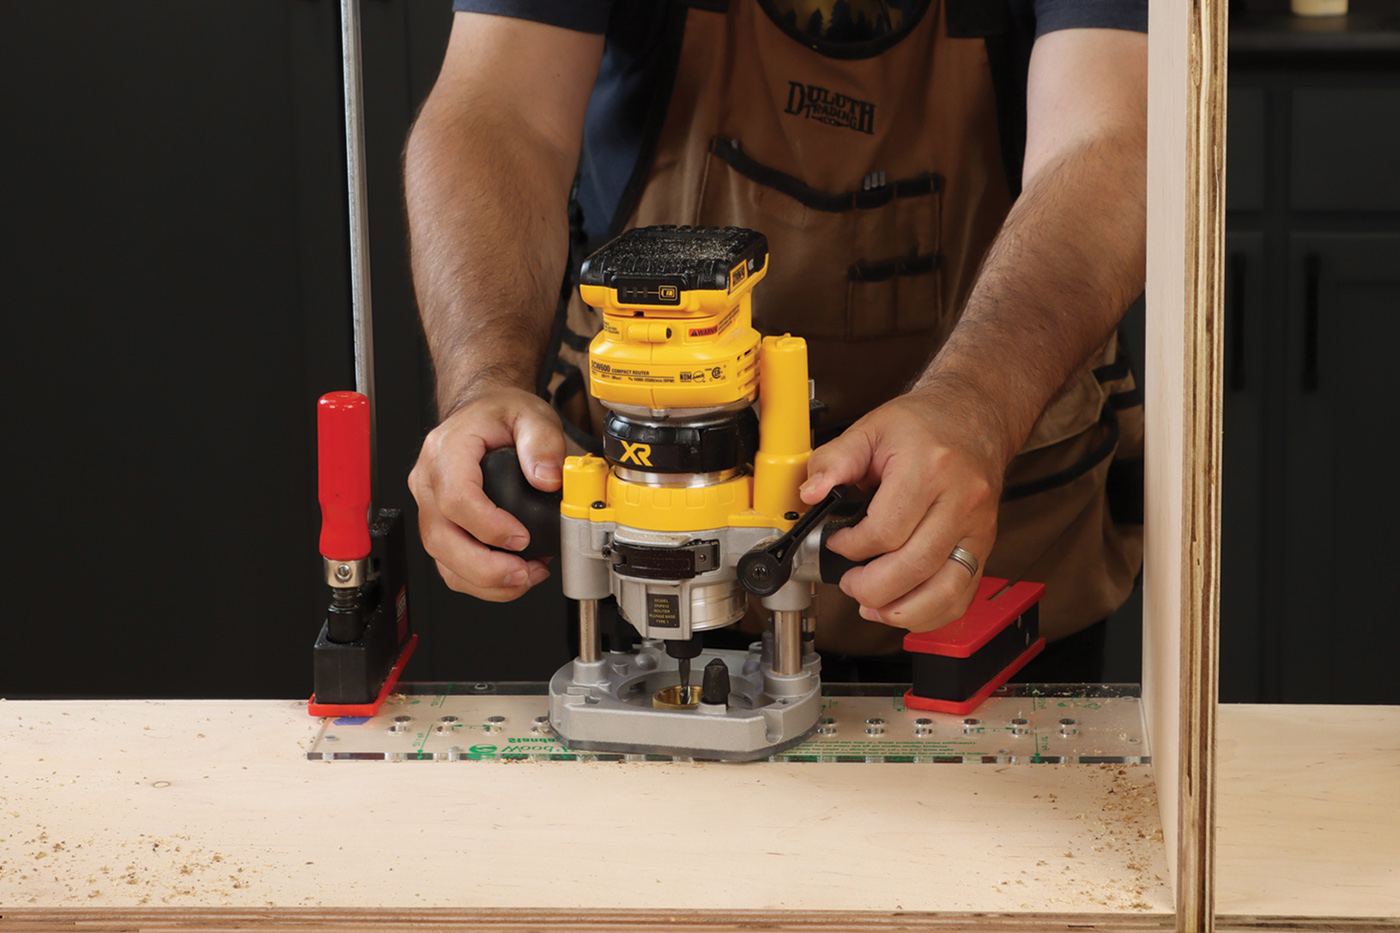
6 Drill the shelf pin holes on the assembled cabinet with a compact plunge router and acrylic template. A 1/4″ spiral upcut bit works best to prevent burning. Once you try this method, you’ll never go back to a drill bit!
7 Cut 4 cleats to size and drill 7 pocket holes in each. That’s two on each end and three down one long edge. The cleats are made from 3/4″ plywood and have been edge-banded on the exposed edge (optional step).
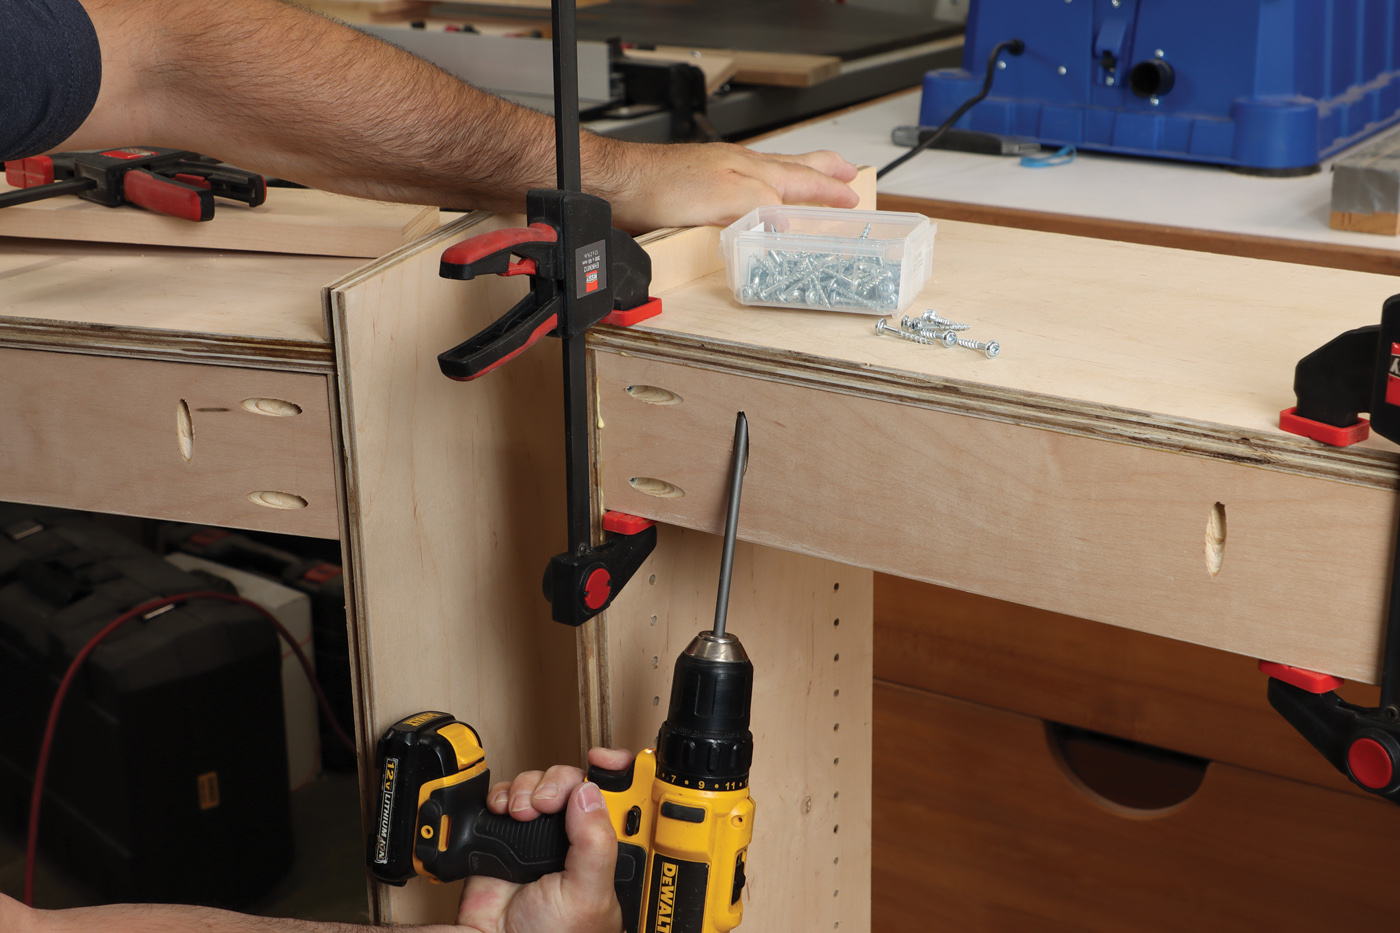
8 Install the cleats at the top and bottom of the main cabinet opening with glue and screws. Align the cleats with the rabbeted ledge.
Face Frame
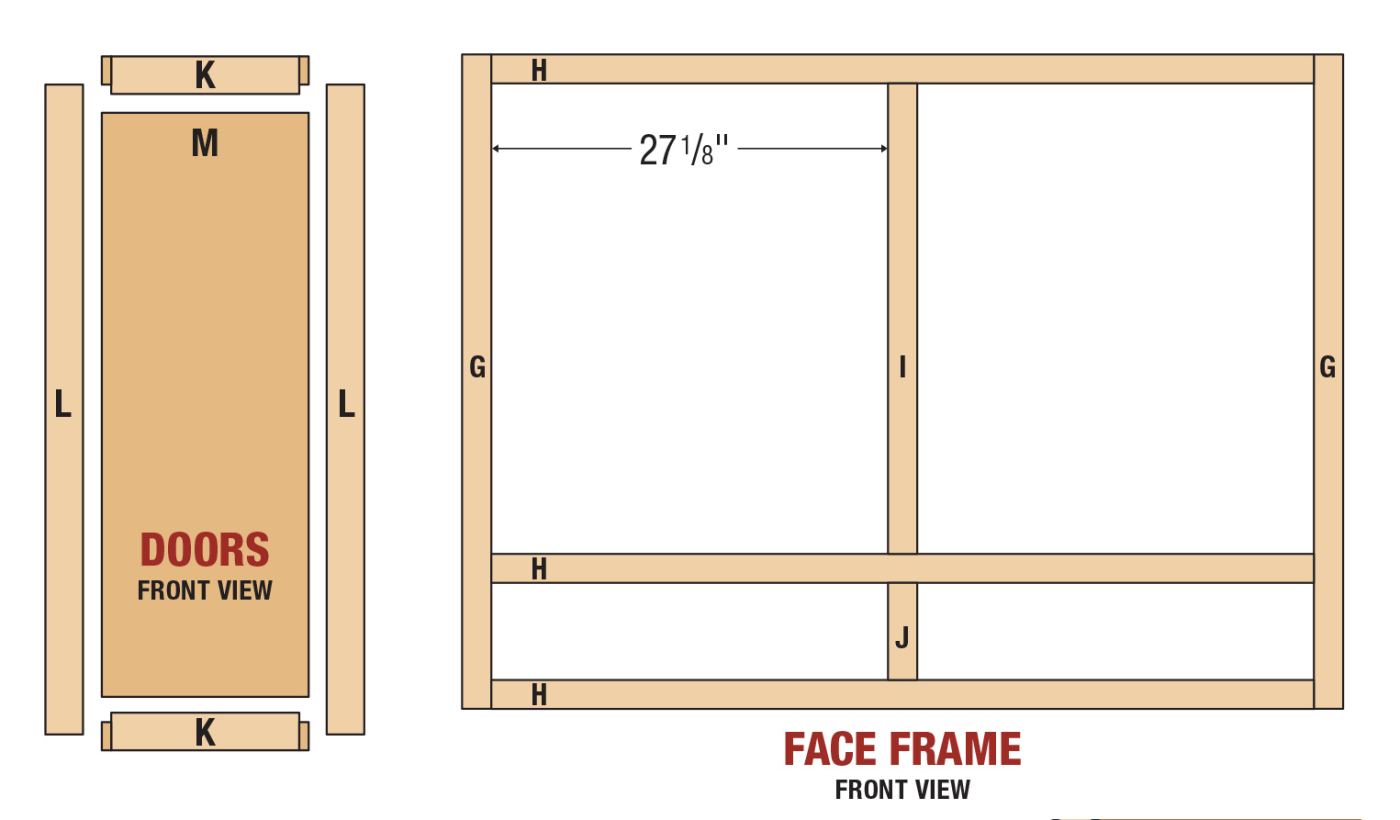
When you buy cabinets from your local home center, you’ll be shocked by the poor-quality materials like MDF, chip board, and plastic corner brackets too. Another thing you’ll see is individual face frames on each upper cabinet. That creates headaches on install day, so instead I gang my cabinets together, and make one continuous face frame. With this approach in mind, align the two cabinets side-by-side and clamp them together. Then permanently join them with nine screws, making sure they stay flush at the front. Now you can take accurate measurements for the face frame components. I usually leave a 1/16“ lip above any shelf, and 1/8“ overhang at the left and right edges. This gives you some leeway when installing the face frame to the cabinet. Cut the face frame parts to size, and drill pocket holes as required. I used hard maple on this cabinet, but I’ve used poplar in the past, and both work fine.
9 Gang the two cabinet boxes together, ensuring that the front edges are aligned. Use 9 screws—that’s 3 at the top, middle, and bottom of the cabinet.
10 Pocket hole the face frame parts with your best method. If you plan on doing another cabinet in the future, it may be worth adding a pocket hole machine to your shop, like this Kreg Foreman.

11 Assemble the face frame, sized to cover both cabinets. Clamping the parts down to your workbench is the key to flush joints.
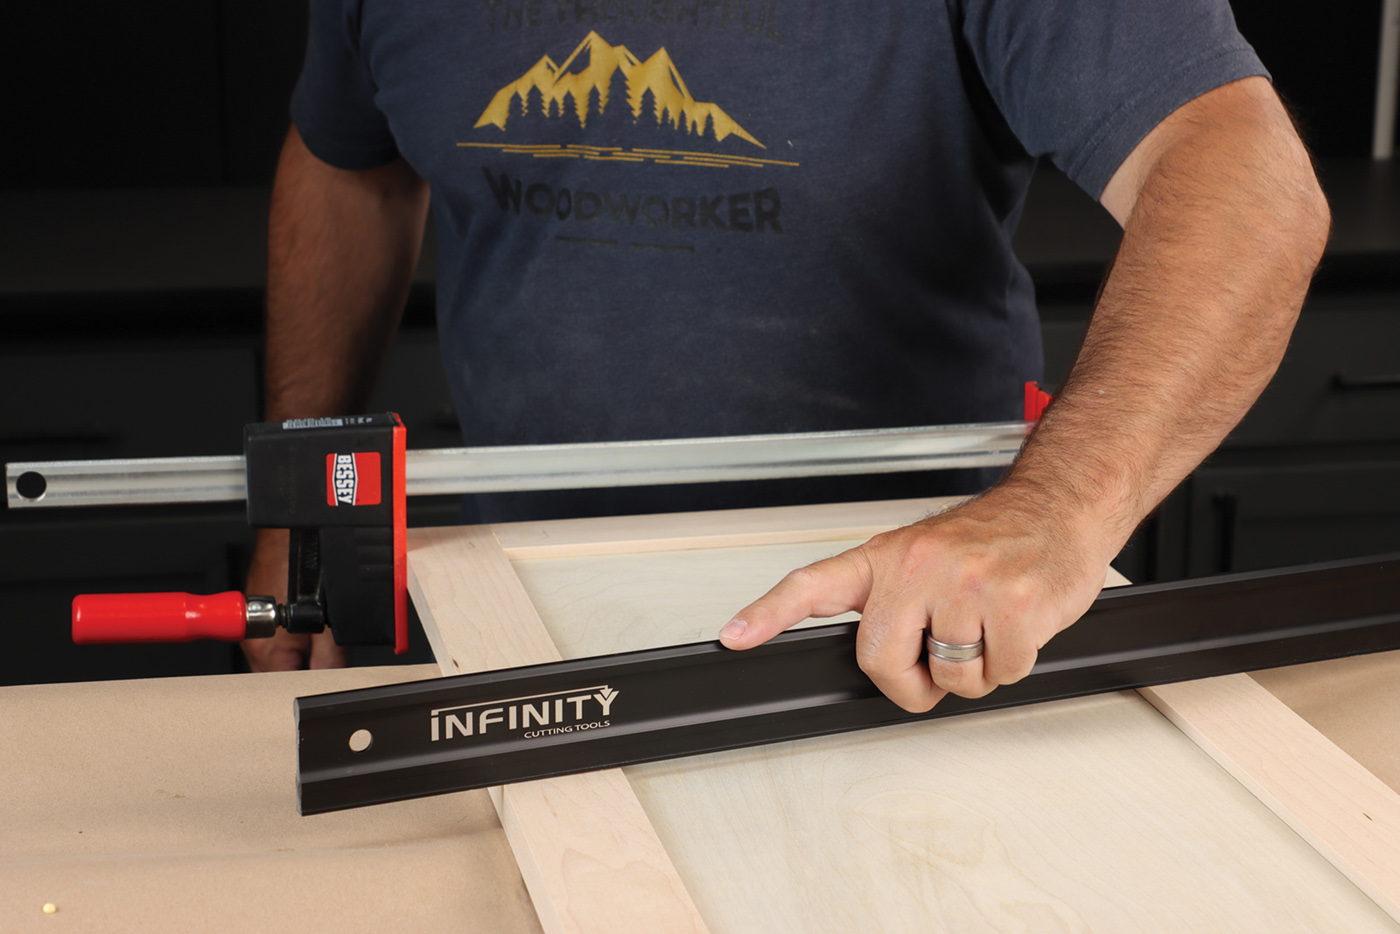
The outer stiles run the full height of the cabinet, while the middle stile is intersected by the intermediate rail. Assemble the face frame with screws and optional glue, making sure to clamp the parts down as you secure the fasteners. Sand the face frame front and back, before gluing it to the cabinet assembly. A brad nailer and clamps work too, but long clamping cauls really help to get a tight joint line. Now decide if you’ll leave the 1/8“ overhang at the sides of the cabinet or trim it flush. My rule of thumb is simple: if the cabinet abuts a wall or another cabinet, leave the overhang. Since mine is a stand-alone wall cabinet, I trimmed the overhang flush for a full custom cabinet look. A cordless router and 1/2“ diameter flush trimming bit make quick work of this task.
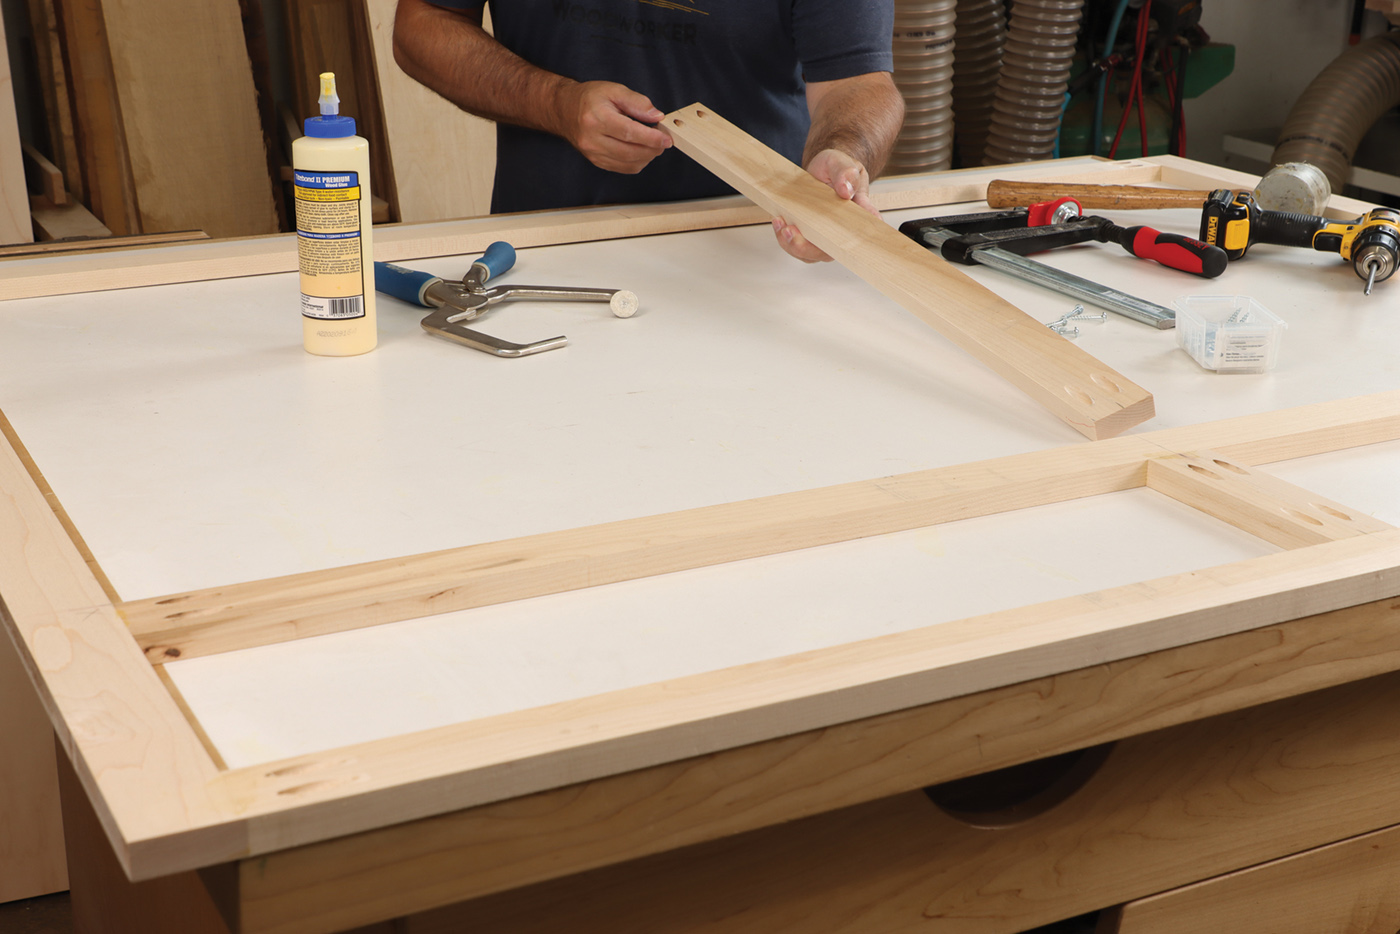
12 Once the perimeter frame is constructed, add the intermediate stiles to complete the large one-piece face frame.
13 Secure the face frame to the cabinet assembly with cauls of various length, and a few clamps.
14 Trim the face frame where it overhangs the left and right side of the cabinet with a router and bearing-guided flush trimming bit.
Cabinet Doors
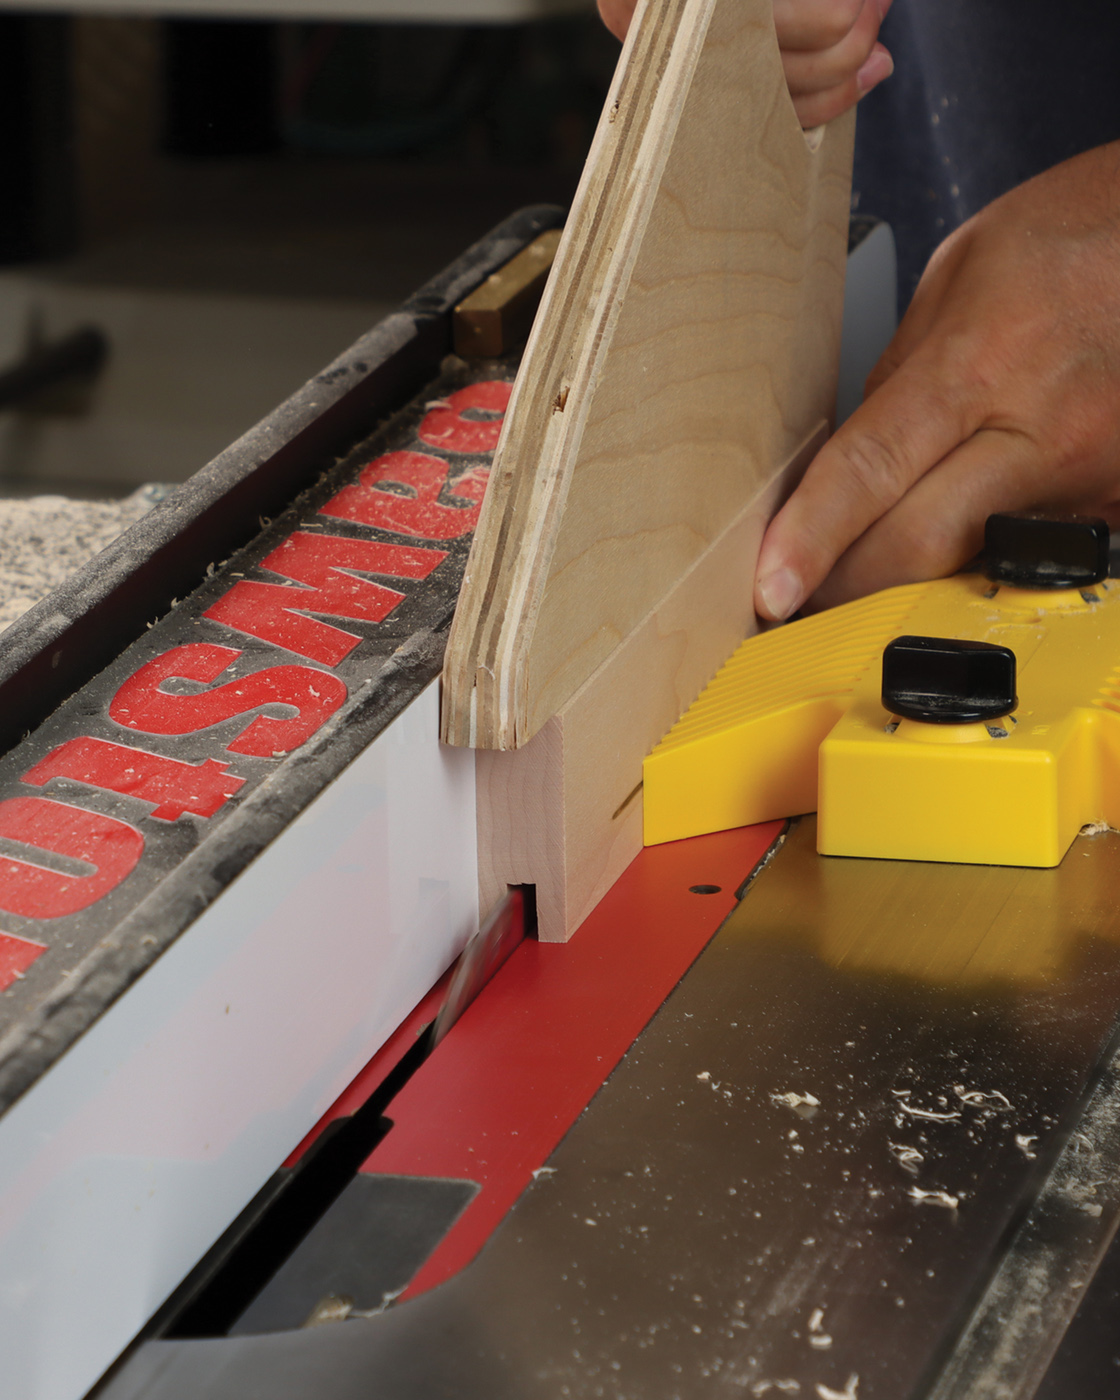
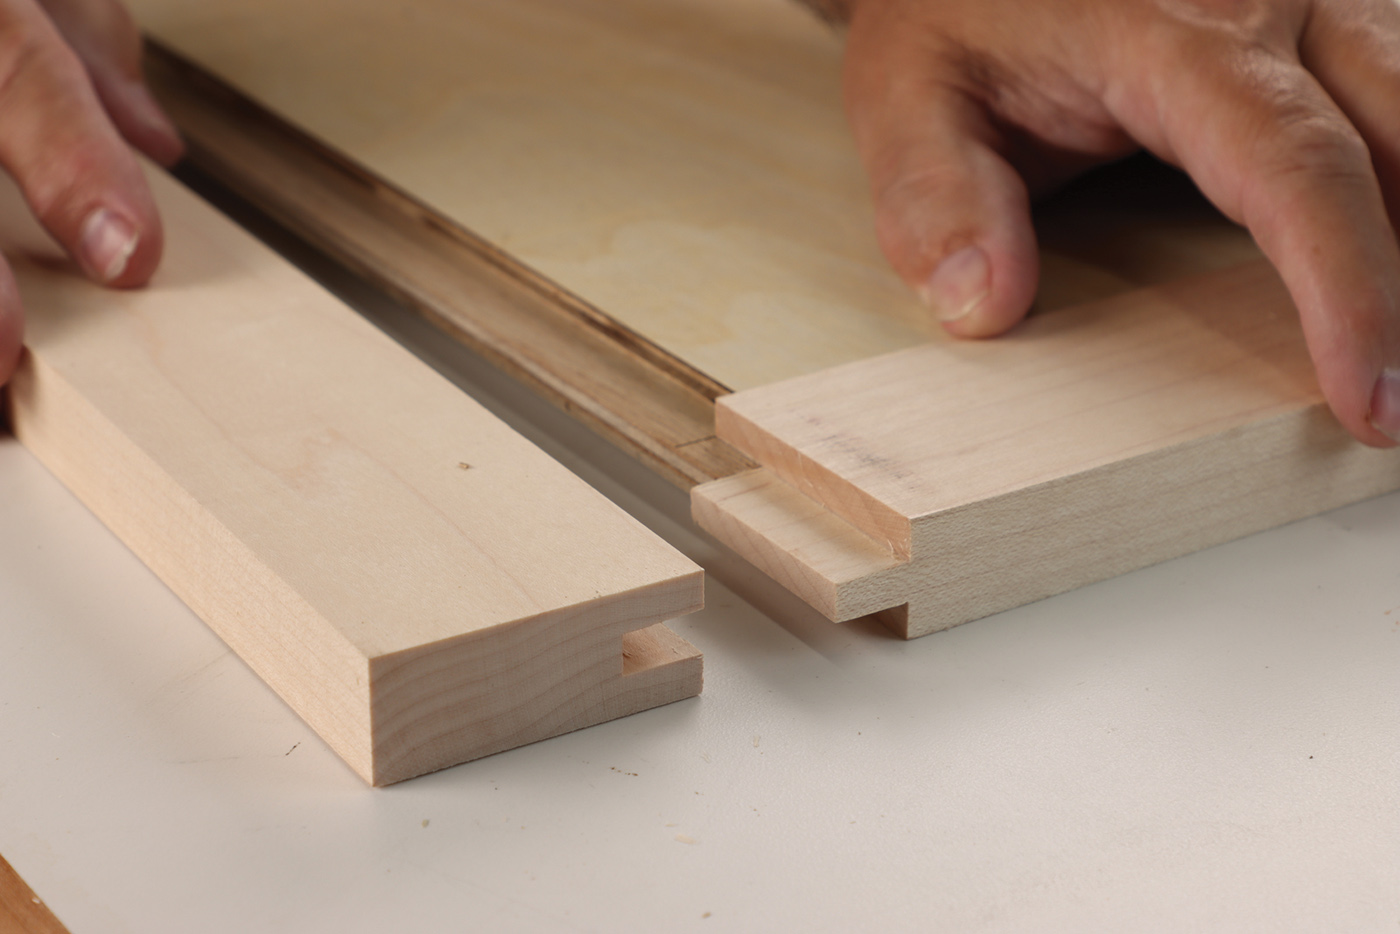
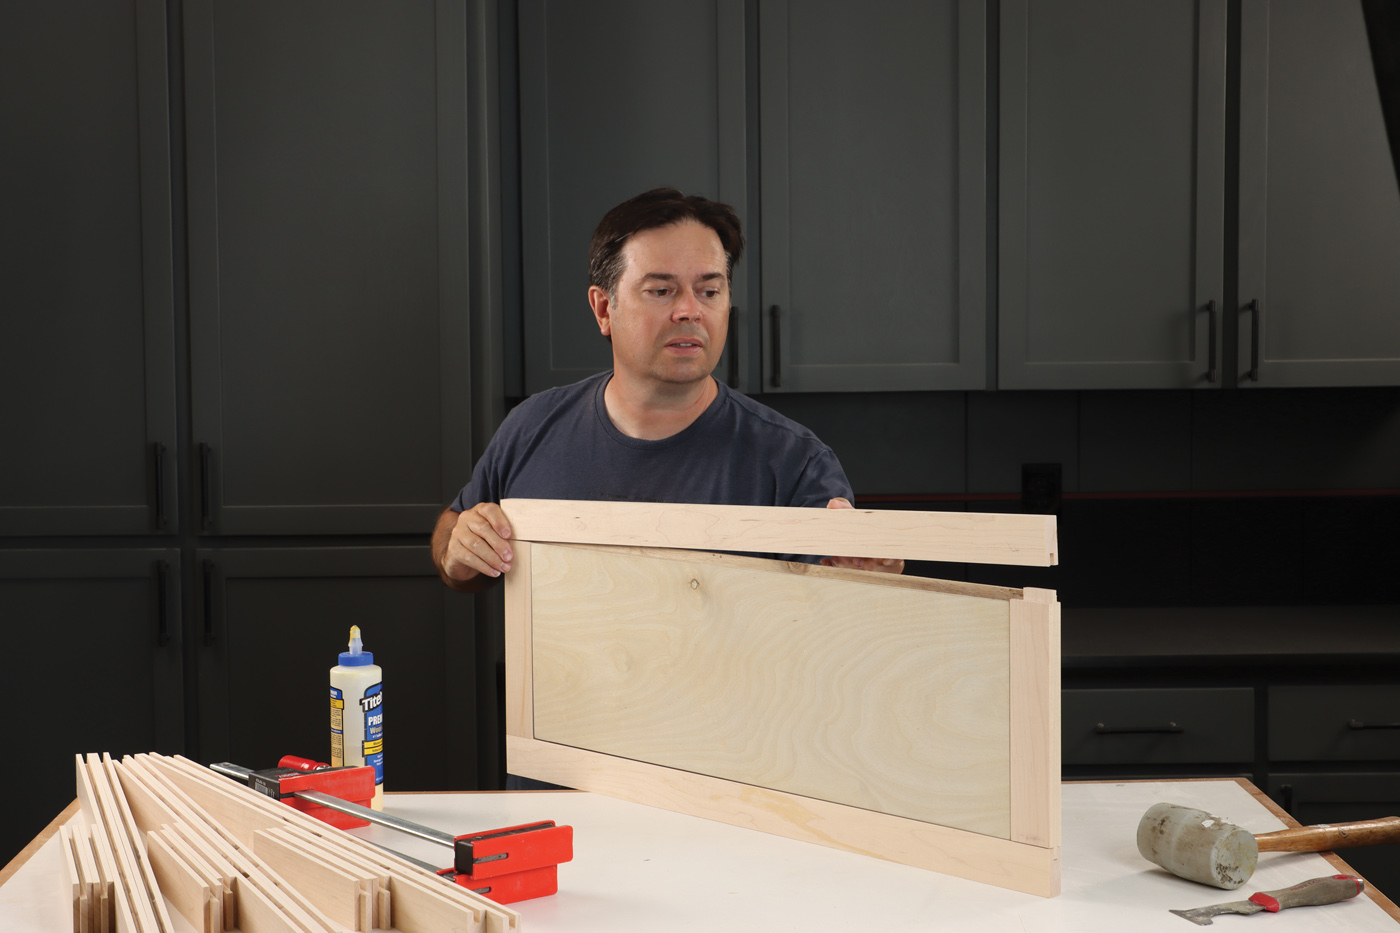
There are a few good ways to build cabinet doors, and while my glass front bookcase doors get special attention, these utilitarian doors use a standard approach with stub tenon joinery. Start by milling a centered groove in all the door parts, about 5/16“ wide and 1/2“ deep. Then use a dado blade and miter gauge setup to batch out the tenons. Raise the dado blade incrementally until the tenon fits snugly into the groove. I usually stop just shy of a perfect fit, and fine tune the tenons with a shoulder plane. The last step in making the door parts is to rabbet the 1/2“ plywood panel until it fits the groove you made. The same setup used to rabbet the side panels works great for this step. Dry assemble the doors to convince yourself that the joinery is sound and sand the panel and inner edges of the hardwood parts. Then glue the doors together, making certain the stiles stay flat as you apply clamping pressure. Center the panel in the frame with a putty knife, and let the doors cure.
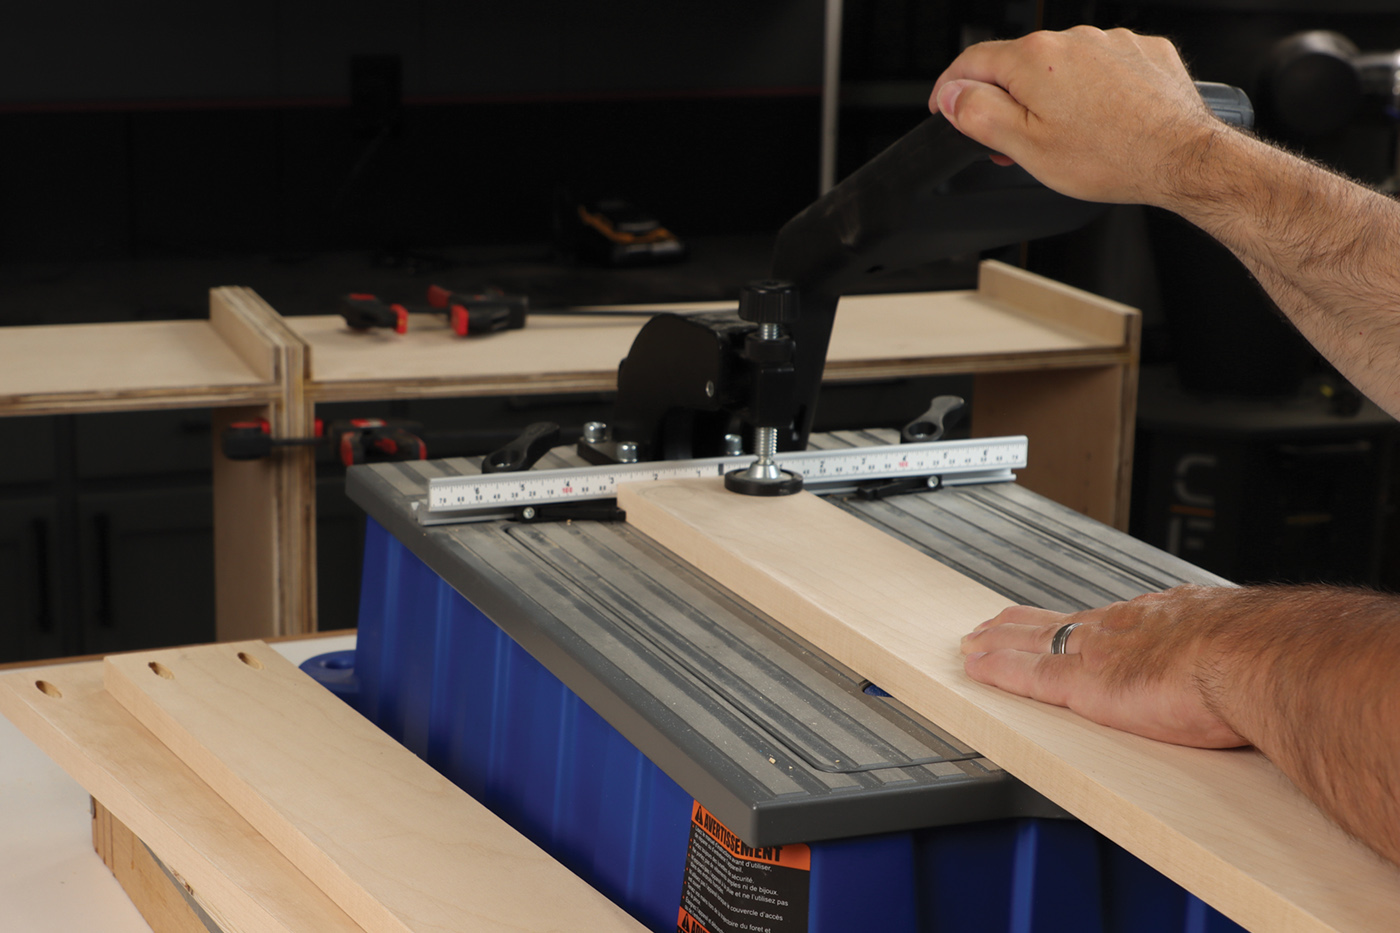
15 Cut a groove in all door frame parts with a full-kerf combination blade. Make two passes, one from each face, for a perfectly centered groove. Note the magnetic featherboard and long pushstick for consistent cuts that are easy to control.

16 Now use a dado blade, miter gauge and sacrificial fence to cut the tenons on the door rails.
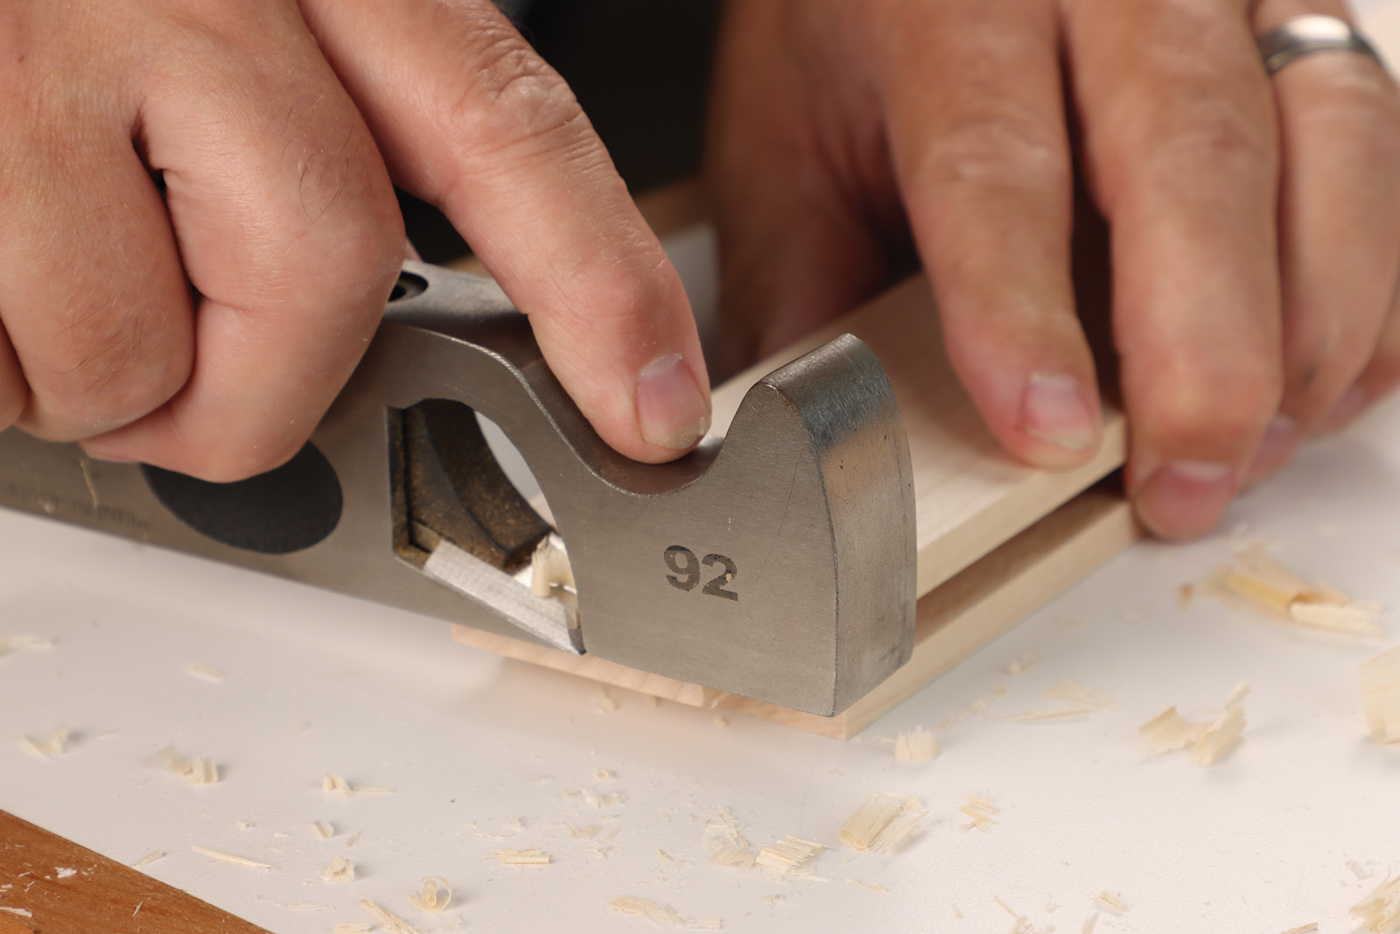
17 Fine-tune the tenon fit with a few swipes of a shoulder plane.
18 Once the stub tenon joinery fits well, rabbet the door panels to fit in the groove, and test fit the entire door.
19 Glue the four doors together on a flat surface. Luckily, they only require two clamps per door to assemble.
20 Once clamping pressure has been applied to the door, check that the parts remain flat with a quality straightedge. Adjust the clamps as needed to correct any twisting, before the glue sets.
21 Flip the door over and center the 1/2″ plywood panel in the frame. A simple putty knife is the right tool for the job.
Odds-and-Ends
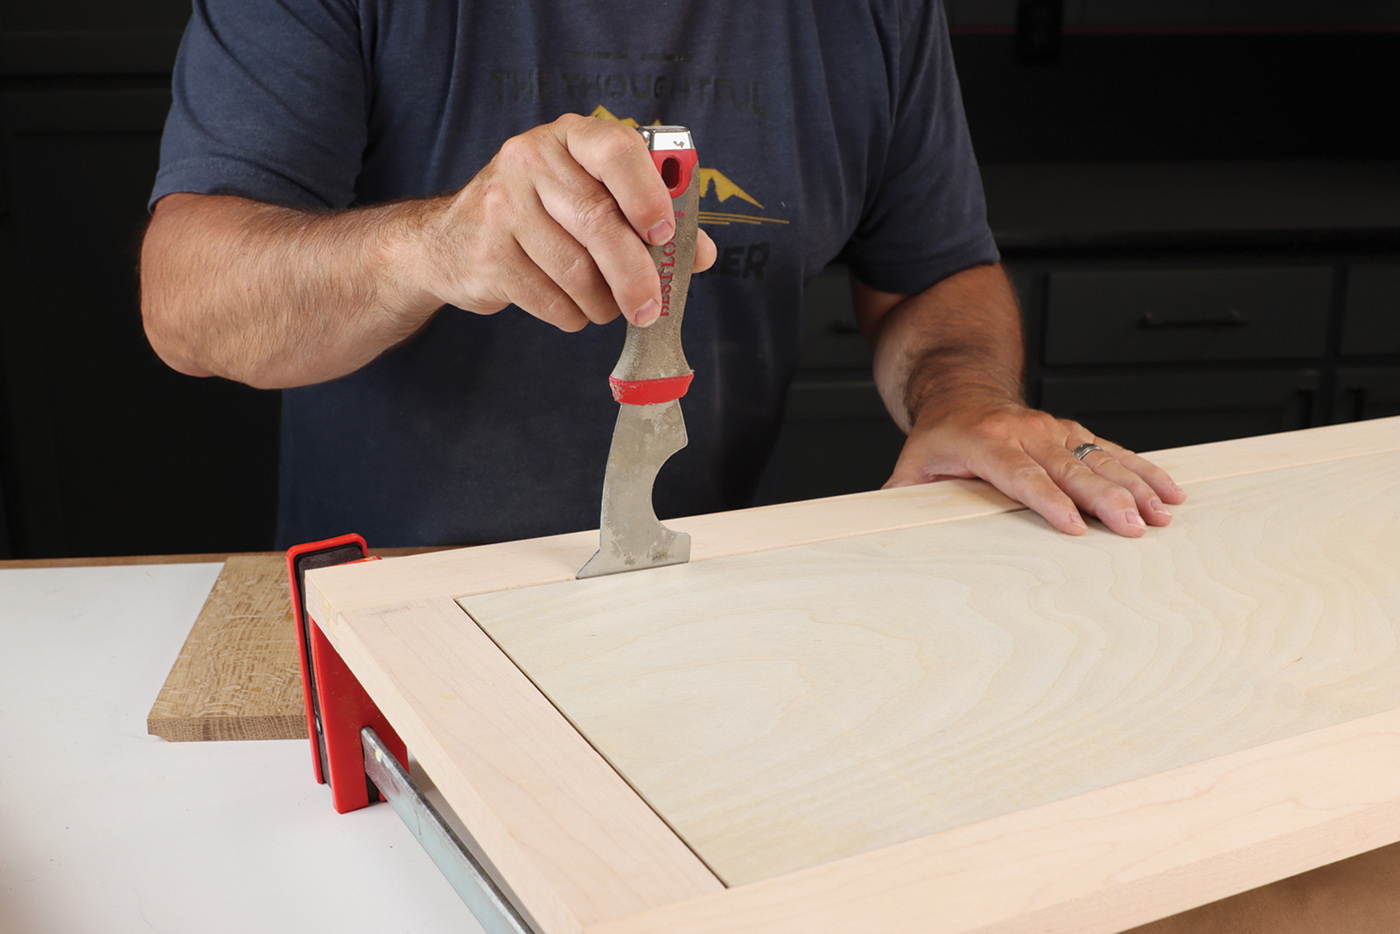
If your cabinets are destined for a painted finish like mine, take a moment to apply non-shrinking lightweight spackle to any nail holes or joint imperfections. Then make either 4 or 6 adjustable shelves and decide if they need to be reinforced with edging. At 28-1/2“ long it’s debatable if edging is needed, but I went ahead and added L-shaped hardwood strips to stiffen the shelves and prevent sagging. If you elect to use iron-on edge-banding instead, just be aware that your shelf width will vary slightly from the cutlist. Cabinet finishing is a topic unto its own, but my general approach is to spray the cabinet boxes before the 1/4“ back panel is installed. This gives me better access for spraying and avoids common problems like blowback and overspray. I’ve taken to a two-tone finish where the boxes are painted, and the shelves and back panels are lacquered. With this charging cabinet in particular, I painted the lower portion of the back panel, because it’s visible from the front. If you’d like to learn more about spraying cabinets check out my YouTube channel, The Thoughtful Woodworker. Drill a pair of 35mm holes for soft-close Euro style hinges with a drill press or hinge-drilling jig. I offset the holes about 1/4“ from the outside of the door stile, but a test hole will confirm you have an adequate 1/2“ overlay with your particular hardware. Likewise, drill for the cabinet door pulls with a jig for accurate placement.
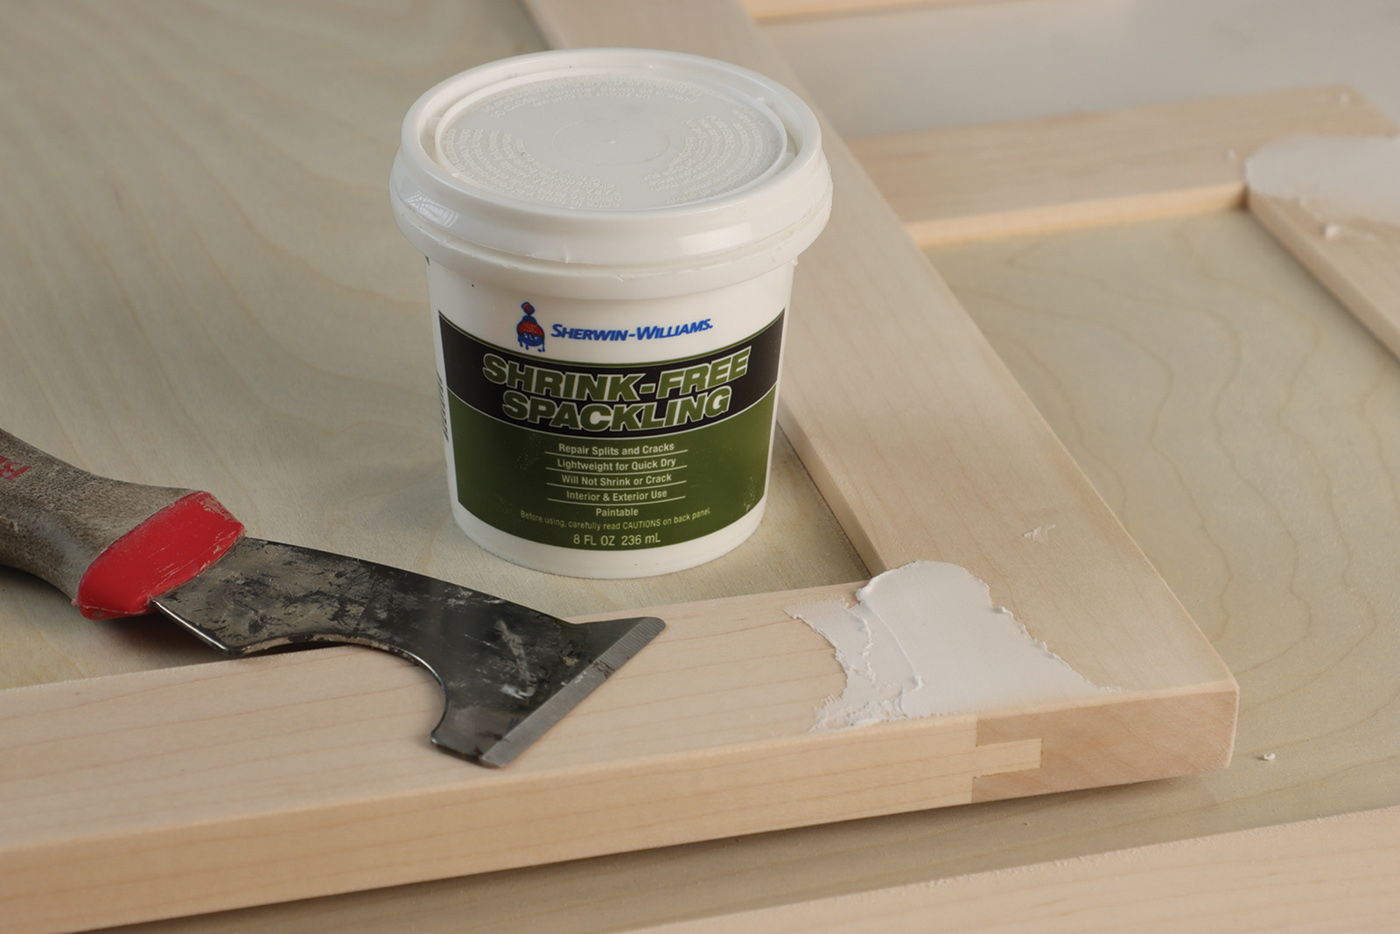
22 For paint grade cabinets, fill any nail holes or joint lines with a lightweight non-shrinking spackle. Leave the filler proud
of the defect, so a single
application will look good,
once sanded.
23 Trim out the adjustable shelves with hardwood edging, and glue it in place. This nosing was made from 11/4″ wide maple and rabbeted to fit the 3/4″ plywood.
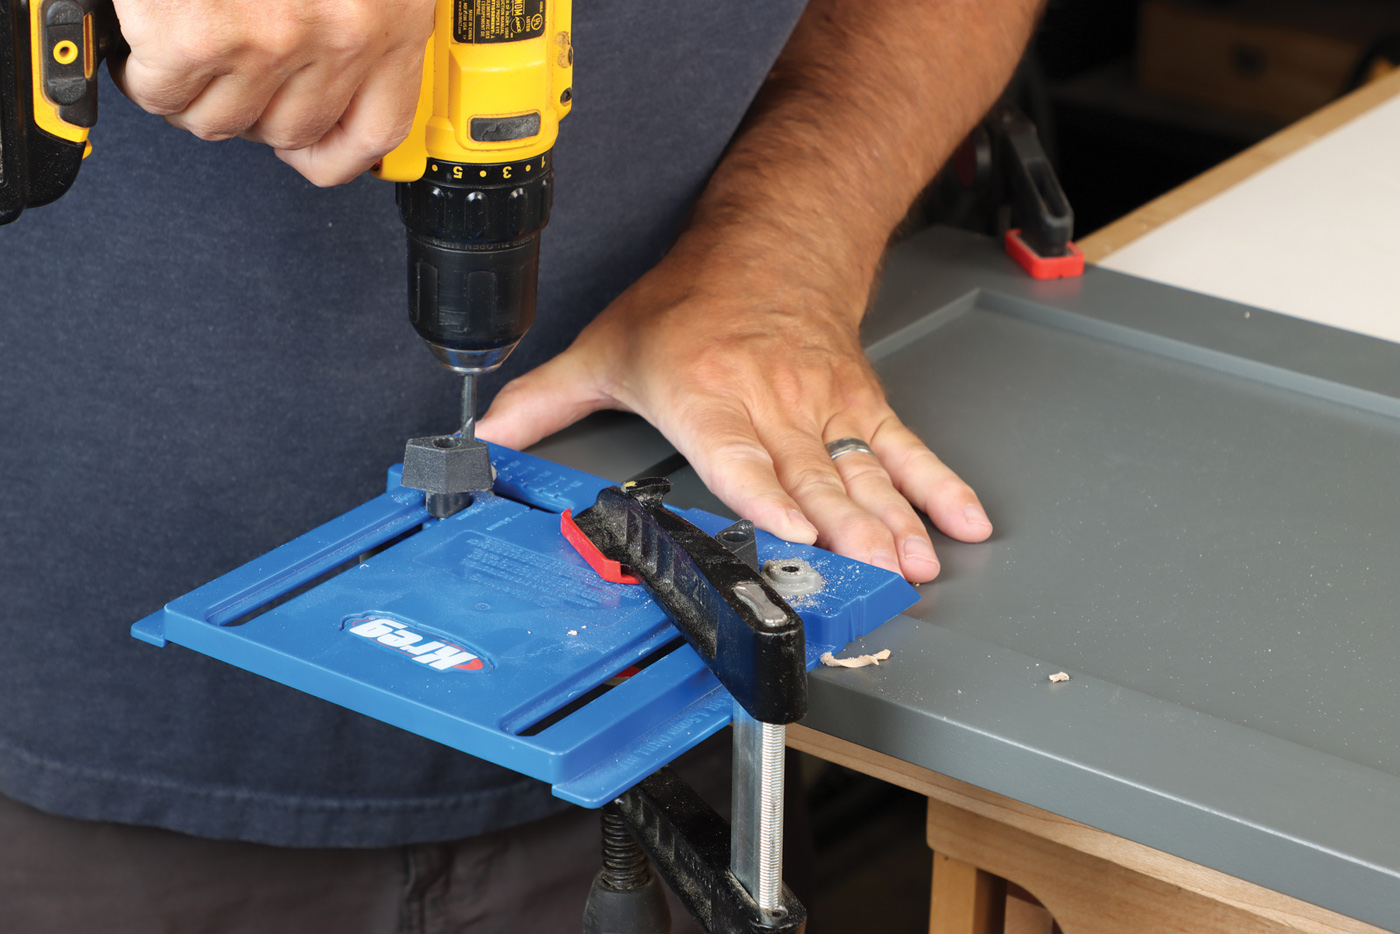
24 Use a jig to locate and drill for door pulls. I selected somewhat industrial looking black cabinet pulls with a knurled detail.
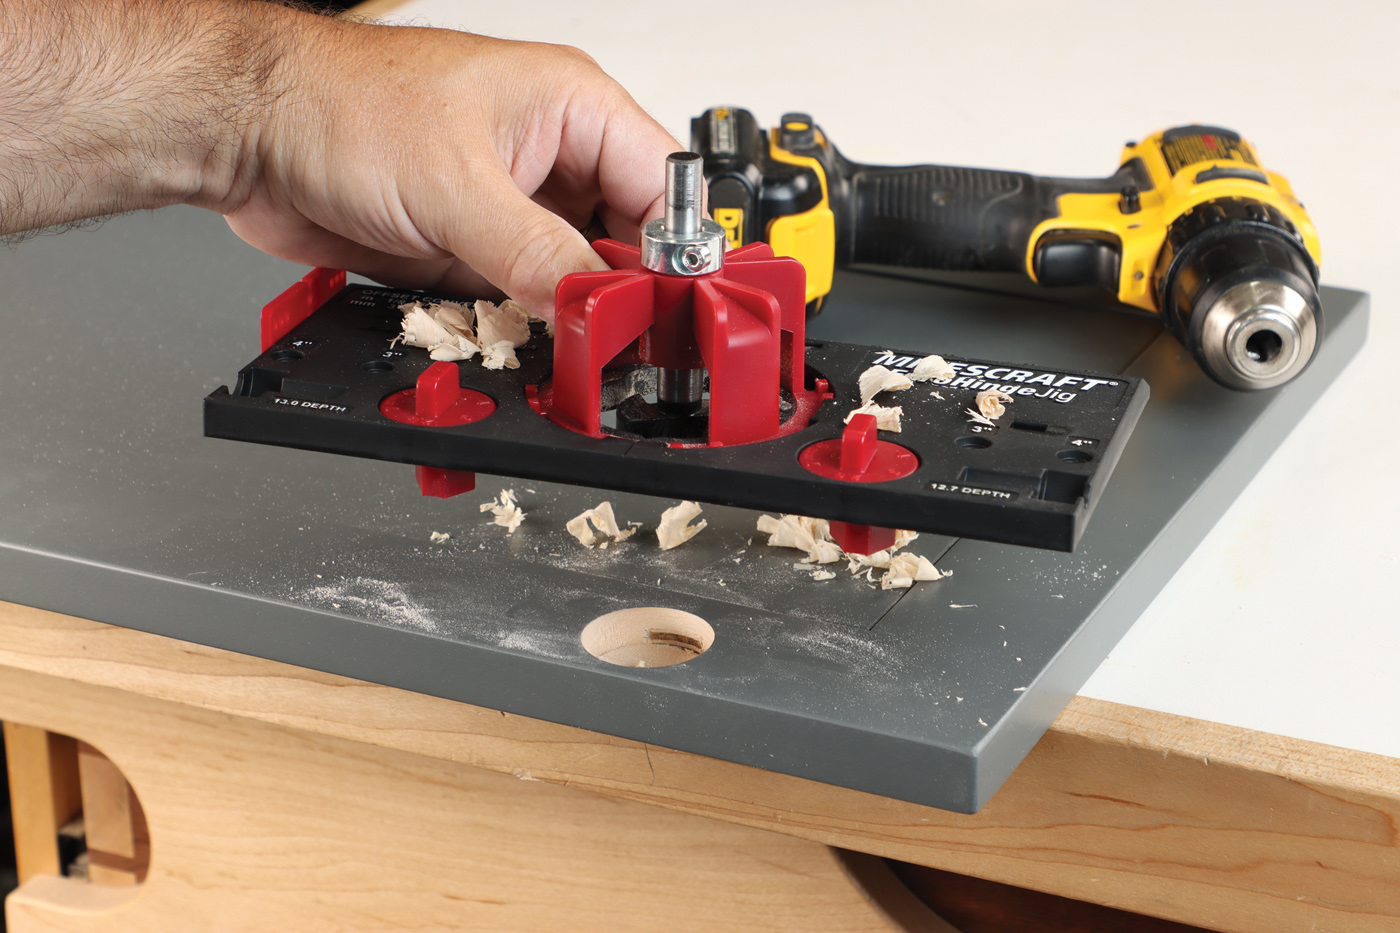
25 Drill 35mm holes with a dedicated hinge drilling jig, like this one from Milescraft. It helps to control both the offset and depth of the cut. A drill press also works for this step.
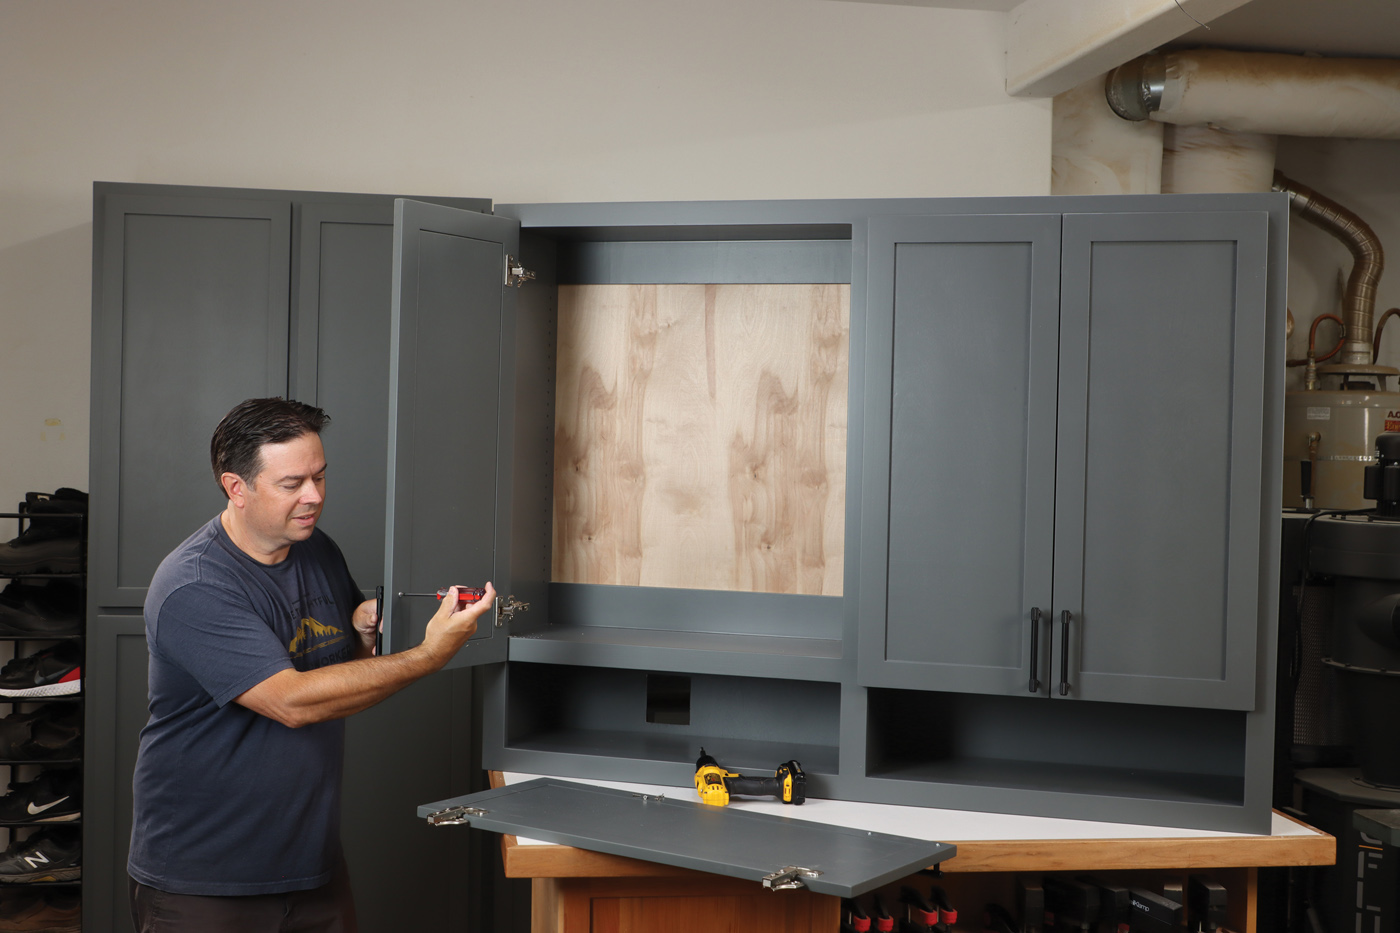
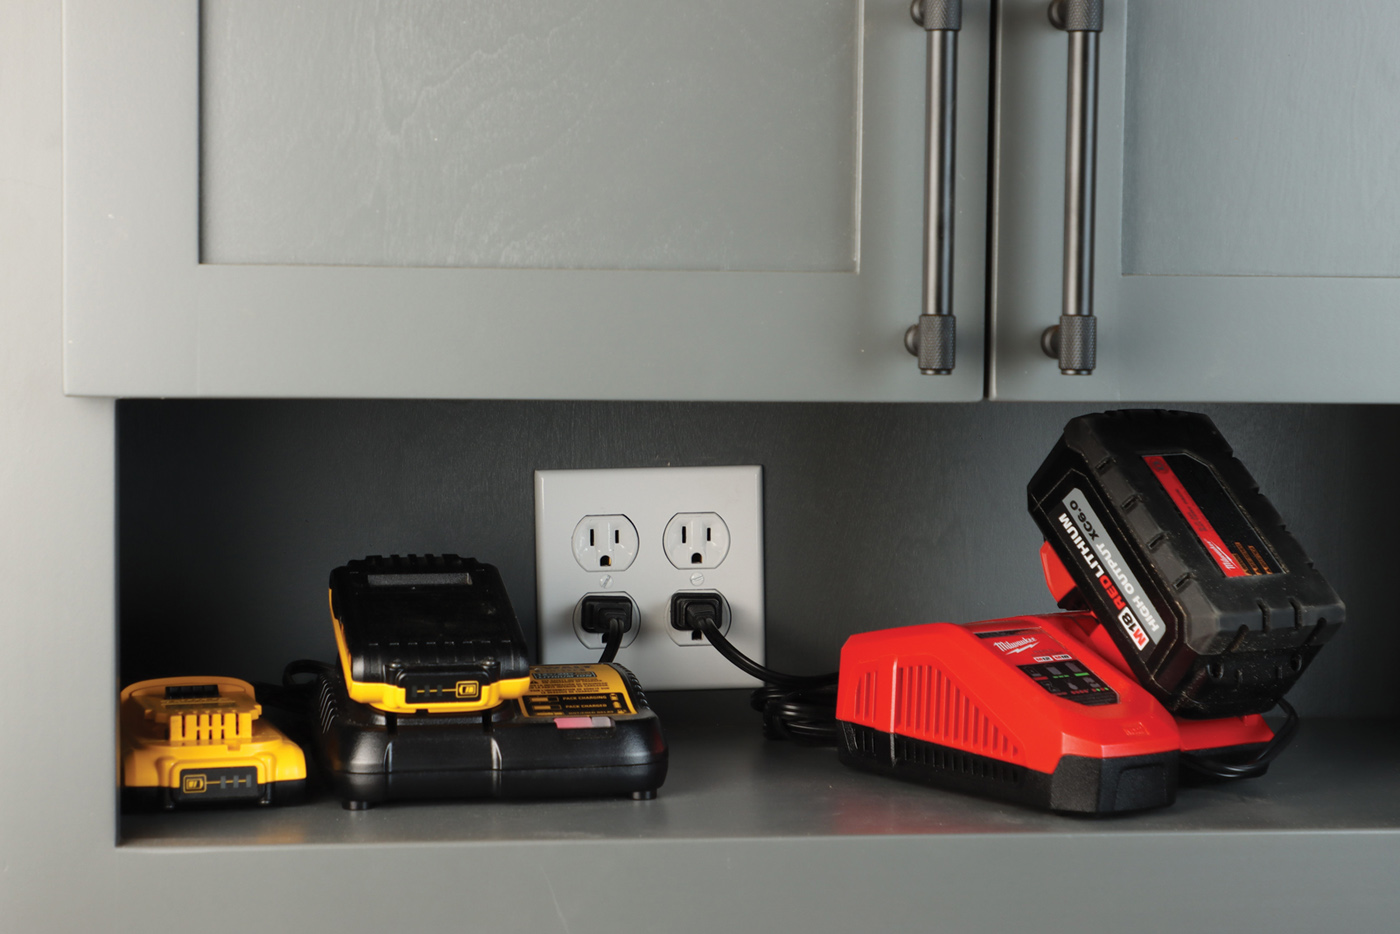
26 Hang the doors and mount the hardware. Note the hole in the left cubby for the double-gang outlet. You can also see how the back panels were painted where they show through the charging cubby and finished with clear lacquer where they’re hidden inside the cabinet.
Electrical Connection & Installation
You’ll likely need to add an electrical outlet that surfaces in one of the cubbies. I had an outlet close but needed to relocate it higher to match the height of the cabinet. It’s pretty easy to do, but check your local electrical codes, and hire an electrician if you’re not comfortable with the work. A 1/4“ box extender is typically required to bring the outlets flush with the inside of the cabinet. This way, you’ll have a convenient way to charge and store all your batteries, while still allowing good air circulation for the charging equipment. Cut a hole for the receptacle and install the back panels with brad nails. Screw a temporary ledger board to the wall, and set the cabinet on it, as you attach it to the wall with twelve 21/2“ screws. When installing upper cabinets, I predetermine the stud locations and start the screws inside the cabinet. That way, you only need helpers for a moment when it’s time to hang the cabinet. Make sure to drive the screws through the upper and lower cleats for adequate strength.


