We may receive a commission when you use our affiliate links. However, this does not impact our recommendations.
Wedged Mortise and Tenon
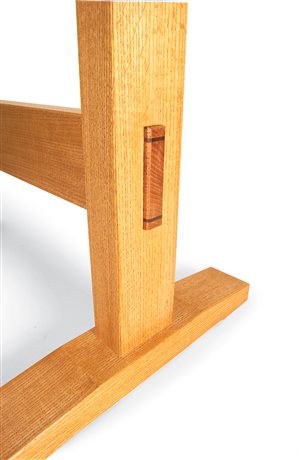
This joint will never loosen!
By Tom Caspar
Tap, tap, tap. The wedges go home, the glue squeezes out and a big smile lights up your face. “This joint isn’t coming apart for a hundred years,” you say. “It’s as solid as a rock!”
Making a wedged mortise-andtenon joint is richly rewarding. Once you understand how it works (see "How the Joint Works," right), you can’t help but admire the joint’s elegant simplicity. It also sends a message. A wedged joint says to one and all, “This was made by a skilled woodworker.”
Where could you use a wedged joint? It’s a candidate for any joint that receives a lot of stress. A table base such as the one shown here, is a good example. Pushing or leaning on the table might slowly force a standard joint apart, but wedges keep this joint locked together.
The wedged mortise-and-tenon joint isn’t difficult to make, but you should have some experience making standard mortise-and-tenon joints before tackling it.
Tools required
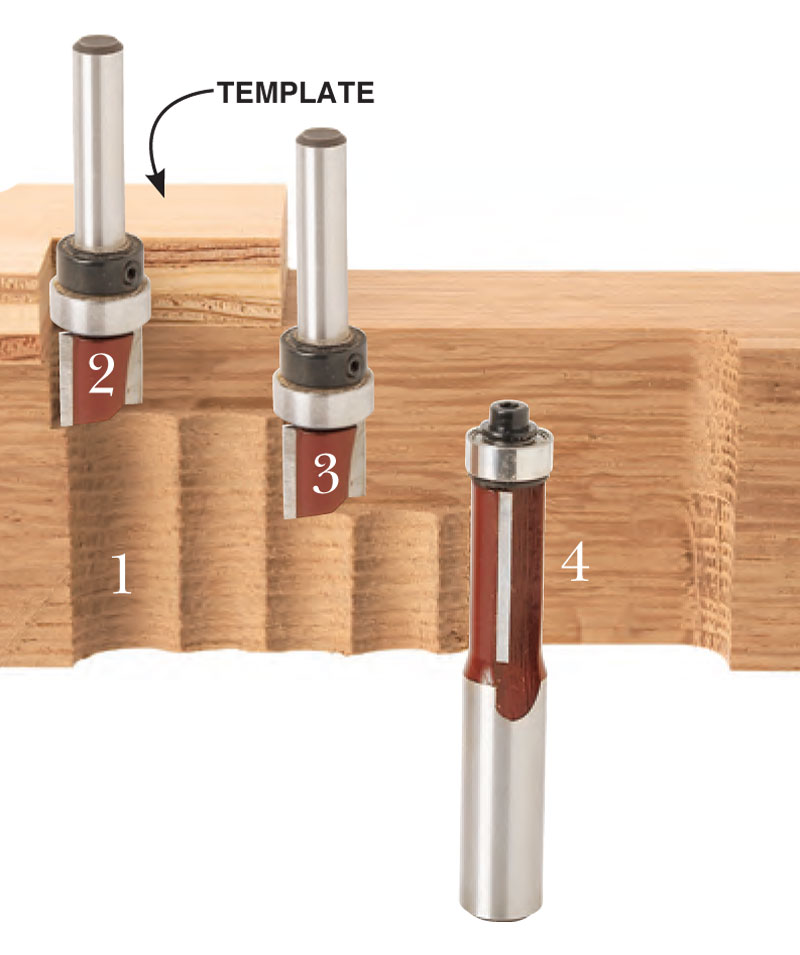
To make this joint, you’ll need a tablesaw, drill press, plunge router, chisel and a bandsaw. If your mortise’s width is 5/8" or more, like the mortise I made, you’ll need a 1/2" dia. top-bearing flush-trim bit. If the mortise is more than 3/4" deep, you’ll need a bottom-bearing flush-trim bit (see Source, below). For a mortise less than 5/8" wide, you’ll need a straight router bit and a fence or jig for your plunge router.
Rout the mortise
Before you begin your project, make a prototype joint (see “Designing Your Wedged Joint,” right).
It’s good practice to start with the mortise for any type of mortise-and-tenon joint. It’s easier to fine-tune a tenon to fit a mortise than the other way around.
This is a through-mortise, meaning it goes all the way through the workpiece. My favorite way to make a fairly large one is to remove most of the waste on the drill press and then use a plunge router and template (Photo 1). This method works particularly well in thick stock, because it makes a mortise with absolutely straight walls. That’s important for appearance’s sake in a through joint, because you can clearly see from the outside how well the mortise and tenon fit together.
Make the template from plywood or solid wood by gluing four pieces together. The inner two pieces are the exact width of the mortise, but their overall length is unimportant. The outer pieces must be long enough to allow room for clamps. Space the inner pieces apart by the length of the mortise.
Before you start routing, use the template to draw the mortise on the workpiece. Drill out most of the waste using a Forstner bit that’s 1/16" to 1/8" smaller than the mortise’s width. Make overlapping holes to remove as much wood as possible. Rout the mortise (Photo 2).
Taper the mortise
Tapering the ends of the mortise requires a razor-sharp chisel; there’s no practical way to do it with a router. You must use a chisel to square the ends of a routed mortise anyway; so tapering isn’t that much extra work.
Make a 1-1/2" to 2" thick block to guide your chisel. Cut one end square. Cut the other end at the angle you’ve chosen for tapering the mortise and wedges. I’ve found that a 3-degree angle works well.
Use the guide block’s right-angle end to square the back of the mortise. Chop about one-fourth of the mortise’s depth. Turn the workpiece over and position the block a short distance away from the end of the mortise (Photo 3). The exact distance depends on the mortise’s depth. You’ll want the taper to extend approximately three-fourths of the way down the mortise. On a 3-degree taper, shifting the block 1/16" from the mortise’s ends results in a taper about 1" deep.
Make the tenon
Make the tenon any way you want. I use a tablesaw tenoning jig to cut its cheeks, a bandsaw equipped with a fence to rip its top and bottom sides and a tablesaw’s miter gauge to cut all four shoulders. The tenon’s length is up to you; it can be flush or stand proud of the joint.
Fit the tenon to the back, untapered side of the mortise. It should be no more than a paper thickness smaller than the opening. If your tenon stands proud, chamfer its end using a block plane or file.
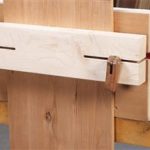
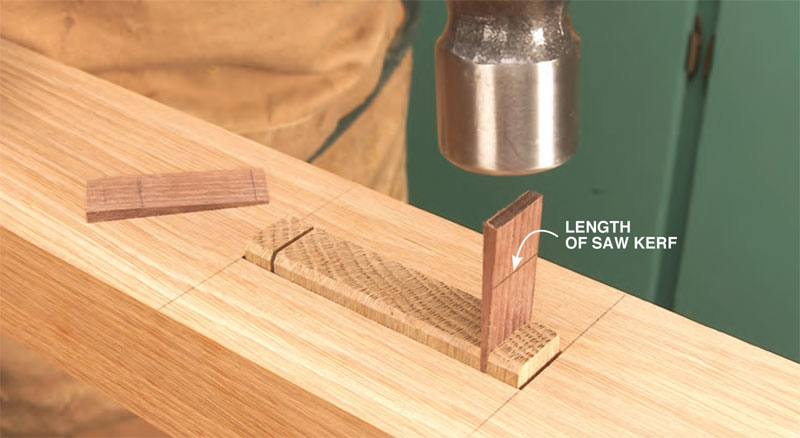
The next two steps are unique to this joint: making the strain-relief holes and sawing kerfs for the wedges. Start by marking and drilling the holes (Photo 4). Their location and diameter determine the flexible strips’ thickness. In most woods, such as the white oak I’m using here, I drill 1/4" dia. holes centered 1/4" from the edge. This makes the bending strip a flexible 1/8" thick. Holes that are only 1/8" are commonly used for this joint, too, for types of wood that bend easily, such as maple and ash.
For the saw kerfs, draw lines that connect the holes to the tenon’s end. Traditionally, the kerfs go to a hole’s center, but I aim for the hole’s inside edge (Photo 5). Looking headon at the completed joint, I believe this divides the tenon into more pleasing proportions.
Saw the wedges
Make wedges using the tablesaw (Photo 6). This method allows you to cut a precise angle and fine-tune each wedge’s thickness. Make a wedge blank from straight-grained wood. I prefer one that contrasts in color from the tenon. Make the blank about 3/4" thick and as wide as the mortise.
Tilt the blade to the guide block’s angle. Here, it’s 3 degrees. Raise the blade to make wedges that are about 1" longer than the tenon.
For a trial cut, position the stop block so the thin end of the wedge is the same thickness as the tenon’s kerfs. Clamp the blank to a tall fence using a wooden handscrew. (A wooden clamp protects your blade from damage if you accidentally place the clamp too low.) Flip the blank around to cut a second wedge. Remove the blank and crosscut the wedges by hand or on the bandsaw. File chamfers all the way around the wedges’ thin ends.
Test the wedges’ fit
Push the tenon all the way through the mortise—without glue, of course. Tap in the wedges, but not too hard (Photo 7). If they’re too skinny, cut them shorter or adjust the stop block and saw new ones. If your wedges become stuck, pull them out using locking pliers. The wedges should go in as far as possible but not be so long that they hit bottom before fully spreading the tenon. Marking the bandsaw kerf’s length on each wedge will help you prevent this problem.
Assemble the joint
When everything is ready to go together, you only have to put glue on the mortise’s long sides and the tenon’s cheeks. Clamp the joint so the tenon’s shoulders are tight to the mortise. Then brush glue into the saw kerfs and the mortise’s tapered spaces. Tap in both wedges and clean up the glue squeeze-out. Saw off the wedge’s excess length after the glue dries. Use a file or low-angle block plane to level the wedges flush to the tenon.
Click any image to view a larger version.

How the Joint Works
Here’s a cutaway view of a wedged mortise-and-tenon joint. Driving in the wedges forces the tenon to flare into a fan or dovetail shape. The mortise is tapered to match the angle of each wedge. Like a dovetail, this joint can’t pull apart after the wedges go home.
This tenon has two unusual features: saw kerfs that create flexible strips and holes that disperse the strain that the wedges create. The wedges cause the strips to bend; the holes prevent the bend from splitting the rail.
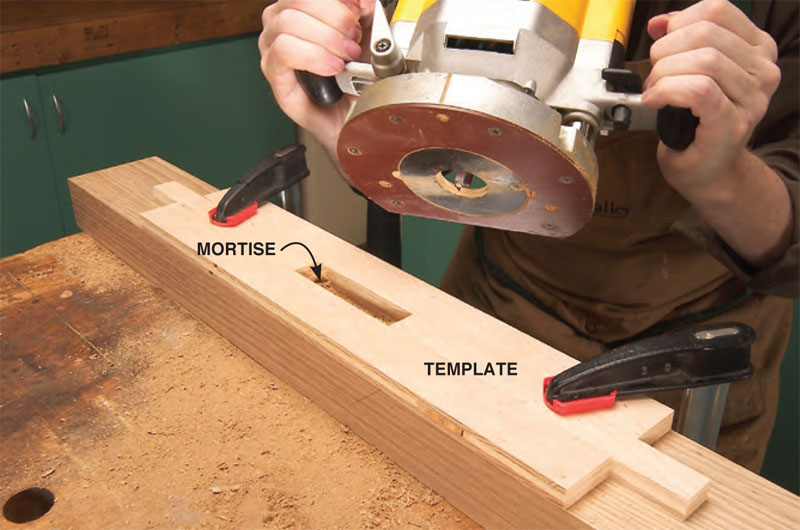
1. Make the mortise before you cut the tenon. I use a shop-made template, a drill press, plunge router and two flush-trim bits to make large throughmortises (Photo 2). The hole in the template is the exact size of the mortise.
2. Here’s a cross section of the mortise in various stages of completion. You make it in four steps: 1. Drill out most of the waste. 2. Follow the template with a short top-bearing flushtrim bit. 3. Using the same bit, remove the template and rout deeper. 4. Flip the workpiece and finish the mortise with a bottom-bearing flush-trim bit.

3. Using an angled guide block and chisel, taper the mortise’s ends into a flared shape. The taper leans 3 degrees from square. Make the taper about three-fourths the depth of the mortise. Turn the mortise over and square the remaining corners.

Designing Your Wedged Joint
Each part of a wedged joint must often be tailored to fit the joint’s size, intended strength and type of wood. Make a prototype following these steps:
1. Substitute a notch made with a dado set for the mortise (see “How the Joint Works,” page 2). Taper both of the notch’s sides by angling the miter gauge.
2. Make a full-size tenon. Observe how well the flexible strips bend. You may be able to use smaller strain-relief holes or no holes at all.
3. Experiment with the notch’s angle. The wider the taper, the stronger the joint. My taper is 3 degrees, but you can increase it up to 8 degrees.
4. Test the bend. My flexible strips are only 1/8" thick opposite the strain-relief hole; so they bend easily. Depending on the wood, this thickness can be increased to 1/4" or so to improve the joint’s appearance.

4. Cut a tenon to fit tightly into the back of the mortise, where there’s no taper. On the tenon, draw a centerline directly opposite the point where the mortise begins to taper outward. Drill two strain-relief holes all the way through the tenon.

5. Saw kerfs in the tenon to receive the wedges. This creates strips that can flex without breaking. I aim for the inner edge of the hole so that the kerfs don’t end up too close to the tenon’s edges.

6. Cut extra-long wedges on the tablesaw. Tilt the blade 3 degrees—the same angle as the guide block you used to taper the mortise. Crosscut the wedges from the blank with a bandsaw.
Caution: You must remove the blade’s guard for this cut. Be careful.
7. Test-fit the wedges without glue. You have to get their thickness just right to completely flare the tenon before the wedges hit bottom. Adjust the tablesaw setup until the wedges are the right size. You’re ready for gluing.
Sources
Note: Product availability and prices are subject to change.
MLCS Woodworking, mlcswoodworking.com, 800-533-9298, 1/2" Pattern/ Flush-Trim Bit, 1/4" shank, #16509; 1/2" Flush-Trim Bit, 1/2" shank, #17803.
This story originally appeared in American Woodworker July 2006, issue #122.

Here are some supplies and tools we find essential in our everyday work around the shop. We may receive a commission from sales referred by our links; however, we have carefully selected these products for their usefulness and quality.