We may receive a commission when you use our affiliate links. However, this does not impact our recommendations.
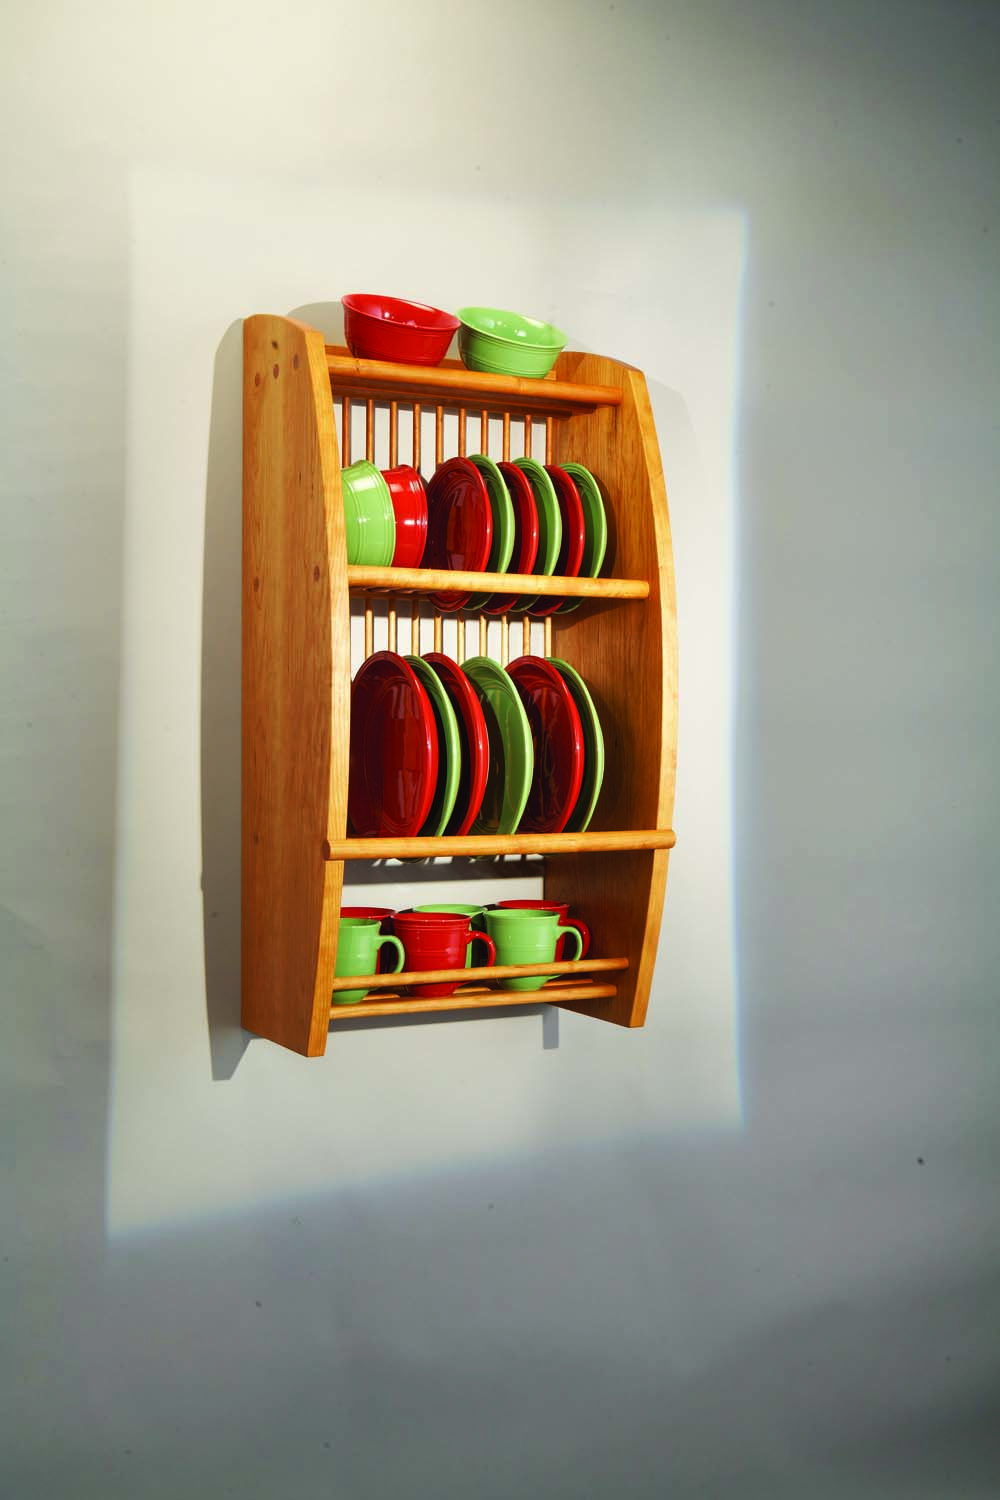
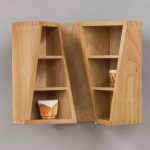
Modern design and Tinkertoy construction team up to make this eye-catching rack fun and sophisticated at the same time. A great addition to any kitchen, it displays your favorite dishes in style while keeping them within easy reach for daily use. Store dinner plates, salad plates, cups, saucers, mugs or bowls. Need more space? Make your rack wider or taller. In fact, you adjust the design to fit just about any dish—or space.
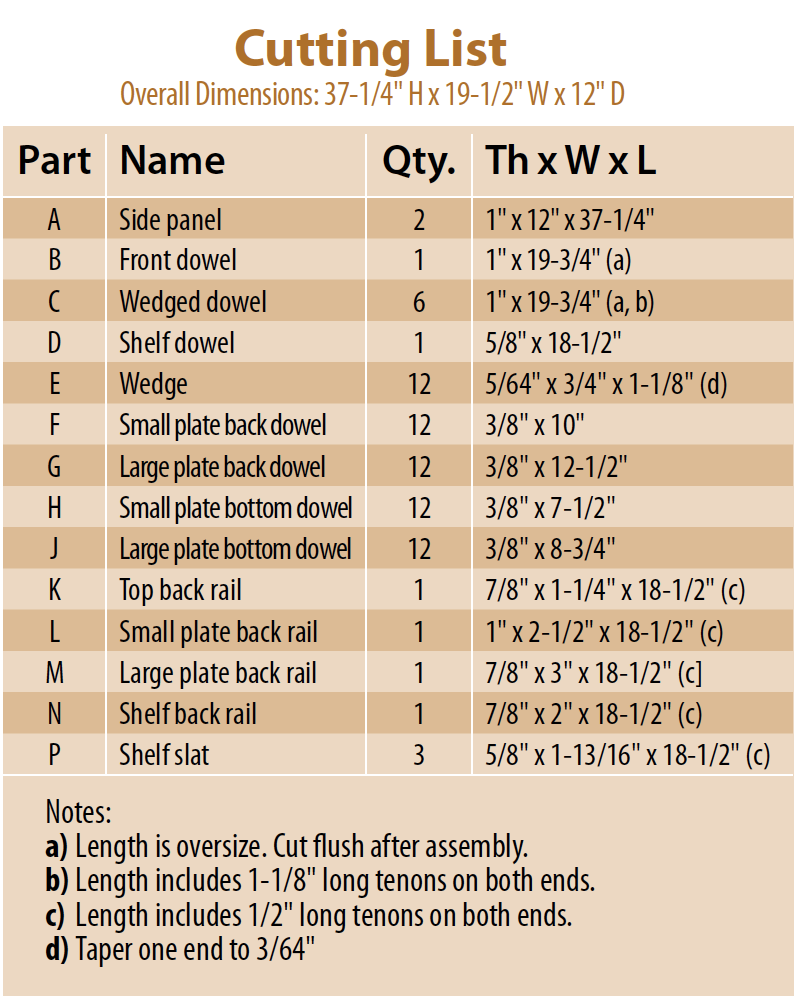

Fig. A. Exploded View
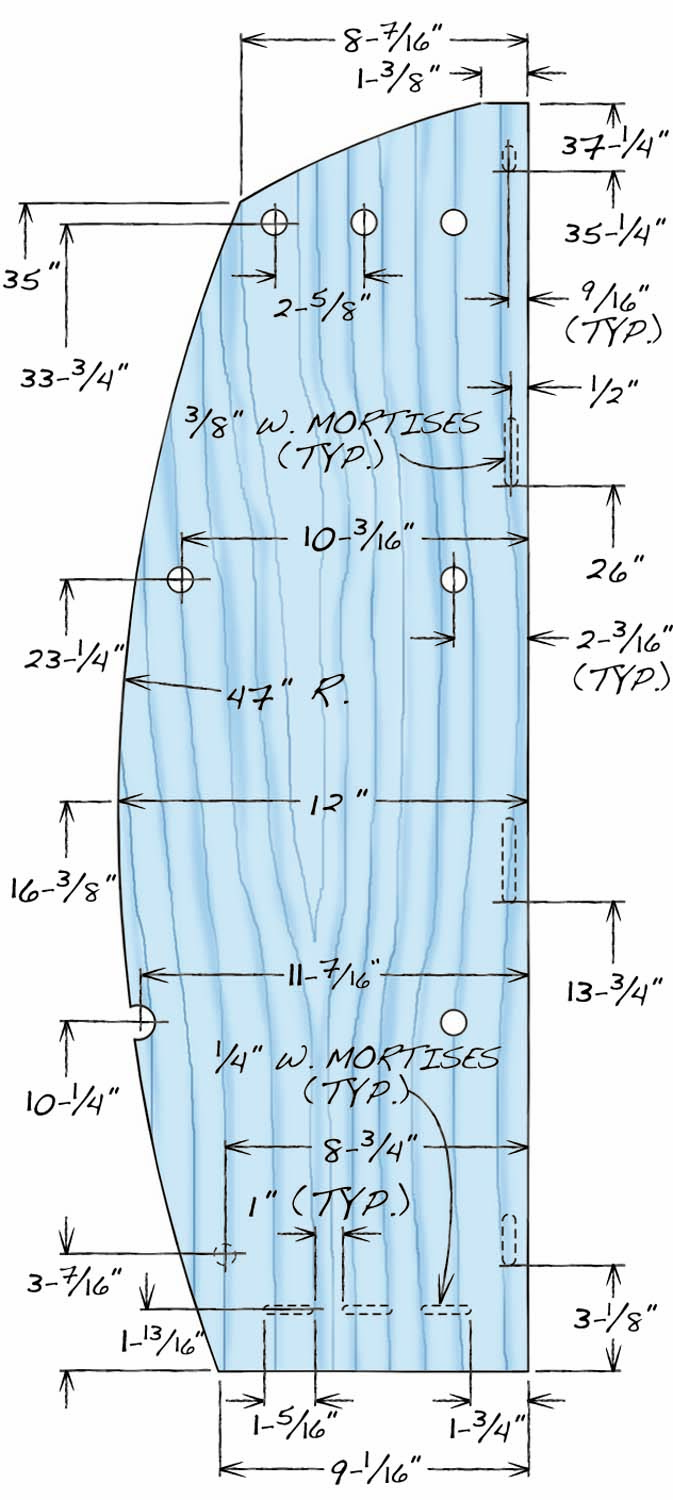
Fig. B. Side Panel Pattern
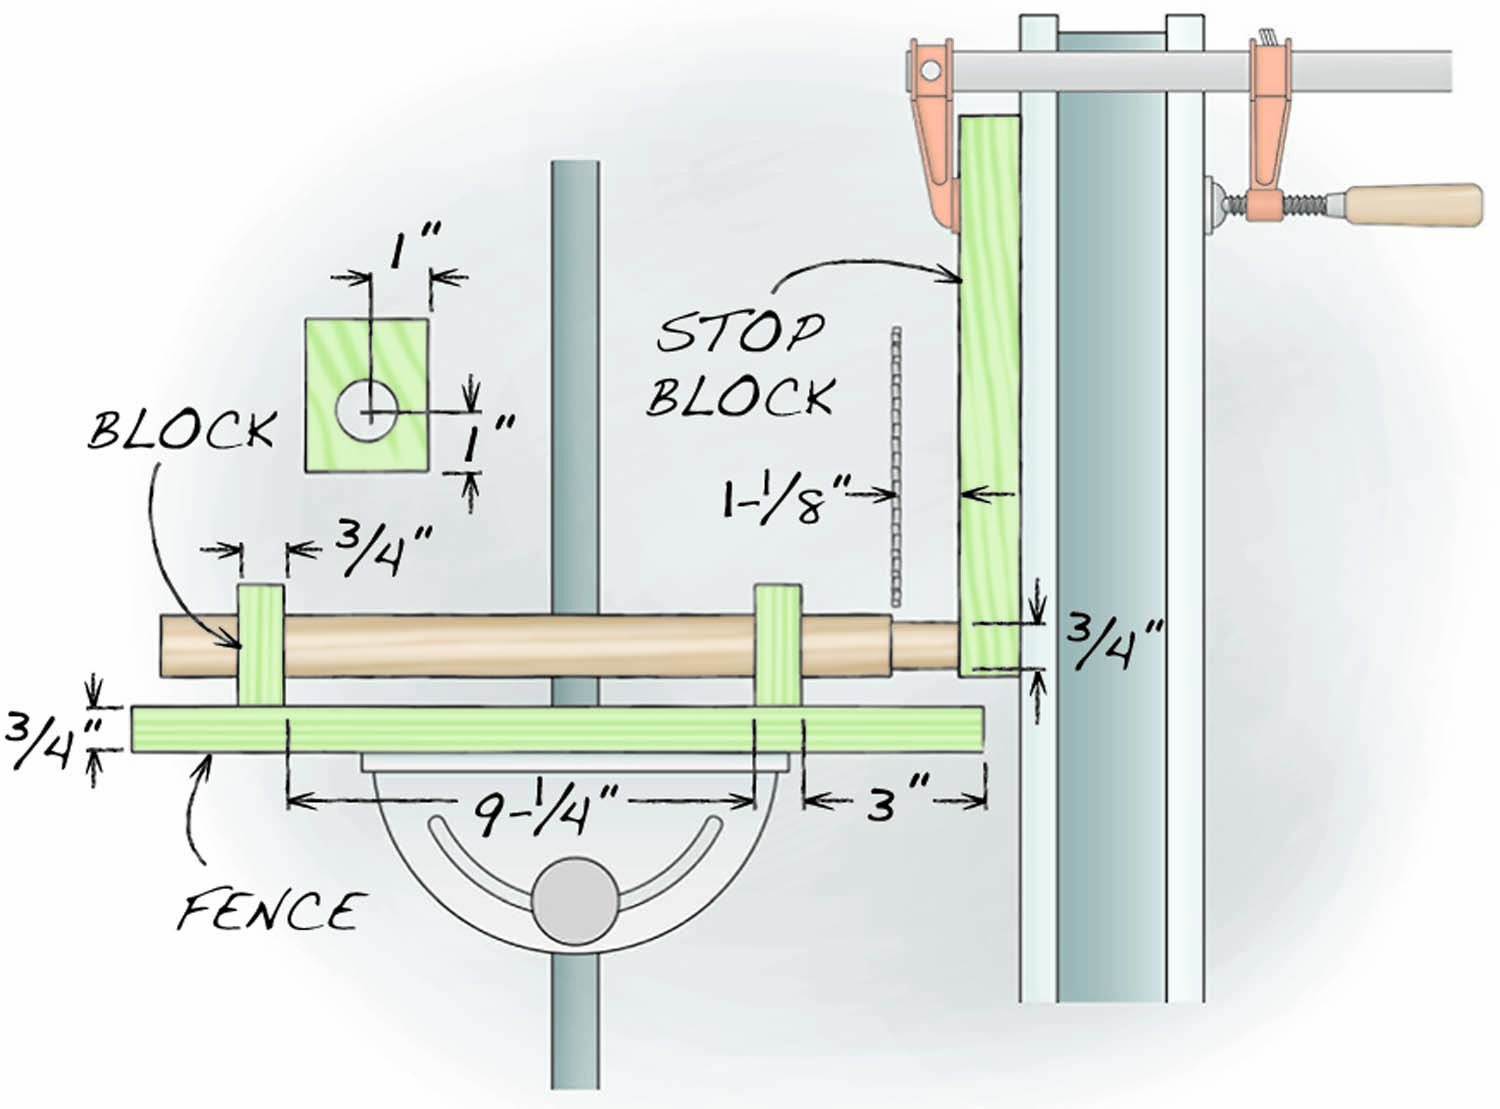
Fig. C. Tenoning Jig
Make the side panels
Mill blanks for the side panels (A, Fig. A, Fig B). Rip them slightly oversize in width and cut them to final length. Locate the large dowel holes and lay out the curved profile on the outside face of each side panel blank (Fig. B; Note: The holes must be identically located in both blanks for the rack to go together properly). Then drill 3/4″ dia. holes for the wedged dowels and a 1″ dia. hole for the front dowel (Photo 1). Install a sacrificial board underneath to minimize tearout. Flip over each blank to locate and drill the 5/8″ dia. stopped hole for the shelf dowel. Complete each side panel by shaping its curved profile. Bandsaw the curves and then sand by hand to remove the saw marks.
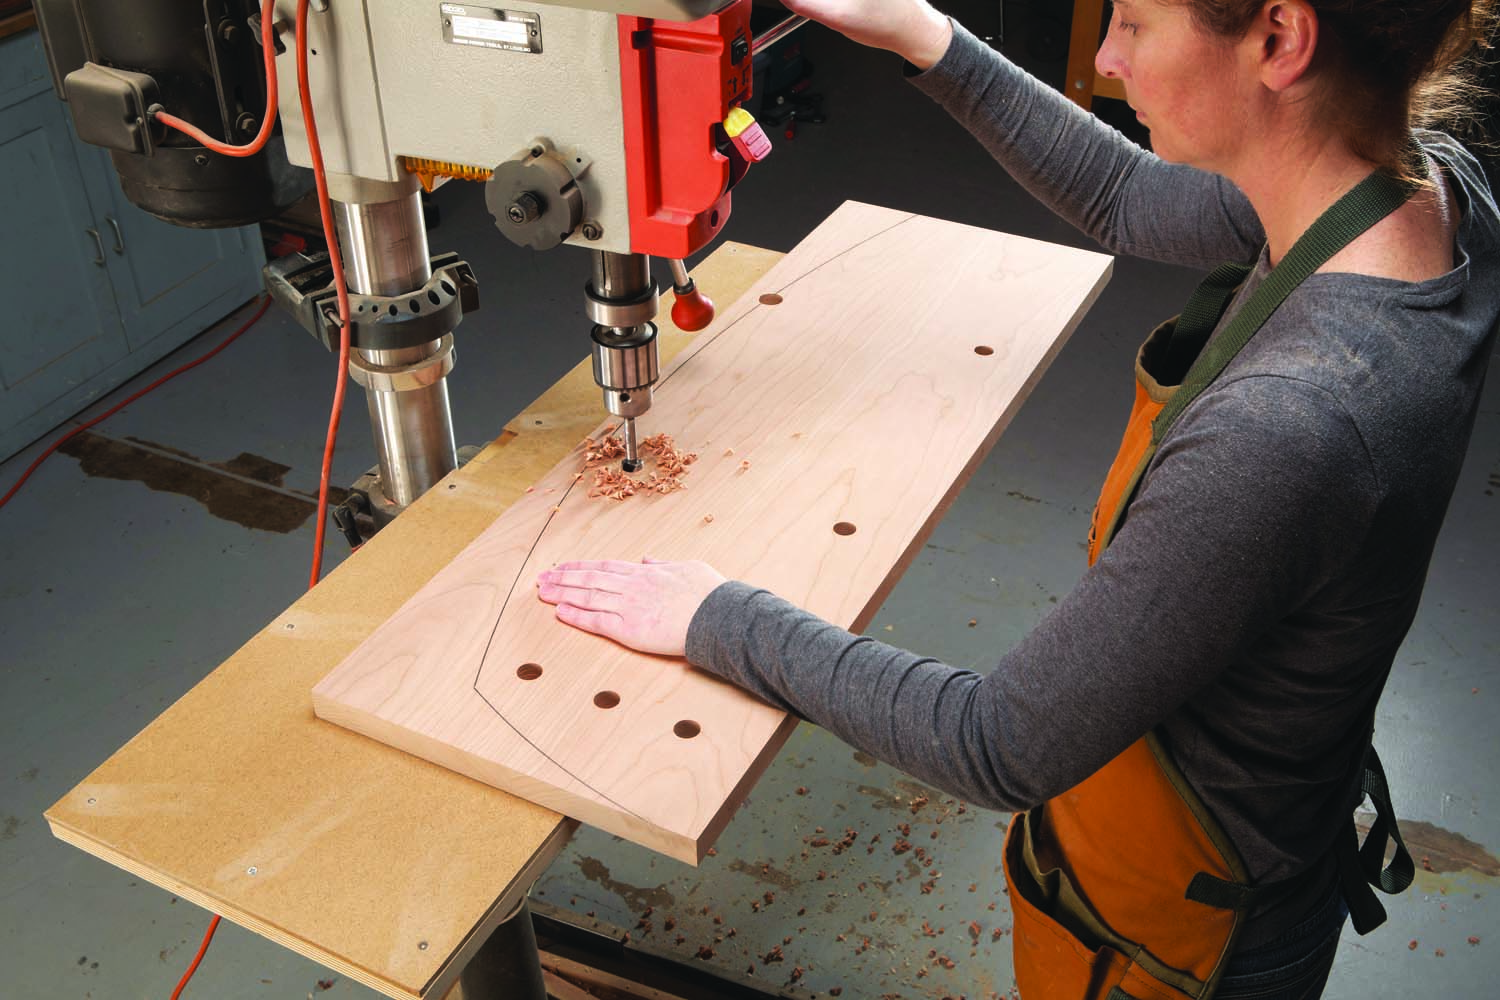
Photo 1. Drill holes for the rack’s large dowels through the outside face of each side panel blank. Any tearout on the inside face will be covered by the dowels.
Cut round tenons
Cut 1″ dowel stock to 19-3/4″ lengths to create blanks for the wedged dowels and the front dowel (B, C). Note: Dowel dimensions can vary from piece to piece. Make sure all your 1″ dowel stock is the same diameter. Cut the 5/8″ shelf dowel (D) to final length. Set the front dowel and the shelf dowel aside.
Build a simple tablesaw jig to cut tenons on the ends of the wedged dowels (Fig.C). The jig consists of a 3/4″ x 2-1/2″ x 14″ fence with a pair of 3/4″ x 2″ x 2-1/2″ attached blocks. Each block has a 1″ dia. hole centered 1″ from the bottom and 1″ from the inside edge.
Setting up the jig takes a bit of trail and error, because the positions of the jig, dowel, rip fence and blade are all related. In a nutshell, you fasten the jig to the miter gauge so that it butts against a stop clamped to the rip fence when the rip fence is set to cut a 1-1/8″ long tenon on the dowel (Photo 2).
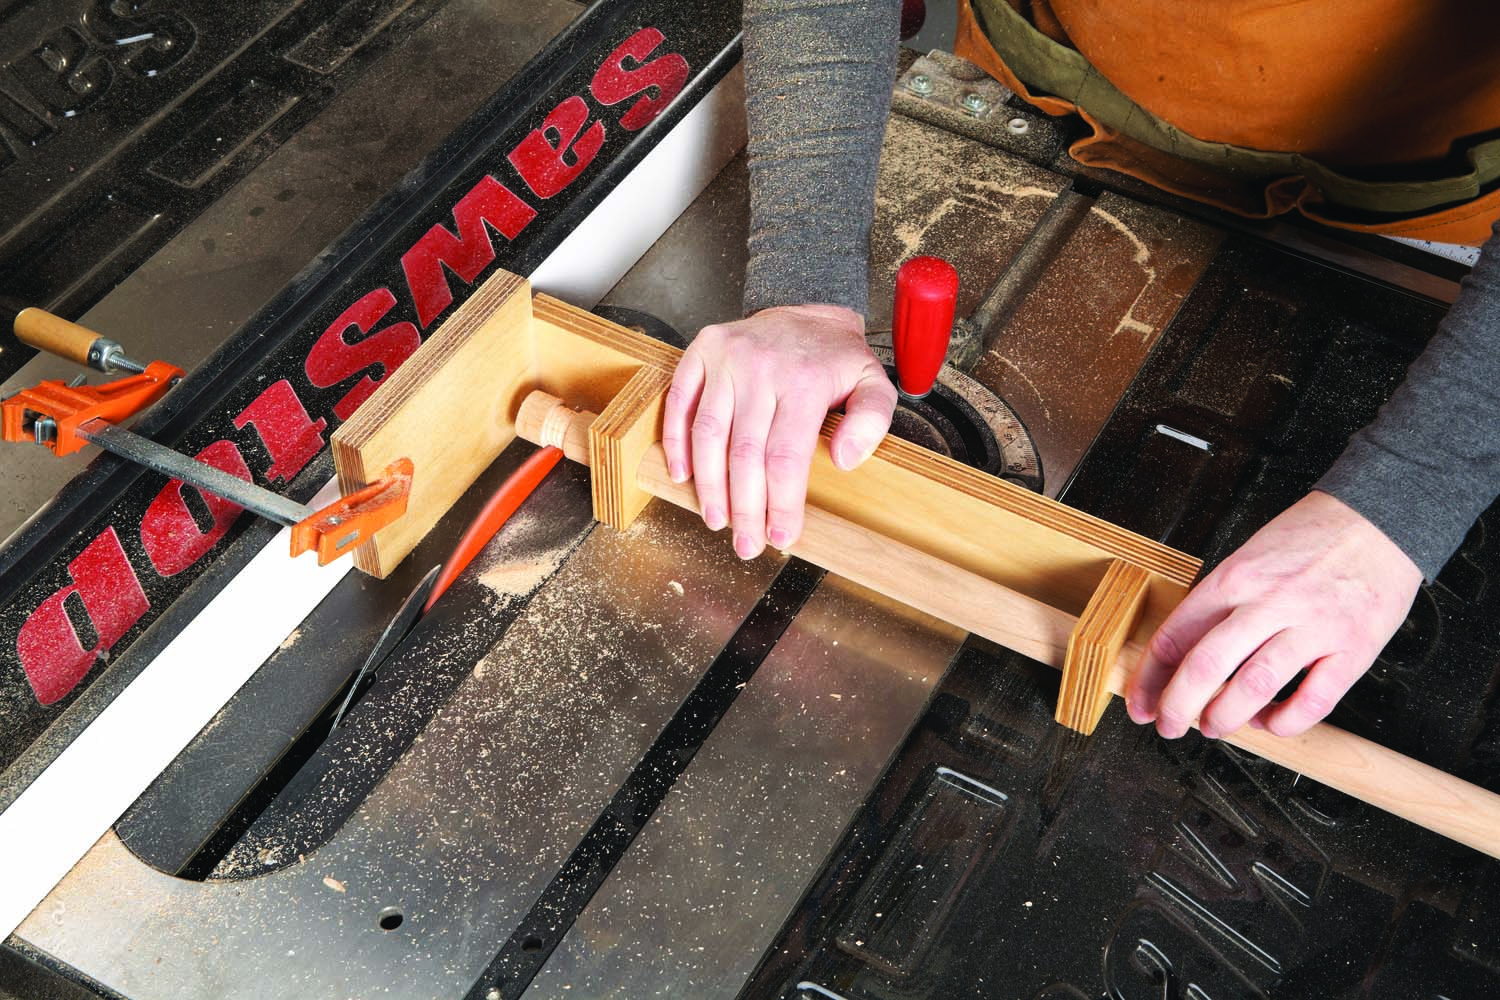
Photo 2. Cut tenons on the large dowels using a shop-made jig and a stop block. To size the tenon, push the jig against the stop. Then raise the blade and rotate the dowel.
Hold the jig against the miter gauge and install a test dowel. Lower the blade, slide the miter gauge forward and position the jig so the dowel extends over the blade’s leading edge. Clamp a stop block to the saw’s rip fence so that the dowel will butt against the block’s face and the jig will butt against its end.
Set the rip fence to cut the tenons by measuring from the face of the stop block to the blade’s outside edge. Make sure the jig butts against the stop and slides freely without contacting the rip fence. Fasten the jig to the miter gauge at this position.
Slide the jig forward until it butts against the stop block. Then raise the blade incrementally and make test cuts on the end of the dowel to dial a 3/4″ dia. tenon. Use a go/no-go block to test-fit the tenon (Photo 3). It should fit snugly and slide in and out without binding or wobbling. The best method is to cut the tenons a tiny bit oversize and sand them to fit.
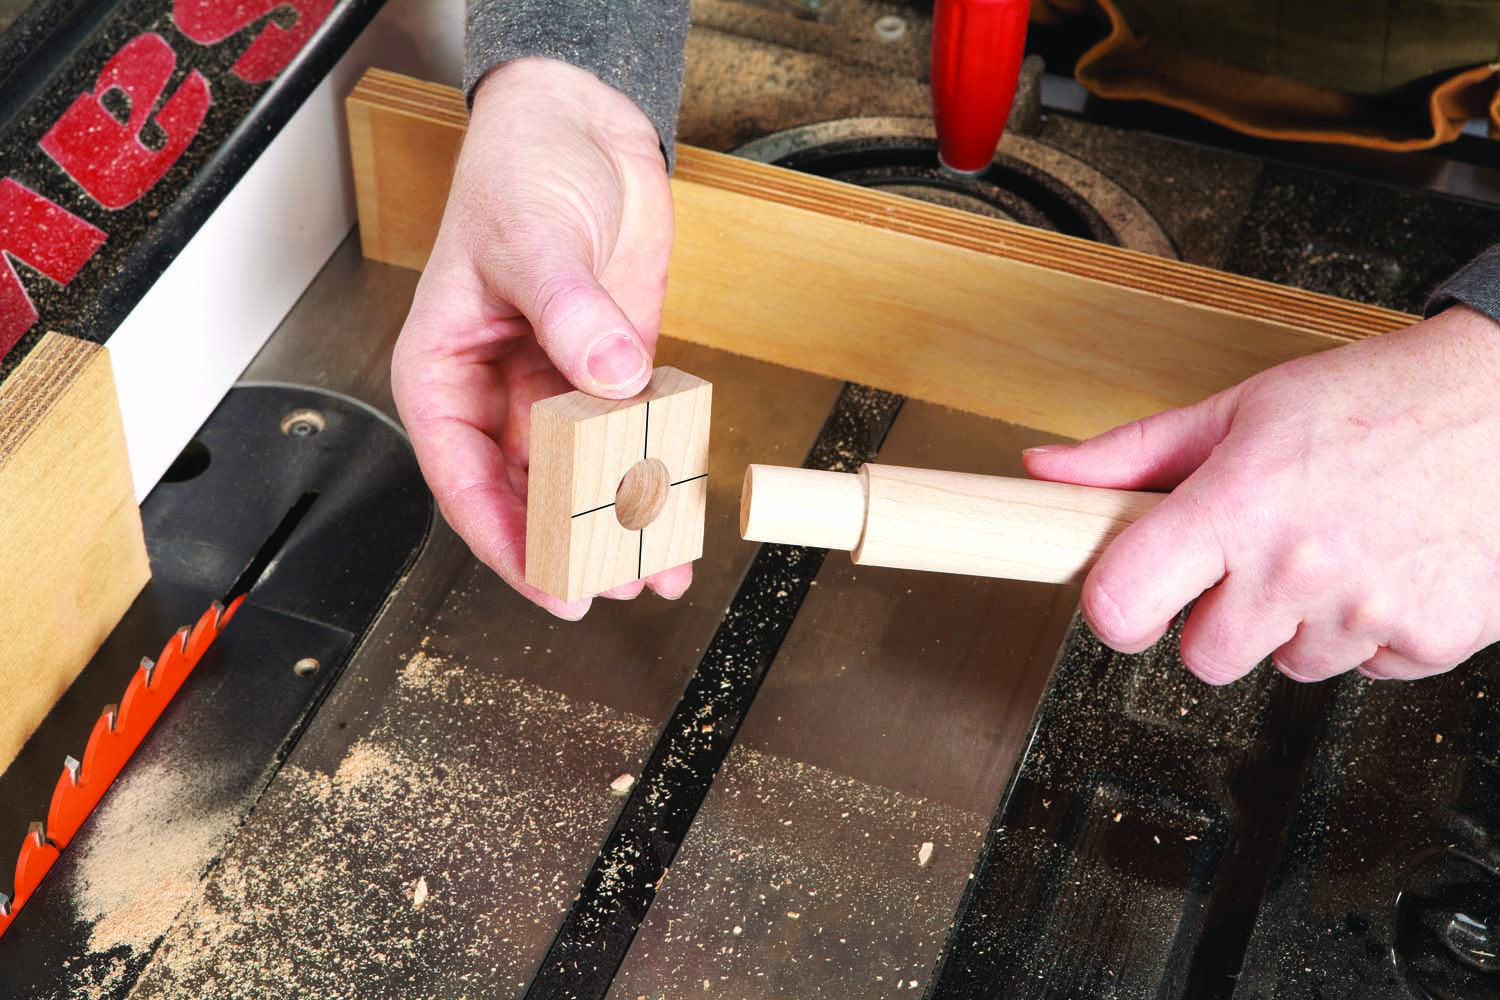
Photo 3. Test-fit each tenon using a go/no-go jig—a block with a hole drilled with the same bit used to drill the holes in the side panels.
Once you’ve dialed in the tenon’s length and diameter, back the jig away from the blade and slide the first dowel against the stop block. Cut the tenon’s shoulder first: Turn on the saw hold the dowel against the stop block and push the jig forward until it butts against the end of the stop. Then rotate the dowel. Rough out the tenon by making a spiral cut: Rotate the dowel while slowly pulling it away from the stop block. Then smooth the tenon by sliding the dowel back and forth over the blade while incrementally rotating it.
Drill the dowels
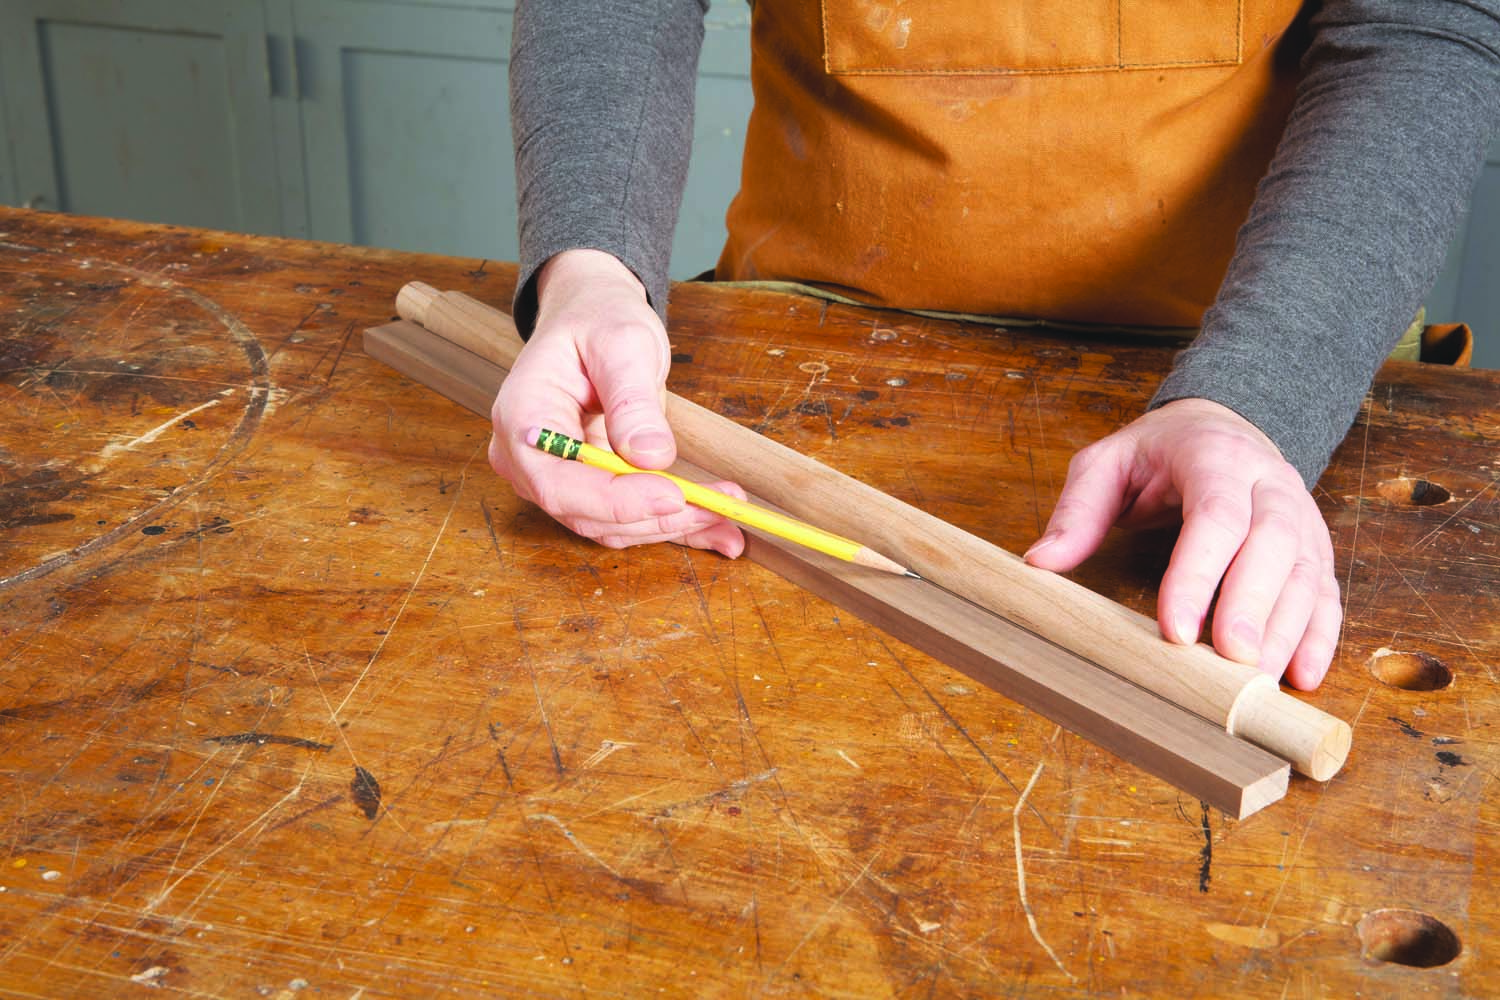
Photo 4. Mark a registration line for drilling holes on five of the dowels. Two dowels have additional registration lines. Use the go/no-go jig’s crosshairs to correctly orient these lines.
Holes drilled in the 1″ dowels house 3/8″ dowels to form the structure that holds plates in the completed rack. In order to assemble this structure, the holes must be accurately located and drilled.
The first step is to draw a registration line that runs the length of each dowel (Photo 4). This is easy as long as the dowels are straight and you have a flat piece of wood to use as a straightedge, a flat surface to work on and a sharp pencil. One dowel requires a second line drawn at 90° to the first and one dowel requires two additional lines, at 90° and 180° (Fig. B). Use the go/no-go jig’s crosshairs to correctly orient these lines.
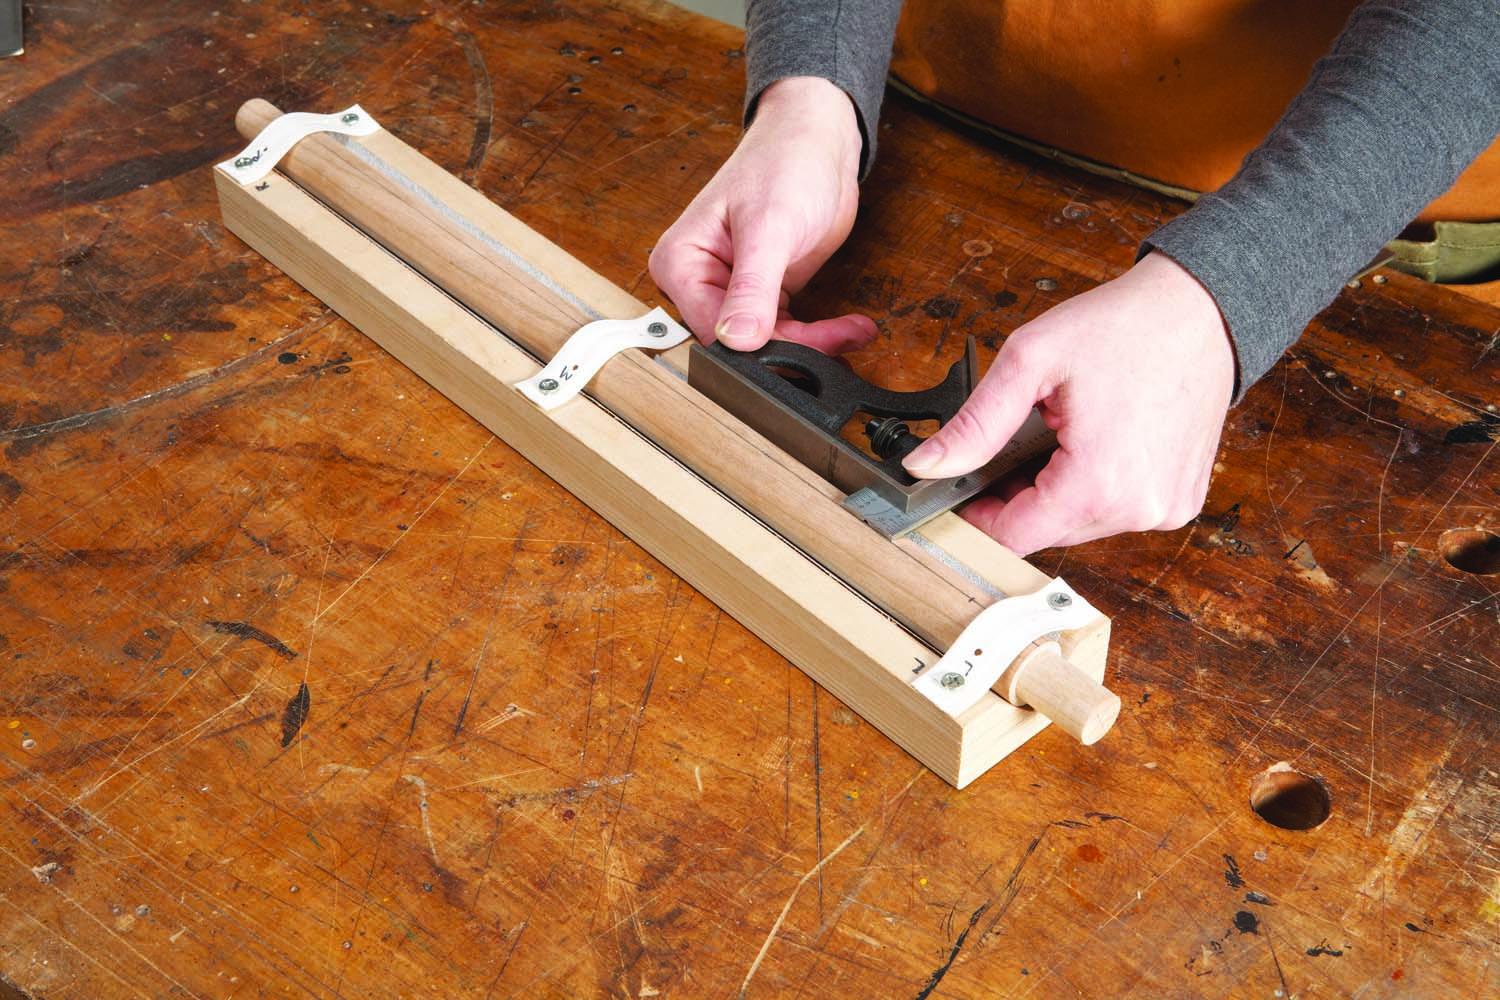
Photo 5. Center the registration line after installing each dowel in a V-groove jig. The dowel is correctly oriented for drilling when the measurement from both sides of the line is the same.
Mark the first hole on every registration line, centered 1-3/16″ from one of the dowel’s tenon shoulders. Mark that tenon, too, so you can keep the dowels correctly oriented for assembly—for example, always start with and mark the left tenon. Build a V-groove jig to hold the 1″ dowels for drilling (Photo 5). To securely hold each dowel, line the groove with sandpaper and attach short lengths of vinyl plumber’s strap across the jig. Carefully center the registration line when you install each dowel.
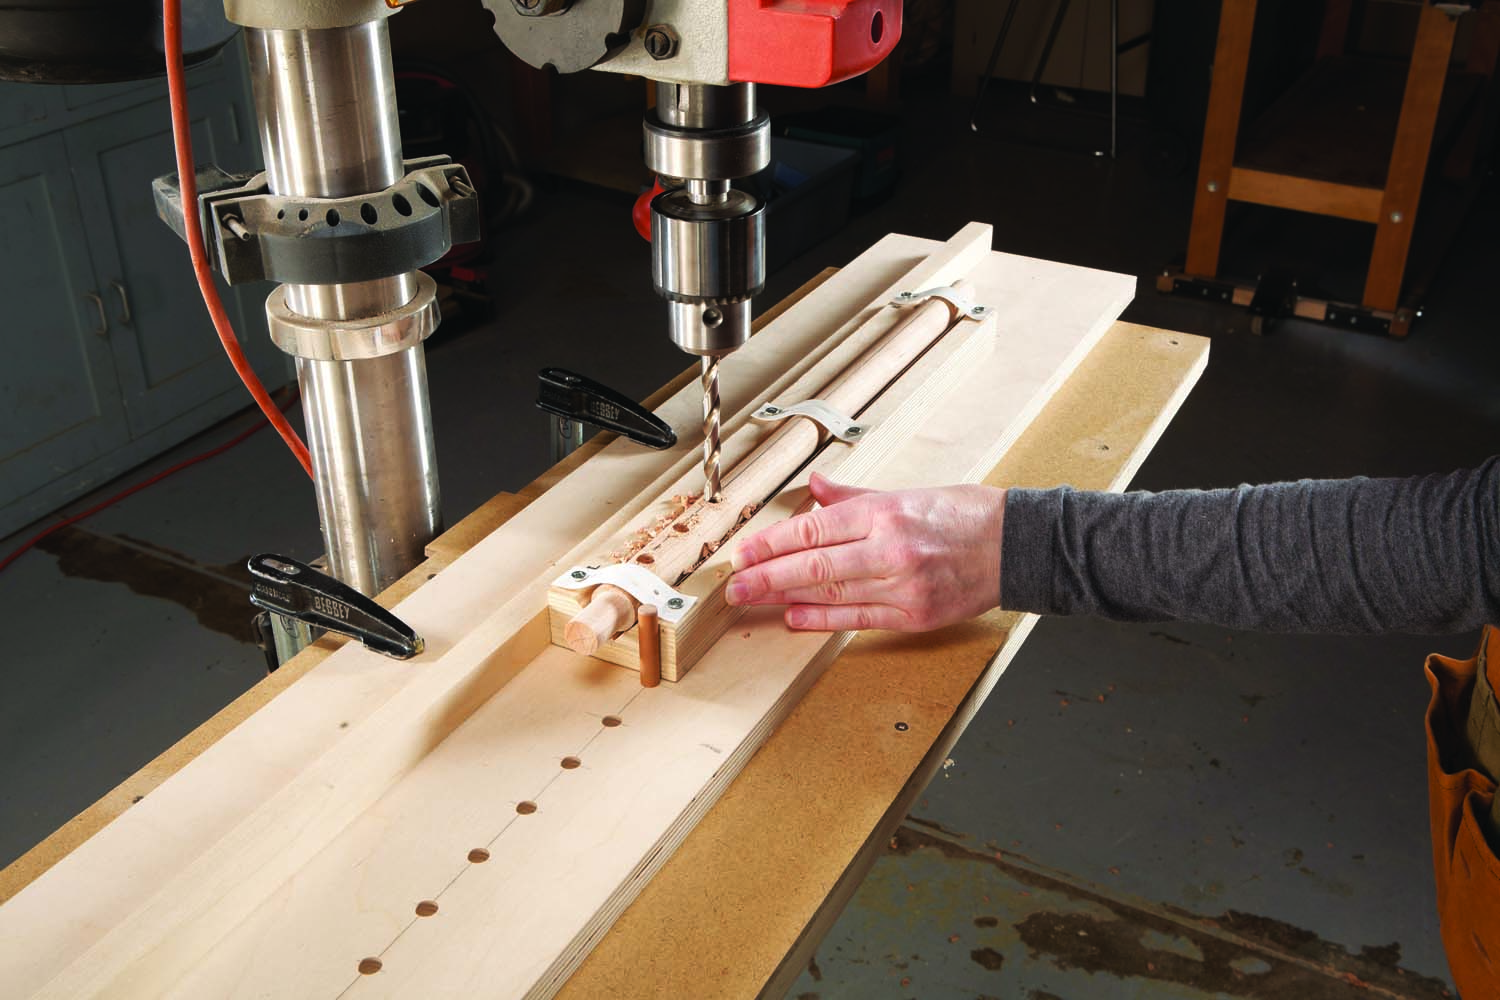
Photo 6. Use an indexing jig to accurately space the holes. Locate both jigs to drill the first hole. Then simply move the indexing pin and reposition the V-groove jig to drill each additional hole.
Build an indexing jig to accurately space the holes (Photo 6). Lay out 3/8″ dia. holes precisely spaced 1-3/8″ apart on a 3/4″ x 9″ x 42″ length of MDF or plywood. (Note: Test the dowel spacing with the bowls you plan to store in the rack. The deeper the bowls, the further apart the dowels must be spaced.) Complete the indexing jig by attaching a fence parallel to the holes you’ve drilled and installing a dowel.
Place the indexing jig on the drill press, install a test dowel in the V-groove jig and butt the V-groove jig against the indexing jig’s fence and dowel. Center the drill bit on the mark you’ve drawn to locate the first hole on the dowel’s registration line and clamp the indexing jig to the drill press at this position. Set the bit to drill 1/4″ deep holes—drilling too deep will cause problems on the dowels that have multiple registration lines. Then drill the holes.
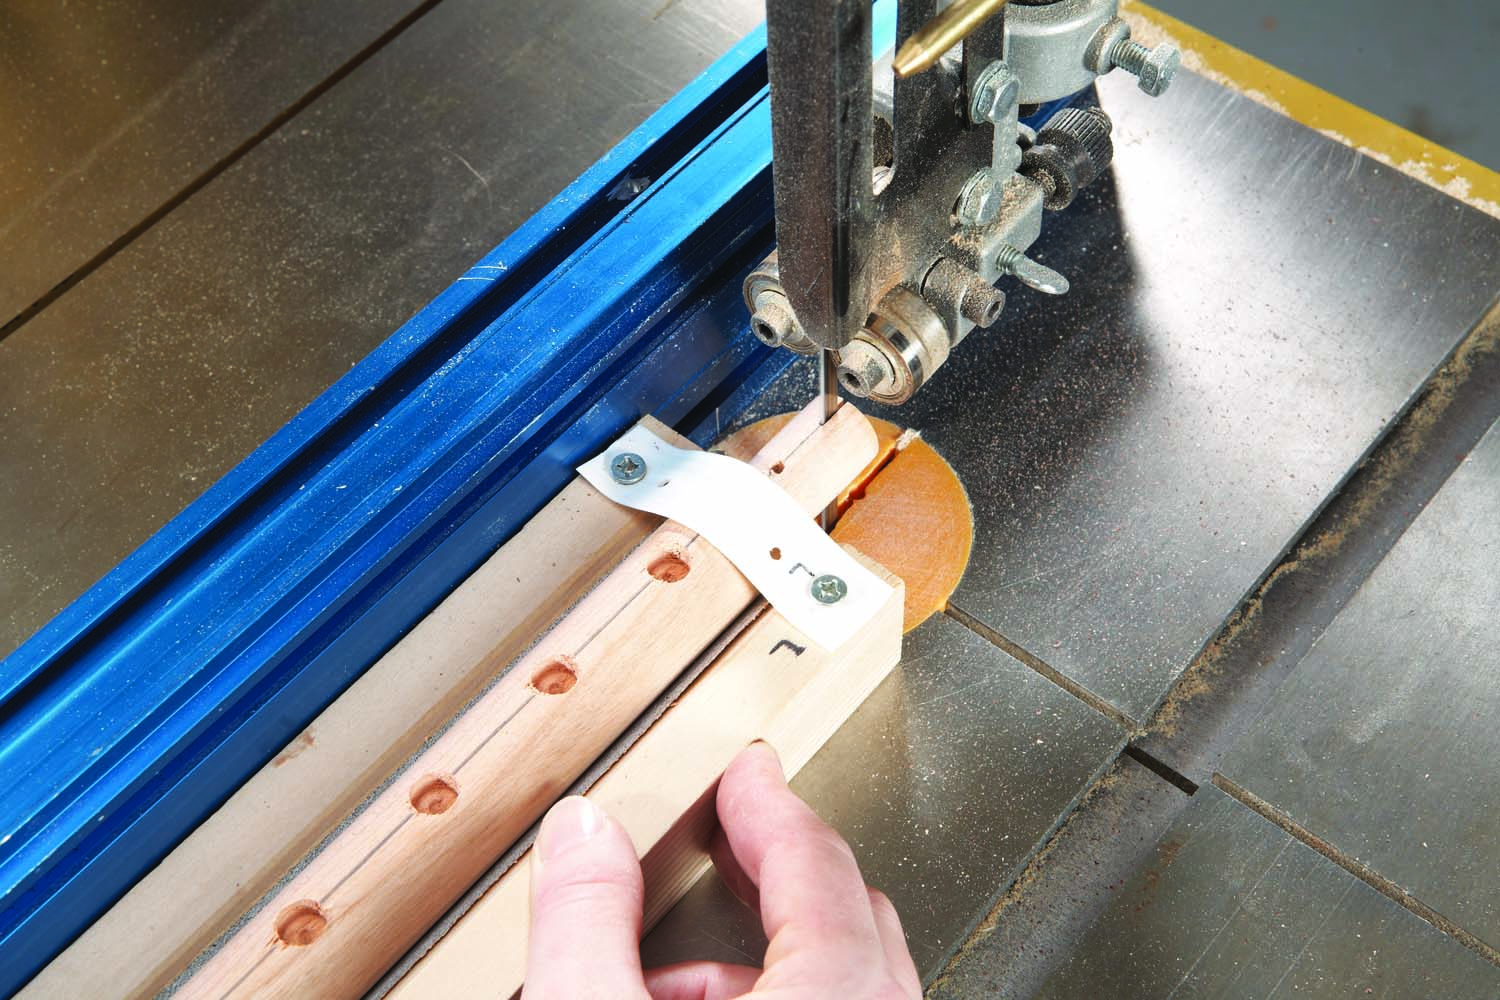
Photo 7. Cut a slot that ends in a stress-relief hole in each wedged tenon. Make sure to orient the slots correctly on the dowels that have drilled holes.
Use the same setup to drill centered, 3/8″ dia. x 1/2″ deep holes in the front dowel (B), 5/8″ from each end. (The front dowel attaches to the side panels with 3/8″ dowels.) Finally, use the setup to drill 1/8″ stress-relief holes in all of the wedged dowels’ tenons. Keep each wedged dowel in the V-groove jig to bandsaw a slot for each wedge (Photo 7). Make the wedges (E) from 5/64″ thick stock. Then cut all the plate dowels (F–J) to final length.
Cut mortises and tenons
Locate and cut mortises in the side panels for the rails and slats. Using a drill press with a fence and a Forstner bit is an easy, old-school method. Install the bit, set the fence and drill a series of overlapping holes. Then use a chisel to square the cheeks. (Note that the mortise for the small plate back rail is set in farther than the other back rails.)
Mill the back rails (K–N) and shelf slats (P) to thickness. Note that the small plate back rail (L) is thicker than the other rails. This rail mounts flush with the back edges of the side panels because it’s used to fasten the rack to the wall. Cut these parts to final width and length. Then cut all the tenons and round them to fit the mortises, using a file or chisel. Make sure the length between the tenon shoulders on these pieces matches the length between the tenon shoulders on the wedged dowels (17-1/2″ in a perfect shop). Round the edges of the shelf slats on a router table, using a fence and a 1/4″ roundover bit.
Drill countersunk holes for mounting screws and buttons in the small plate back rail. Make sure to locate the holes between the plate dowels.
Tinkertoy-style assembly
Start by assembling all the parts without glue to make sure everything fits properly. After making any necessary adjustments, disassemble the parts and prepare for gluing by finish-sanding all the dowels, rails and slats and the inside faces of both side panels.
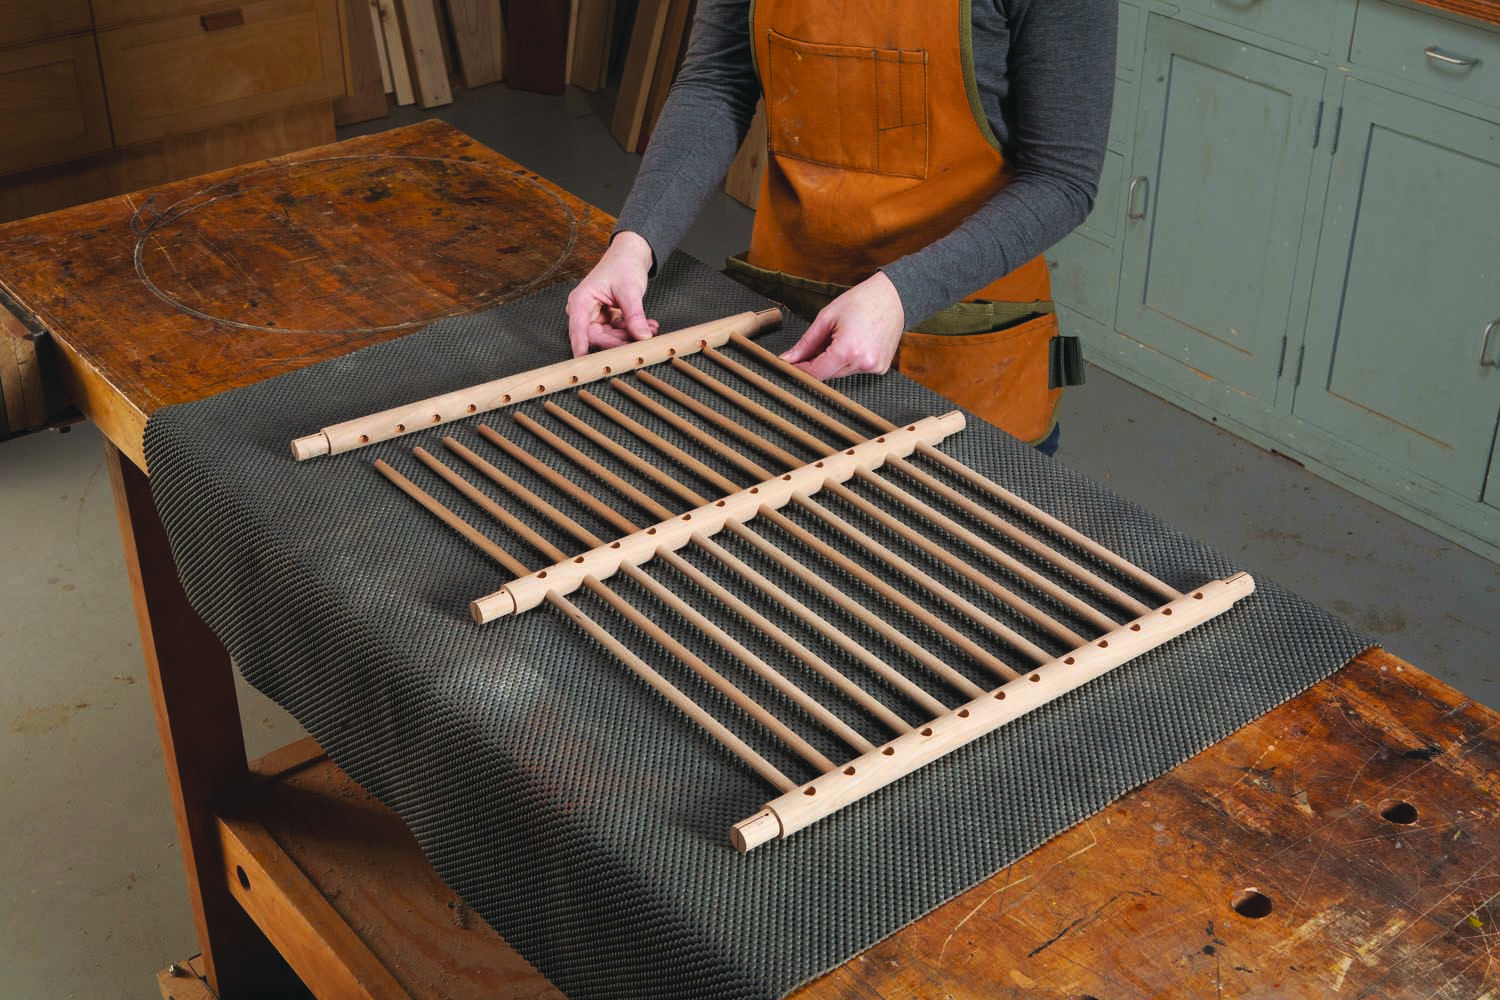
Photo 8. Press the back plate dowels into the back wedged dowels. Don’t use glue.
Make sure to use glue with a long open time. I prefer Unibond 800, a two-part liquid urea resin glue that’s perfect for complex assemblies like this one (see Sources). Unibond 800 is temperature sensitive, so if your shop is cool, just throw an electric blanket over the assembly to heat it up.
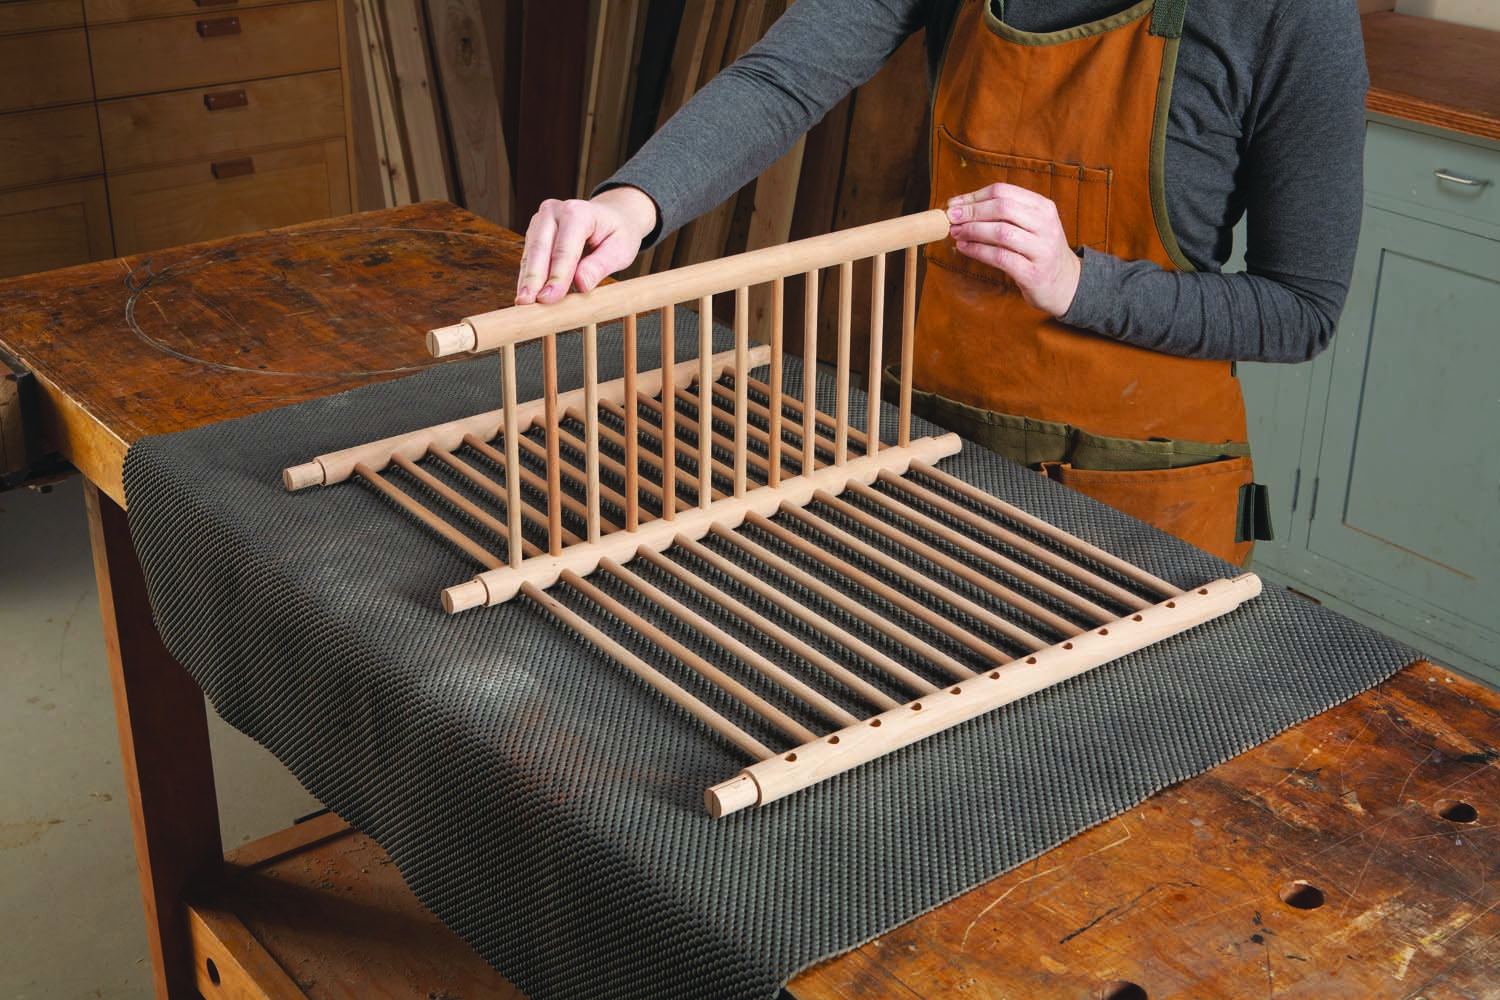
Photo 9. Add the small plate bottom dowels and the front wedged dowel, also without glue.
Working on a padded surface, install the back plate dowels in the three back wedged dowels without glue (Photo 8). Next, add the small plate bottom dowels and the front wedged dowel (Photo 9). As this assembly isn’t glued, you may want to tie it with string to hold it together.
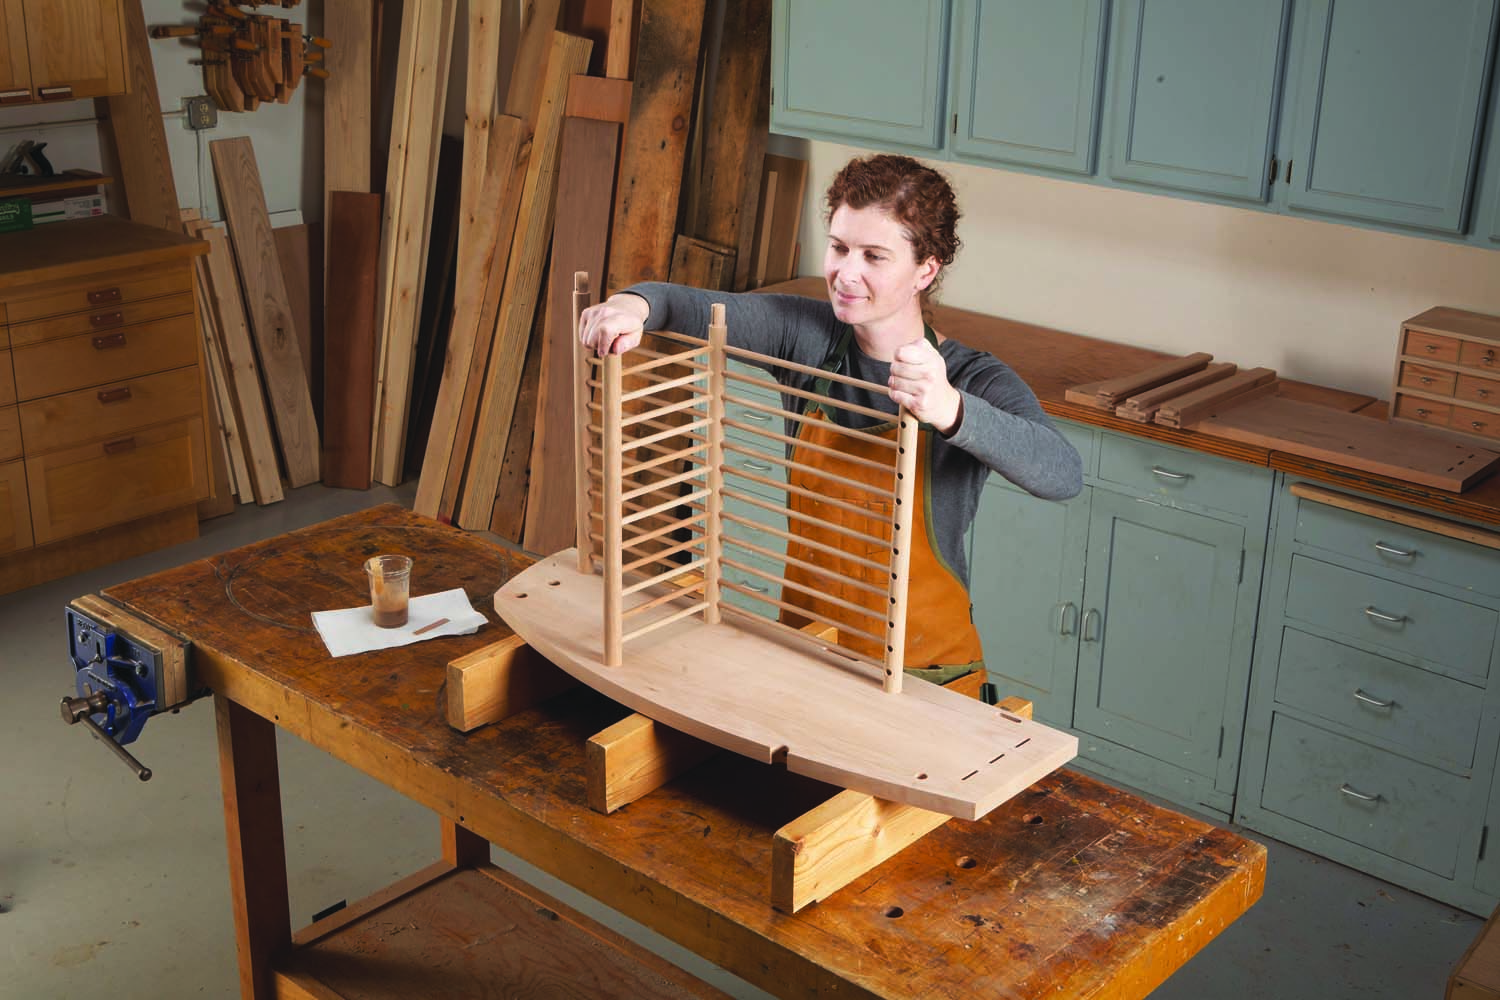
Photo 10. Apply glue and press the dowel assembly into a side panel. Glue in the rails and slats, then glue on the remaining side panel and clamp the assembly together.
Lay one of the side panels on risers to provide clearance for clamps. Apply glue to the holes for the wedged tenons in the dowel assembly. Then carefully lift the dowel assembly and install it (Photo 10). Similarly, glue in the remaining wedged tenons, the back rails, the shelf slats and the plate dowel. Glue on the remaining side panel and clamp the rack together.
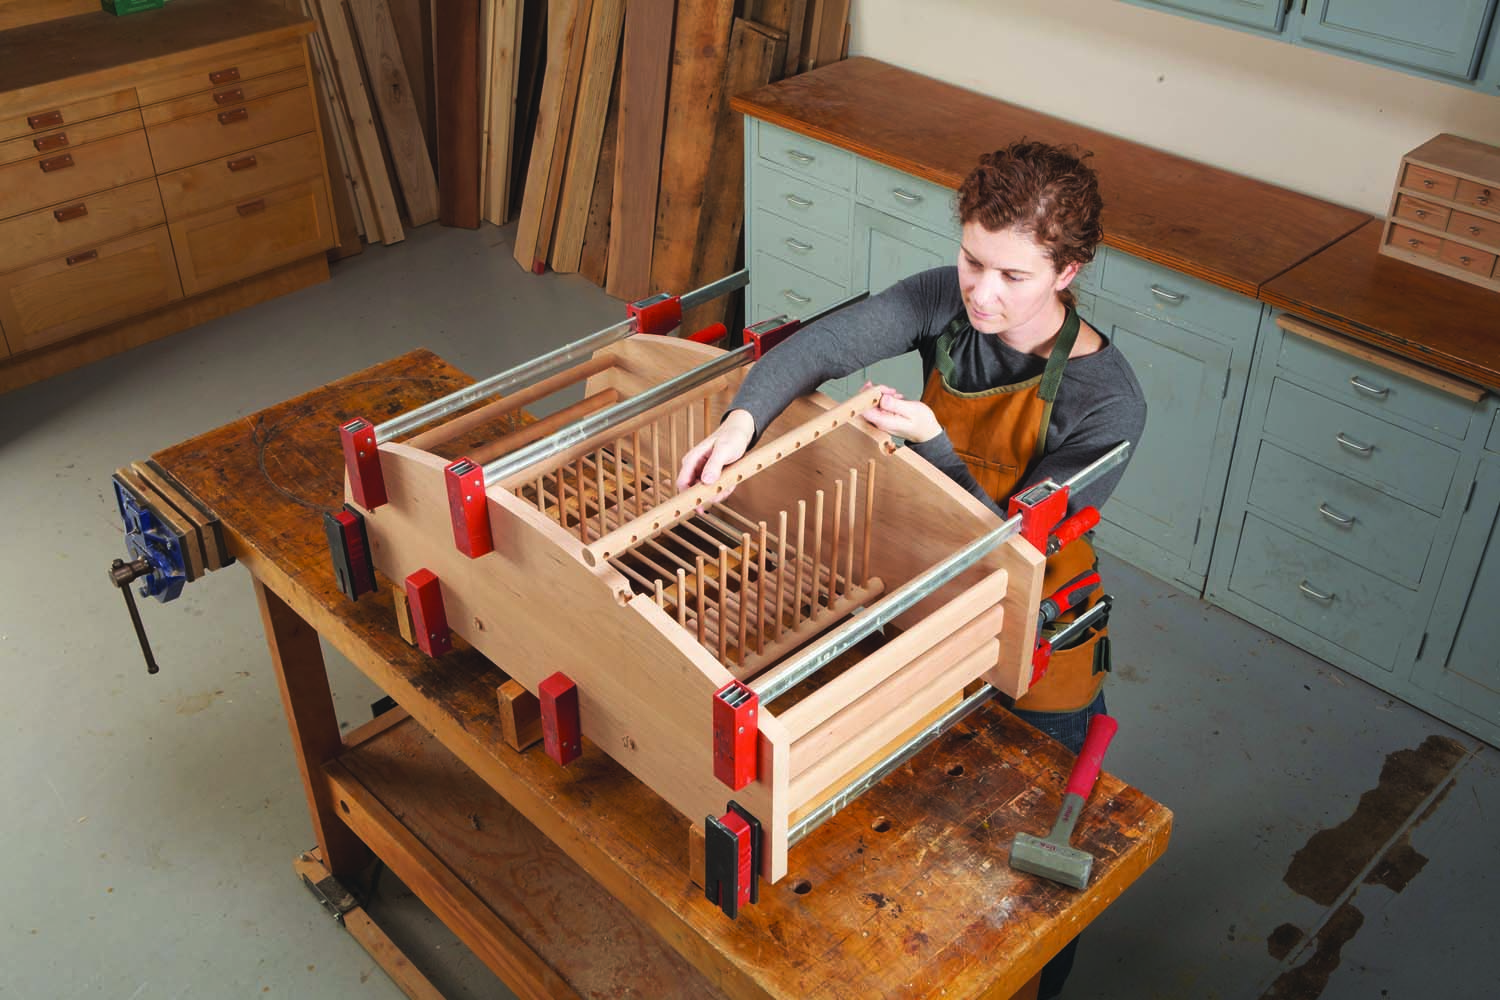
Photo 11. Glue the front dowel to the side panels after installing the large plate bottom dowels without glue.
Install the large plate bottom dowels and the front dowel without glue. The front dowel is already drilled for the dowels that will connect it to the side panels. Center this dowel on the side panels and then transfer the hole locations to the side panel cutouts. Drill 3/8″ dia. x 3/4″ deep holes, install dowels and test-fit the front dowel. Make adjustments until everything fits—Unibond 800 is gap-filling, so it’s okay to slightly widen a hole or shave a dowel, as necessary. When you’re happy with the fit, glue the front dowel onto the side panels after installing it without glue on the plate dowels (Photo 11).
Install wedges
Stand the rack up to install the wedges (Photo 12). Apply a bit of glue in each slot, insert the wedge and lightly tap it in. Leave the left-over Unibond in a plastic cup with a stick in it. When the glue is rigid and can be pulled out of the cup, you can remove the clamps from the rack.
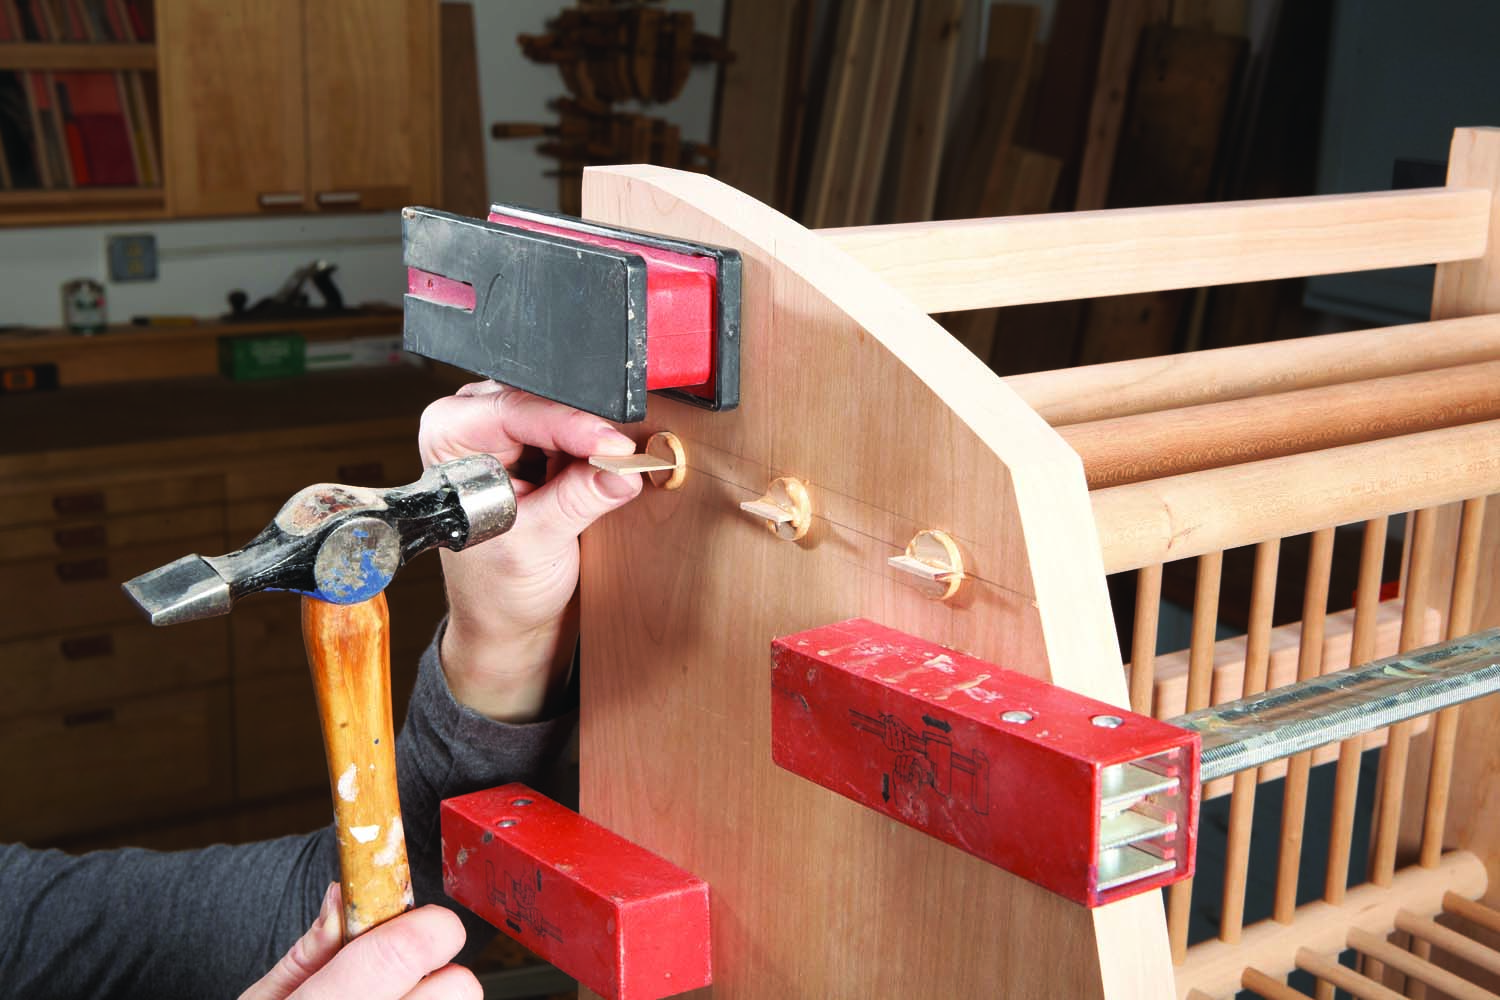
Photo 12. Tap in the wedges after applying a bit of glue. Let the glue dry and then trim the wedges and protruding tenons flush with the side panels.
Cut the wedged tenons and the front dowel flush with the sides, using a flush-cut saw (see Sources). The teeth on a flush-cut saw have no set, so they won’t mar the side panel surfaces. Finish-sand the sides. Then choose a finish that will be easy to maintain, such as Velvit Oil, an oil-based wipe-on/rub-off finish that’s easy to reapply as needed.
Here are some supplies and tools we find essential in our everyday work around the shop. We may receive a commission from sales referred by our links; however, we have carefully selected these products for their usefulness and quality.