We may receive a commission when you use our affiliate links. However, this does not impact our recommendations.
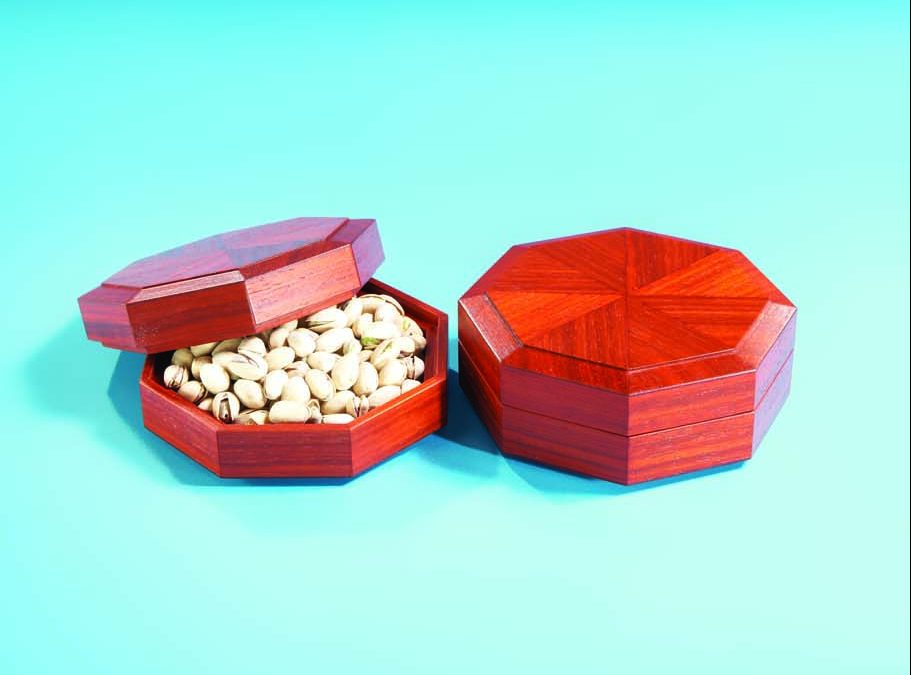 Is an eight-sided box twice as complicated as one with four sides? Not this one. As far as measuring goes, the OctaBox is easier to build than a rectangular box. On the OctaBox, every side is the same length and the top and bottom are identical—in fact, there are only two different parts to make for the whole project.
Making the two halves fit perfectly together isn’t complicated, either. I used a really clever system (see The Easy Way to Make a Lipped Box at bottom). It worked great, but my execution was flawed: I made the box upside down! Granted, the top and bottom look alike, so what’s the difference between them? Not asking that question while building the box is how I got into trouble.
I wanted the box to have a deep lid, so you could use it as a receptacle for discarded shells or candy wrappers. I also wanted the lid to be narrower than the base, so when assembled the box didn’t look top-heavy. So far, so good.
I goofed somewhere else: The lips are reversed. On the vast majority of boxes with lipped edges, the lip on the lower half sticks up. Mine doesn’t—it’s recessed. You didn’t notice? Neither did I, until someone pointed it out just before this article went to print. I’m not sure that it really matters, so I didn’t get upset; I just laughed. I was tripped up by the project’s simplicity—not complexity—and built it so fast that I overlooked a subtle detail. The plans given here are for the box just as I made it, but I’ve included alternate plans for making the box the “right” way.
I did learn one important lesson: Flying by the seat of your pants can be dangerous. When making a box, draw a cross section before you begin and keep track of which side is which!
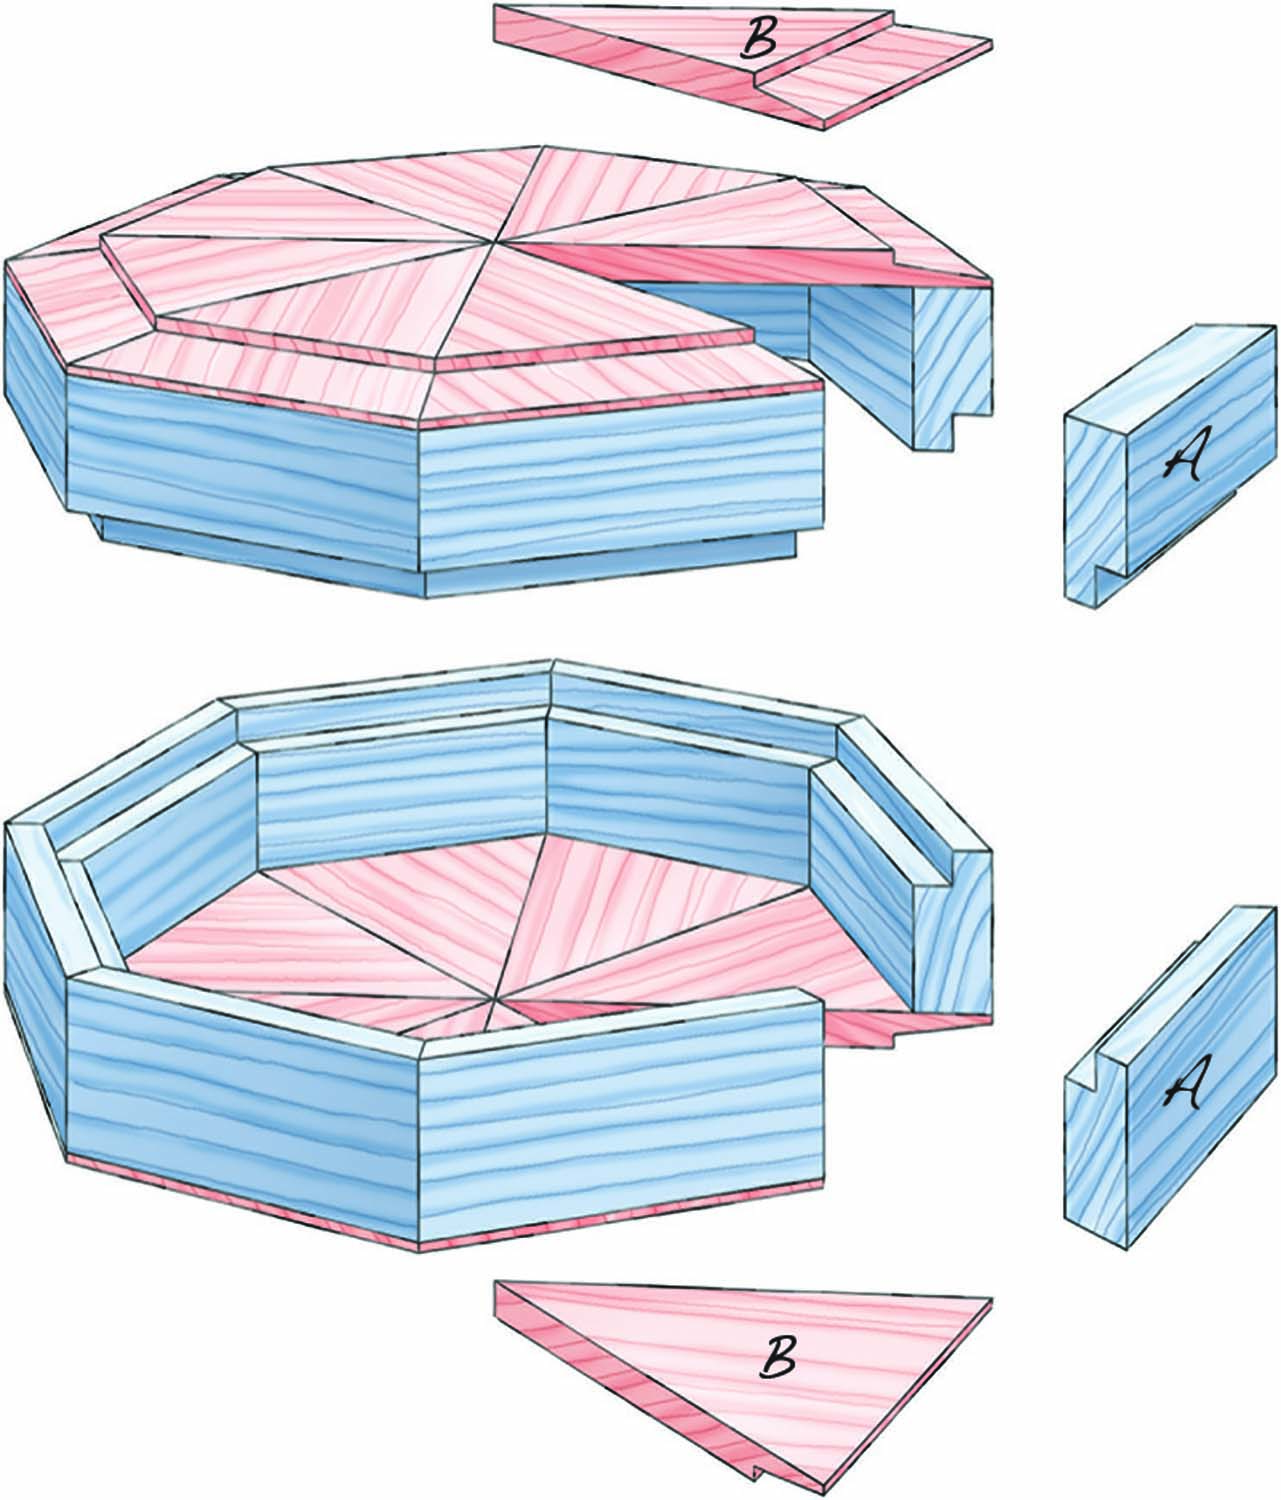
Fig. A. Exploded View
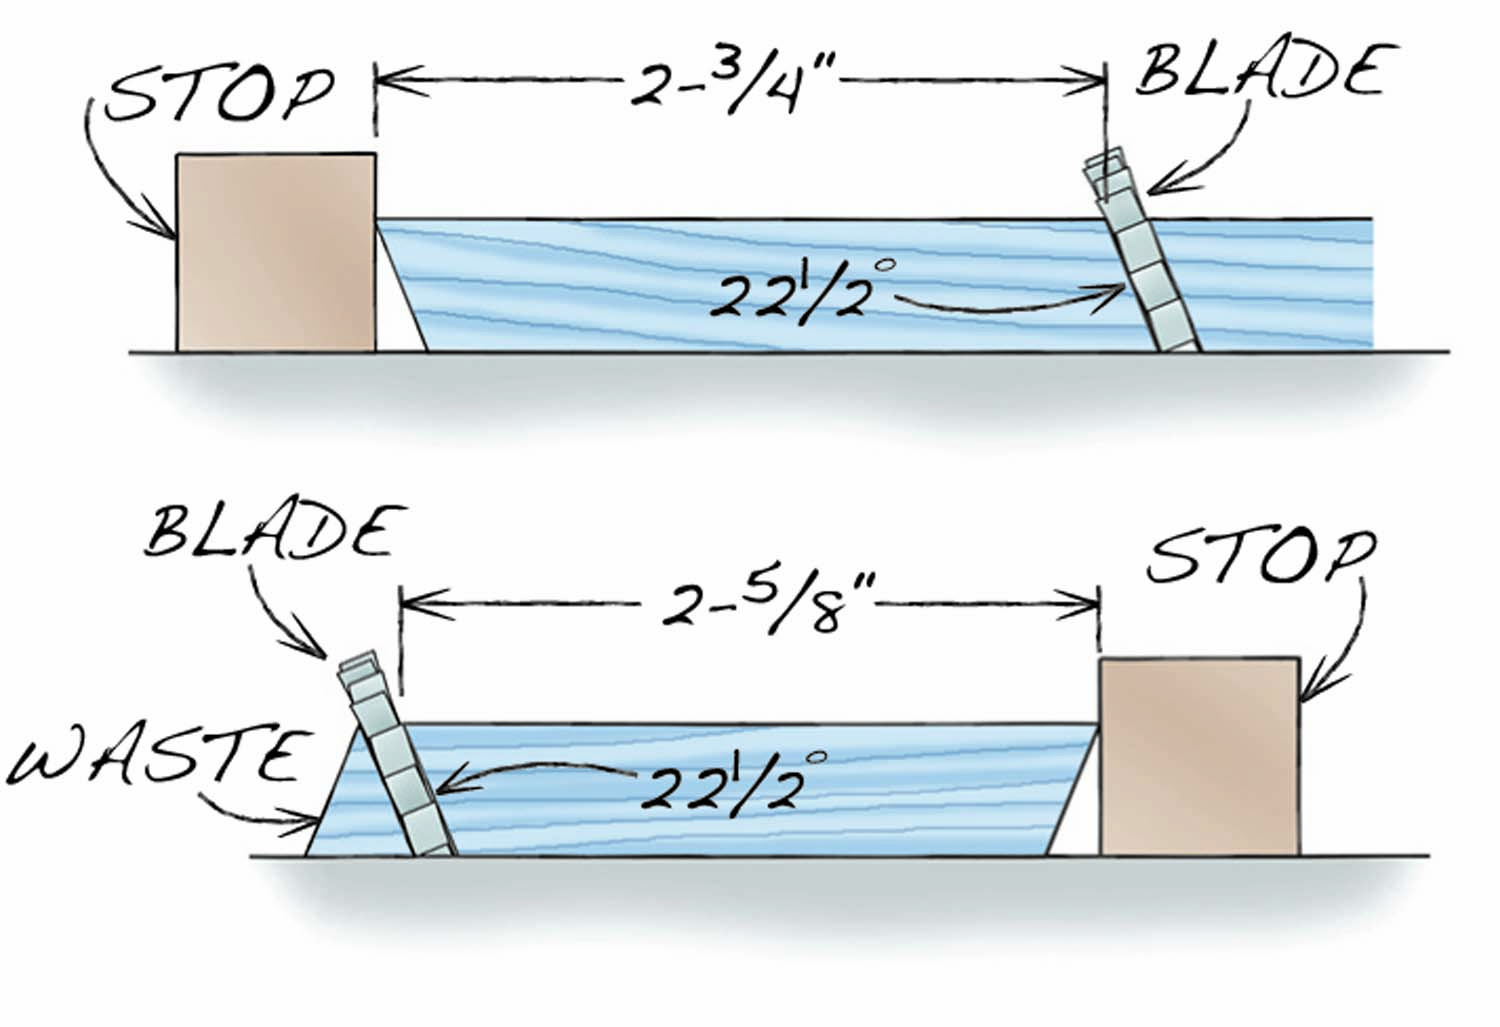
Fig. B. Side Segment Cuts
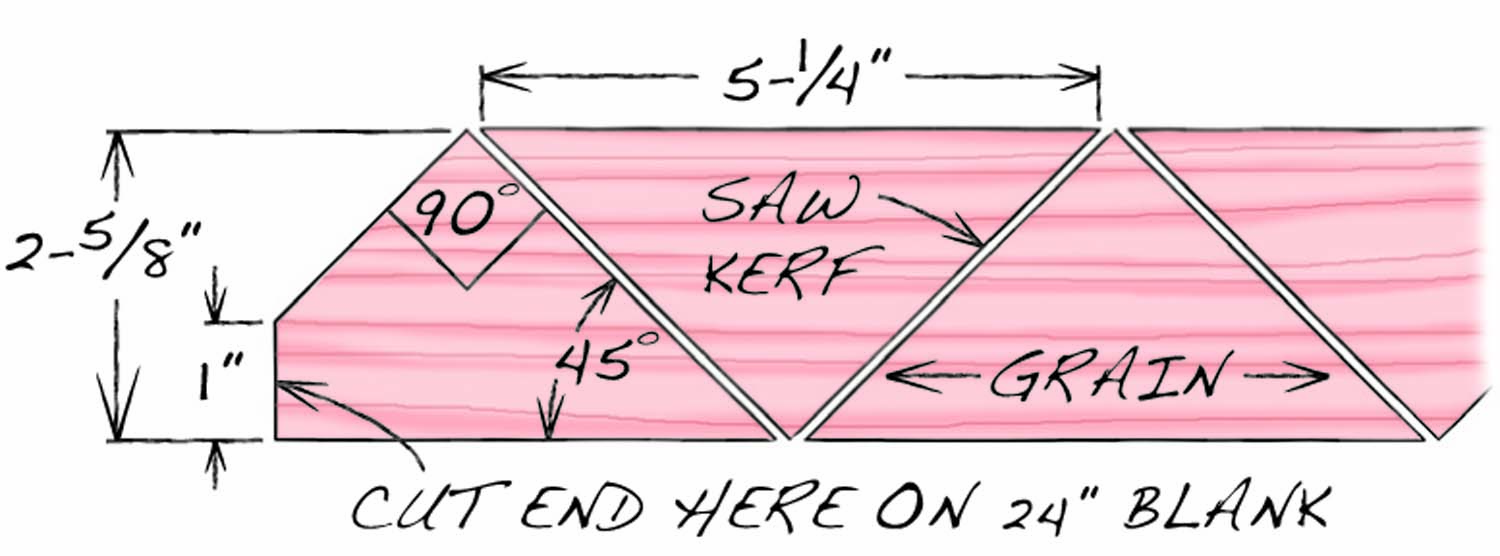
Fig. C. Top and Bottom Segment Cuts
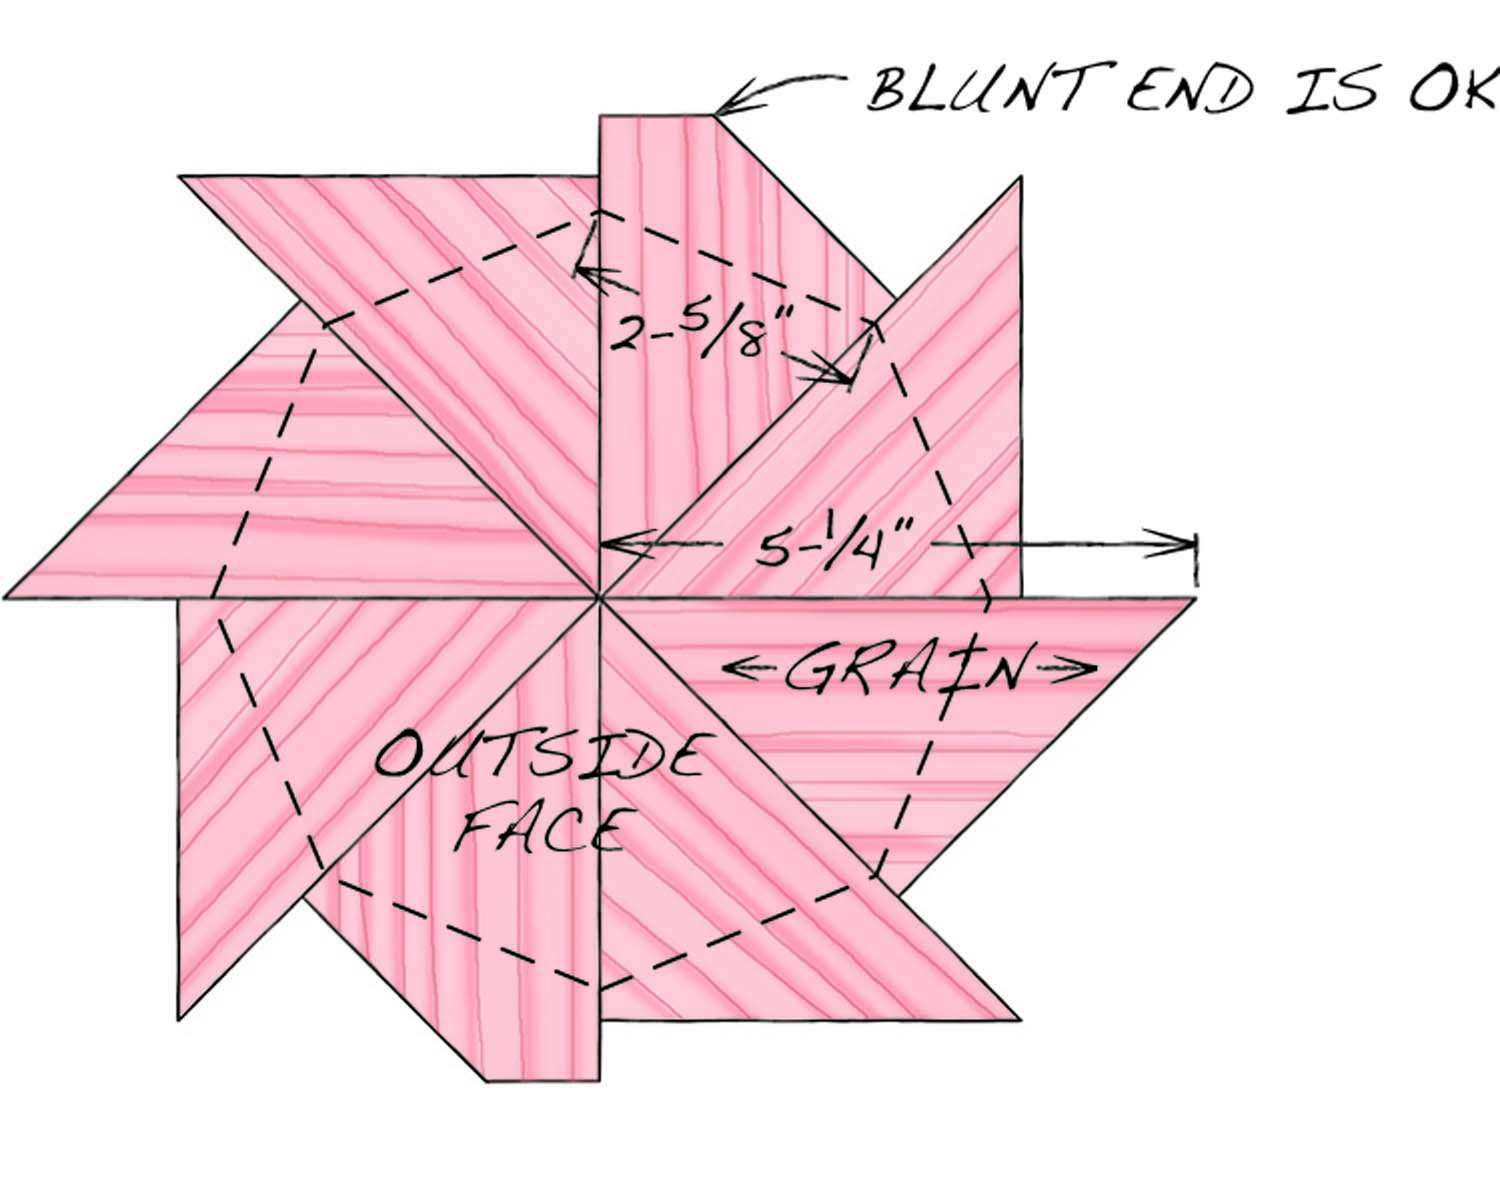
Fig. D. Pinwheel
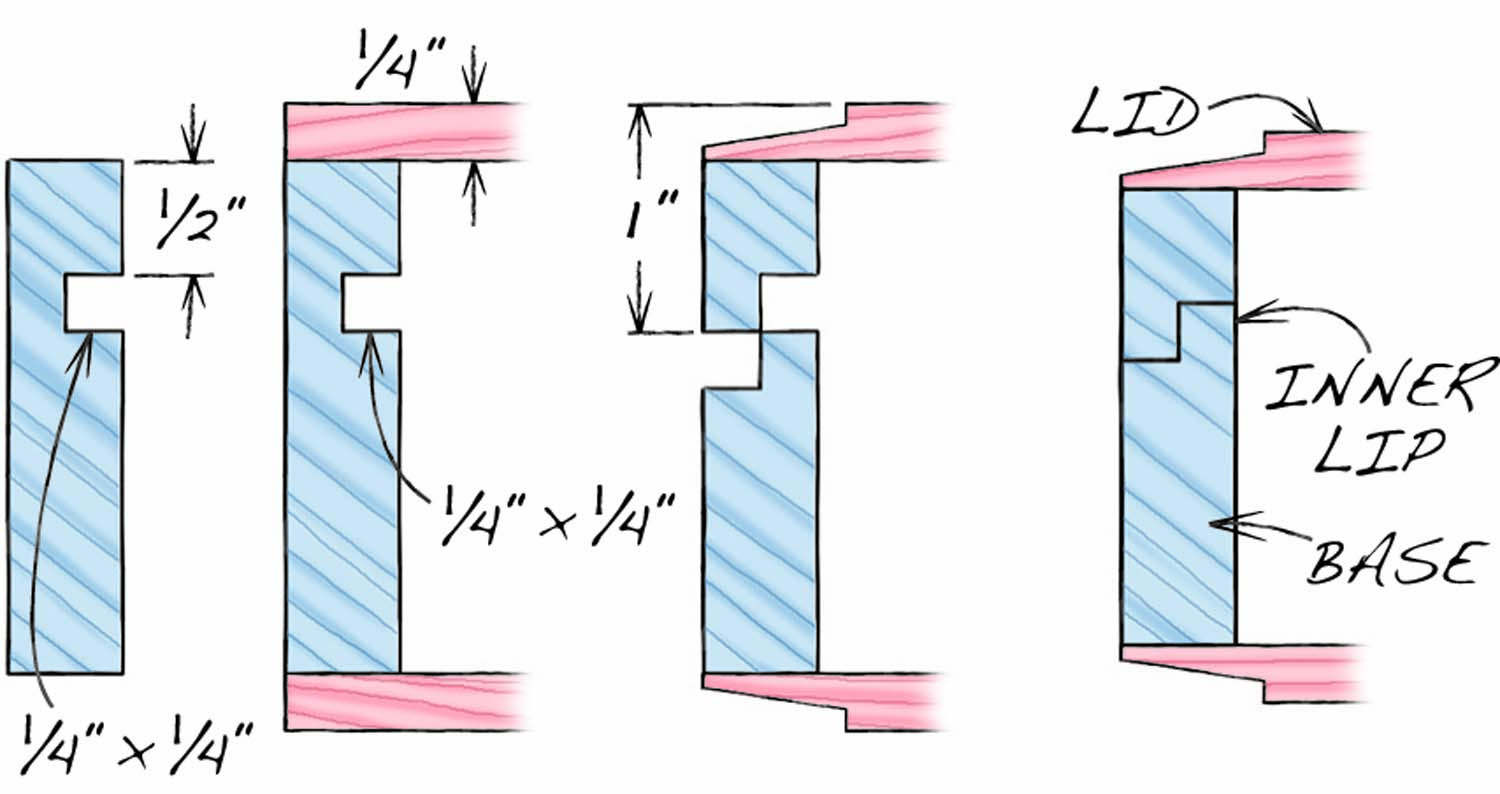
Fig. E. Alternate Lip Arrangement
 Choosing wood
 Choosing wood
You don’t need much wood to make an OctaBox, so you won’t have to spend a lot to buy something special. I used cocobolo, a brightly colored exotic wood that’s relatively easy to work. I looked for boards with straight grain so all the pieces of the box would look pretty much the same.
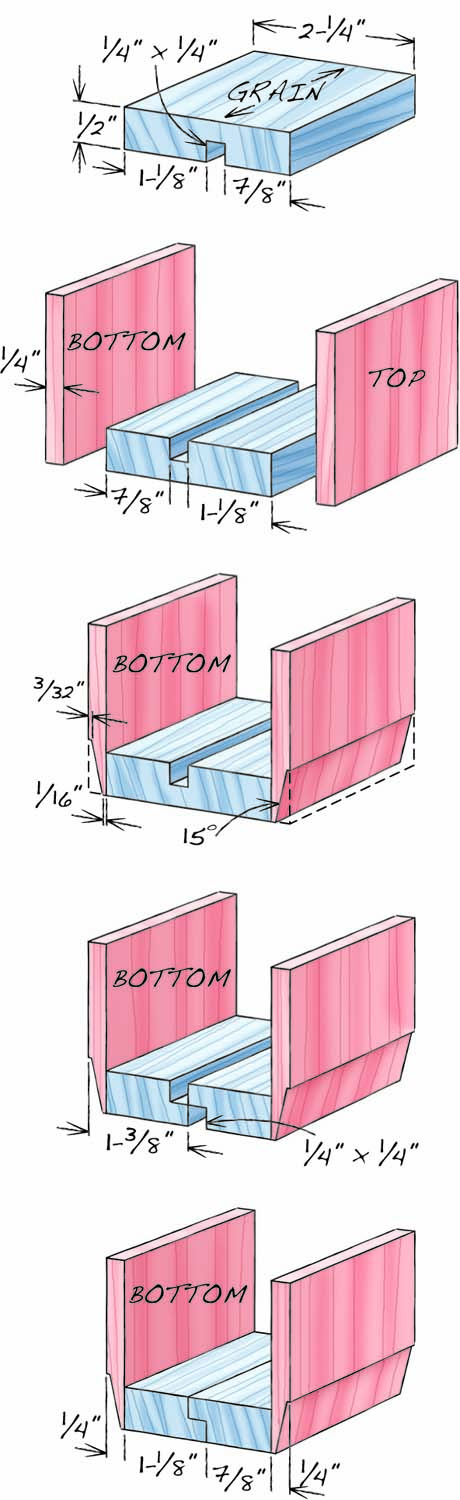
You’ll need 1/2″ material for the sides of the box (A) and 1/4″ material for the box’s top and bottom (B). The most convenient way to obtain this wood is by ordering it over the Internet. It usually comes in pieces that are 3″ wide and 24″ long. I’ve dimensioned the box so you can get all of the side pieces from one 24″ board and all of the top and bottom pieces from two 24″ boards. However, I strongly recommend that you make or order at least one additional piece of each thickness for testing your setups. (This wood could be any species, of course.)
I milled my own lumber for the box and cut the pieces 30″ long. This additional length helped quite a bit when cutting the side pieces (Fig. C) because I had more support for the last cut. Bottom line: 24″ will work, 30″ is better.
Make the sides first
Before we get on the road, let’s look at a map. You’ll be making the box as a single unit, then sawing it apart into two pieces. You’ll be making lips on these pieces so they nest together, and that’s where you’ll start—with the lips.
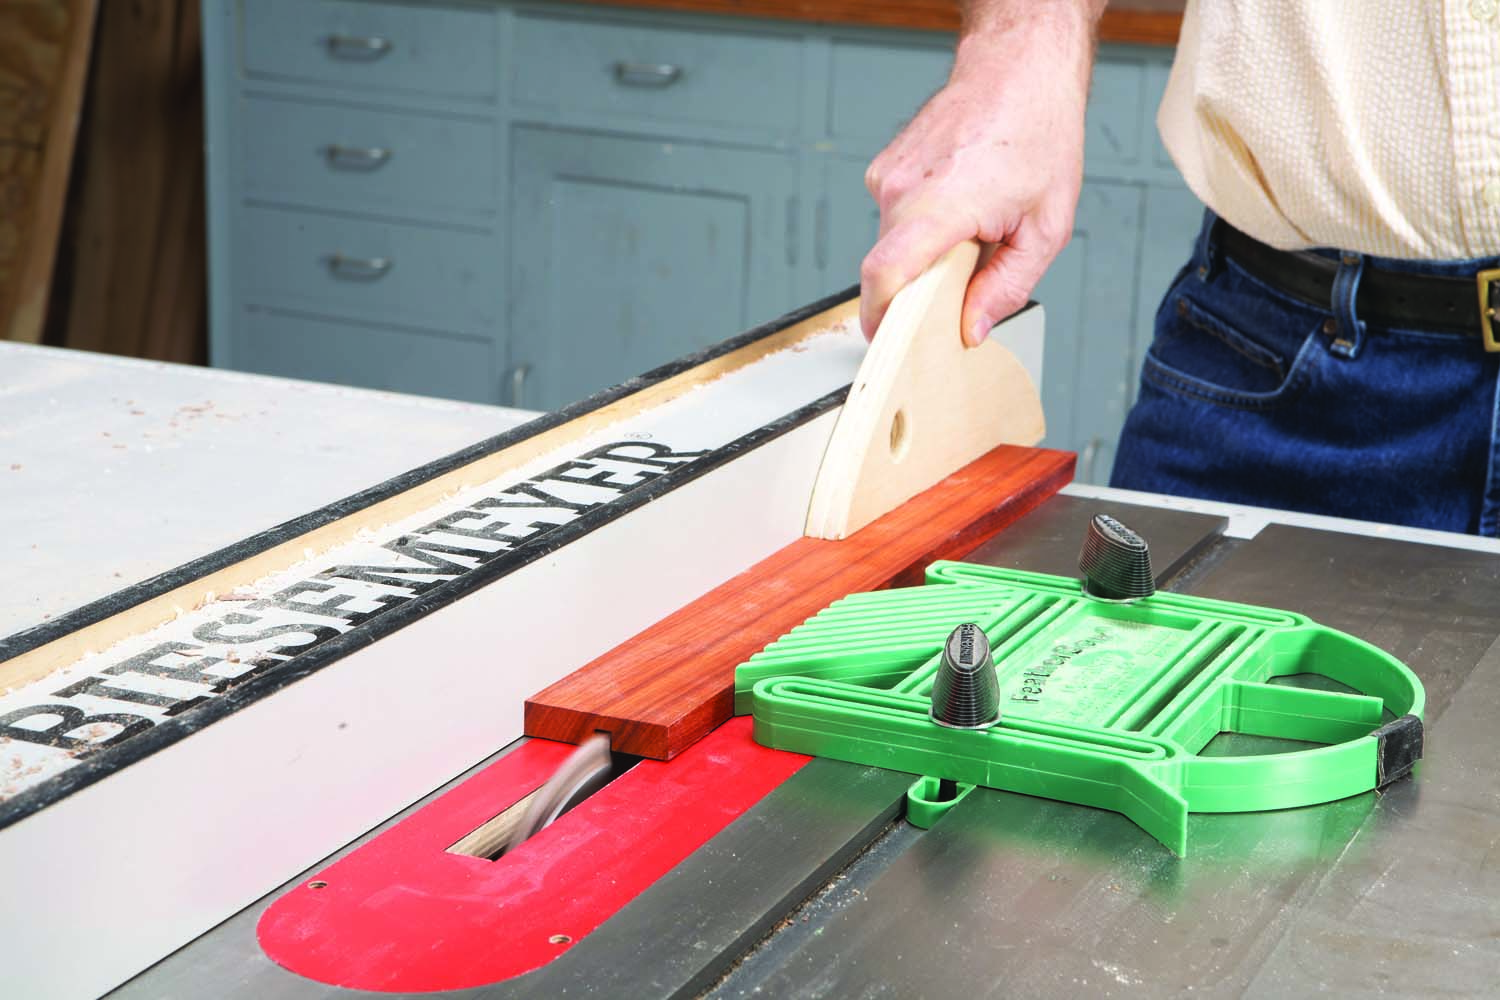
Photo 1. Start by milling one board to make all of the box’s side pieces. Cut a groove halfway deep; its position determines where the box separates into two halves.
Rip the 1/2″ thick piece 2-5/16″ wide, then joint both edges to yield a piece that’s 2-1/4″ wide. Install a 1/4″ dado set in your saw and cut a groove the length of the board (Photo 1). Cut the same groove in one of your test pieces. Ideally, you’d use a special set of blades or a single blade that cuts a flat bottom, but a standard dado set will be OK. (It will leave some unobtrusive scoring marks that you can’t easily remove—flat-topped blades won’t.) Turn over the piece and apply a finish to it (Photo 2). In addition, draw a slanted line down the full length of the side without the groove. This orientation line will enable you to reassemble the pieces in the correct order after they’re cut apart in the next steps.
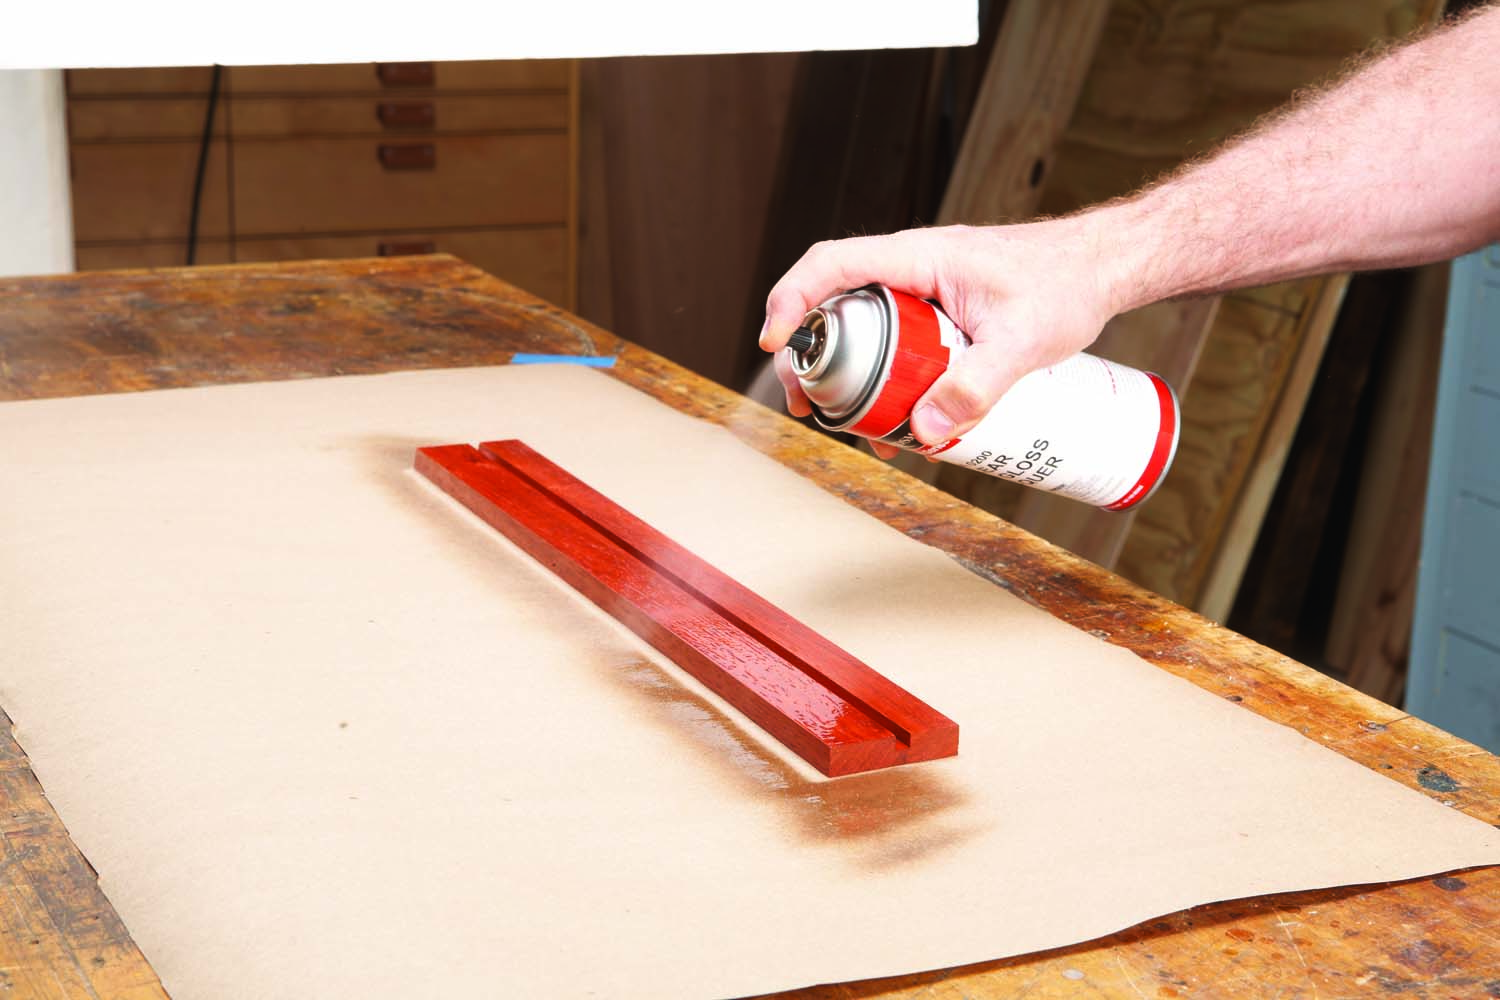
Photo 2. Spray finish on the grooved side of the board—this is its inside face. Finishing this side now will help you clean up dried glue later on.
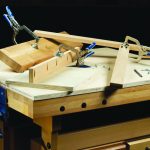
Cutting the 1/2″ piece into segments is a two-step pro-cess (Photos 3 and 4; Fig. B). The bevel cuts must be right on the money, so it’s worth the time to make test cuts first. (You can use any wood for this. The angle is correct when eight pieces form a tight-fitting octagonal frame.)
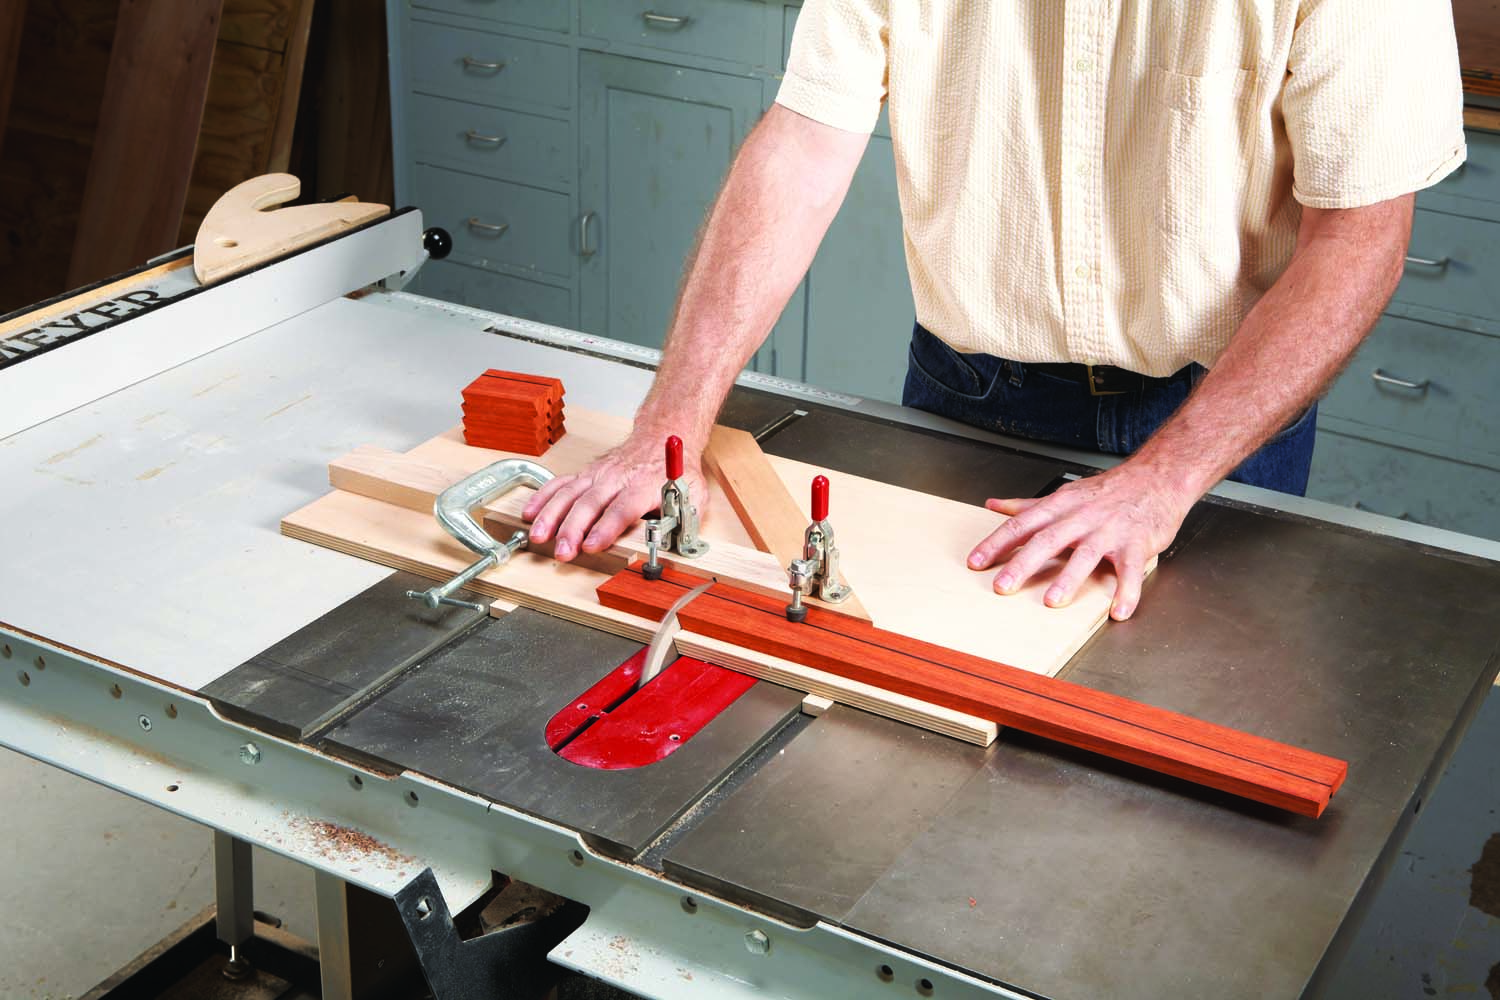
Photo 3. Cut the board into eight equal pieces. The grooved side is down. A slanted line on the other side will enable you to reassemble the pieces in the correct order.
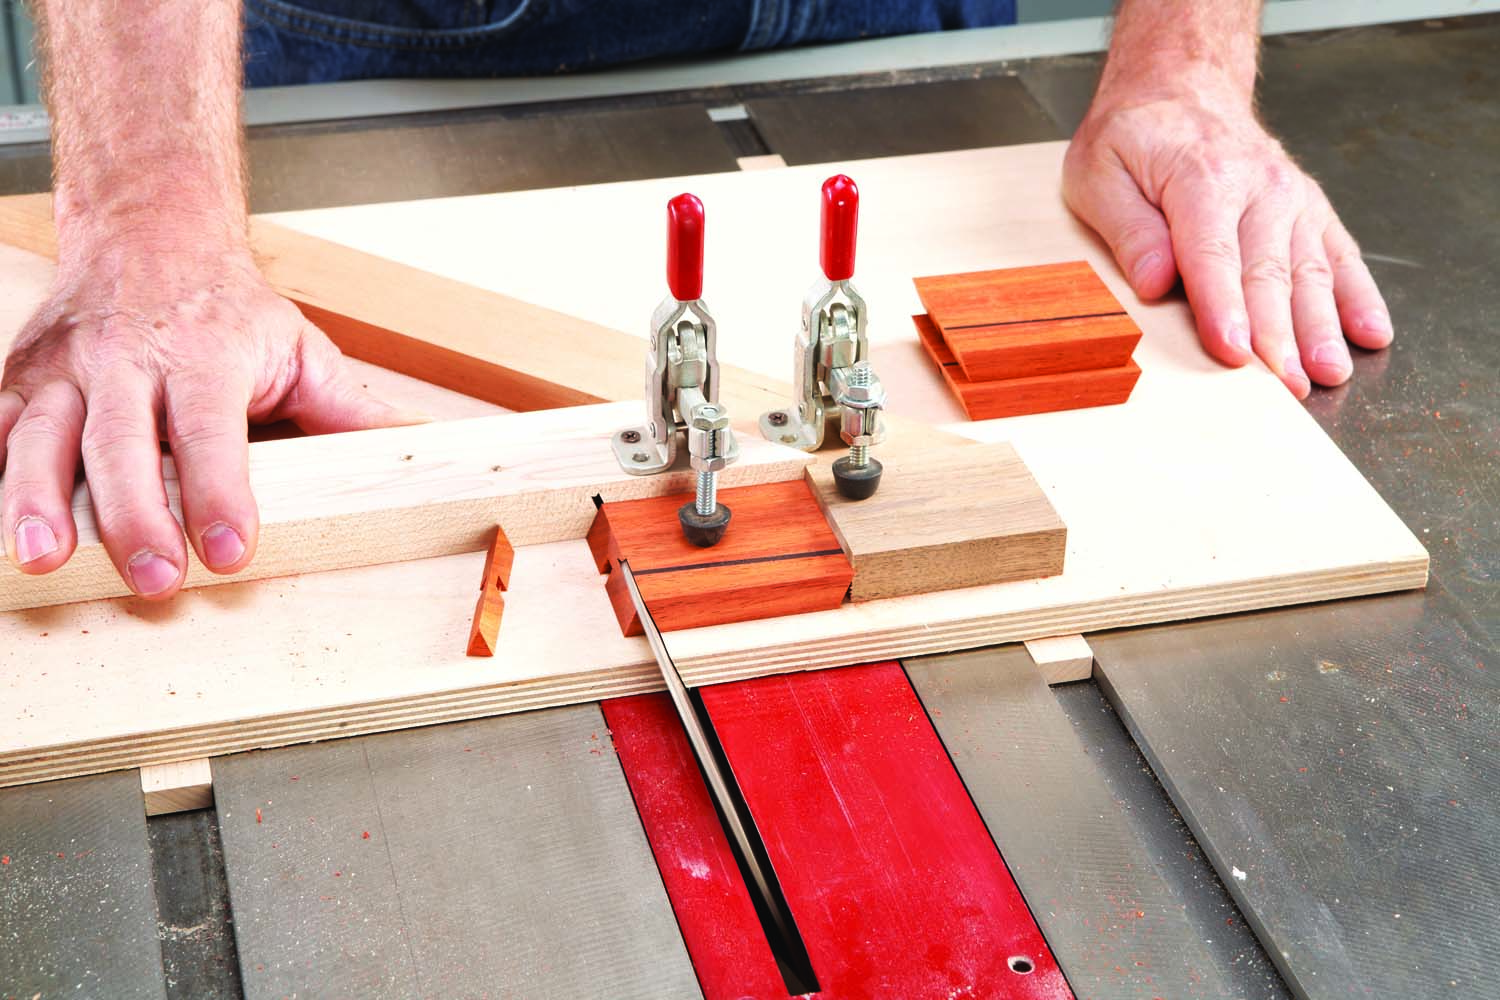
Photo 4. Turn all of the pieces around, reposition the stop block and recut one end of each piece. Both ends of the blocks now lean the correct way.
Tip: Make a dedicated sled for cutting both the box’s sides and the top and bottom parts. While you could simply use a miter gauge and a fence, the sled has a number of advantages. First, there’s no tearout, because there’s zero clearance around the blade. Second, you can easily mount toggle clamps on the sled to prevent the parts from moving—and to keep your hands out of harm’s way. Third, the cuts are absolutely straight because the sled runs true, without any wiggle.
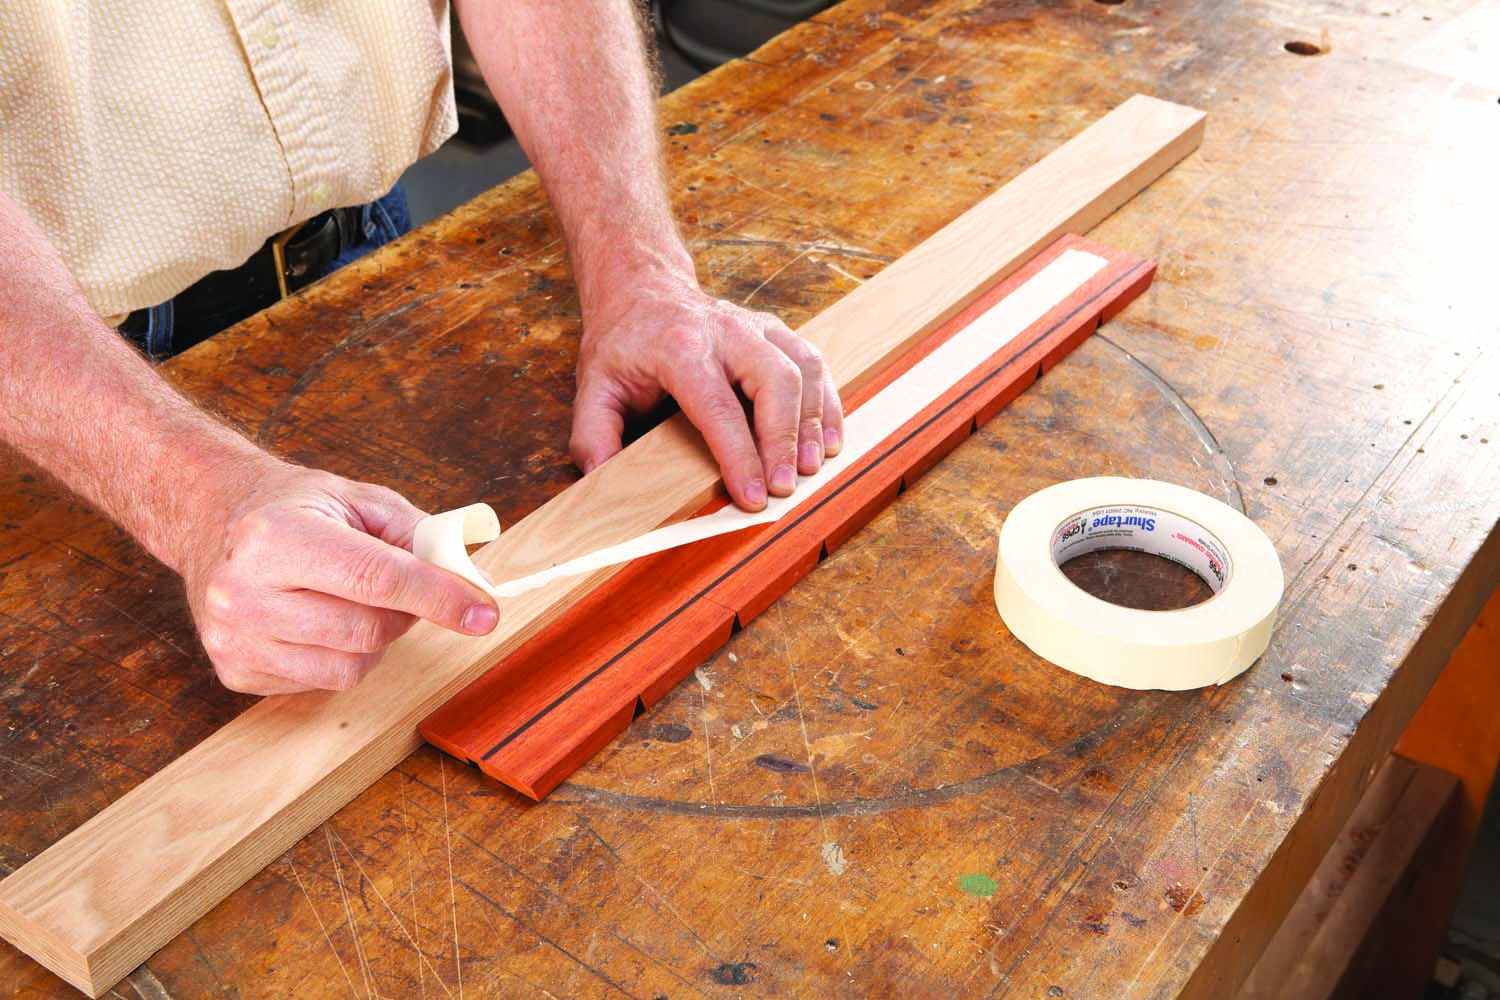
Photo 5. Place all of the pieces along a straightedge, outside face up, and tape them together. Turn over the assembly and apply glue to the joints.
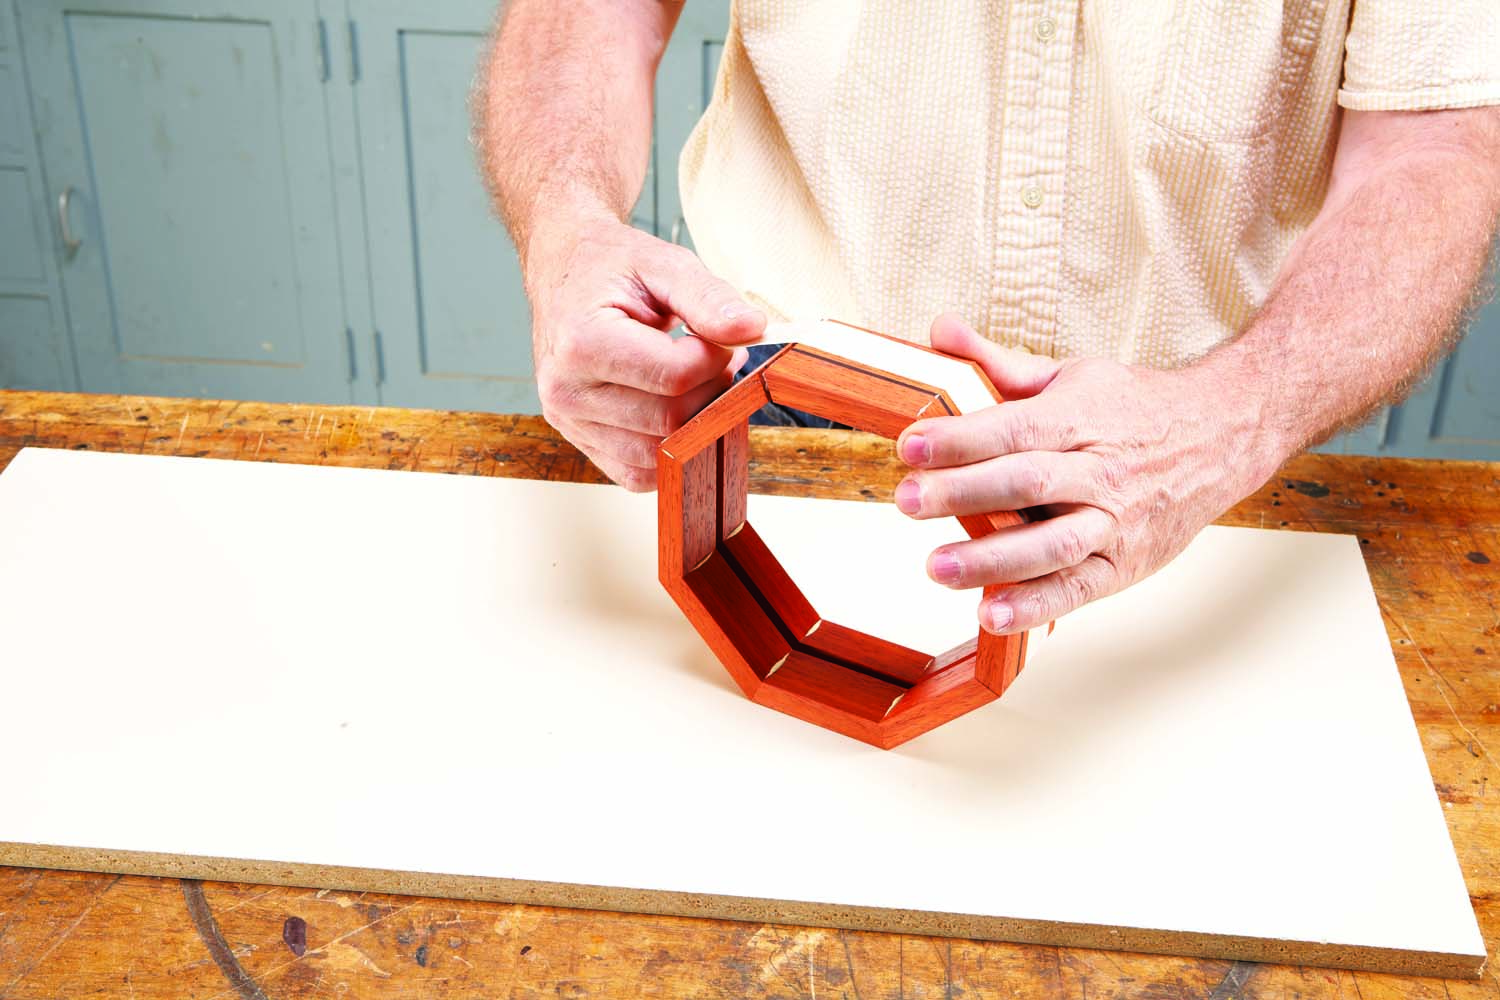
Photo 6. Pull the two ends of the assembly together with more tape. No clamps are necessary.
Tape the segments together in the correct order and glue them together (Photos 5 and 6). Level the top and bottom edges of the box with a jack plane or by rubbing the box on a full sheet of sandpaper taped to the top of your tablesaw. Before moving on, mark the location of the groove on the outside of the box (Photo 7). This is very important. Once you’ve glued on the top and bottom of the box, the groove will be hidden. You’ll need to know exactly where it is when you saw the box apart.
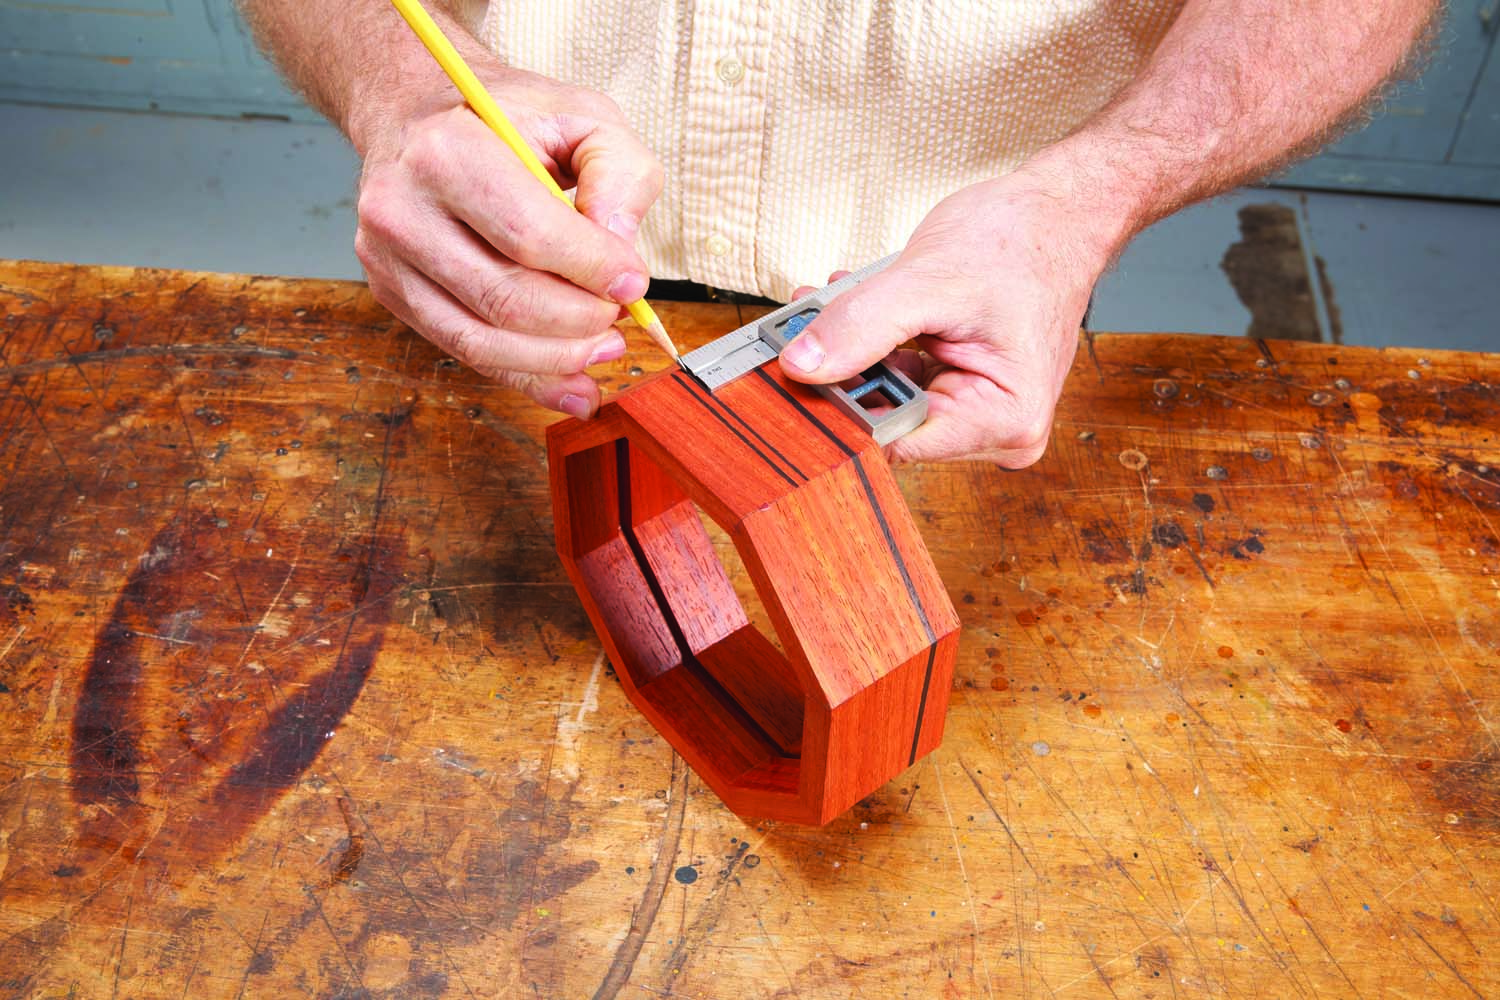
Photo 7. Mark the position of the groove on the outside of the box.
Add top and bottom
To save time, you could make the box’s top and bottom from single pieces of wood. It’s risky, though: They might crack. Gluing the pieces all around restrains them from expanding and contracting in width with changes in humidity. My solution is to minimize this movement by making the top and bottom from triangular segments, forming a “pinwheel” (Fig. D). The pinwheel’s grain doesn’t run in a single direction—it rotates with each segment.
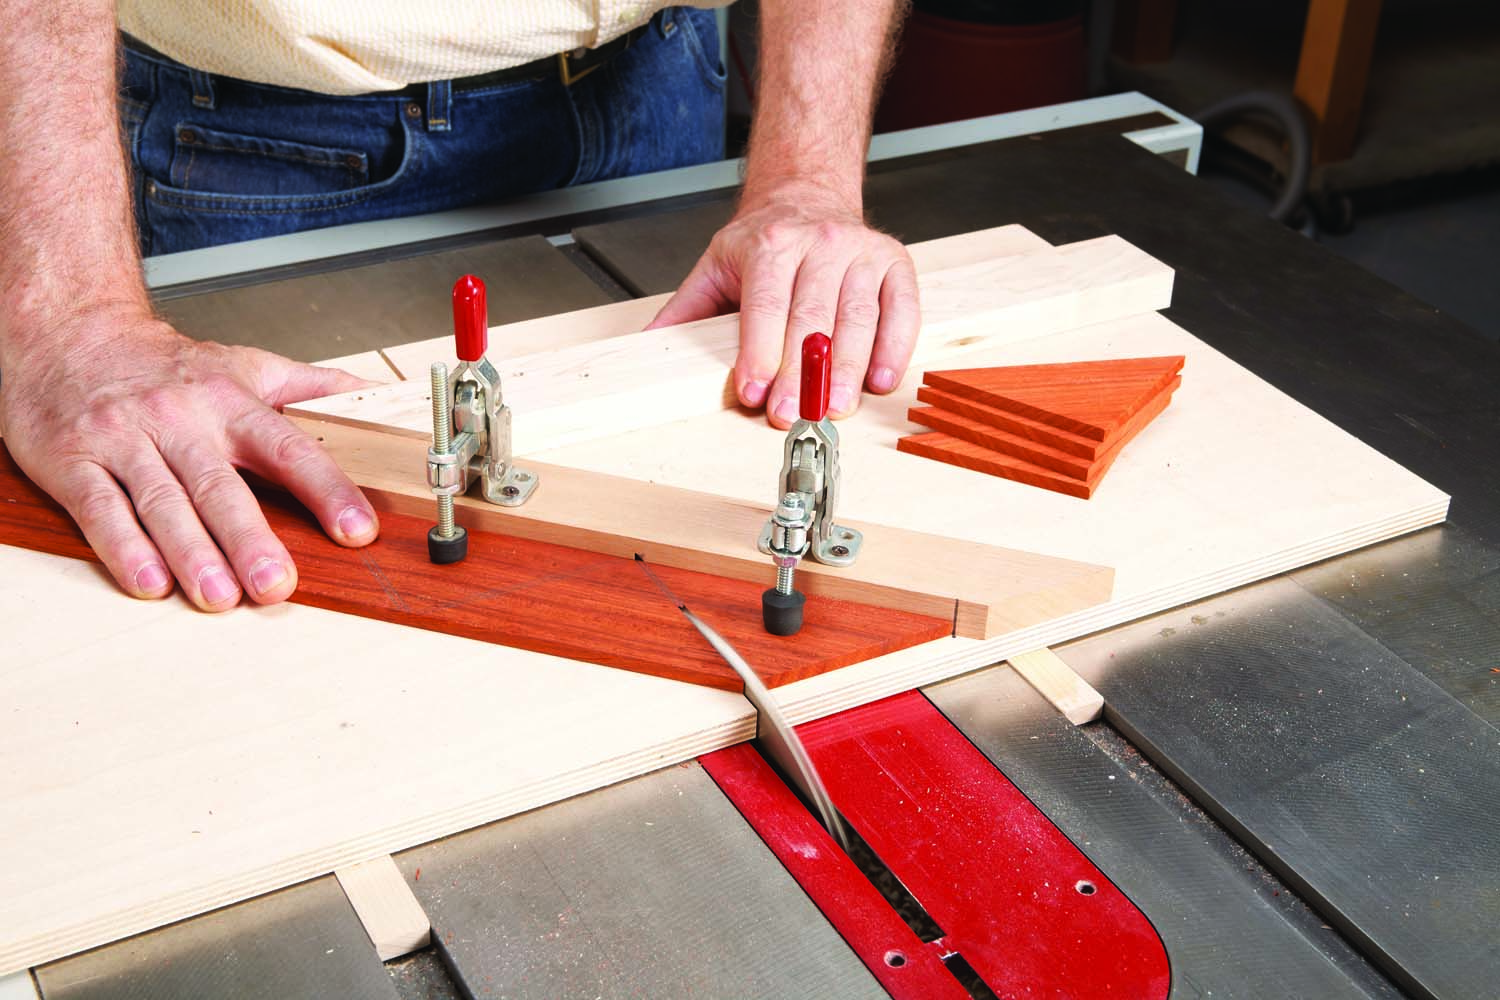
Photo 8. Begin making the top and bottom of the box. First, saw a long board into triangles.
Sawing these segments is exacting work (Photo 8). The 45° cuts must be precise. As with the side segments, the best strategy is to make test cuts, adjusting the fence until you can make a complete pinwheel with tight joints, right off the saw. I had to reposition the fence on my sled a few times
to accomplish this. Even so, I had to shim the last piece of the pinwheel before cutting it in order to tweak its angle just a smidge.
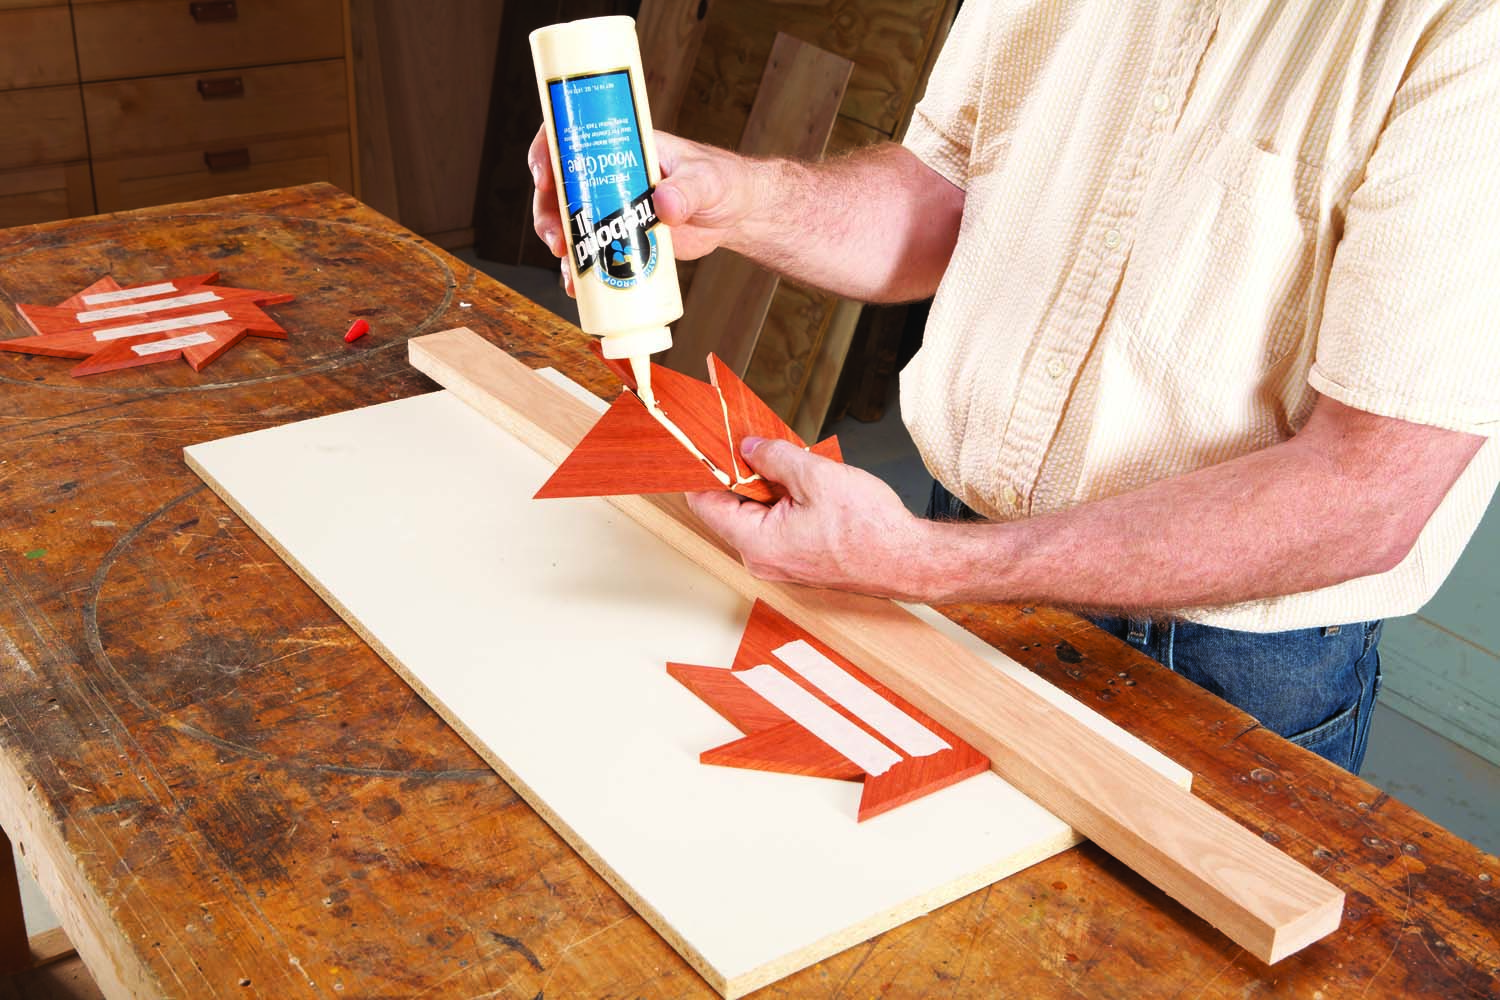
Photo 9. Tape four triangles together, making half of a pinwheel. Open the joints and apply glue. Glue the two halves together, making a complete pinwheel.
Once you’re set, rip and joint the 1/2″ material so it’s 2-5/8″ wide. If your wood is only 24″ long, leave a blunt end on the first segment in order to obtain all eight pieces (Fig. C). The last segment will have a blunt end, too—but it won’t matter (Fig. D). Tape and glue the segments into two halves (Photo 9), then tape and glue the halves together. Sand both surfaces of the pinwheels until they’re flat and even.
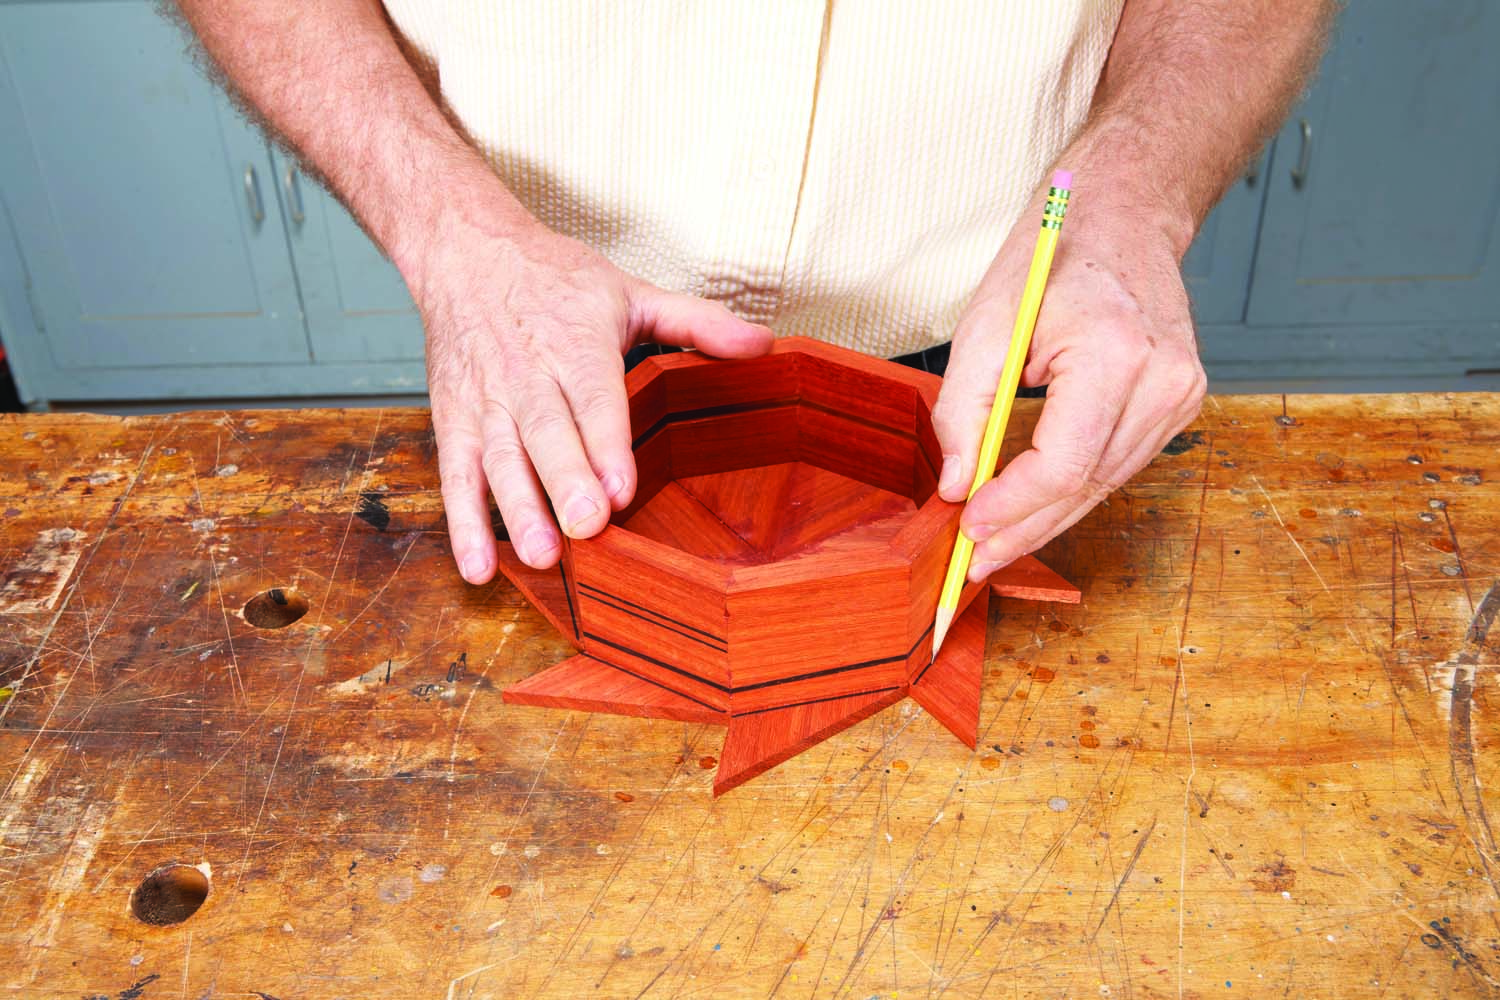
Photo 10. Align the sides of the box with the top and bottom pinwheels. Trace around the box. Saw off the waste, then glue the pinwheels to the sides.
Place the box’s sides on both pinwheels and trace around them (Photo 10). Be sure that the pinwheel “spins” the same way for both top and bottom—it’s easy to get mixed up here. Remove the waste using a bandsaw, staying about 1/8″ away from the line. Glue the top and bottom onto the box. You don’t have to use clamps, just weight. A gallon can of paint works well. Trim the top and bottom flush with a router (Photo 11).
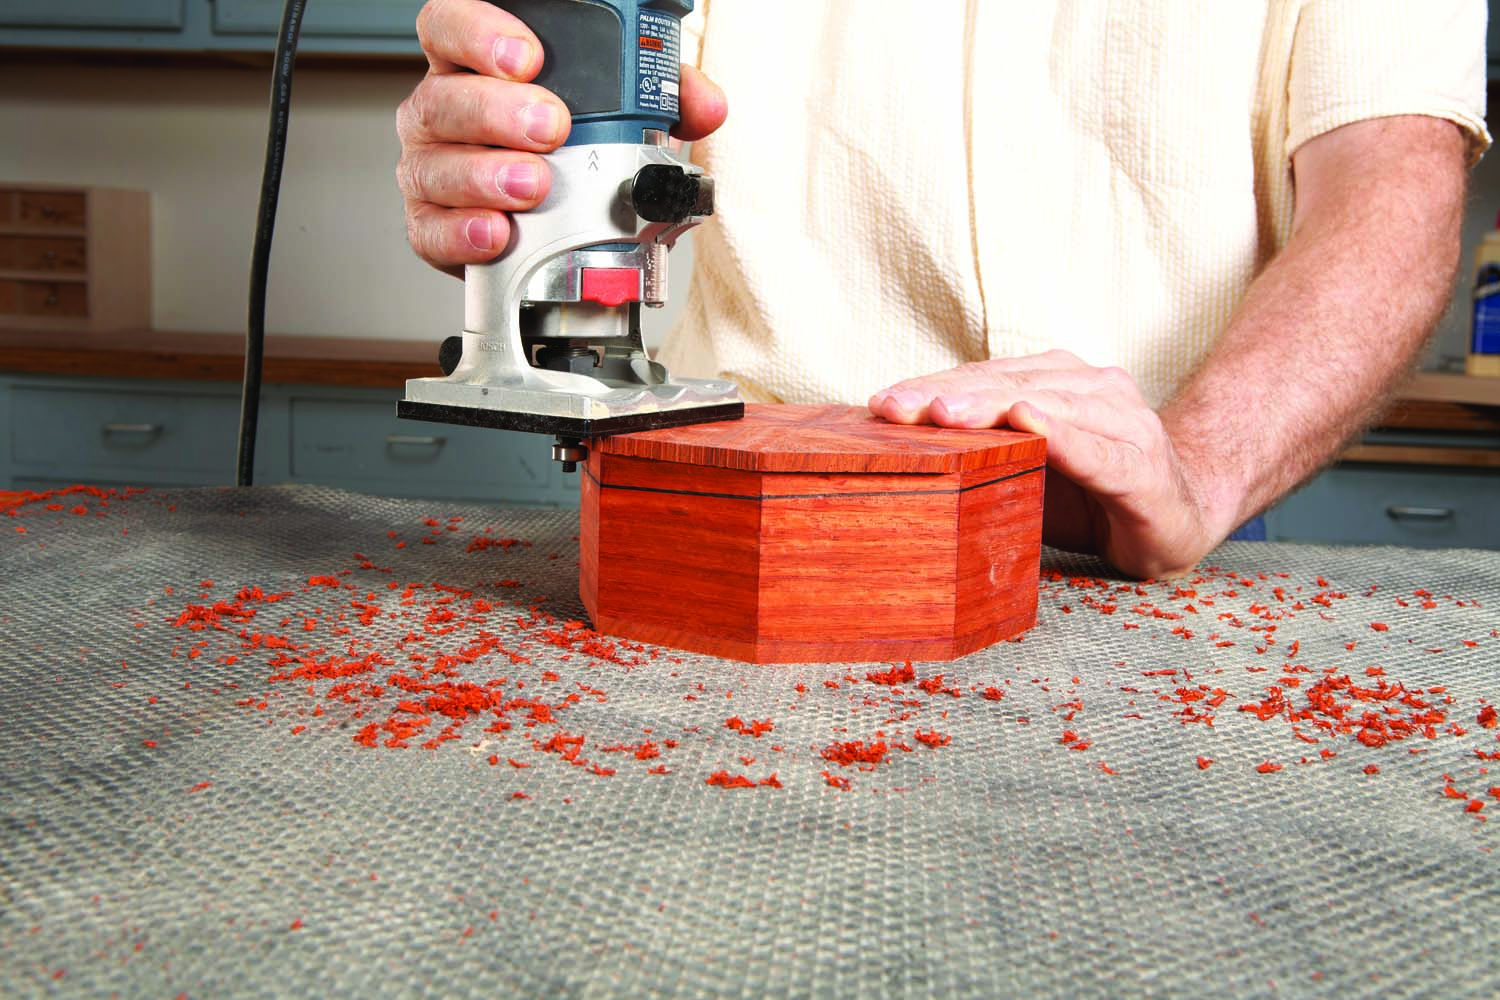
Photo 11. Even up the edges of the top and bottom with a bearing-guided flush-trim bit.
Bevel the top and bottom (Photo 12). This cut is fussy, too—you don’t want to take too much or too little. It’s best to make the first round of cuts a bit shy of the goal, then adjust the blade and fence in small increments.
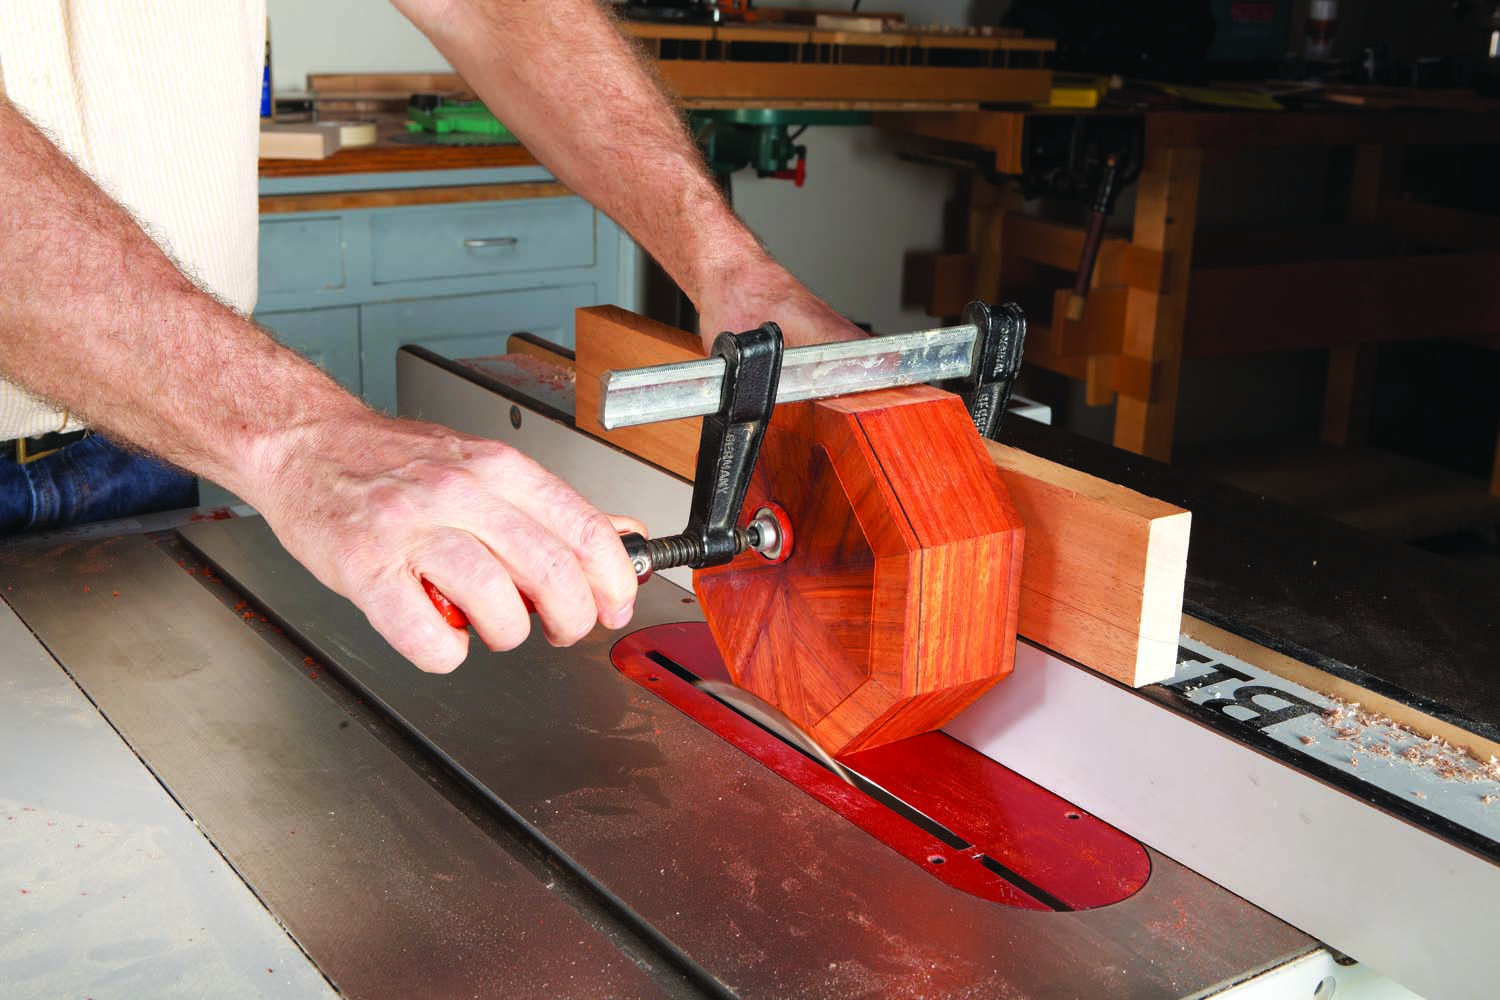
Photo 12. Saw bevels all the way around the top and bottom. Clamp a long board to the box to prevent it from tipping.
Separation time
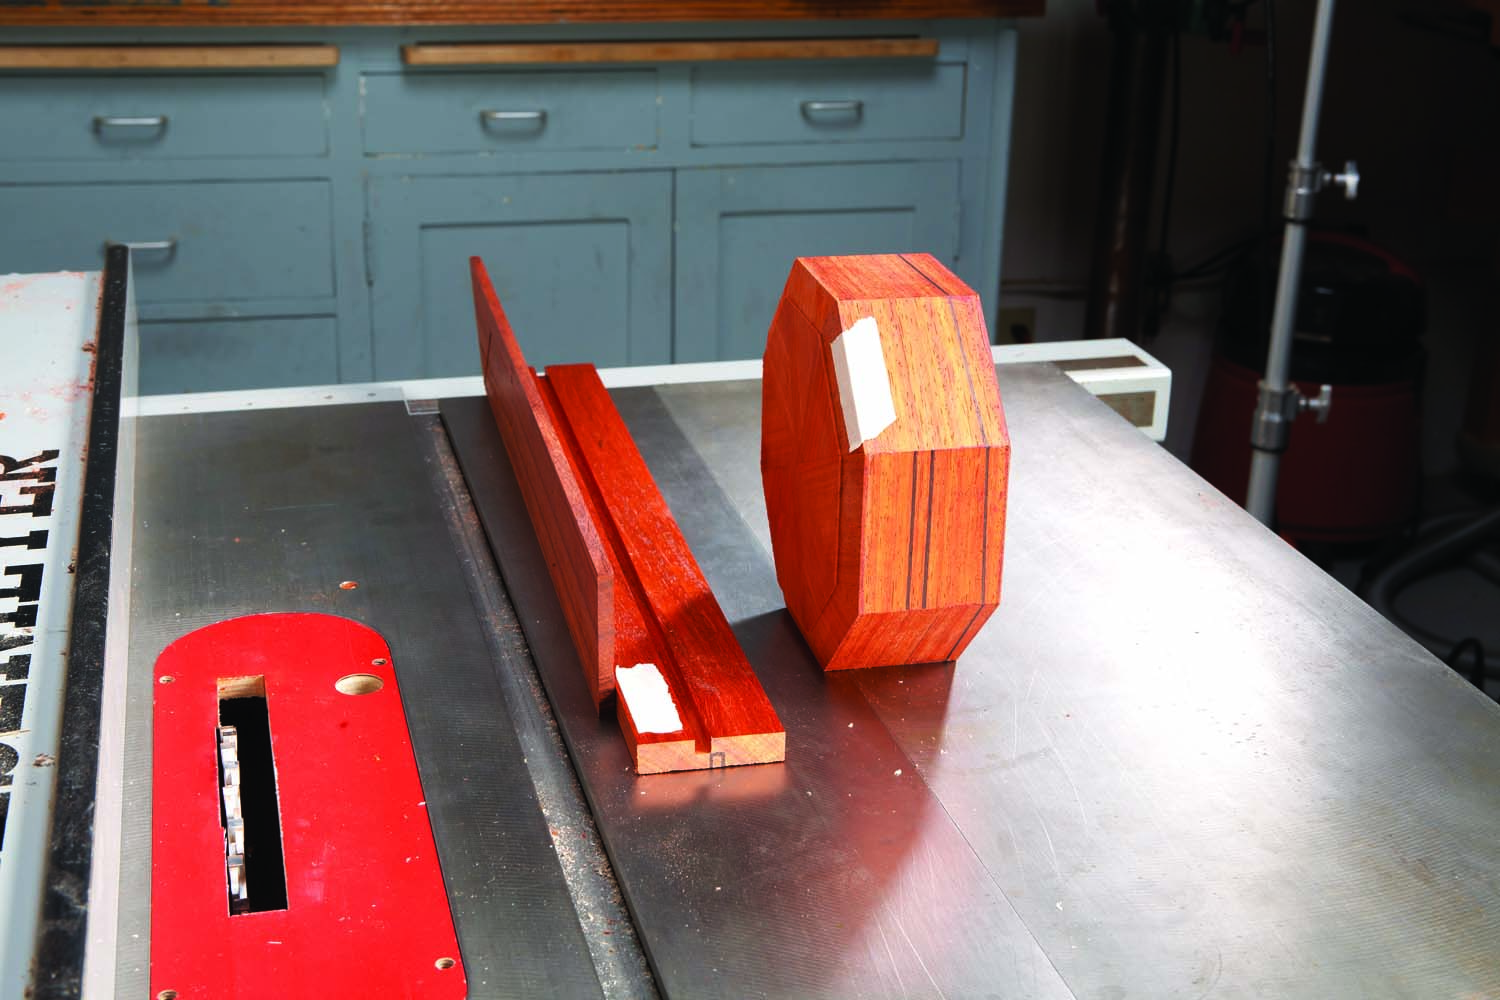
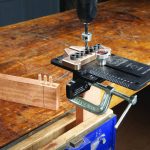
Photo 13. Prepare to separate the box into two halves. To avoid cutting in the wrong place, set up the saw using two leftover pieces. Tape identifies the box’s bottom.
The next step is to cut the box apart. To succeed, you’ll need to know the exact location of the groove you cut in the first step. Of course, it’s hidden inside the box now—but you marked it on the outside of the box, right? It’s not easy to set up the saw from this mark alone, however—you’re much
better off using the pieces you made for test cuts (Photo 13).
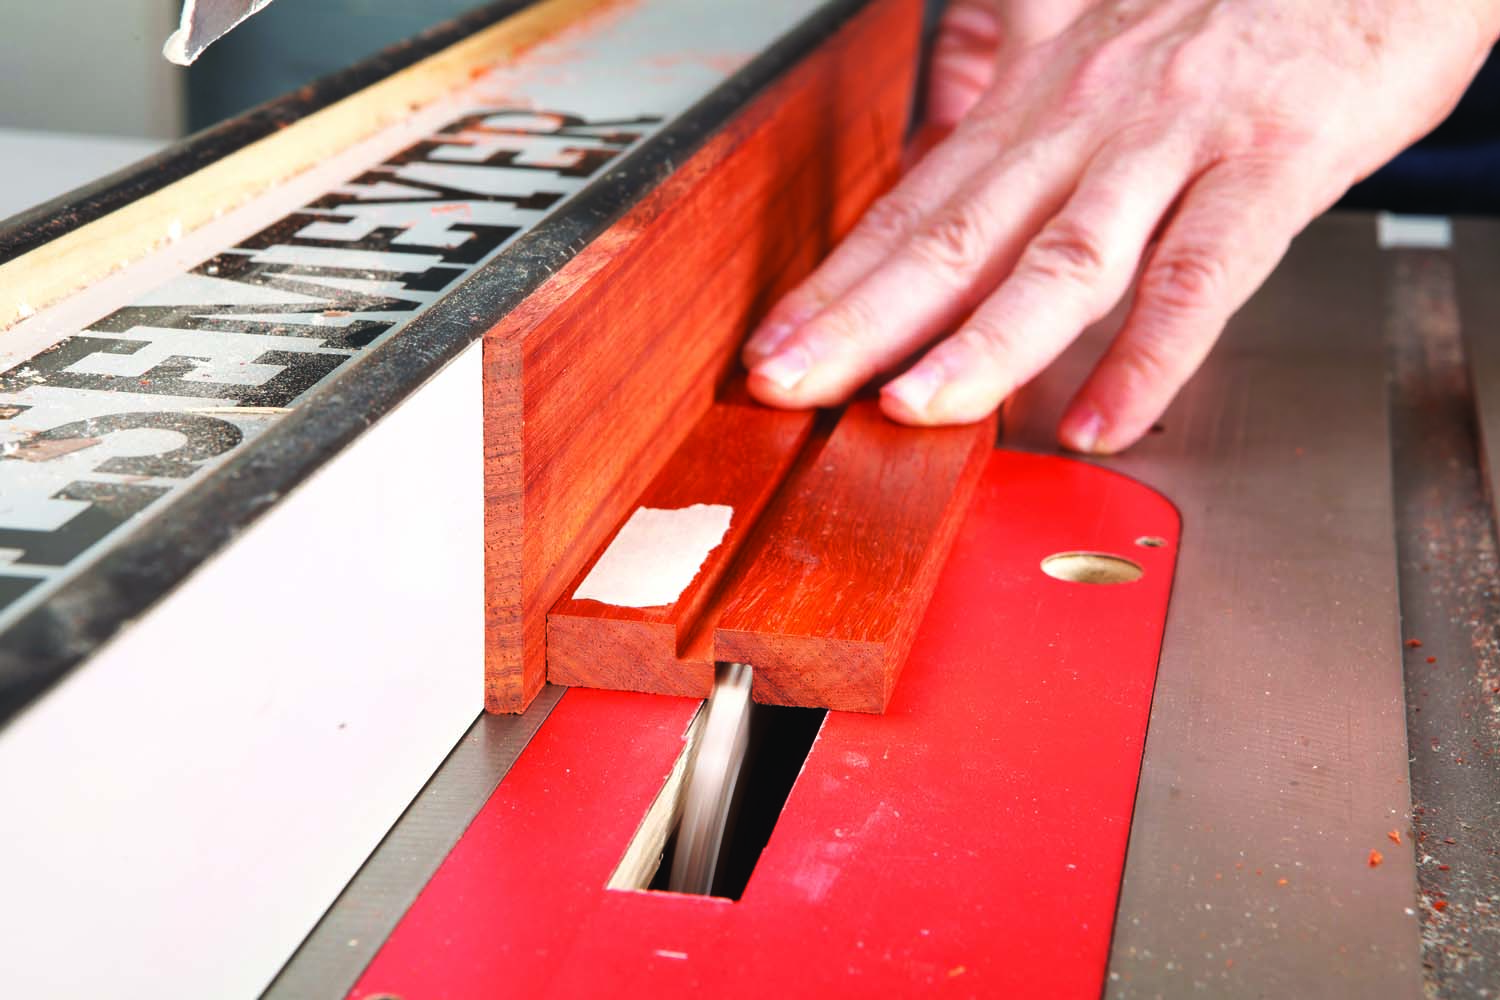
Photo 14. Make a short test cut. This groove should also be halfway deep and leave just a whisker of wood separating it from the other groove.
Mark the location of the new, outside groove on the 1/2″ thick piece. Cut a short test groove in this piece (Photo 14). Ideally, the top of this groove should exactly line up with the bottom of the inside groove. However, this might result in a fit that’s too tight. (The box’s lid must fit in eight different
positions!) It’s better to cut the outside groove an additional 1/64″ deep, which will result in a slightly looser fit. Adjust the fence so the grooves are separated by a whisker of wood.
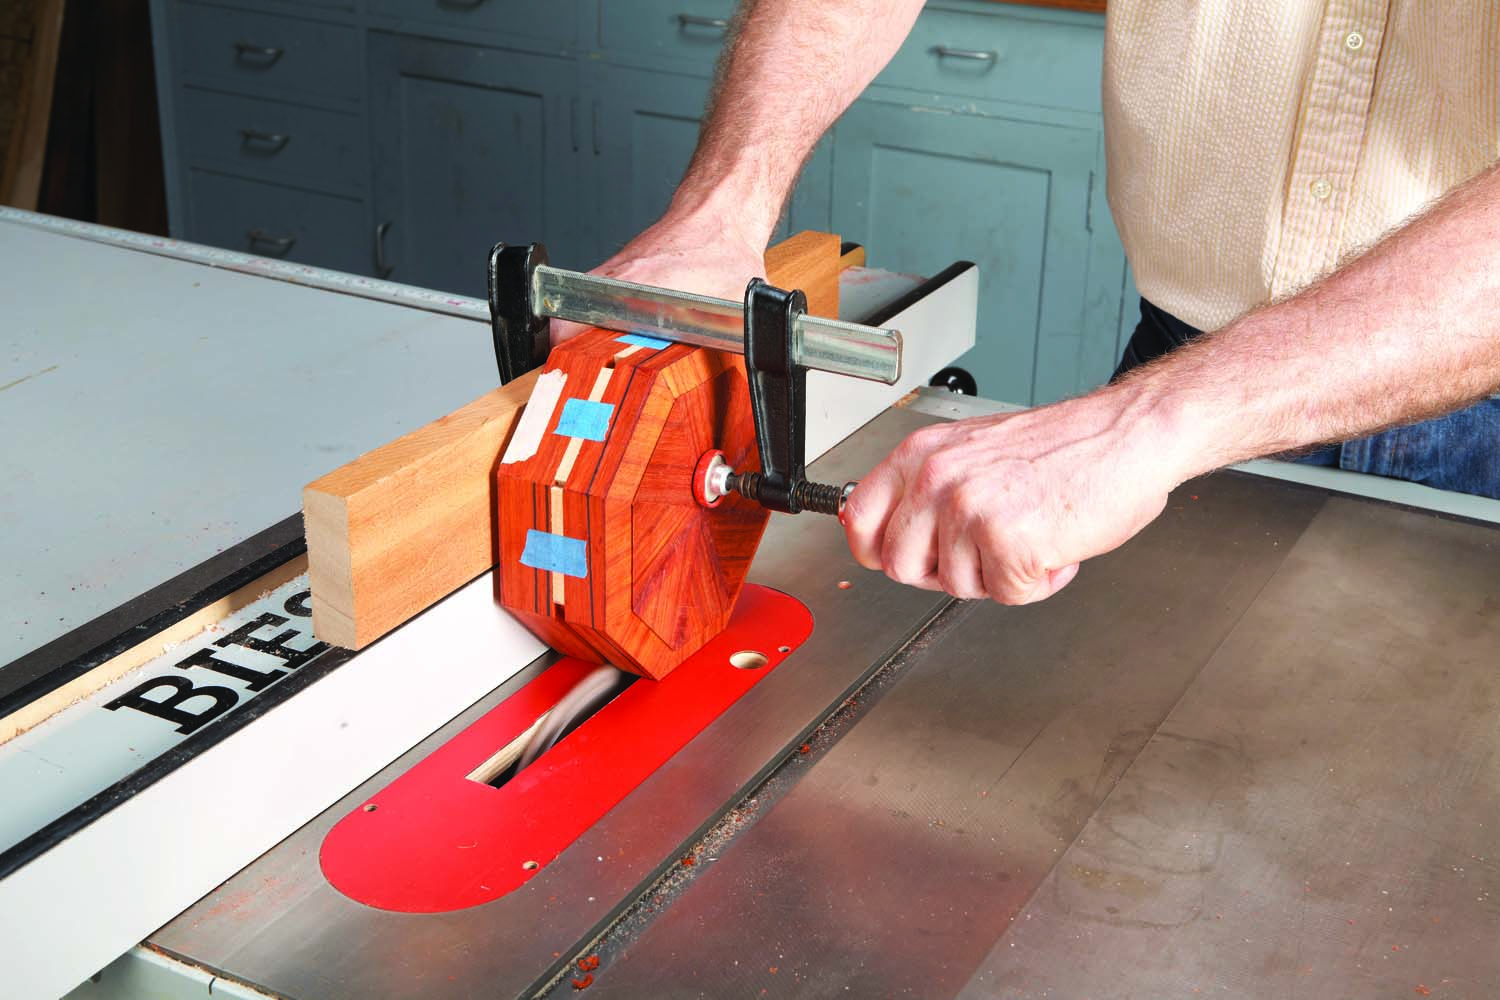
Photo 15. Cut the groove all the way around the box. Tape filler pieces into the grooves as you cut. Separate the two halves with a knife.
Saw all the way around the box (Photo 15). Put tightfitting filler pieces into each groove as you cut—they’re essential for keeping the box intact as you cut it apart. Tape the pieces in place. When you’re done, separate the
two halves by scoring the outside groove with a thin knife. Bevel the lips by planing or sanding, then test the lid’s fit all eight ways. If it’s too tight, use a rabbet plane or sandpaper to adjust the fit. Sand and finish.
The Easy Way to Make a Lipped Box
 First—what is a lipped box? It’s one that has a stepped rim all the way around the lid or the base, enabling the two pieces to nest together. The lip provides a tight seal and aligns the two pieces. If the box isn’t hinged, a lip is essential. There are many ways to make upper and lower lips—here’s an easy method that automatically results in a good fit. The directions below are for the box I actually made, but if I had to do it over again, I’d reverse the positions of the two lips and make a thinner lid. See Fig. E, for a better design.
1) Cut a groove in a blank long enough to make all of the box’s side pieces (Photo 1).
2) Miter the side pieces and glue them together, then add the box’s top and bottom pieces (Photos 3 – 11).
3) Bevel the top and bottom (Photo 12).
4) Cut a second groove all the way around the box, almost touching the first groove(Photos 13 – 15).
5) Separate the two halves of the box with a knife, then nest them together.
Here are some supplies and tools we find essential in our everyday work around the shop. We may receive a commission from sales referred by our links; however, we have carefully selected these products for their usefulness and quality.