We may receive a commission when you use our affiliate links. However, this does not impact our recommendations.

Television Cabinet
Hide the electronics behind ingenious double-hinged doors
by Dave Munkittrick
I love my new 36-in. TV but my wife hates what the glass and plastic
monolith does to the look and feel of our family room. To avoid marital
strife we went looking for something to house the behemoth. No luck.
Sounds like a job for the family woodworker! I love it when I get a
chance to justify my sometimes-controversial investment in the shop.
A cabinet large enough to accommodate a 36-in. TV could look like an
oversized shipping crate. But I used a design with angled corners to
ease the big-box look.
Note: There are a few extra-deep 36-in. TVs that may require you to
cut a hole in the back for the TV to poke through. You could make a
deeper cabinet but you’d have to buy an additional sheet of plywood.
Play it safe; buy your TV first, then adjust the depth if necessary.
The double-hinged doors fold flat against the sides to open up the
cabinet for unobstructed viewing. Plus, they’re a whole lot cheaper and
easier to install than pocket doors. The adjustable, no- mortise,
partial-wrap hinges (see Sources, below) make these doors a snap to
hang.
| 1. Make all the shelves identical by using one shelf as a template. Cut the angled corners on the other shelves a bit oversize. Clamp the rough-cut shelves to the template, and trim flush with a router. |
Click on any image to see a larger version.
|

| 2. Glue edging to the cabinet parts. The angled corner edging on the shelves is done first. Use a notched block to apply clamping pressure. Let the edging overhang along the front. Then trim it flush to the plywood on the tablesaw. |
 |
| 3. Assemble the cabinet with cauls and shims. The shims help put pressure in the center of the cabinet sides. Fasten the center divider to the two center shelves before assembly. Use screws for the bottom shelf; molding will cover them later. |
 |
| 4. Create a ledge below the doors with solid wood fastened to the underside of the component shelf. Use a 7/8-in. spacer block to keep an even reveal. |
 |
| 5. Add a row of nailers below the ledge to create a surface to nail moldings to. The nailer is flush with the ledge in front but is recessed at the angled corner where the column base fits. Determine the setback for the recessed nailer by holding the column base in place and tracing the back edge onto the ledge above. |
 |
| 6. Screw dividers into the case to create the drawer opening. A 33-1/2 in. long spacer board keeps the dividers parallel as they are screwed into position. Tip: Mount the drawer slides to the dividers before they’re fastened to the cabinet. |
 |
| 7. Attach the moldings with nails and glue. We used special molding glue instead of traditional yellow glue. The thick-bodied molding glue won’t drip or run while positioning the molding. |
 |
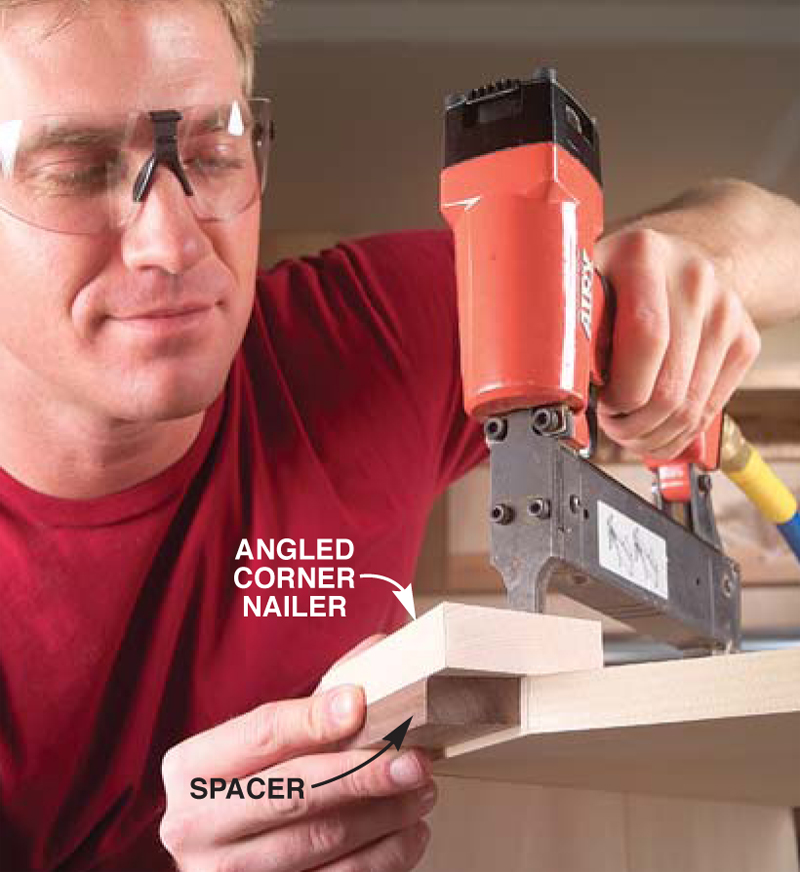
| 8. Fasten nailer boards on top of the cabinet. These nailer boards create an overhang above the doors and provide a surface for applying the cove molding. Start with the angled corner nailer. Use a 1-1/4-in. spacer block to set the overhang. Attach the remaining nailers and screw them down securely. |
 |
| 9. Rout the ogee edge on the top. Just glue on the edging, sand flush and rout. Then screw the finished top onto the cabinet. |
 |
| 10. Apply cove molding under the top and against the edge of the nailers. Hold the molding in place with spring clamps as you go. Fasten the molding with glue and pin nails. |
 |
| 11. Rip the 45-degree bevels on the columns. To avoid kickback, make sure the blade tilts away from the fence. That’s easy on a left-tilt saw; on a right-tilt, move the fence to the left side of the blade. |
 |
| 12. Hang the column on the cabinet. First, fasten the hinges to the column. Then use shims to position the column door on the cabinet. The half-wrap, no-mortise hinges wrap around the inside surface of the cabinet; all you have to do is screw them in place. Remove the columns after you’re satisfied with the fit. |
 |
| 13. Attach the door to the column. Make sure the column and door frame are even at the top by butting both pieces against a board clamped to your bench. Put some short 2x4s under the hinged joint so you can get to the screw holes. |
 |
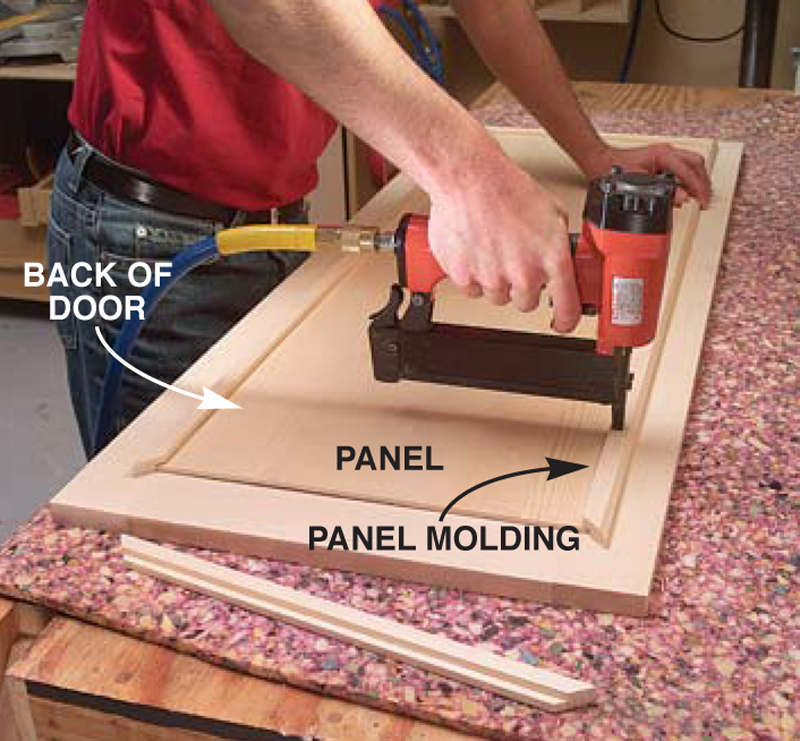
| 14. Nail panel molding to the back of the door frame to hold the 1/4-in. panel in place. Miter the corners of the molding to give your door a finished look inside and out. |
 |
| 15. Cut the door trim on the bandsaw. Tilt the table to 20 degrees and secure a guide fence. Use a sharp, high-tooth-count blade (6 to 8 teeth per inch) for a cleaner cut that won’t require a lot of sanding. |
 |
| 16. Nail the drawer front to the drawer box. Shim the drawer front so the gaps will be even. A piece of duct tape stuck to the inside of the drawer acts as a temporary pull. Open the drawer and screw on the drawer front from inside the box. The holes left by brad nails are tiny and easy to disguise with filler. |
 |
| 17. Cut the bun feet on a bandsaw using a circle-cutting jig. Set the blank onto the pivot point of the jig. Then slide the jig onto the bandsaw and cut halfway through the blank. Clamp the jig in place and spin the blank to cut the bun foot. |
 |
| 18. Shape the bun foot on a router table with a 1-in. round-over bit. With the subfences wide open, set the fence over the bit so the blank just makes contact with the bearing and the subfences are just shy of the blank. This will minimize bit exposure. |
 |
| 19. Measure how much your floor dips away from the wall. This cabinet must be level so the doors will stay open. Simply subtract an amount equal to the dip in your floor from the thickness of the foot blocks for the back feet. Now there’ll be no unsightly shims under the feet after your cabinet’s installed. |
 |
| 20. Screw the bun feet to the foot blocks. The thinner foot block in back allows the cabinet to sit level on a sagging floor. Sources(Source information may have changed since the original publication date.) Lee Valley & Veritas, leevalley.com, 800-871-8158, Two Iron Pendant Pulls, 01A60.30, $6 ea.; Two Iron Oval Pulls, 01A60.40, $7 ea.; Twelve Part Wrap Iron Hinges with Minaret Tips, 01H31.50, $4 ea.; One 18″ Black Full-Extension Drawer Slide, 02K11.18, $16 ea.; Four 3/8″ x 1/10″ Rare Earth Magnets, 99K32.03, $0.50 ea.; Public Lumber Company, publiclumber.com, 313-891-7125, Two 3/4″ birch plywood, $50 ea.; Two 3/4″ clear or knotty pine plywood, $70 ea.; One 1/4″ clear or knotty pine plywood, $40 ea.; 50 bd. ft. pine, $4 per bd. ft. Adams Wood Products, adamswoodproducts.com, 423-587-2942, Woodworker’s Supply, woodworker.com, 800-645-9292, One pint Titebond wood molding glue, 921-971, $7; One gal. sealcoat (shellac), 119-459, $23. Woodcraft, woodcraft.com, 800-225-1153, One Trans Tint Golden Brown Dye, 128482, $17. This story originally appeared in American Woodworker July 2003, issue #101.
|
 |

Here are some supplies and tools we find essential in our everyday work around the shop. We may receive a commission from sales referred by our links; however, we have carefully selected these products for their usefulness and quality.