|
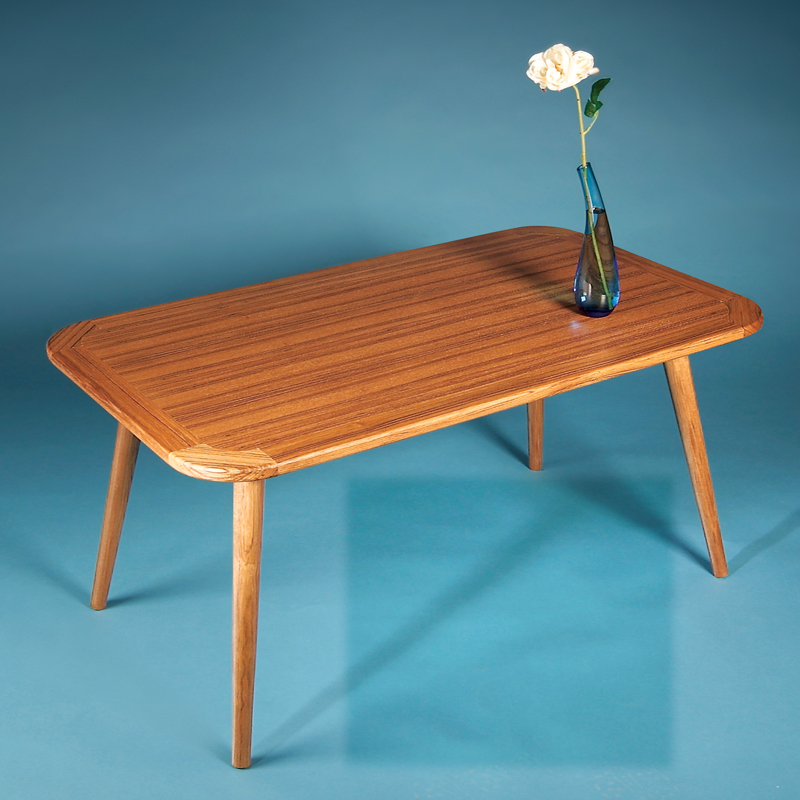
With the resurgence of the mid-century
Modern style in furniture, I thought I’d
have some fun with this classic little coffee
table. I used teak because it was the wood of choice
for the Danish Modern style in the 1960s and 1970s. The
same can be said for the round tapered legs and the soft,
rounded edges and corners on the top.
The impressive, curved, solid-wood edging on the table
looks more difficult to make than it is (see “Curved Corner
Edging”). After the top is done, building the rest
of the table couldn’t be easier. Just turn four round
tapered legs, attach them directly to the table with screw on
leg plates and you’re done.
I’ll show you a nifty turner’s technique for ensuring an
even taper on each leg. If you don’t own a lathe, an alternative
to turning is to make square tapered legs and use a
1/2-in. round-over bit on all four edges. Use a block plane
and sandpaper to complete the round shape of the leg.
Make the top
1. Cut the tabletop (A, Fig. A, below), edging pieces (B,
C and D) and splines (E, F and G) to size. Shape, fit and
attach the edgings to the top as described in “Curved
Corner Edging”.
2. Rout the round-over edges and finish-sand the top. Be
careful on that veneer—it’s paper thin.
Turn the legs
3. Mill the leg blanks (H) and cut them 1/2 in. extra long.
The extra length is used to hold the leg at the tailstock end
of the lathe. You’ll cut it off after the leg is turned.
4. Before you turn the legs, make them hexagonal by
chamfering the corners on a bandsaw or tablesaw.
Removing the waste gives you a head start on turning
squares into cylinders.
5. Mount a leg blank between the centers of your lathe. Turn
the blank to a 1-3/4-in.-dia. cylinder with a roughing gouge.
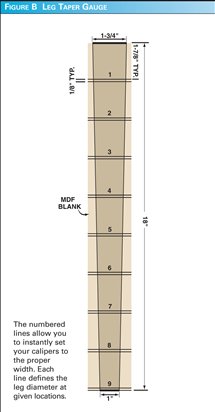
6. Make a leg taper gauge from some MDF scrap (Photo 1;
Fig. B, below). Lay out the leg taper and the 1/8-in.-wide
parting diameter lines and cut the tapered profile on the
bandsaw. Now you have a quick reference gauge for setting
your calipers.
7. Turn on the lathe and hold up the gauge to the leg.
With a pencil, transfer the parting lines from the gauge to
the blank.
8. Use a parting tool and calipers to cut each groove to
the proper depth (Photo 2).
9. Rough out the tapered shape of the leg using the bottom
of the grooves as a depth guide (Photo 3). Finish shaping
the leg using a wide, square nose scraper.
10. Smooth the leg with sandpaper and a sanding block.
Part the leg deeply at the bottom. Use a handsaw to remove
the bottom waste. Hand-sand the leg with the grain to
remove cross-grain scratches.
Assemble the table
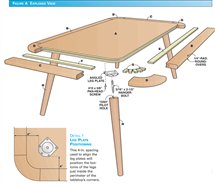
11. Drill 15/64-in. pilot holes in the legs and insert the
hanger bolts (Photo 4).
12. Mount the angled leg plates (Fig. A, Det. 1, below).
You may need to drill shallow relief holes in the underside
of the table to accommodate the ends of the hanger bolts.
13. Apply two coats of clear satin varnish to the teak. Let
the finish cure, thread the legs into the leg plates and
you’re done.
Sources
(Note: Product availability and costs are subject to change since original publication date.)
Woodworkers Source, exoticwoods.net, 800-423-2450, Teak, 4/4; Teak, 8/4.
Buck Woodcraft, buckwoodcraft.com, 305-743-4090,
Teak plywood, 3/4 in. x 24 in. x 36 in.
Lee Valley, leevalley.com, 800-871-8158, Screw-on angled leg plates, 5/16 in. x 18 thread, #00H33.80.
Woodcraft, woodcraft.com, 800-225-1153, Hanger bolts, 5/16
in. x 18 thread x 2-1/2 in., #130238.
Local lumberyard, Poplar, 4/4.
Local paint store, Clear satin varnish.
Project Requirements

Cutting List
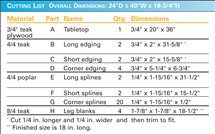
Fig. A: Exploded View
Detail 1: Leg Plate Positioning
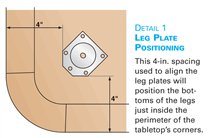
Fig. B: Leg Taper Gauge
This story originally appeared in American Woodworker November 2005, issue #118.

November 2005, issue #118
Purchase this back issue.
|