


We may receive a commission when you use our affiliate links. However, this does not impact our recommendations.
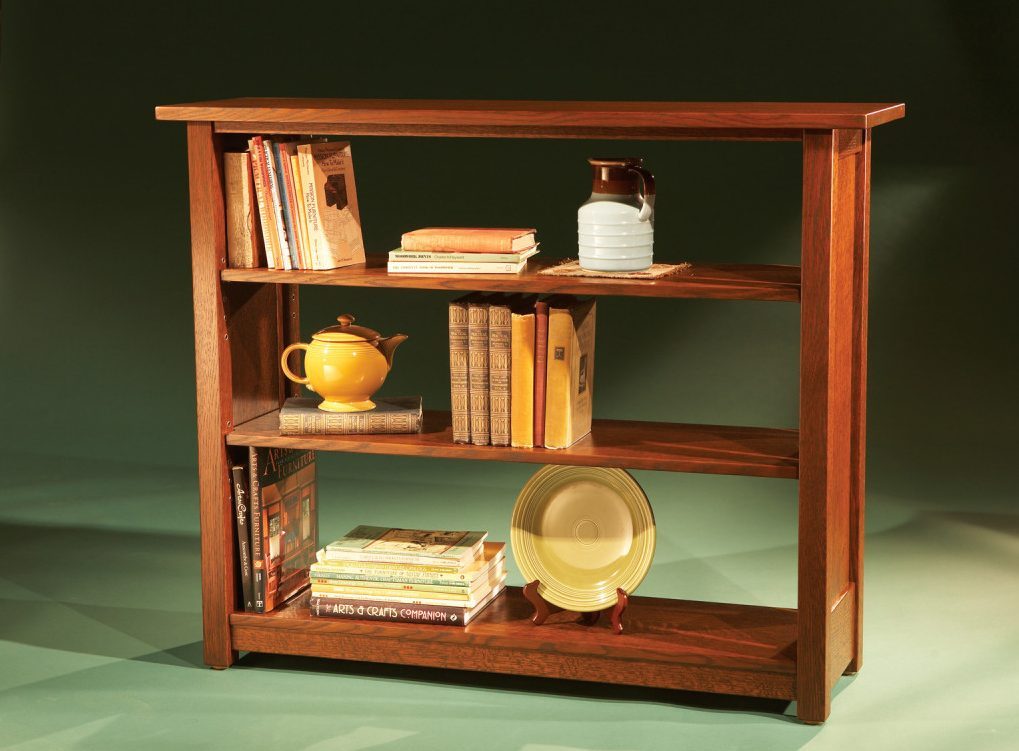
How to build a strong bookcase without a back.
When I’m designing furniture, I often turn to the Arts and Crafts era for inspiration. I love this style. It’s simple, but elegant. When a client commissioned me to build a small bookcase, I knew exactly what to start with: a photograph of a piece built by L. & J. G. Stickley around 1904.
This Stickley bookcase was perfect for my clients’ modern condo. They wanted a bookcase with an open back, so it could be accessed from both sides and used as a room divider. I changed the Stickley piece’s dimensions and design a bit, but kept the distinctive look of its side panels.
 As it turned out, my clients moved just as I was completing their bookcase. They didn’t need a divider in their new living room, but they did need a piece to fit behind their sofa. The bookcase was a natural. It’s proven to be a very versatile design!
Materials and tools
I built this bookcase from quartersawn white oak, the same kind of wood that was used to build most Arts and Crafts furniture. This wood’s most prominent feature is its ray fleck, but some quartersawn boards have much better-looking figure than others. Before I got started, I set aside the best boards for the side panels and the top.
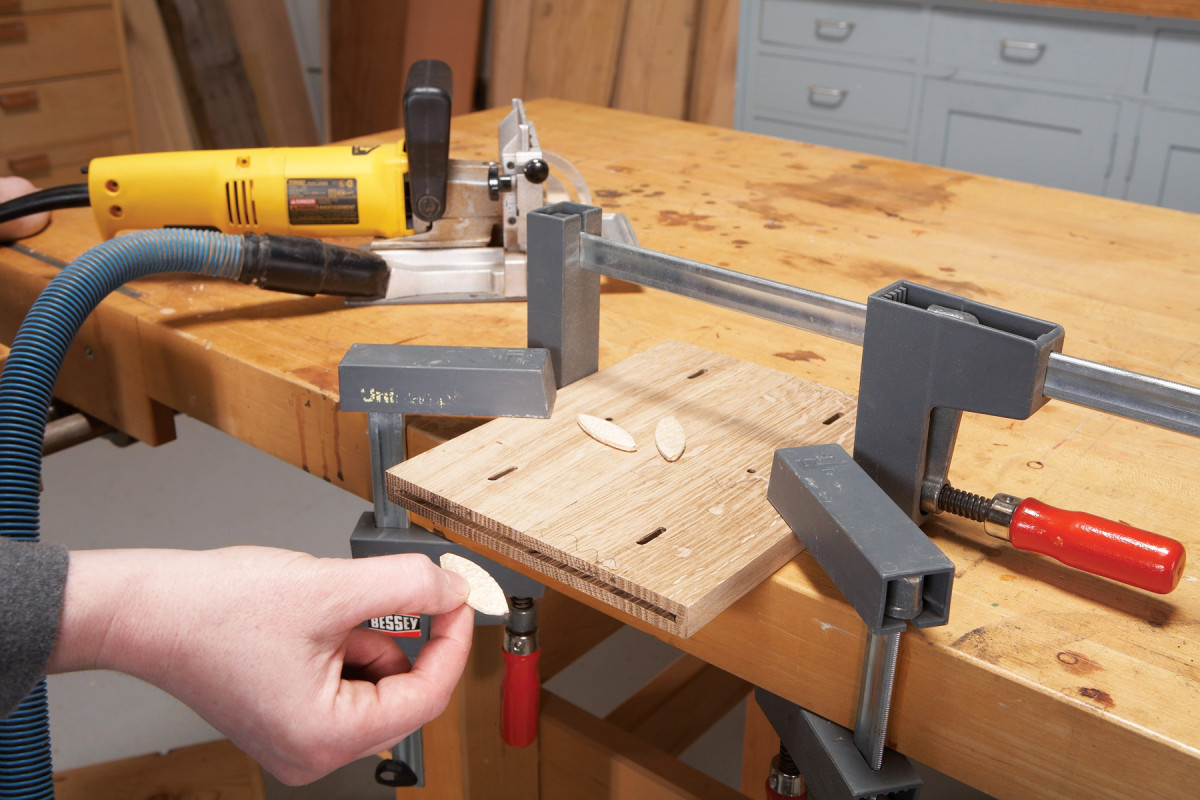
The double tenons I used on this bookcase can be tricky to machine. I’ve found that the easiest method is to make them as loose pieces, like dowels or biscuits. This requires a lot of accurately machined mortises, made with a plunge router. You can make your own jigs to guide the router, but I used the Leigh FMT, which is designed for this kind of work (see Sources, page 53).
Make the joints

1. Begin by routing double mortises in the legs. I’m using a Leigh FMT Pro, a jig which has templates of various sizes to guide the router. Many types of shop-made jigs can make these joints, too.
Begin by making the legs (B). Cut them to final size and mark the best sides to face front and out. Rout all the mortises in the legs (Photo 1 and Fig. D).

2. Rout similar mortises in the ends of the rails. This jig holds work both horizontally and vertically.
Mill all the rails (C, D, E, F and K). Be sure to trim all of the side rails (E and F) and the anti-racking rails (K) to the same length. Rout mortises in their ends, to match the mortises in the legs (Photo 2).
Make loose tenons (M, N, P and Q) to fit the mortises. They’re all the same thickness, but have different widths. Make each batch of tenons from one piece that’s at least 12″ long (shorter pieces aren’t safe to mill).

3. Mill some long, thin pieces to make loose tenons. Round the edges of these pieces to fit the mortises.
Note that the tenons for the front and back upper rails are 1/8″ narrower than their corresponding mortises. This important detail requires a little explanation. These mortises are horizontal, rather than vertical. The tenons are narrower than the mortises so you can adjust the position of the rails side to side later on, to accommodate the length of the anti-racking rails (K). If the tenons were exactly the same width as the mortises, you’d have to mill the joints very precisely so that all the parts would fit together. While that’s not out of the question, my approach–leaving some room for adjustment–is much easier.

4. Cut the tenon stock into short pieces and glue them into the rails.
Round the edges of the tenon stock on the router table (Photo 3). Cut the stock into short pieces and glue the tenons into the rails (Photo 4). On the front and back upper rails (the ones with the narrower tenons), glue the tenons in the middle of the mortises.
Build the sides

5. Assemble the bookcase’s side, without glue. Measure the distance between the rails. Cut the side panels to this length.
Mill the side panels (G), but leave them 1″ extra long. Assemble the sides, without glue, and measure the distance between the rails (Photo 5). Cut the panels to this exact length (it’s best to take off a little at a time, until they fit perfectly). Disassemble the sides.

6. Cut biscuit slots in the ends of the side panels. Glue the sides together.
Cut three biscuit slots in the ends of the panels and in the upper and lower side rails (Photo 6 and Fig. A). Pre-finish the edges of the side rails that have the biscuit slots. The panels will contract when the weather is dry; pre-finishing prevents this shrinkage from revealing unfinished wood.
Glue the sides together, all in one shot. I use Titebond Extend (see Sources) for complicated assemblies like this. Its open time is longer than the open time of most yellow glues, so I don’t have to rush as fast. Start by gluing the side panels to the rails–the joints that have three biscuits. Apply glue only to the center slots, and leave the outer ones dry. This will allow the panel to shrink and swell without being restrained by glue.

7. Plane the top of each side so the rails and legs are flush. Cut biscuit slots on the inside face of the top rails.
After the sides are glued, plane or sand the top rails and legs so they’re even, if necessary. Cut a pair of biscuit slots on the inside edges of the top rails (Photo 7).
Stickley Bookcase Cut List
Overall Dimensions: 36-5/8″ H x 45-1/2″ W x 13-1/4″ D
| Part | Name | Qty. | Th x W x L |
| A | Top | 1 | 7/8″ x 13-1/4″ x 45-1/2″ |
| B | Legs | 4 | 1-3/4″ x 1-3/4″ x 35-3/4″ |
| C | Upper rail, front/back | 2 | 3/4″ x 1-1/2″ x 38″ |
| D | Lower rail, front/back | 2 | 1-1/4″ x 1-3/4″ x 38″ |
| E | Upper rail, side | 2 | 1-1/4″ x 2″ x 9″ |
| F | Lower rail, side | 2 | 1-1/4″ x 5″ x 9″ |
| G | Side panel | 2 | 3/4″ x 7-1/2″ x 27-3/4″ |
| H | Shelf, middle/top | 2 | 3/4″ x 12″ x 38-7/8″ |
| J | Shelf, bottom | 1 | 3/4″ x 12″ x 38-3/8″ |
| K | Rail, anti-racking | 2 | 5/8″ x 3-1/2″ x 9″ |
| L | Button | 10 | 1/2″ x 1″ x 1-5/16″ |
| M | Tenons, upper rail | 4 | 1/4″ x 5/8″ x 2-1/2″ (a, b) |
| N | Tenons, lower rail | 8 | 1/4″ x 1-1/4″ x 2-1/2″ (c) |
| P | Tenons, upper rail, side | 8 | 1/4″ x 1″ x 2-1/2″ (c) |
| Q | Tenons, lower rail, side | 8 | 1/4″ x 3″ x 2-1/2″ (c) |
Notes: a) Tenon stock should be at least 13-1/2″ long. This includes 2″ on either end for planer snipe. b) Make these tenons 1/8″ narrower than their mortises.
c) Tenon stock should be at least 25″ long or two pieces 14-1/2″ long.

Fig. A) Exploded View

Fig. B) Upper Rail Joinery

Fig. C) Shelf Button

Fig. D) Leg Joinery
Assemble the case
8. Make two “anti-racking” rails, and clamp them together. Cut a series of biscuit slots in their ends, to make one long groove. When you separate the pieces, the groove will run out the side of each piece (see inset, top left).
Drill holes and slots in the anti-racking rails for fastening the top (Fig. B). The ends of the rails have biscuit slots that are a bit unusual. These slots are more like grooves–they stop shy of one edge, and run all the way out of the other edge. This design will allow you to slide the piece over a biscuit, as you’ll see later. The easiest way to make these long slots is to clamp the two anti-racking rails together (Photo 8), and make a number of regular plunge cuts at each end.
Cut single biscuit slots in the upper front and back rails to receive the anti-racking rails. Glue biscuits in these slots, and carefully remove any glue squeeze-out.

9. Cut biscuit slots in the upper rails to receive the anti-racking rails. Clamp the parts together using biscuits, but no glue. Align the ends of the upper rails with each other.
One more thing before getting ready to glue: Rout slots on the inside faces of all four front and back rails to receive the wood buttons (L) that will fasten the top and lower shelf (Fig. A). Make the buttons from a long piece of stock (Fig. C).

10. Glue the case together. Slide out the anti-racking rails before the glue dries.
You’re ready for the big glue-up. First, place biscuits–without glue–into the ends of the anti-racking rails, and clamp these rails between the upper rails (Photo 9). Position the anti-racking rails so they project about 1/4″ beyond the ends of the upper rails. Use a framing square to align the ends of the upper rails.

11. Spread glue on the ends and inner edge of the anti-racking rails, and slide them back in place. Clamp the rails to the sides.
Glue the case (Photo 10). Again, with so many pieces to handle, using glue with a longer open time will really help. Before the glue dries, loosen the clamps that hold the anti-racking rails and slide these rails back an inch or so, to ensure that they aren’t inadvertently glued in place. When the glue dries, remove the anti-racking rails. Spread glue on the ends and sides of these rails, slide them back in place (Photo 11), and clamp them to the sides.
Finishing up
Glue up the shelves (H & J) and top (A), and cut them to final size. Notch the shelves so there’s a 1/16″ gap between the shelves and the end panels (so you can drop the shelves in place), and a similar gap between the shelves and the legs (so the shelves have room to expand in width). Make a plywood template for spacing the shelf pins and drill their holes. I use brass sleeves (see Sources) to line the shelf pin holes; the sleeves add a nice decorative touch to the bookcase. Install the sleeves after the piece is finished.
I use a three-step finish on white oak. First, I apply a yellow dye (see Sources). Next, I wipe on one or two coats of Bartley’s Jet Mahogany gel stain, followed by three applications of Bartley’s gel varnish.

12. Fasten the lower shelf and top. I like using shop-made wooden buttons, which fit into grooves in the rails. Buttons add a classy look–although you have to get on your hands and knees to see them!
After the finish is dry, fasten the lower shelf and the top to the case (Photo 12). Center the top on the case. Using a spacer, leave a 1/8″ gap between the button and the rails, to allow the shelf and top to expand when the humidity is high. In addition to the buttons, secure the top with screws that go through the anti-racking rails.
SOURCES
Leigh Industries, www.leighjigs.com, (800) 663-8932, FMT Pro, $929; Super FMT, $449.
Franklin International, www.titebond.com, (800) 877-4583, Titebond Extend Wood Glue, $7.50 for 16 oz.
Widget Mfg. Co., WidgetCo.com, (800) 877-9270, 1/4″ Antique Brass Shelf Pins,
#1-250-ATQ-S, $0.29 each; 1/4″ Antique Brass Shelf Pin Sleeves, #1-250-ATQ-G, $0.15 each.
Homestead Finishing Products, www.homesteadfinishingproducts.com, TransFast Lemon Yellow powdered dye stain, water soluble, #3287, $25.95/ 4 oz.
Bartley Classic Reproductions, www.bartleycollection.com, (800) 787-2800, Jet Mahogany Gel Stain, $16.75/qt; Gel Varnish, $16.75/qt.
Laurie McKichan designs furniture to be “simple, honest and direct.” You can see
more of her work at www.lauriemckichan.com


