


We may receive a commission when you use our affiliate links. However, this does not impact our recommendations.
Doors are the gateway to the home. Make a bold statement with shop-made entry doors.
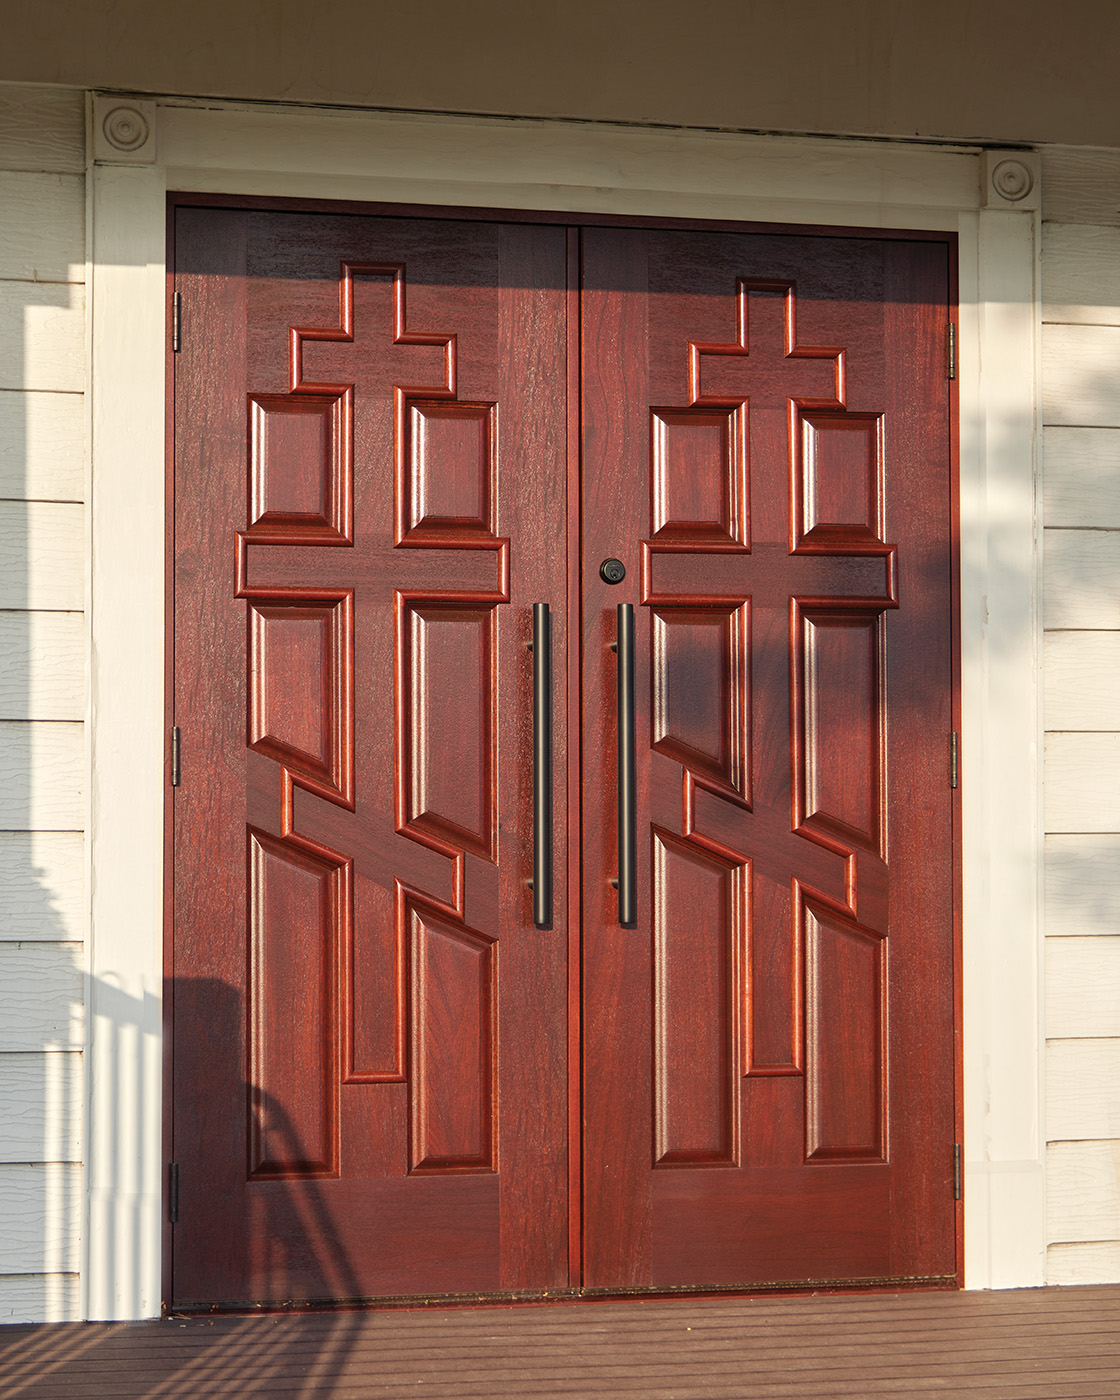
The door to any building is the first impression that someone has as they enter the structure. Building your own entry door is not only a chance to make a statement, but to also show off your skills to visitors.
As you may have read in my editor letter, a friend asked me to build a set of French doors for their Serbian Orthodox church. The church was built in the 1850’s, and the doors at some point were replaced with cheap, commercial glass doors. They leaked like a sieve, and the church was doing some work to the building to preserve it. If I must say, these doors really top it off.
Now, obviously, I assume that if you’re reading this article and are interested in building an entry door, I assume you’re not going to build doors for a Serbian Orthodox church. Honestly, if you are, cool. By all means. Just make sure you follow my example, and take payment for your work in delicious Serbian food. Seriously. I think they got the short end of the deal on this one.
In all seriousness, the intent behind this article is to show you the techniques required to build entry doors that will last the test of time; not to copy these doors exactly.
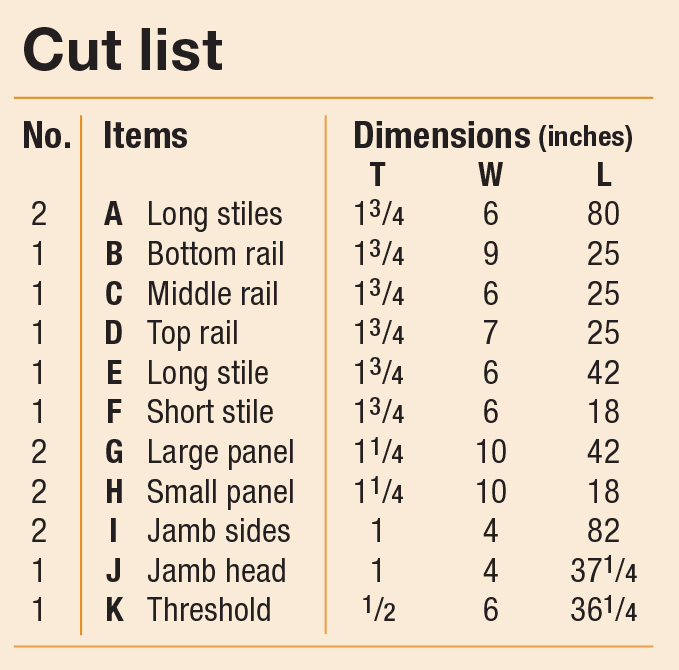
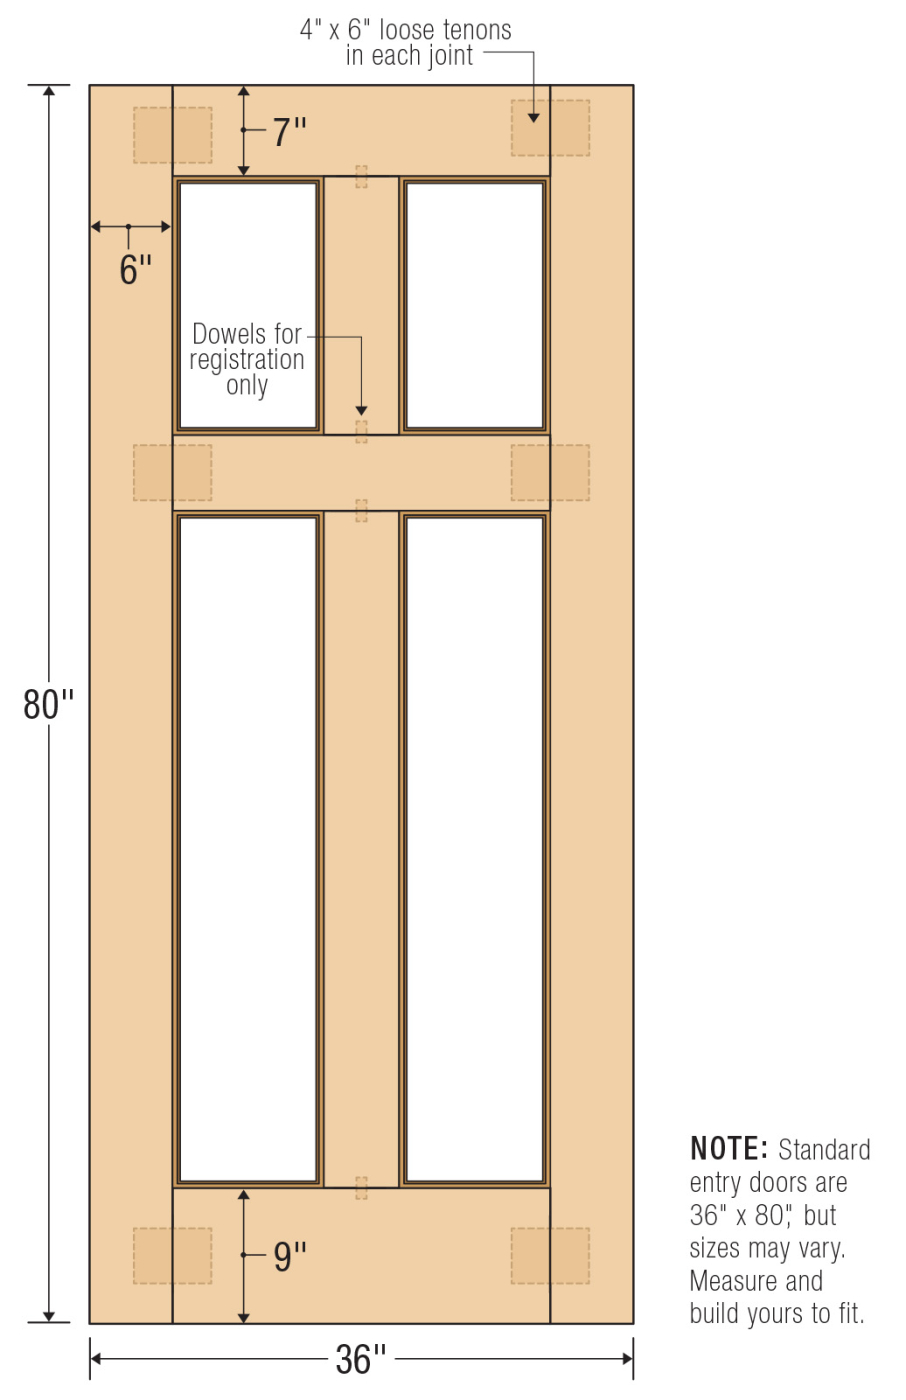
Cutlist and Diagrams
Solid Foundation
First things first. Entry doors pose a unique challenge. Depending on where you are in the world, the doors are exposed to vastly different climates at the same time. Take Iowa for example. The outside temperature may be 105° at 85% humidity, while the interior is a cool 72° and 40% humidity. Talk about opposing forces (the winter time difference can be even more extreme).
Choosing the proper material for your door is of the utmost importance. The material needs to be stable, and weather resistant. Local guidelines may dictate what materials may be used—where we are, doors either need to be a laminated core (layers of pine or soft wood veneered with a hardwood), or built from solid mahogany. Laminating cores is probably the cheaper route. However, when you factor in time, and the need for a vacuum press, we chose to build these from solid mahogany.
Selecting your actual material is next. These doors will continuously be expanding and contracting with changes in humidity. The best practice is to grab material that is as quartersawn as possible. The quartersawn material will expand and contract less across its width, and more in its thickness. If you must mix in some plain sawn material it’s probably best to do it in the panels where there’s a bit of room. Anywho—let’s get to building.
Big Ol’ Parts
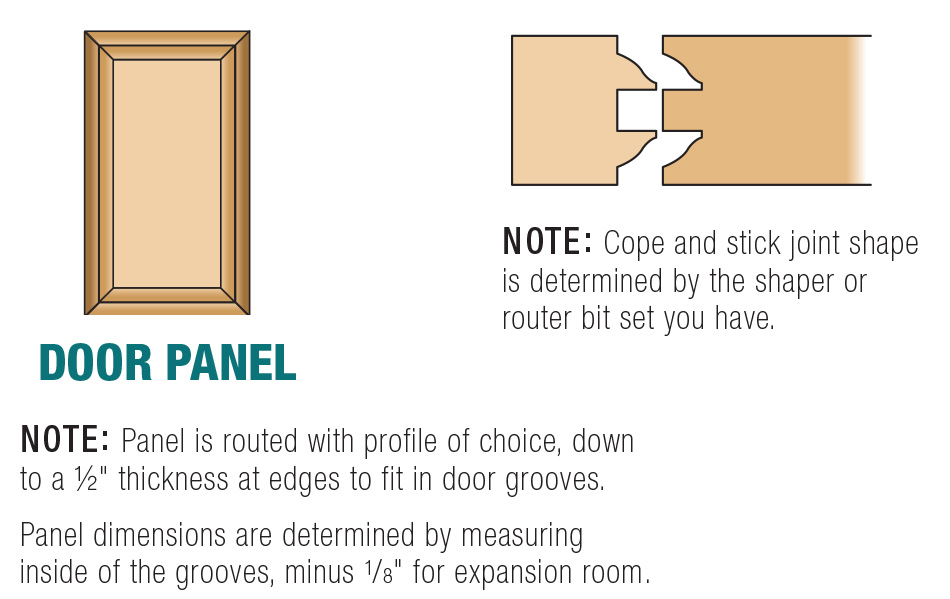
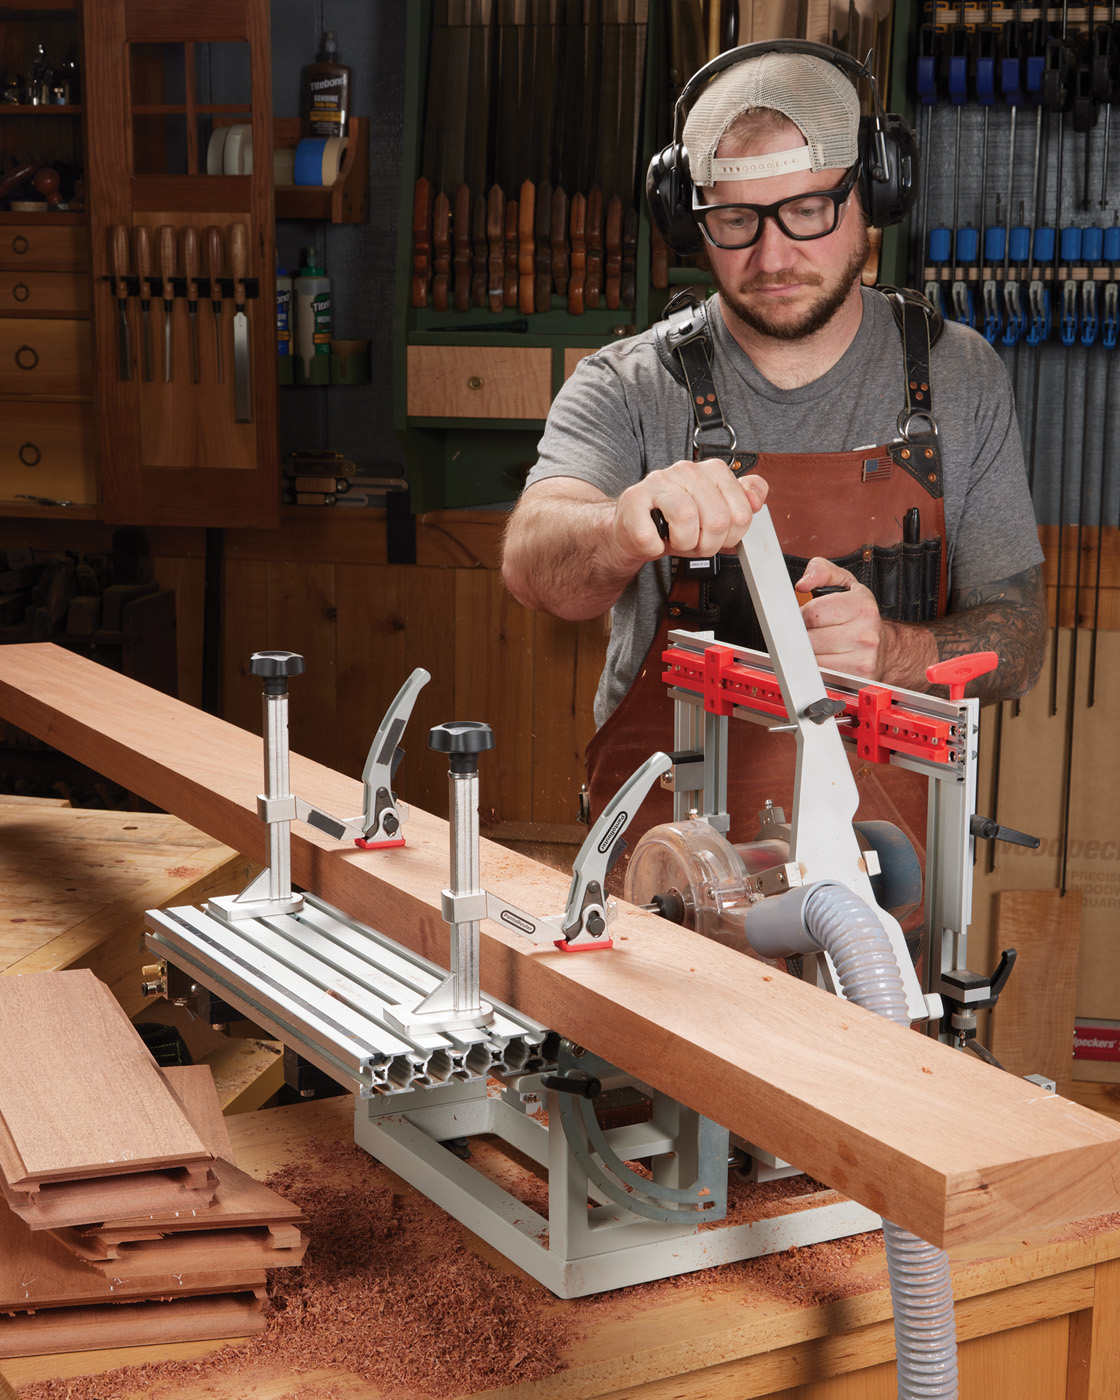
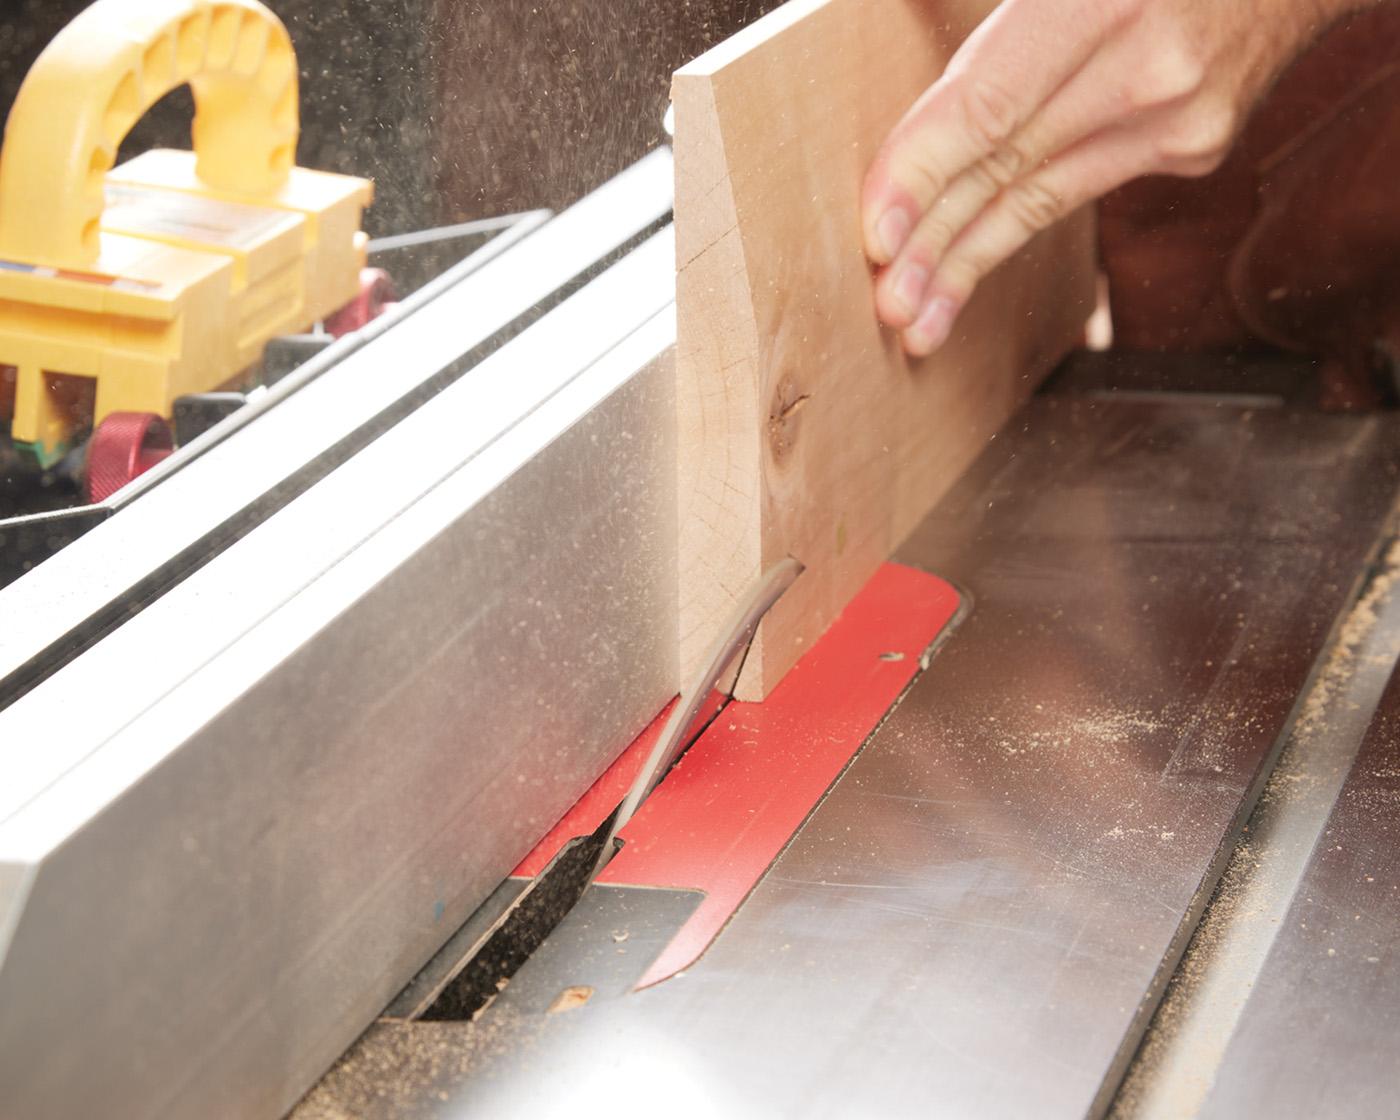
A beautiful thing about doors, is that they generally don’t have many parts. A dozen, dozen and a half at most. The parts are thick however. An issue or two back, I showcased a sliding table that I installed on my saw. This particular project was the reason for that—being able to accurately cut long parts to length is much easier with the extra support from the sliding table. You’ll want to be diligent as you cut parts to length. The rails all need to be exactly the same length so that the door glues up nicely. Use a stop block and cut everything at once.
1 Cut the parts to length. The sliding table is a great way to easily cut them to length by yourself. A crosscut sled will do the trick too, but you may need a helping hand.
As you can see in the main photo, the top rail on these doors is the widest of the group. This is backwards from most door construction, but it was due to the applied molding that formed the cross image. Regardless—leave the top and bottom rail a bit wider than you need so that you can trim the door down after final glue up.
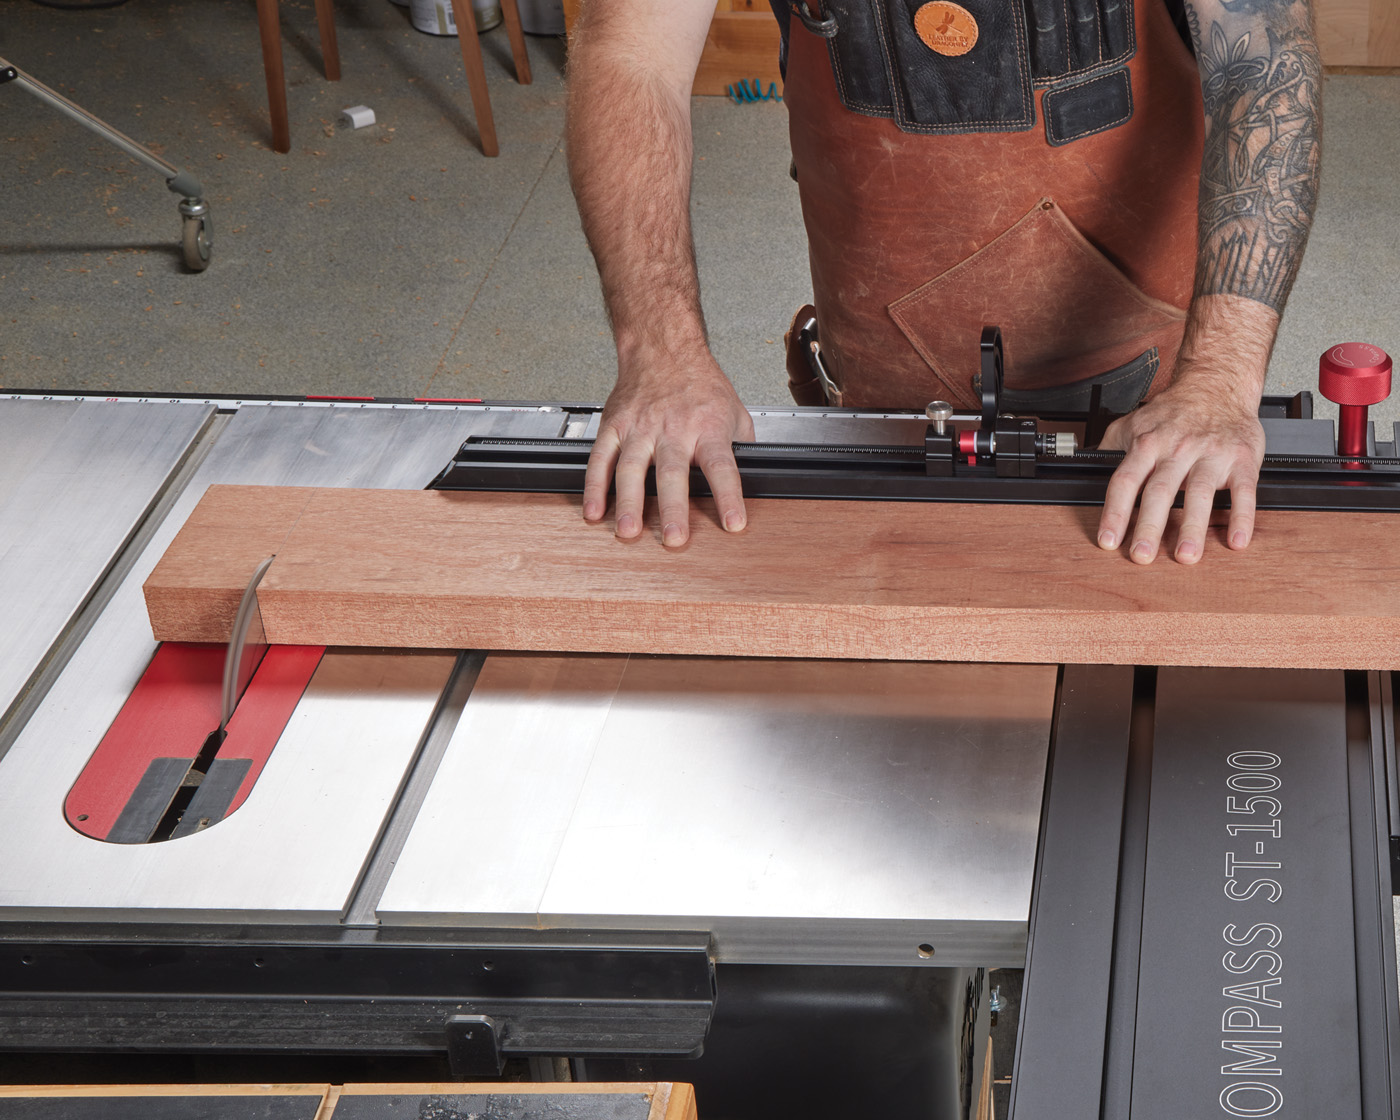
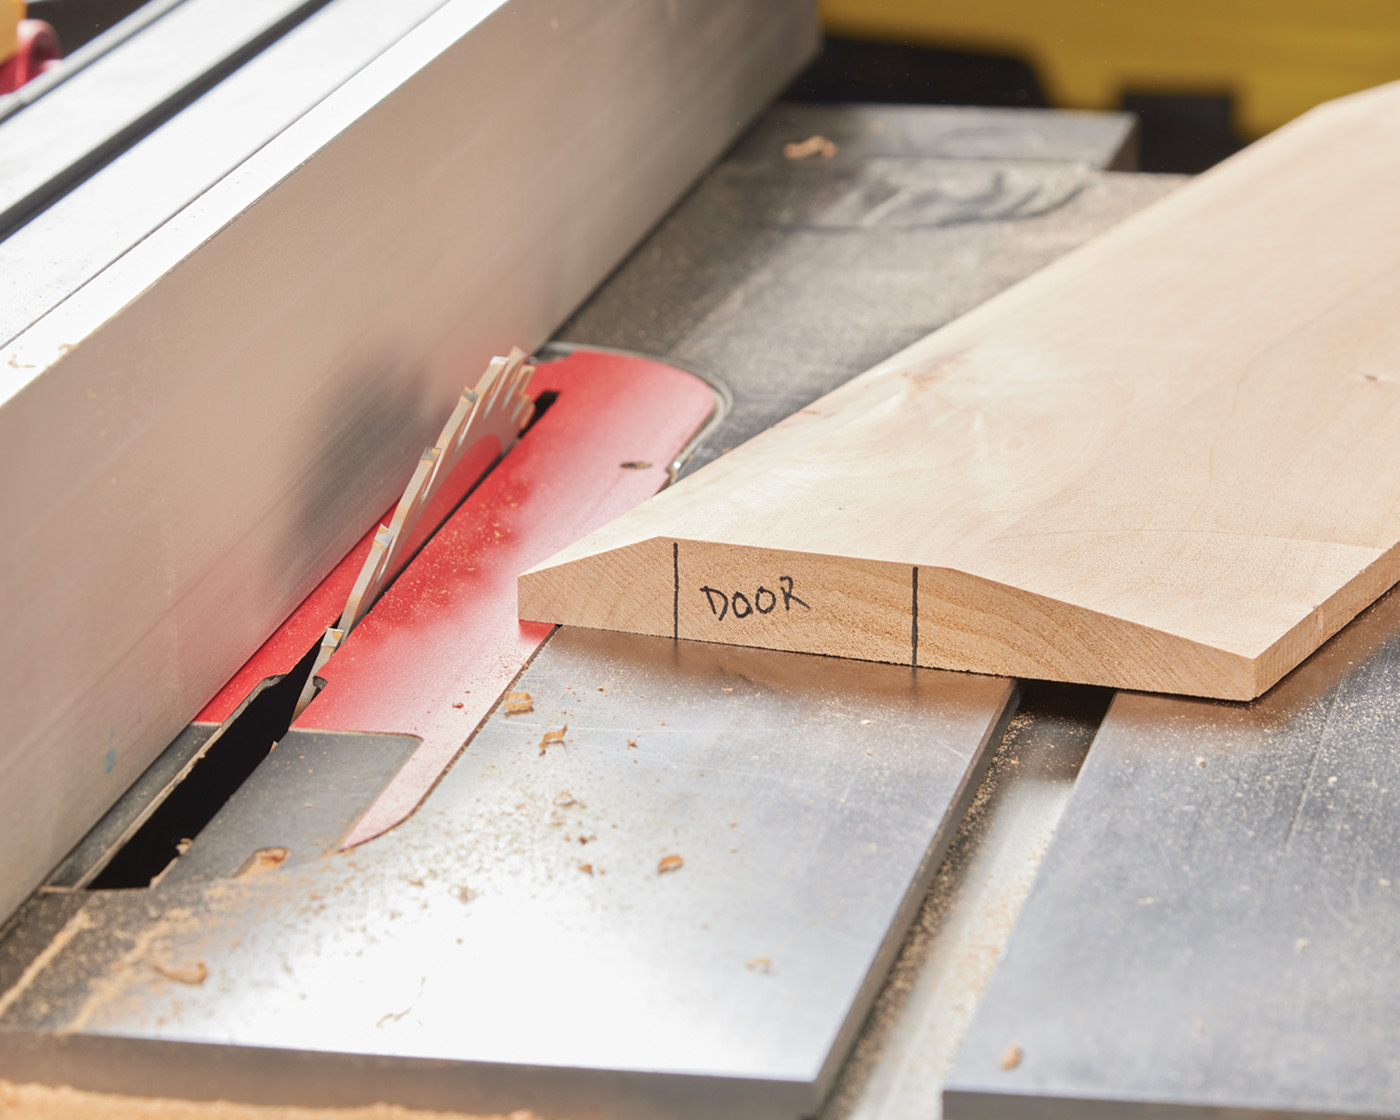
2 My doors feature an angled rail, also easily done with the sliding table.
One other oddity about these doors is that the parts aren’t all square. Most styles of entry doors will have 90° parts. The angle of the middle rail on these church doors throw a wrench into it. These are angled at 25°, so the sliding table is set to make a 65° cut on the ends. Likewise, the middle stiles that meet up with this angled rail need to be angled. The entire thing adds a bit of work to an otherwise simple project.
Cope & Stick
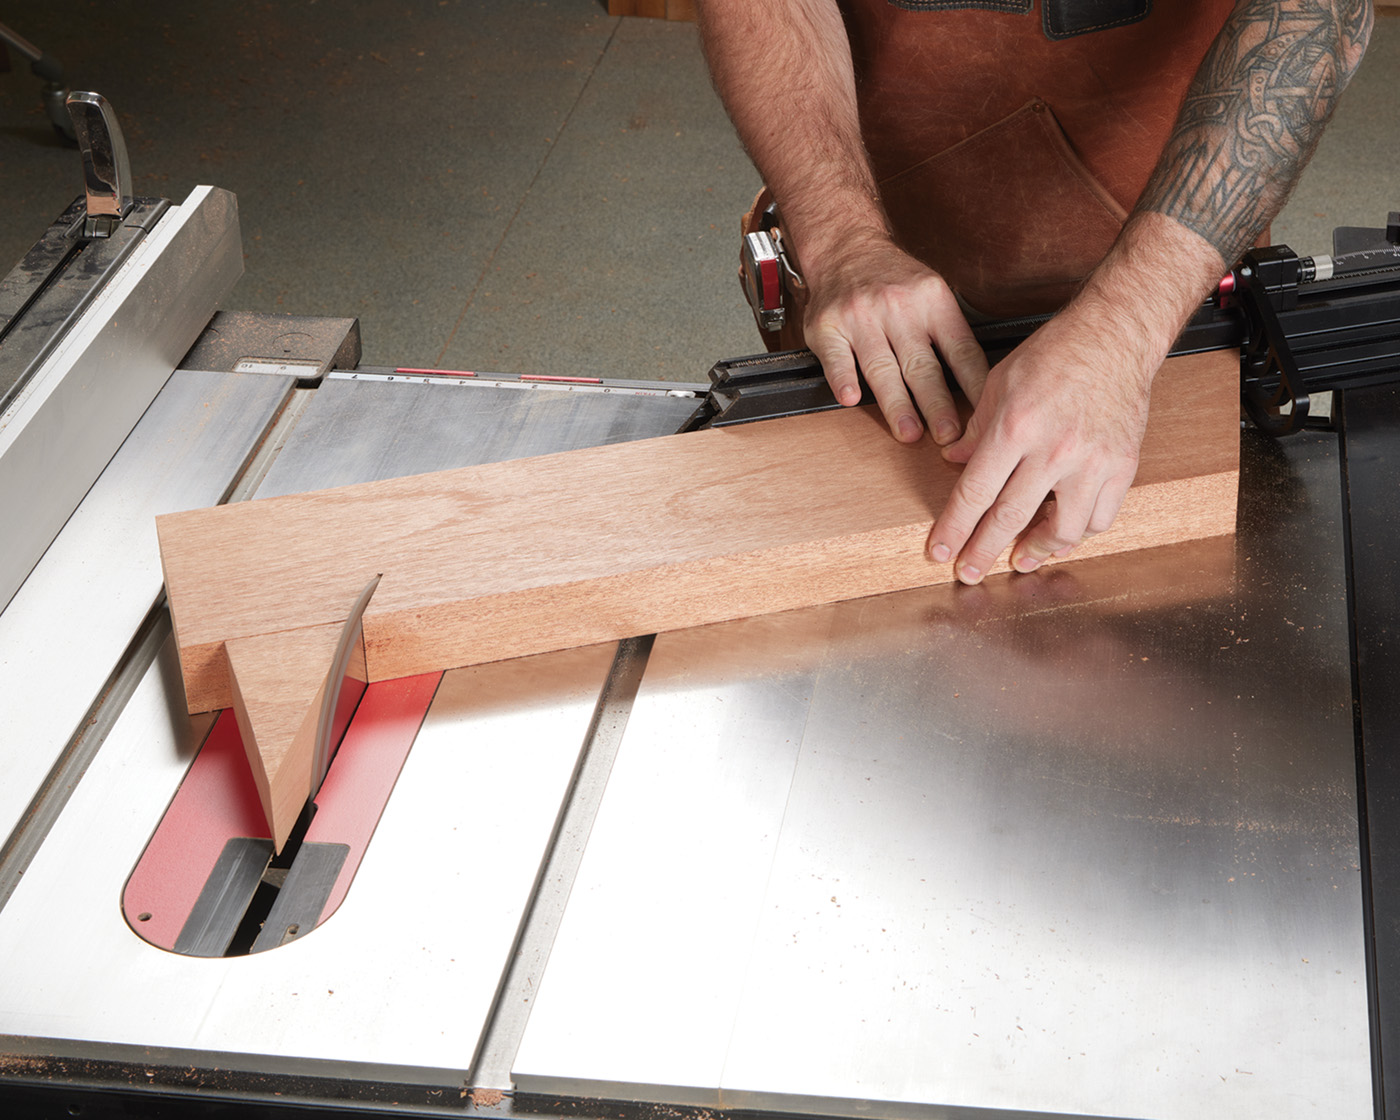
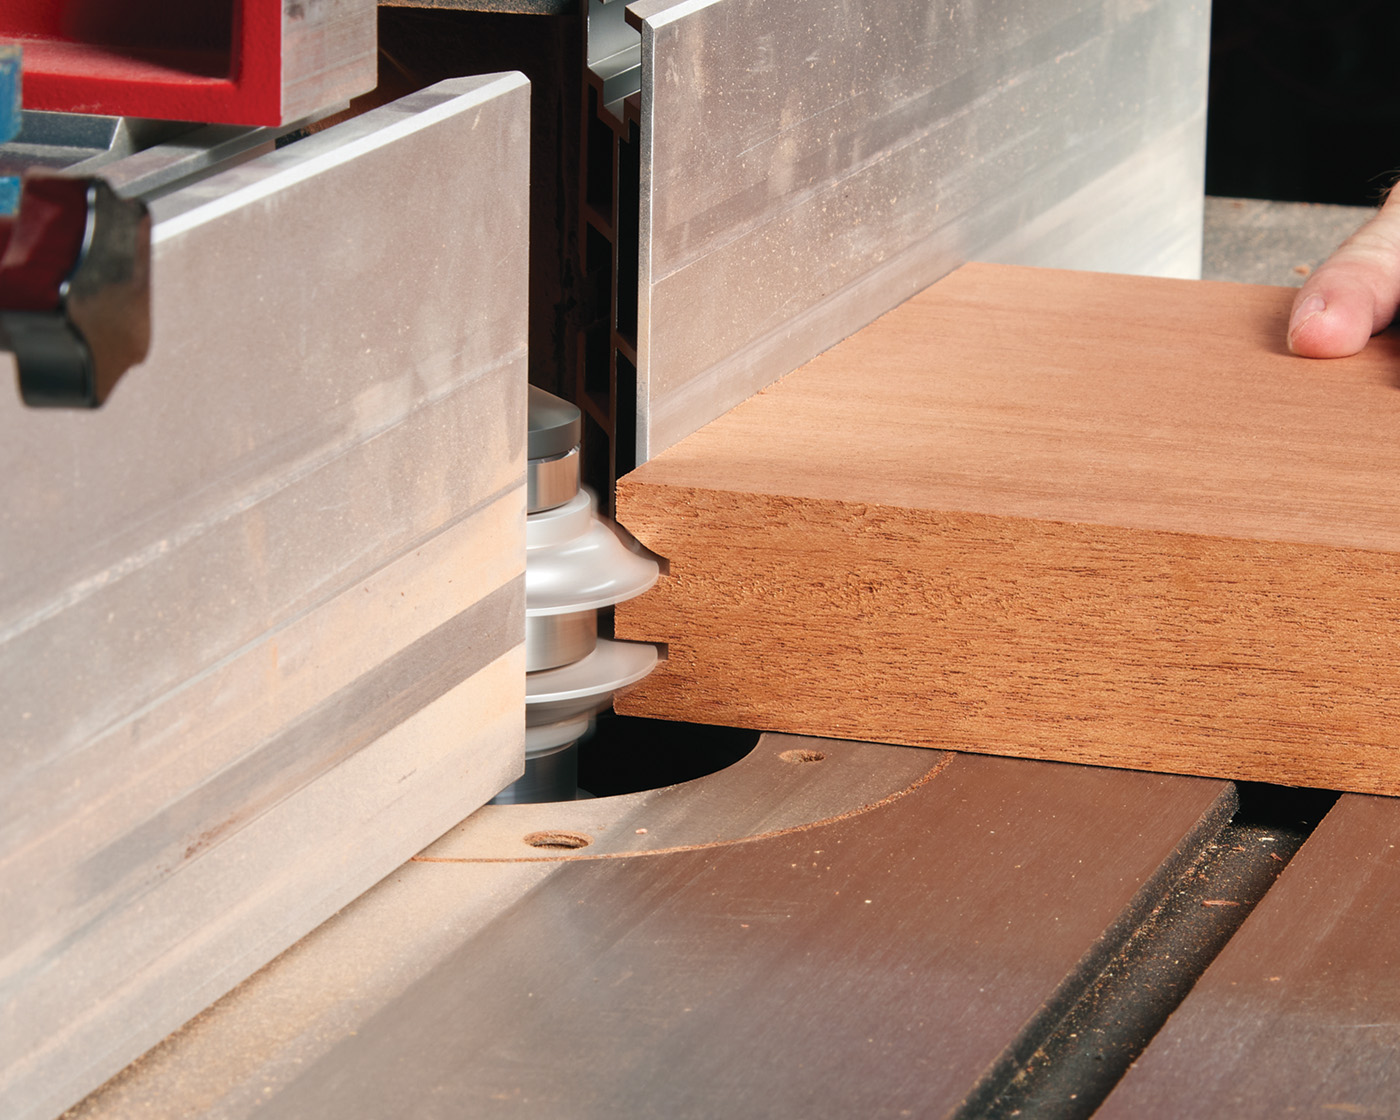
As I mentioned before, my goal here is to show you my process for building entry doors. Build one for yourself, and change the design. One of the design elements that you can change is how the rails and stiles join. One of the cleanest, and most traditional ways, is to use a cope and stick set in a router table or shaper. The aesthetic of the ogee shaper cutter from Infinity (83-040) was exactly what I was looking for.

3 Shape the inside edges of all of the parts first. This will become the groove for the mating tongue, as well as the groove that will hold the panel. A shaper can spin this big bit and make these cuts in one pass.
The idea behind the cope and stick cutter is that one part of the set cuts the inside edges of all the parts—it adds a decorative edge, while also forming a groove for the panels. The mate of the bit forms a tenon on the ends of the rails. Together, they create a super clean look. Note—if you go hunting for a cope and stick cutter, pay attention to the groove size they make. Cutters that make 1/4“ grooves are designed for smaller cabinet doors. 1/2“+ sized grooves are for larger entry doors.
I always start by milling the profile on the inside edges of the parts. Take your time to position the bit so that it is cutting exactly in the middle of your stock. I also make sure that I mark a face on each part that will become the reference. The face is always either up or down on all parts—using a reference face as such will help eliminate any variances when you go to glue up the door.
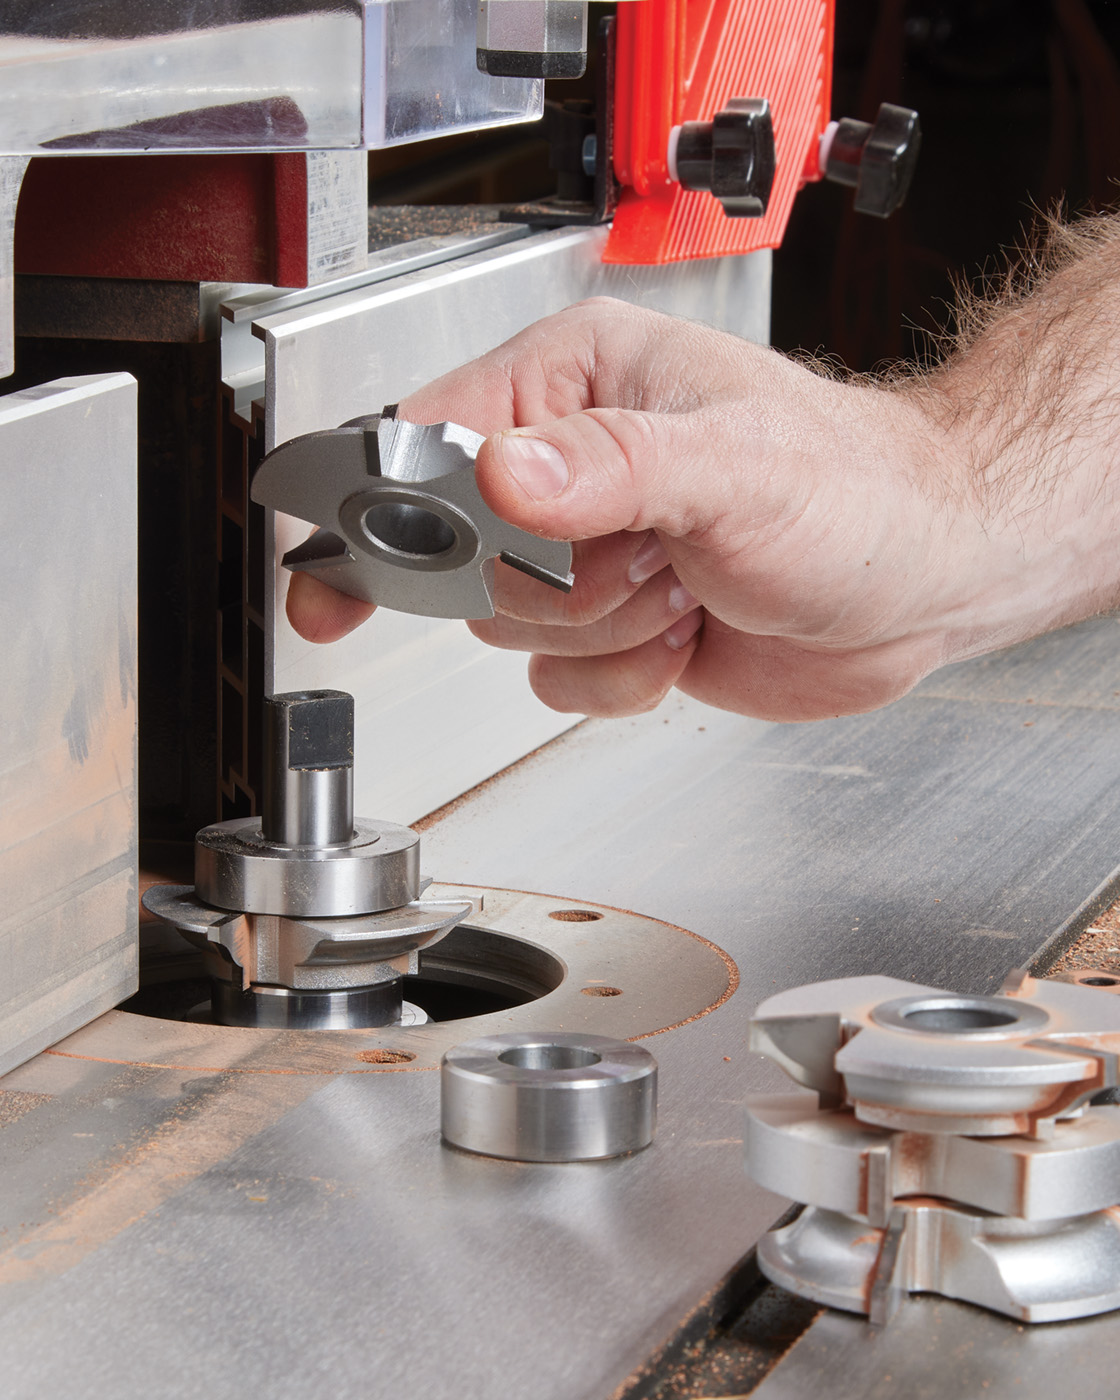
4 Swap the bit out for its mate.
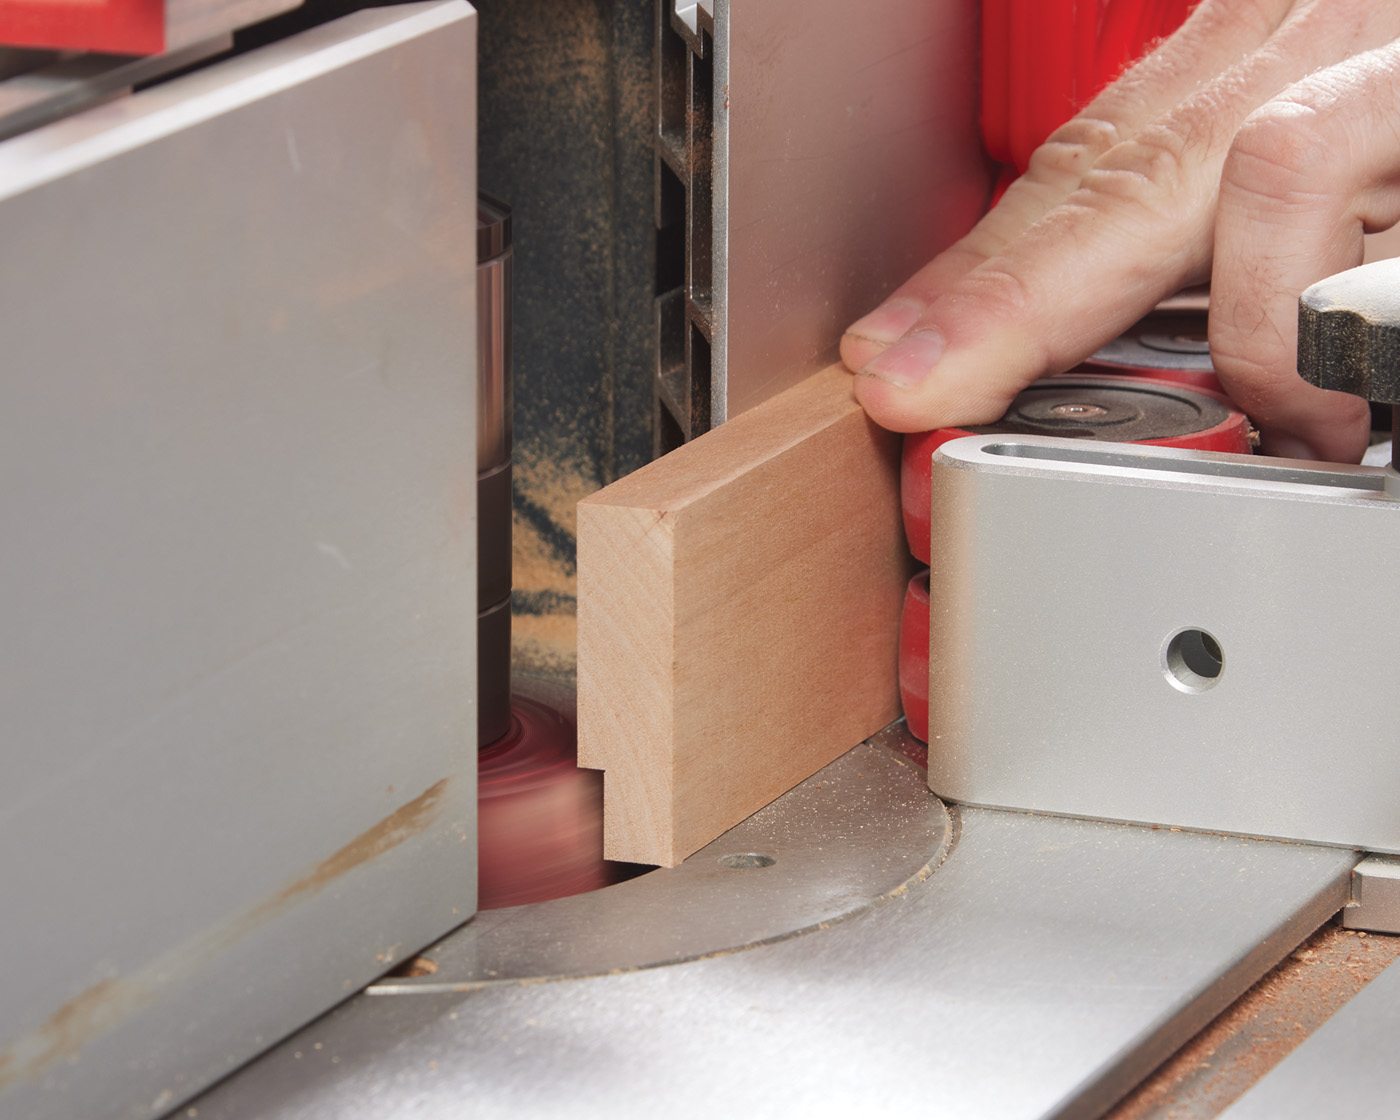
5 Cut the tongues on the ends of all of the parts. Wider parts can be cut up against the fence; narrower parts are easily done with a coping sled.
Once the grooves are done, you can swap out the cutter for its mate. Now it’s time to rout the ends. On wider parts, you can simply run the end along the fence (photo 5). However, on narrower parts, I like to use a coping sled, like you see in photo 6 (routing the tenons on the angled rail). (Generally, the plastic guard rides against the fence, but it wouldn’t reach with the angled rail).
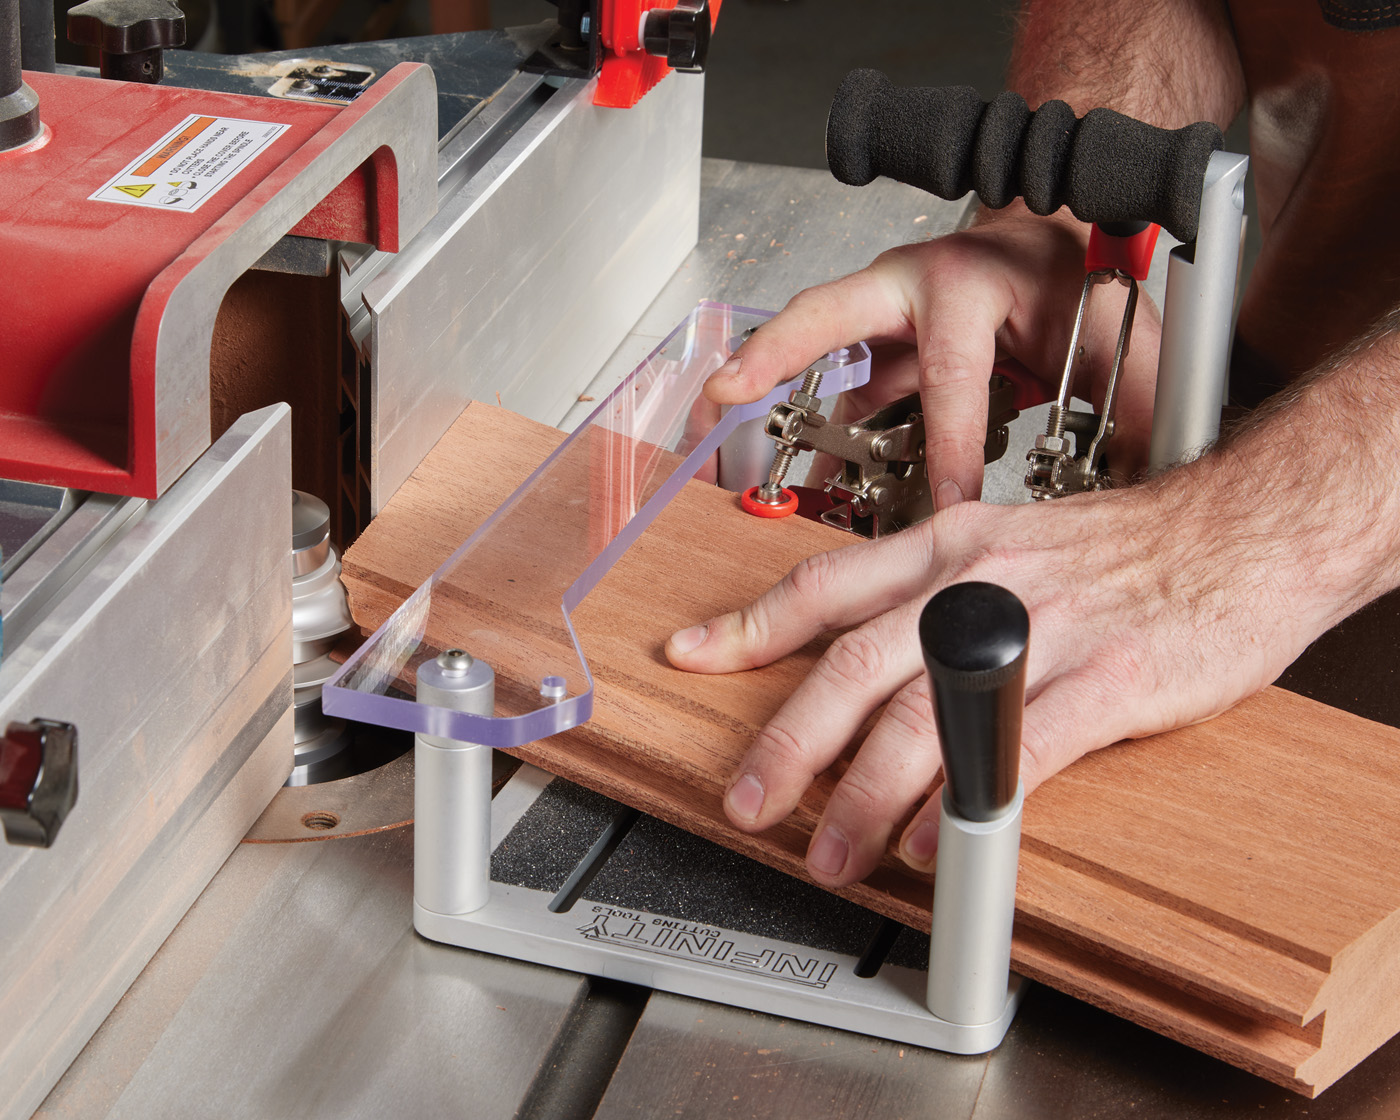
6 A coping sled is a great way to keep your hands free of the bit.
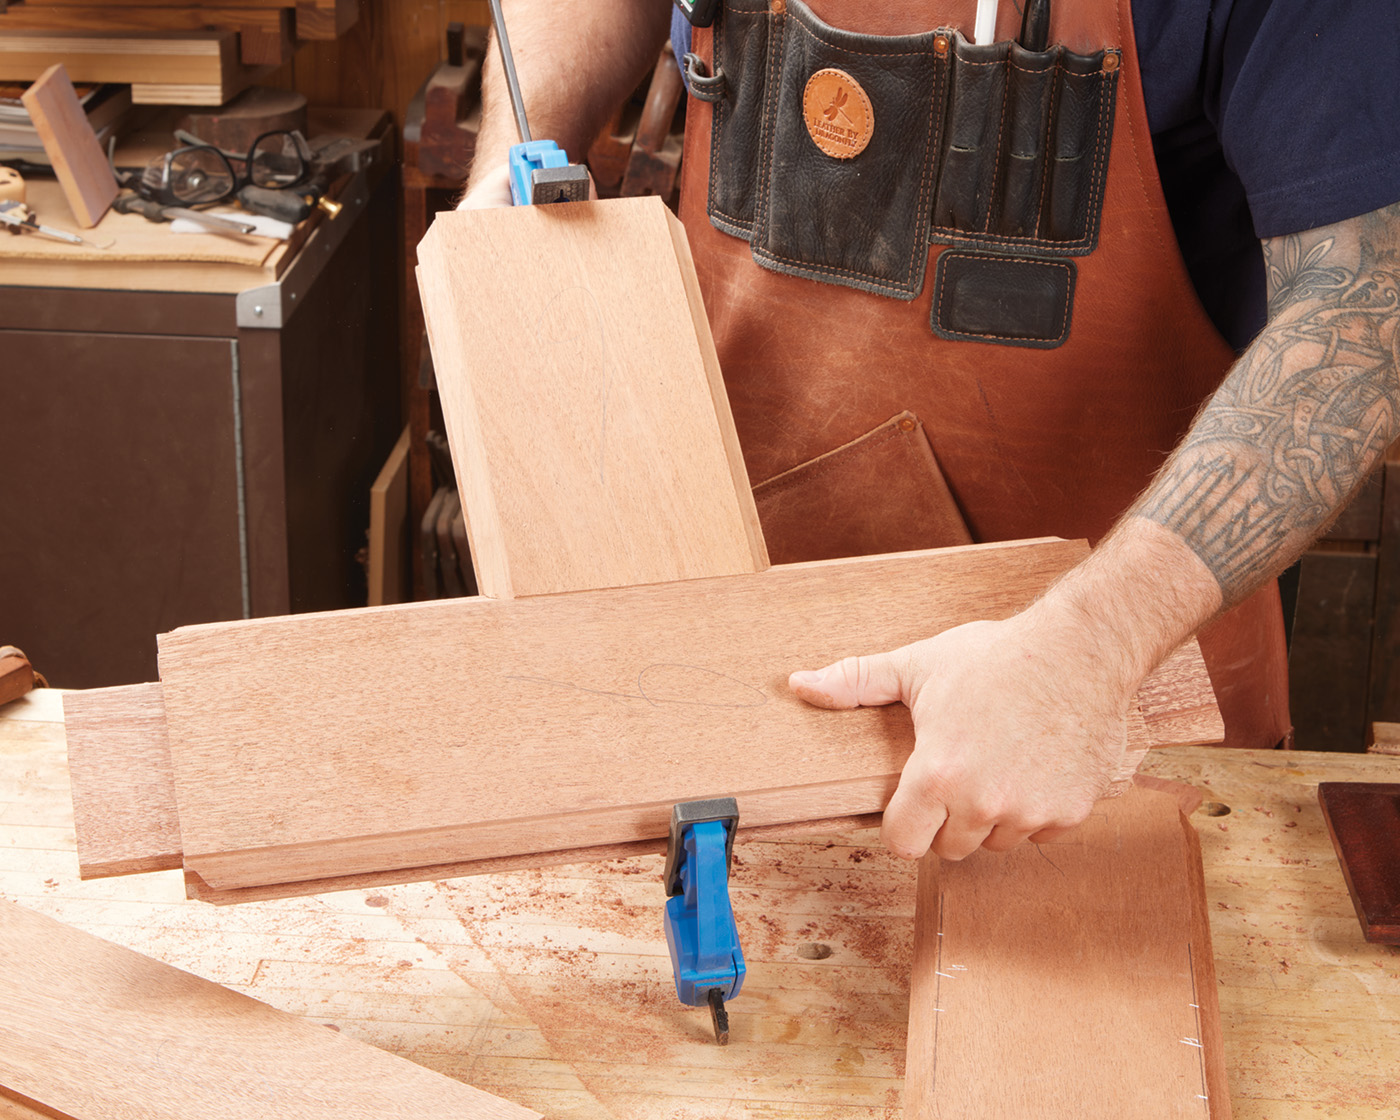
Make Panels
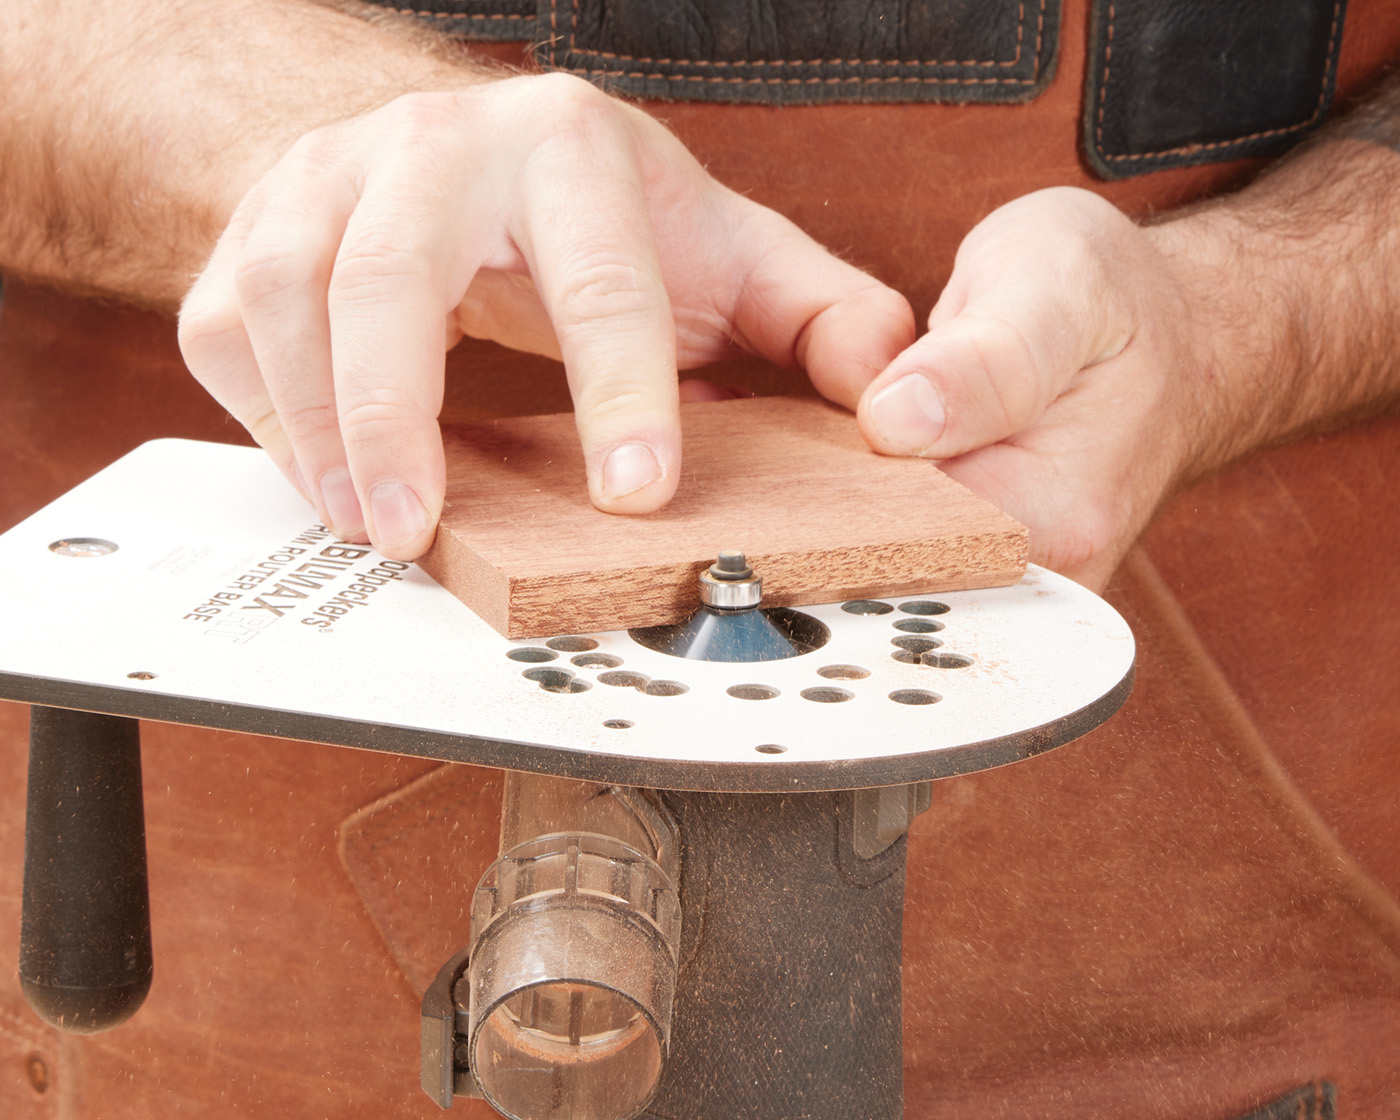
Slap the door together on your bench (or sawhorses) and measure between the grooves for panels. Again, we have to keep in mind that these are exposed to the elements, so you have to not only seal the panels in the grooves, but also allow them room to expand and contract. Fun stuff. I took all of the measurements for these doors and subtracted 1/8“ from each direction. This allows for a 1/16“ gap around the outside that will be caulked during assembly. The panels are milled with a raised panel cutter. A rub collar is a great way to guide them, but I also found that a sacrificial fence on the shaper’s fence to be just as effective. After you’ve verified the fit, go ahead and apply finish to the panels. To see what finish I used, check out this article.
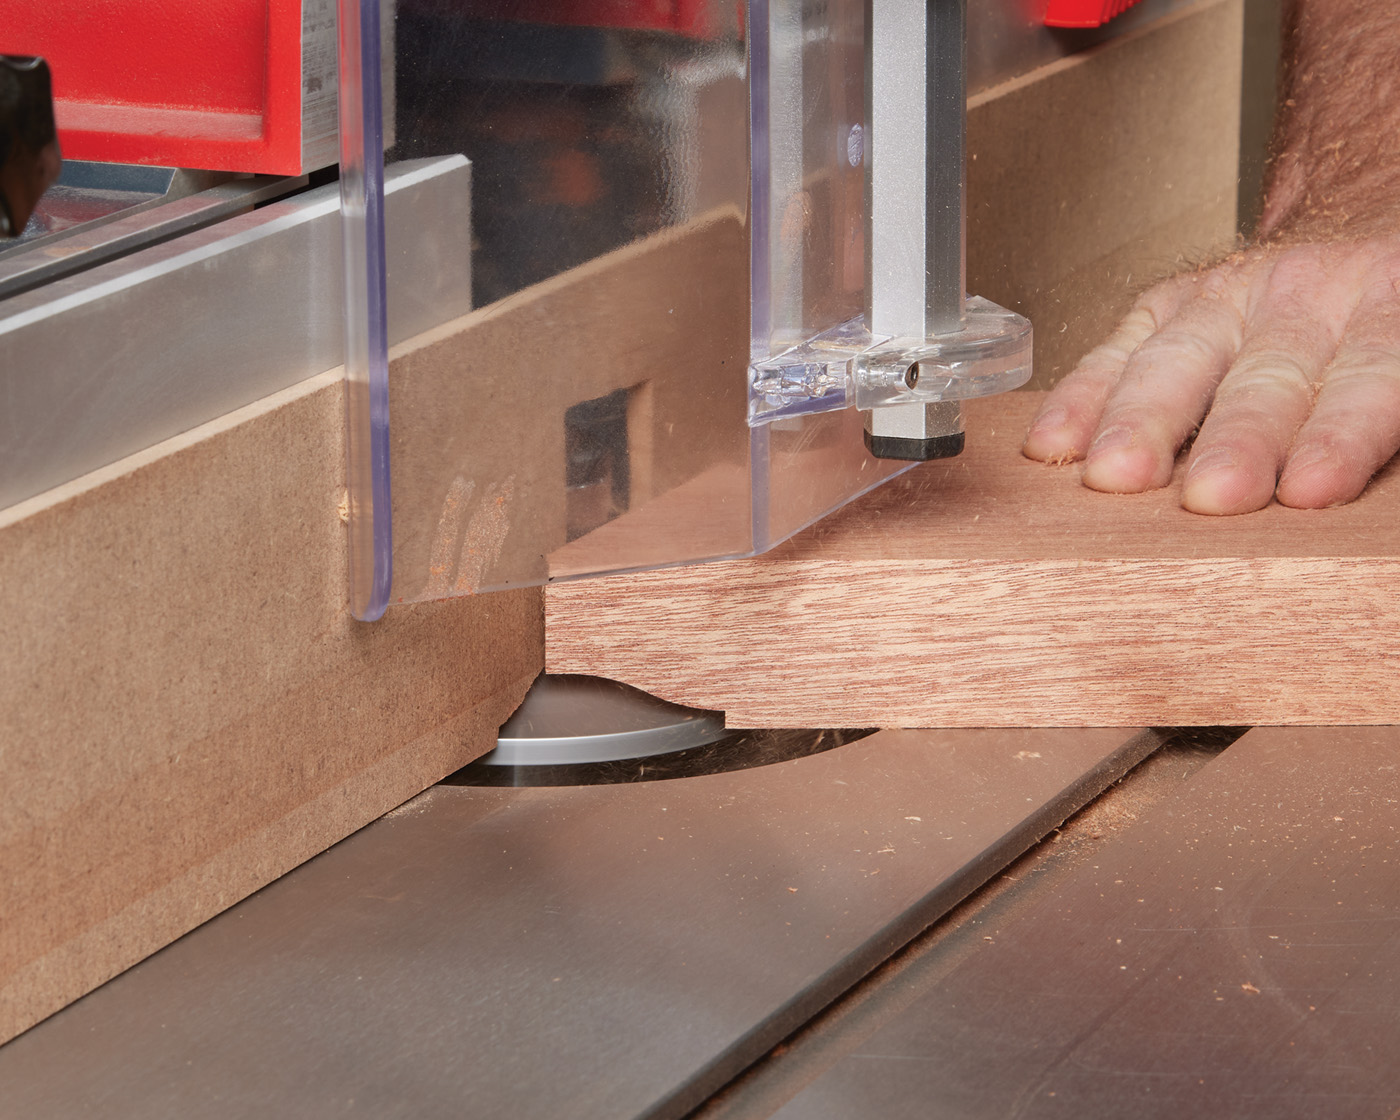
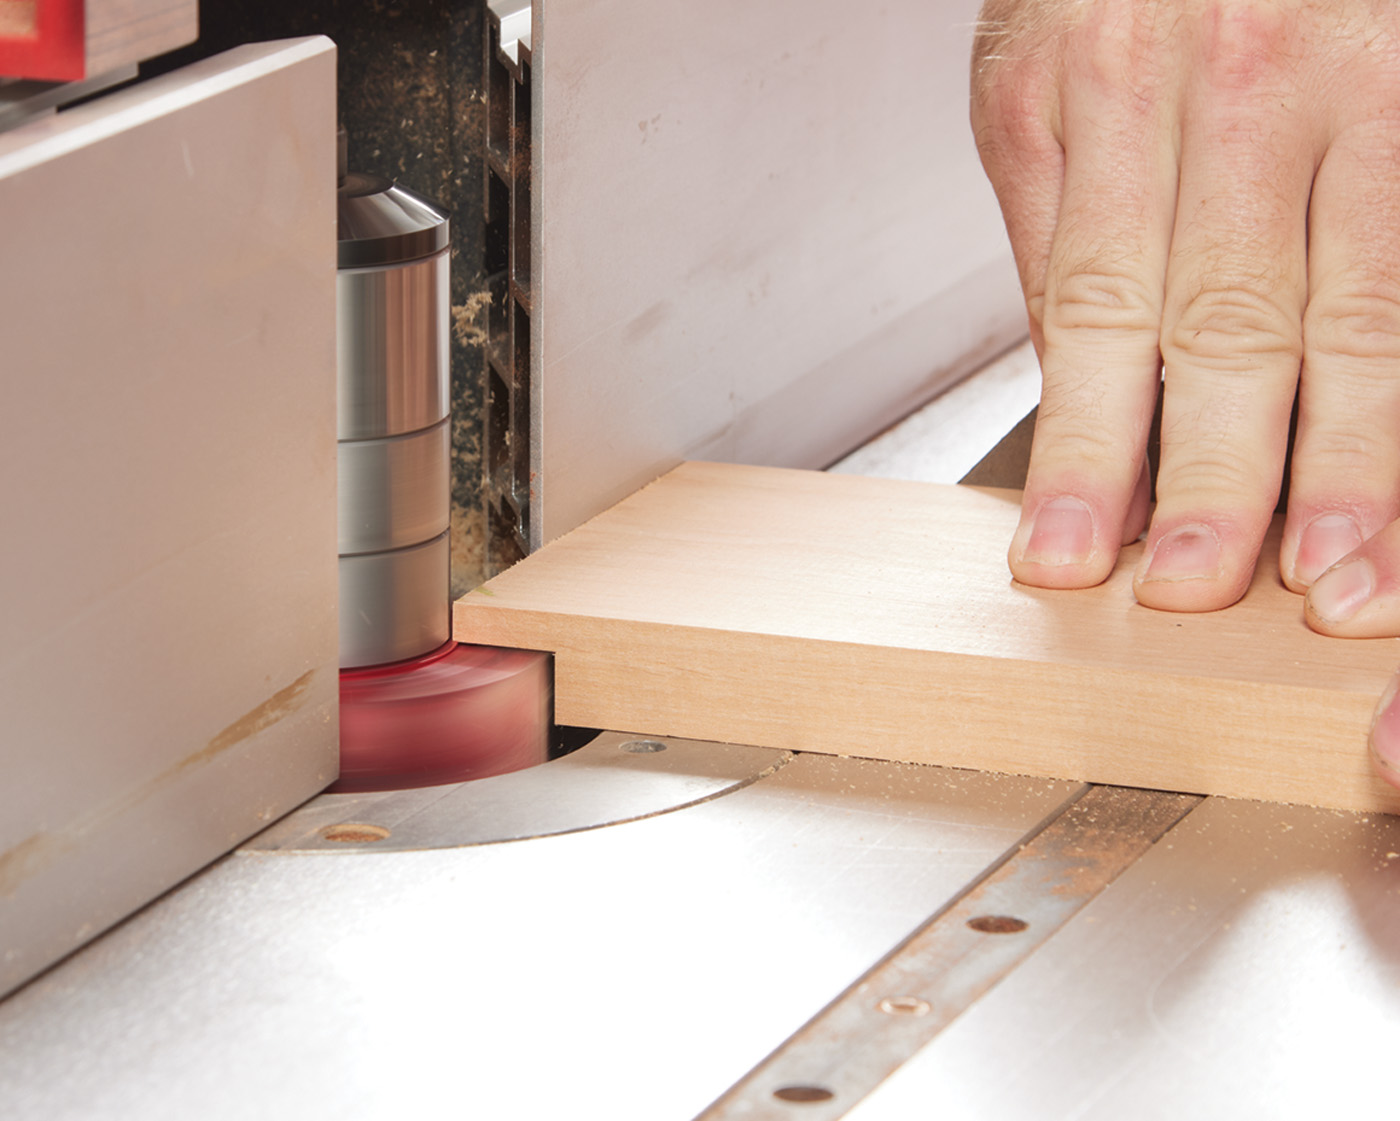
7 The raised panel is made by making passes on both sides.
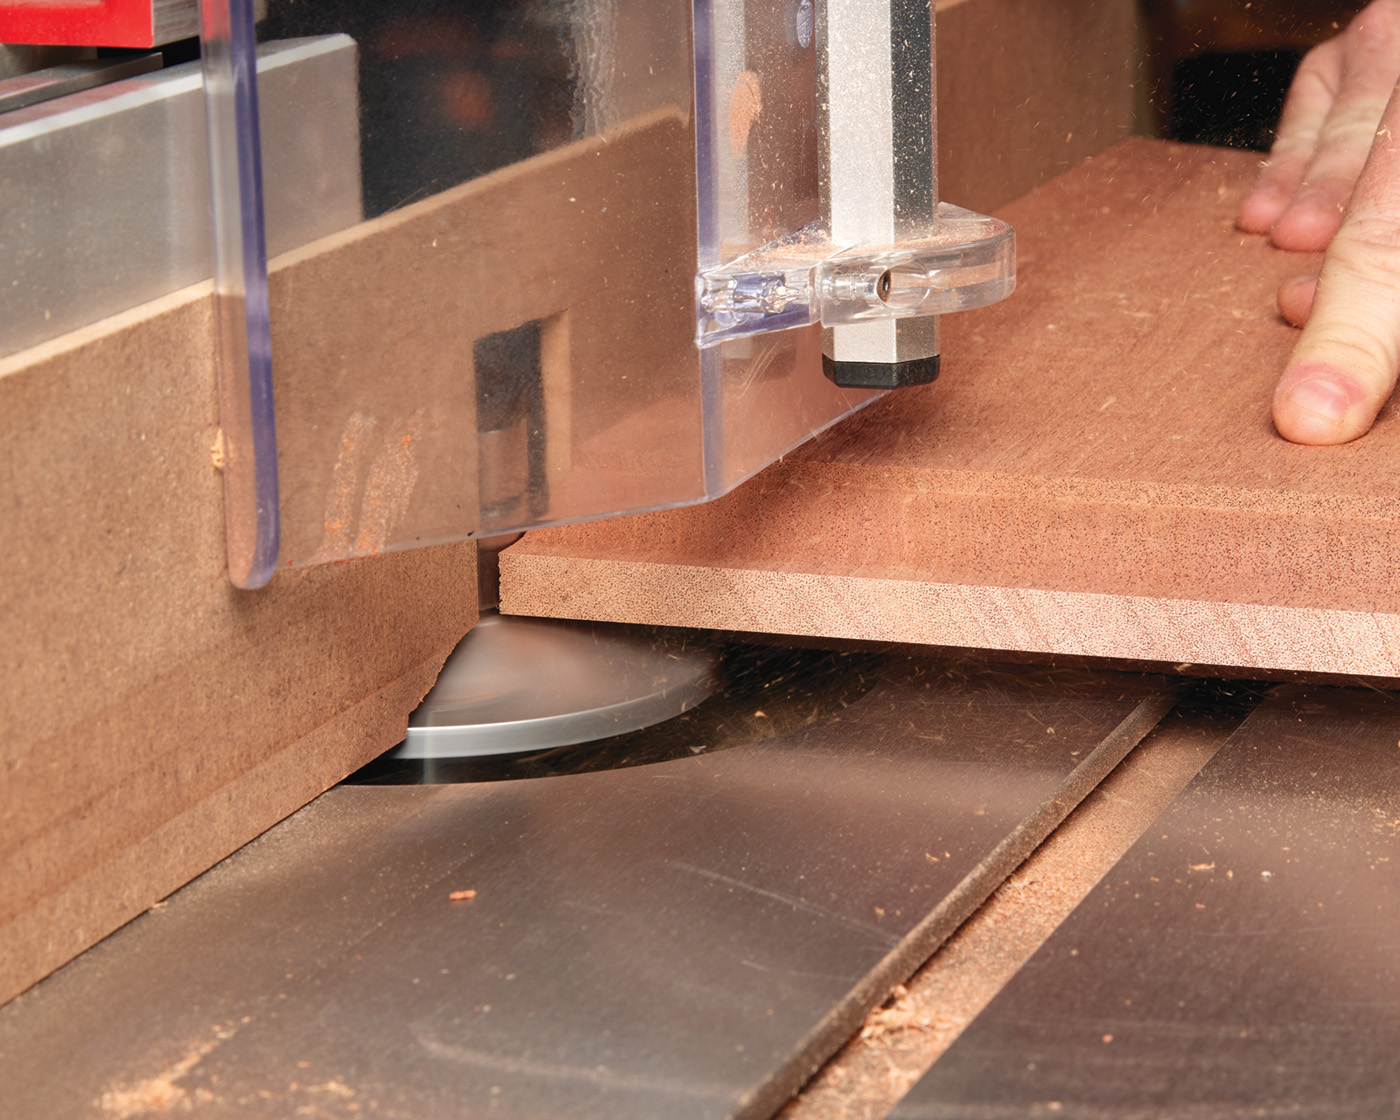
8 This leaves a tongue that fits in the groove of your door.
Now the Structure
Here’s another tricky issue with solid doors like this. They’re heavy. These mahogany doors are about 125lbs a piece (trust me, they feel every bit of it as I moved them around the shop for a few weeks). The cope and stick bits give you a great looking joint, but that’s pretty much it. The short tongue on the ends of the rails are not nearly enough surface area for that to become a structural connection.
9 The PantoRouter becomes a slot mortising machine with the slot mortise template.
For this, I generally opt for loose tenons. This means making deep mortises in all the parts and putting shop-made tenons in place. As you can see in Photo 9, my tool of choice for this is a joinery machine, such as the PantoRouter.
10 Make the tenons and chamfer the edges so they fit the mortises.
The goal is to create as deep of a mortise as you can, while being accurate. With the PantoRouter and a quality bit, I could squeeze out about a 3“ deep mortise in each part. This gives me a tenon that is about 6“ overall length, 4“ wide, and 1/2“ thick. I think that will do nicely. The tenons are made out of the same stock as the door. I chamfered the edges so that they slipped into the mortises easily and glued them in place on the end of each of the rails. To be fair, I had two doors to glue up. So, I tried it both ways—gluing the tenons into the rails first, or trying to glue all parts up at once. Gluing everything at once was maybe the most stressful thing of my life. Make sure to use an outdoor rated glue.
11 Glue one half of the slot mortise joint.
12 Then install the tenon
13 If possible, glue up smaller sub-assemblies before tackling the entire door.
The Assembly
With the tenons in place on the ends, I decided to do myself one more favor. That was to use dowels to locate the center stiles in all of the rails. One dowel in each was enough—just to give a registration point. To be fair, I probably could have measured and shot some brad nails, but the dowels give a pretty solid location as you’re gluing everything together.
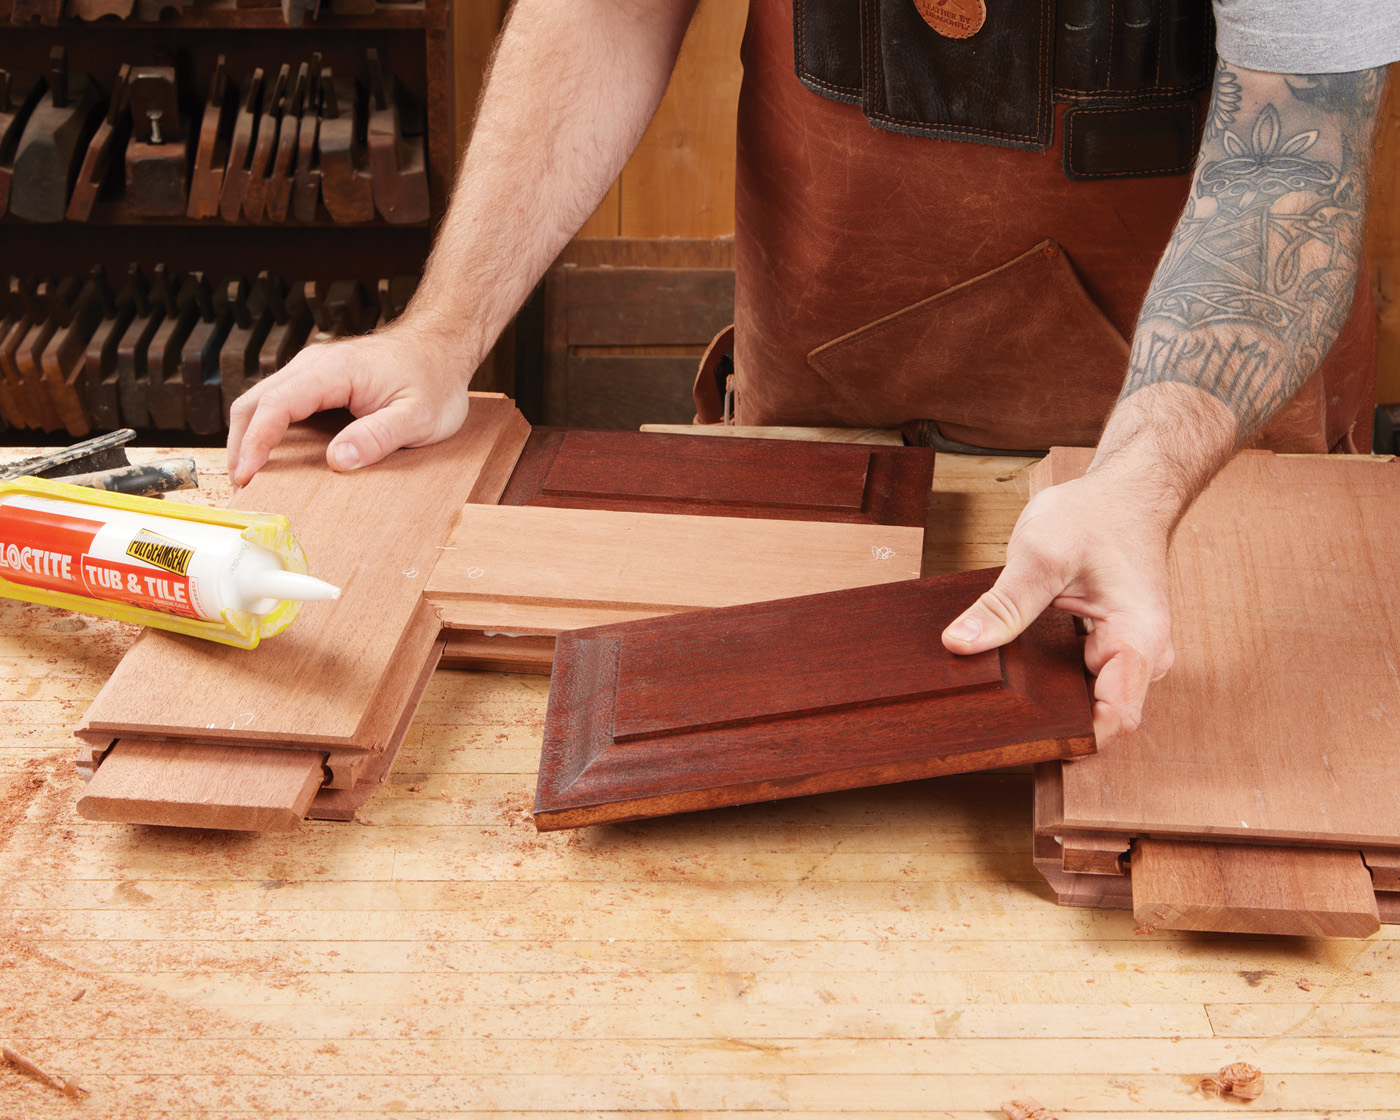
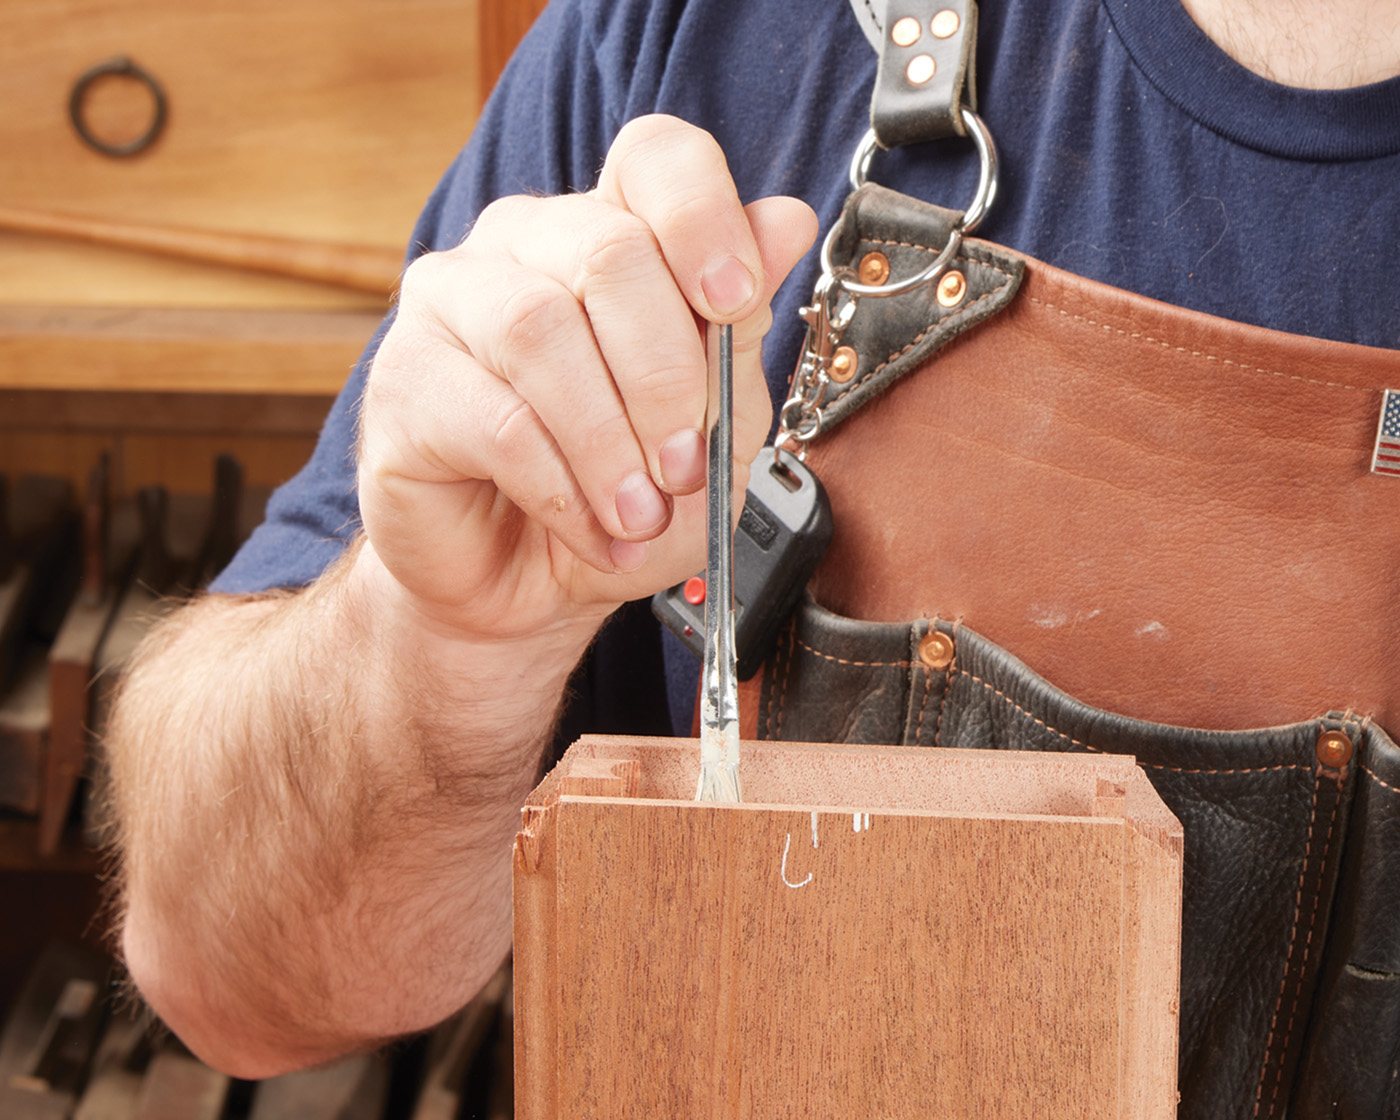
14 With the tenons in place, apply a thin bead of water-clean up caulk to the inside of the panel groove before slipping the panel into place.
Now, comes the messy part. I caulk the panels in place as I’m assembling. Is it necessary with a good fit? I don’t know. I do it to help air infiltration, and to also help avoid the panels rattling if they shrink a little. A small bead of caulk is really all that is needed. Make sure to use a latex caulk—I avoid silicon at all costs when it comes to raw wood… I have a feeling any squeeze out would leave a haze, no matter how quickly it’s cleaned up.
Speaking of which, as you’re assembling the door, any caulk that squeezes out should be cleaned up quickly. I treat the caulk like hide glue—use a toothbrush and hot water, and scrub the snot out of it. I find doing so helps avoid the dreaded haze that I just mentioned.
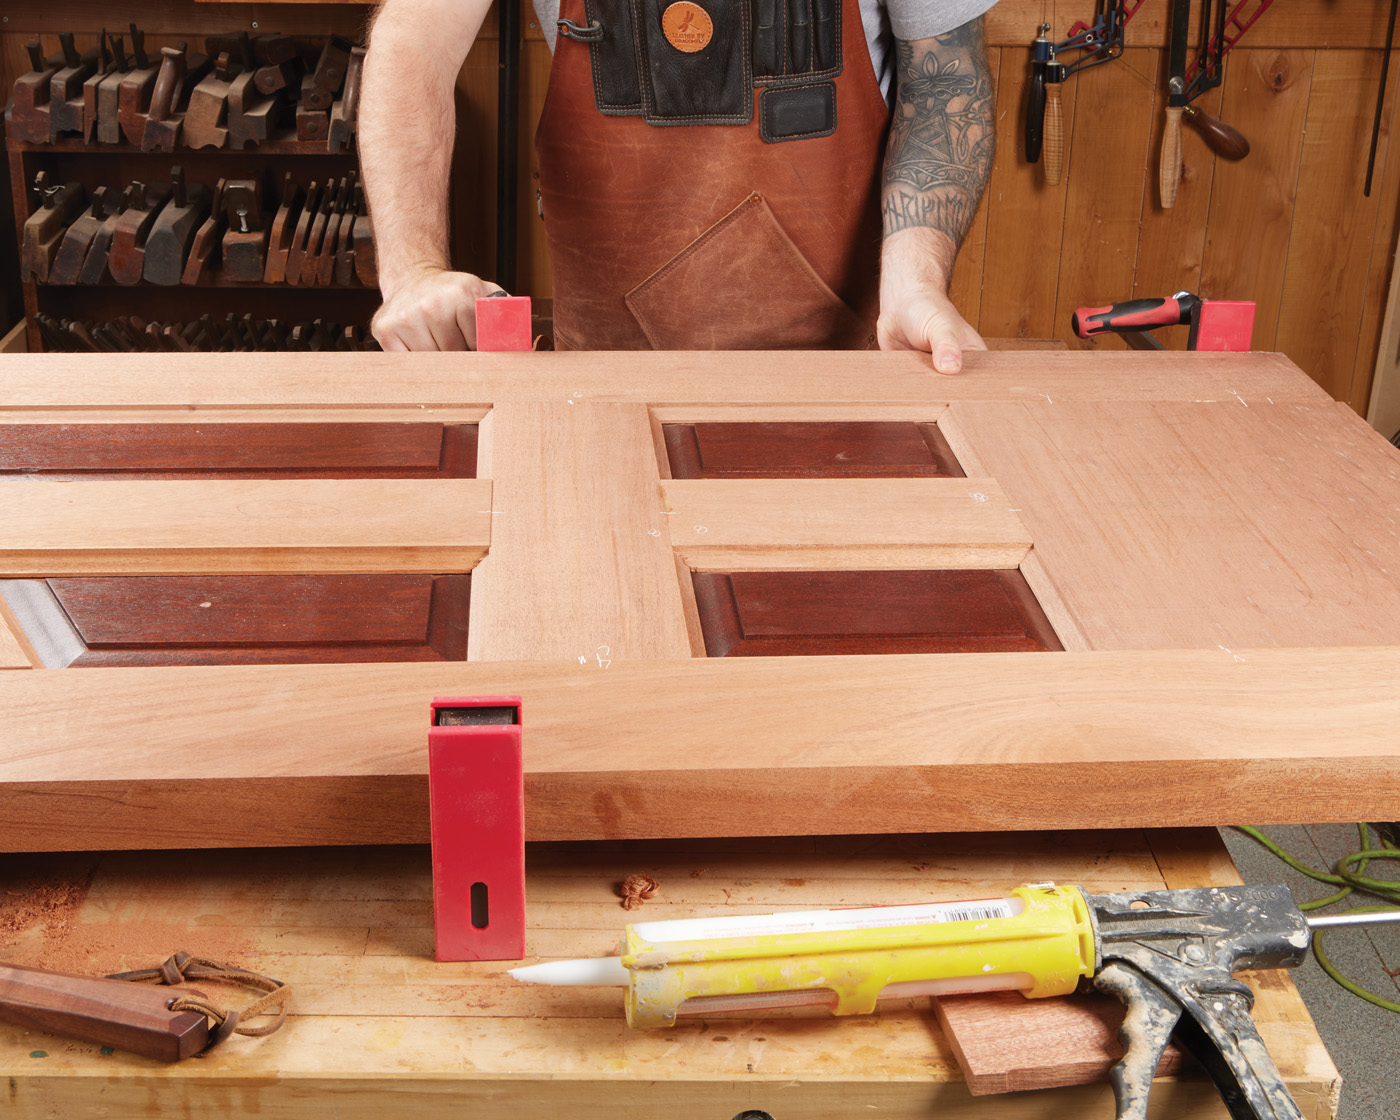
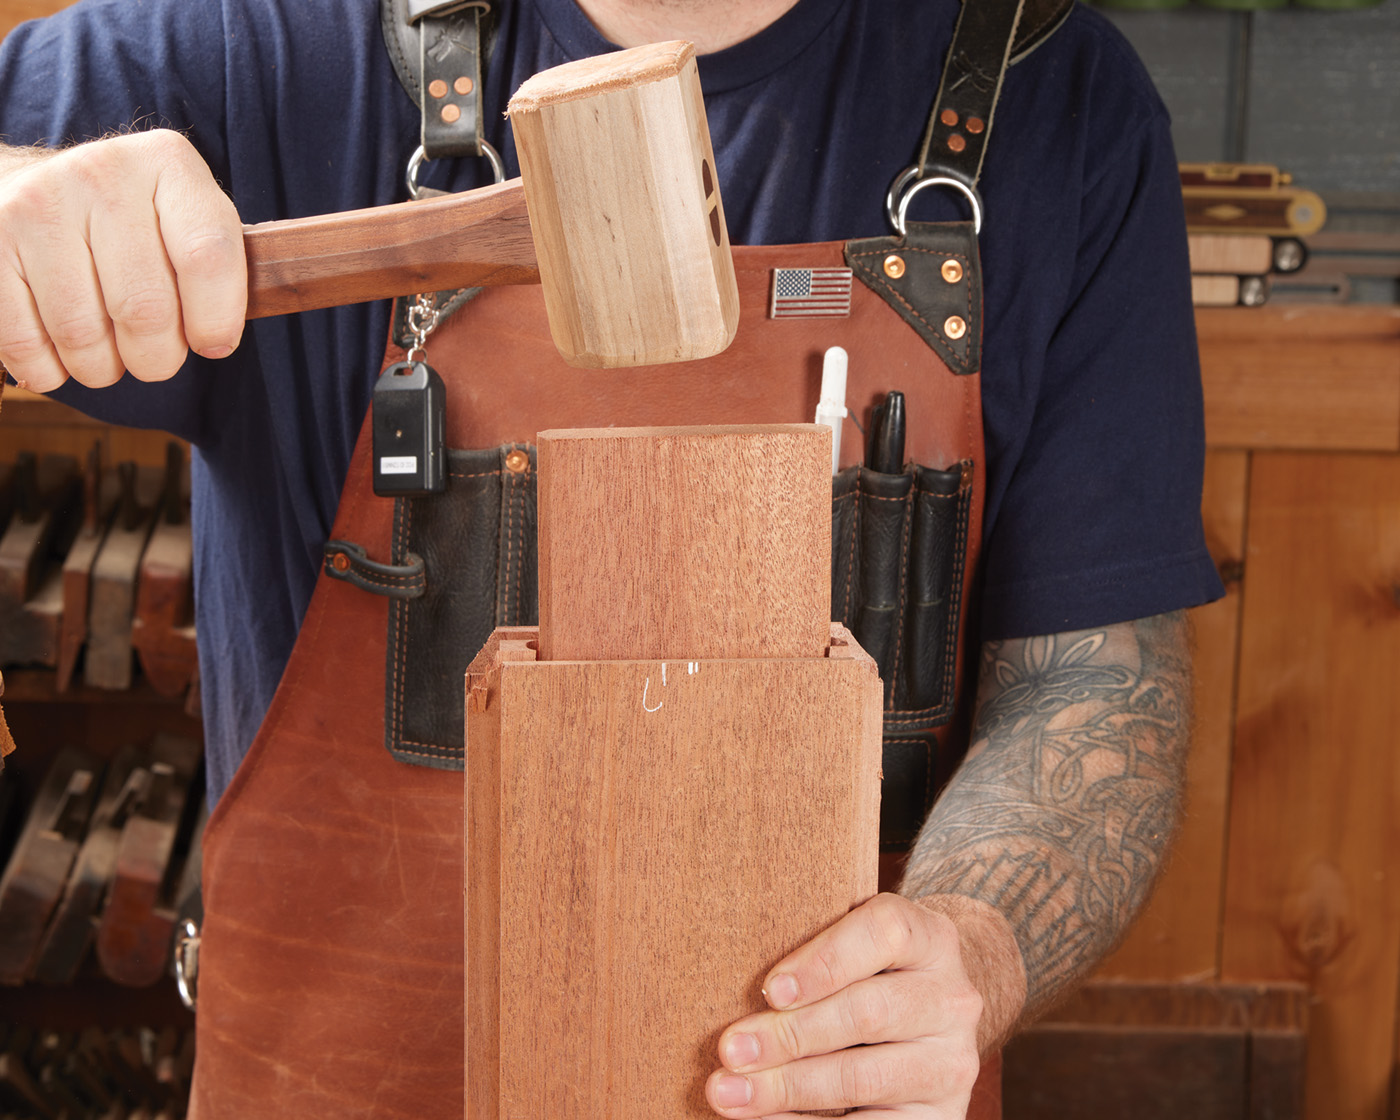
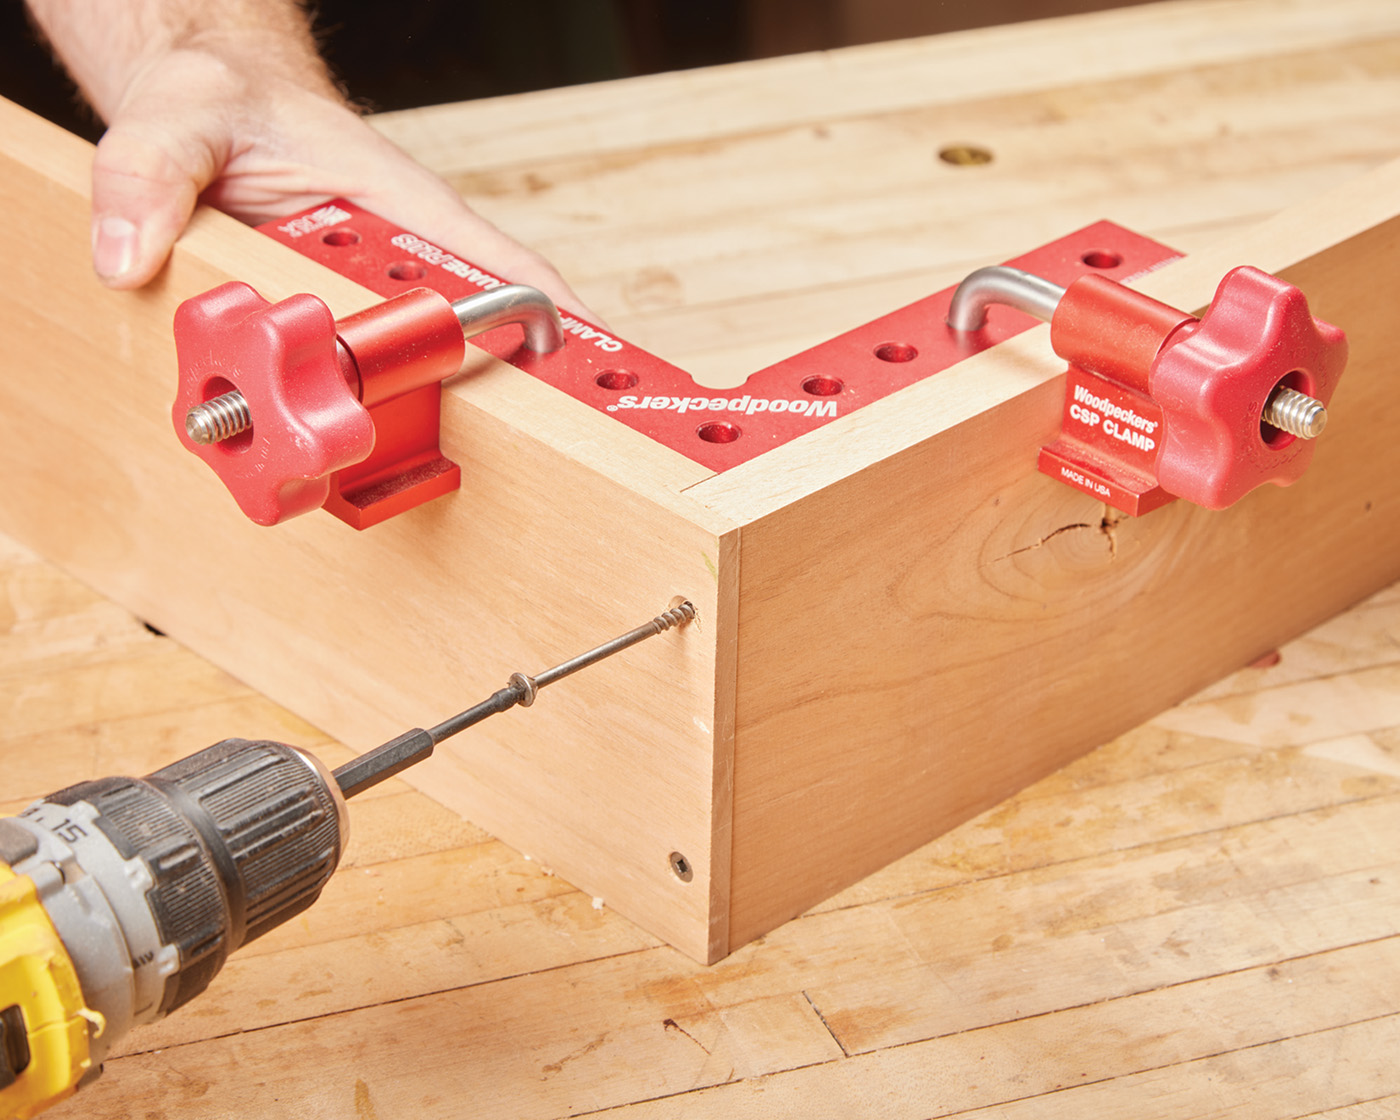
15 Glue up the entire door. make sure that the door is square, and all of your panels are fully seated before tightening down the clamps.
Now, go ahead and squeeze down the clamps. Take a few measurements and perform a few strategic mallet taps if something’s out of square. At this point, I don’t worry about glue squeeze out along the faces of the door, but I do clean up any in the routed edges.
Onto Hardware
If you want sticker shock, go check out how expensive nice door hardware is. Like other hardware, quality door hardware is expensive. However, if you’re going through the effort to build doors, don’t skimp here, in my opinion.
Building these doors for a church brings in some specialty considerations. It’s a “public” space that requires certain things to meet code. Door closers, ADA certified pulls, etc. Those change depending upon where you are in the world, but what doesn’t change are hinges.
Considering the weight of a solid hardwood door, you want a quality ball-bearing loaded hinge. These will allow the door to open smoothly, with minimal effort. Luckily, those aren’t too expensive.
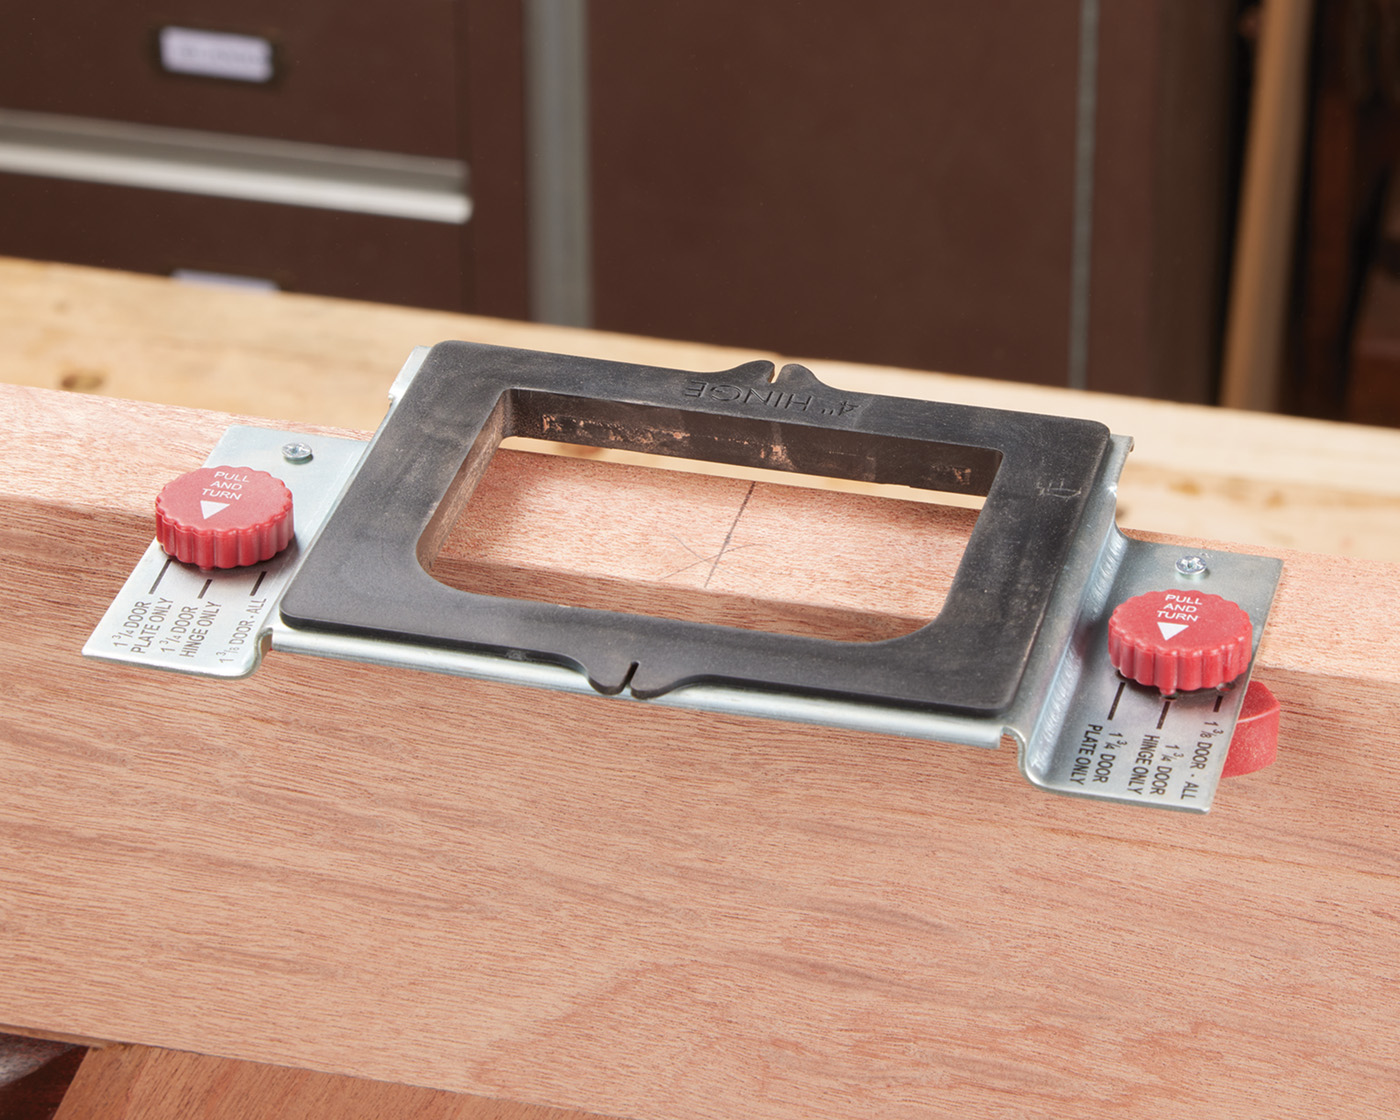
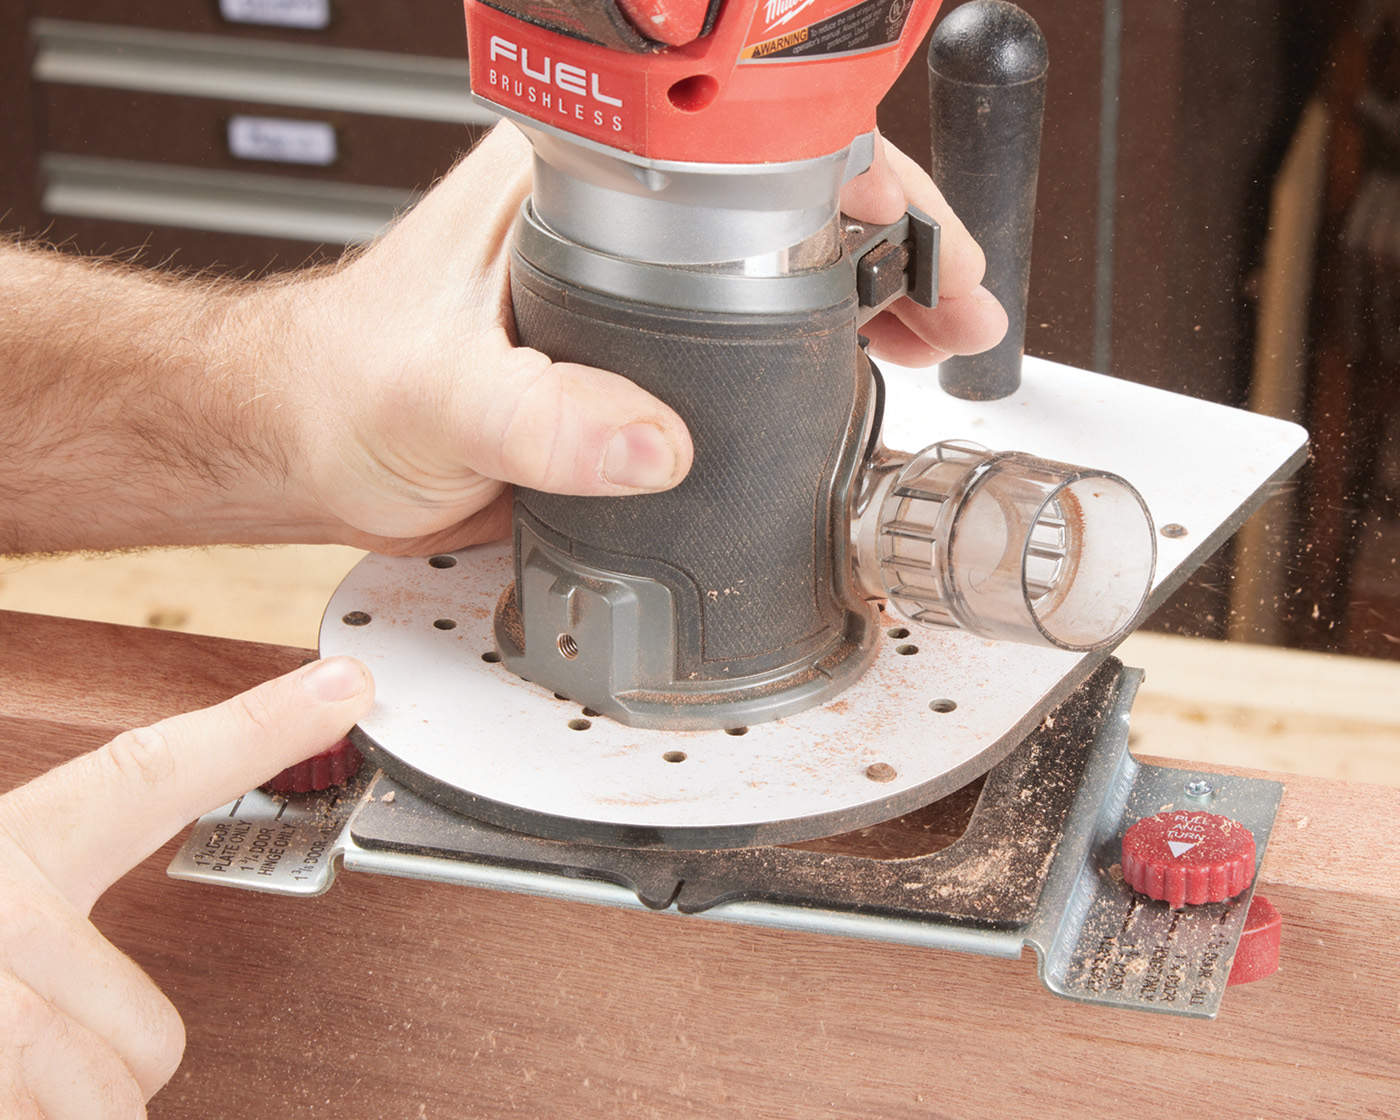
16 The hinge jig is set for the size of hinge that you purchase, and is screwed in place on the door.
The hinges on entry doors are mortised in. This means that you need to recess both the door jamb, as well as the edges of the doors. For something as standard as door hinges, I use a commercial jig, like you see here. This one is from Milescraft, and it’s fairly inexpensive.
The thing I like is that you can use it to rout hinges, strike, and latch plates. Knobs on the side have a cam underneath, allowing it to be used on either 13/8“ thick (interior doors) or 13/4“ thick doors. The black insert plates match commonly-sized hinges, and you just pop in the one for your hinge size. I’m sure you could come up with some way to clamp the jig to your door, but honestly — I use the provided screws and just screw it to the edge. You never see the edge of the door anyways, so what’s the harm.
One thing to point out is that you do have to use the bit that Milescraft supplies with it—the bearing is slightly bigger than the bit, and this combination makes a mortise that is just slightly bigger than the hinge (a bit of wiggle room is a good thing as you’re installing the doors into the jamb).
17 Make a scoring cut first, across the front edge of the door to avoid blow out.
Routing the mortise isn’t crazy. I do make a scoring pass first, along the front edge of the door to make sure that it doesn’t blow out when exiting the cut. My biggest complaint is that it’s kind of hard to see as you’re routing, but after doing this six or twelve times, you can get all the waste in one go.
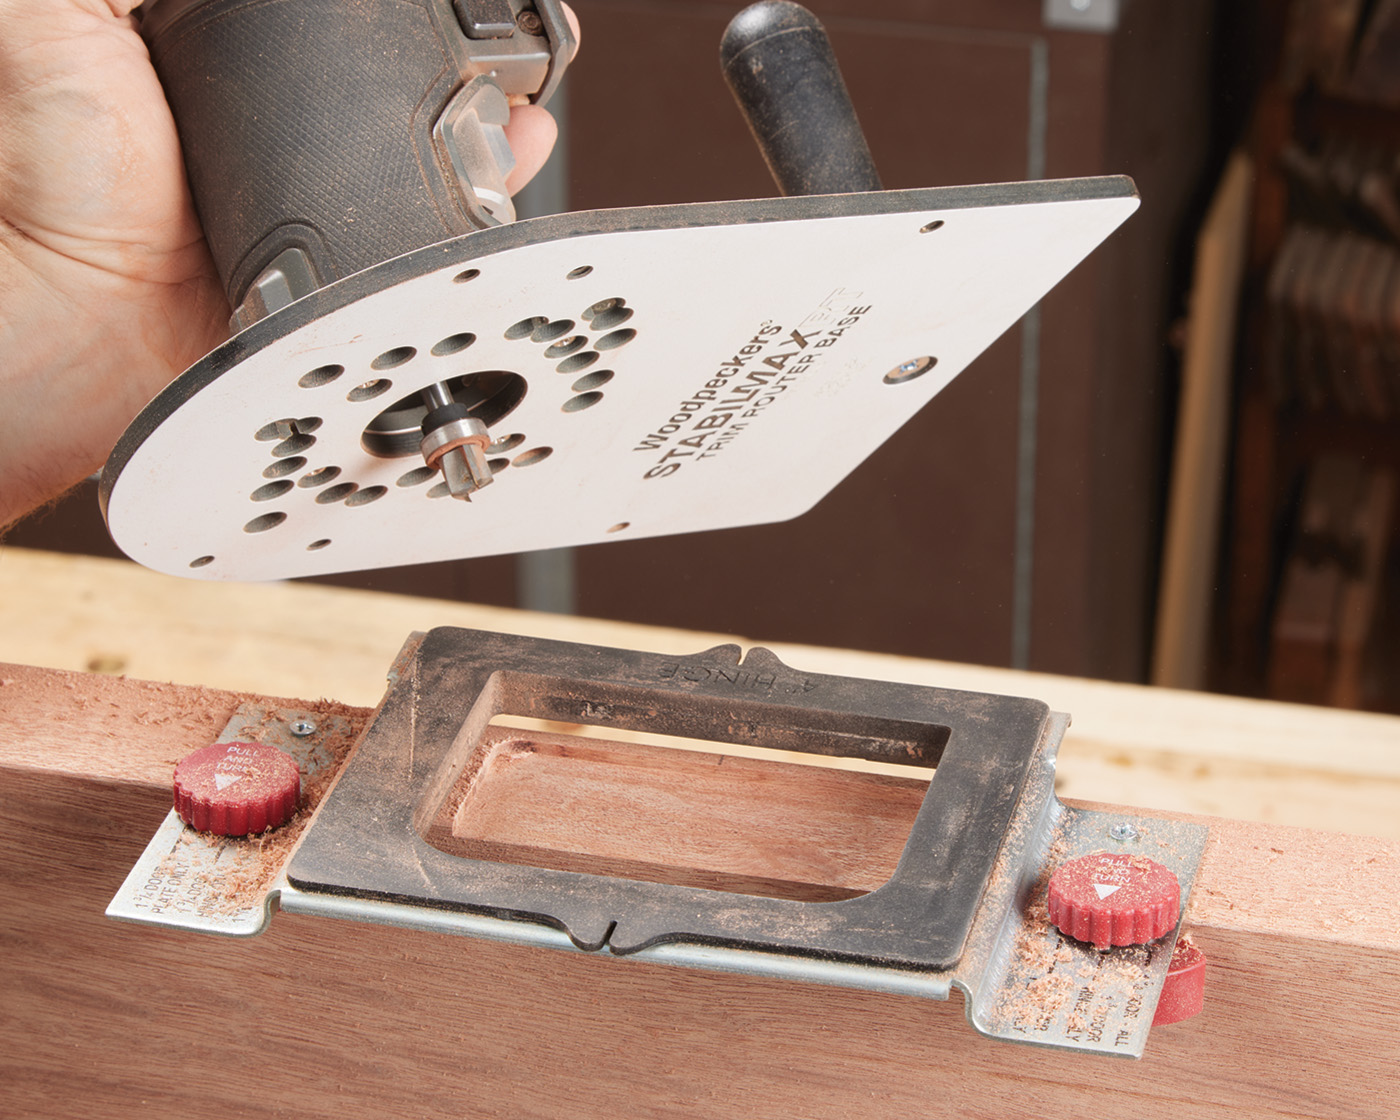
18 Rout the remainder of the mortise, nibbling away the waste.
With the mortises routed, you may need to square up the corners, depending if you have rounded hinges or not. I use a little stubby butt chisel to chop these square. Sever the fibers first before chopping with the grain. If you try to go with the grain first, you could accidentally split it out. I test the door fit with a couple of screws in each hinge (the final screws are installed during final installation).
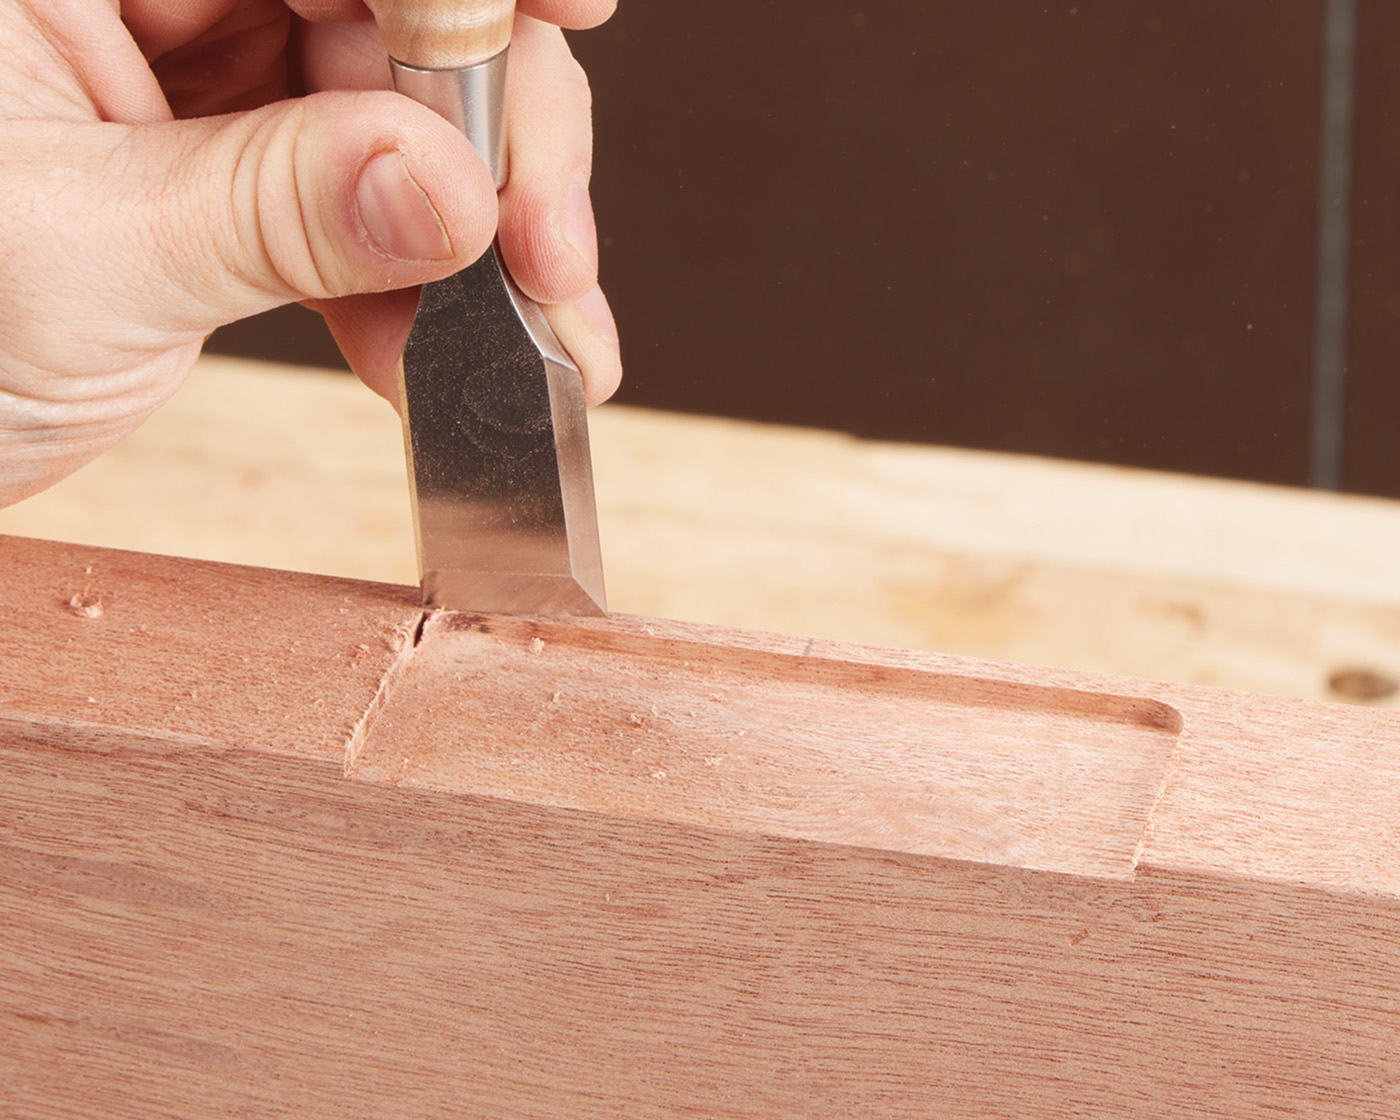
19 Chisel the corners square.
All The Extras
Now, at this point, your door is all glued together. It’s pretty much ready to sand and finish. For these doors that I was building, the easy part just got finished. As you could probably tell from the main photo in this article, one of the defining features of this door was the applied trim that formed the shape of the Orthodox cross. Again, I do not expect that anyone would have a need to do this on their door. However, it poses some interesting challenges.
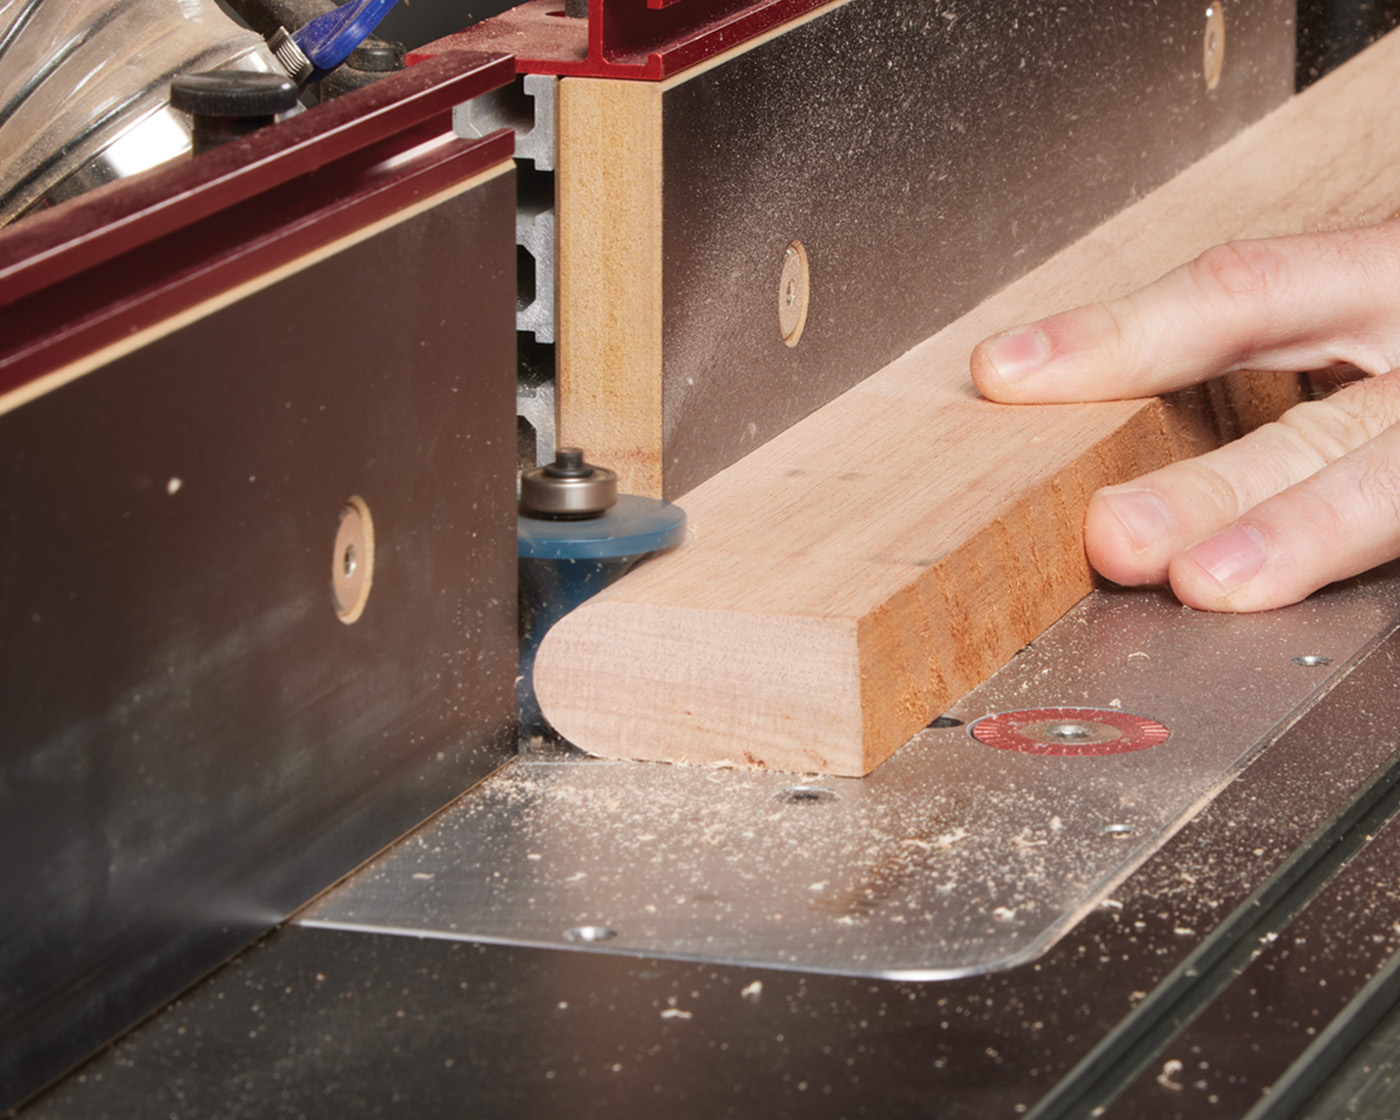
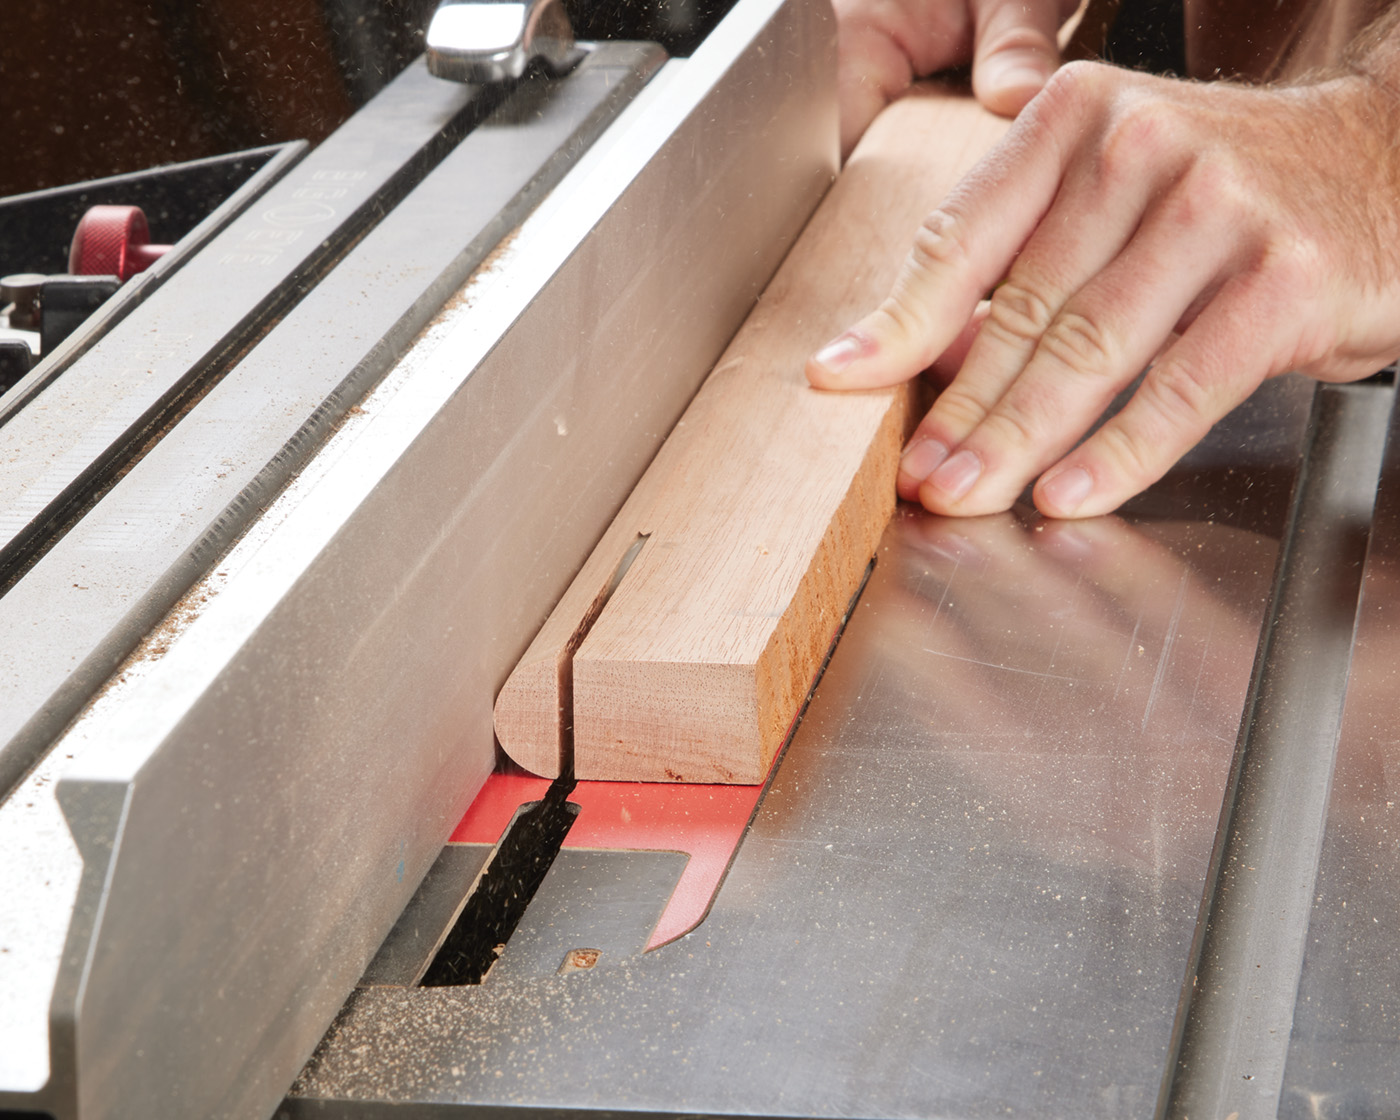
20 Have several sticks of stock planed to thickness. Start by routing a profile on one side.
I originally had bought a shaper cutter that I thought was going to make a great profile for use in this trim. It did not work out how I wanted. Instead, I ended up loading up a bull-nose bit in my router table and making some half-round molding. You can see this in photo 20. I ended up needing quite a bit of molding for these crosses—
the crosses are on both the inside and outside of the doors. My processes was to get several pieces of mahogany, and jump back and forth between the router table and the table saw. Rout a bullnose on each of the strips, head over to the table saw and rip it off. Back to the router table, rout, rip, and repeat. All said and done, I ended up with about 30 strips that were 5’ long or so. And I still ran out.
21 Rip the molding off at the table saw.
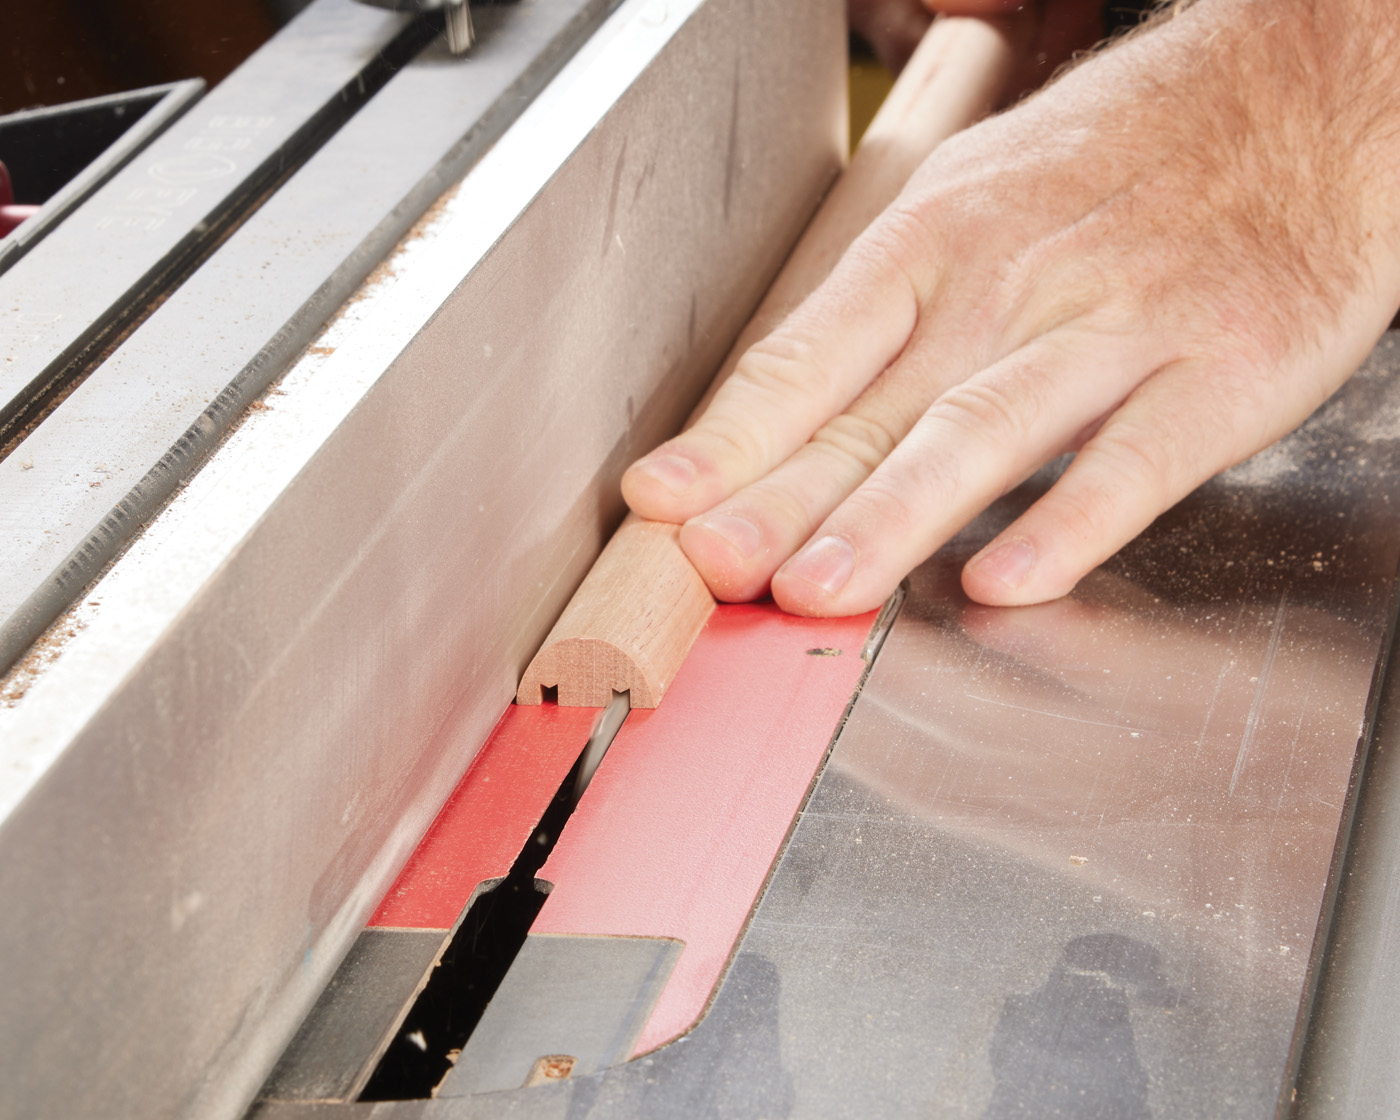
22 A few kerfs become glue grooves.
My application process was to glue the trim in place, and nail it on with brad nails. There’s a lot of nooks and crannies that glue could squeeze out of. To avoid squeeze out, I ran each stick of trim over the table saw to create a kerf along each edge (photo 22). These are what I refer to as “glue traps”. The kerfs allow the glue room to squeeze out as I nail it in place. Honestly, it’s one of my favorite tricks when working on trim, as it avoids any excess mess. You just have to get them as close to the edge as possible, without compromising the integrity of the trim. An extremely important step when making trim is to make sure you do a majority of the sanding of the trim before you install it. If you do not, you’ll probably struggle a bit getting it smooth. You’ll need to touch it up a bit later, but do the lion’s share of the work right now.
Cut, Glue & Nail
Because I am applying trim to both sides of these doors, it makes it a little tricky, but easier at the same time. Once I’ve dialed in a length, I want to set a stop block and cut several pieces at the same time. This makes using something like the miter saw a little tricky, as you’re constantly flipping the saw back and forth. Instead, I find the table saw is an easier task for this. If you have multiple miter gauges, it will make things easier. Luckily, I thought at one point I wanted to try some segmented turning, so I bought a couple of Miter Sleds from Woodpeckers. I did not try segmented turning, but it was the perfect tool to cut the trim.
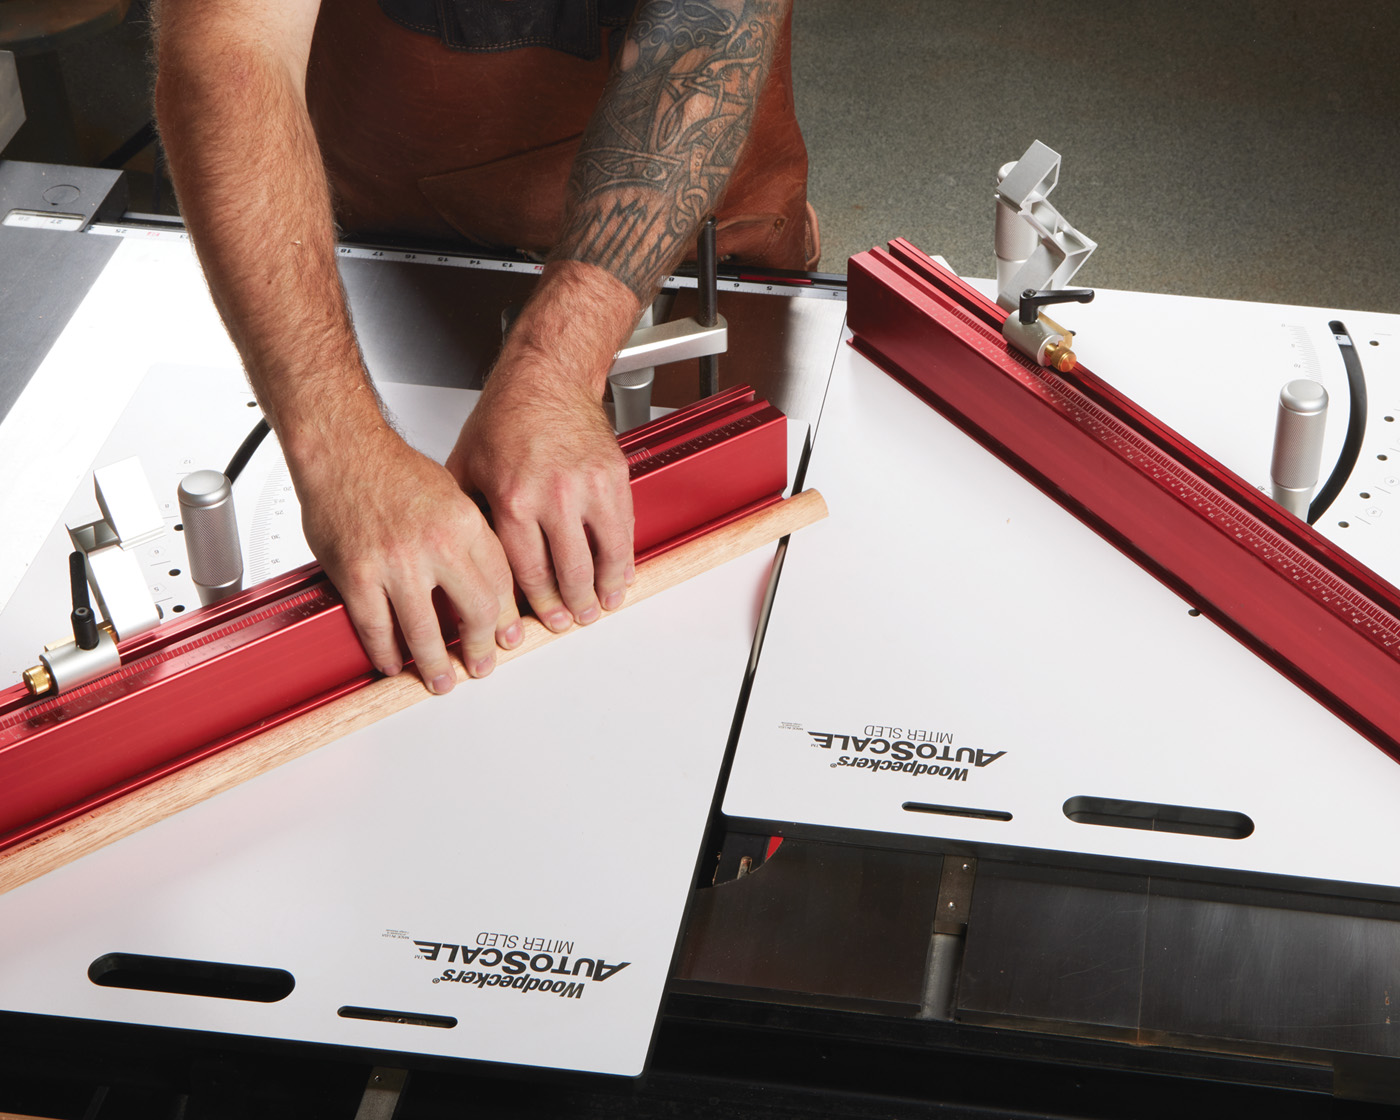
23 Left and right sleds cut all the miters.
Cutting trim like this requires both left-handed and right-handed miters. Some of the cuts are at 45°, Others are at oddball degrees (37.5°). It is a long and tedious process of measuring, cutting, test fitting and re-cutting. Once you have a piece to the correct length, a bead of glue can be applied down the center (photo 24), and it can be positioned in place. For this door, I let the edges of the rails and stiles be my guide. Luckily, Titebond III seems to provide quite a bit of stick when you position a piece in place, so that you can hold it down without it slipping. A few brad nails on each piece of trim hold it while the glue dries. I used 18 gauge brad nails—I feel the stain I used did a pretty good job of filling the holes in, but you may want to fill them with a filler, depending on what project you’re applying trim to.
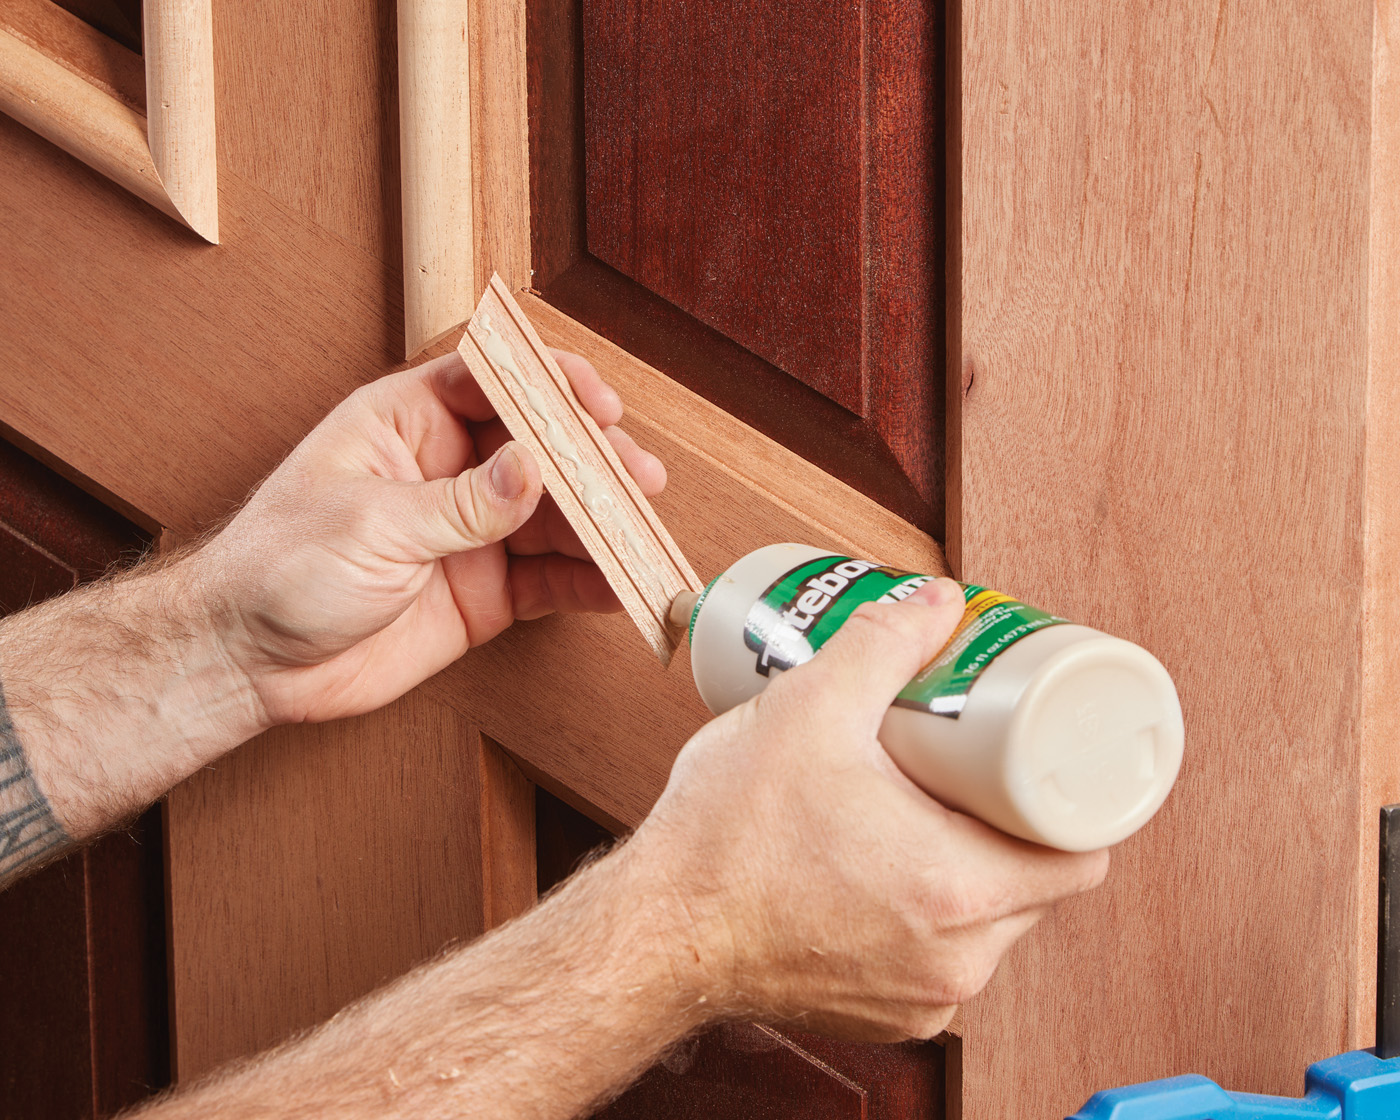
24 The center between the glue grooves is the glue area. Apply a thin bead before sticking it on your project.
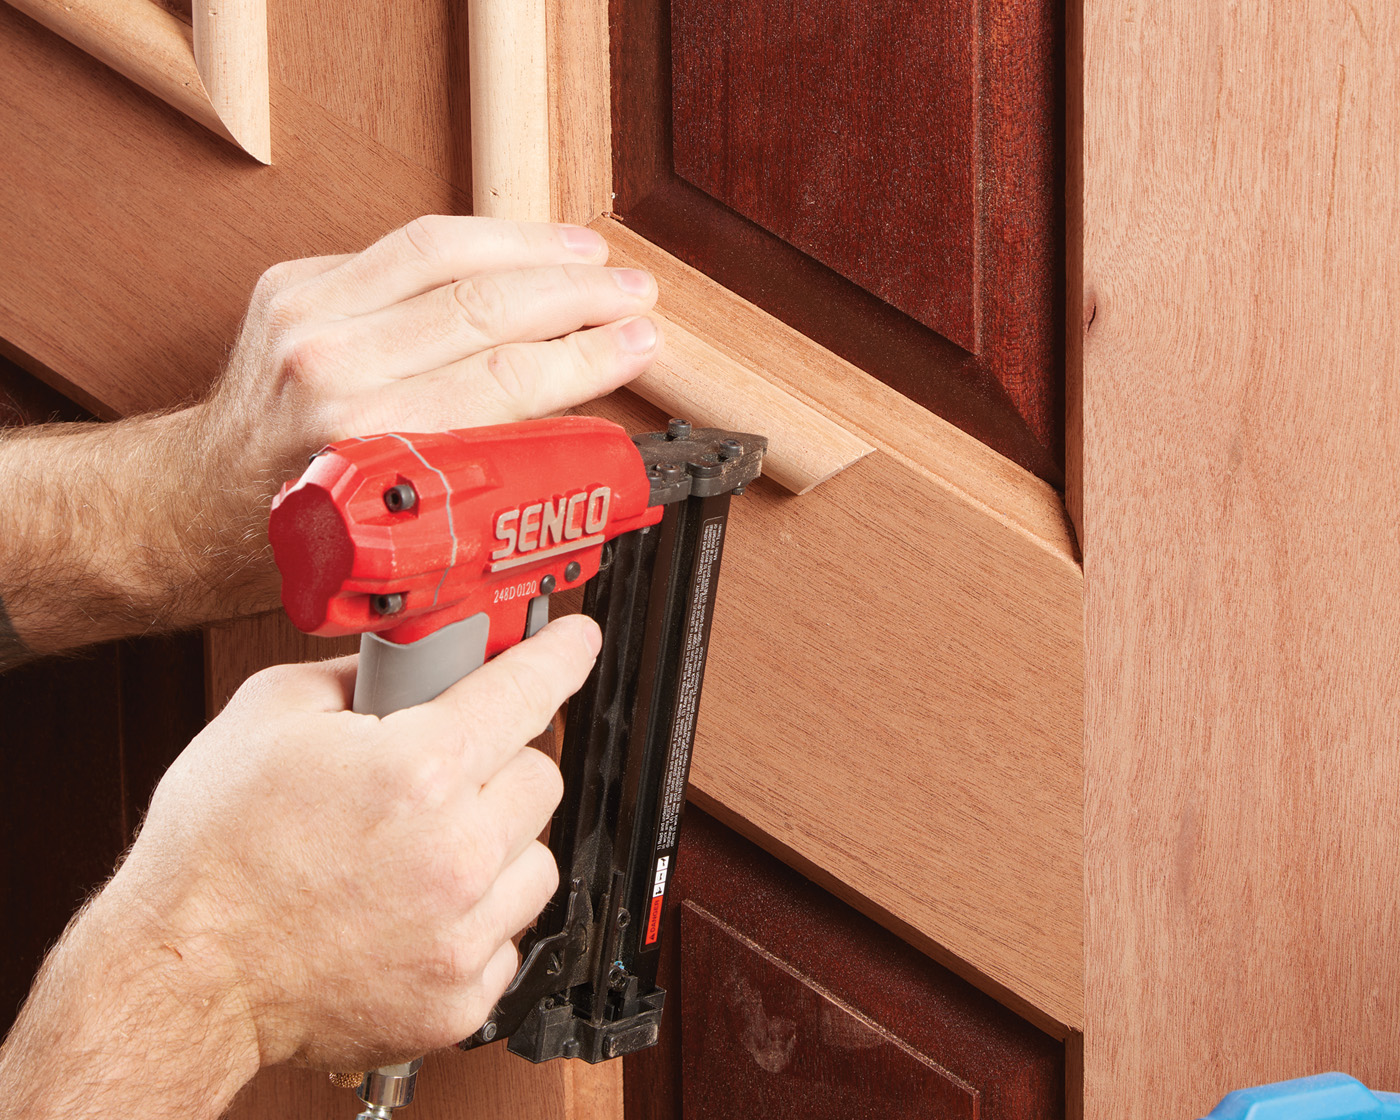
25 Push the trim down for a few seconds so that it grabs and doesn’t slip before you use a finish nailer to tack it in place.
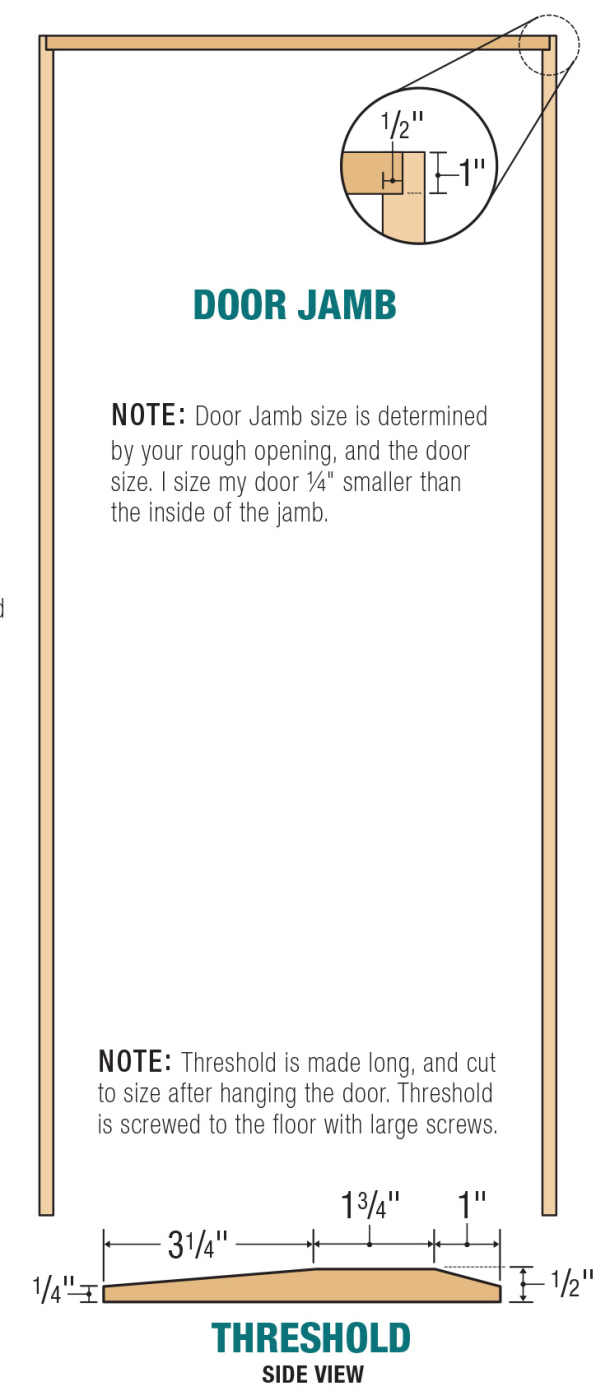
Jamb, Stripping & Threshold
Now, that pretty much does it for a door build. If you’re replacing an existing door, you may be able to re-use the existing door jamb (with stripping) as well as the threshold. If you’re building the entire thing from the ground-up, you should consider building the entire set. The jamb, threshold, and stripping are all straightforward to make, and really complete the look of the doors.
Build a Jamb
A The top of the left and right door jamb (the side jambs) are rabbeted to accept the head jamb.
B The head jamb is screwed to the side jambs. Use long, coarse screws for a good grip until the jamb is installed.
Weatherstripping
A Weather stripping channel may be built into the jamb, but I find it’s easier to apply as a piece of molding. Rabbet the molding with a shallow rabbet.

B Once applied to the door jamb, the rabbet forms a groove for the weather stripping to be inserted into.
Threshold
A I create my thresholds with two different bevels. A longer 10° bevel forms one side (usually the outside) of the threshold. This can change with different door swings.
B A shorter 20° bevel forms the opposite side. The flat in the center is where the door will sit in the closed position.
Again, I’ve said it several times. Use this article as the template to build a door for your house. Maybe for your shop. Heck, maybe you know a church that needs a set of doors. They’re fun and rewarding to build.


