


We may receive a commission when you use our affiliate links. However, this does not impact our recommendations.

A classic furniture form revised for 21st-century entertainment.
I have a love-hate relationship with my television. I love (too much, perhaps) to watch shows, but I hate having the TV out in the open as the focal point of my living room. But I also dislike most commercial entertainment centers, as I’ve a penchant for antique and antique-style furniture.
So, I flipped through a pile of books on Shaker furniture and auction-house catalogs to cull design ideas for a stepback cupboard that could be repurposed as a modern entertainment center that would not only allow me to hide a 32″ flat-panel TV behind doors, but also house the cable box, DVD player and various stereo components. (Of course, if you want to use it in your dining room, just omit all the holes in the backboards for air flow and cord management.)

Hidden entertainment. This traditional cupboard hides a flat-screen television and all the accompanying audio and video accoutrements.
Additional reading: Check out five of our favorite Shaker projects.
In our store: Shaker Storage & Shelving Shop Resources Collection
More from Megan Fitzpatrick: Three Drawer Chimney Cupboard Project
Shaker Stepback Cut List and Diagrams
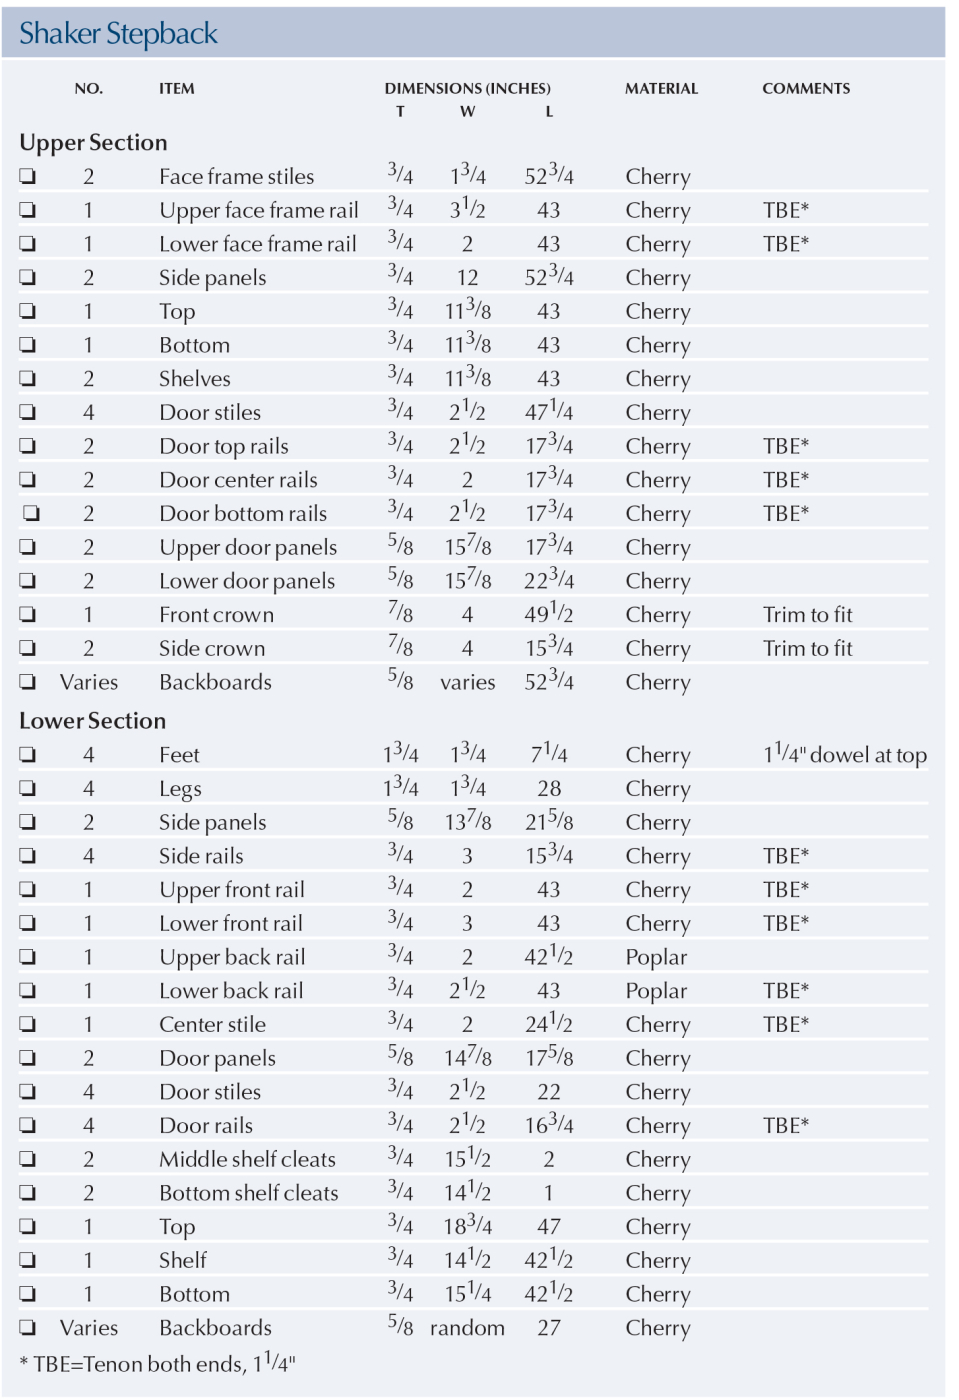
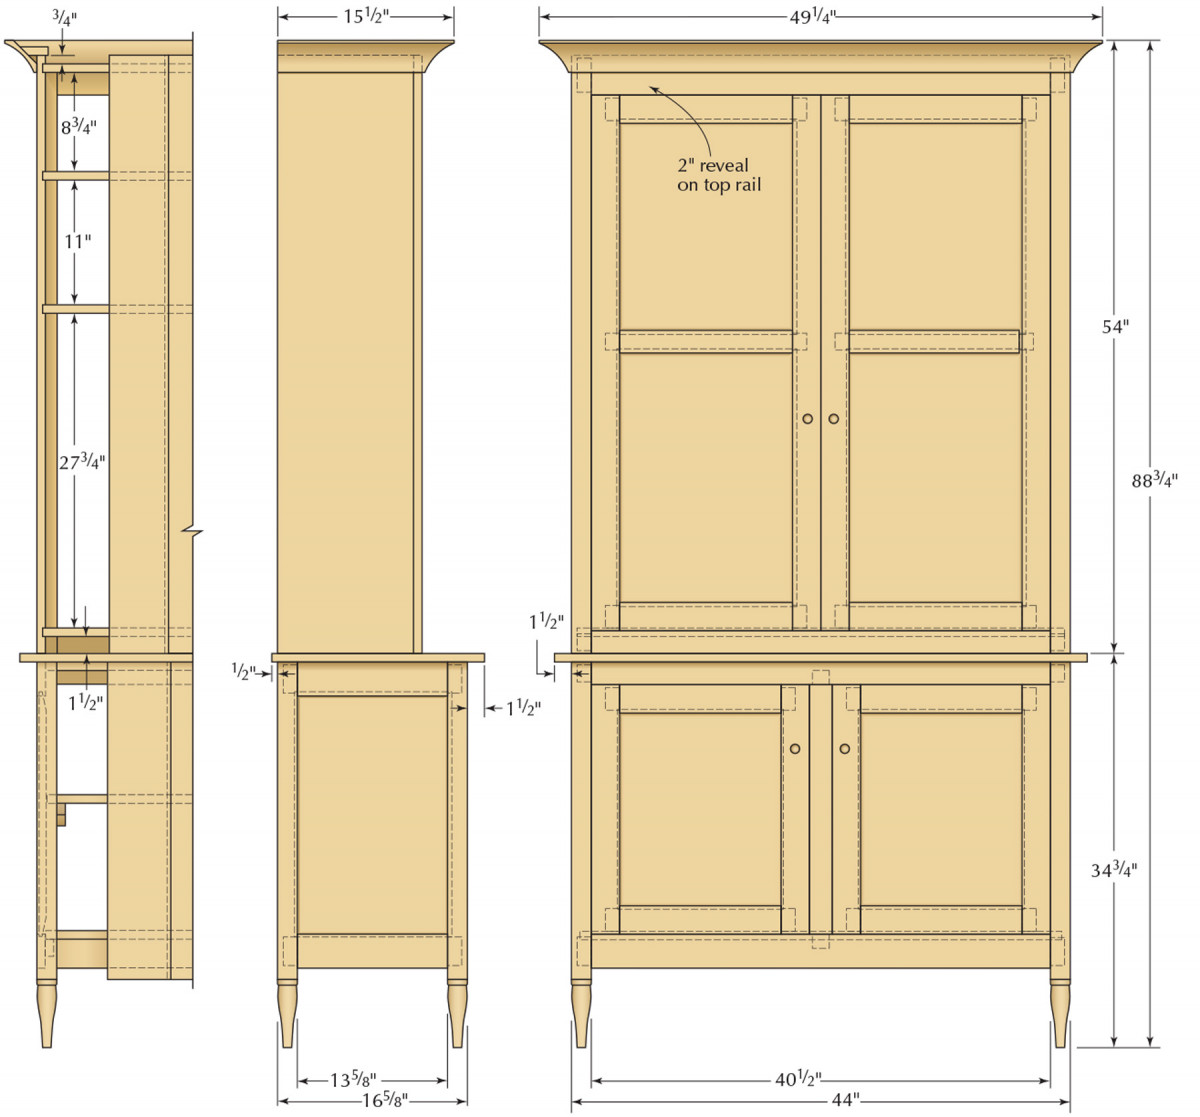
Left to Right: Back elevation detail, Profile, Elevation
A Plethora of Panels
While this project is quite large, it’s suprisingly easy to build – though it’s an exercise in organization to keep all the parts straight. The upper face frame, lower carcase and all four doors are simple mortise-and-tenon joints, with panels floating in grooves in the doors and carcase sides.
The first step is to mill and glue up all the panels. Use your best stock for the door panels, as they’ll show the most. And here’s a tip I didn’t know until after it was too late: Keep all your cathedrals facing in the same direction and your panels will be more pleasing to the eye.
For the four doors, you’ll need six 5⁄8“-thick panels, two each of three sizes. You’ll also need two 5⁄8“-thick panels for the lower carcase sides.
Unless you have access to a lot of wide stock, you’ll also need to glue up 3⁄4“-thick panels for the upper carcase sides, top, bottom and shelves, and the lower carcase bottom, shelf and top.
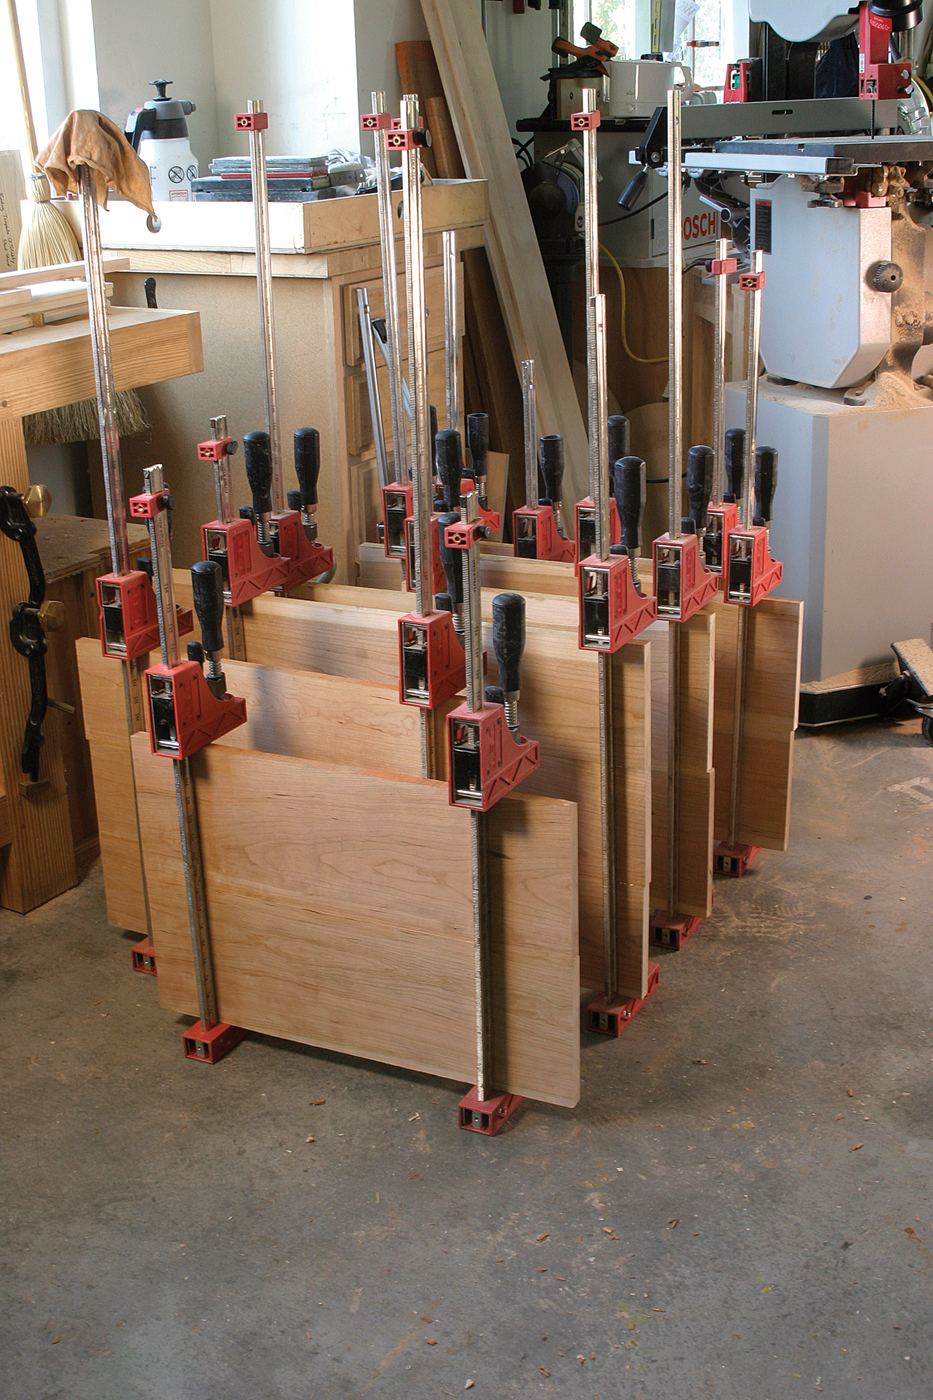
A sea of panels. I wanted to glue up all the panels at the same time – but I ran out of clamps and space. Above are the six door panels and two lower side panels.
I glued up all my panels oversized. After the glue was dry, I took them out of the clamps, stickered them and set them aside. I cut each to its final dimension as it was needed, after calculating its exact measurement from the dry-fit frames and carcase sides. I don’t trust cut lists; no matter how religiously I stick to the plan, measurements change in execution.
Mortises and Tenons Galore
With the panels set aside, I moved on to all the pieces that would be joined with mortise-and-tenon joints. Initially, I’d planned to concentrate on one carcase at a time to more easily keep things organized. I quickly realized that’s an inefficient work method, as the mortise-and-tenon setups are the same on both the top and bottom pieces of the project. Rather than create each setup twice on the machines, I prepared all my stock and cut the joints at the same time.
Many mortises. The majority of joints in this project are mortise and tenon. Take the time to set the hollow-chisel mortiser to cut dead-on centered mortises, 1-1⁄4″ deep – it will save you a lot of frustration and time later.
First, chuck a 1⁄4” chisel and bit in the mortiser, and take the time to make sure the chisel is dead parallel to the machine’s fence. I began with the leg mortises – the only pieces on which the mortises aren’t centered. After choosing the best faces for the show sides of each, mark which leg is which. Mark out your mortises. On the inside back of the rear legs, they’re set in 1″ so the rail can accommodate the 5⁄8“-thick backboards. On the front and sides, they’re 1⁄4” back from the show faces, so that the rails end up flush with the front of the leg faces. The top rails are flush with the top of the legs, so lay out 11⁄2” mortises on the inside front of the two front legs, and 2-1⁄2” mortises on the side, 1⁄4” down from the top. The bottom rails are all 3″, so your mortises will be 2-1⁄2“, 1-1⁄4” up from the bottom of the leg.
Cut the mortises for the back rail first with 1″ distance between the chisel and the fence, then change the setup to 1⁄4” spacing, and cut the remaining mortises in the legs. To make clean mortise cuts, most of the Popular Woodworking editors use the “leap-frog method.” That is, skip a space with every hole, then clean up between the holes. Some woodworkers prefer to overlap each hole to get a clean cut. Try both methods on scrap pieces, and use whichever you prefer.
Assuming your stile stock is exactly 3⁄4” thick, the setup should remain the same for the face frame and door mortises, but double check that the chisel is centered in your stock before making that first frame cut. And, make sure you always work with the same side against the fence – if you are off a little bit, you’ll be equally off on every joint, and cleanup will be easier.
Lay out all the mortises on your face frame and door frames and make the cuts. (A sturdy 6″ rule is my preferred tool for cleaning the detritus out of the bottom of each mortise.)
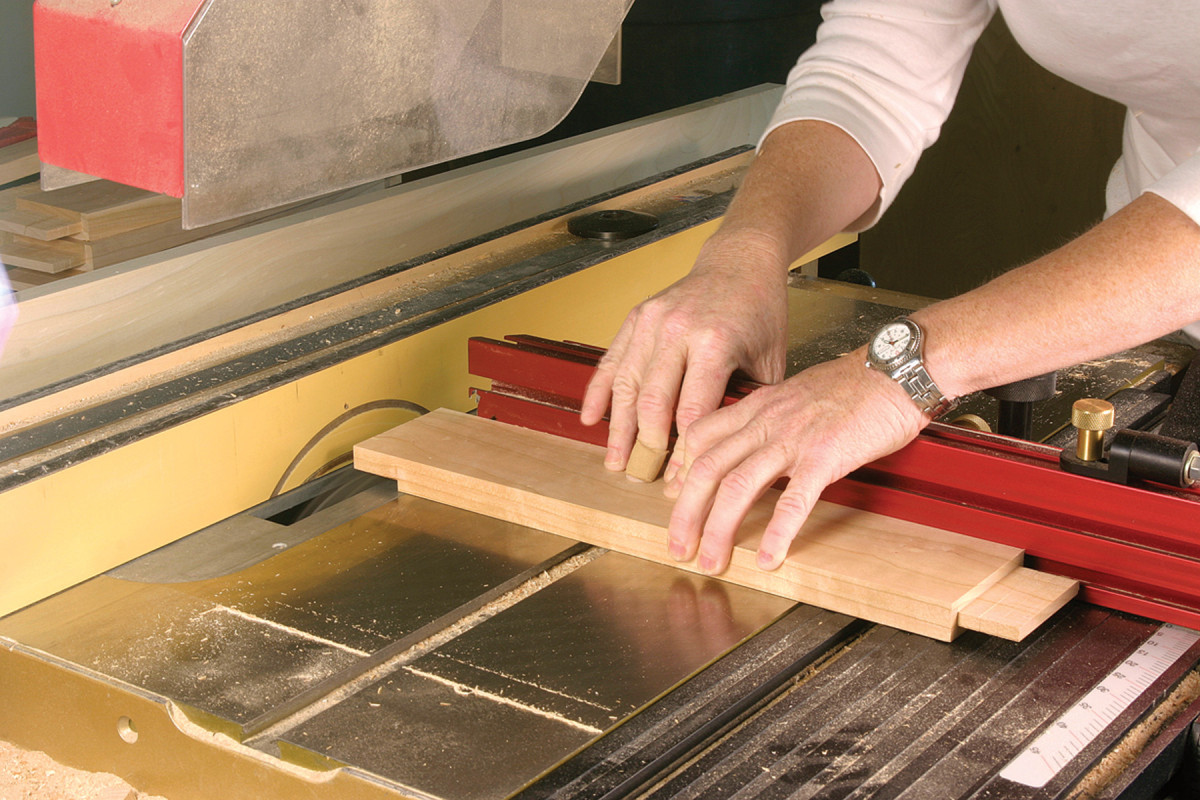
Table-saw tenons. The full dado stack on our table saw is 13⁄16″ and the tenons are 1-1⁄4″ long, so I made the first cut on each face with the workpiece tight to the fence, then slid it to the left for a second pass. The blades are raised just shy of 1⁄4″ so I was able to simply roll the end of each 3⁄4″ workpiece to cut the tenons with one setup.
Now it’s on to the tenons. I prefer to set up the full 13⁄16“-wide dado stack at the table saw, and raise it to just shy of 1⁄4“. That way, I can make two passes on each end of my tenoned workpieces, and simply roll around each face to create the tenons, without having to change the setup at all for any of my 1-1⁄4“-long tenons.
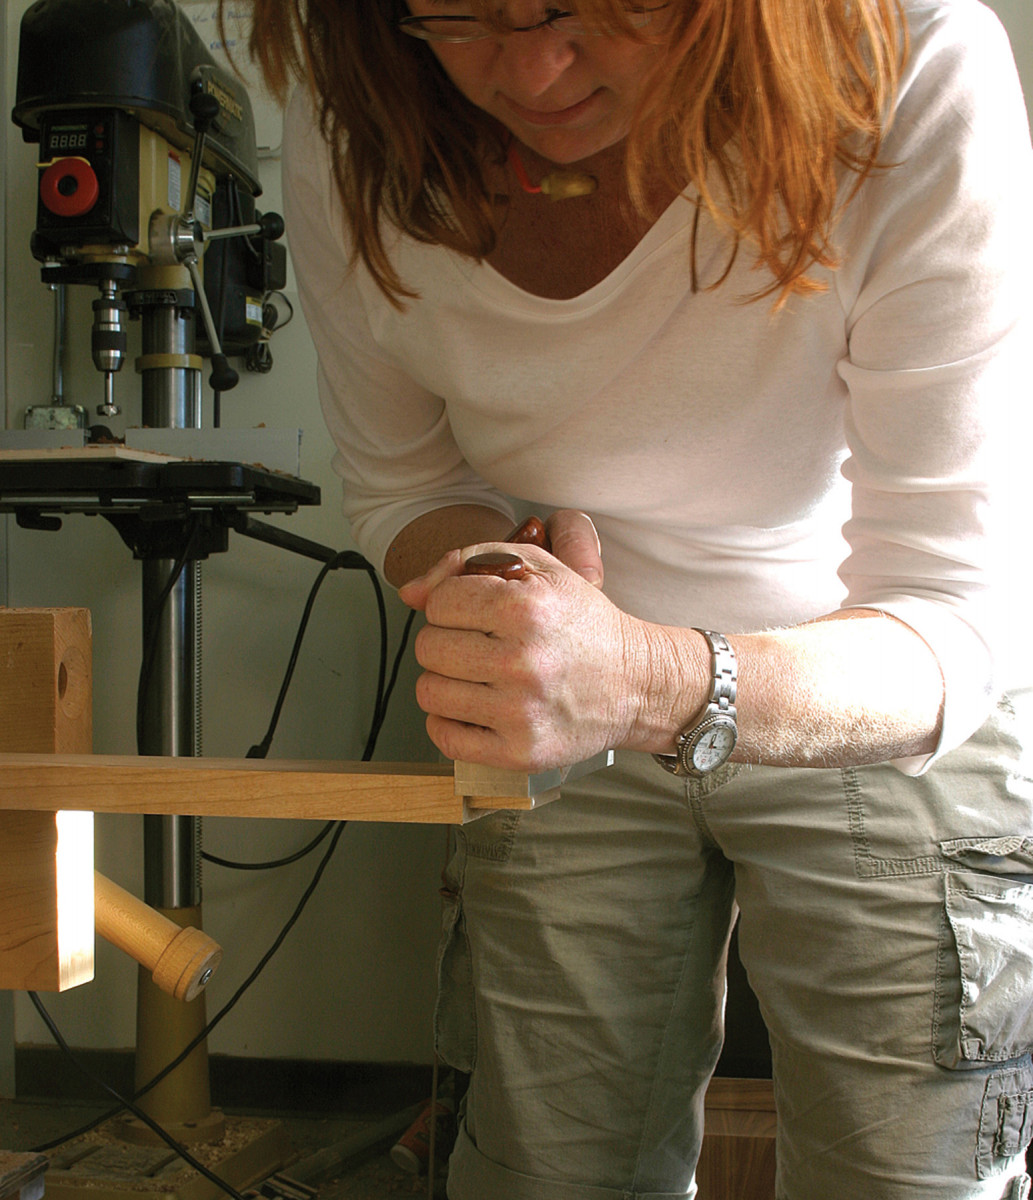
Final fit. I purposely cut the tenons just a hair oversized. I reached the final fit by testing each tenon in its mortise, then shaving each cheek as needed with a shoulder plane. And, I planed a slight chamfer on the tenon ends to make them easier to fit.
With the tenons cut just a hair oversized in thickness, I test-fit each one individually in its mortise and used a shoulder plane to reach the final fit. Planing a slight chamfer at the end of the tenon will help it seat. (The fit should be a tight press fit. The tenon shouldn’t move around in the mortise – nor should you need a mallet to get things together.)
Grooves for Floating Panels
With the mortise-and-tenon joints all dry-fit, it’s time to cut the grooves that will accept the floating panels. Chuck a 1⁄4” three-wing cutter into your router table, and raise it 1⁄4” (you can use your already cut mortises to set the height – no measuring necessary). Set the fence to make a 3⁄8“-deep cut.
Start with the legs – and double check to make sure you have the faces marked correctly. The floating panels are on each side of the carcase, so a groove is needed from mortise to mortise on the front face of both back legs, and on the back face of both front legs. Unless your ear protection blocks out all noise, you should be able to hear the difference in sound as the router cutters move from the hollow of the mortise into the groove cut (mark the starting and stopping point if you’re worried about recognizing the sound differential). With the leg flat to the table and the mortise toward the bottom, push the leg against the fence so that the router bit is spinning in the empty mortise hole, then move the leg across the table, cutting a groove that stops in the other mortise, then pull the leg away. Repeat until all four leg grooves are cut, and set the legs aside.
Test the bit height on your 3⁄4” stock before proceeding. It shouldn’t need adjustment … but it never hurts to be sure. Grooves are needed on all frame pieces that will house a panel – that’s the inside edges of all the door rails and stiles, and on both long edges of the medial rails for the upper doors. On the stiles, the groove goes from mortise to mortise. On the rails, in order to cut a full 3⁄8” deep across the rail, you’ll be nipping the inside edge of the tenon. That’s OK – but be careful to cut away as little as possible so that the joint retains maximum strength.
Raised Panels
Now dry-fit the sides and doors and take the final measurements for all the panels. Add 5⁄8” to both the height and width of each; with 3⁄8” hidden in the groove on all sides, you build in an 1⁄8” on either side for your panel. Retrieve the door and side panels from your stickered stack; cut them to final size at the table saw.
Raised panels. Set up a fence-extension jig on the table saw, set the blade at a 12° angle, set the distance between the fence and blade at 3⁄16″and raise the blade until it just clears the workpiece as the cut is made. This jig slides along the rail, so the workpiece can be clamped in place.
Now, set up a fence-extension jig on your saw – a stable flat panel attached to your rip fence will work, but that jig will be stationary and you’ll have to carefully move your workpiece across the spinning blade. It’s safer to make a jig that fits over the fence and slides along it. That way, you can clamp the workpiece to the jig and move the unit instead.
For any stock thickness, set the blade angle to 12°, and set the fence so there’s 3⁄16” between the fence and the inside saw tooth as the tooth clears the bottom of the throat plate. Raise the blade enough so that the stock fits between the blade and the fence (approximately 2-3⁄4“). This ensures the blade will clear the stock completely as the cut is made. Make sure you use a zero-clearance throat plate; otherwise, the thin offcuts will get caught and kick back.
Cut across the grain first, at the top and bottom edges. Any tear-out will be cut away on your second two cuts, which are with the grain. Clamp your workpiece firmly to the fence extension and slide it smoothly across the blade. Now repeat until all six panels are raised, and sand away the mill marks. These panels will fit snug in the 3⁄8“-deep grooves, and allow for seasonal expansion and contraction. And if you prefer a more country look to a Shaker style? Face the raised panels to the outside of the piece and you’re there.
Shapely Feet
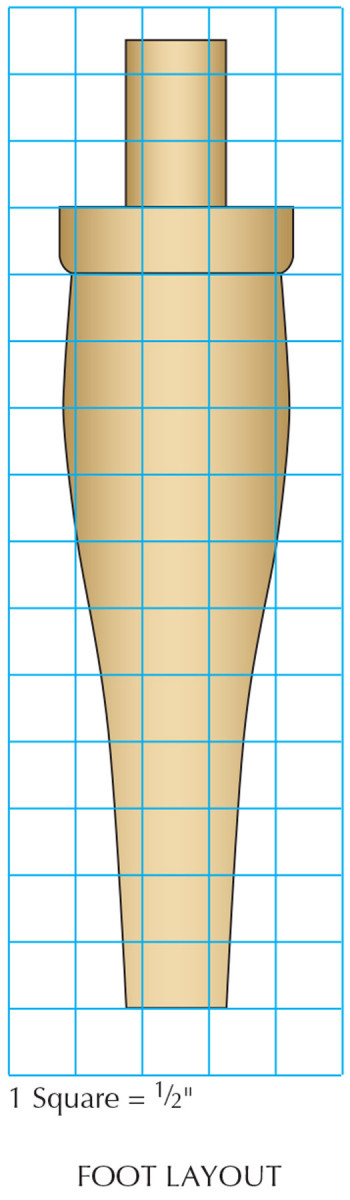
Foot layout
At some point before you do any glue up, you’ll want to turn your feet at the lathe and create a tenon at the end to join to the leg. (Of course, you could also add 6″ to your leg length, and turn the foot on the leg stock. However, I decided I’d rather muck up a 6″ length of wood than a 34″ piece, so I made the feet as separate pieces.) I first milled each foot blank square, then turned them round and shaped each foot, following the pattern above.
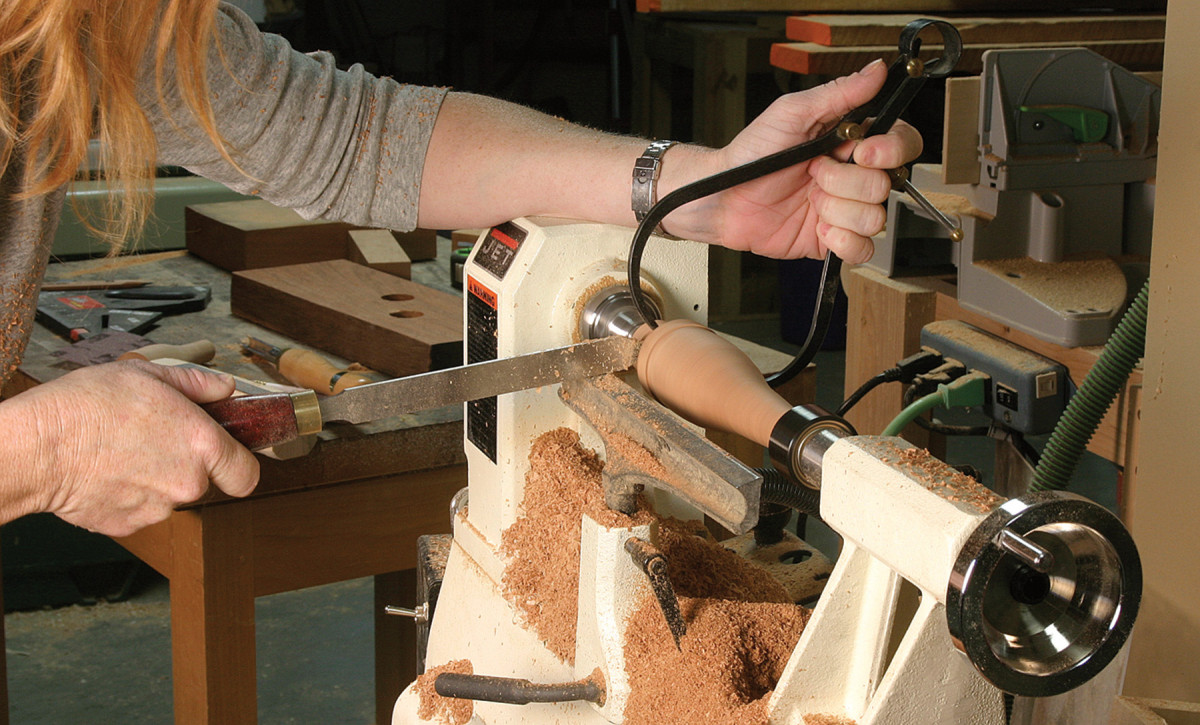
Custom feet. I shaped my 6″ feet on the lathe and turned a 3⁄4″ x 1-1⁄4″ tenon at the top of each. While the feet needn’t be identical, the tenons should be close in size. I held calipers set to 3⁄4″ against the piece as I used a parting tool to make the cut. When I reached 3⁄4″, the calipers slipped over the tenon and I was done.
Even if each foot is slightly different (you can’t tell unless they’re right next to one another), be careful to turn the tenoned ends as close in size as possible. To achieve this, I set my calipers to 3⁄4” and held them against the tenon as I cut the waste away with a wide parting tool. As soon as I reached a 3⁄4” diameter, the calipers slid over the piece. I then turned the rest of the tenon to match.
Why make those tenons the same? Well, you have to fit the tenons into drilled holes that are centered in the bottom of each leg, and I wanted to use but one drill bit and achieve a tight fit.
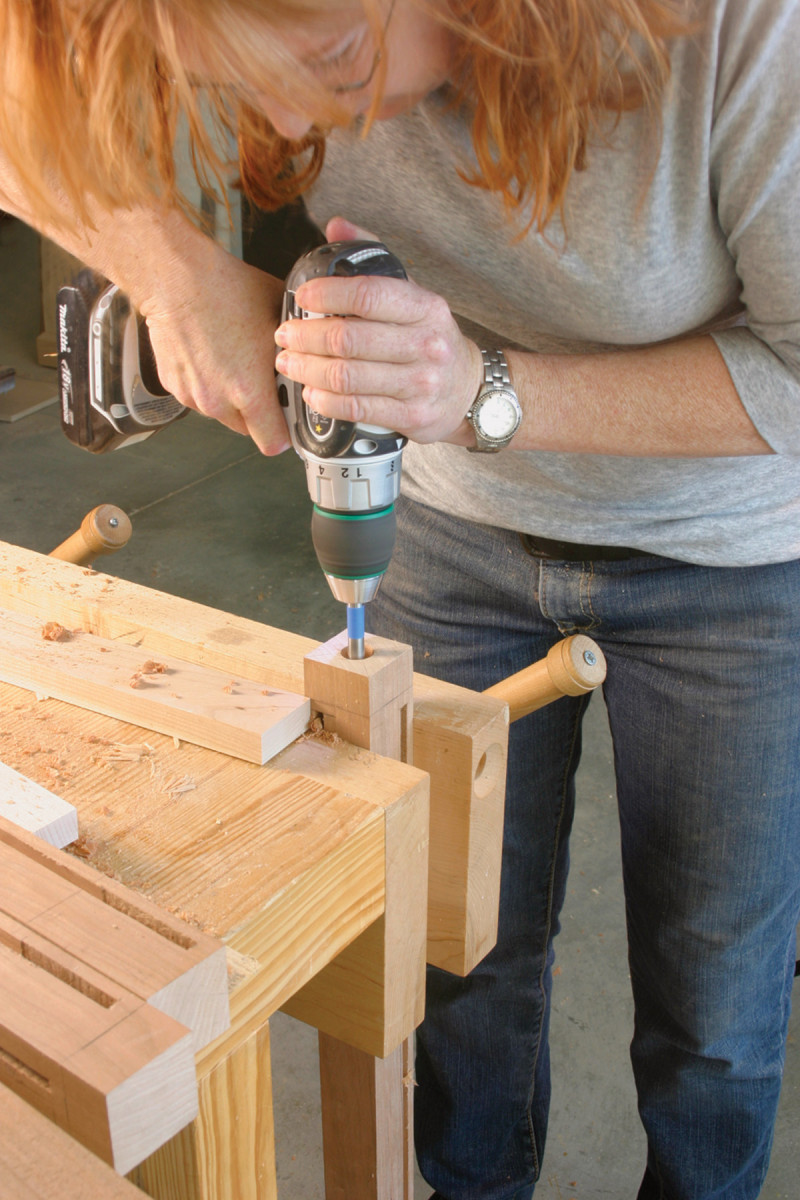
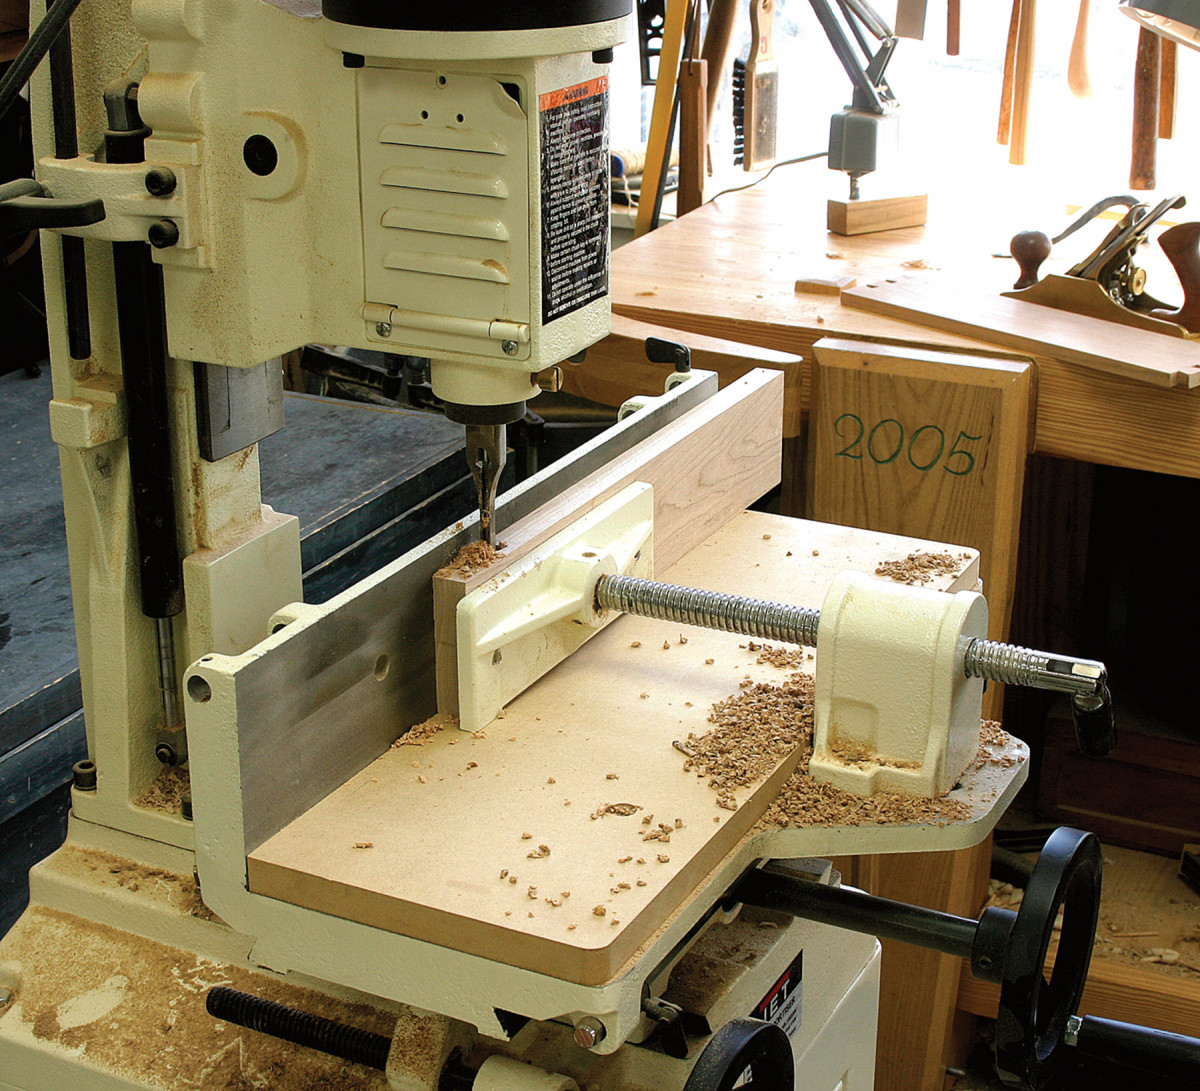
Foot holes. Before the bottom carcase is glued up, drill holes to receive the tenons on the turned feet. I used a 3⁄4″ Forstner bit to drill 1-1⁄4″-deep. Match your bit and depth to the size of the tenons on your feet.
I clamped each leg perpendicular to the floor, and drilled 3⁄4“-diameter x 1-1⁄4“-deep holes centered in the bottom of each leg. Be careful to keep your drill straight (or set up a drill press for greater accuracy). With the holes drilled, I set the feet aside until the rest of the bottom carcase was done.
Time for Glue Up
Dry-fit all your panels to the grooves inside the door frames and the bottom case sides, and make any necessary adjustments. Once everything fits snug, get your clamps ready and work with one glue-up at a time (I started with the lower doors and side panels, as they involved fewer pieces).
Use an acid brush to apply a thin layer of yellow glue on the walls of your mortises and the tenon faces, slip the rails in place, then slide the panel in place and cap it off with the opposite stile (keep a damp rag handy to wipe away any squeeze-out). Clamp until the glue is dry. (Again, add glue only to the mortise-and-tenon joints; the panels should float.) The upper doors are a bit tricky to glue up, with two panels plus the medial rail in each. I’m sure my contortions were amusing to watch. I recommend getting a friend to help wrangle things in place.
While you’re waiting for the lower sides to dry, glue up the upper face frame, check it for square, clamp and set it aside. Once the lower side panels are set, complete the lower carcase’s mortise-and-tenon joints by gluing the lower back rail, the front rails and the center stile in place. (The upper back rail is notched around the legs at both ends, so it’s easier to use pocket screws for that joint, though you can cut a mortise-and-tenon joint if you prefer.)
Now it’s on to the upper section. Cut your sides, top, bottom and shelves to final size. The 3⁄4“-thick top, bottom and shelves are housed in 1⁄4“-deep grooves cut into the side pieces. So set up the dado stack again at the table saw but use only enough blades and chippers to create a 3⁄4“-wide cut (and be sure to run a few test pieces first). Raise the stack to 1⁄4“. Mark the cuts on one of the case sides and set the fence off that piece, making the cuts in both sides before moving the fence for the next location. Make sure your cuts are on the inside faces of your sides. Note in the illustration that the top and bottom pieces are not at the ends; they’re set in to add rigidity, and the bottom protrudes 1⁄4” above the face-frame bottom and thus functions as a door stop.
Before you take off the dado stack, run a 3⁄4“-deep x 7⁄16“-wide rabbet up the back of each side; these will house the backboards.
Now lay one side piece flat on your workbench (groove-side up) and fit the top, bottom and shelves into place. Set the other side piece on top, and use a dead-blow mallet to fully seat the pieces in the grooves. (This is a big workpiece – you might want to grab a helper.) If the pieces fit together snug, you could pull them back out, add a little glue and refit them. But after struggling to get them in place once, I didn’t want to go through that exercise again (and it was a lot of exercise). Instead, I chose to toenail the shelves in place from the bottom face at both the front and back edges.
At this point, I also pegged all the mortise-and-tenon joints, and pegged the shelves in the upper carase into the sides, using 1⁄4” white oak pegs (for more on pegging, see “Square Pegs, Round Holes”).
Now fit your doors to the face frame, and mark then cut the hinge mortises. Keep the door fit tight – you’ll do the final fitting once the entire carcase is together (things could move when you add the backboards later – trust me). You might as well fit the lower doors and hinges at the same time.
Now, flip the upper carcase on its back and glue the face frame in place, adding enough clamps to pull it tight along each side. If things work out correctly, you’ll have a slight overhang on both sides, which, after the glue dries, you can flush to the face frame with a trim router or handplane.
Backboards

Buttoned down. The top of the bottom section is attached to the side and front rails with buttons. I used a biscuit joiner to cut two 1⁄2″-deep x 1-1⁄4″-wide slots on each side, and three along the front. I simply screwed through the back rail into the top’s bottom to secure it at the back.
Is that dado stack still in your table saw? Good. Mill enough 5⁄8“-thick stock for your backboards for both the top and bottom, and run 5⁄16” x 3⁄8” rabbets on opposing edges for shiplaps (and don’t forget to calculate the rabbets as you’re measuring the width of your rough stock). The outside pieces get only one rabbet each.
I used random-width boards pulled from an old stash of sappy cherry. Because the backboards will be on view with the doors open as I watch TV, I didn’t want to use a less attractive secondary wood. So I used less-attractive pieces of primary wood. With the rabbets cut, change the table saw set-up back to a rip blade, and rip the outside backboards to final width (the humidity was low here when I built this, so I used dimes as spacers).
Screw the backboards in place, with one screw at the top and bottom of every board set just off the overlapping edge. (That screw holds the joint tight, but allows for slight movement of the underlapped piece. Your last board needs two screws at the top and bottom to keep it secure.) Now do the final fit on your doors, taking passes with a handplane or on the jointer (take a 1″ cut on the trailing end first, then reverse the piece to avoid tear-out). I aimed for a 1⁄16” gap all around (on some sides, I even hit it). After marking locations for any necessary wire and air-circulation holes in the backboards, take the doors and backboards off, drill any needed holes at the drill press, then set the doors and backboards aside for finishing. Drill any cord/air holes at the drill press with a Forstner bit.
Complete the Bottom
Flip the lower carcase and choose your foot position. Line up the grain of the foot with its matching leg so the look is pleasing. One of my holes was a bit off straight, so I used a rasp to take down one side of my tenon until I could adjust the angle accordingly. Once everything fits to your satisfaction, drip a little yellow glue in the holes and seat the feet. You don’t need clamps here (unless you’re using them to pull something in line). If the fits are good, simply flip the piece upright and the weight will keep the feet in place as the glue dries.
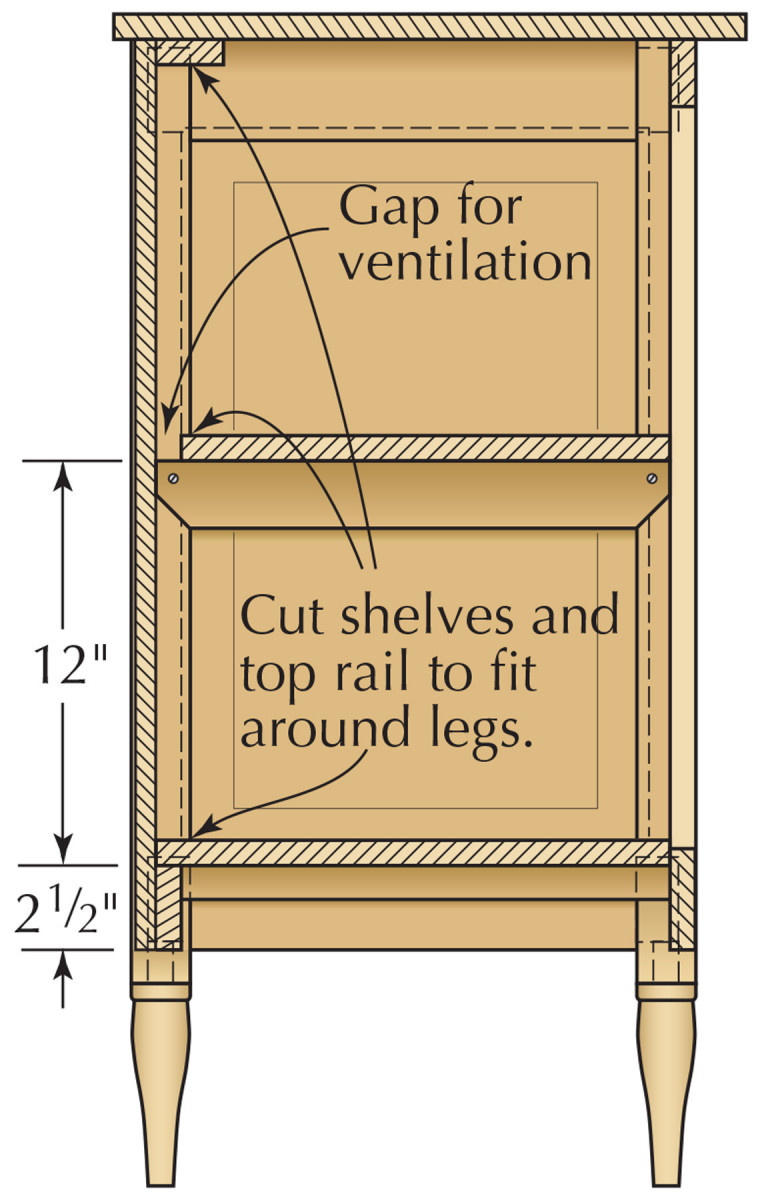
With the backboards and doors off, now’s the time to fit the cleats that support the bottom and shelf in the lower section, and cut button slots in the top rail to attach the top. The bottom is notched around the legs and the back edge is rabbeted to fit neatly over the back rail. But because I need airflow in the bottom section for A/V equipment, I fit the shelf to the inside corner of each leg and to the front center stile where it serves as a door stop. I left a gap at the back and sides to run wires and for air circulation.
To complete the bottom section, use a biscuit cutter to cut slots in the front and side rails for buttons, and notch the upper back rail around the rear legs and use pocket screws to hold it in place. For added strength, countersink a screw through the front edge at each end into the leg, too. Cut the top to final size, and attach it with buttons at the front and sides. Countersink screws underneath through the back rail into the bottom of the lower section.
The Crowning Touches
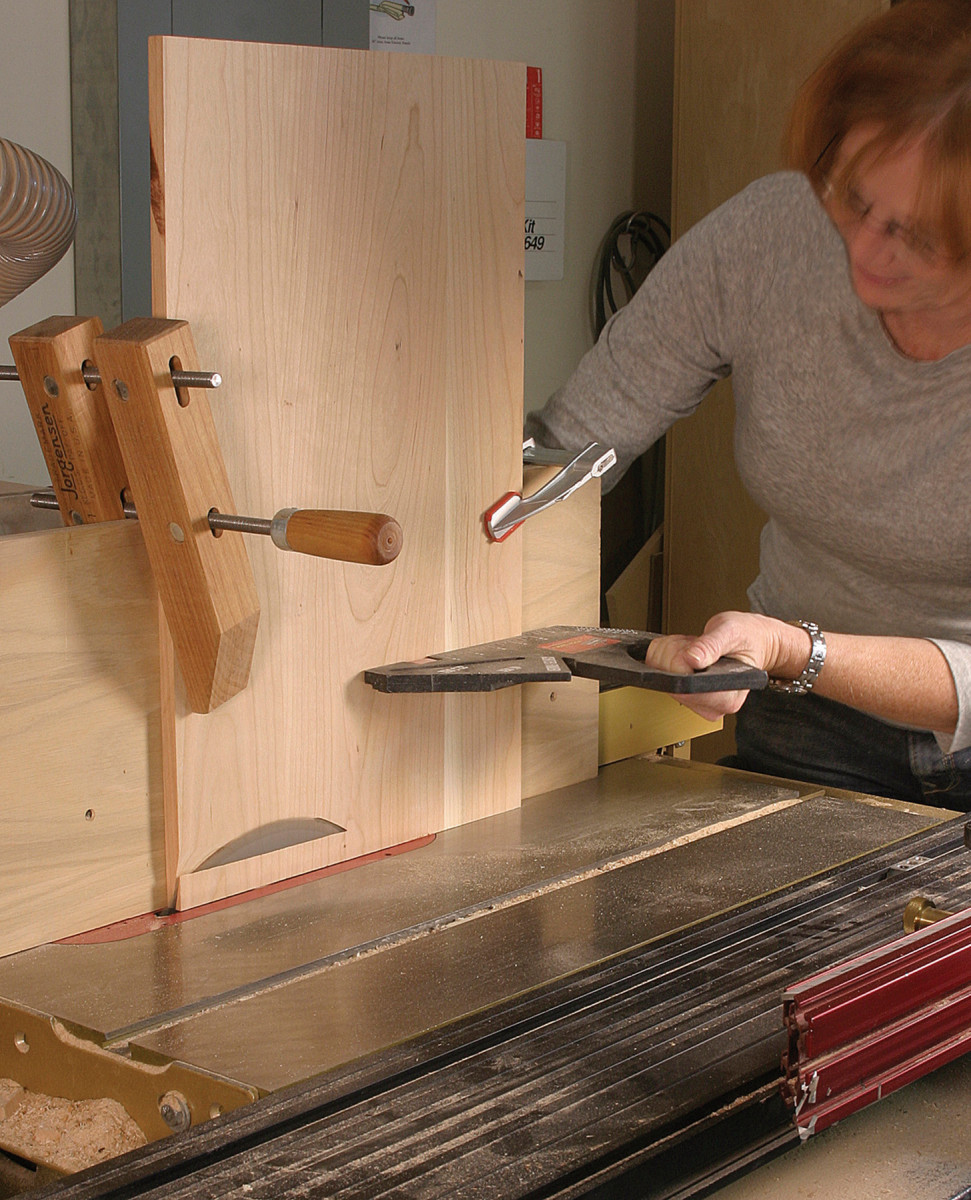
Set up your table saw to cut crown moulding, and sand it smooth before fitting. (For instruction on cutting cove moulding on the table saw, see this video.)

Cutting crown. The crown is cut by running 7⁄8″ x 4″ stock at an angle over the table saw. Raise the blade to 7⁄16″ then center your stock to the blade. Clamp a long straightedge to the table to guide the stock, then lower the blade and make a series of passes as you gradually raise the blade until you reach 7⁄16″ (or your desired depth).
Often, the crown is connected with a flat piece to the top edge of the sides and face frame. But my face frame and sides weren’t high enough, so instead, I cut blocks with 45° angles (on two faces for the corner pieces), glued those to the inside of the crown and added brads to the top of the carcase for a bit of additional strength.
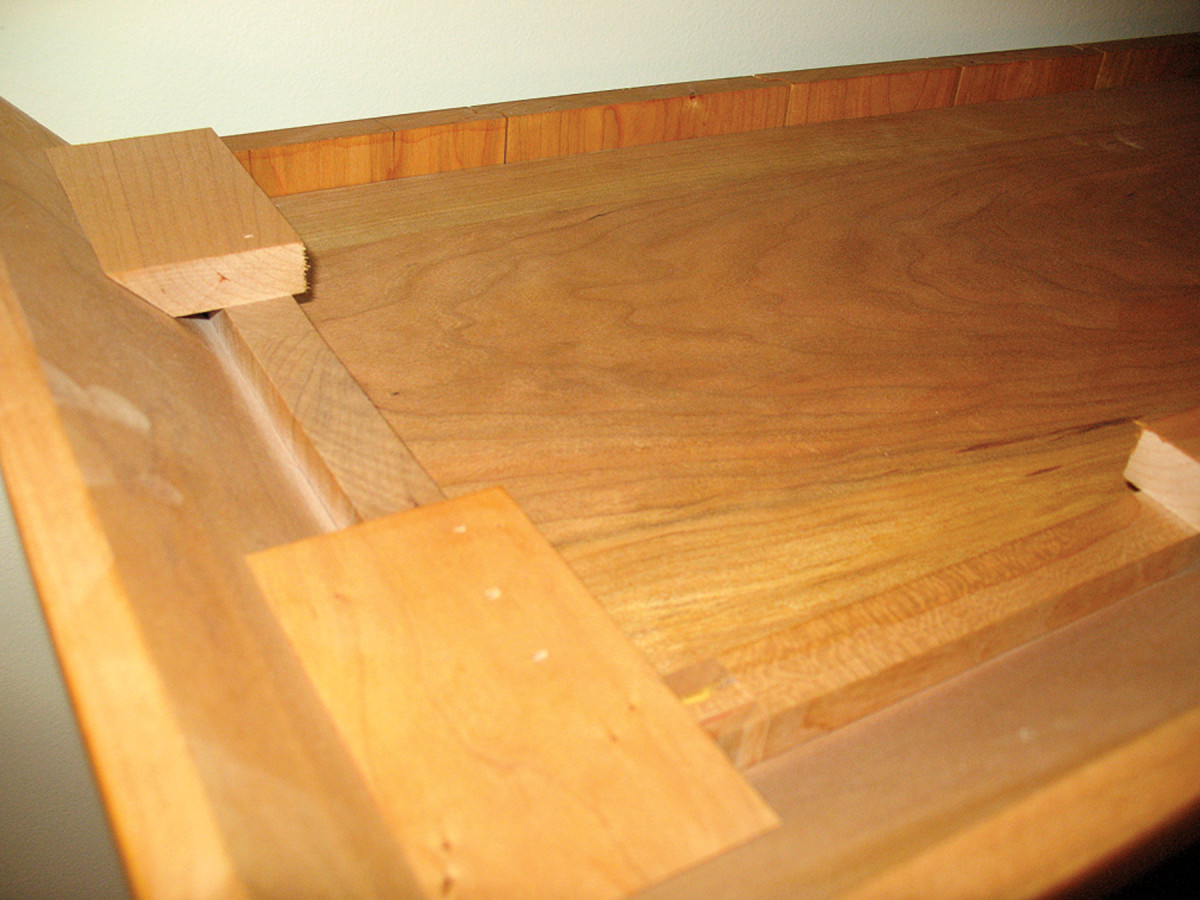
Blocked in place. I intended for the top of the carcase to match the top of the crown, so I could attach the crown with a piece that tied into both. That didn’t happen. So instead, I cut blocks with a 45° angle on the front, and glued them to the top of the carcase and the inside face of the crown — one at each front and back corner and three more along the front. You can also see the shiplapped back in this picture. Each piece is secured top and bottom at the corner by a screw.
The Finish
I sanded each piece to #180 as I went along, so once the construction was complete, I was ready for the finish. Because I didn’t have two decades to wait for a nice warm patina to develop (we shot the opening picture just 20 minutes after the handles were in place), I added warmth with two sprayed coats of amber shellac and a top coat of dull-rubbed-effect, pre-catalyzed lacquer.
Because I couldn’t afford five sets of hand-forged iron hinges but wanted an aged look to the hardware, I de-lacquered then added patina to brass hinges with gun bluing.
Oh yes – the handles. I tried to turn them, but ran out of time and talent. Thank goodness for our local woodworking store and its Shaker pull supply. The handles were sprayed separately, set in a scrap of plywood. You see, I didn’t know where I wanted to place them until the entire piece was assembled and the A/V components were in place. A friend helped me hoist the upper piece atop the lower cabinet, where it’s held in place simply by gravity. I then marked my pull locations, drilled 3⁄8” holes with a Forstner bit and glued the pulls in place.


